Welcome to Hero EMR
Explore every corner of the platform at your own pace. Each section below includes annotated screenshots and one-click links that sign you into a live dev environment so you can try features hands-on.
Inbox Hero
Unified clinical inbox with messages, tasks, lab results, and refill requests.
Ready to tour →Medication Hero
Medication autofill, safety checks, PDMP/EPCS, refills, and med-list sync.
Ready to tour →Note Hero
Ambient scribing, chart context, dotphrases, F2 fields, and encounter completion.
Ready to tour →Calendar Hero
Self-scheduling, provider rules, waitlists, reminder cadences, and follow-ups.
Ready to tour →Billing Hero
Claims processing, payment collection, and revenue cycle management.
Ready to tour →Orders Hero
Turn a saved SOAP note into diagnoses, orders, follow-up, and charges for review.
Ready to tour →Patient Portal
The patient-facing experience: appointments, messages, records, and billing.
Ready to tour →One inbox. Every channel.
Hero EMR unifies every patient-initiated message — patient-portal threads, SMS, email, and phone-agent calls — into a single clinician inbox. In this guided demo you'll first step into the patient's shoes to see why we steer patients toward the portal, then set up a test patient, find your org's inbound numbers, send messages from your own phone and email, and watch them all land in the EMR.
What you'll see
A 4-chapter story: log in as Maria Garcia in the patient portal, set her contact info, send her a message from SMS / email / phone, then open the clinician inbox and find every message threaded to her chart.
See the portal through a patient's eyes
Before setting up the other channels, log in as Maria Garcia in the patient portal. The portal is the most robust and secure way to reach the practice — and it's where Hero steers patients whenever possible.
Why we start here
SMS, email, and phone calls are great fallbacks when a patient is on the go or hasn't enrolled yet — but the patient portal is always the preferred channel. Messages are authenticated, end-to-end tied to the patient's identity, and carry the full context of their record. Hero's outbound replies, appointment reminders, and bill notifications all nudge patients toward the portal for anything sensitive.
- Authenticated — every message is tied to the patient's verified identity, no phone-number spoofing or matching heuristics.
- Secure — messages stay inside Hero's HIPAA-compliant environment instead of bouncing through a carrier or consumer email.
- Rich — patients can attach photos, fill forms, book appointments, pay bills, and see their full chart history alongside the conversation.
Step 0.1 Log in to the patient portal as Maria Garcia
Click below to open the patient portal in a new tab. Sign in as Maria using her test credentials:
- Email:
testpatient5@soaper.ai - Password:
testpatient5
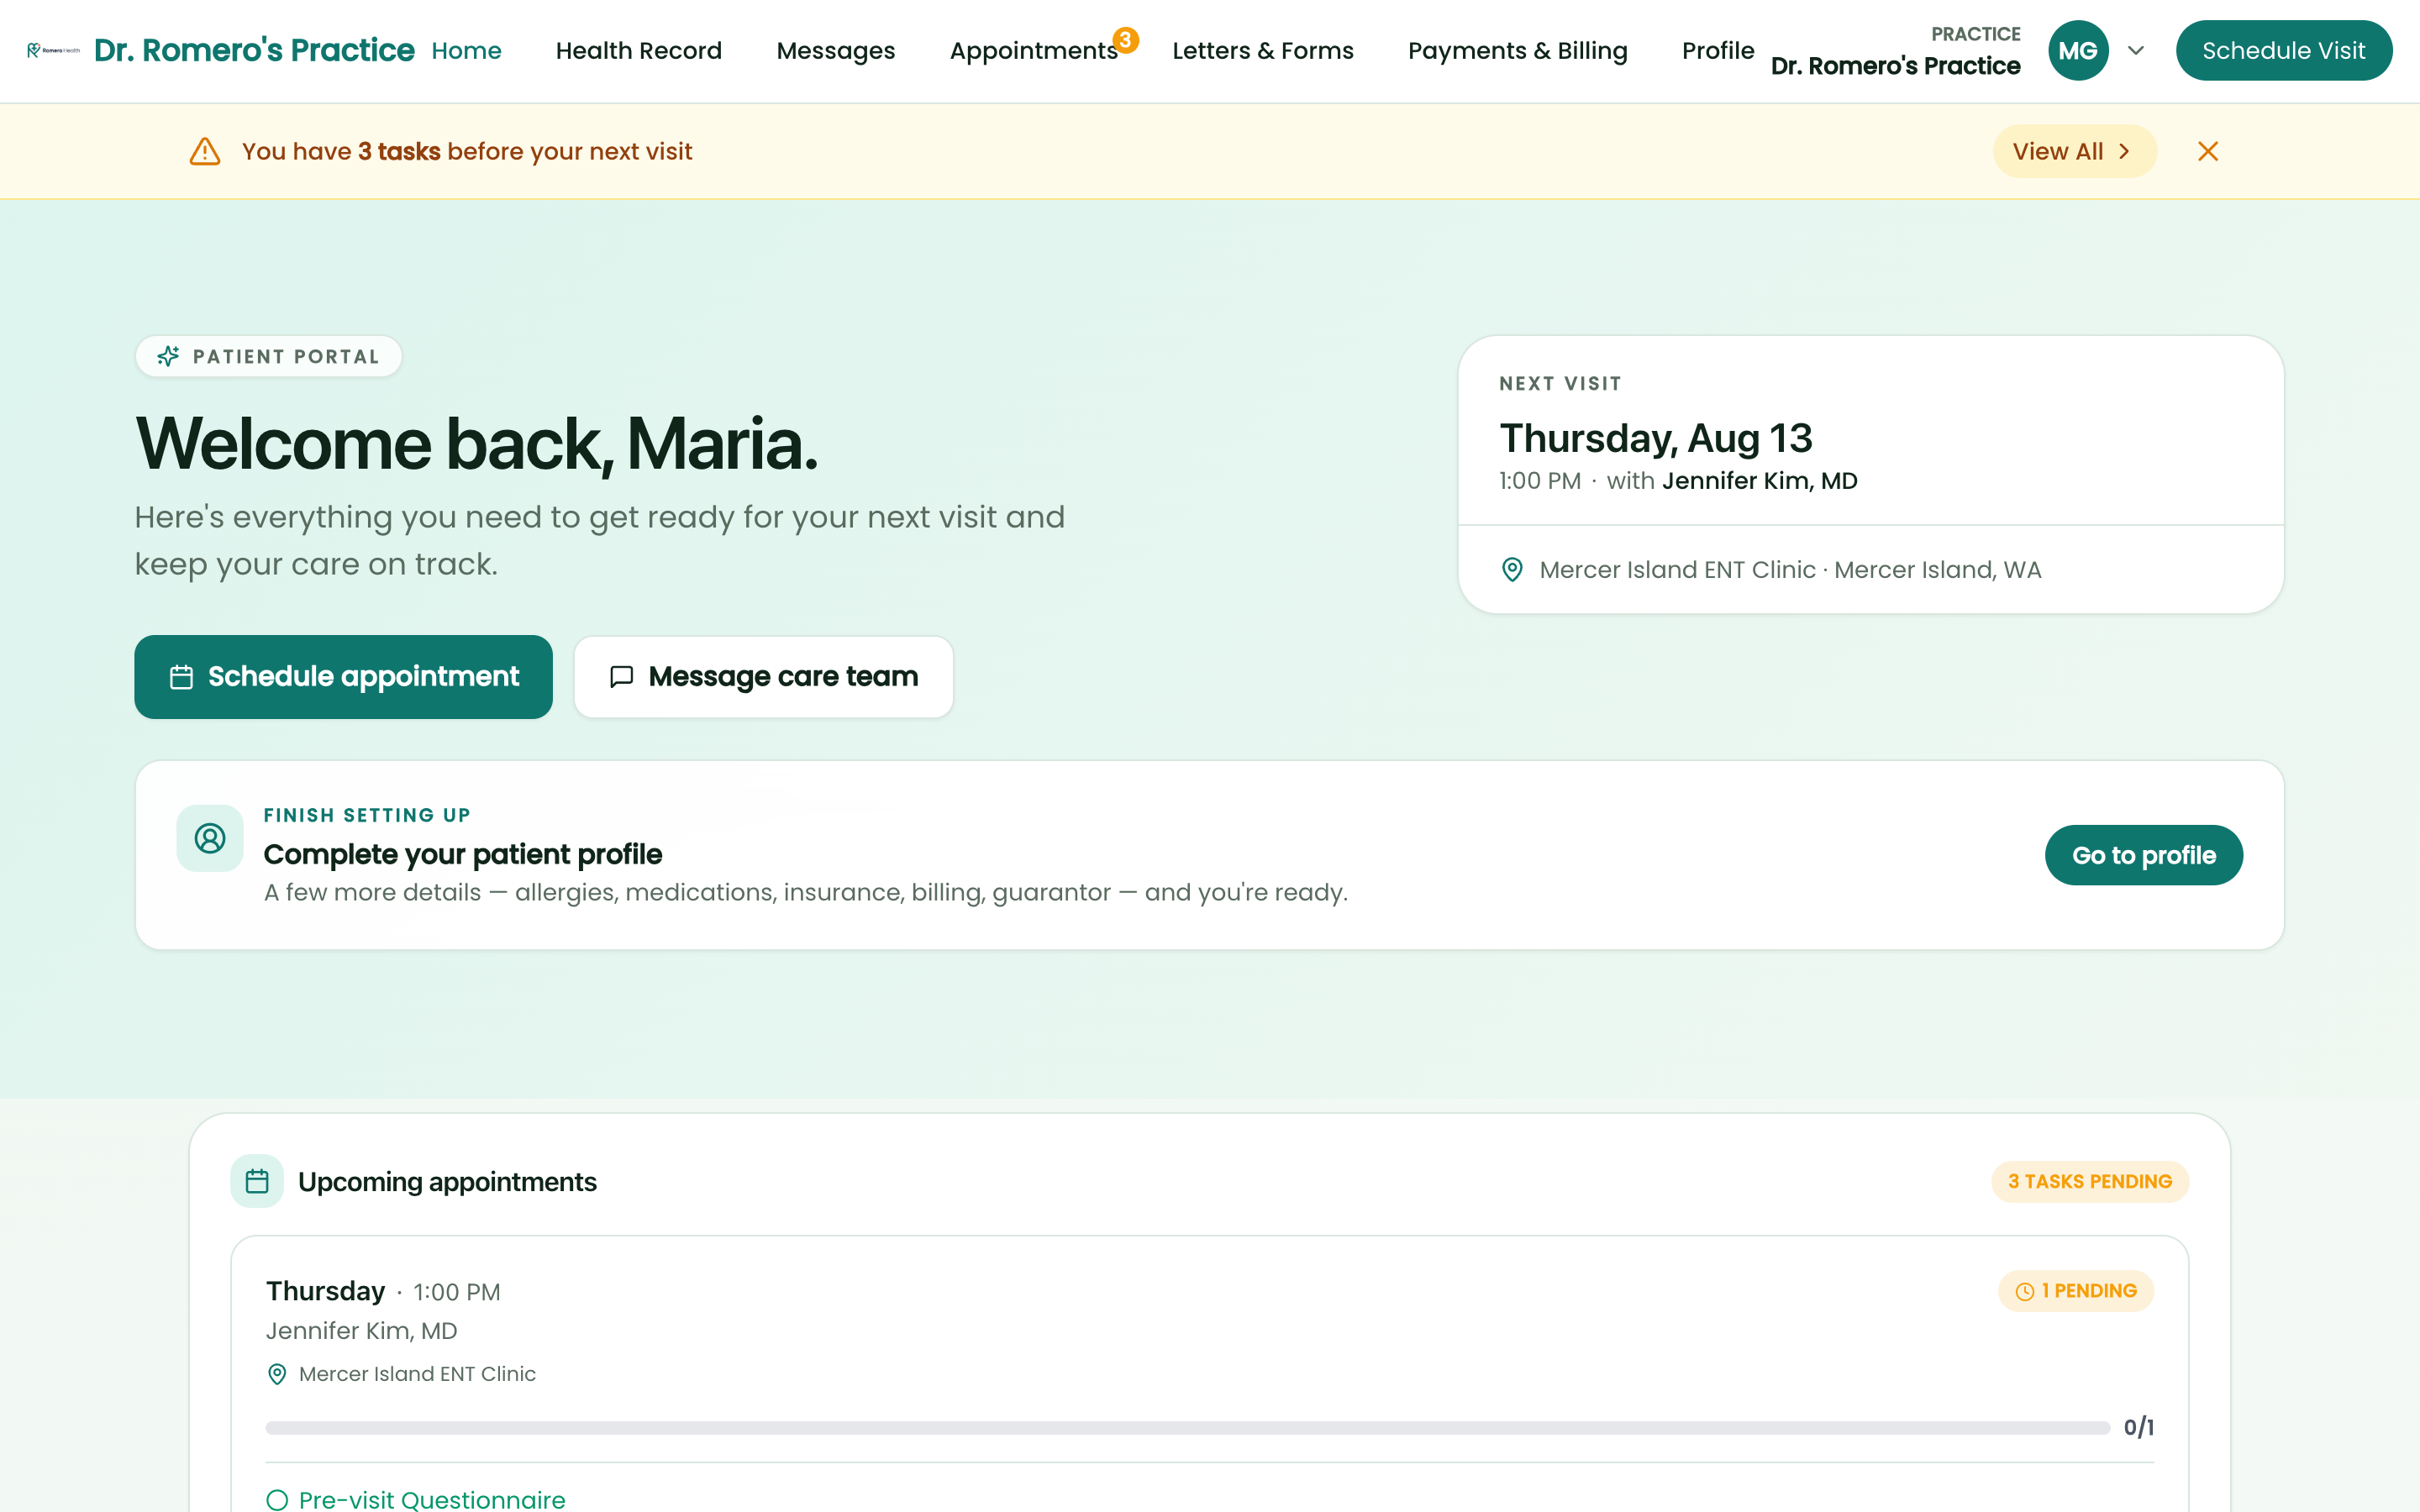
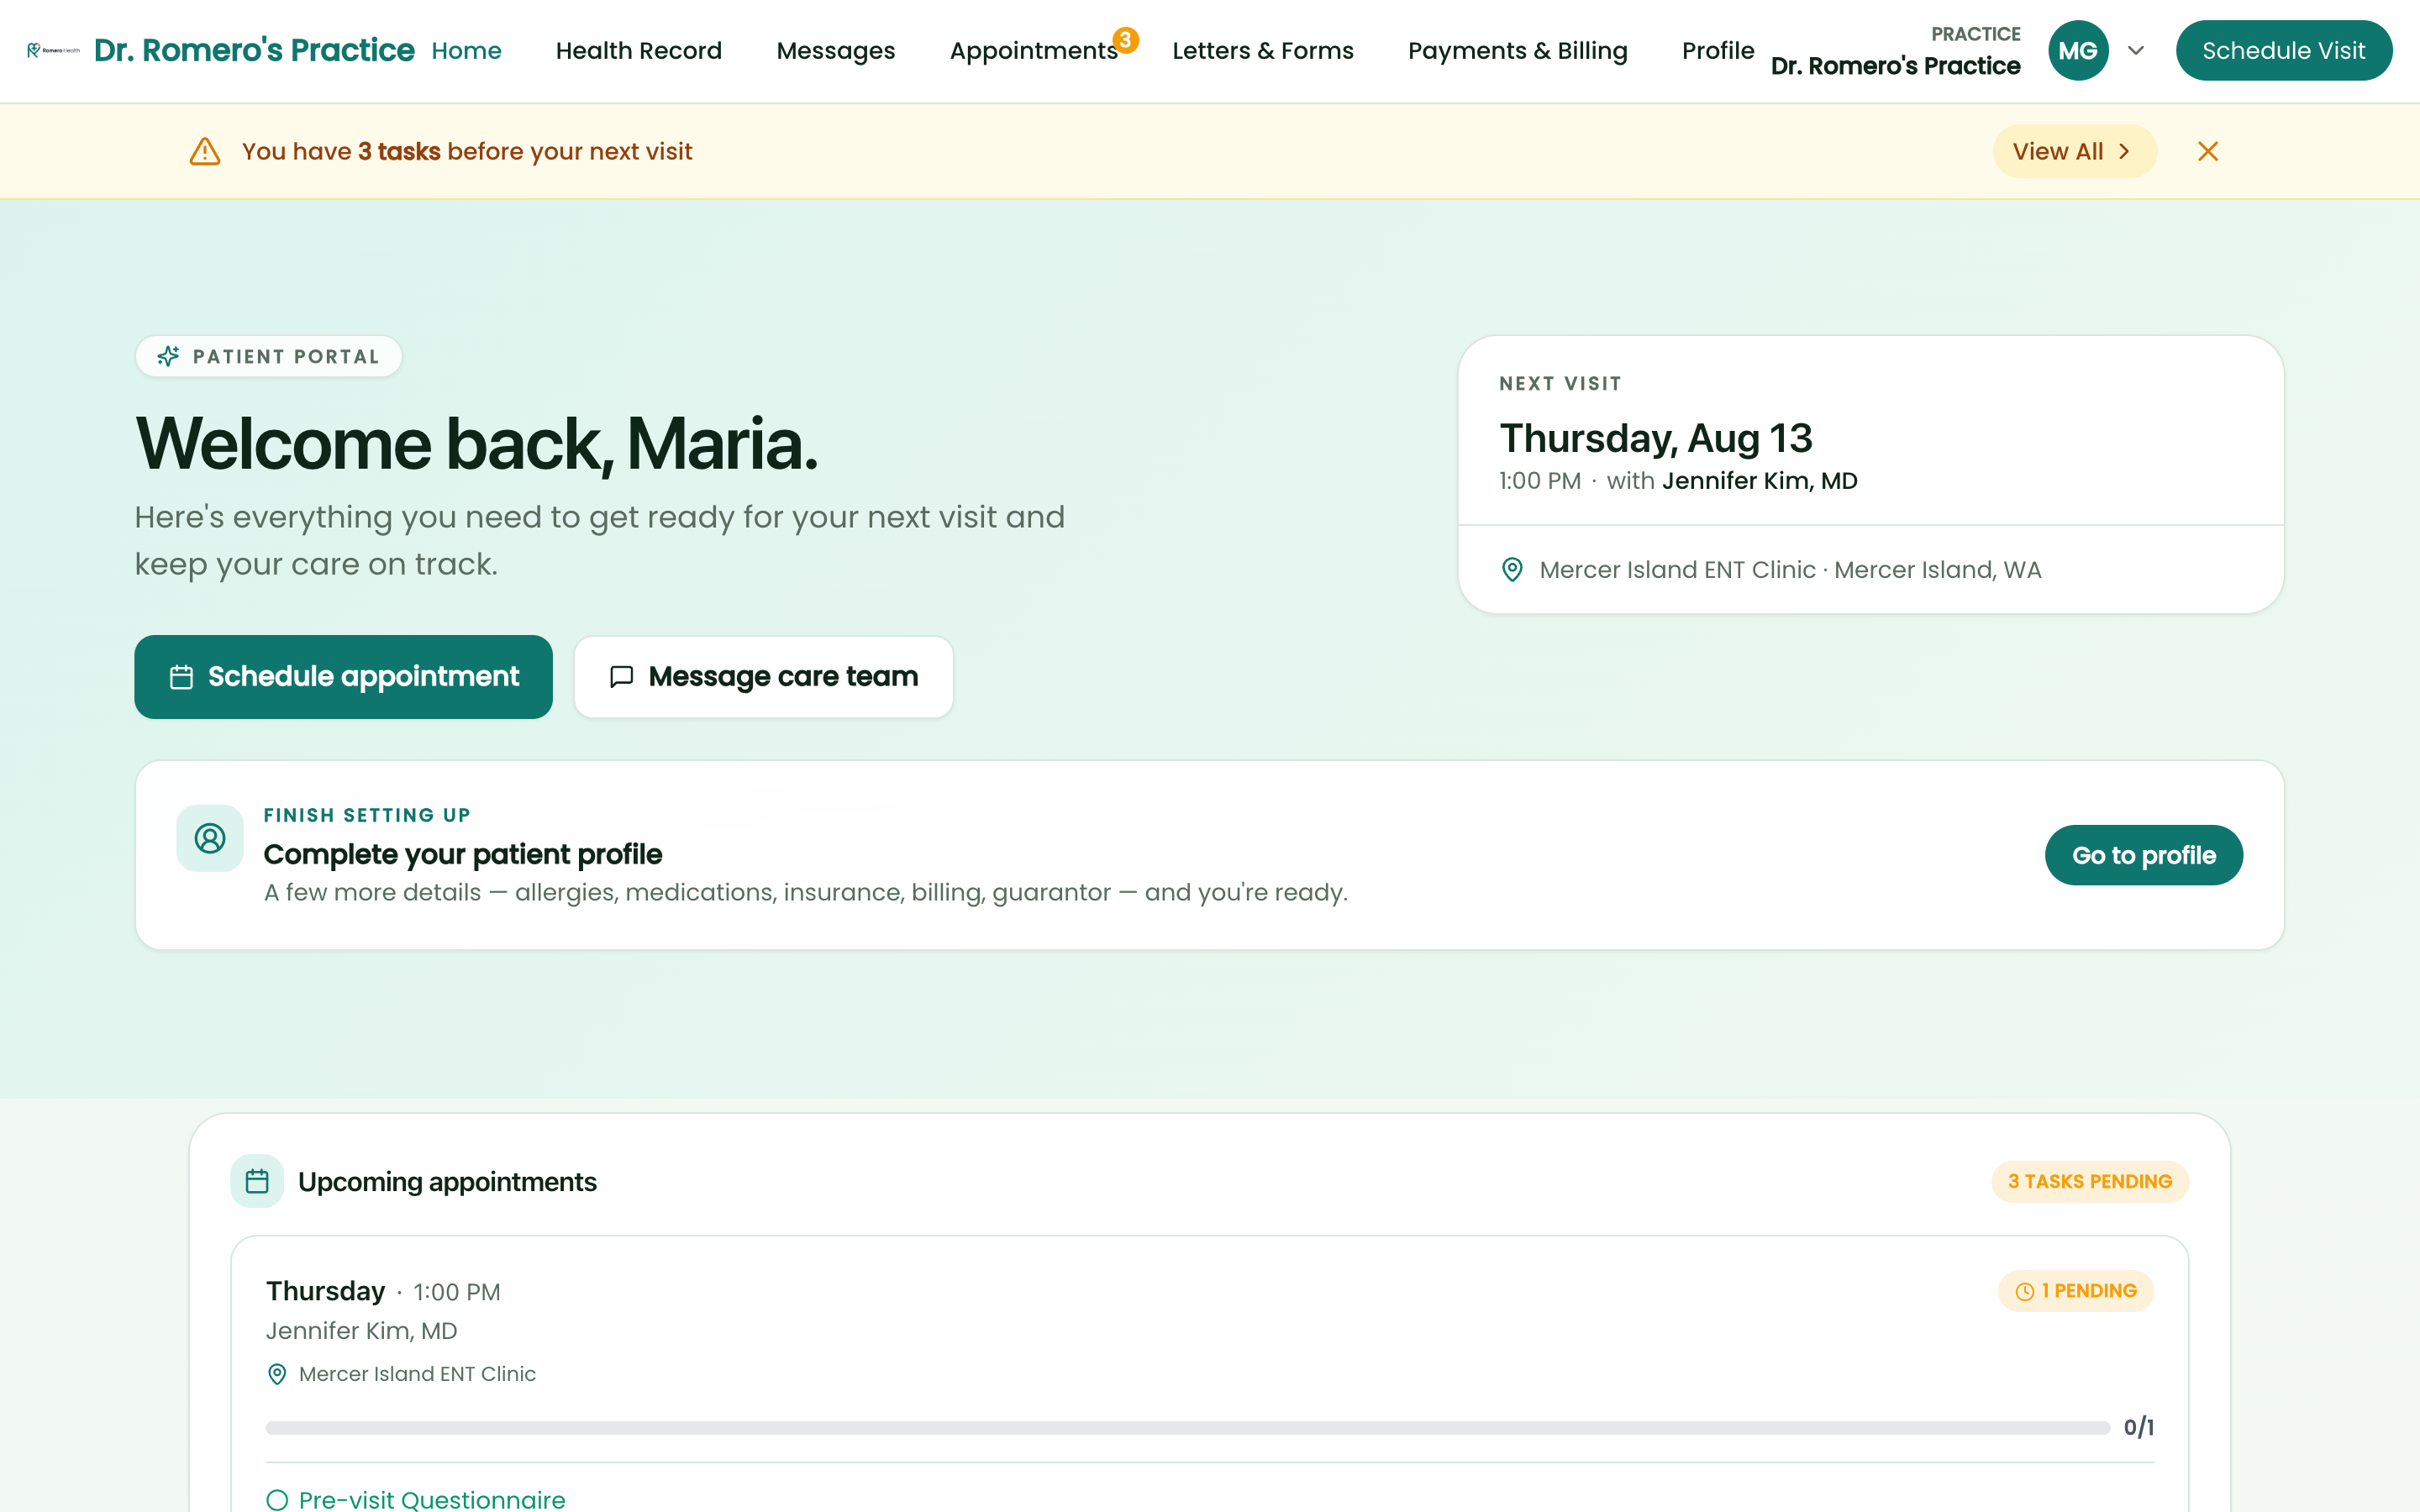
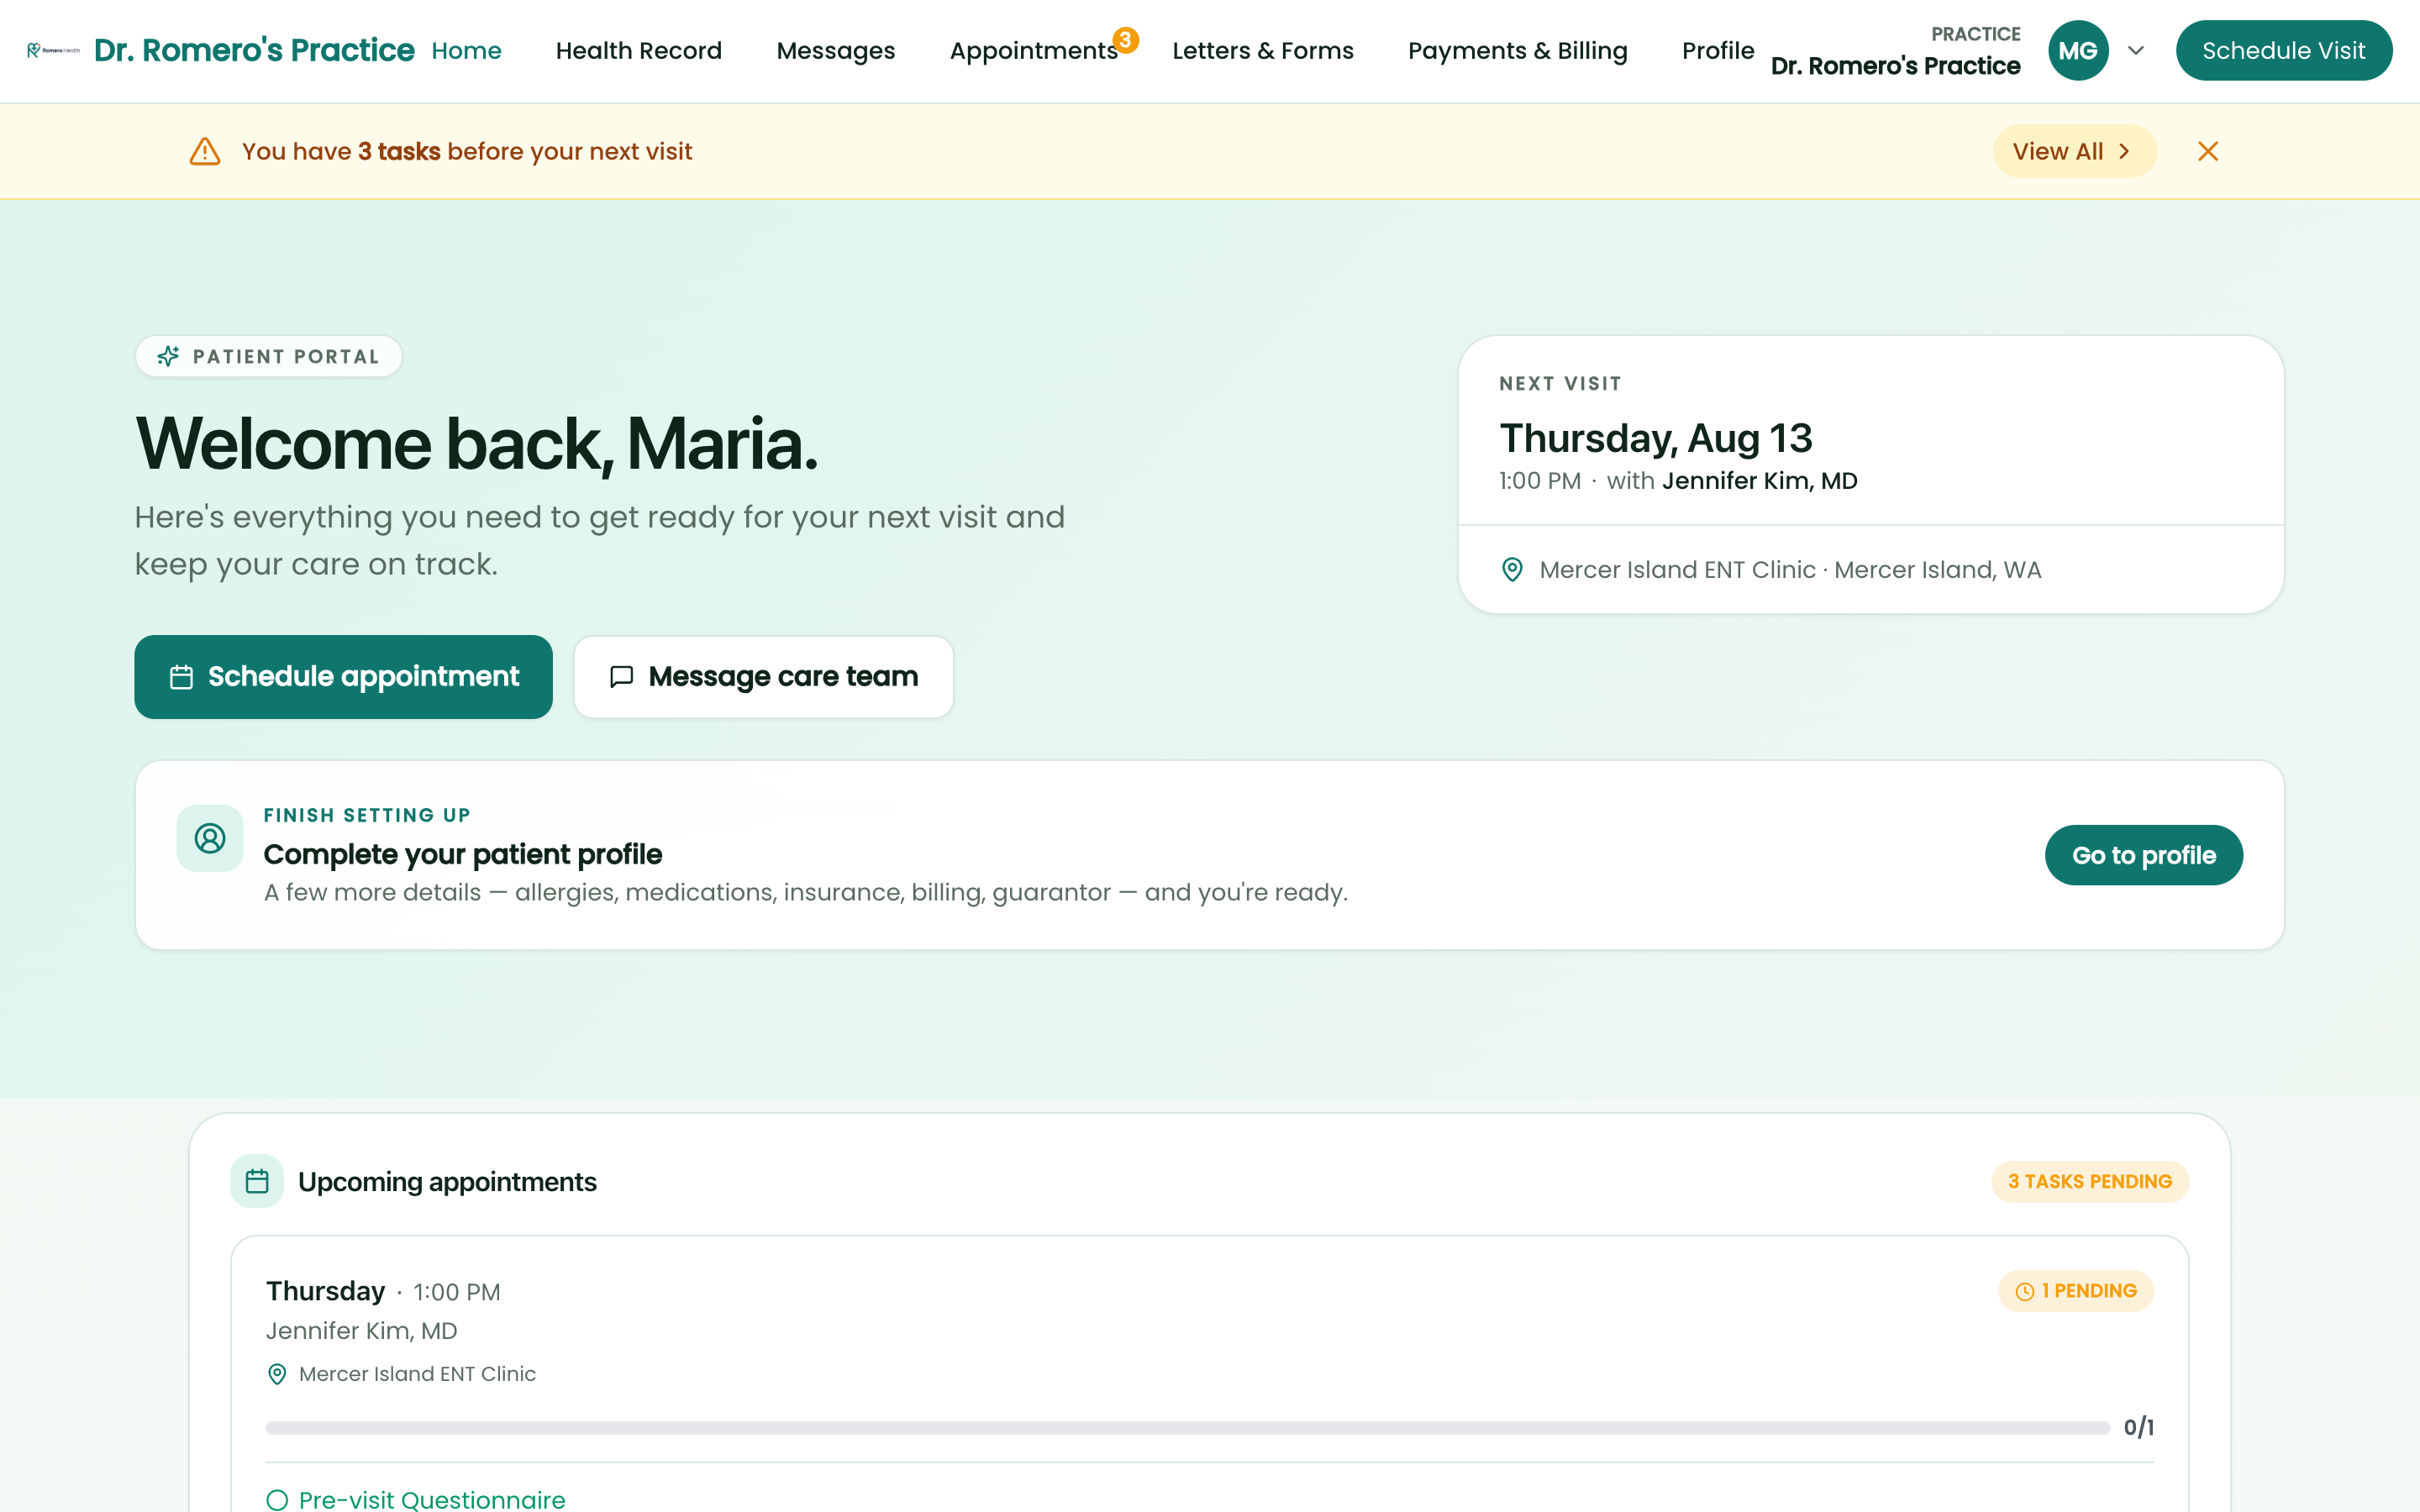
You'll land on the portal home — the same view Maria would see after logging in from her phone or laptop. Notice the "Welcome back, Maria." greeting, the Schedule appointment and Message care team buttons, the next-visit snapshot card, and the pre-visit checklist and forms-to-sign cards when a visit is coming up.
Step 0.2 Click Messages in the top nav
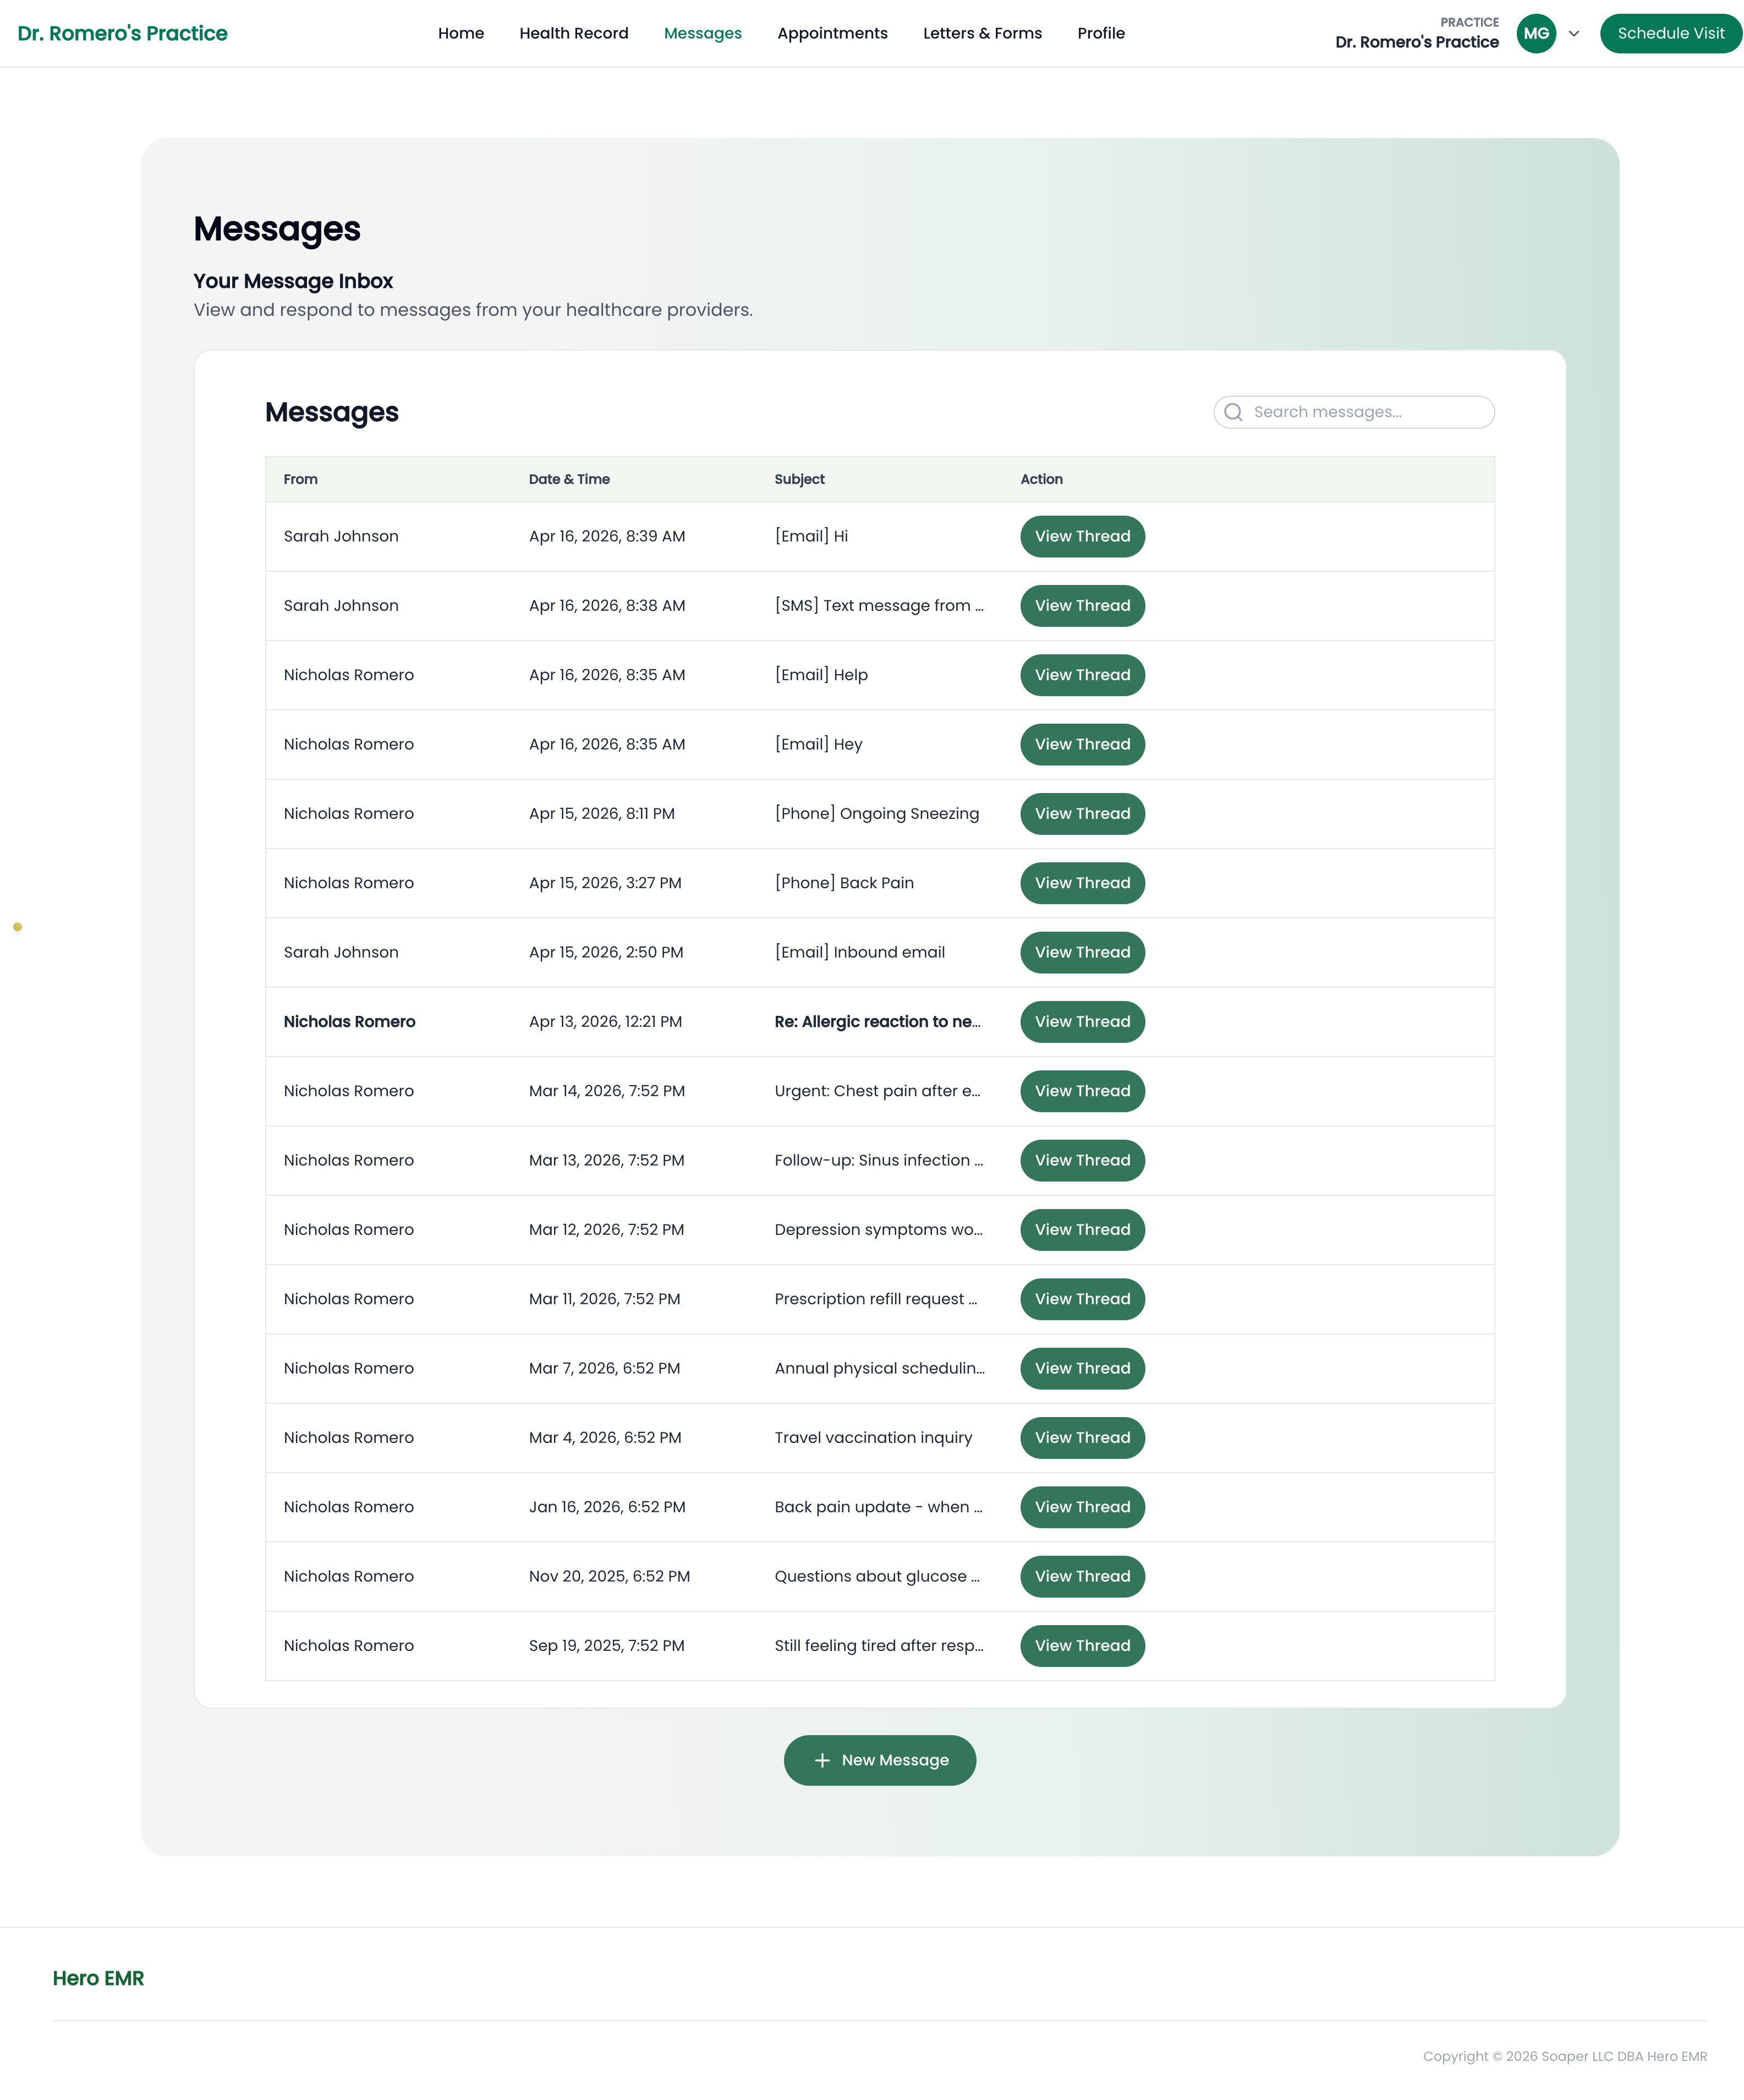
Maria's inbox shows every conversation she's ever had with the practice — portal threads, SMS she's sent, emails she's written, and AI phone-agent calls she's placed — all unified into one list. Each row is tagged by source so she knows where the thread started.
Step 0.3 Open a thread — e.g. [SMS] Text message from Maria Garcia
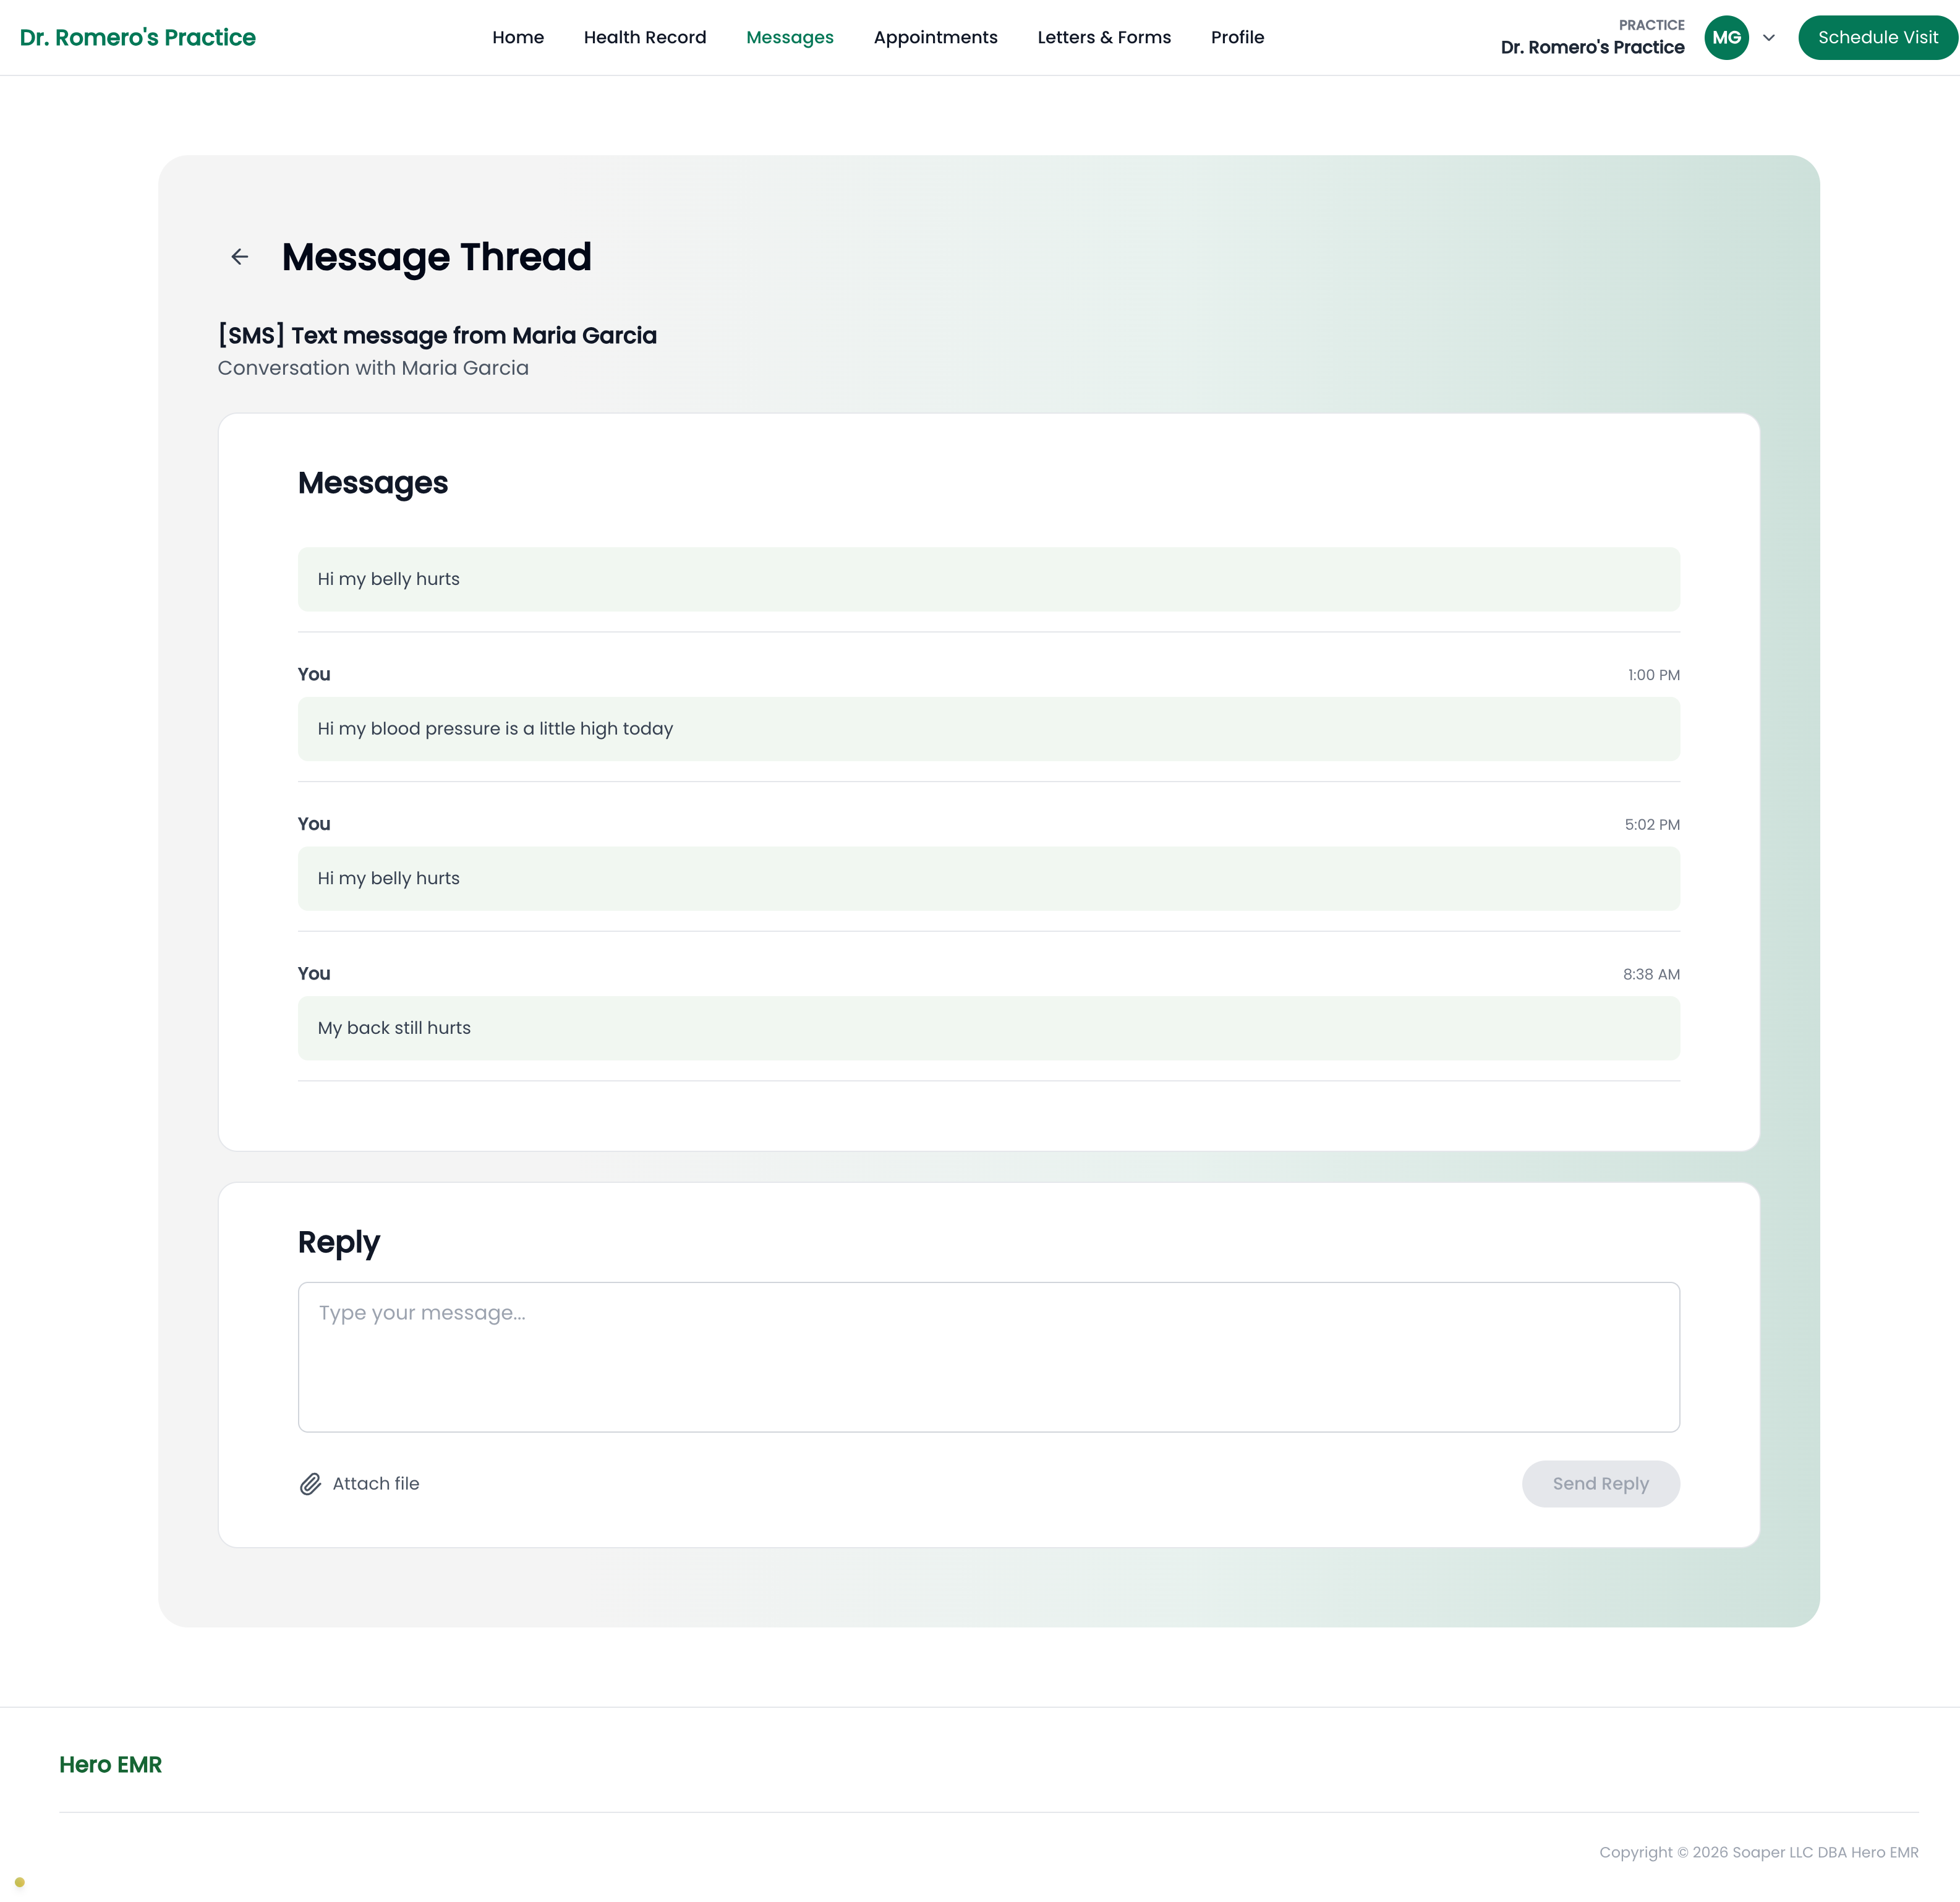
Click View Thread on any row. Maria sees the full back-and-forth, with her own messages on the right and the care team's replies on the left. She can reply directly from here — and her reply goes right back into Dr. Romero's clinician inbox.
When you're done exploring, switch back to this tab to continue with the clinician flow.
Give Maria Garcia a phone and an email
Inbound SMS and email are matched to patients by contact info. Start by making sure Maria has both.
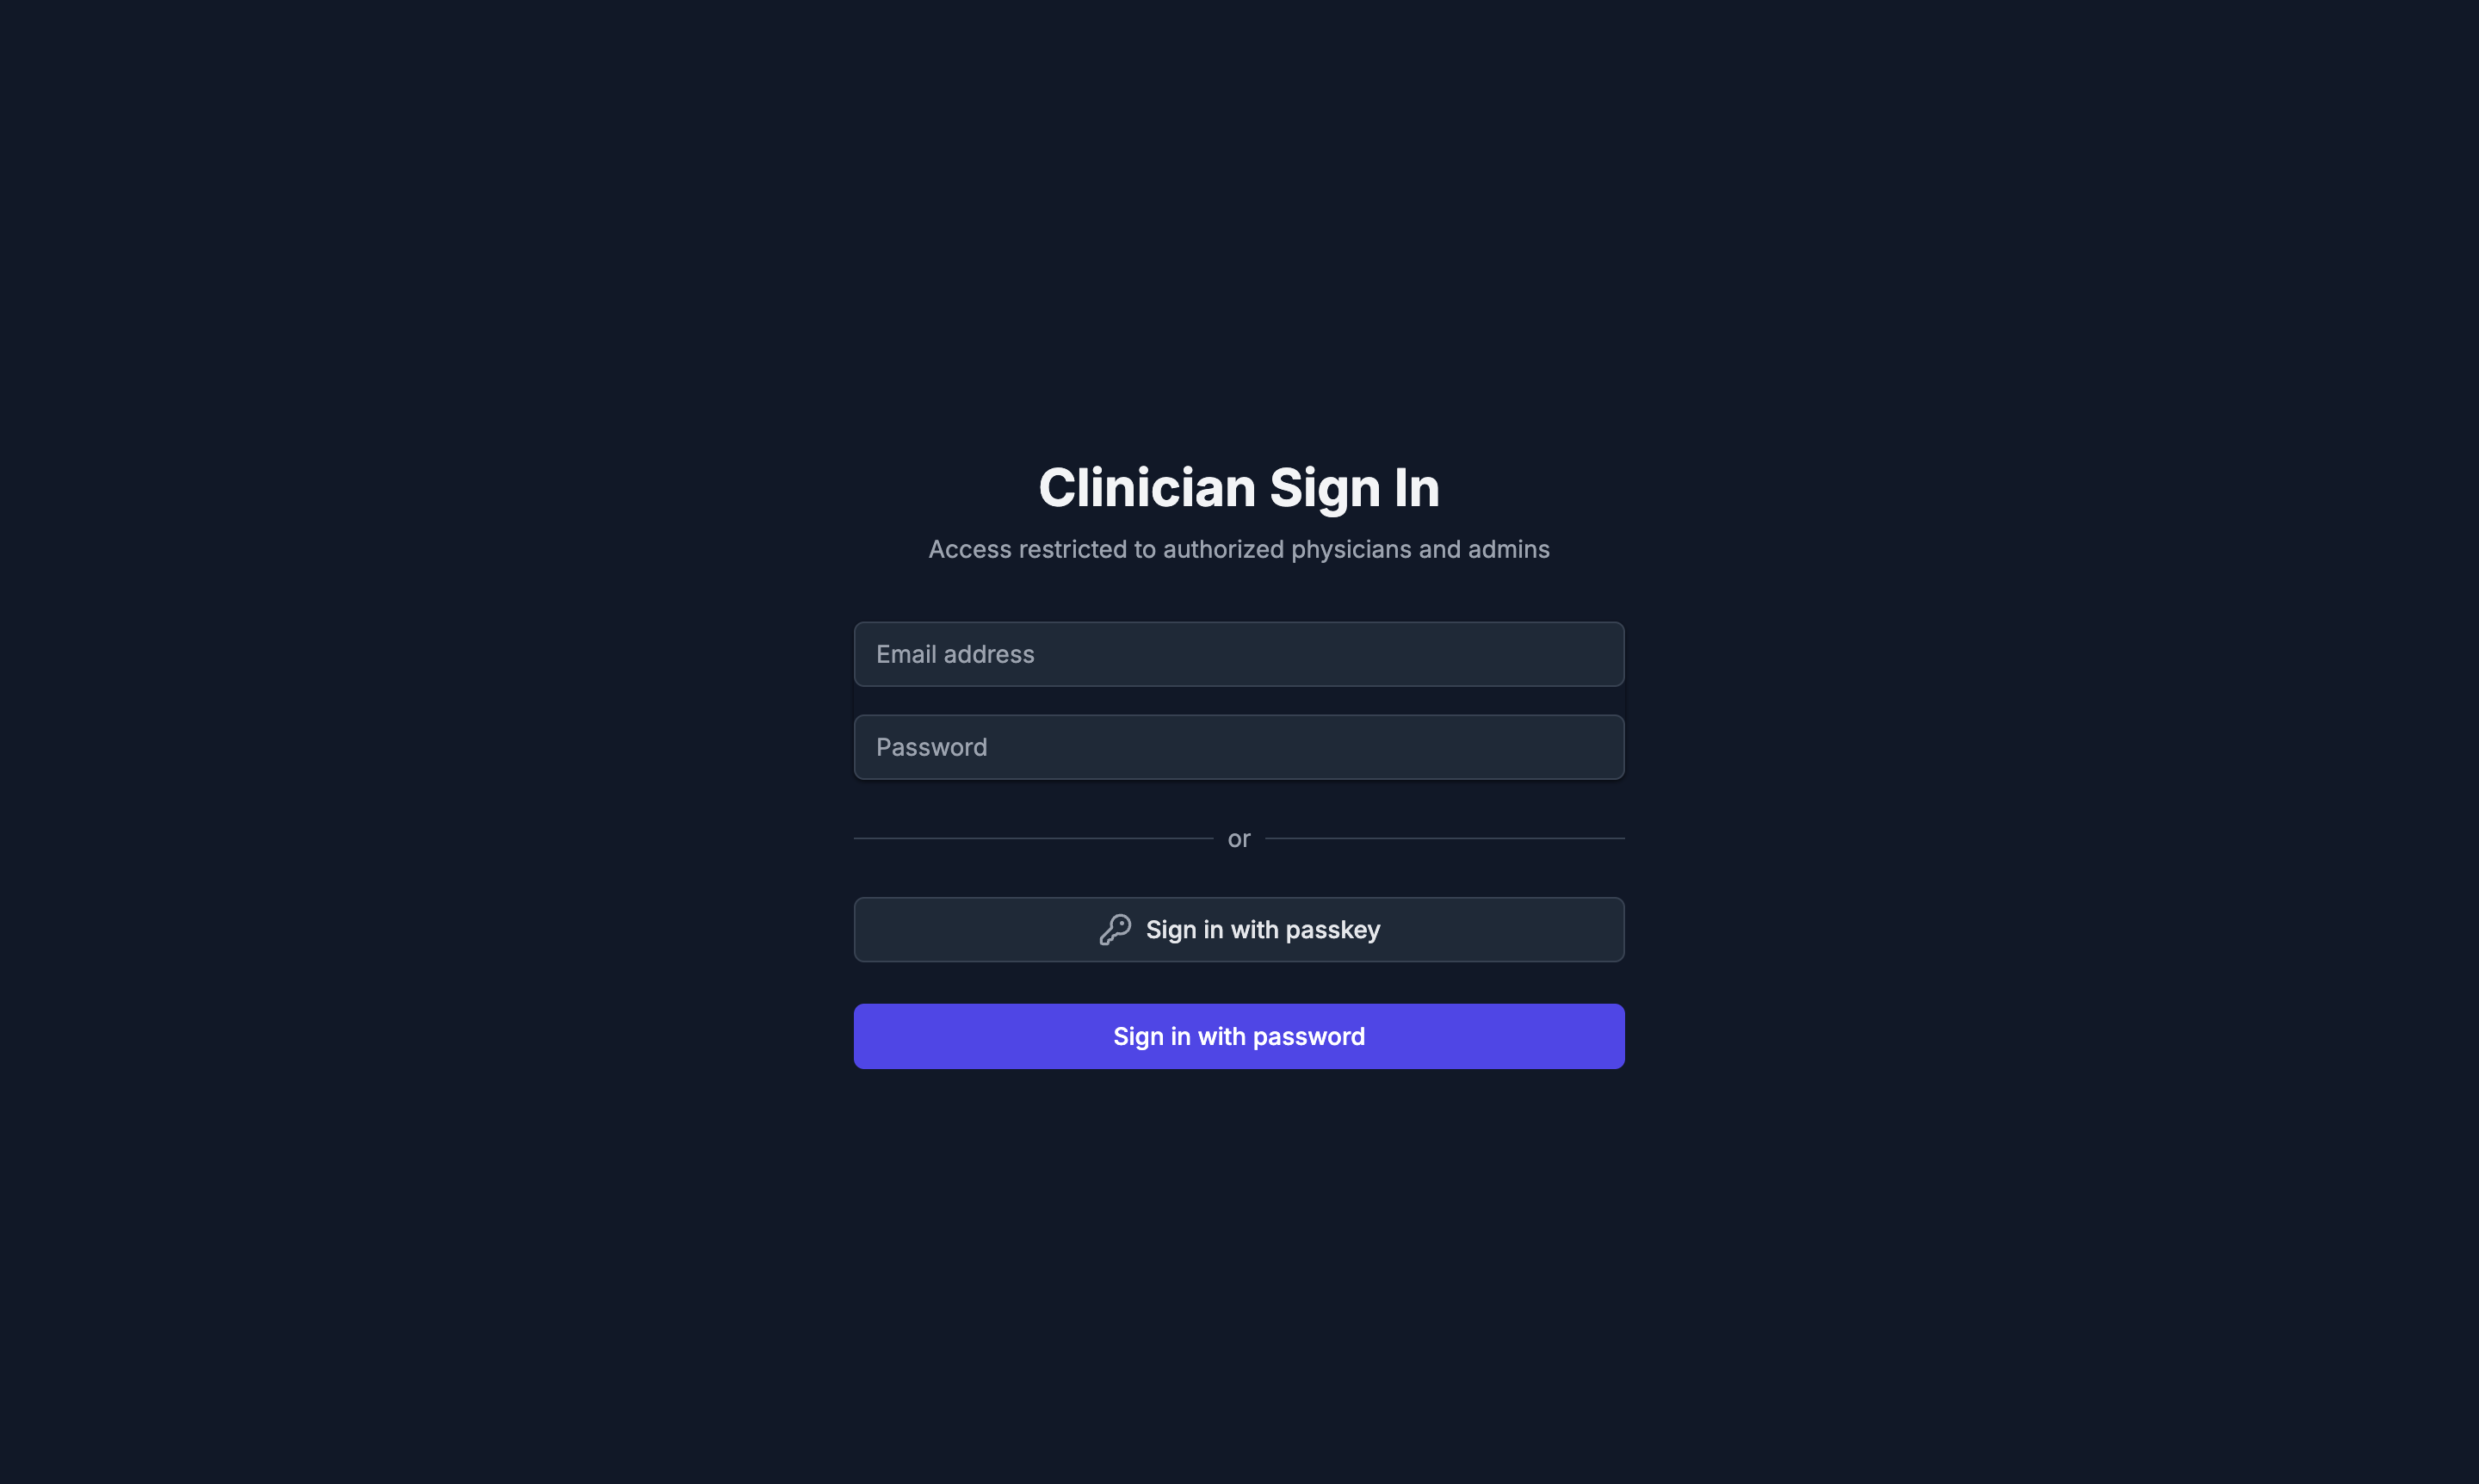
Step 1.1 Log in to the EMR
Click the button below to open Hero EMR in a new tab, signed in as a test clinician — no password needed. Deep links drop you straight into the dev workspace at hero.soaper.ai.
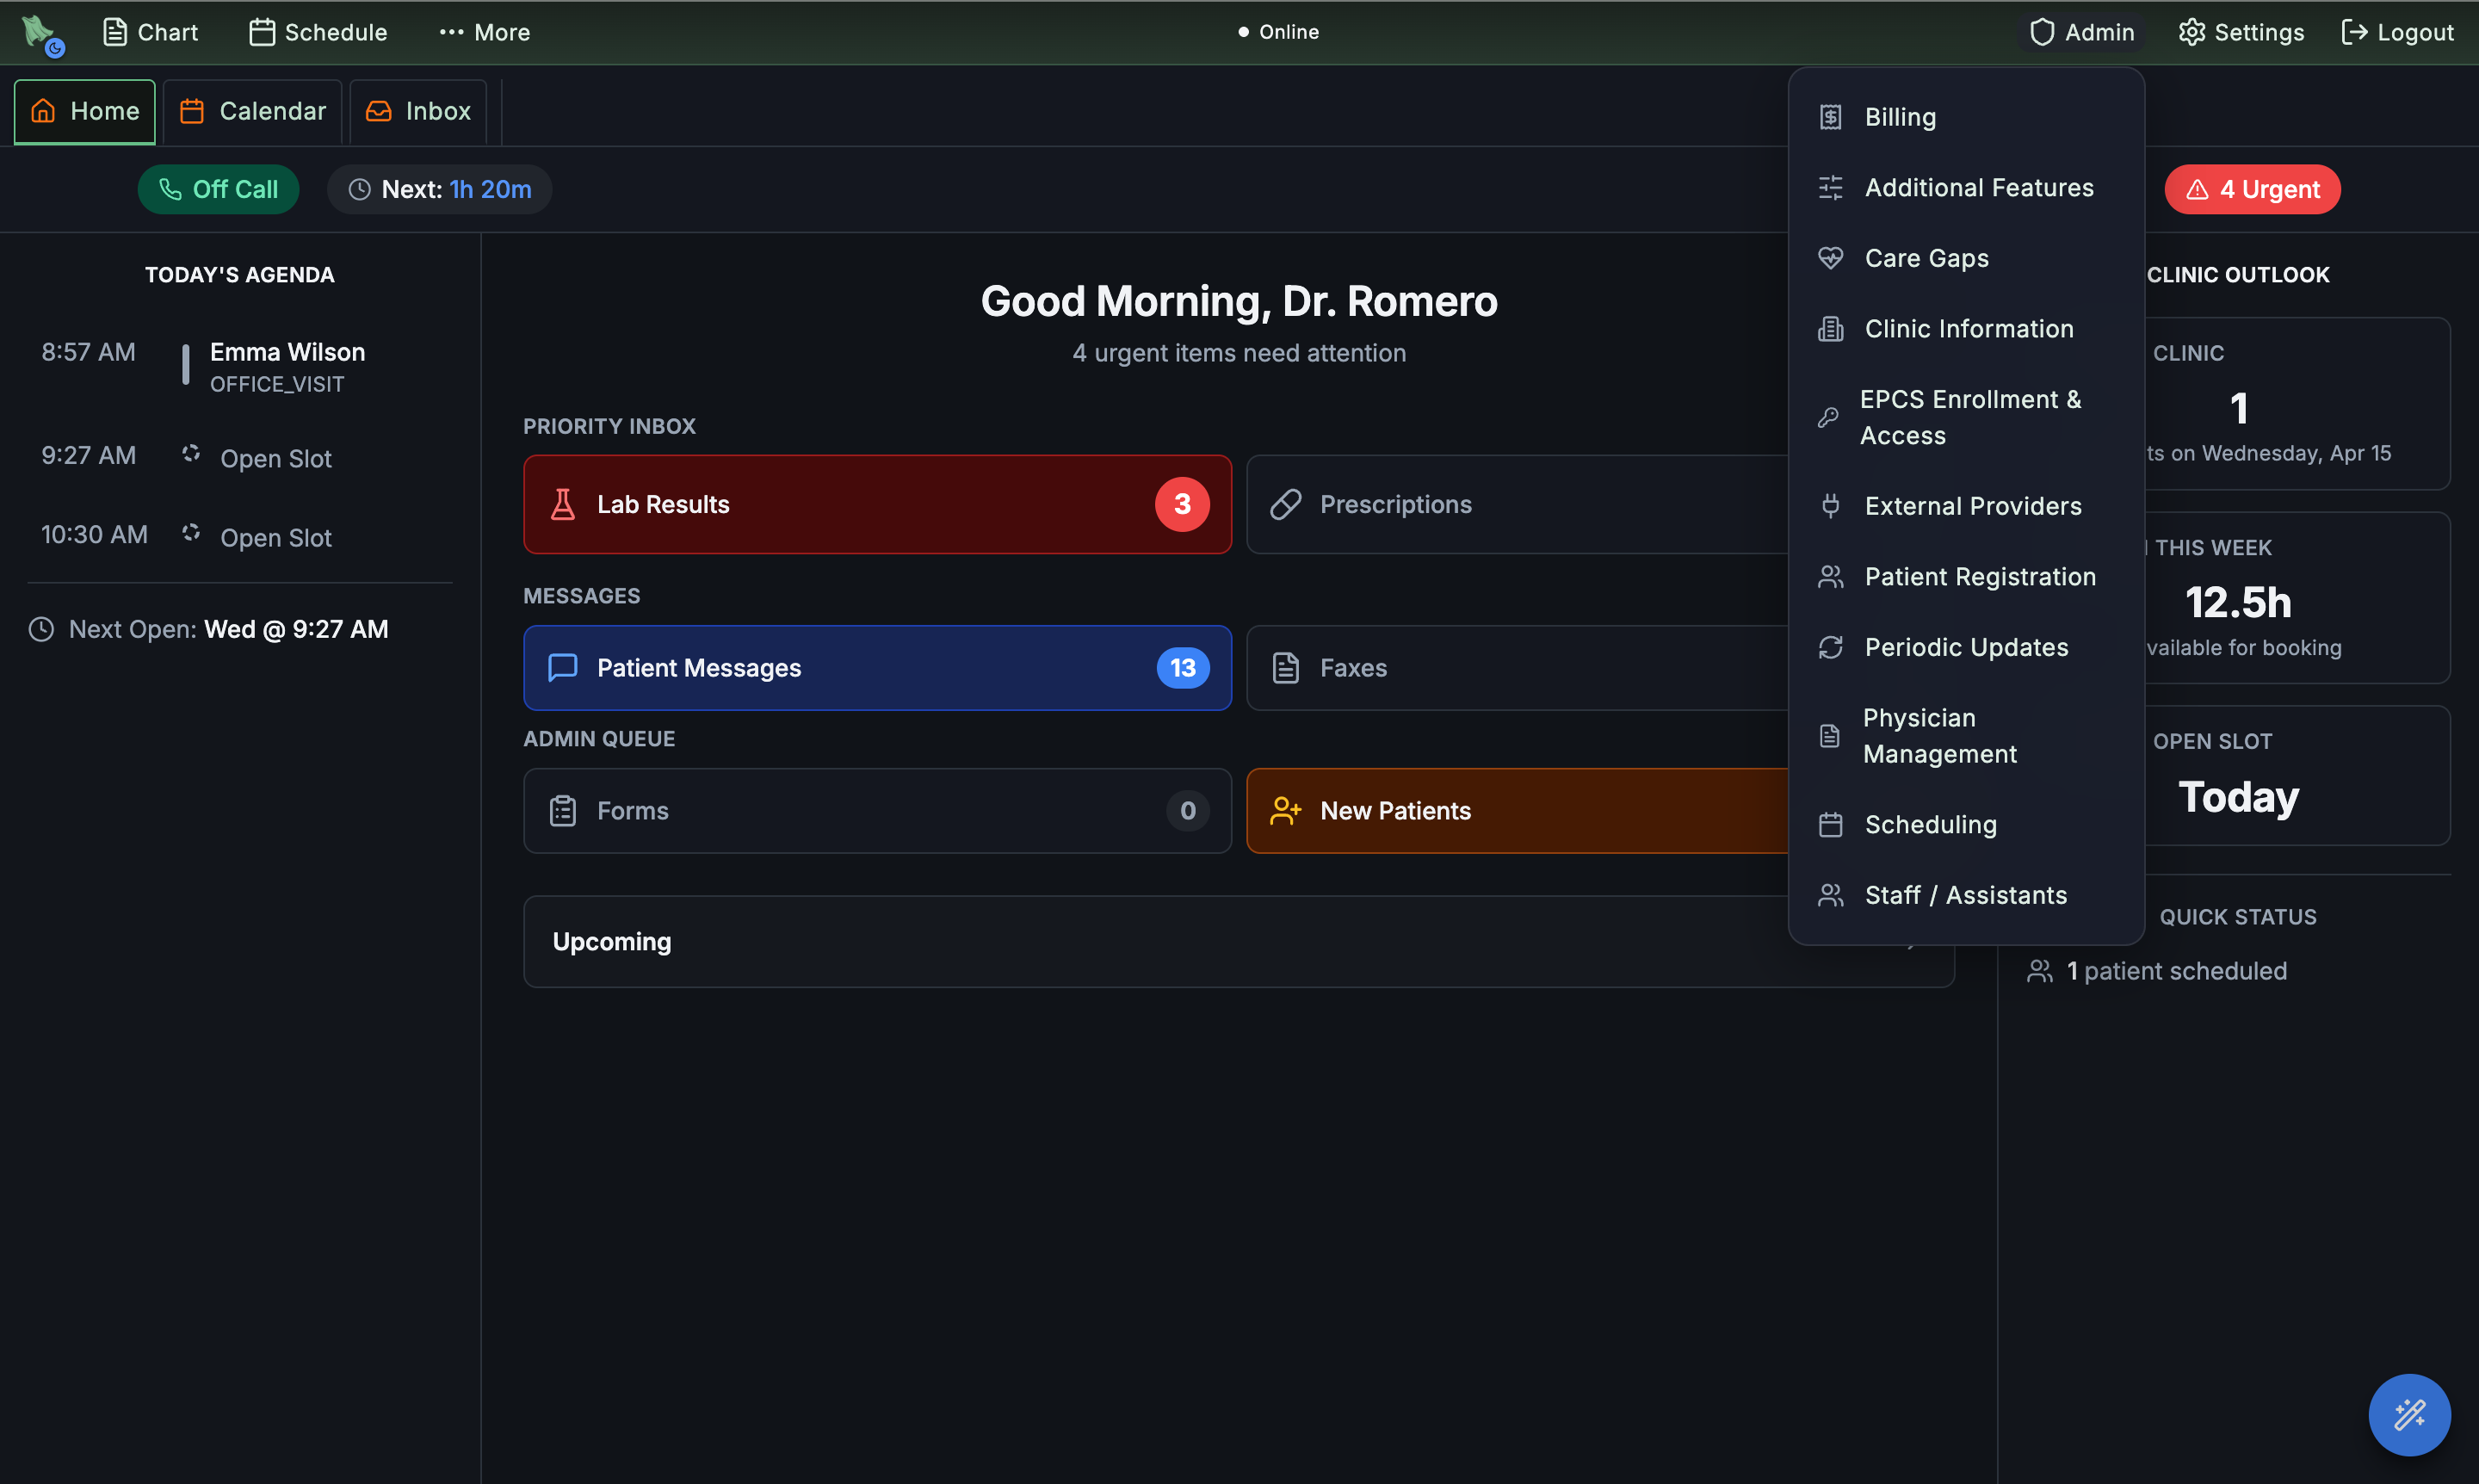
Step 1.2 Open Admin → Patient Registration
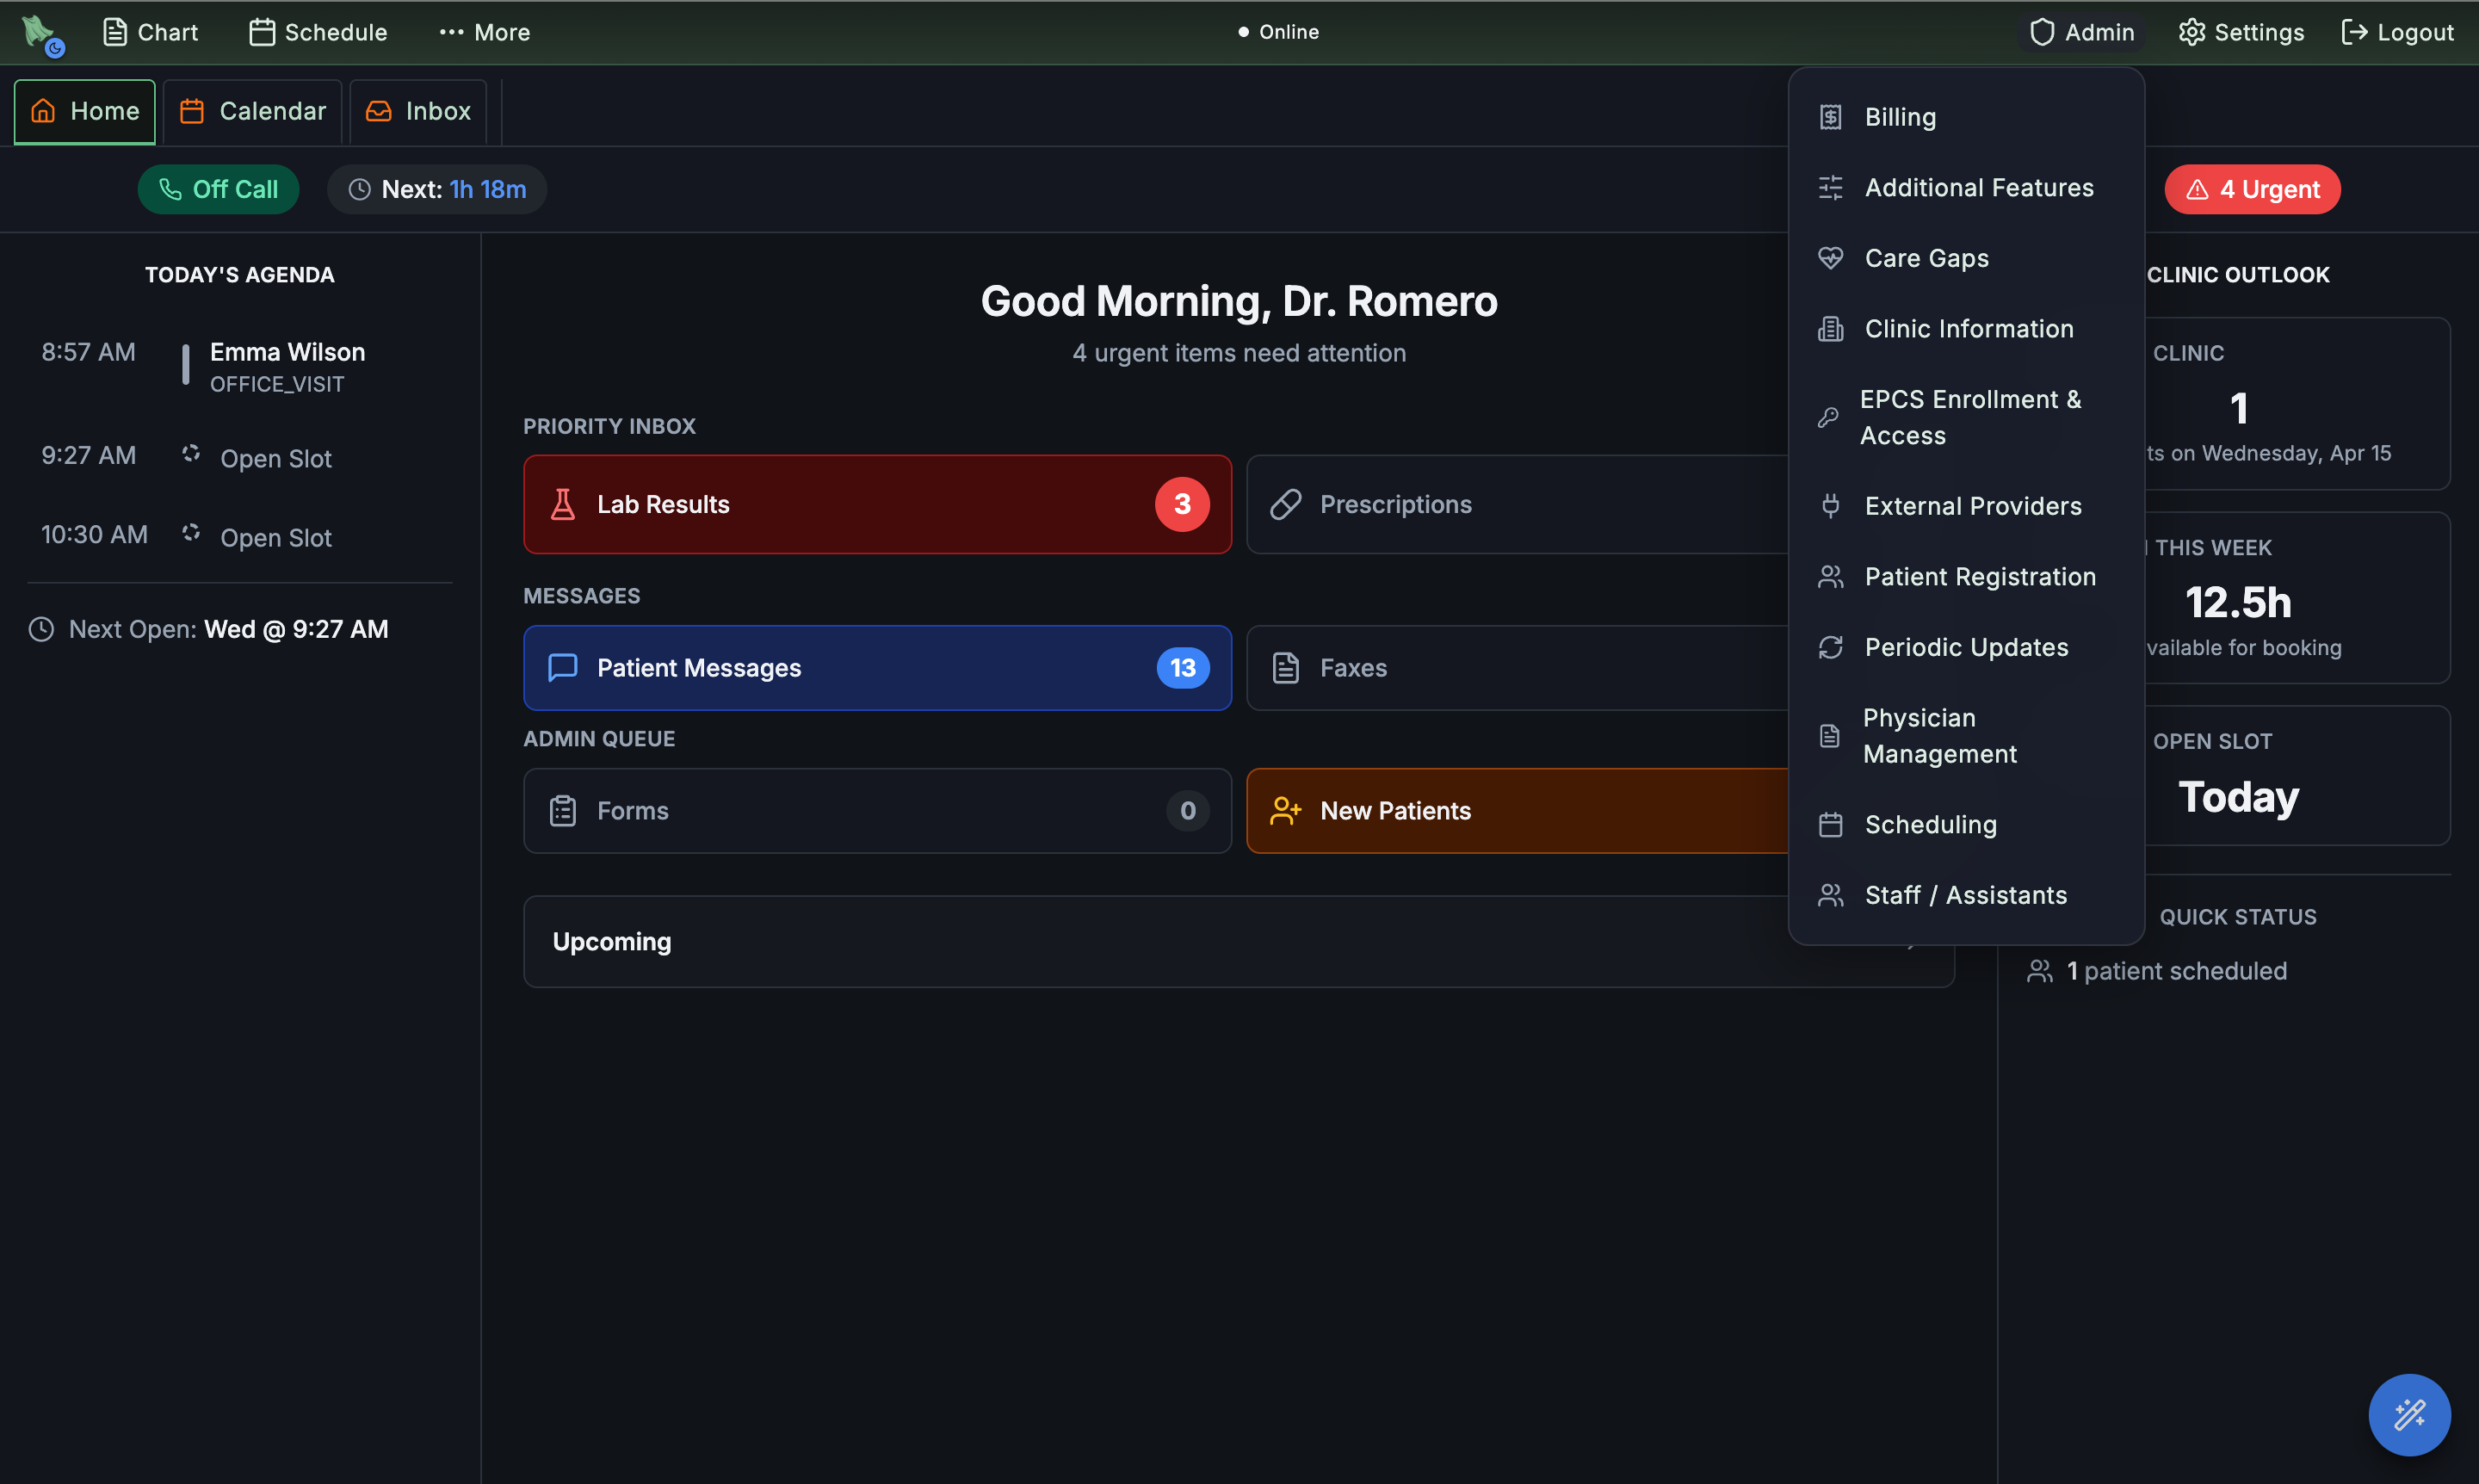
In the top toolbar, click Admin, then select Patient Registration. This opens the patient list for your practice.
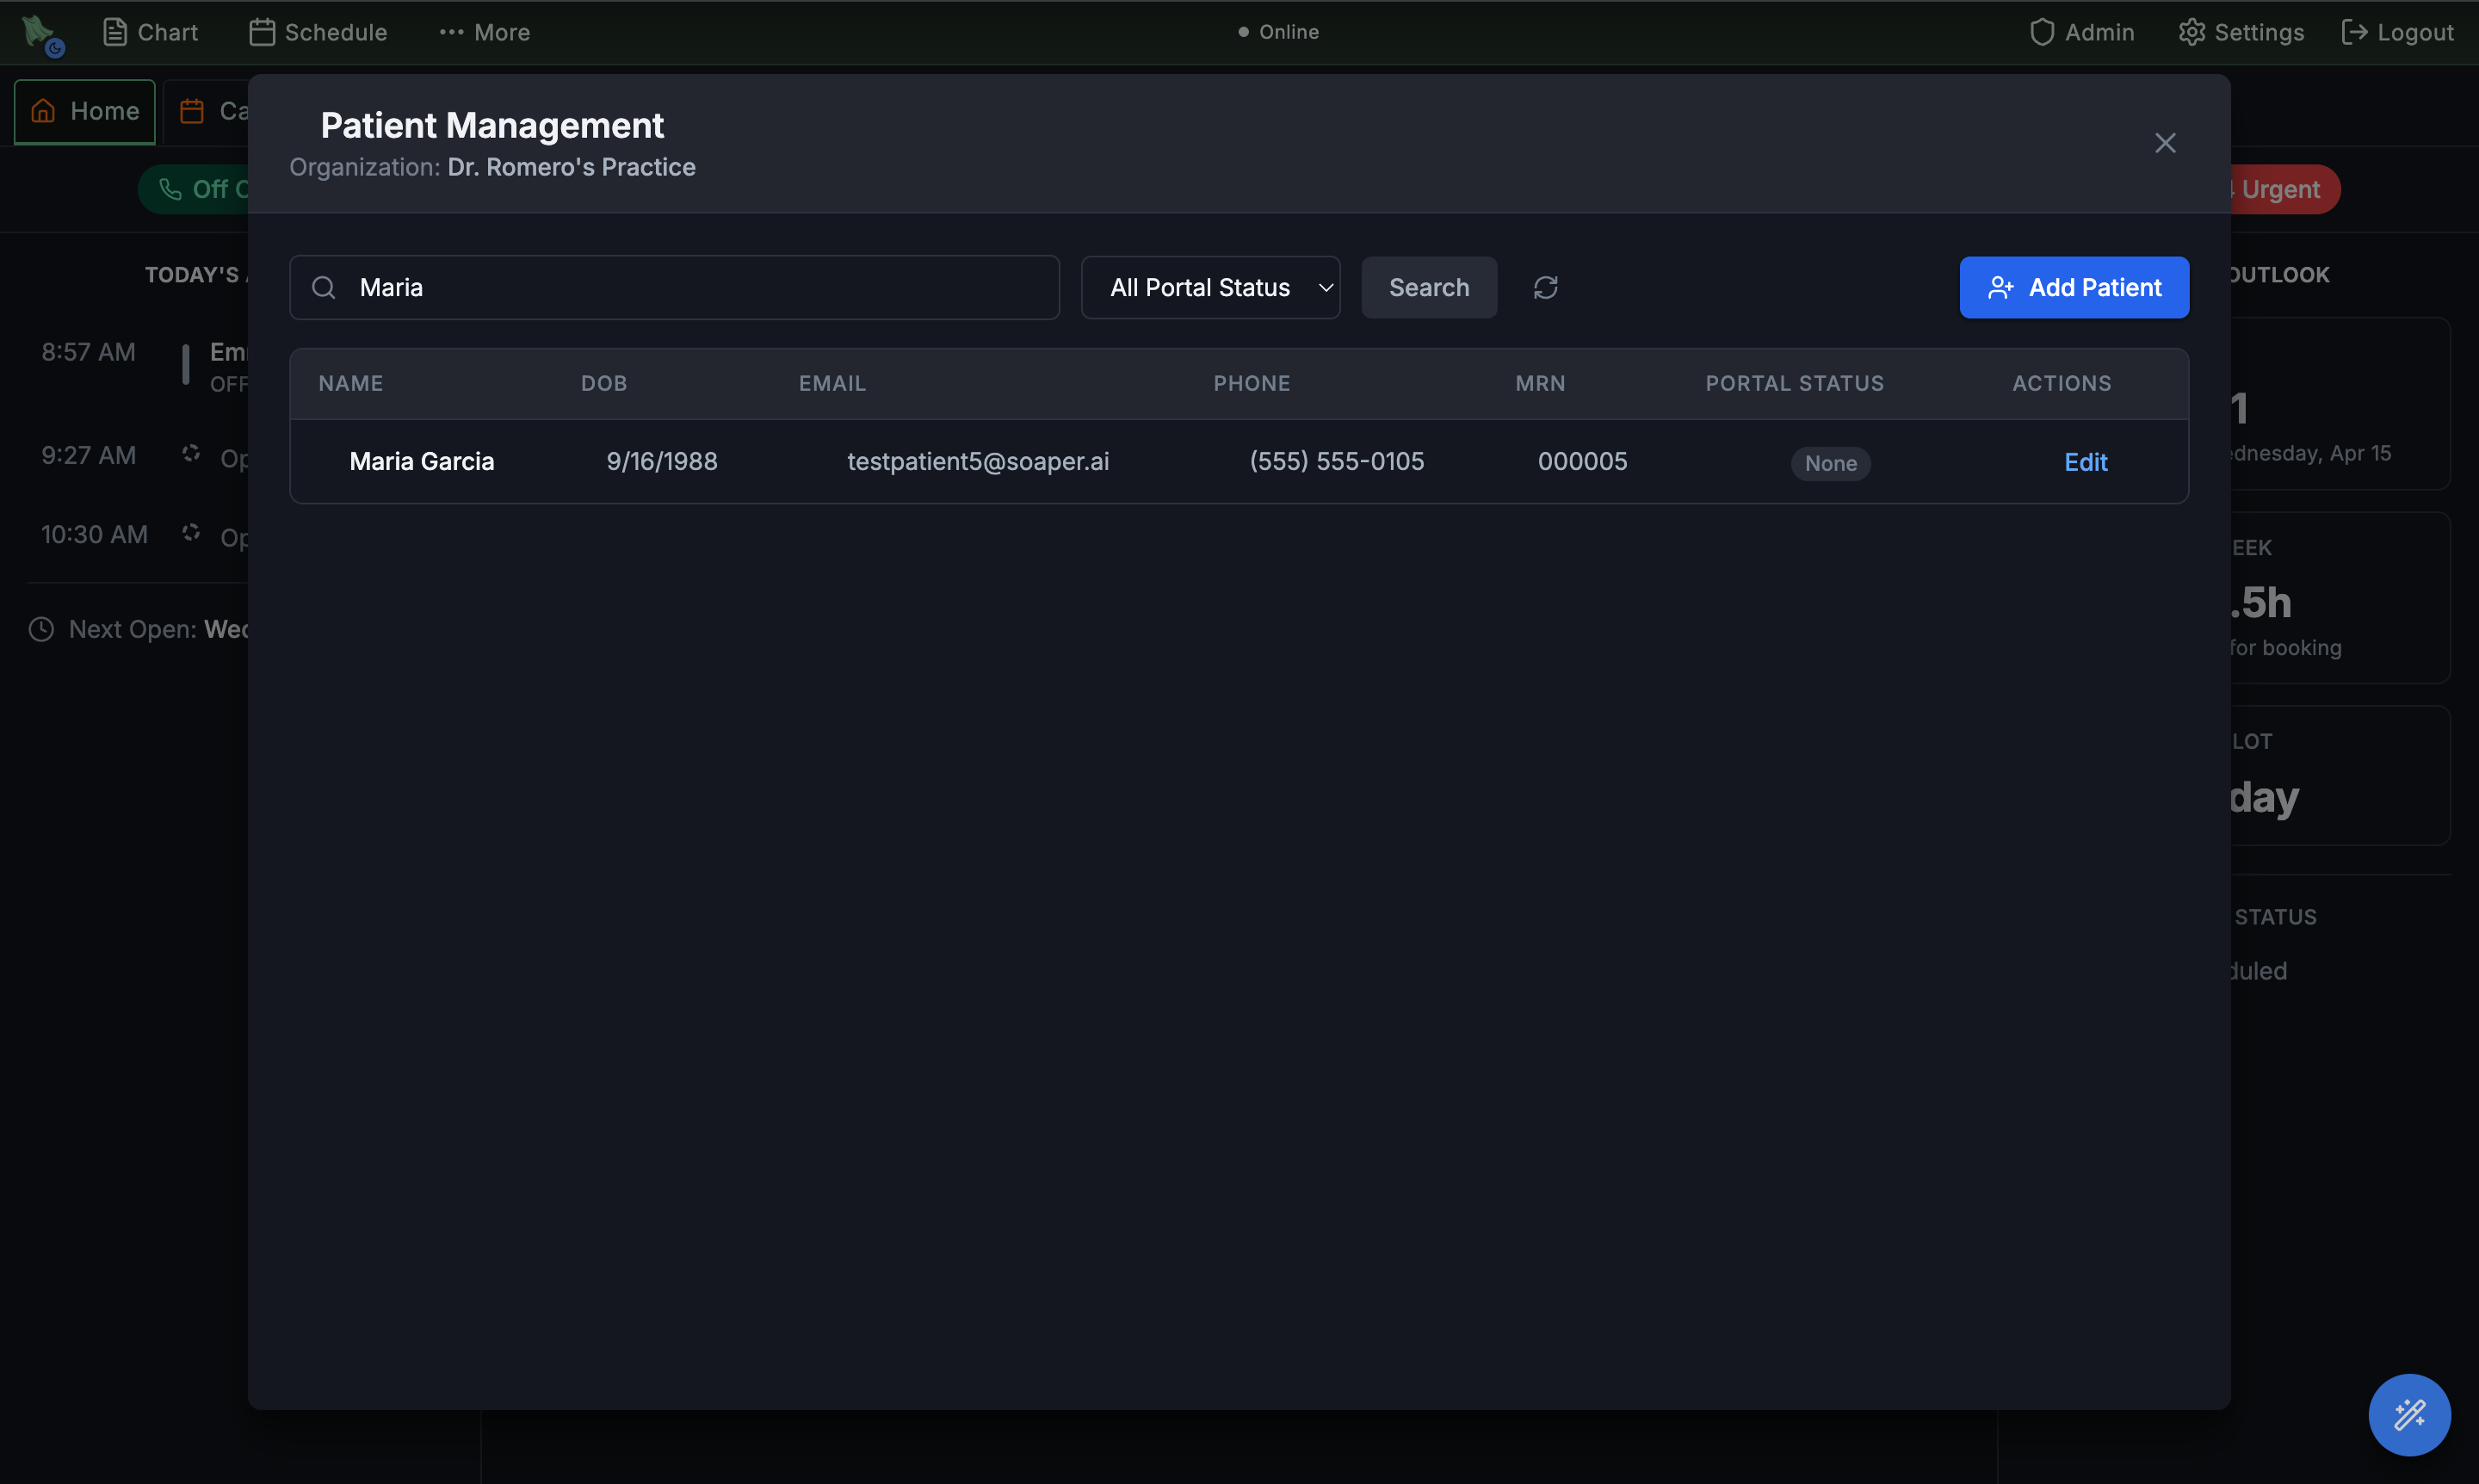
Step 1.3 Find Maria Garcia
Type Maria in the search field. You'll see Maria Garcia in the results. Click the Edit button on her row.
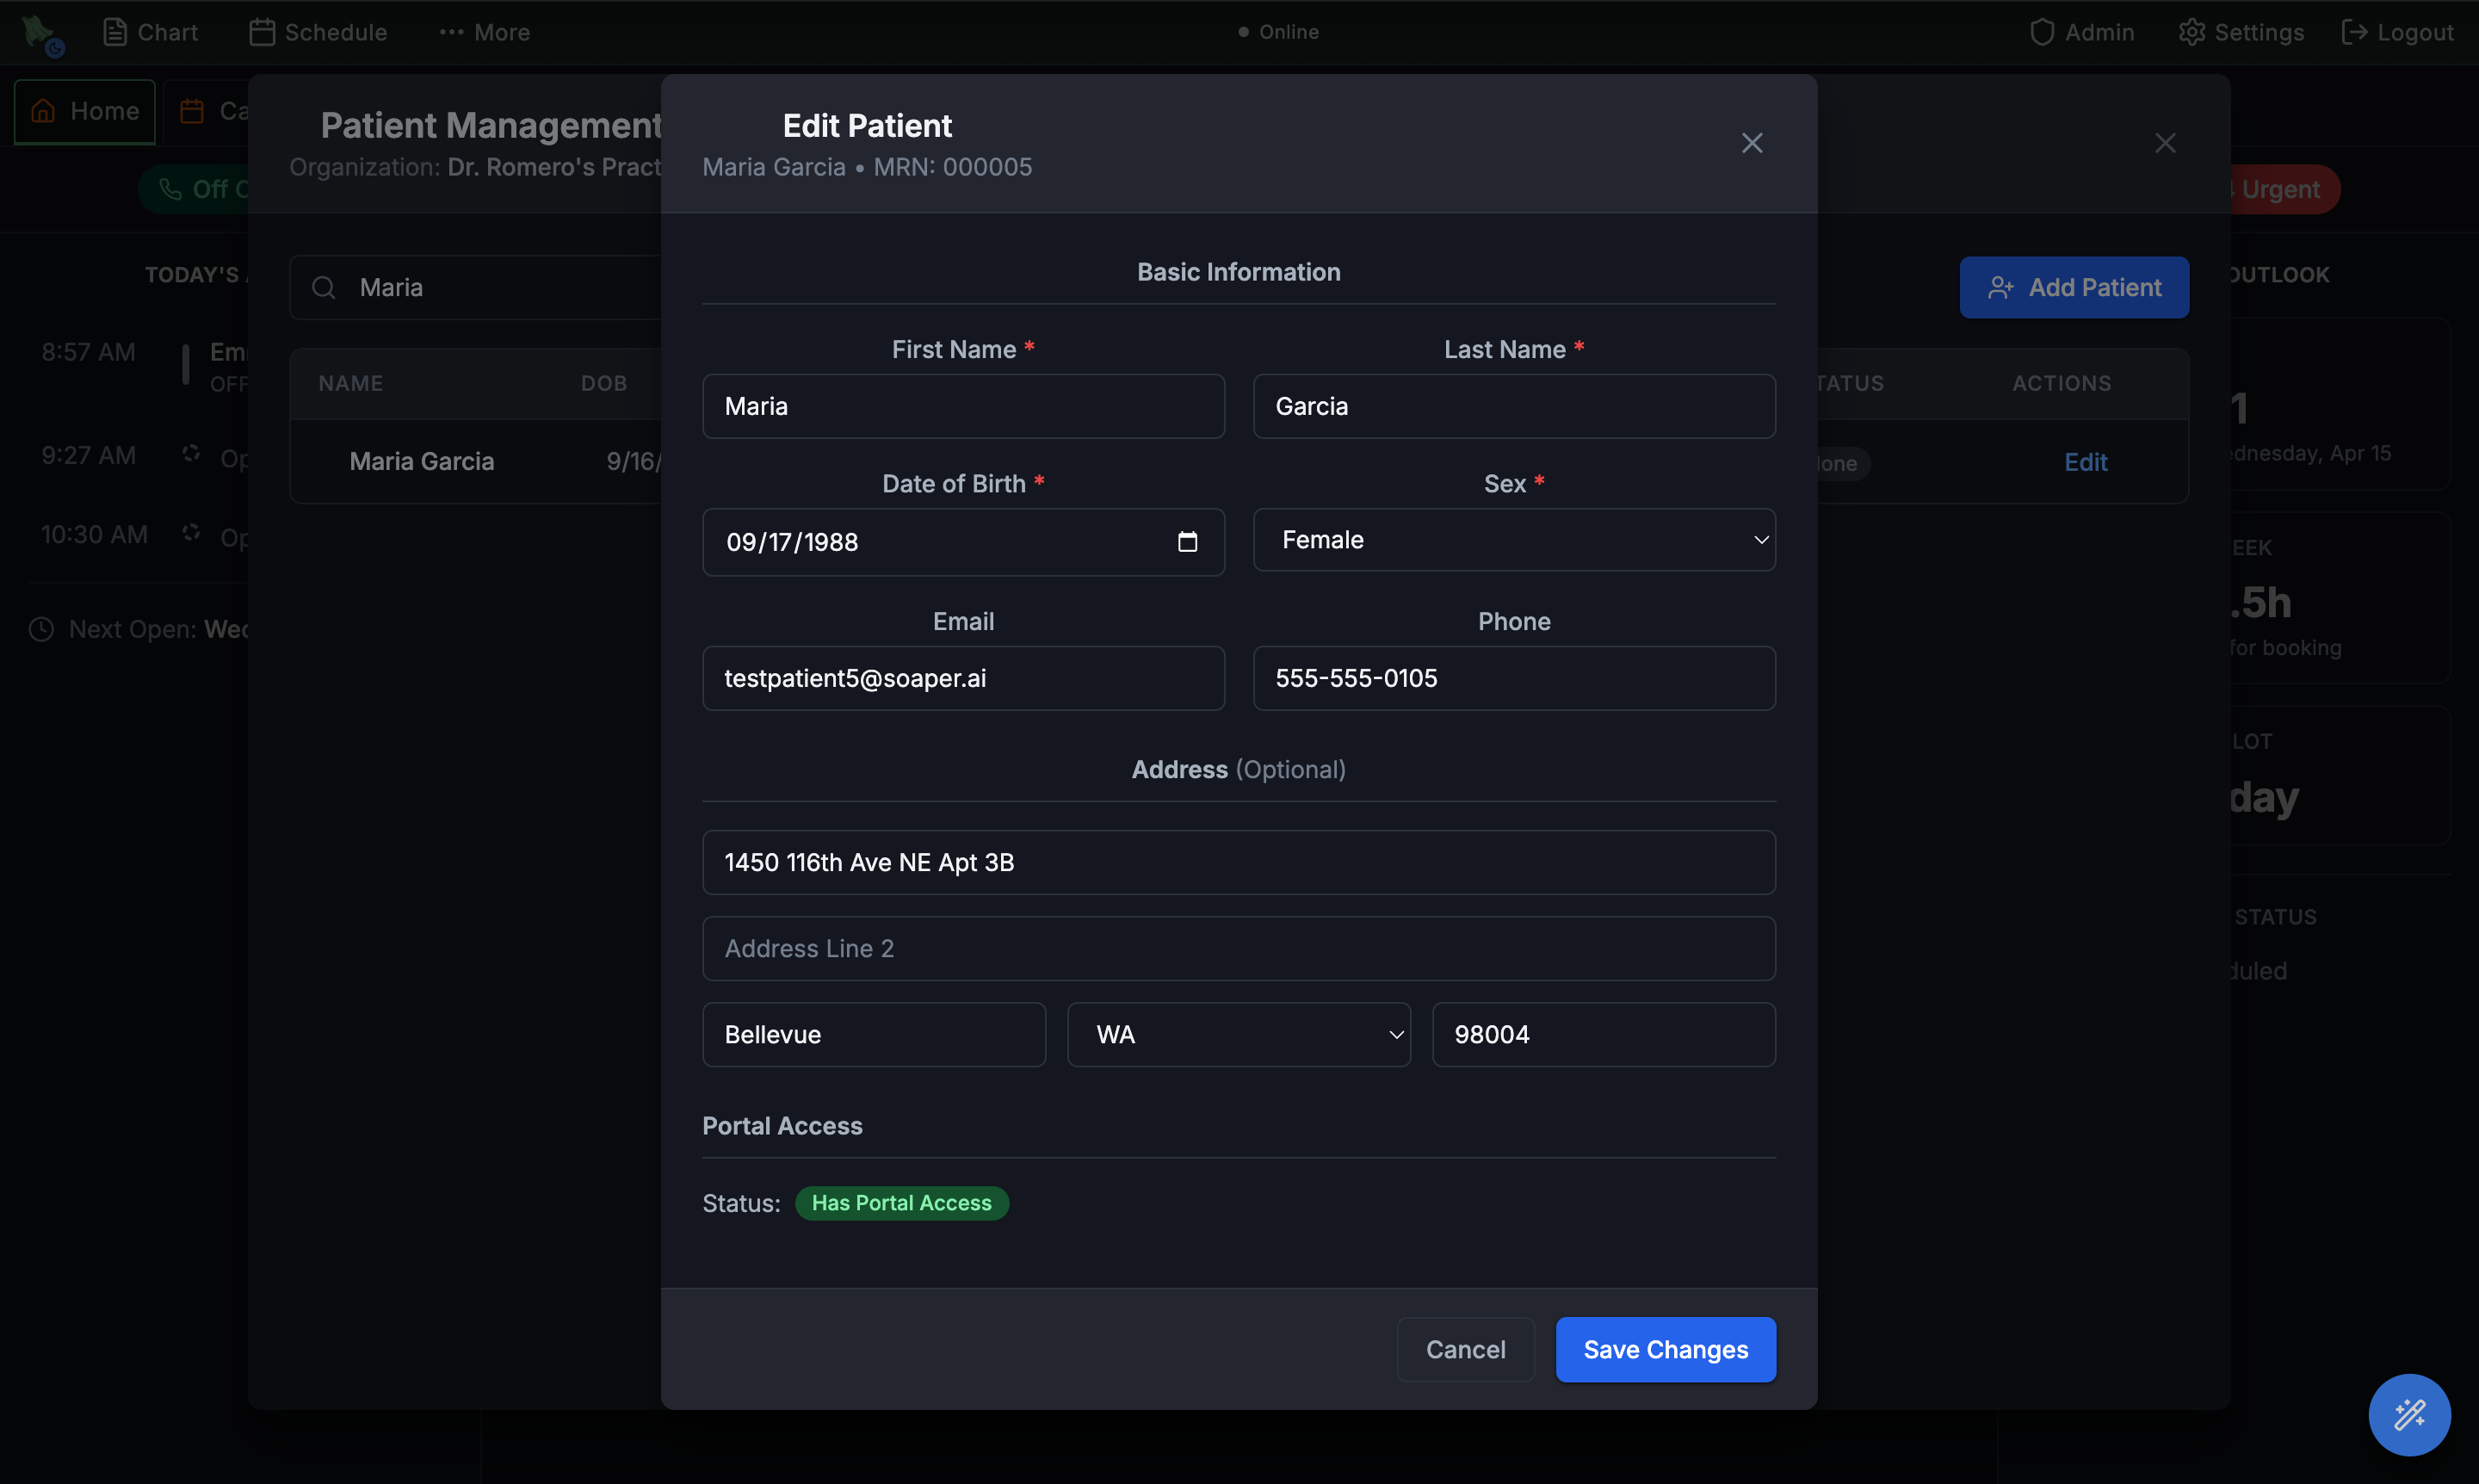
Step 1.4 Add email and phone, then save
In the edit modal, set:
- Email — use your own email address so replies reach your inbox
- Phone (Primary) — use your own mobile number, including the country code (e.g.
+15551234567)
Click Save. Hero EMR will now match any SMS or email from those contacts to Maria's chart.
Find your org's inbound numbers
Every Hero practice gets a dedicated inbound email address and SMS number. Grab them from External Providers.
Step 2.1 Open Admin → External Providers
Close the patient registration modal. Click Admin again, and this time choose External Providers. This is where every outside connection lives — email, SMS, e-fax, labs, payments, and more.
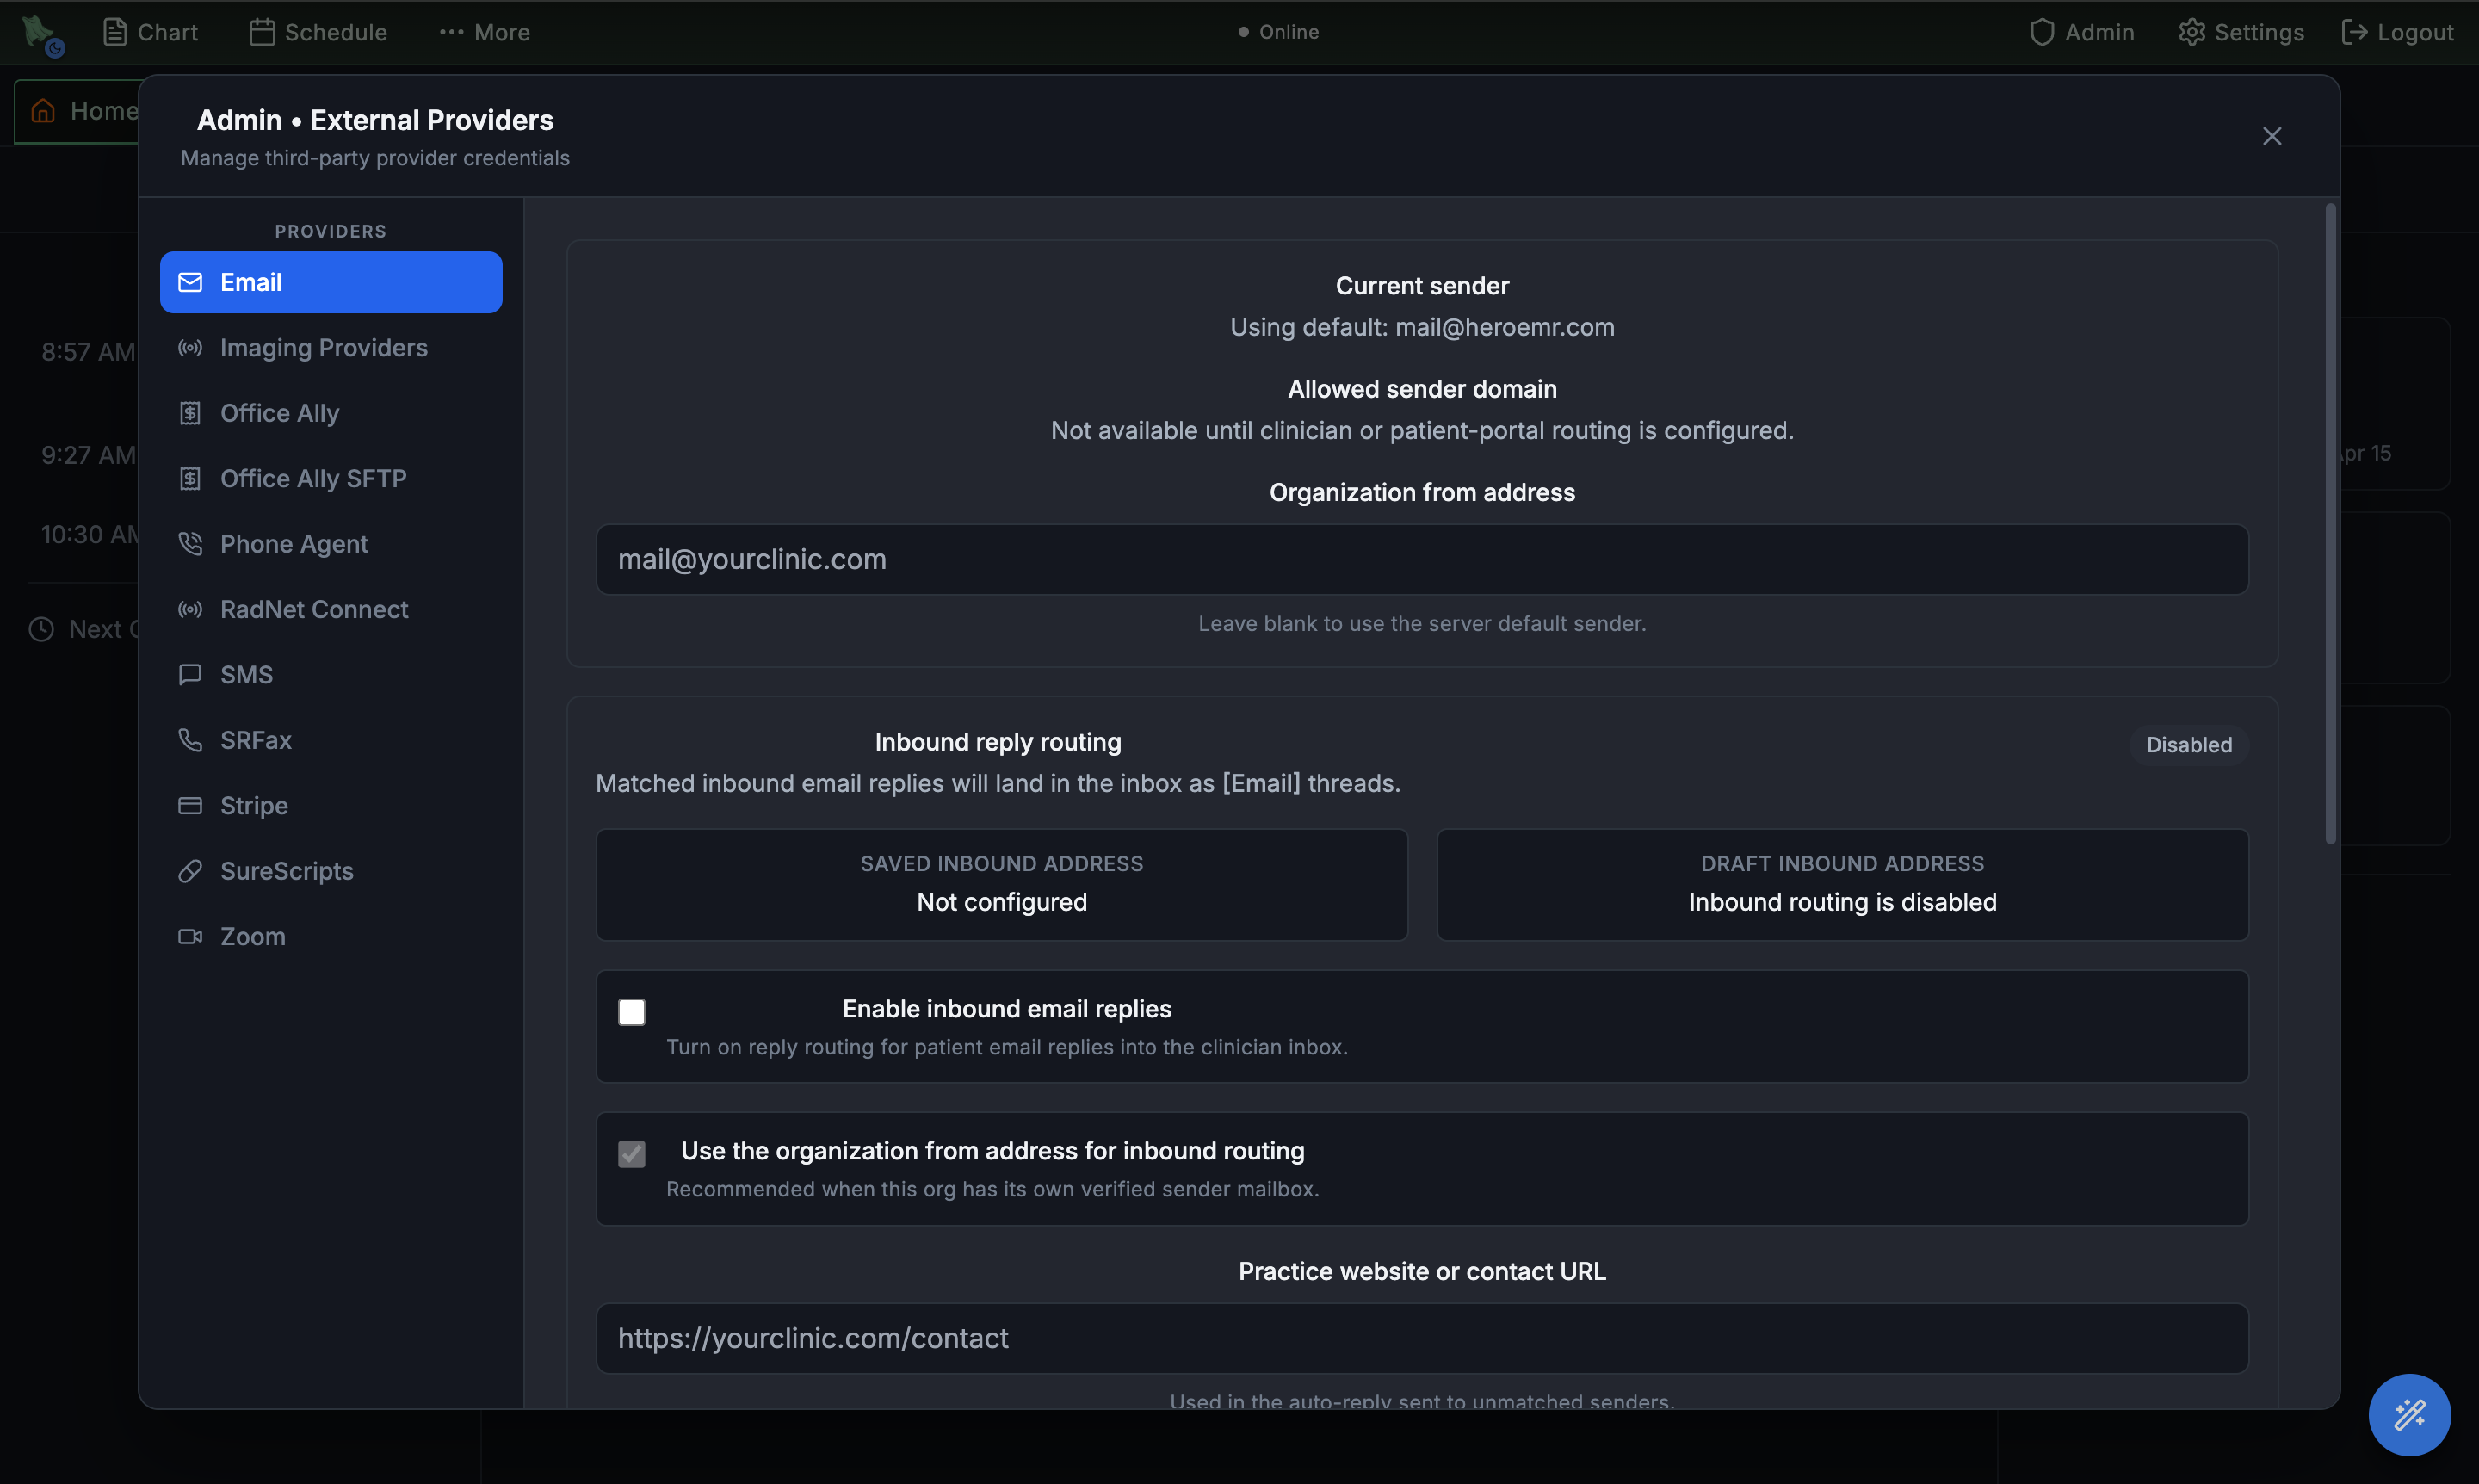
Step 2.2 Email Understand email routing
Hero EMR routes inbound email directly to individual physicians. Each physician has a dedicated address in the format first.last@inbox.hero.soaper.ai — for example, Nicholas.Romero@inbox.hero.soaper.ai. Emails sent to that address land straight in Dr. Romero's inbox.
Automated reminders and appointment confirmations are sent from the org-level address configured on this tab. If a patient replies to the org address, Hero routes the message to the right physician based on the patient's recent visits and upcoming appointments.
first.last@inbox.yourdomain.com, and outbound mail is sent from whatever sender address you configure on your own domain (e.g. reply@yourdomain.com). Nothing goes out from hero.soaper.ai — those addresses are for this demo environment only.
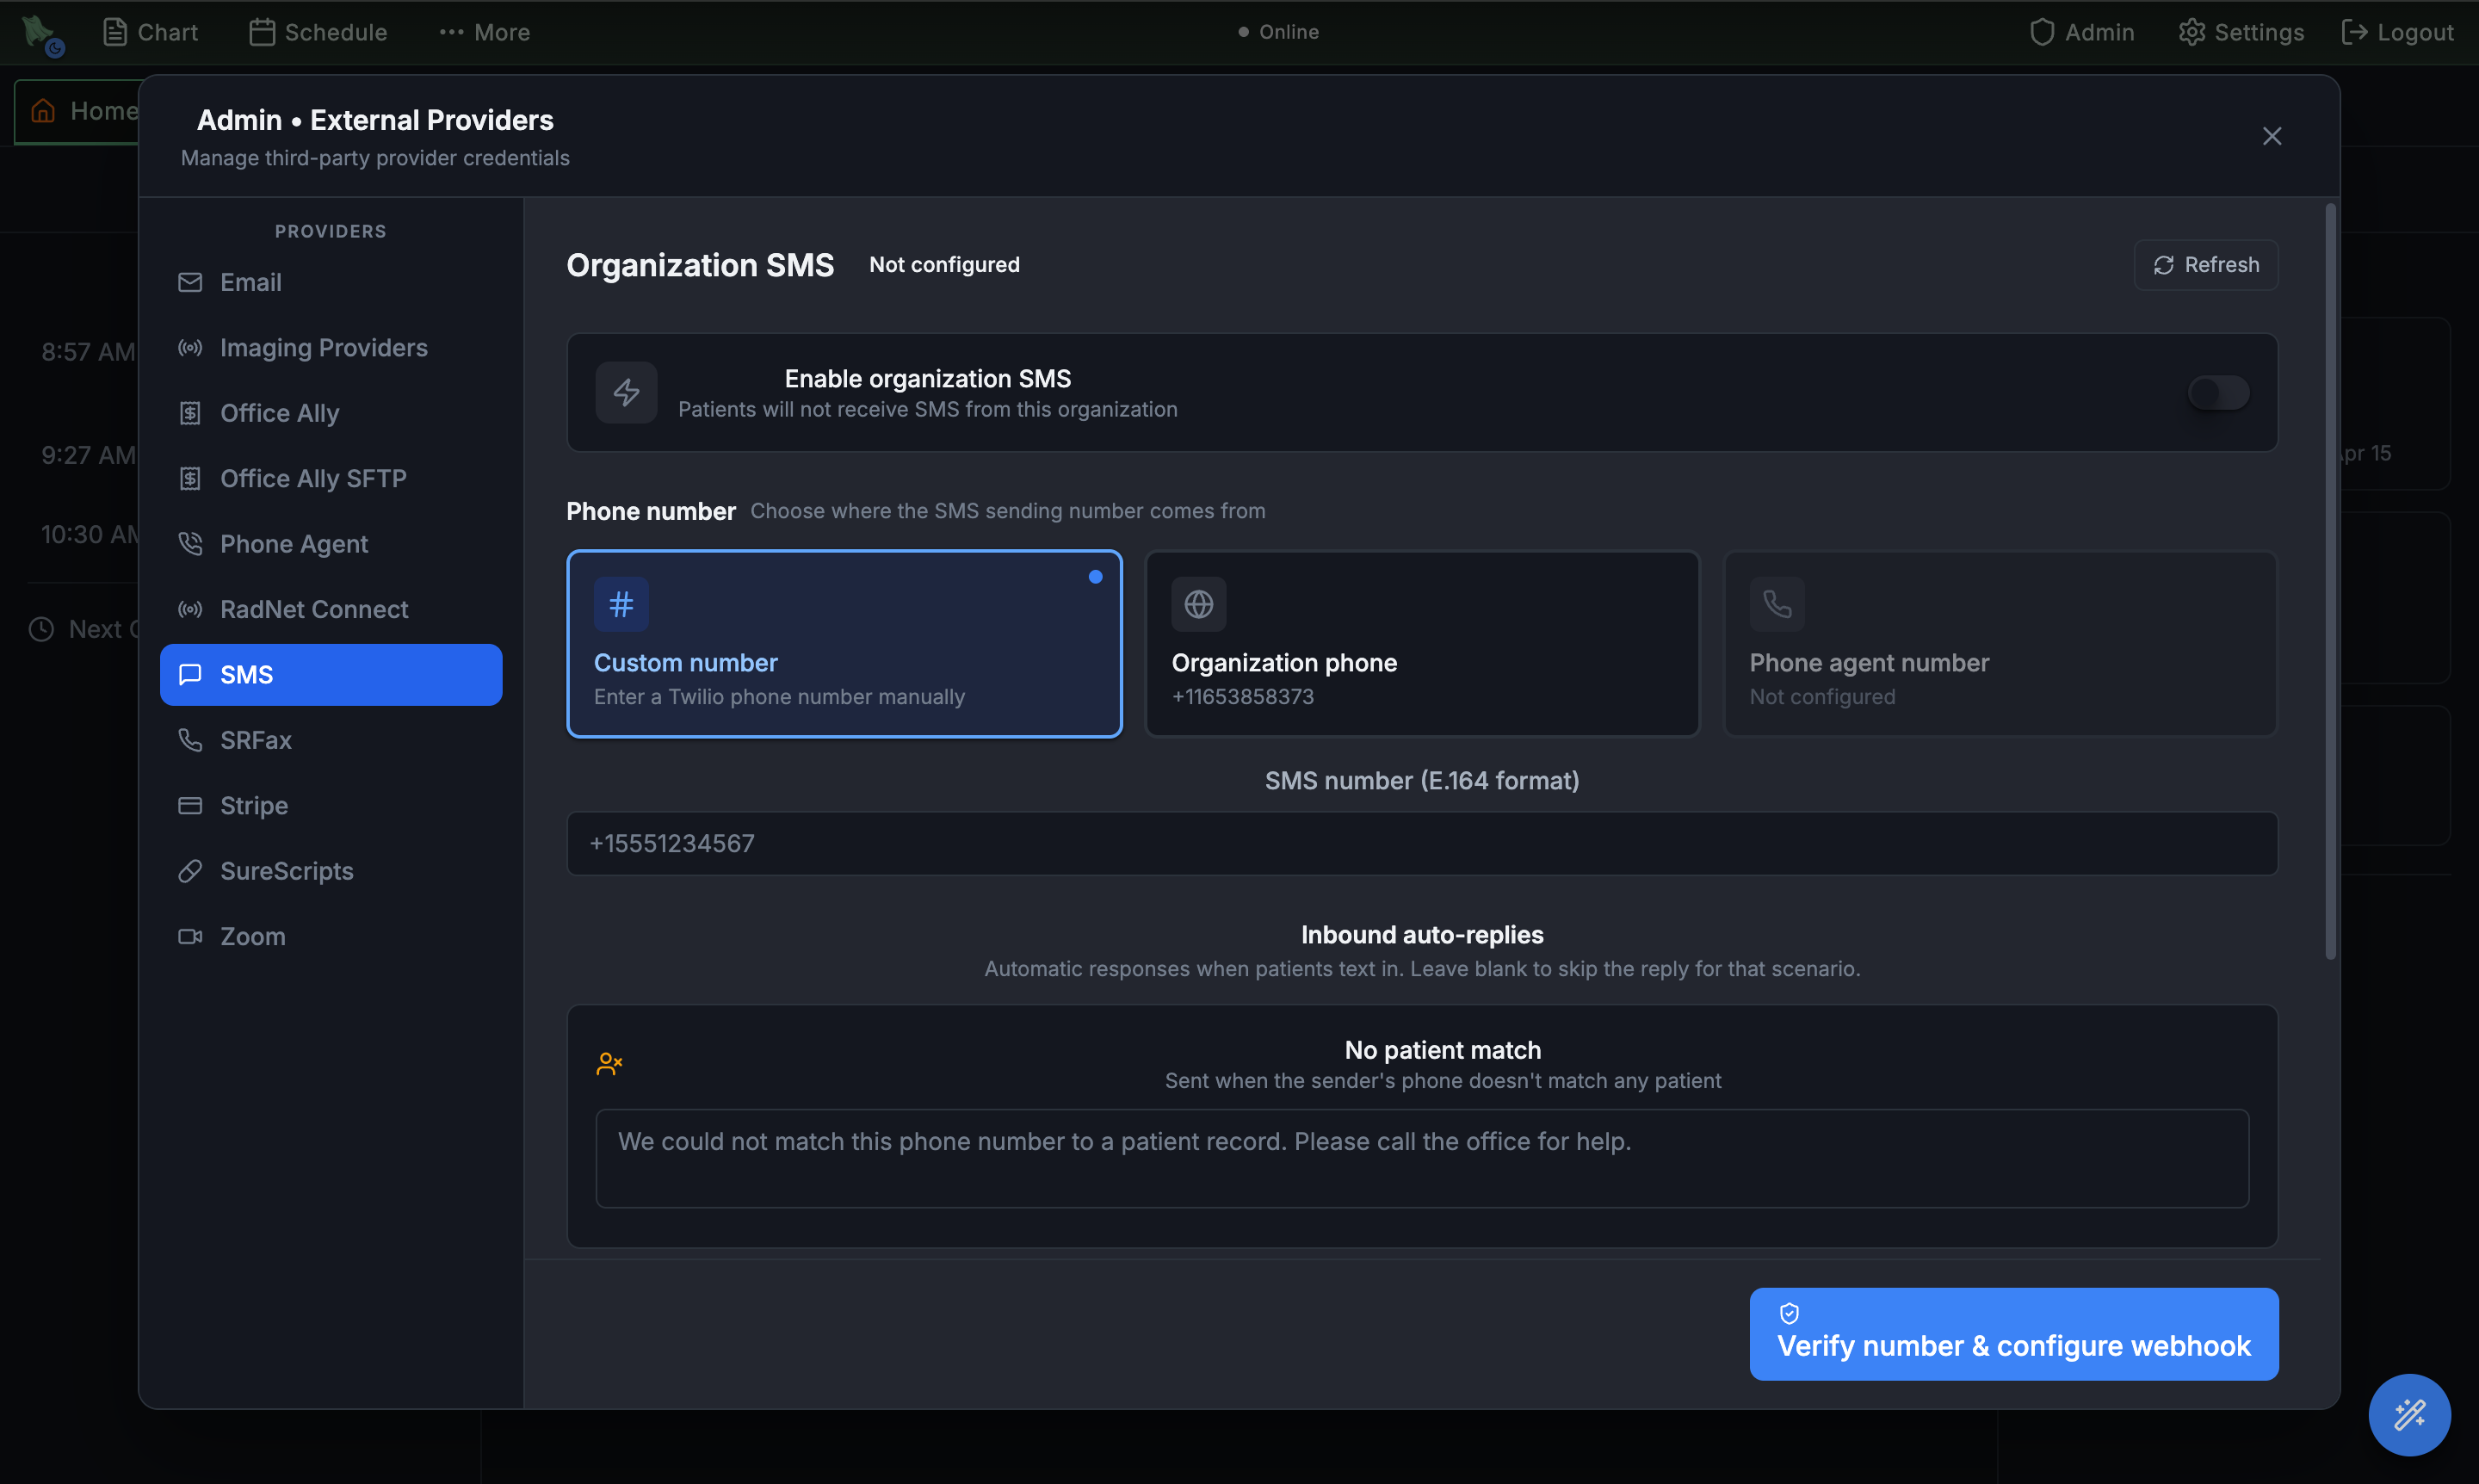
Step 2.3 SMS Find the inbound SMS number
Click the SMS tab. The SMS number shown is the number patients text to reach the practice — +18207773844 in this demo environment. The phone agent has its own number on the separate Phone agent tab; you'll use that one in Chapter 3.
Send a message from each channel
Pick up your phone. Open your email. Trigger the phone agent. Each message goes straight to Maria's thread.
Step 3.1 SMS Text the practice number
From the mobile number you just saved for Maria, text the practice's SMS number a short medical concern — "My blood pressure has been high recently" works great. Hero recognizes the number as Maria's and files the text into her chart as a new message thread.

Step 3.2 Email Email Dr. Romero directly
From the email you set on Maria's chart, send any message to Nicholas.Romero@inbox.hero.soaper.ai. Subject & body are up to you. Hero recognizes the sender as Maria and posts the email into Dr. Romero's inbox, attached to her chart.

Step 3.3 Phone Call the phone-agent number
Open the Phone agent tab in External Providers to find the phone-agent number — +15075018212 in this demo environment — and call it. The Hero phone agent answers, greets you, and asks how it can help. Say something like "I need to leave a message for Dr. Romero about my appointment." When the call needs a person, the agent hands it off with a summary and transcript into the clinician inbox.

Watch it land in the inbox
Back in the EMR, open the inbox. Every message you sent should be there, tagged by source and threaded to Maria.
Step 4.1 Open the Patient Messages inbox
Click Inbox in the top tab bar (or use the deep link below). Make sure the Patient Messages tab is selected. You'll see three new threads from Maria Garcia — one per channel.
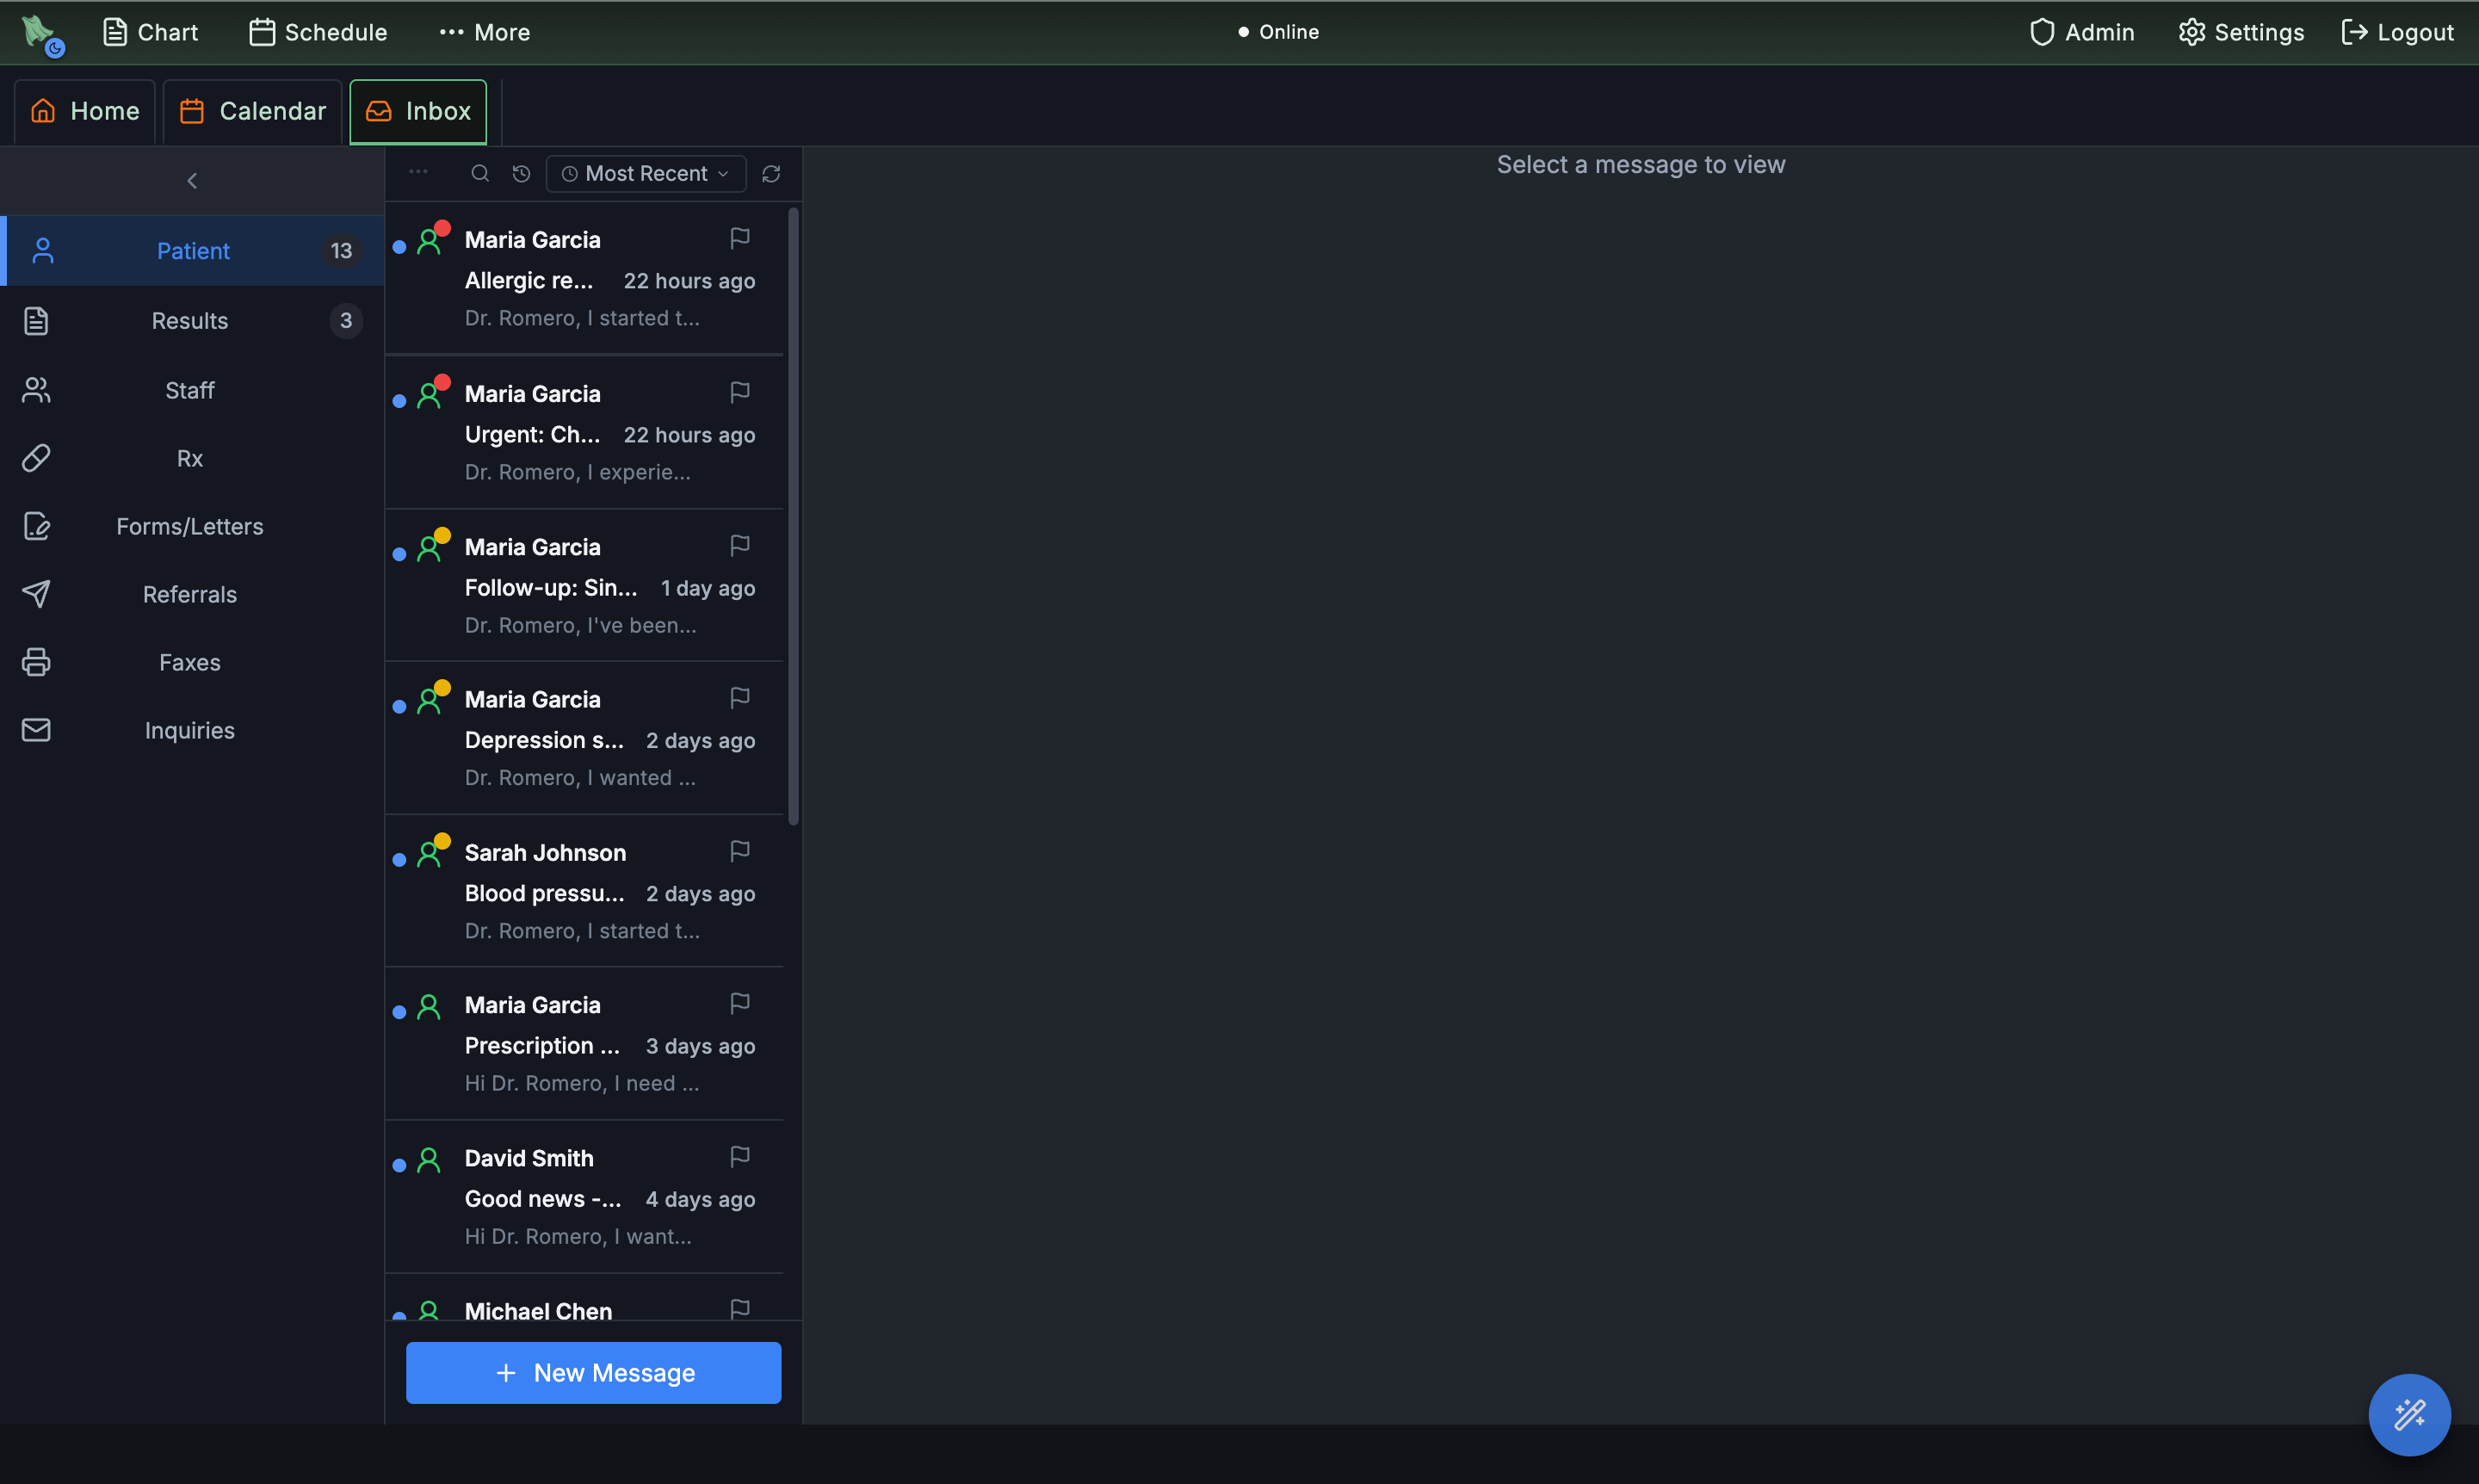
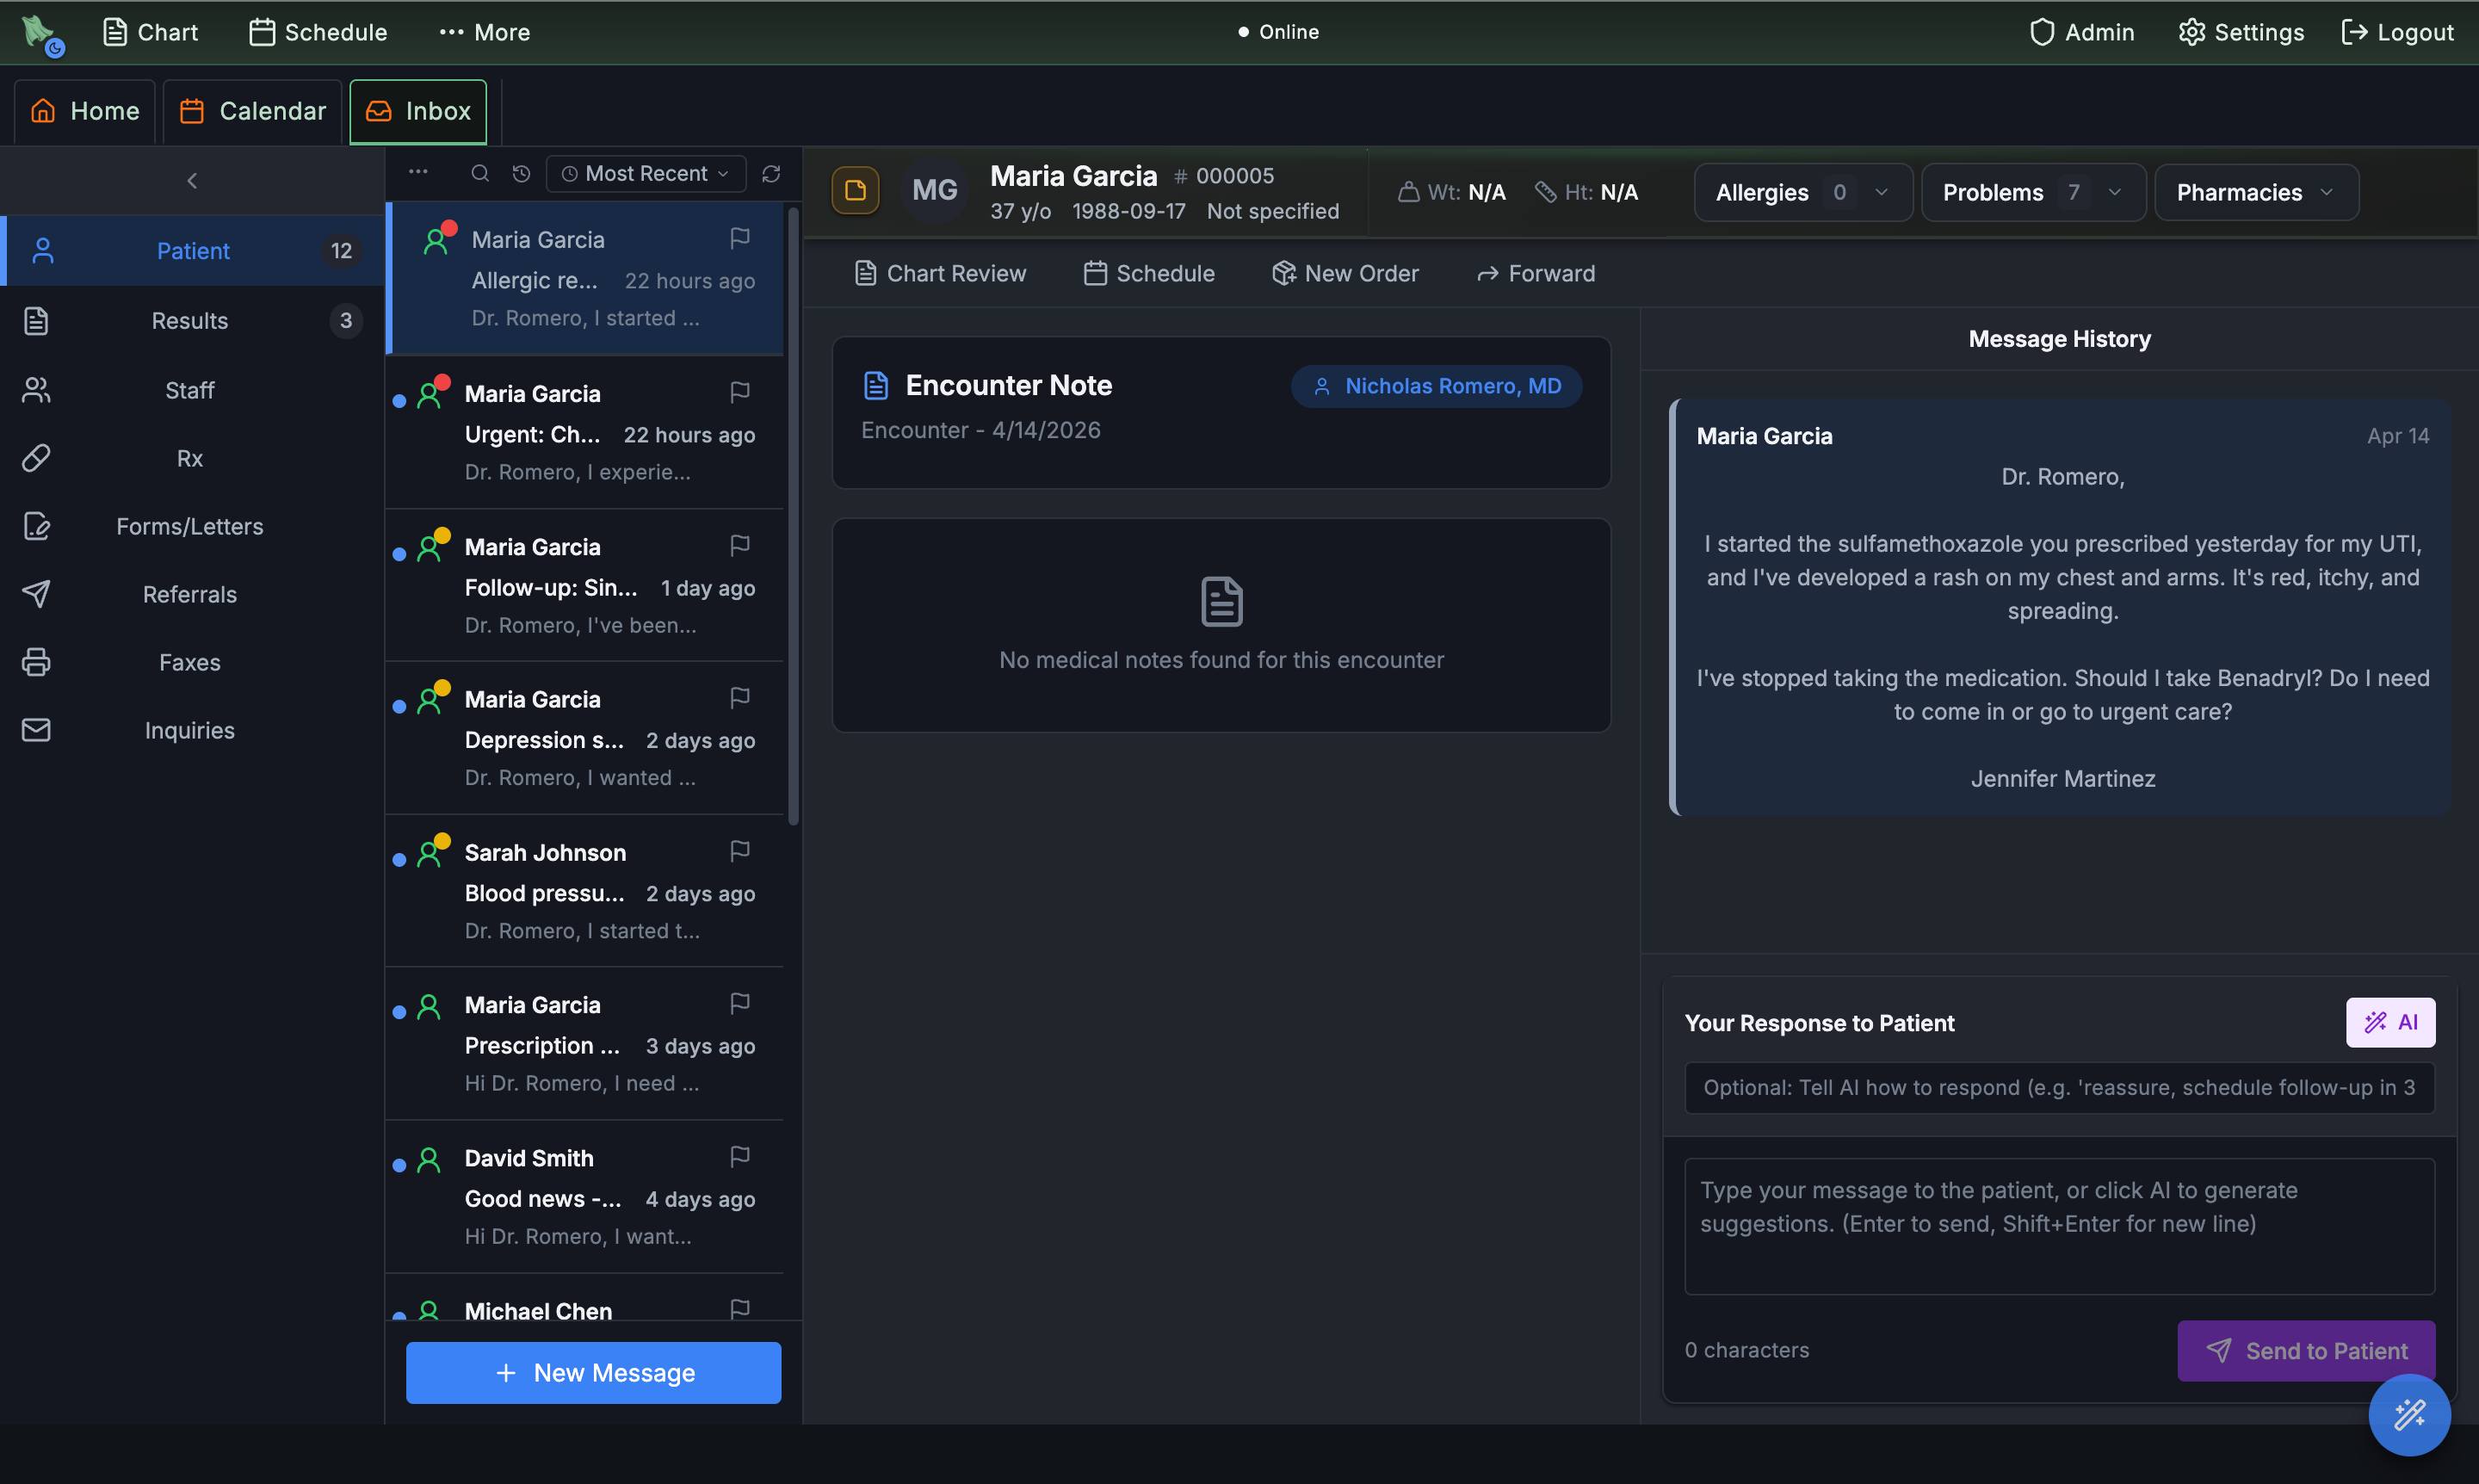
Step 4.2 SMS Open the SMS thread
Find the thread titled [SMS] Text message from Maria Garcia. Click it. You'll see the exact text you sent from your phone, attached to Maria's chart and ready for a reply.
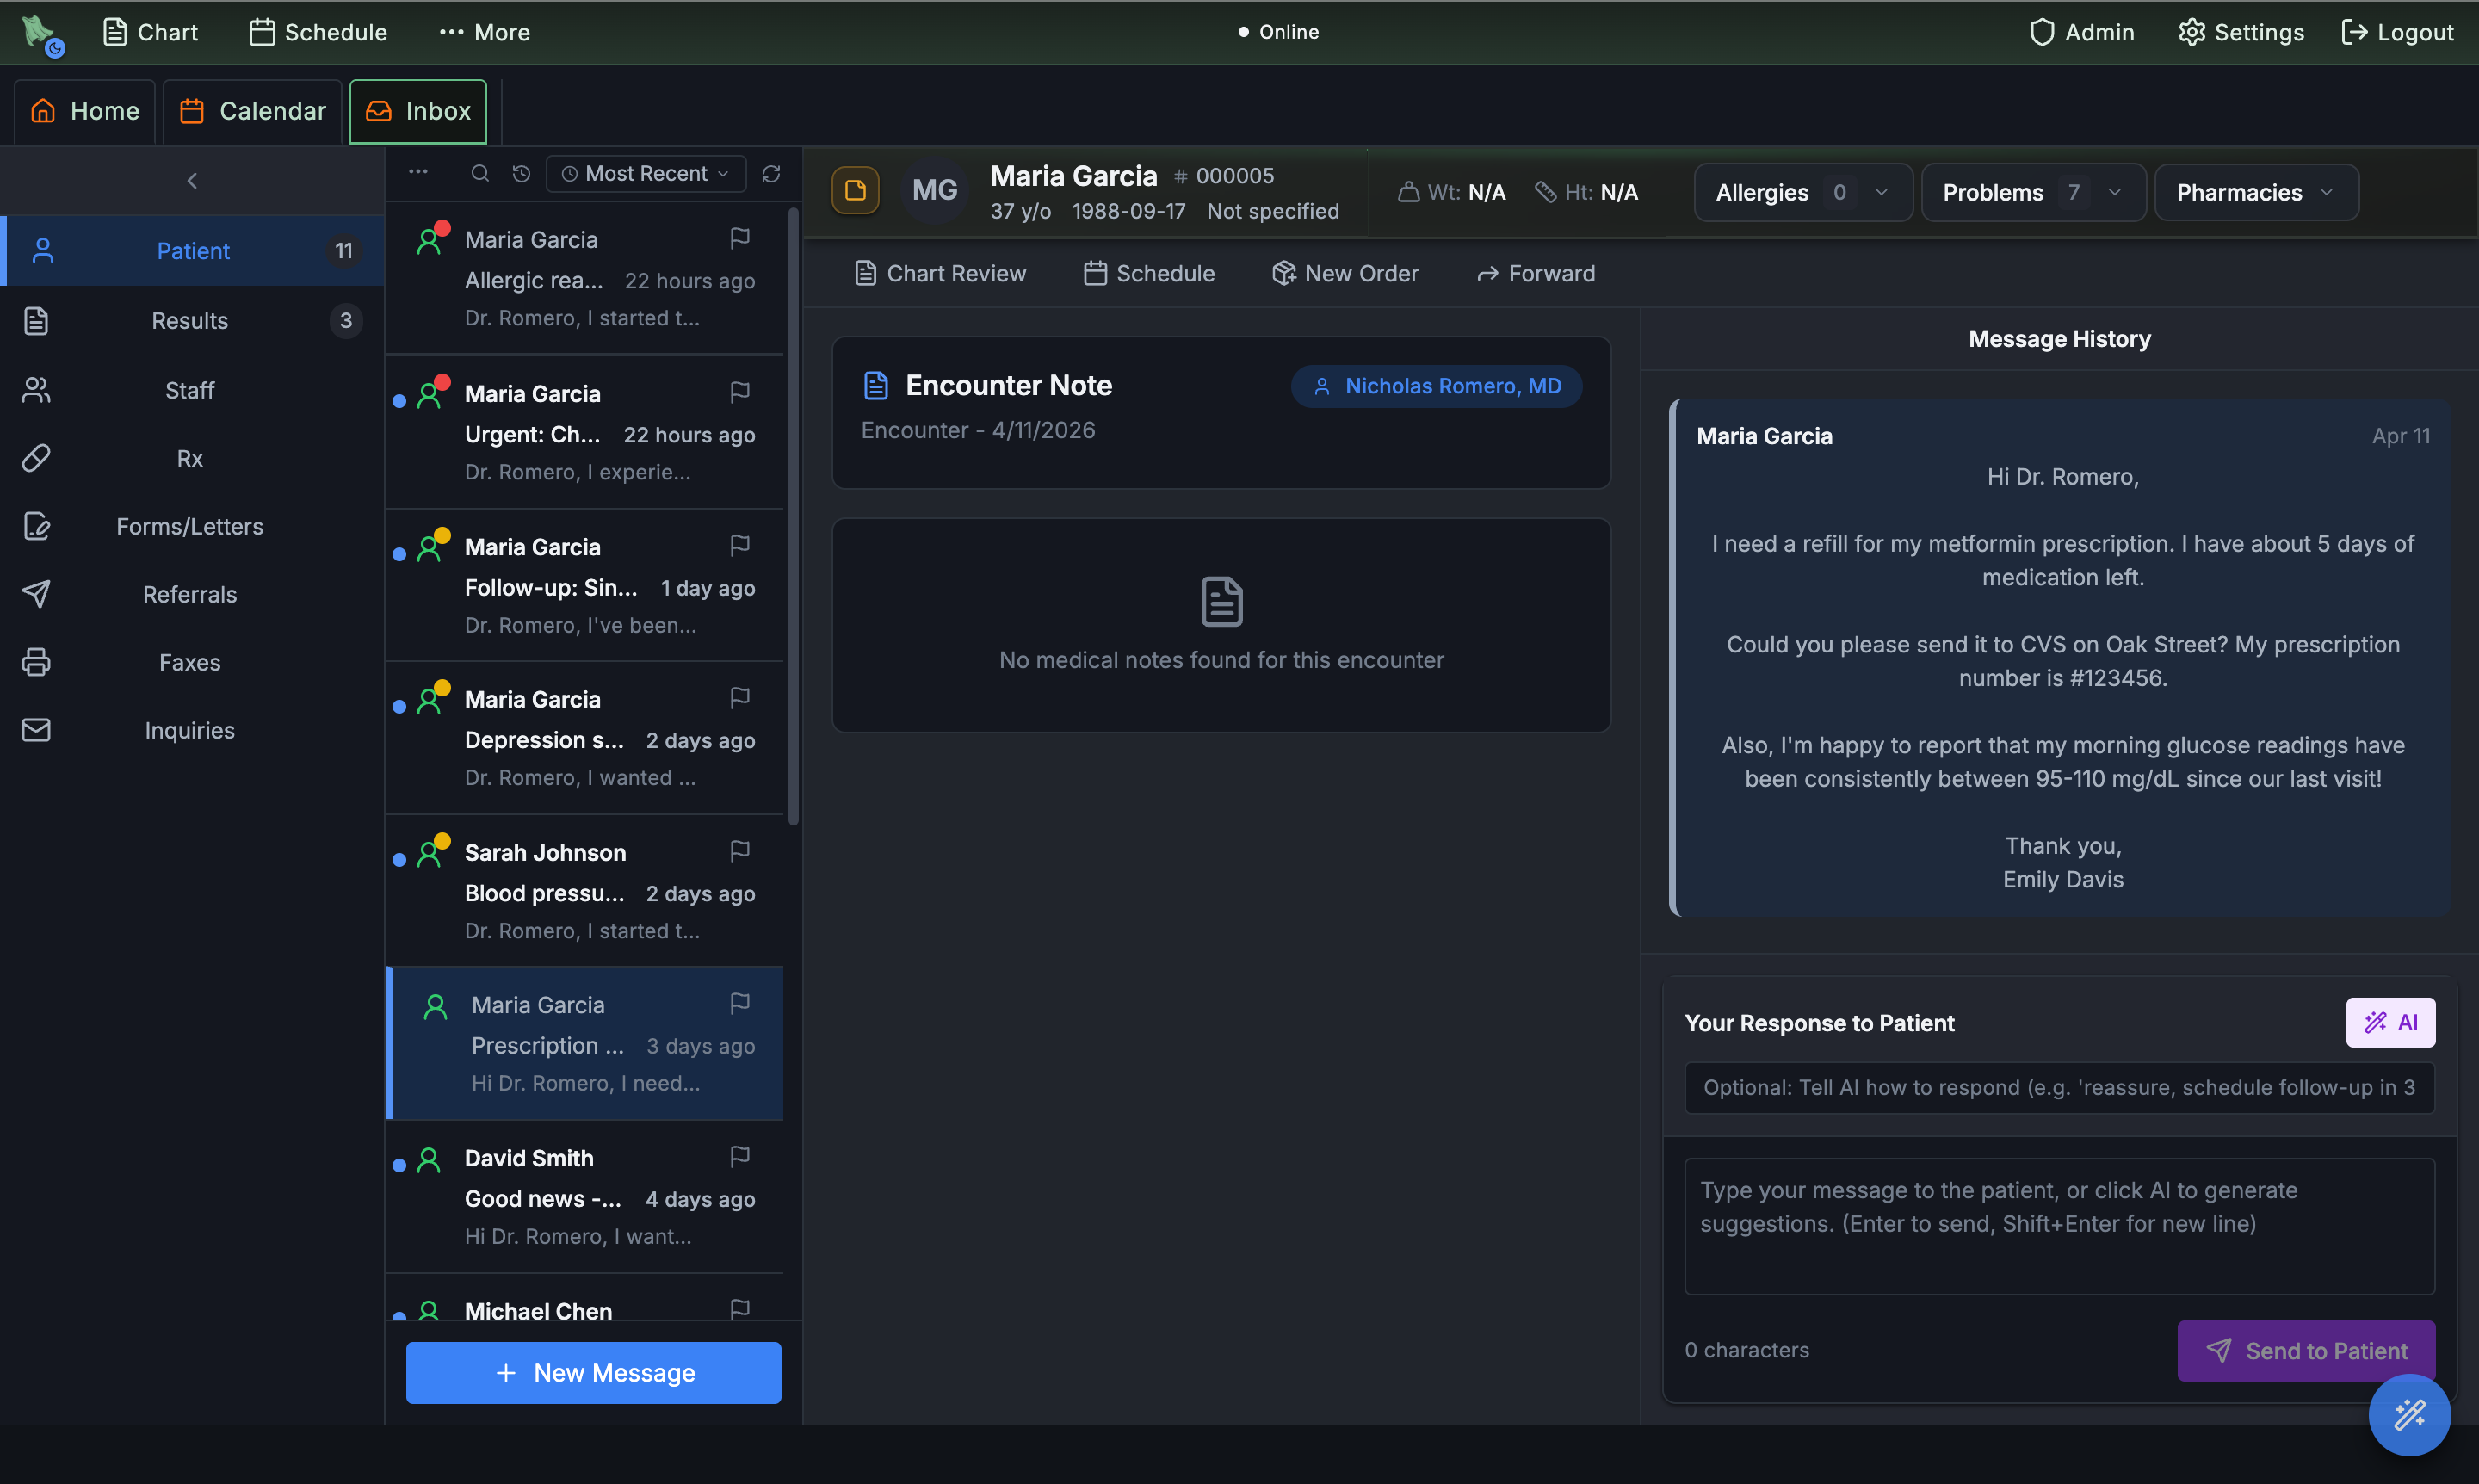
Step 4.3 Email Open the email thread
Open the thread prefixed with [Email]. Hero pulls out the subject and your message, trims the quoted reply history, and shows it alongside the thread's contact card — Maria's email. Any reply you send from here goes back out from the practice's email address.
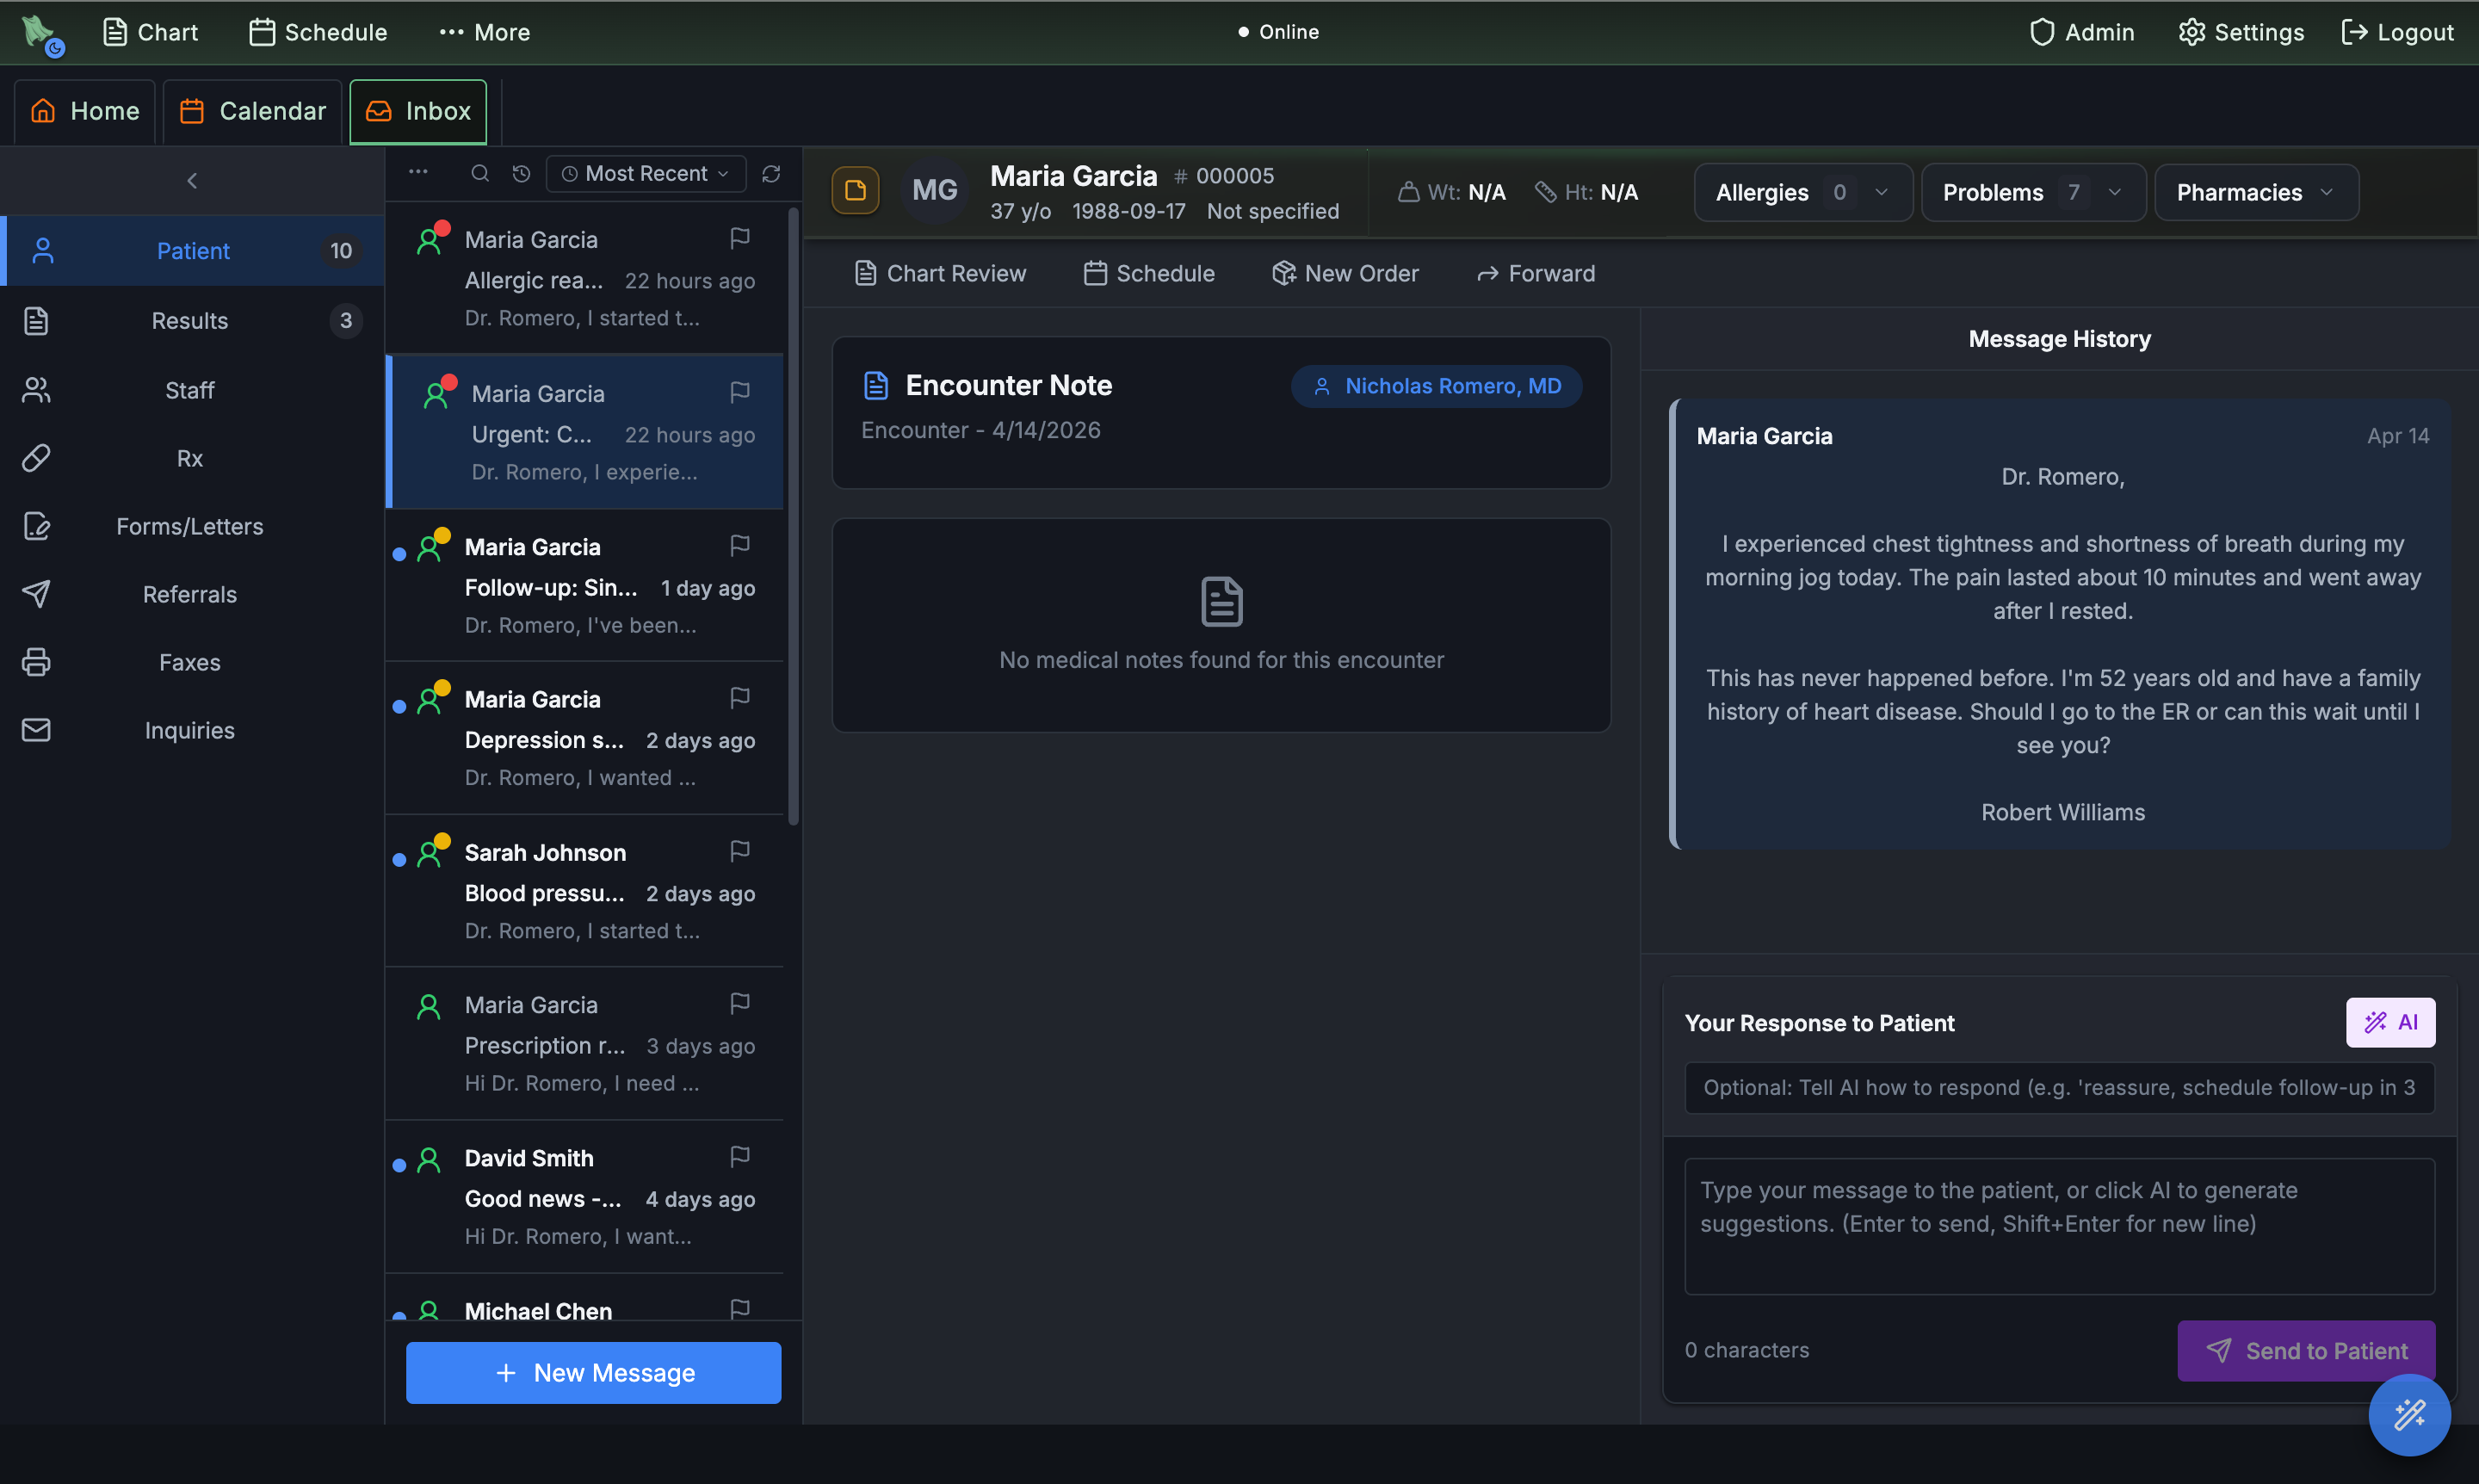
Step 4.4 Phone Open the phone-agent escalation
The phone-agent message has a subject like Phone Agent Escalation – Maria Garcia: …. Open it to see the AI-generated summary, the urgency level, and the full call transcript. You can reply by calling back, sending an SMS, or leaving a note on the chart — all from the same thread.
Step 4.5 Use the magic action button
Open a message, lab result, refill request, or phone-agent escalation and use the AI action button. Hero reads the thread, transcript, result text, and chart context, then proposes the work that should come next: follow-up tasks, patient instructions, medication refills, lab orders, imaging orders, or a return visit.
The important part is that the inbox does not become a second chart. The extracted work opens in the right review surface, so staff can approve it and let Hero create the follow-up, order, or prescription in the patient record.
Every prescription, safety check, and refill in one workflow.
Medication Hero is more than an eRx button. It keeps the medication timeline current, turns note context into structured prescription drafts, checks allergies and interactions, handles PDMP/EPCS requirements for controlled substances, and updates the medication list when the encounter is signed.
What you'll see
Six features: the patient medication timeline, in-encounter prescribing, medication autofill from the SOAP note, safety checks, PDMP/EPCS for controlled meds, and automatic medication-list cleanup after the visit.
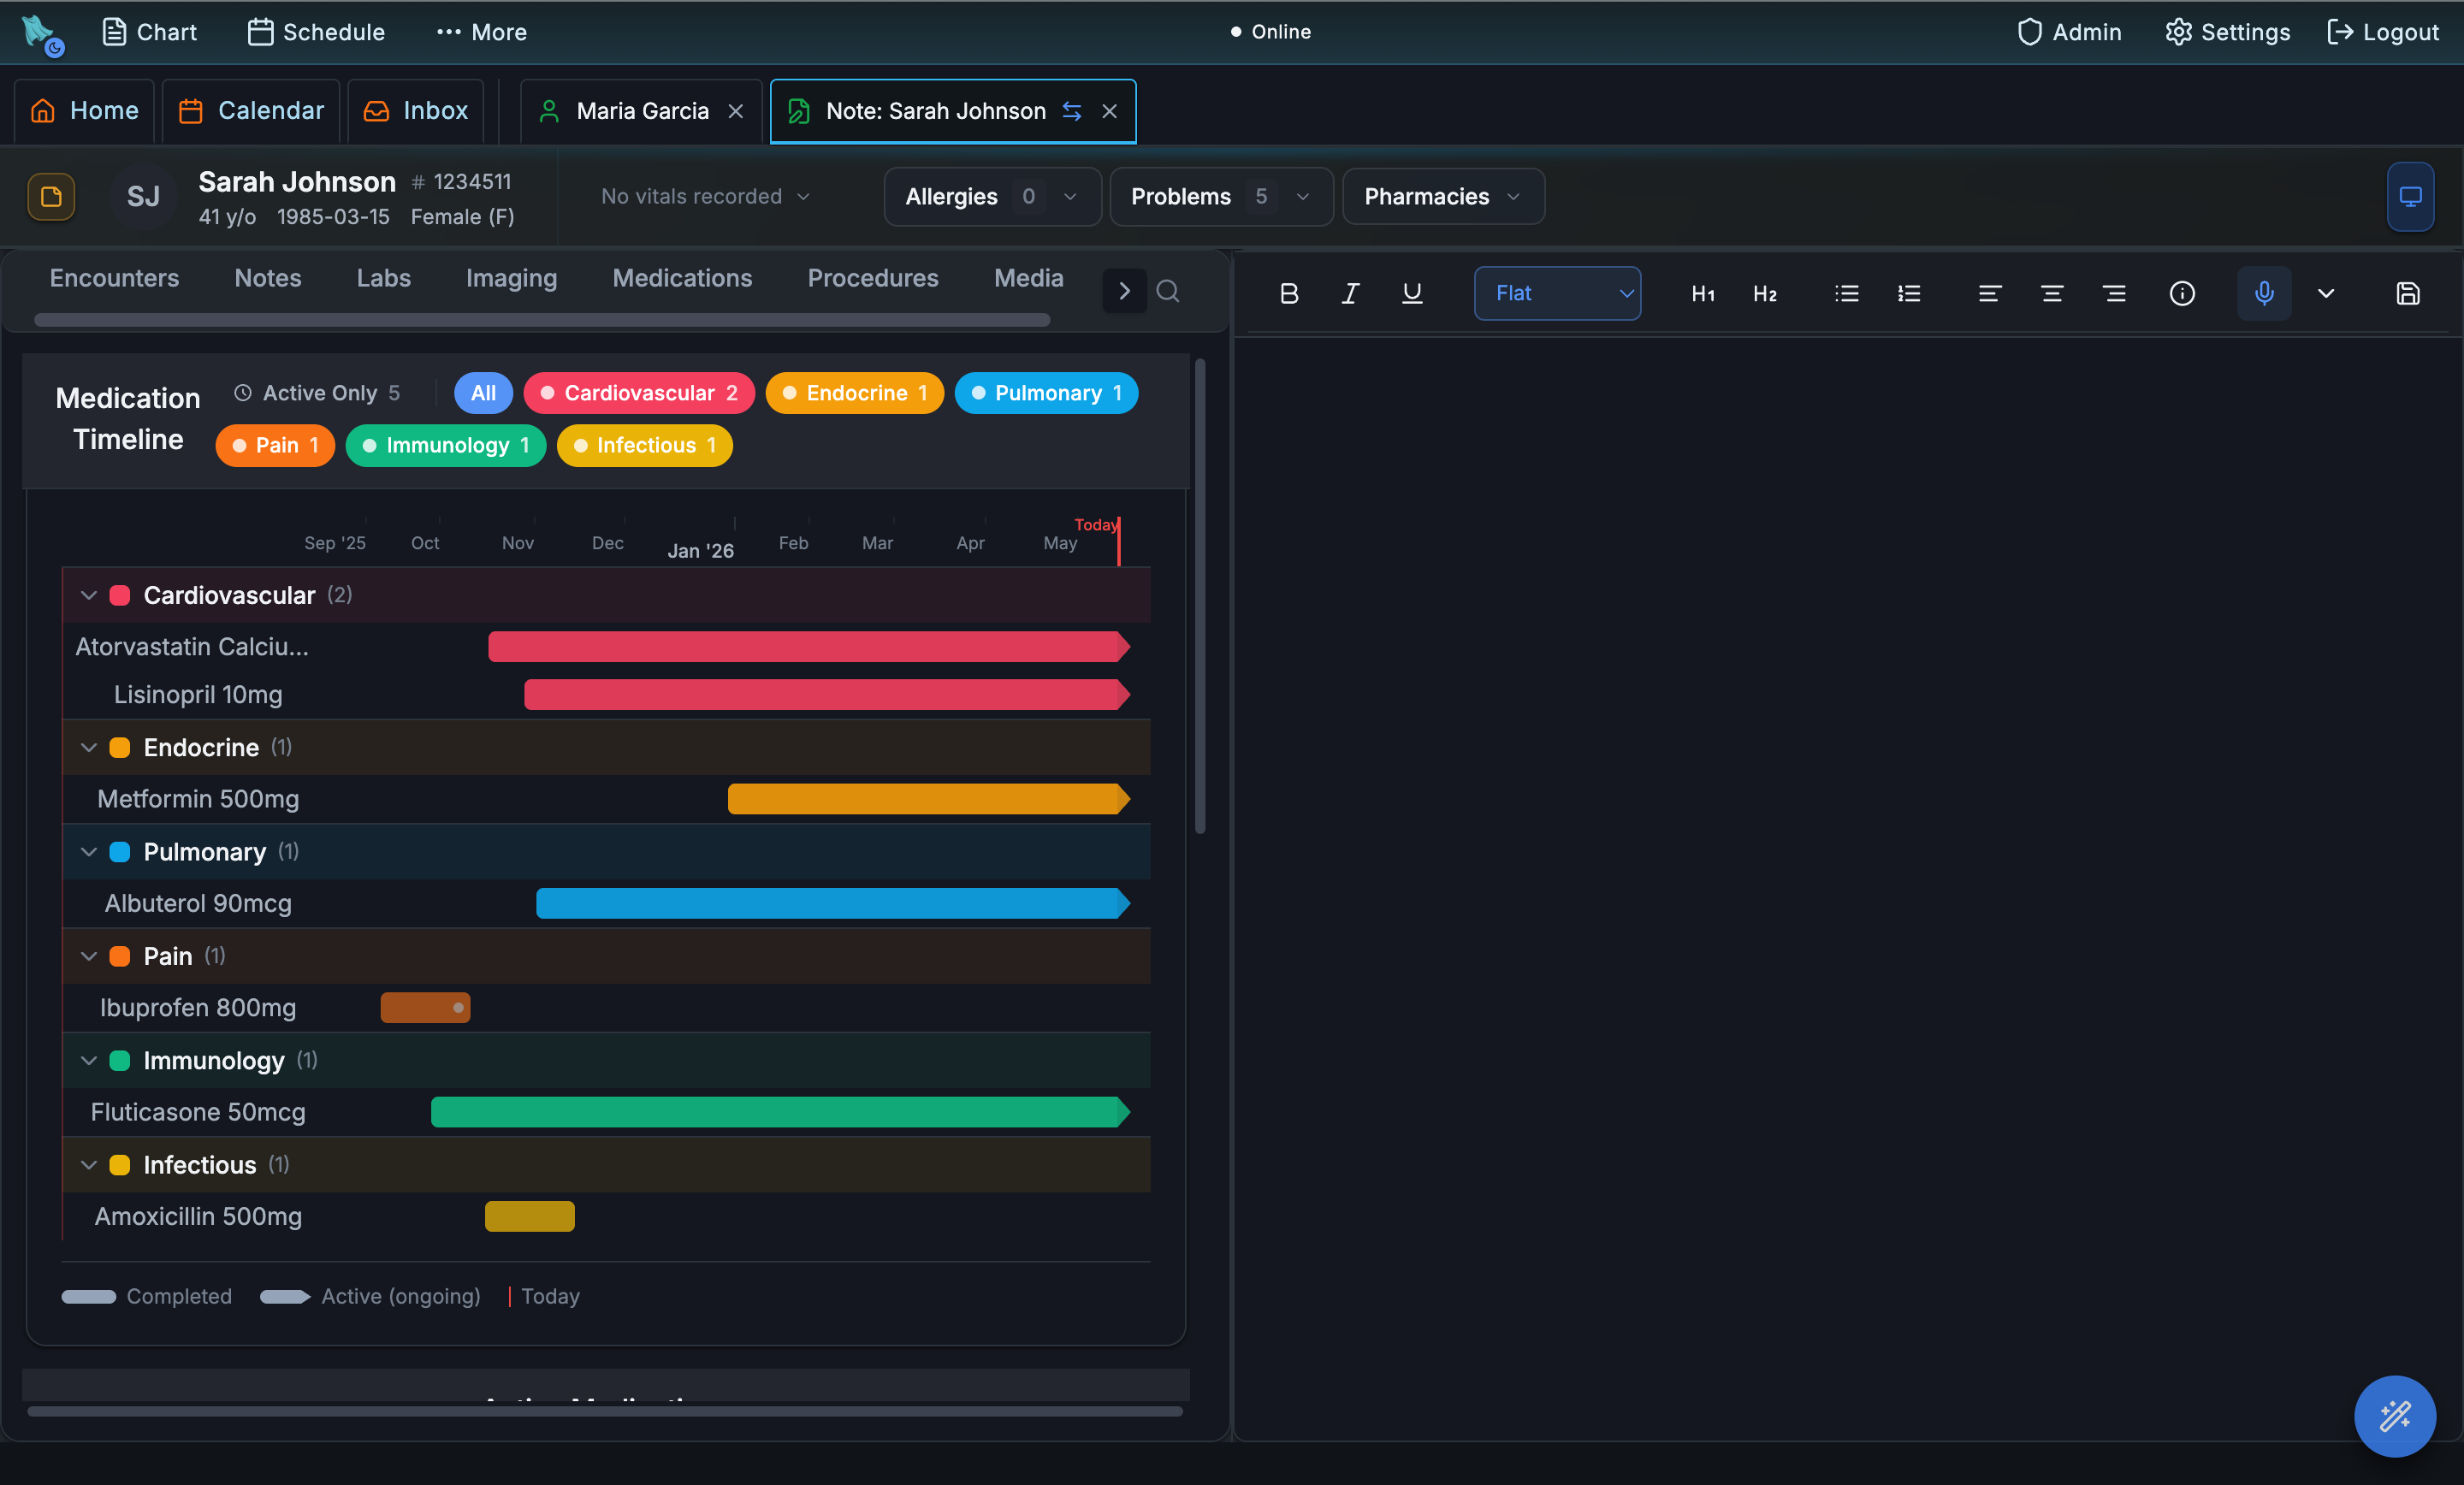
Step 1 See every medication at a glance
Open a patient's chart and click Medications. The timeline lays out every drug they've been on, grouped by body system and color-coded so you can scan it fast — heart, hormones, lungs, and more. A solid bar means the medication is still active; a faded one means it's finished.
Below the timeline, the Active Medications and Medication History lists show the dose, the instructions, and when each one was last filled.
Step 2 Add a prescription inside Encounter Completion
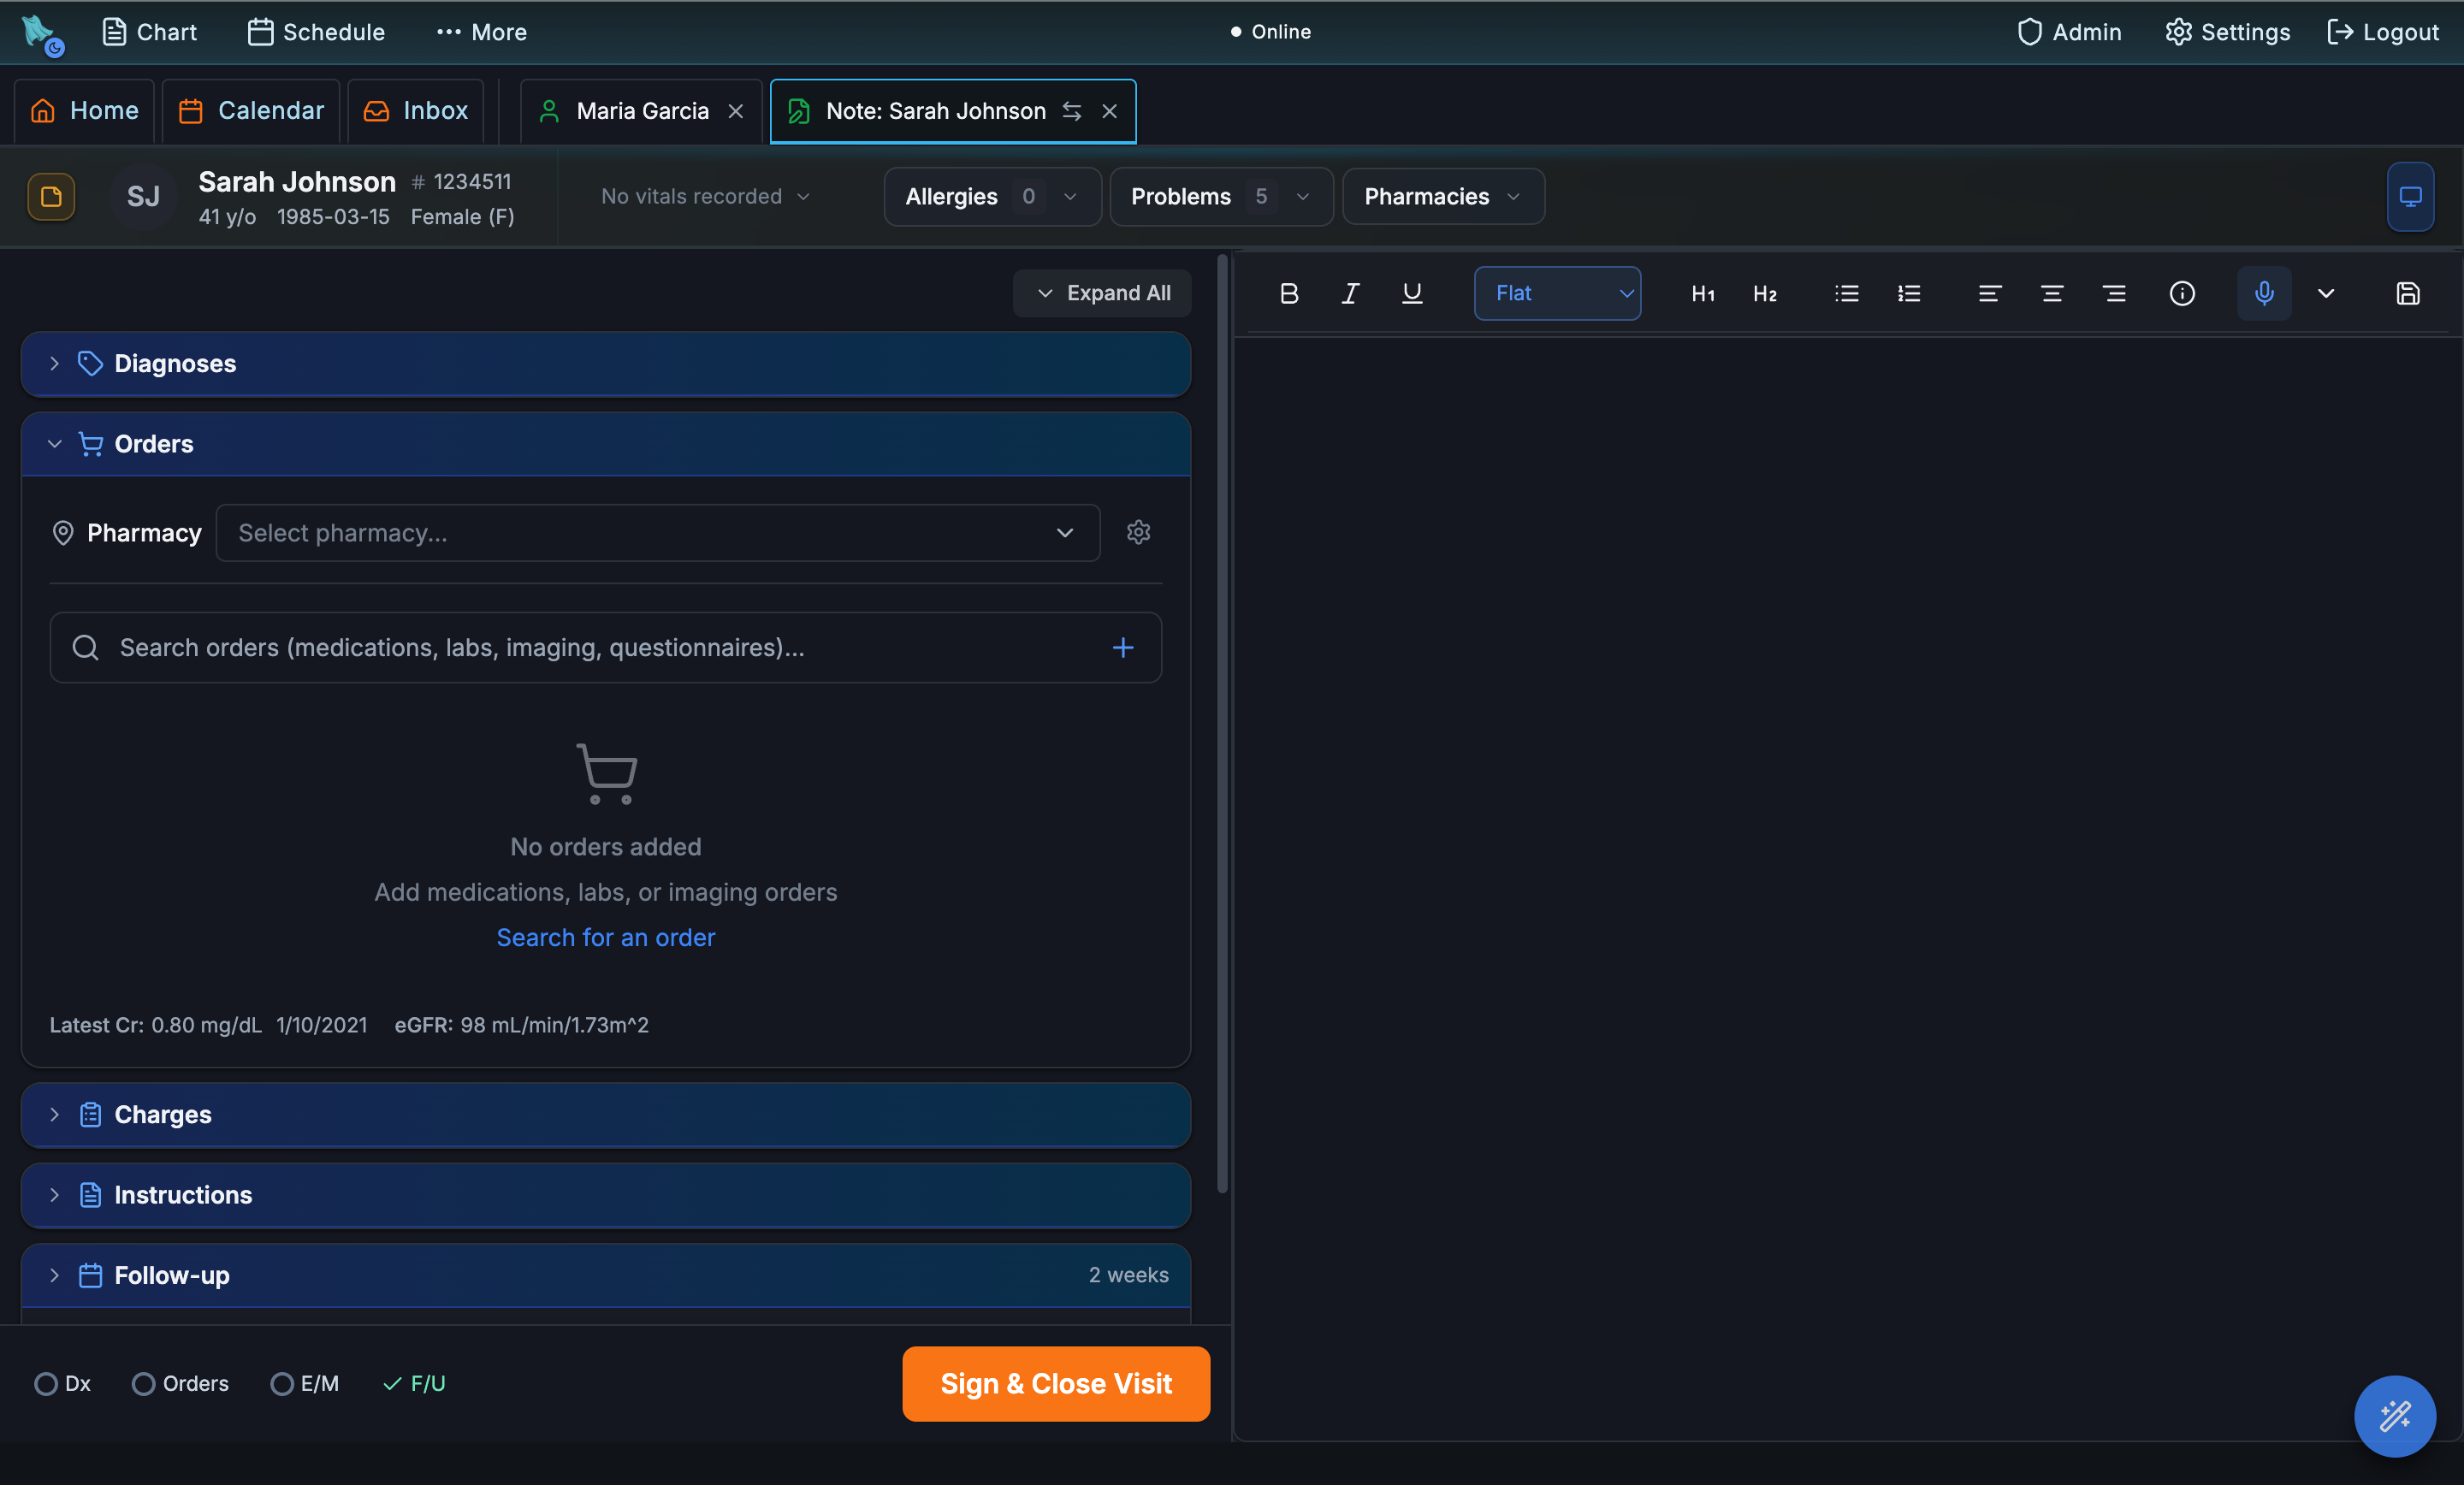
While you're with a patient, begin their encounter and open Encounter Completion → Orders. Pick the patient's pharmacy, then search for a medication — the same search surface also handles labs and imaging.
Hero keeps clinical context on the screen while you prescribe: the selected pharmacy, the latest kidney function, the active medication list, allergies, and the order draft all stay together so dosing decisions are not made in a separate tab.
Step 3 Let Hero autofill the prescription
If the note already says what you want, use the autofill action in the prescription editor. Hero reads the SOAP note and encounter context, then fills the structured sig: dose, route, frequency, duration, dispense quantity, refills, PRN details, substitution settings, and notes to pharmacy.
You can also start from a plain-English instruction. For example, type the patient has pharyngitis, please prescribe Augmentin in the note or command flow; Hero turns it into plan text and a review-ready medication draft instead of leaving the instruction buried in the note.
Step 4 Review medication safety before sending
Every new medication is checked against the patient's allergies, current meds, and key chart context. Hero surfaces drug warnings in the draft, keeps the latest renal function visible for dosing decisions, and requires explicit review before severe interactions are sent.
The system analyzes new or AI-added medications and saves the warnings back to the encounter draft, so the same order does not need to be re-checked from scratch every time you reopen the visit.
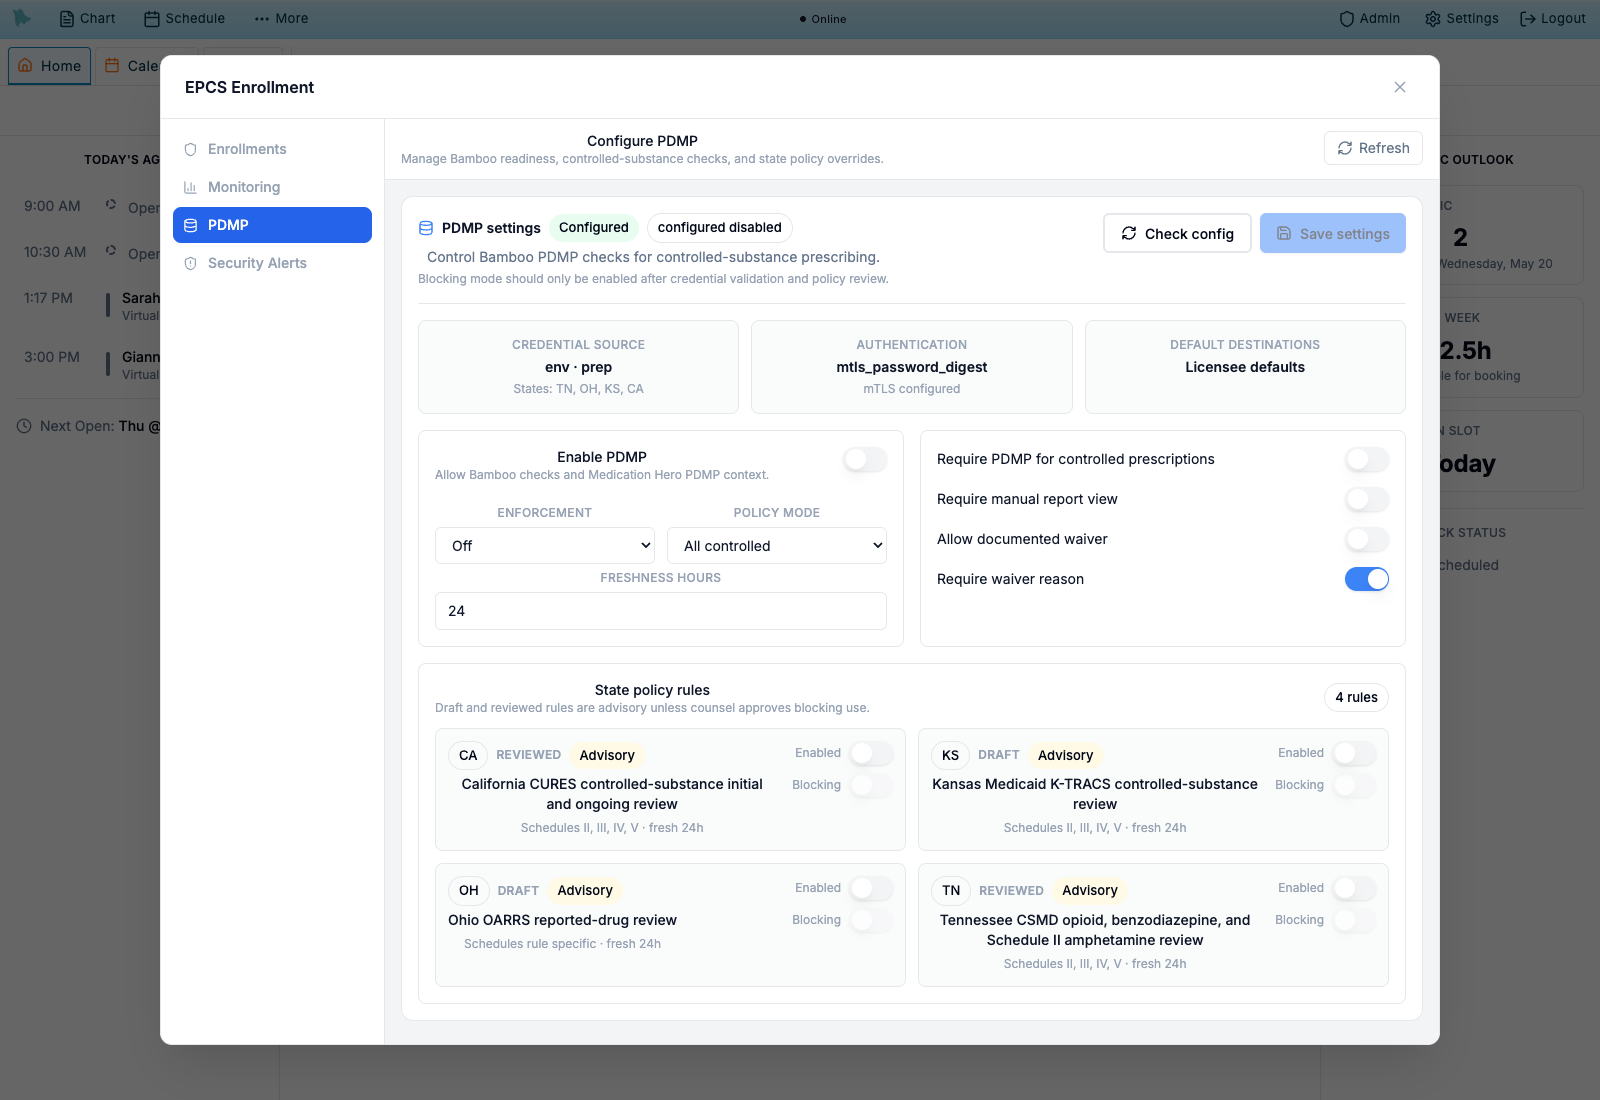
Step 5 Use PDMP and EPCS for controlled medications
When a medication is controlled, Hero changes the workflow automatically. The draft shows the DEA schedule, requires a valid medication identity and structured sig, and prompts the prescriber to run or review the PDMP check before signing.
For EPCS, Sign & Send opens the controlled-substance signing flow: PDMP status, prescriber/DEA details, passkey or mobile approval, and the legal signing attestation all stay in one modal.
Step 6 Keep the medication list clean after signing
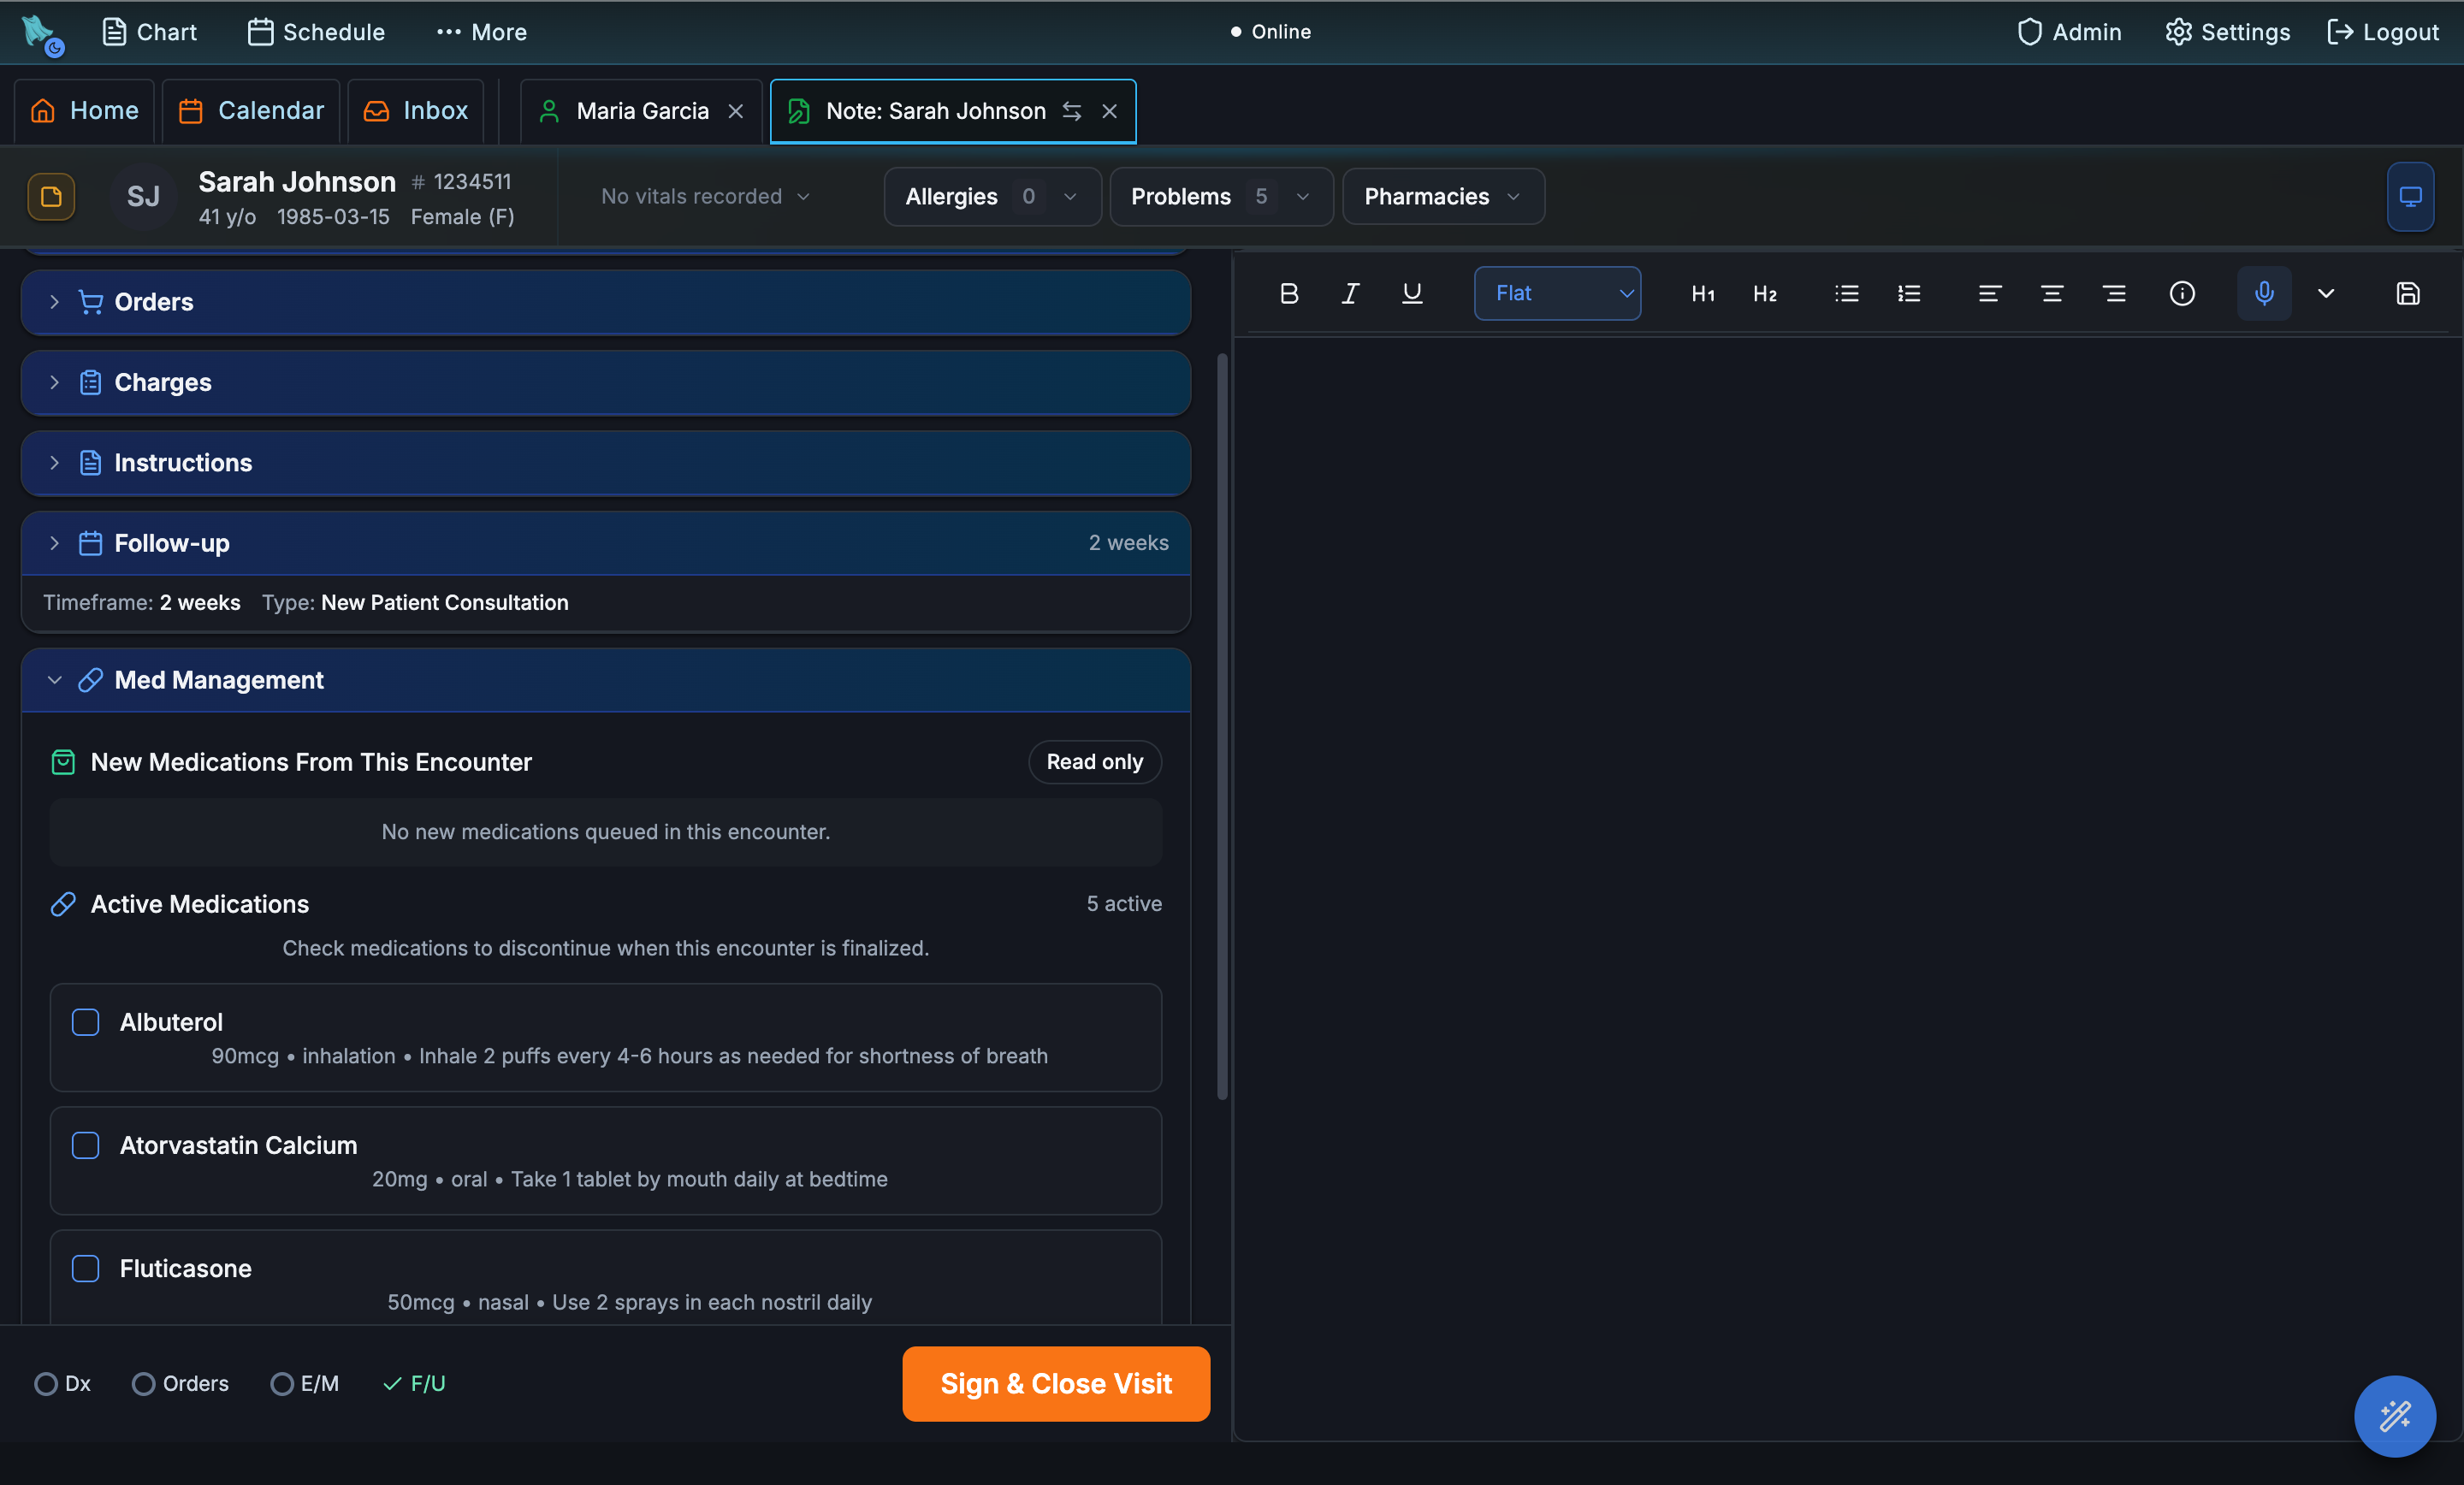
The Med Management panel shows medications added in this visit alongside everything the patient is already taking. To stop an old medication, check it off; Hero discontinues it when you finish the visit.
When the encounter is signed, the prescriptions you reviewed become real prescription records and flow into the patient's medication list and timeline. Later pharmacy refill requests land in the inbox, tied back to the same patient chart.
Ambient documentation that closes the encounter.
Note Hero is not a basic dictation pad. It listens ambiently, reads relevant chart history, drafts in your preferred style, expands dotphrases and patient-data shortcuts, and turns the finished note into diagnoses, orders, follow-up, instructions, and billing suggestions for review.
What you'll see
Seven features: ambient scribing, old-note context, prompt and template customization, dotphrases, F2 fields and dropdowns, typed clinical instructions, and encounter completion.
Step 1 Start Ambient Scribe
Begin a patient's encounter and open the note writer beside the chart. Tap the recorder at the start of the visit; Hero listens to the patient conversation, then moves through recording, transcription, and note generation without making you dictate a polished paragraph.
For telehealth visits, the recorder can be configured for virtual-visit audio so the note can include both microphone and system audio. The goal is the same in person or remote: capture the encounter while you focus on the patient.
Step 2 Let the note read the chart first
For follow-ups, Hero can bring in the last signed note before drafting today's SOAP note. You can also choose problem-focused or exploratory context so the scribe searches prior encounters and problem-list history for the relevant background.
That same context is available inside the editor. Type .hero summarize patient history, .hero list medication compliance issues, or another plain-English question and Hero answers from the chart instead of writing from memory.
Step 3 Customize the prompt and template style
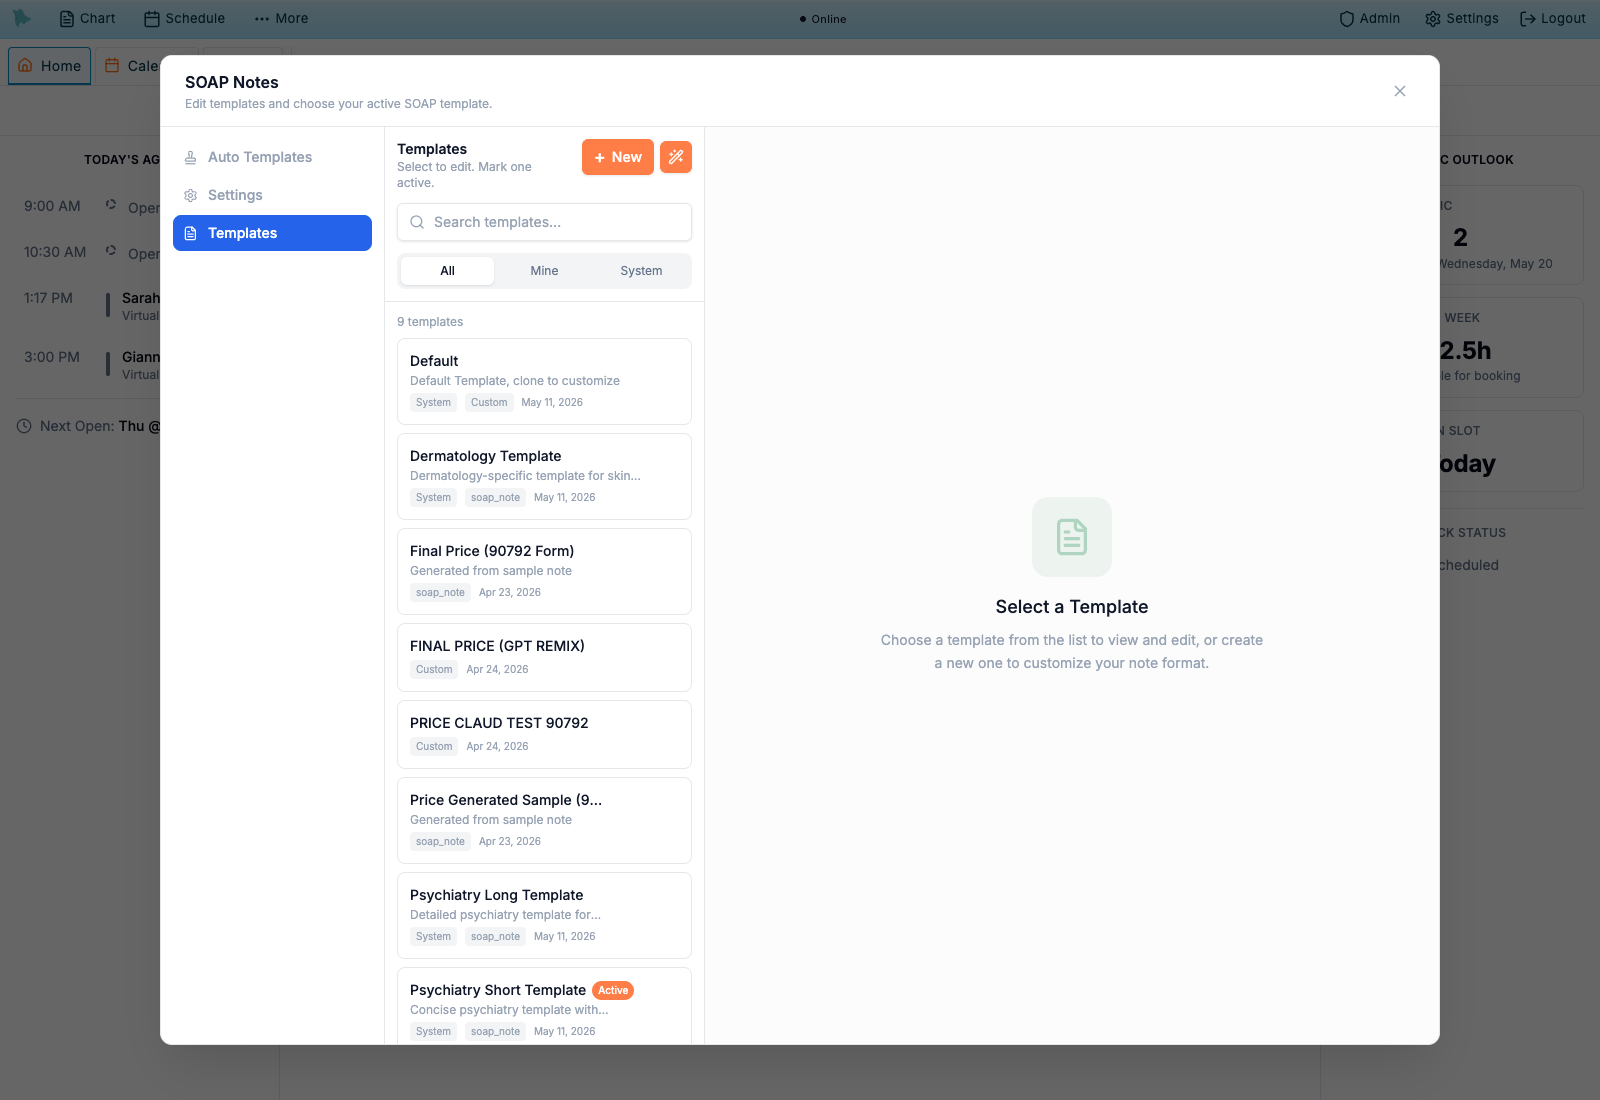
Open the Note Writer customization flow when you want the AI to sound more like you. Paste a sample SOAP note or answer the style questions, and Hero builds a custom template around your preferred section order, wording, and level of detail.
Templates can also carry their own advanced AI prompt and can be tied to visit types, so a new-patient visit, acute sore throat, and chronic follow-up do not need to start from the same blank note.
Step 4 Use dotphrases and patient-data shortcuts
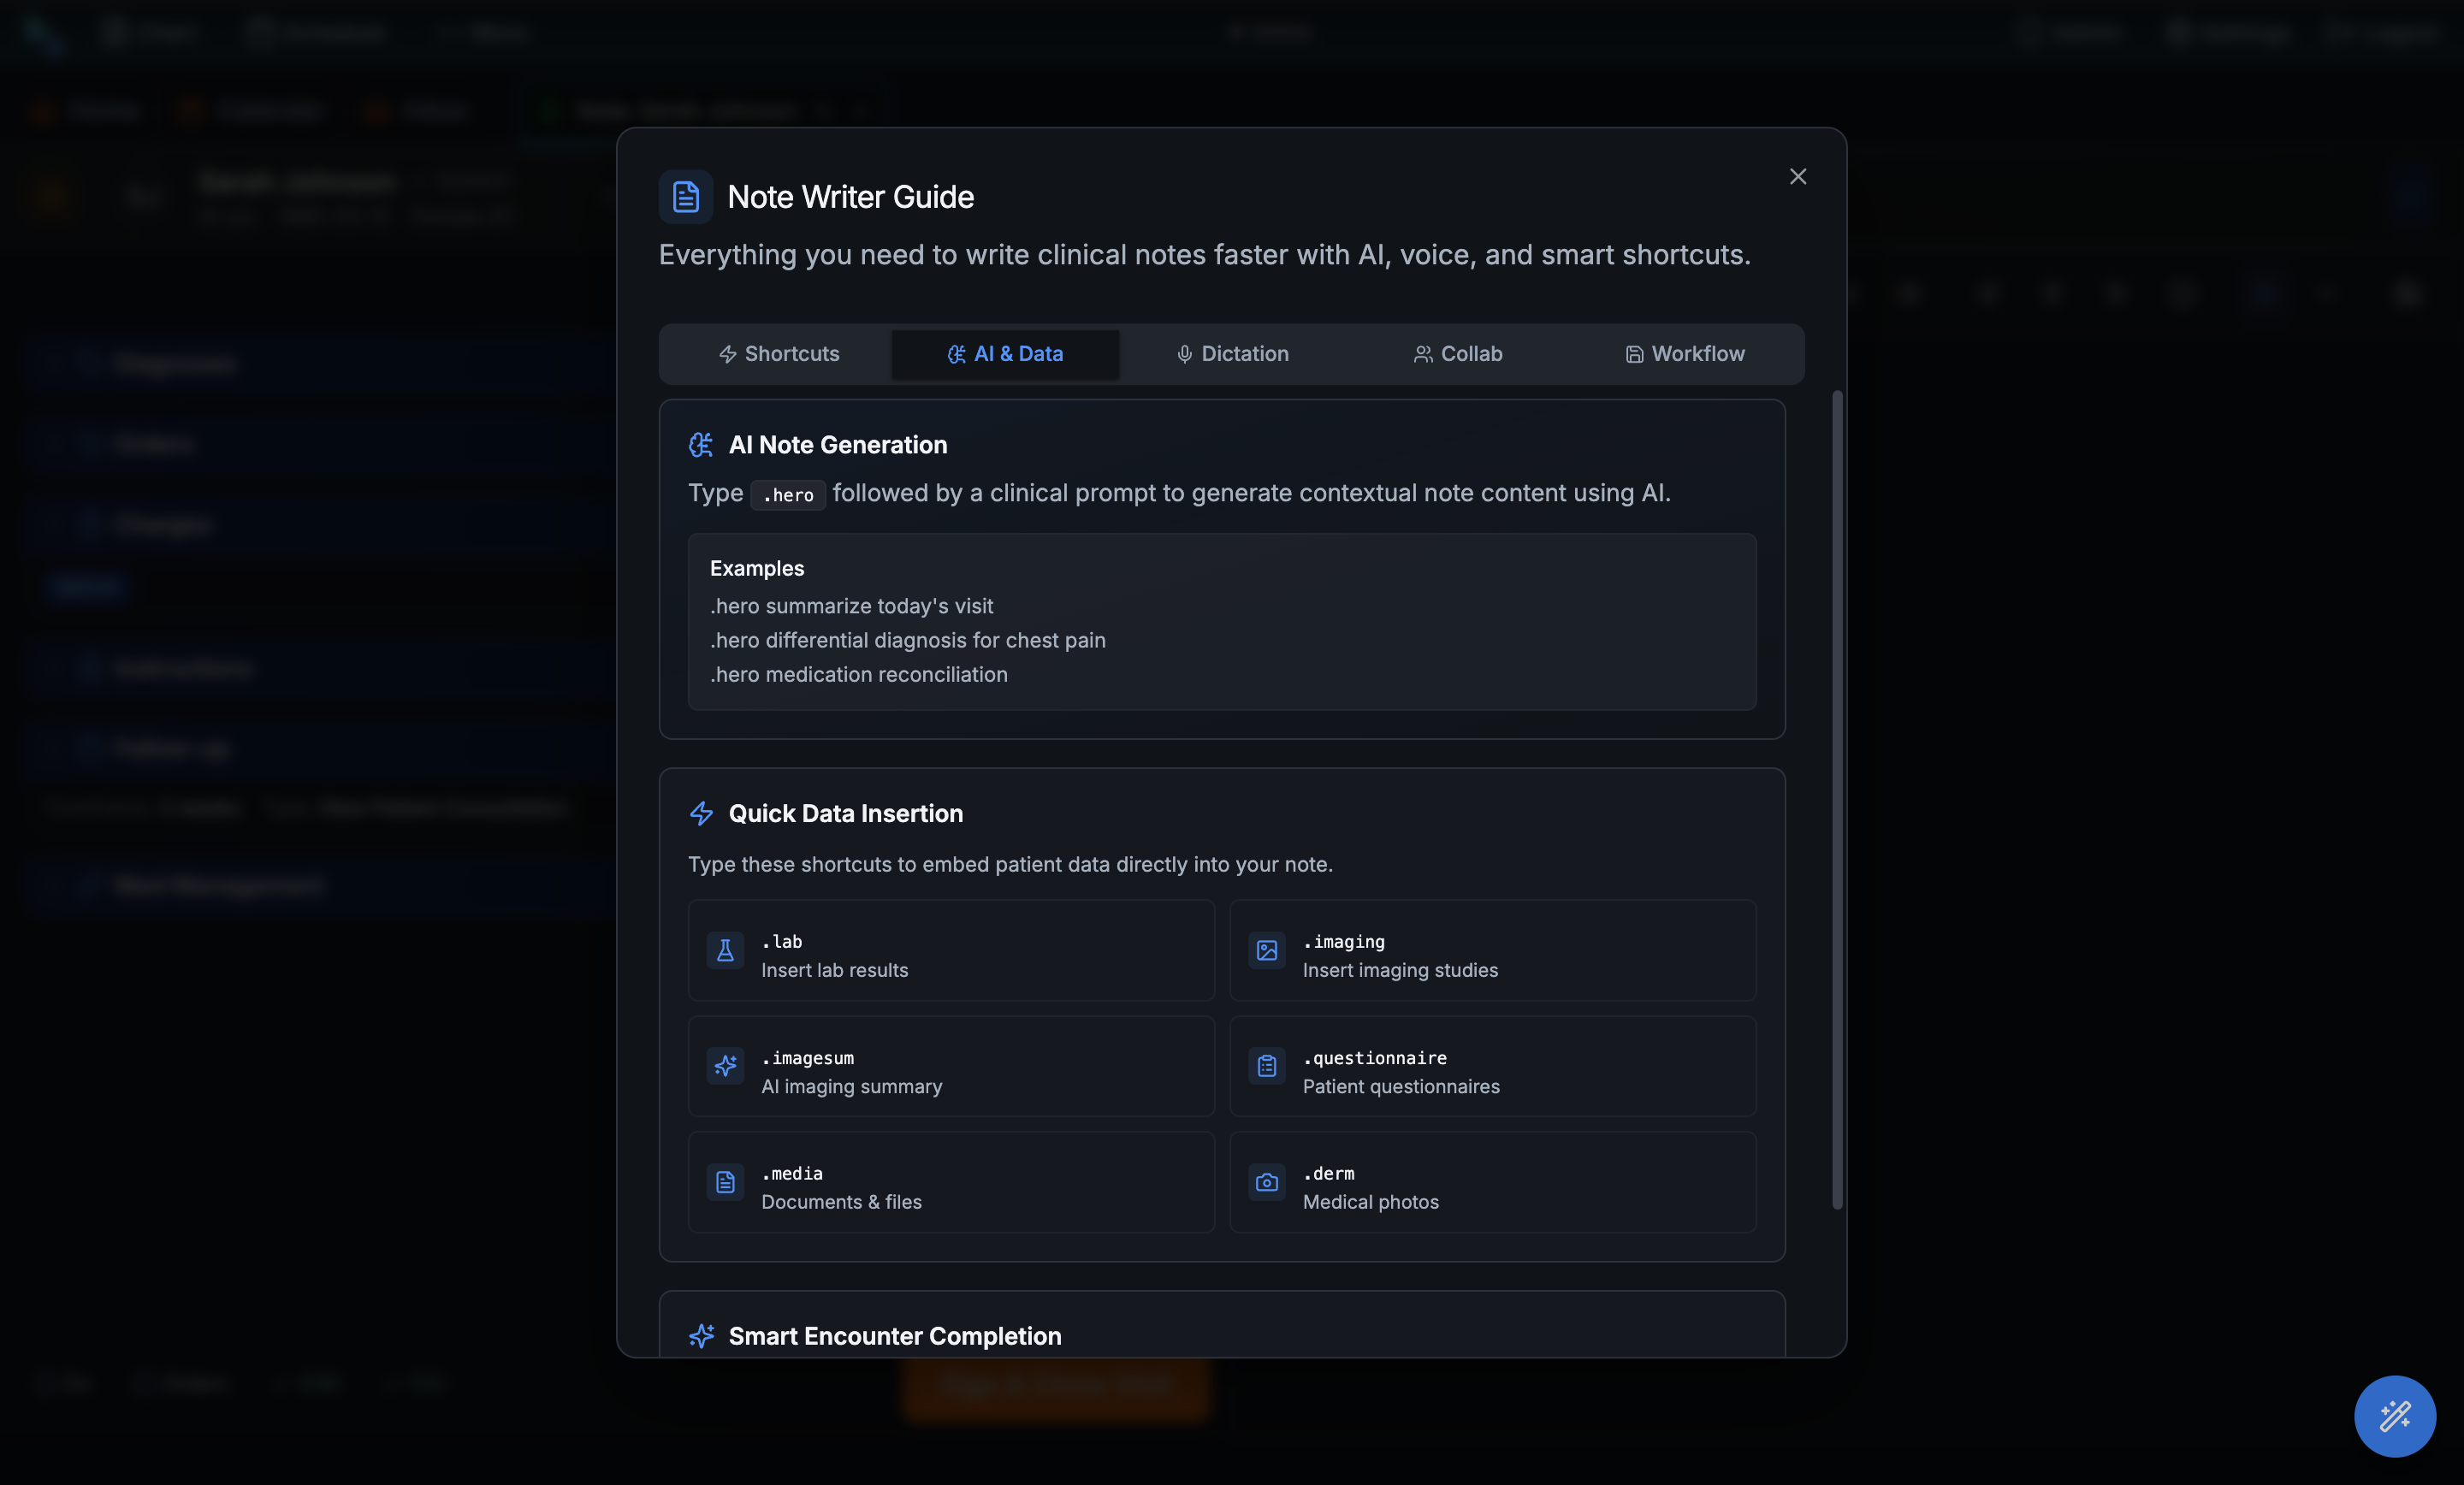
Type a period and a shortcut to insert reusable clinical text. Your everyday snippets can sit next to Hero's data shortcuts: .lab inserts lab results, .imaging pulls imaging summaries, .questionnaire brings in patient answers, and .media can reference uploaded documents or images.
.hero is the AI dotphrase. It opens a guided prompt picker with favorite and recent questions, or you can type your own request about the current patient.
Step 5 Move through blanks and dropdowns with F2
Templates are not static text blocks. Add *** anywhere you want a free-text blank, and add dropdowns with syntax like {{Strep positive|Strep negative|Not tested}}. Press F2 to jump to the next field and Shift + F2 to go back.
This is how Note Hero stays fast for structured visits: the scribe drafts the note, and the clinician quickly confirms the few fields that need a choice.
Step 6 Turn a typed instruction into encounter work
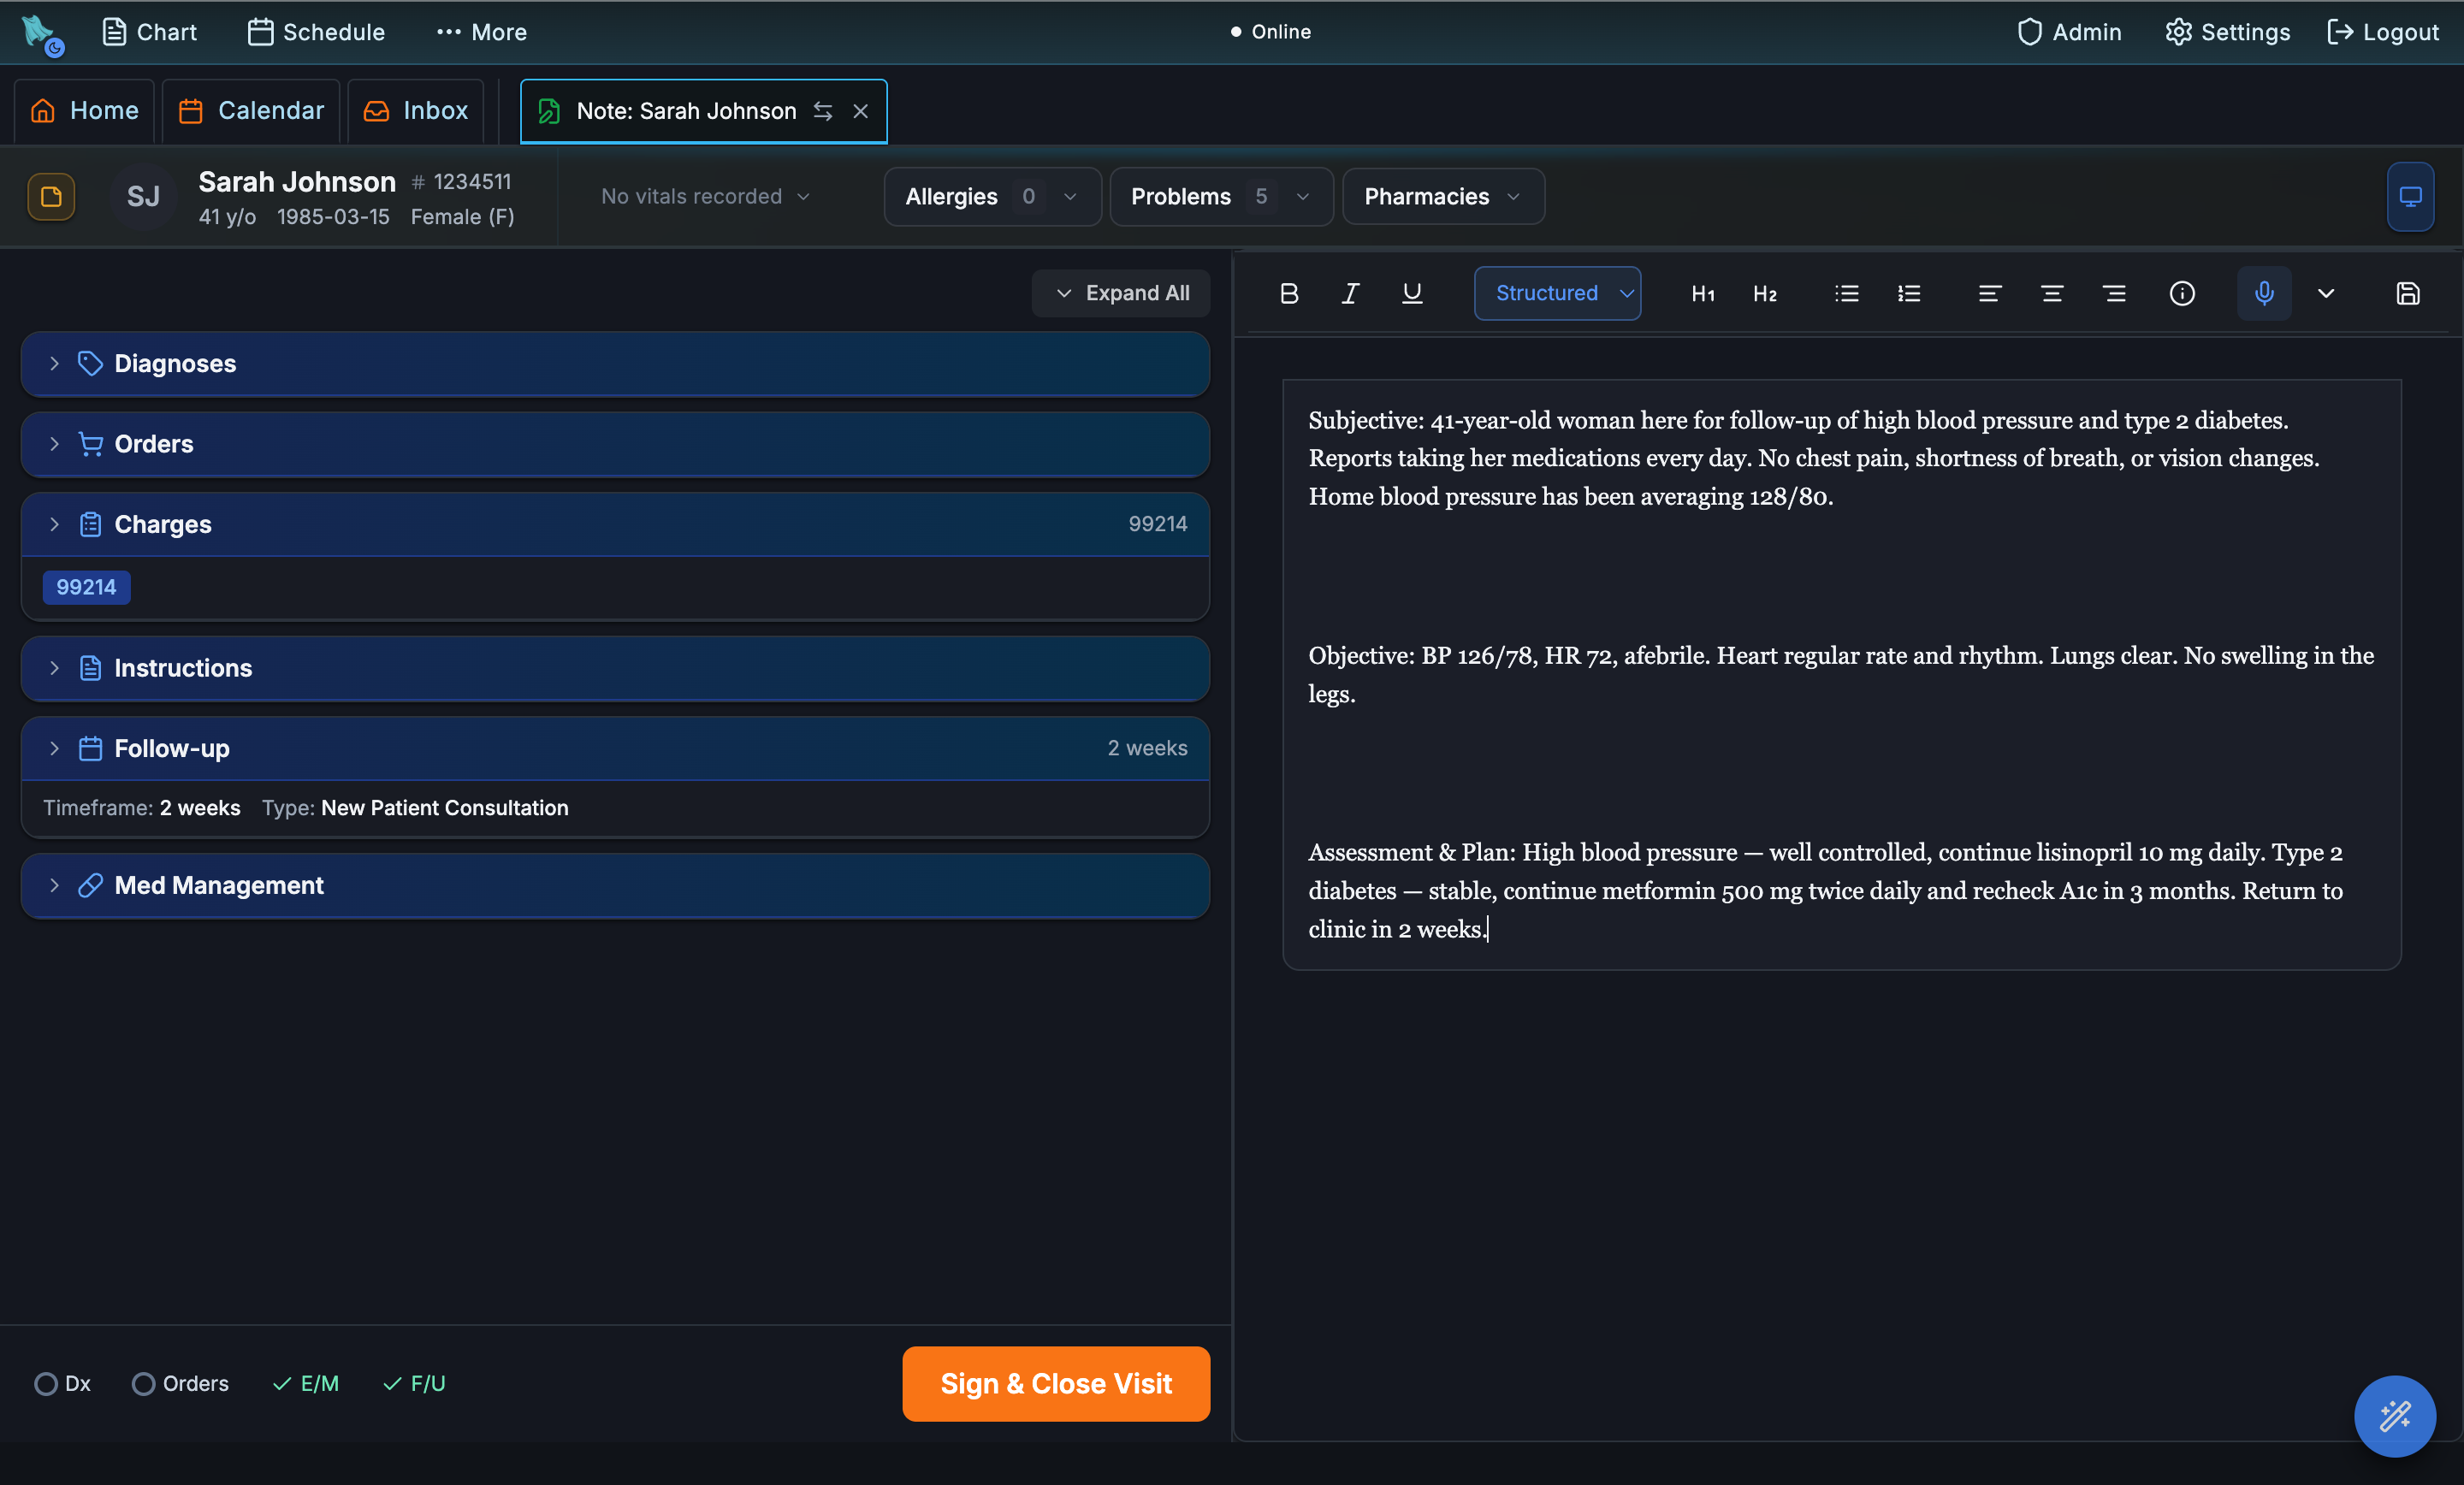
Try a plain clinical instruction such as the patient has pharyngitis, please prescribe Augmentin. Hero can turn that into plan language and a pre-populated medication draft for physician review.
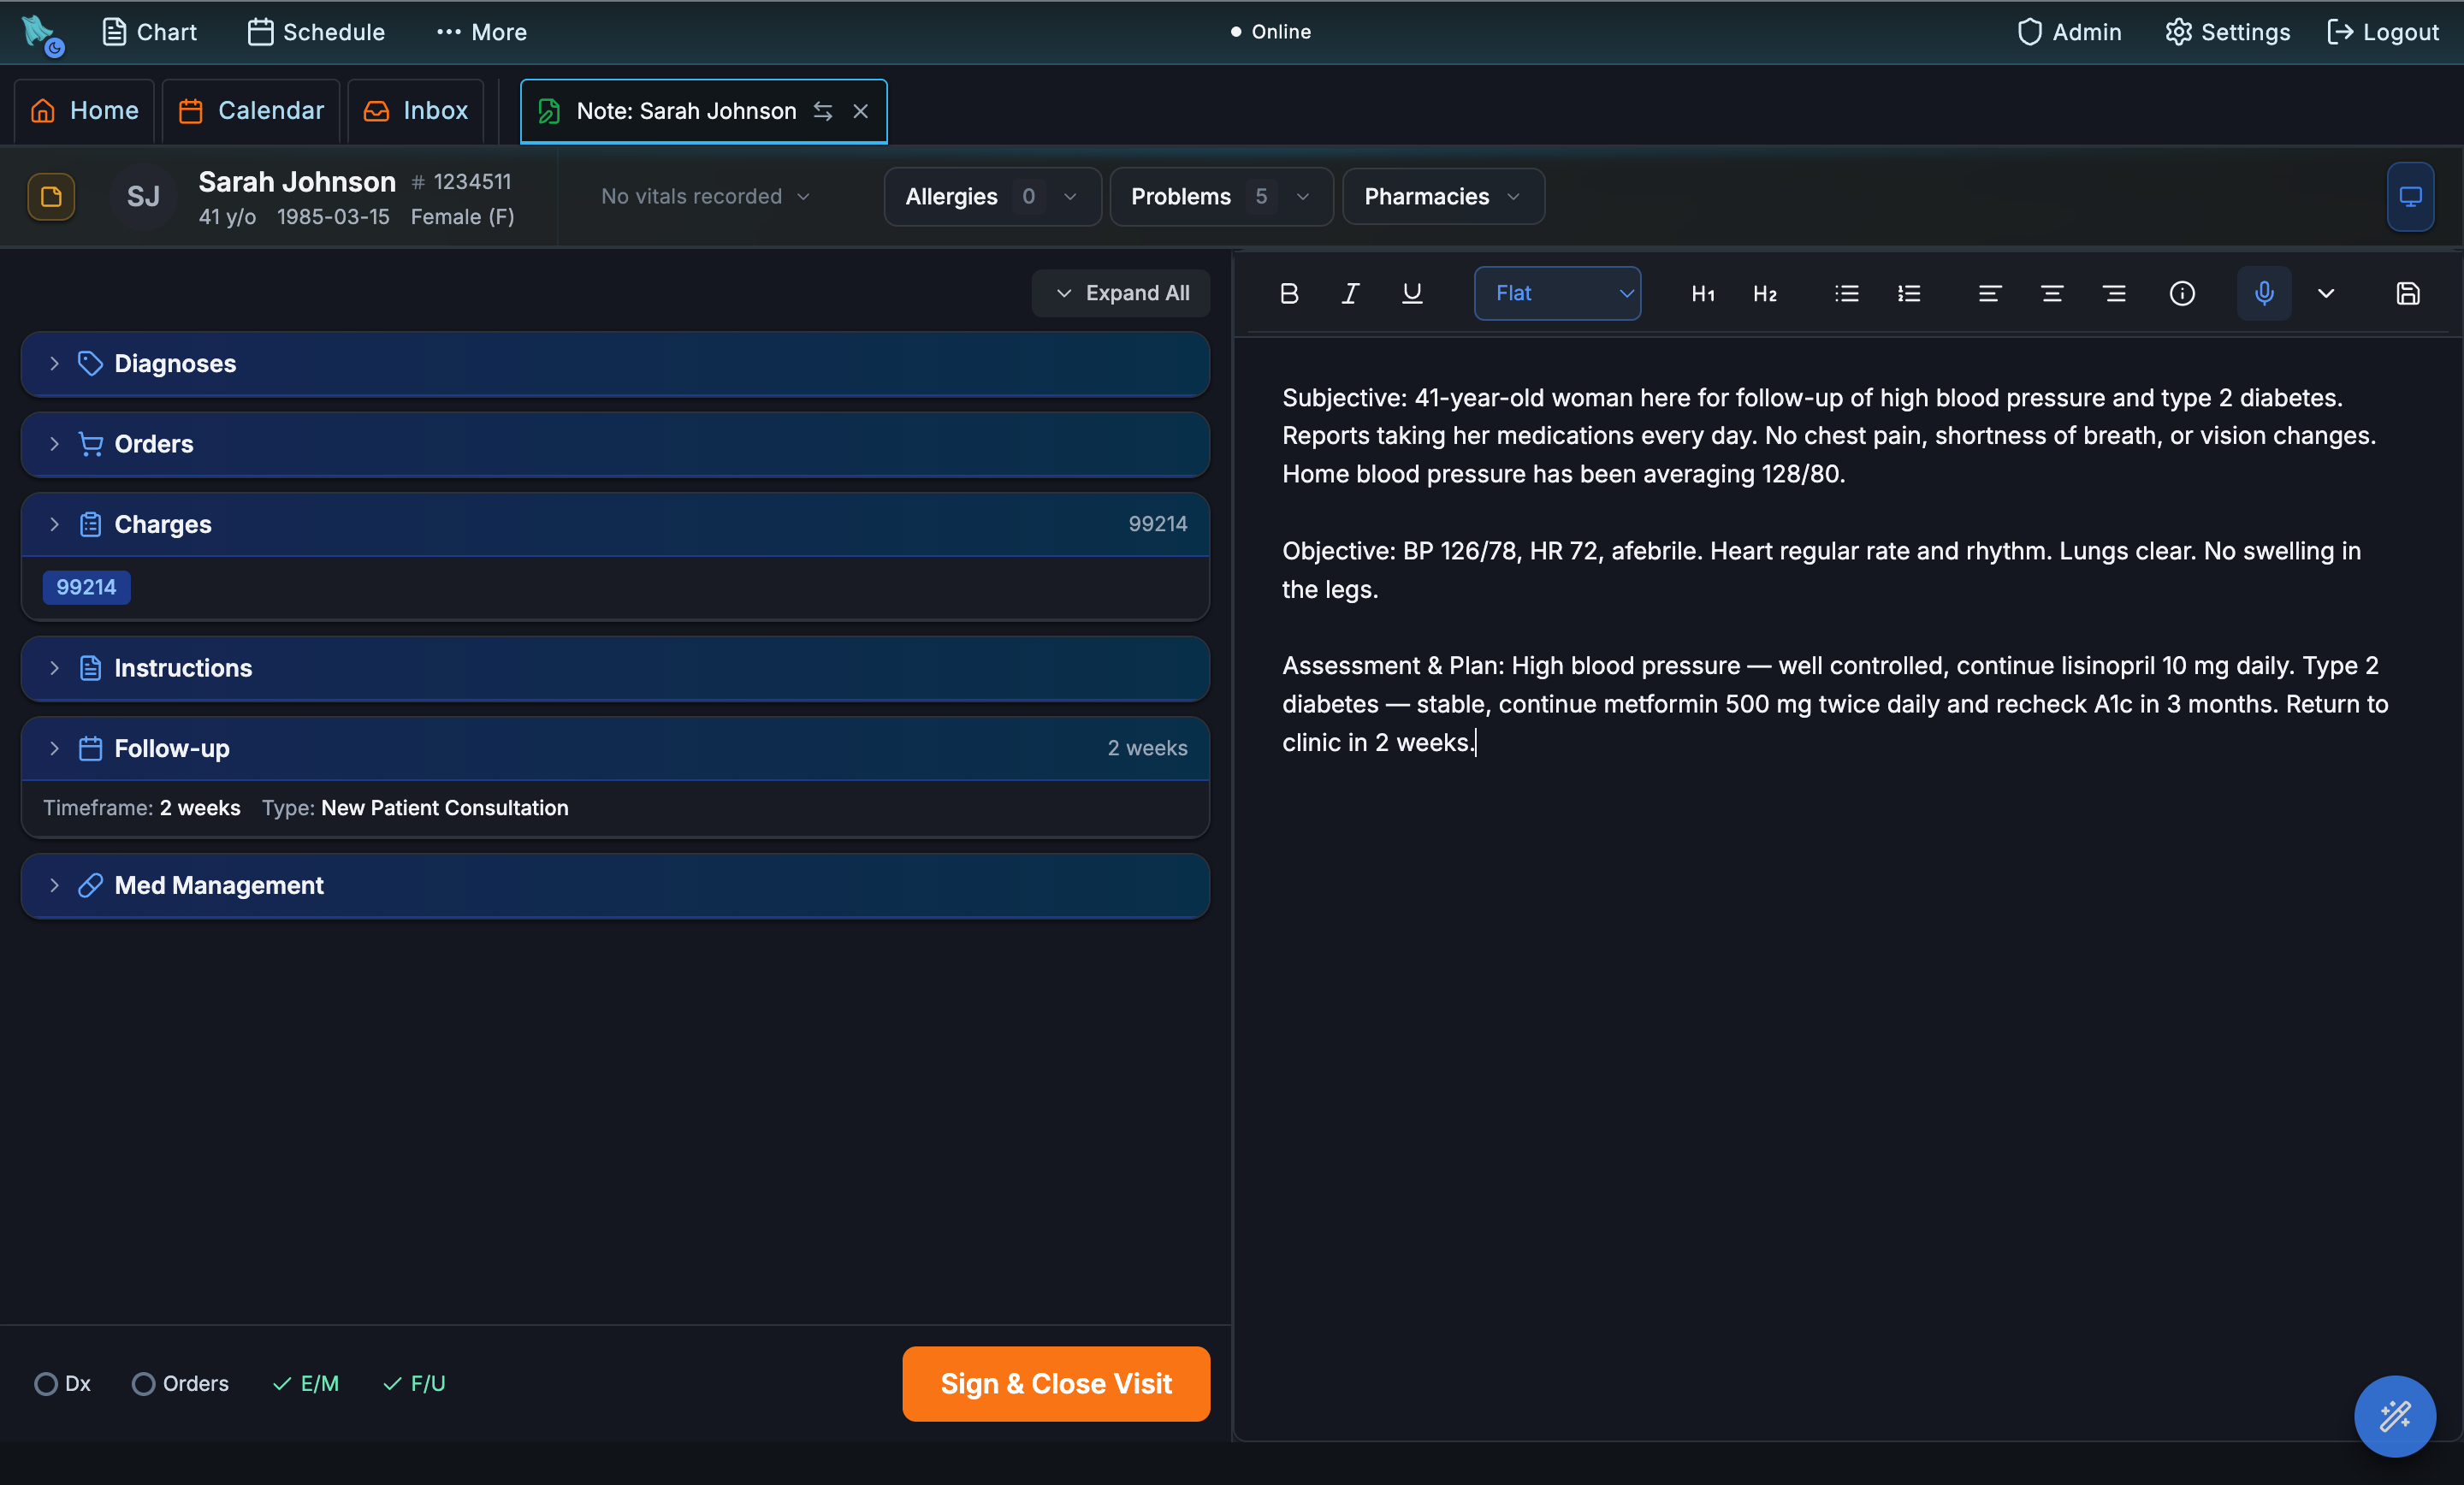
When the note is saved, the encounter completion system extracts the work hidden in the note: ICD-10 diagnoses, medications, labs, imaging, referrals, follow-up timing, patient instructions, charges, and E/M level suggestions.
Step 7 Sign and close the visit
Switch between Flat and Structured views as you review the note, then click Sign & Close Visit. The final screen is the bridge from documentation to operations: diagnoses, medications, labs, imaging, referrals, follow-up, patient instructions, and charges are all reviewed together.
That is why Note Hero matters beyond documentation. A signed note can schedule the next follow-up, queue orders, send prescriptions, and keep billing aligned with the actual visit.
One calendar. Every visit.
Hero EMR makes scheduling a single, self-running surface — patients book themselves on the portal, your front desk books from the calendar, waitlists fill cancellations, reminders go out on their own, and follow-up requests from notes or inbox messages flow back into booking.
What you'll see
A 5-chapter story: step into the patient portal, open day/week/month views, book a visit for Maria Garcia, configure provider availability, turn on waitlists and reminder cadences, then close the loop from encounter follow-up back to scheduling.
Start where your patients start
Before you open the clinician calendar, log in as Maria Garcia on the patient portal. Half of Calendar Hero lives here — patients schedule, reschedule, and confirm without ever calling the front desk.
Why begin on the portal
Every appointment has two sides. Patients want to book on their own time; your front desk wants the calendar to fill itself without a phone tree. Hero's patient portal is the self-service half of Calendar Hero — and it stays in lockstep with the clinician calendar you'll see in Chapter 1.
- Self-scheduling — patients pick a provider, visit type, and open slot from real, live availability.
- Always in sync — a slot booked on the portal disappears from everyone else's options immediately.
- Fewer phone calls — reschedules, confirmations, and reminders all happen in the portal.
Step 0.1 Log in to the patient portal as Maria Garcia
Click below to open the patient portal in a new tab. Sign in as Maria with her test credentials:
- Email:
testpatient5@soaper.ai - Password:
testpatient5
You'll land on the portal home — the same view Maria sees from her phone. From here she can schedule a visit, message her care team, or review her records.
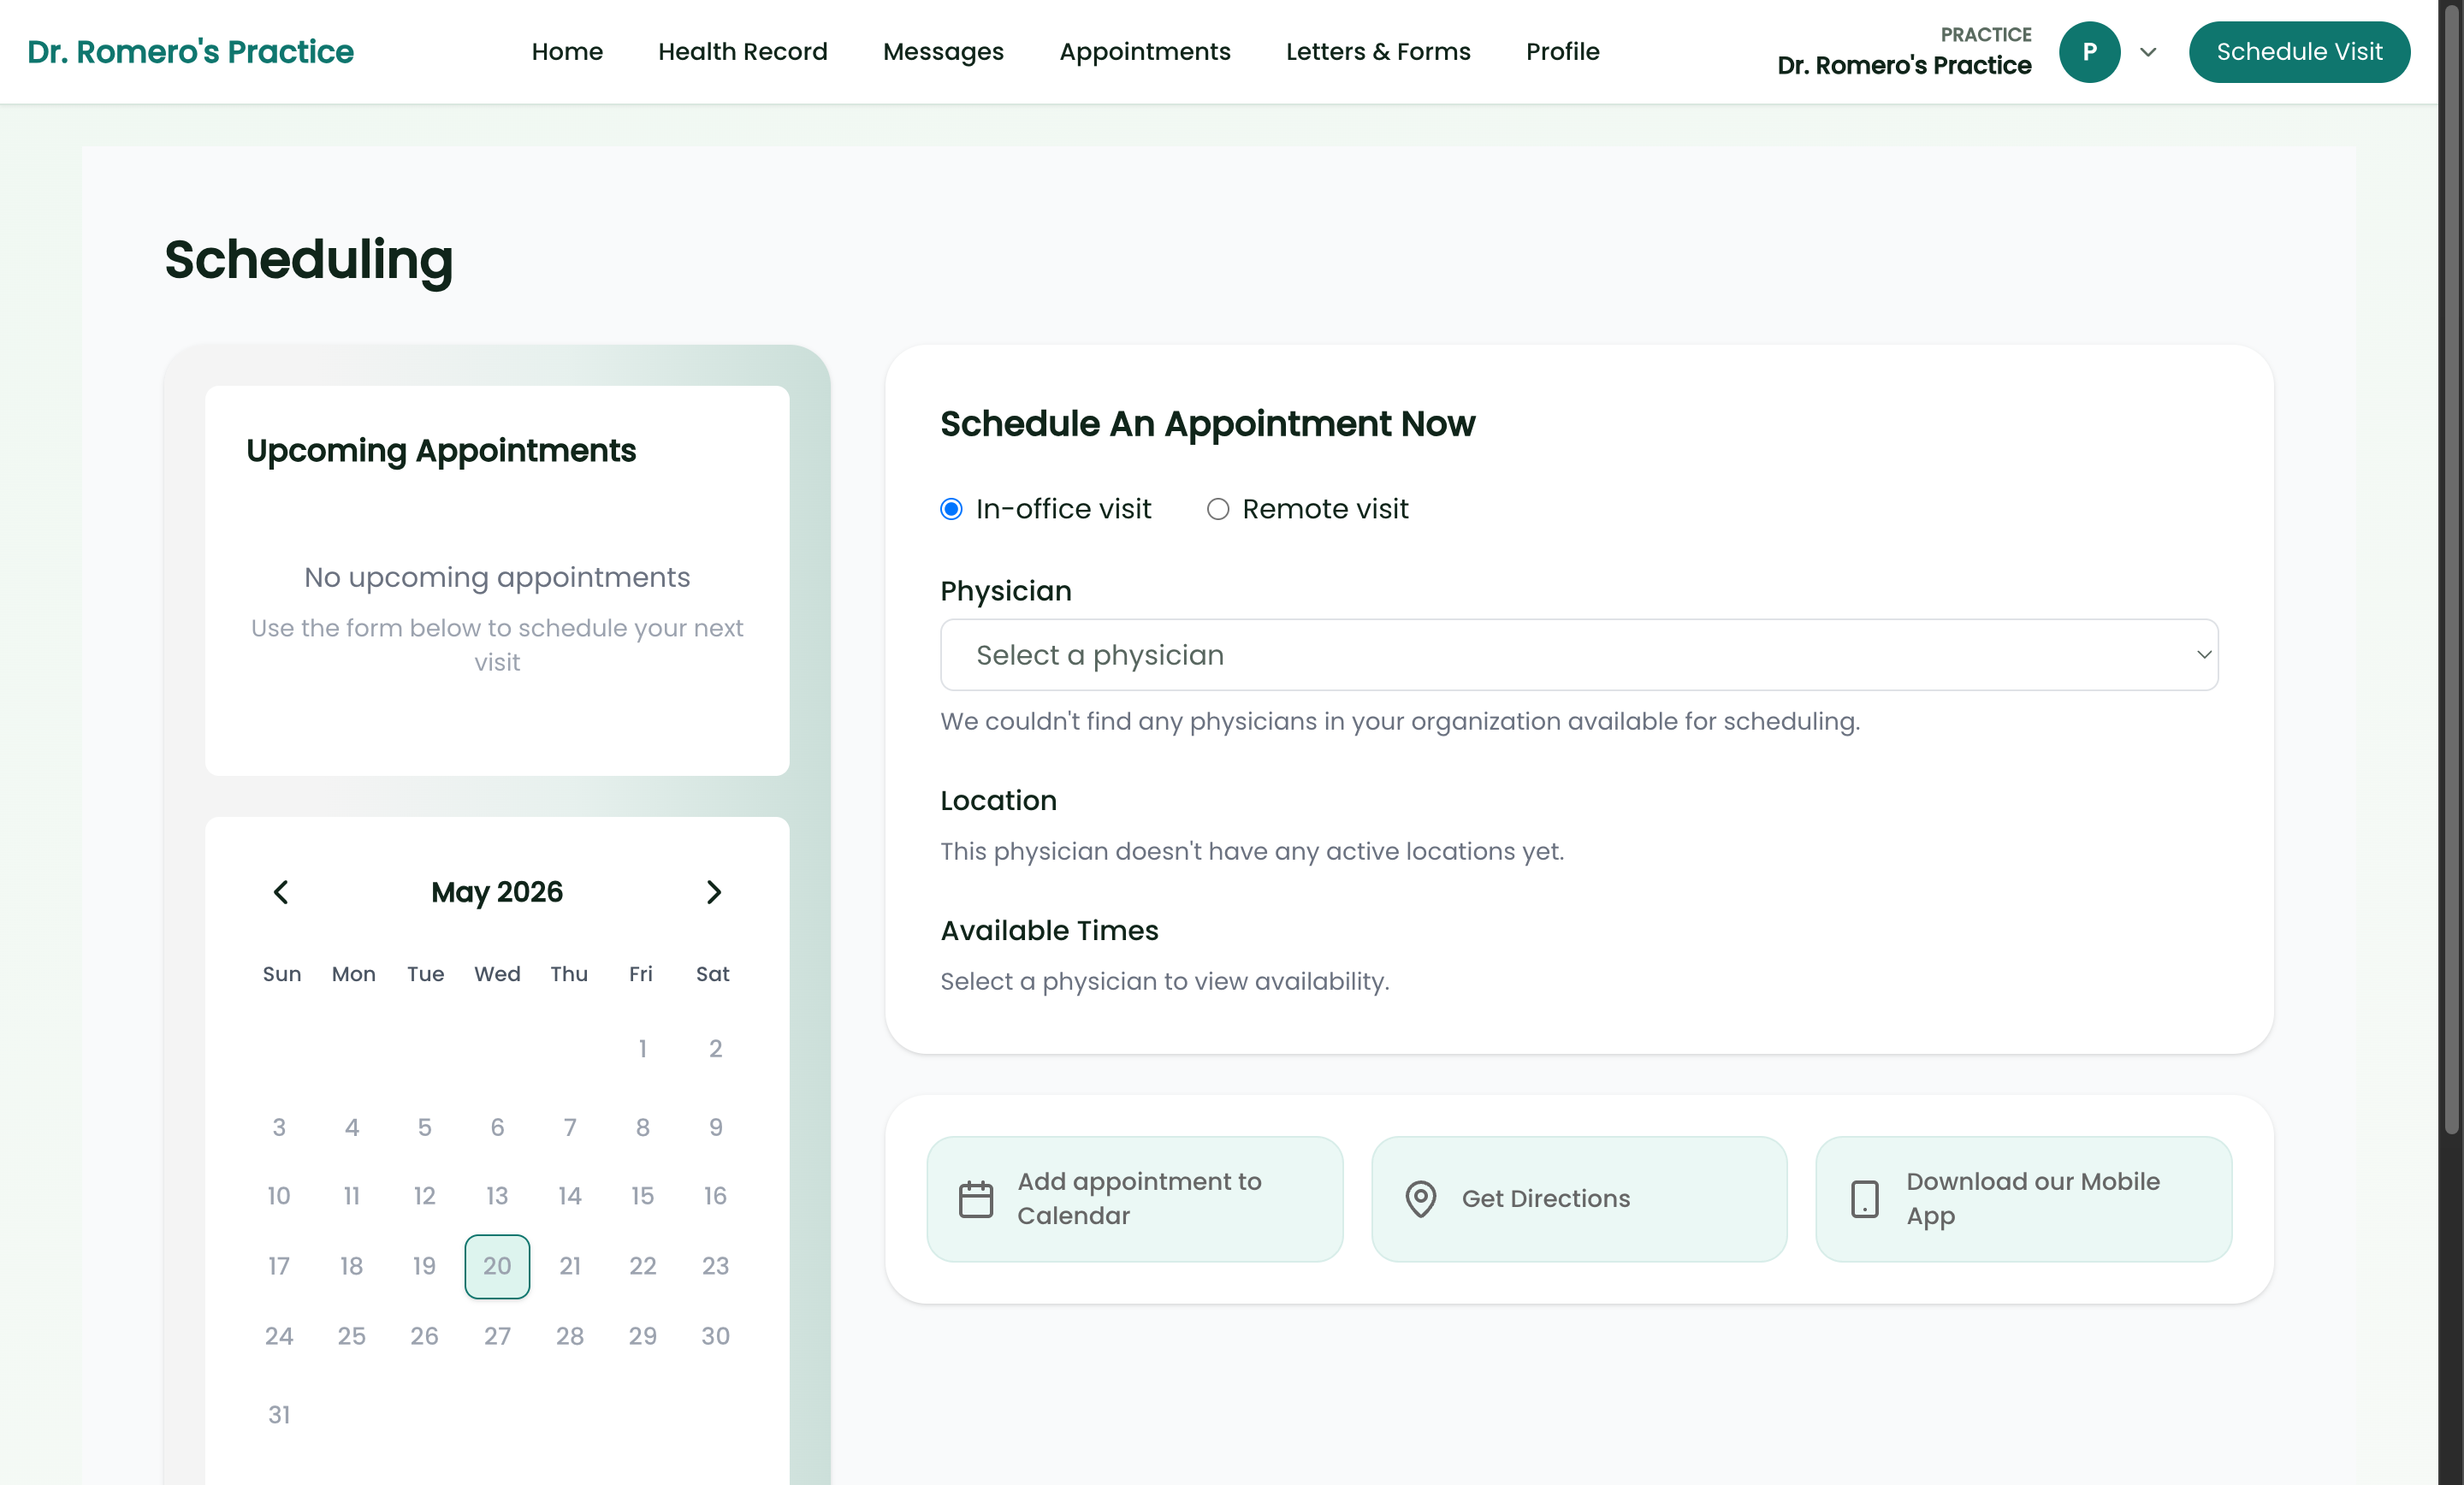
Step 0.2 Click Schedule appointment
The self-scheduling page lets Maria choose an in-office or remote visit, pick her provider, select a visit type, filter by location, and see open times on a calendar. Every slot shown comes straight from that provider's live availability — working hours, visit-type rules, location schedules, templates, time off, and visits already booked.
Open the calendar
Now switch to the clinician side. Sign into Hero EMR and open the Calendar tab — the everyday home base for your front desk and providers. It comes in three views.
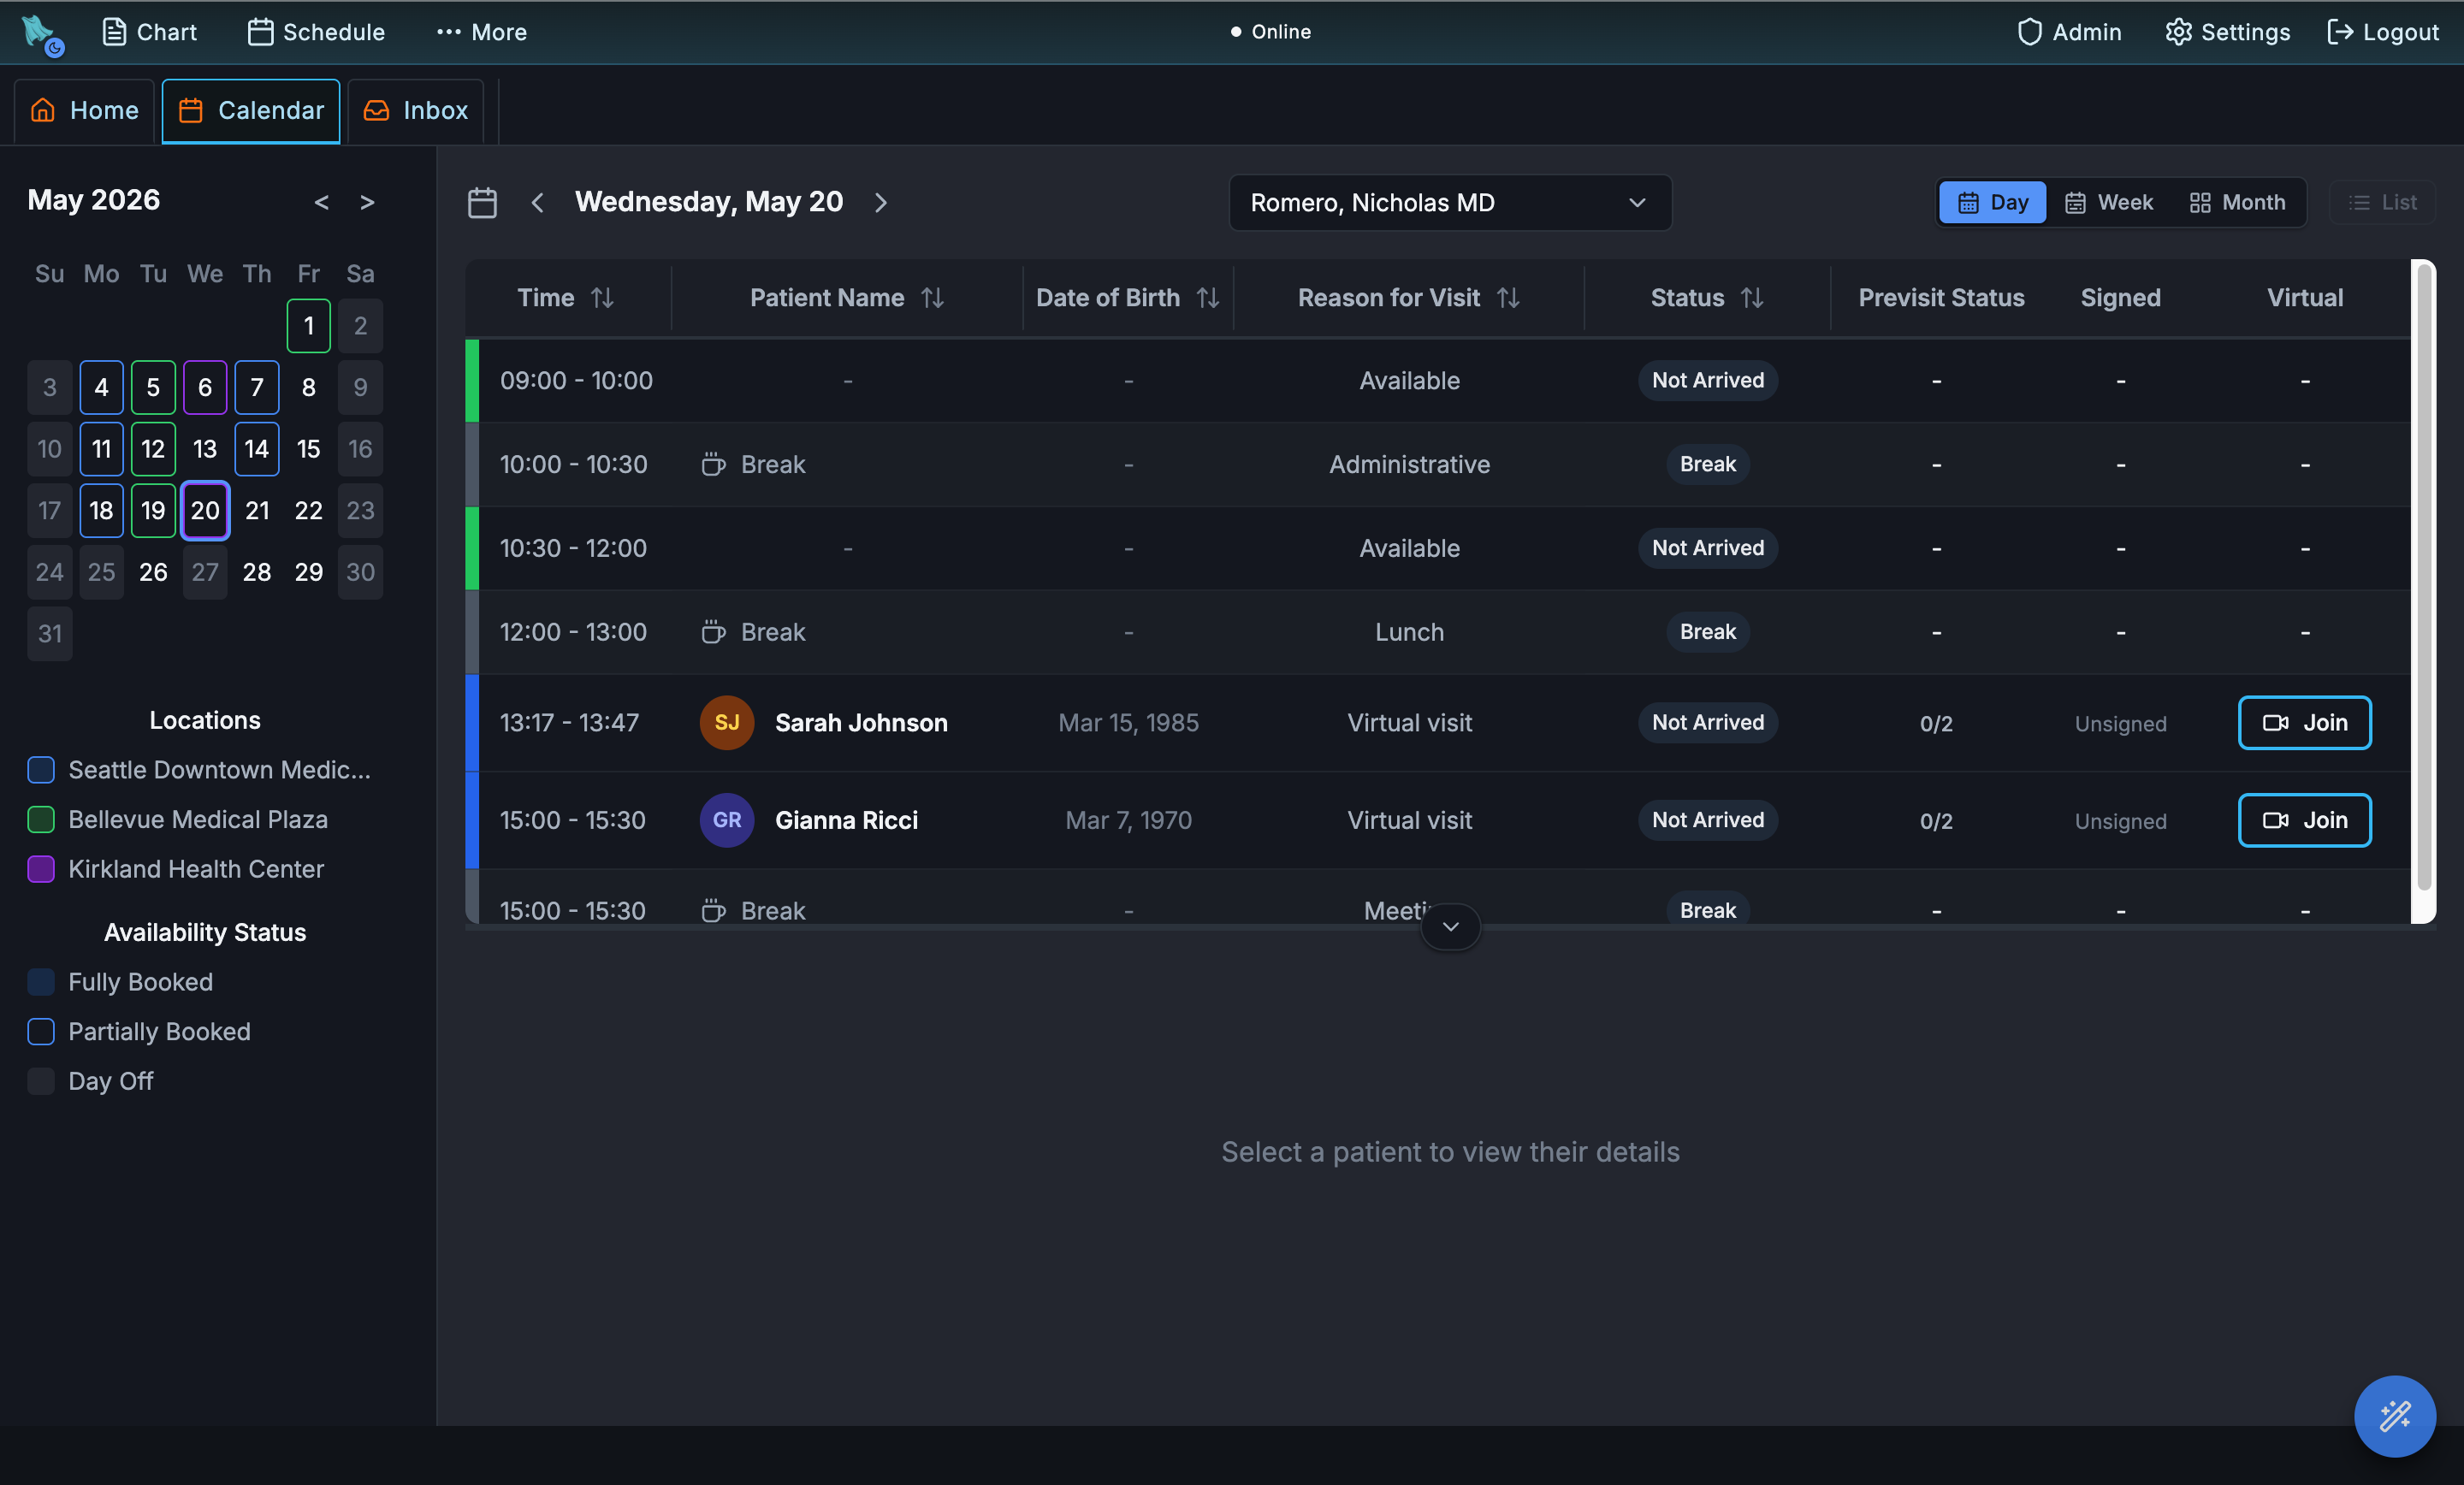
Step 1.1 Day view — today, hour by hour
Click below to open Hero EMR signed in as a test clinician — no password needed. The Calendar opens on the Day view: a single-day list of every appointment, available block, and break, with columns for check-in status, pre-visit paperwork, signed status, and whether the visit is virtual.
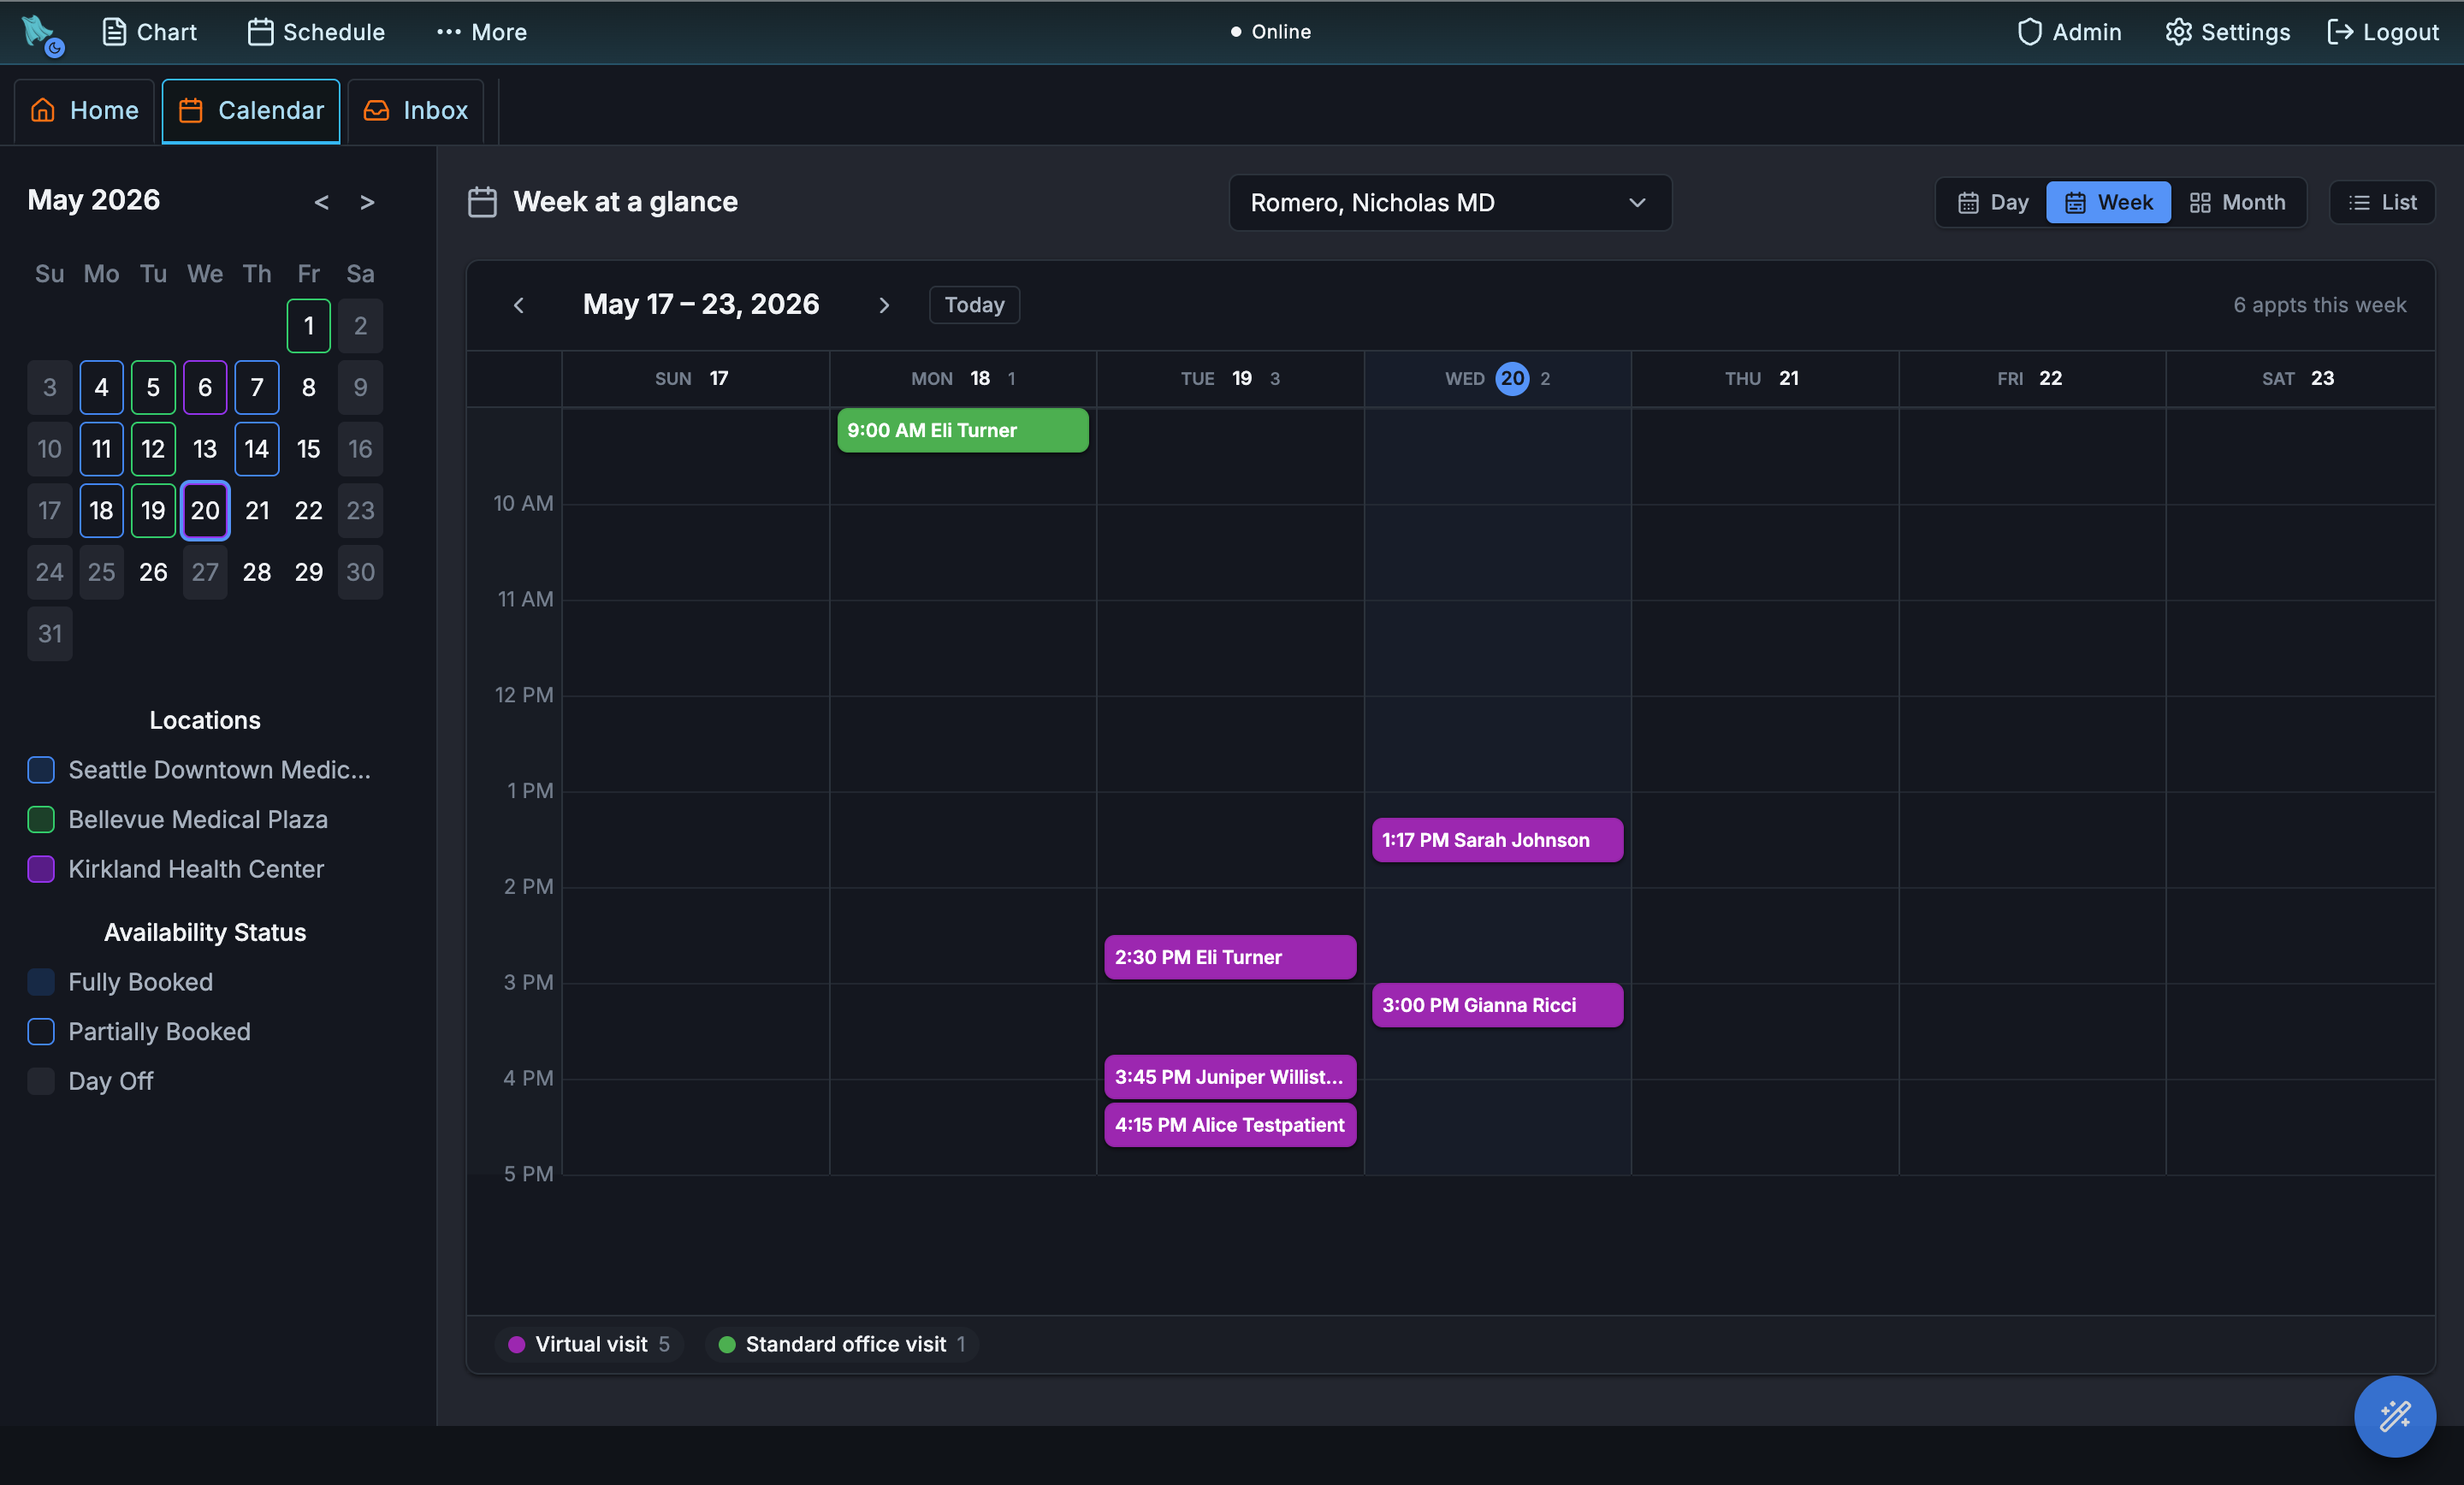
Step 1.2 Week view — spot the gaps
Switch to Week for a seven-day grid. Appointments are color-coded by visit type, so a glance tells you how full each day is and where the open slots sit. Use the location filter in the left rail to focus on one clinic at a time.
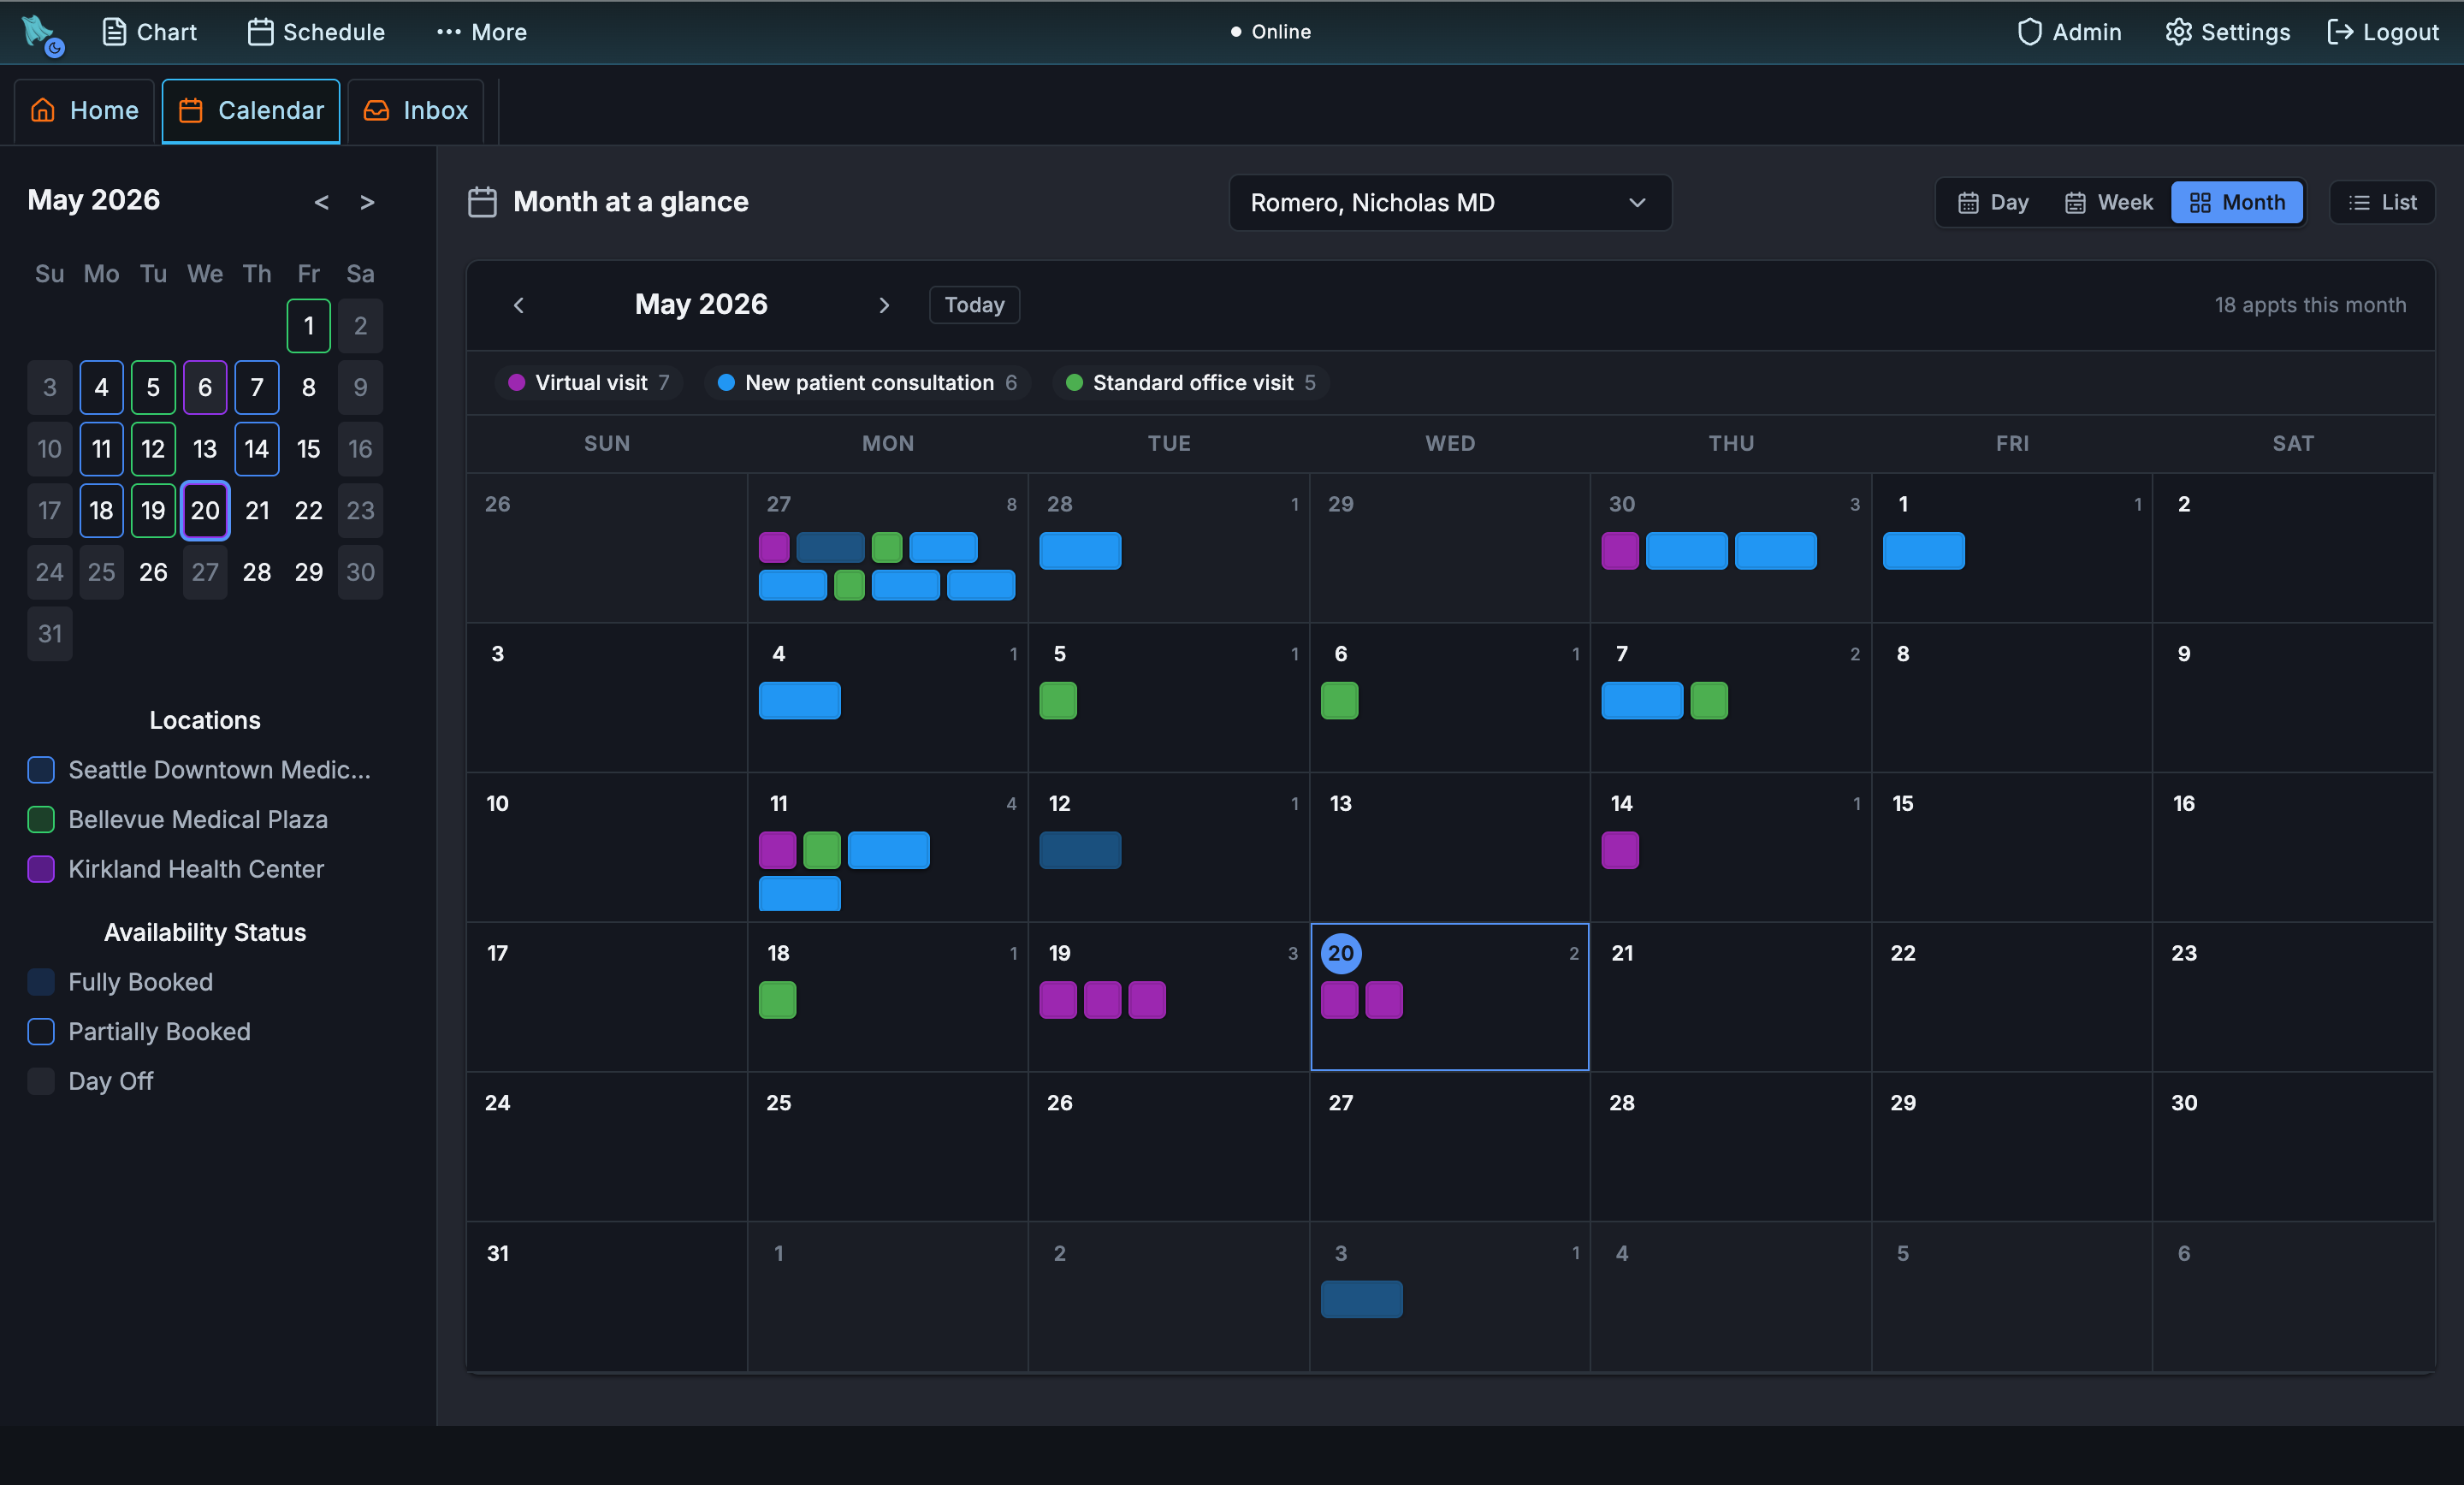
Step 1.3 Month view — the big picture
The Month view is a heatmap of the whole month. Each day shows its appointment count and a color band for fully booked, partially booked, or day off — it's how providers plan time off and how the front desk finds the next open clinic.
Book a visit for Maria Garcia
Time to put an appointment on the calendar. From the clinician side, your front desk can book any patient in a few clicks — the same slots Maria saw on the portal.
Step 2.1 Open Schedule and find the patient
Click Schedule in the top toolbar and search for Maria Garcia. Her scheduling workspace opens with two tabs — Book and Patient Appointments — alongside a live list of available time slots for the selected provider and day.
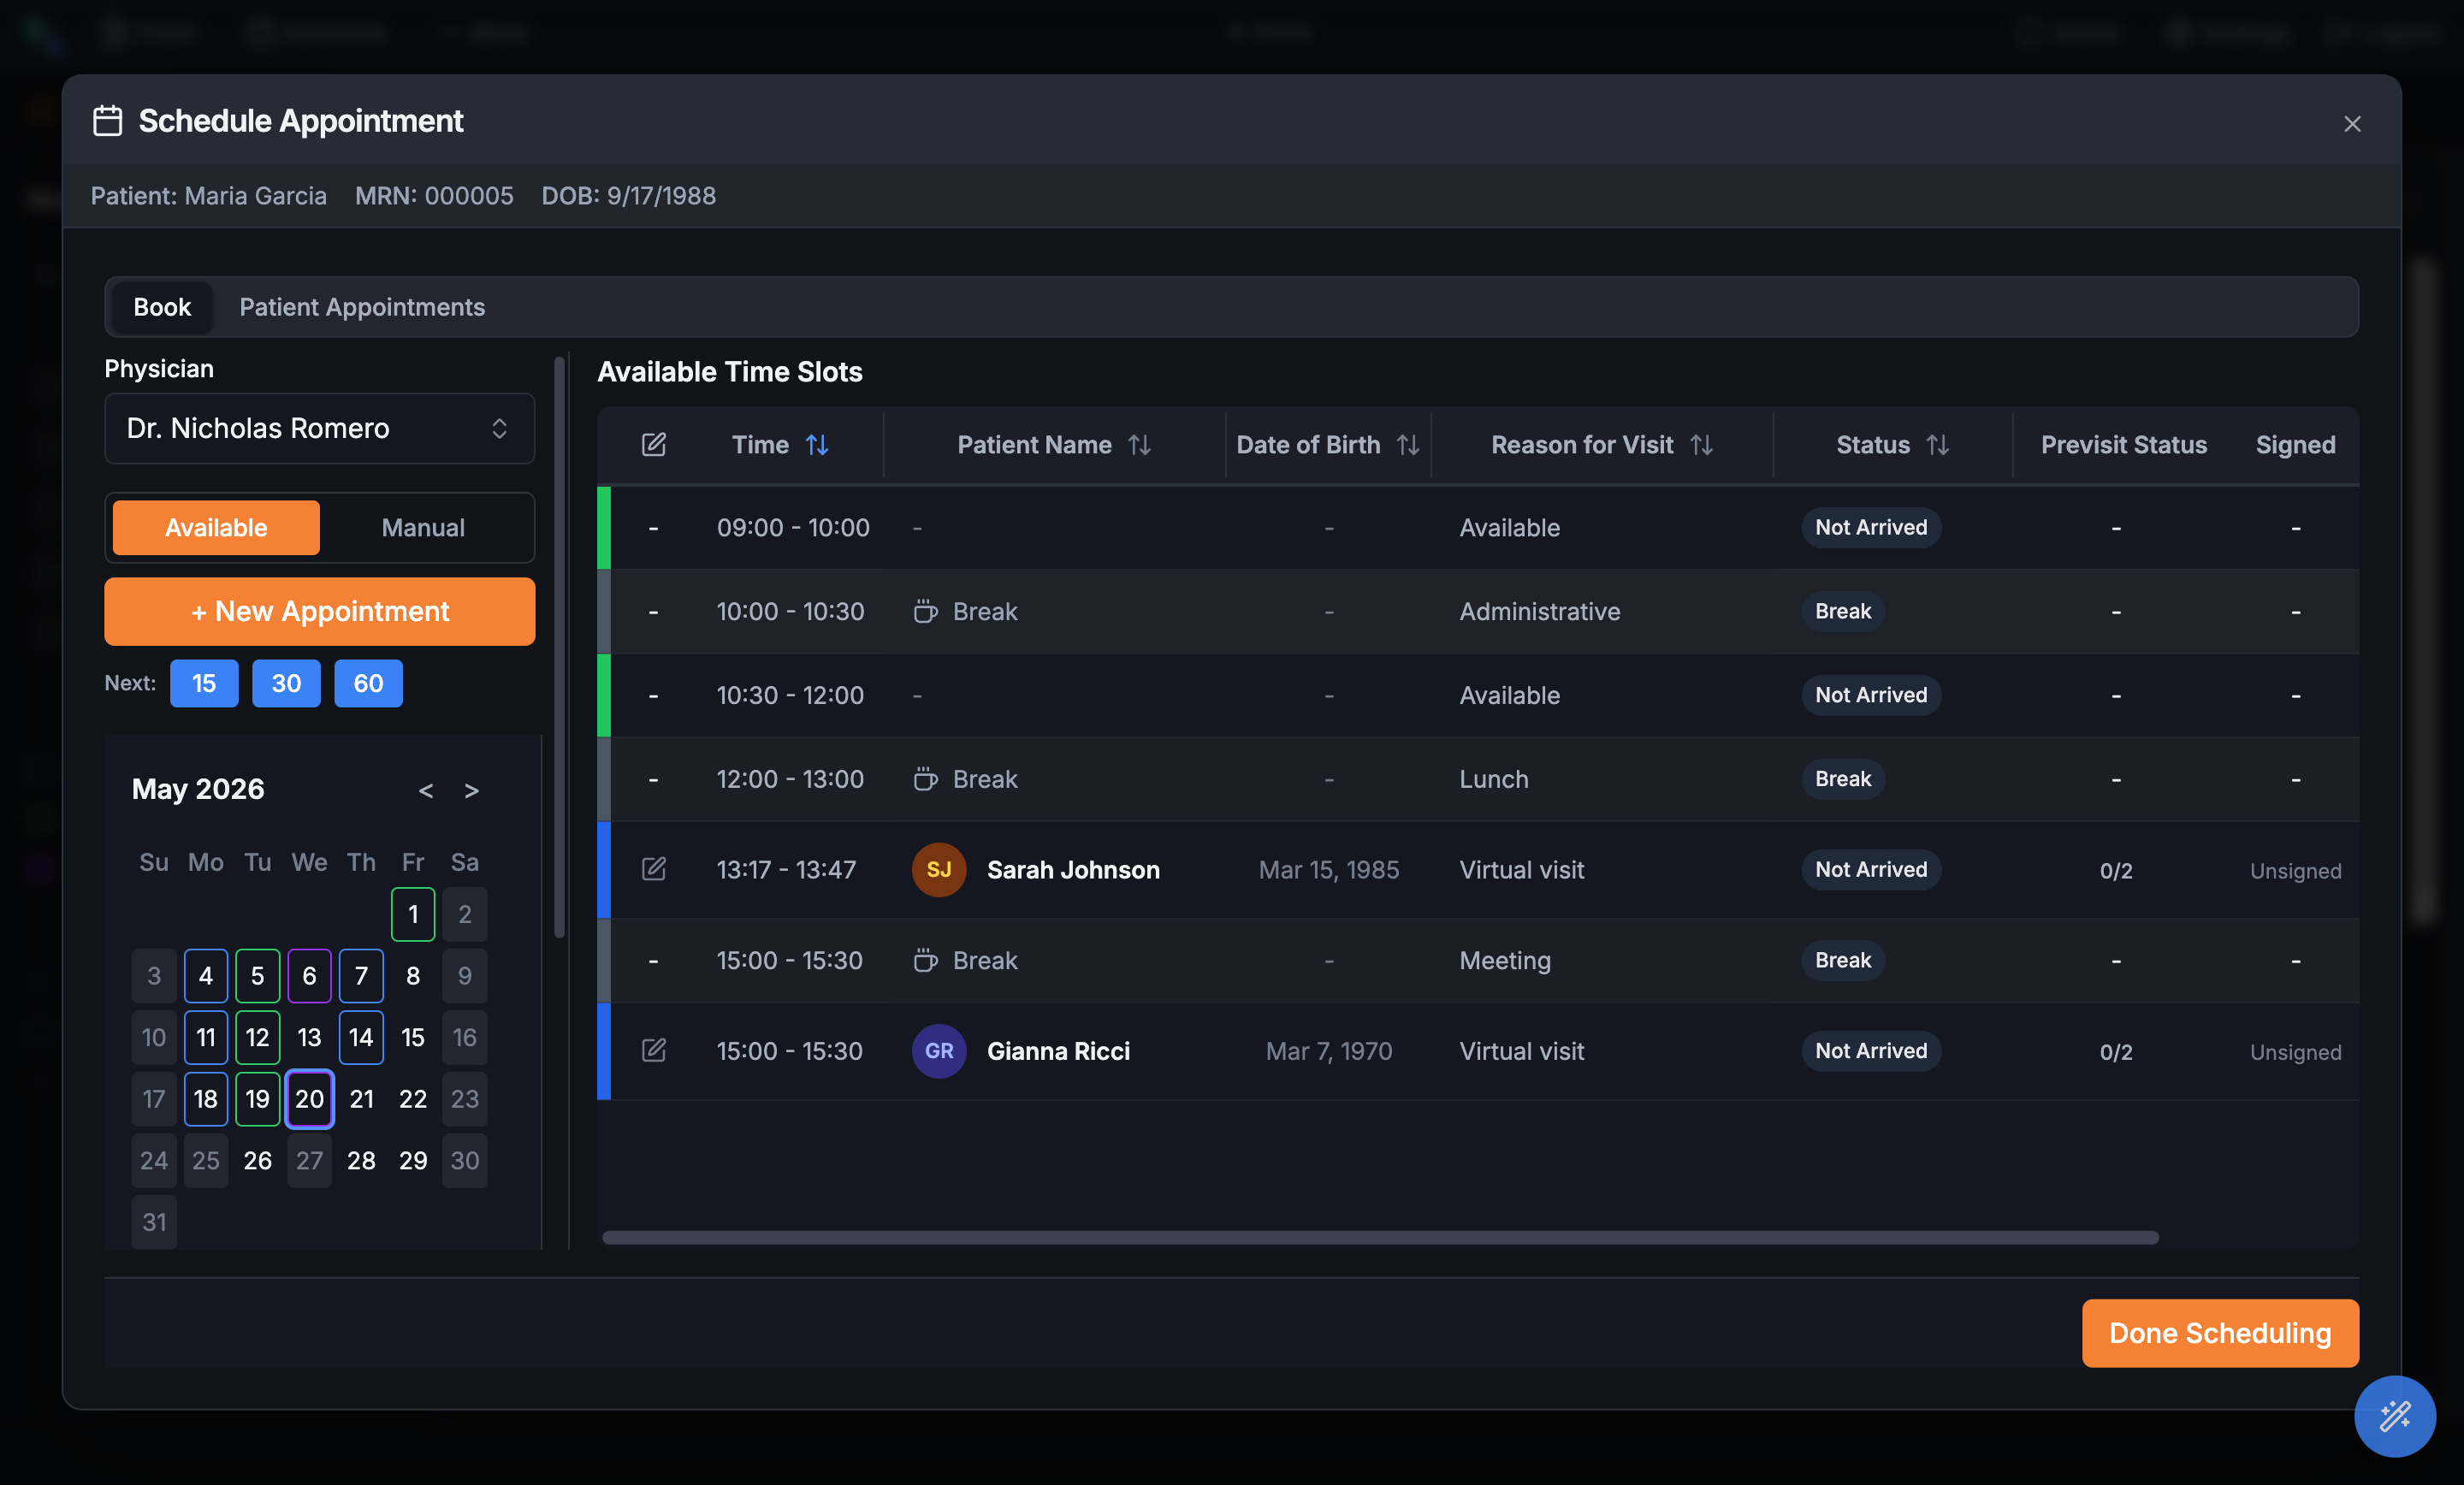
Step 2.2 Create the appointment
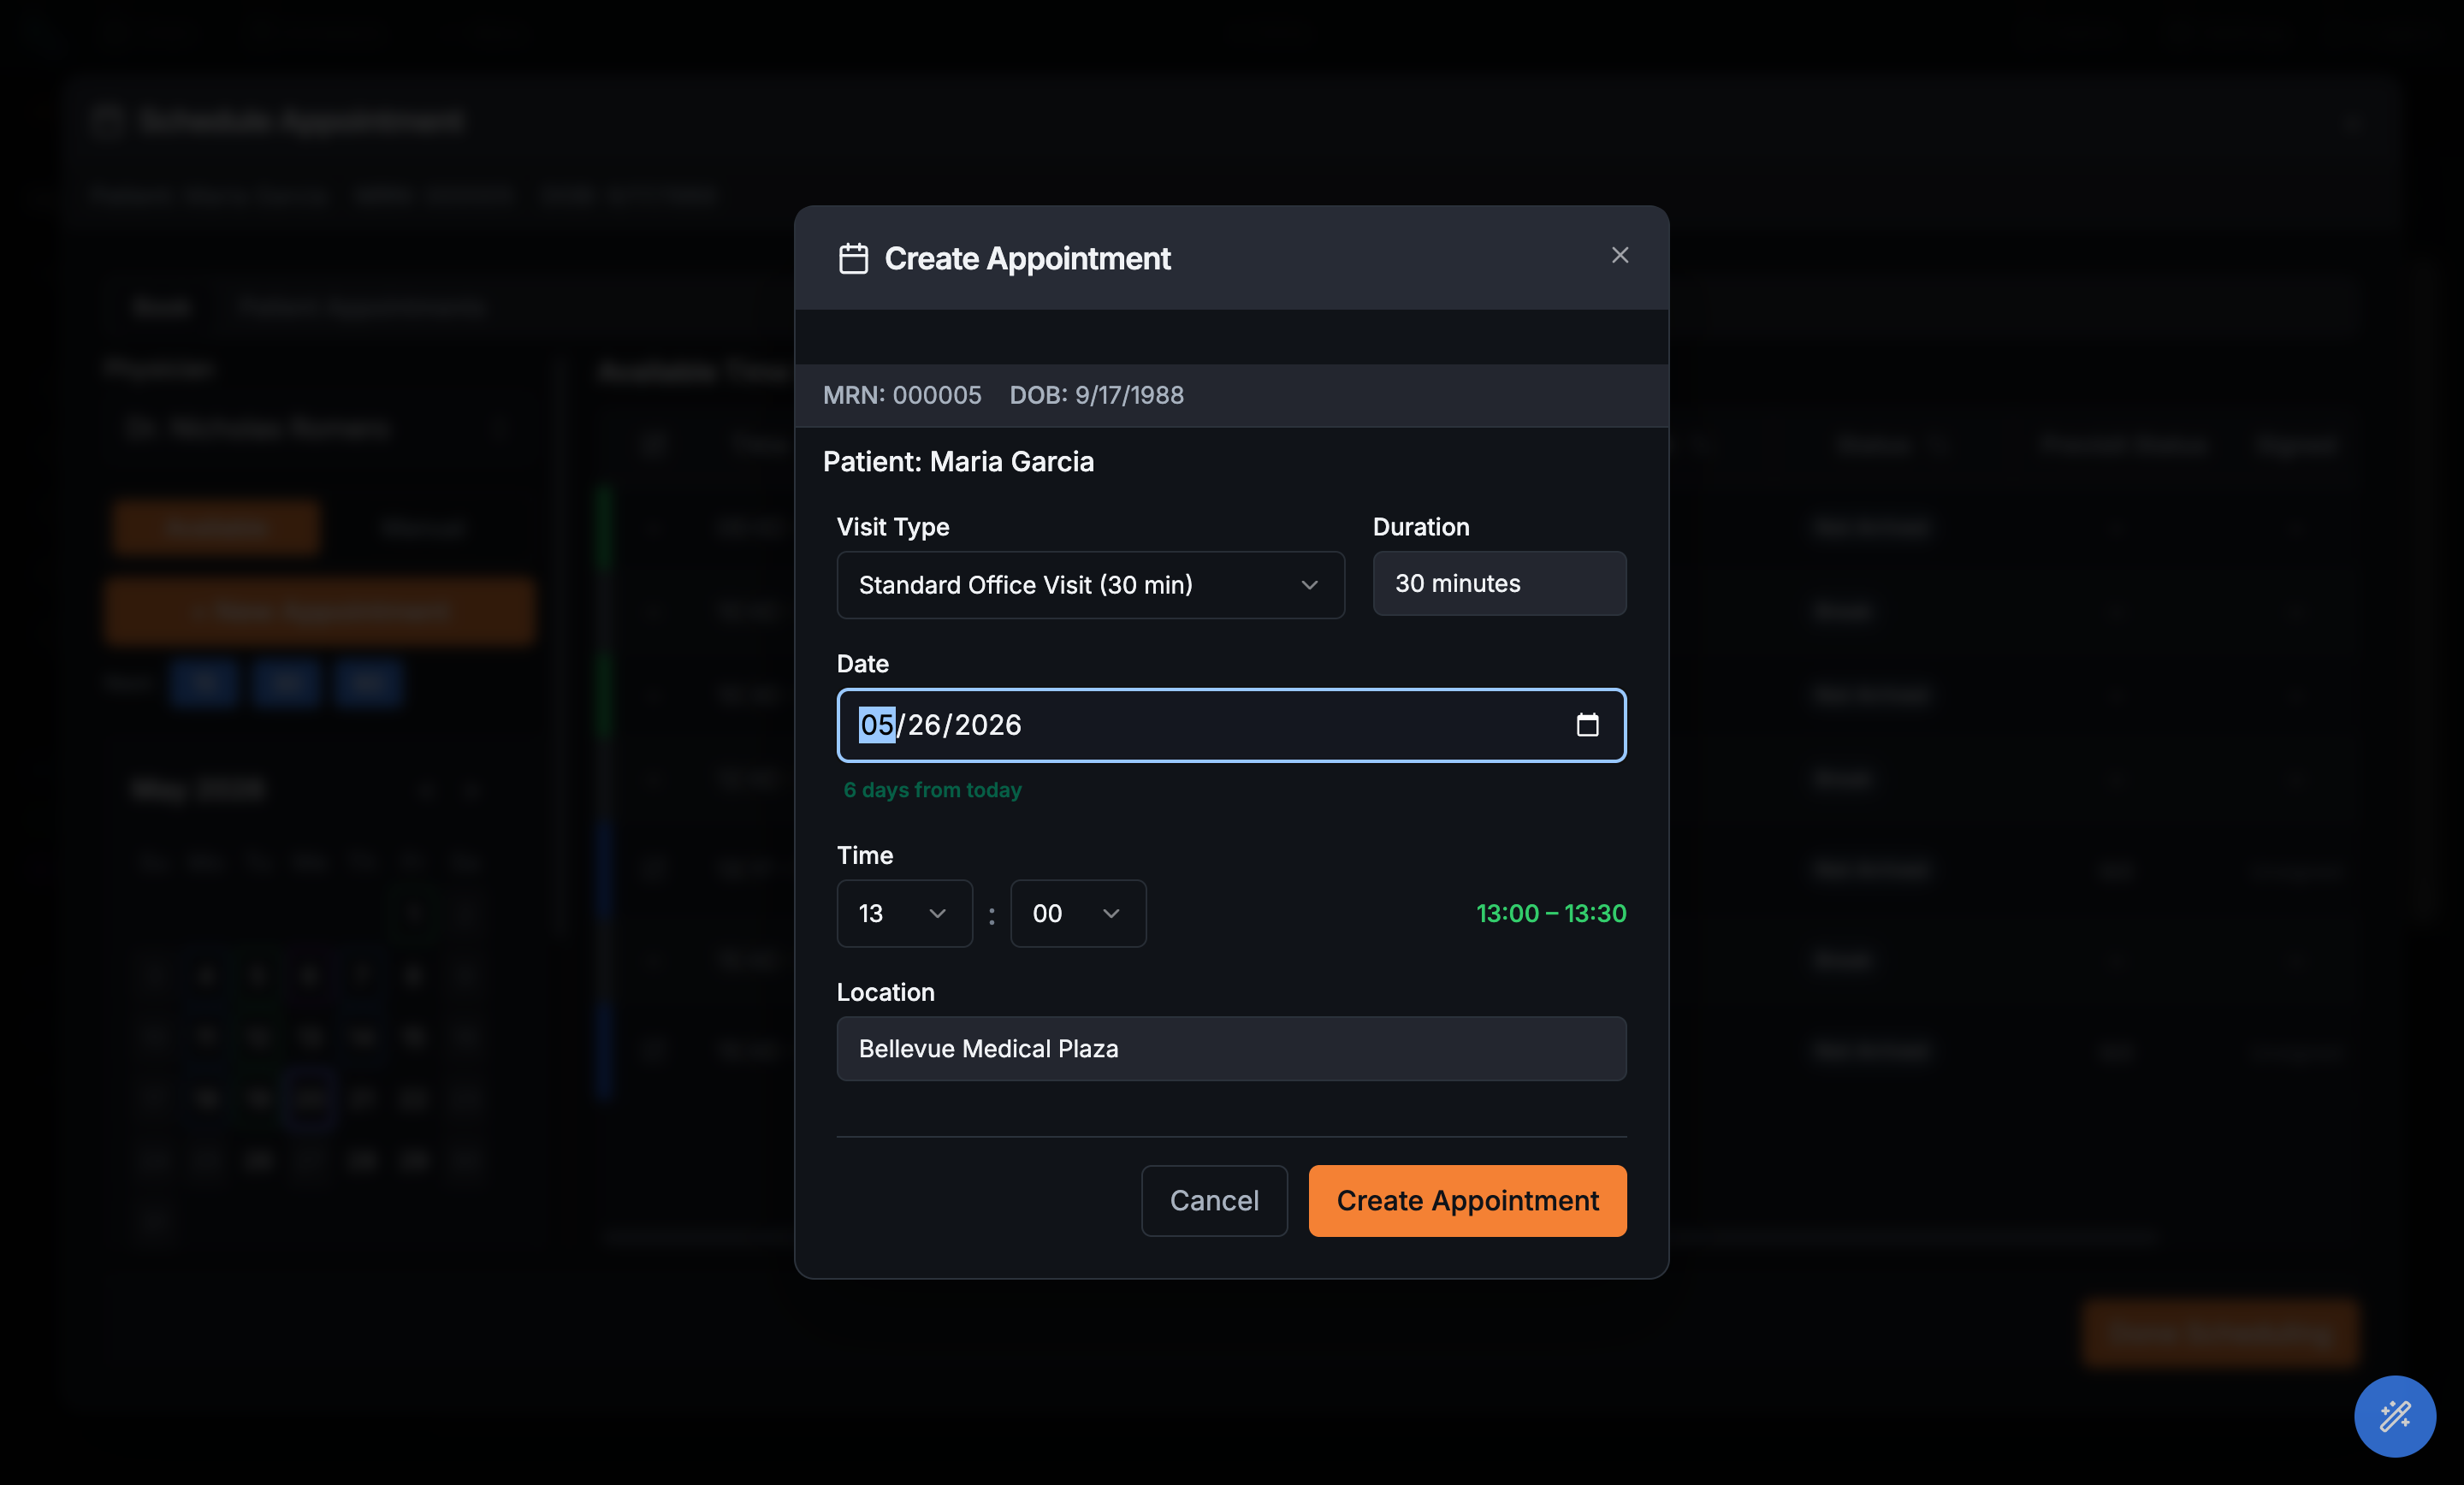
Click + New Appointment. Pick a visit type — the duration fills in automatically — then choose a date, time, and location. Hero checks the slot against the provider's availability in real time and warns you if it collides with a break or lands in the past. Click Create Appointment.
Admin → Scheduling and every booking inherits them.
Step 2.3 Understand the rules behind each open slot
Calendar Hero is configurable per physician. In Admin → Scheduling, staff can associate clinic locations, define weekly hours by location, add time-off blocks, and layer templates for lunch, admin time, urgent holds, same-day access, or meetings.
- Visit catalog — duration, color, telehealth, previsit form requirement, online booking, buffer time, minimum notice, maximum schedule-ahead window, and max-per-day.
- Availability rules — provider hours, location hours, time off, templates, existing appointments, and visit-type restrictions all have to pass before a patient sees a slot.
- Collision checks — staff booking uses the same rules as the patient portal, with real-time warnings before a conflict is created.
Waitlists and reminders run themselves
An appointment on the calendar is only half the job — open slots need to get filled, and scheduled patients still have to show up. Calendar Hero handles both with configurable waitlists and reminder cadences.
Step 3.1 Turn cancellations into waitlist offers
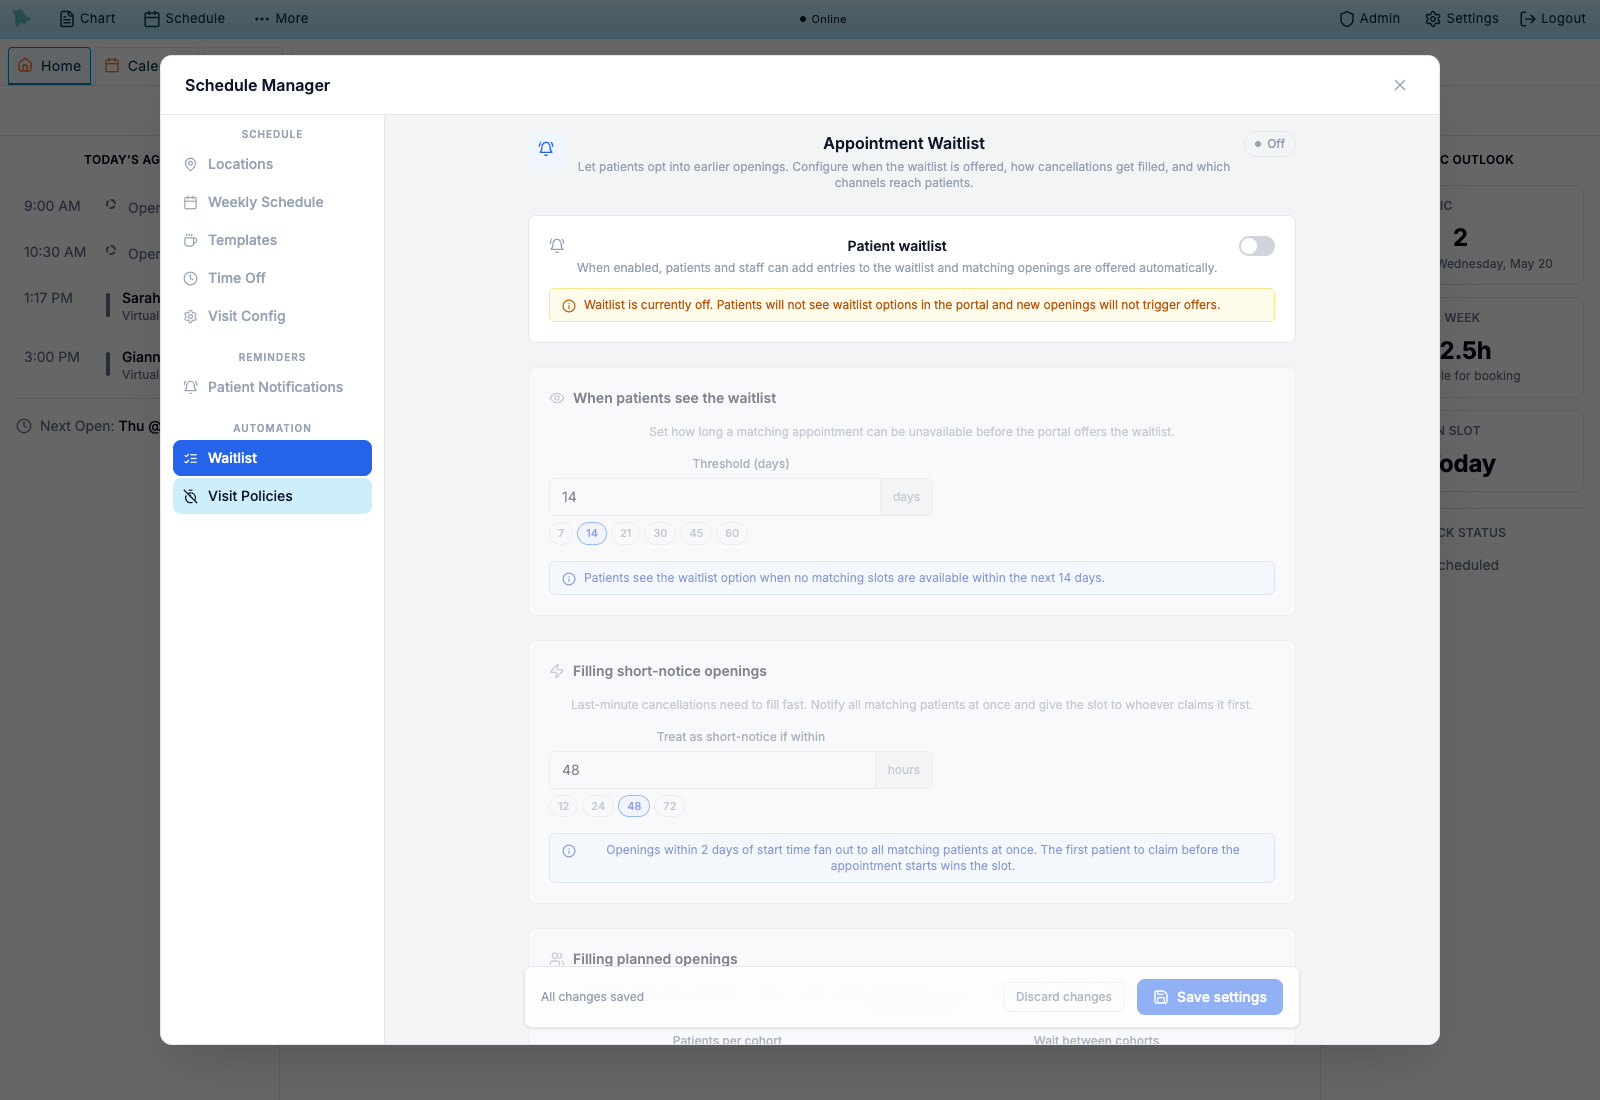
In Admin → Scheduling → Waitlist, choose when patients should see a waitlist option, how short-notice openings are handled, which channels can send offers, how long a patient has to claim a slot, and when stale waitlist entries expire.
Hero supports both blast-first-claim and rolling-cohort workflows. When an opening appears, matching patients get an offer; the first accepted offer rechecks the slot before booking so a claimed waitlist spot does not double-book the provider.
Step 3.2 Check the channels
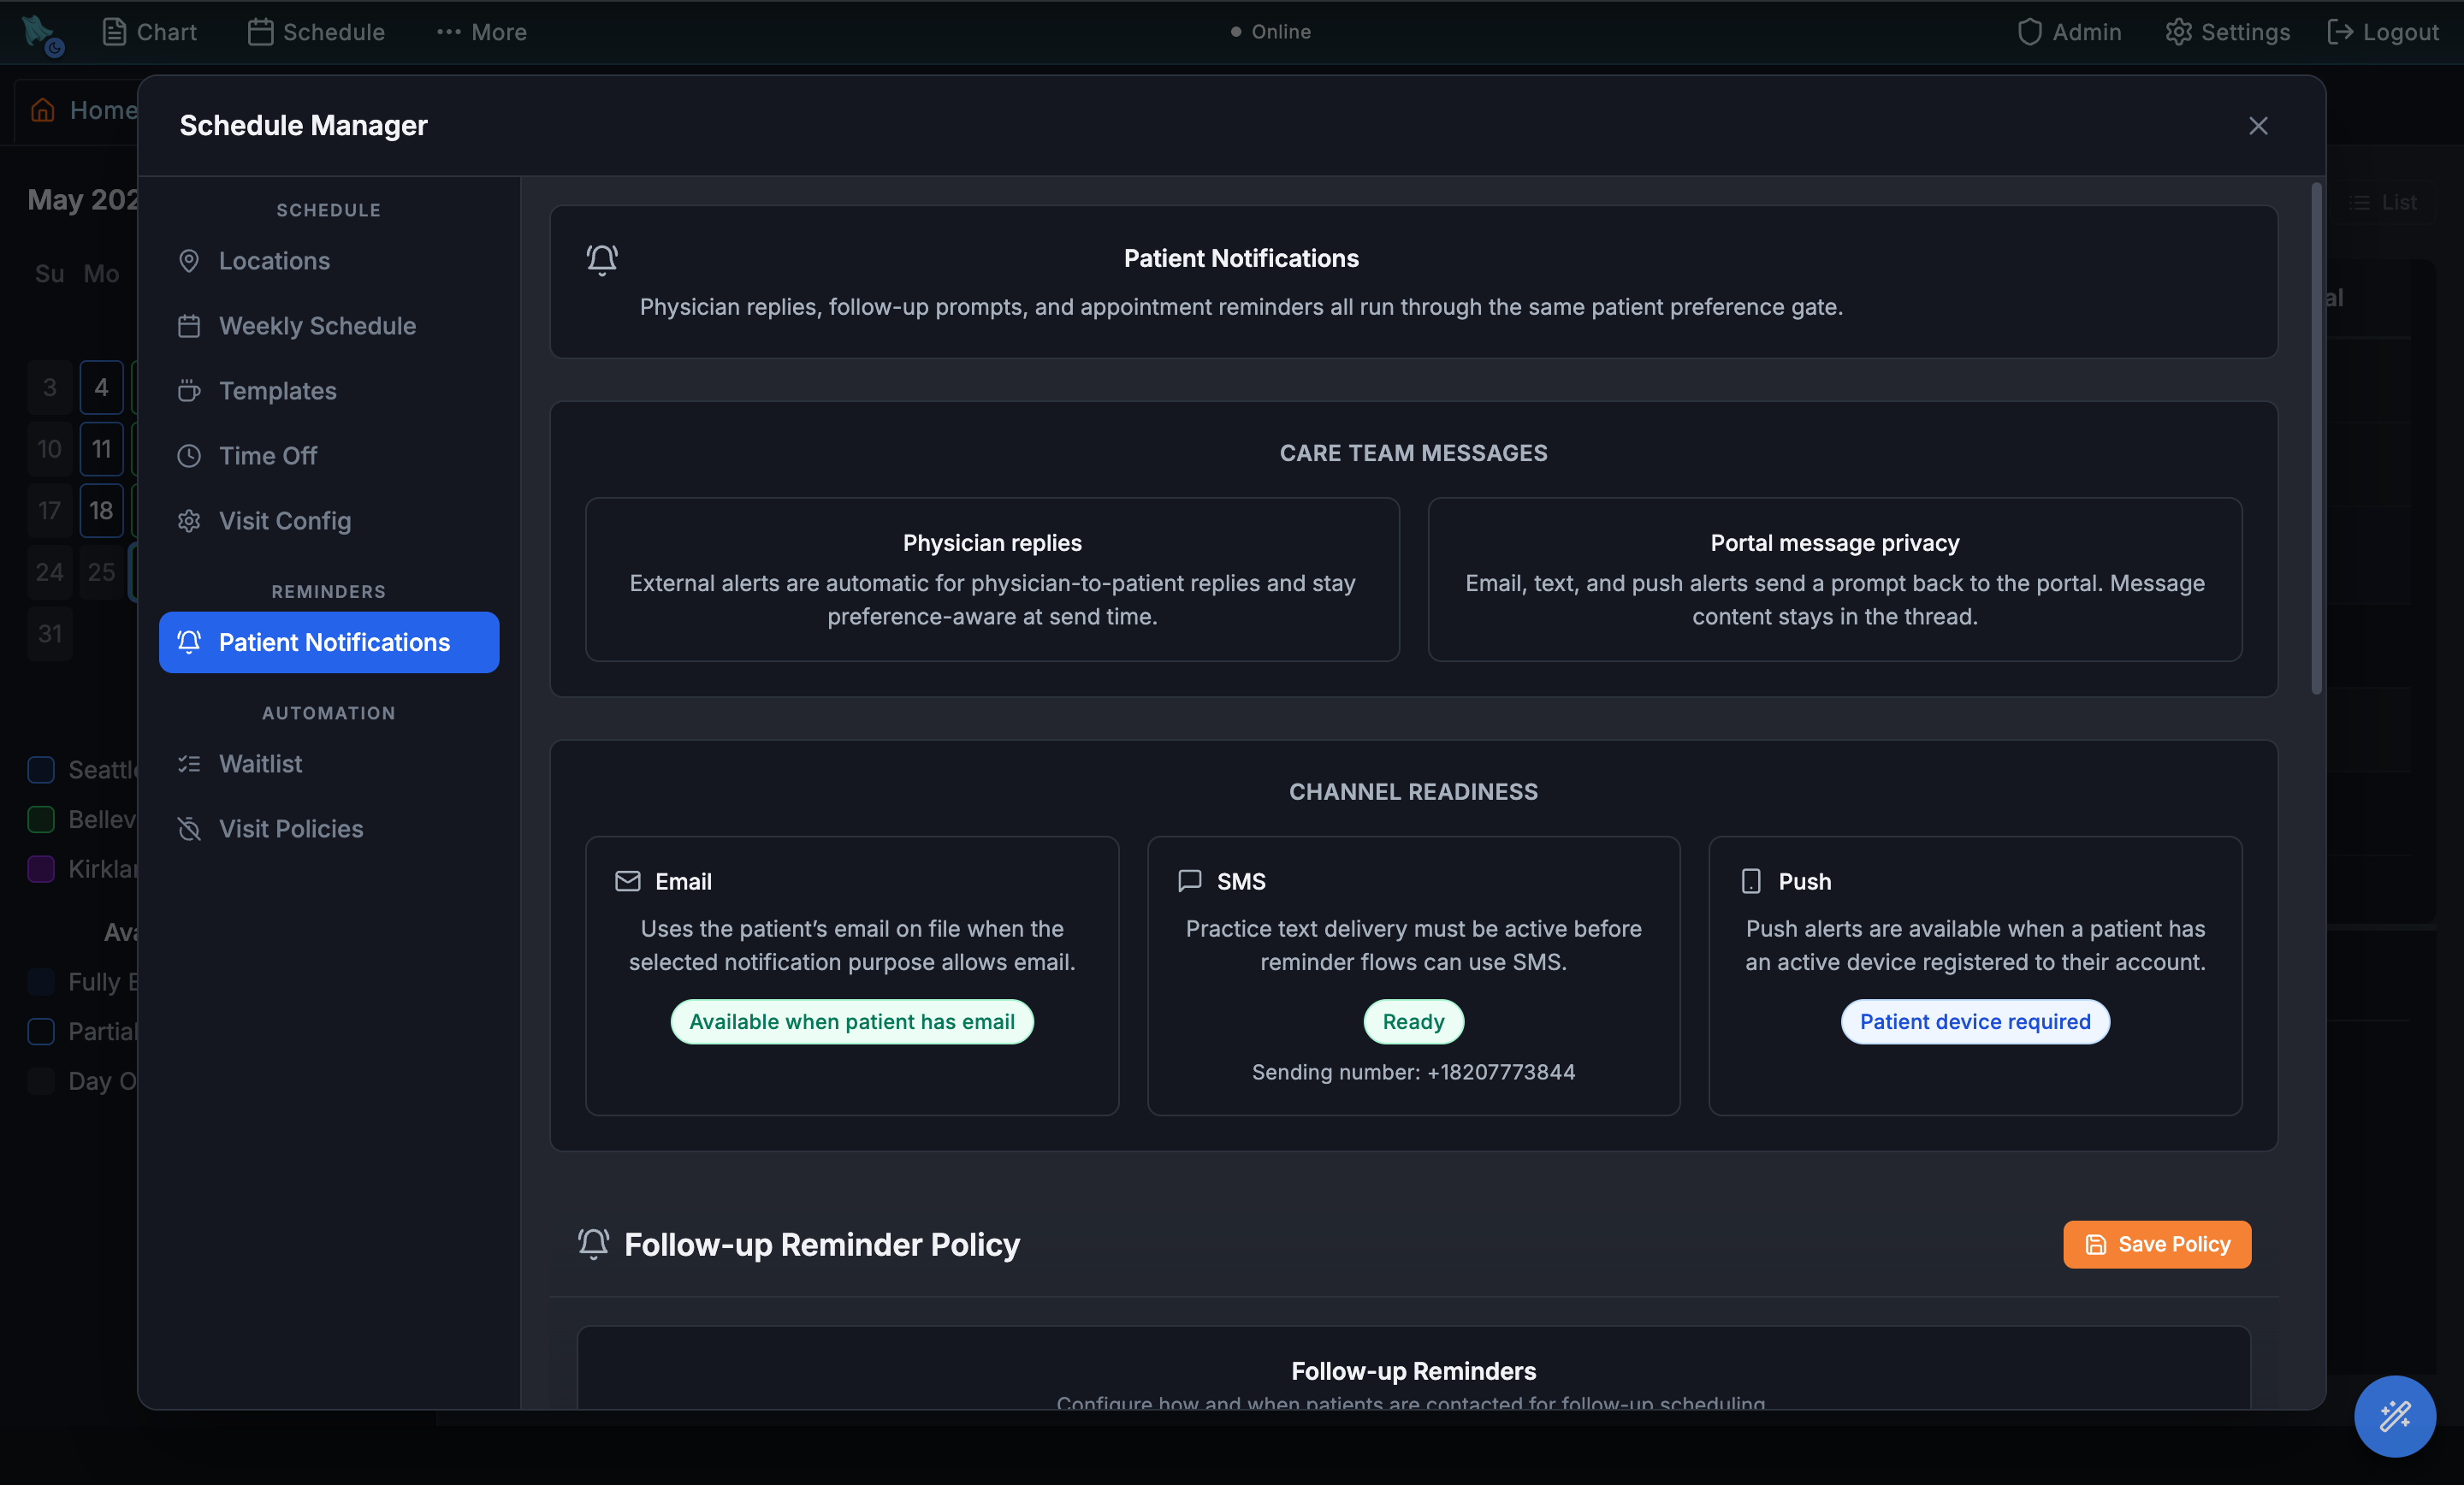
In Admin → Scheduling → Patient Notifications, the Channel Readiness panel shows which delivery channels are live for your practice — Email, SMS, and Push. Each patient is reminded only on the channels they've opted into.
Step 3.3 Set the reminder cadence
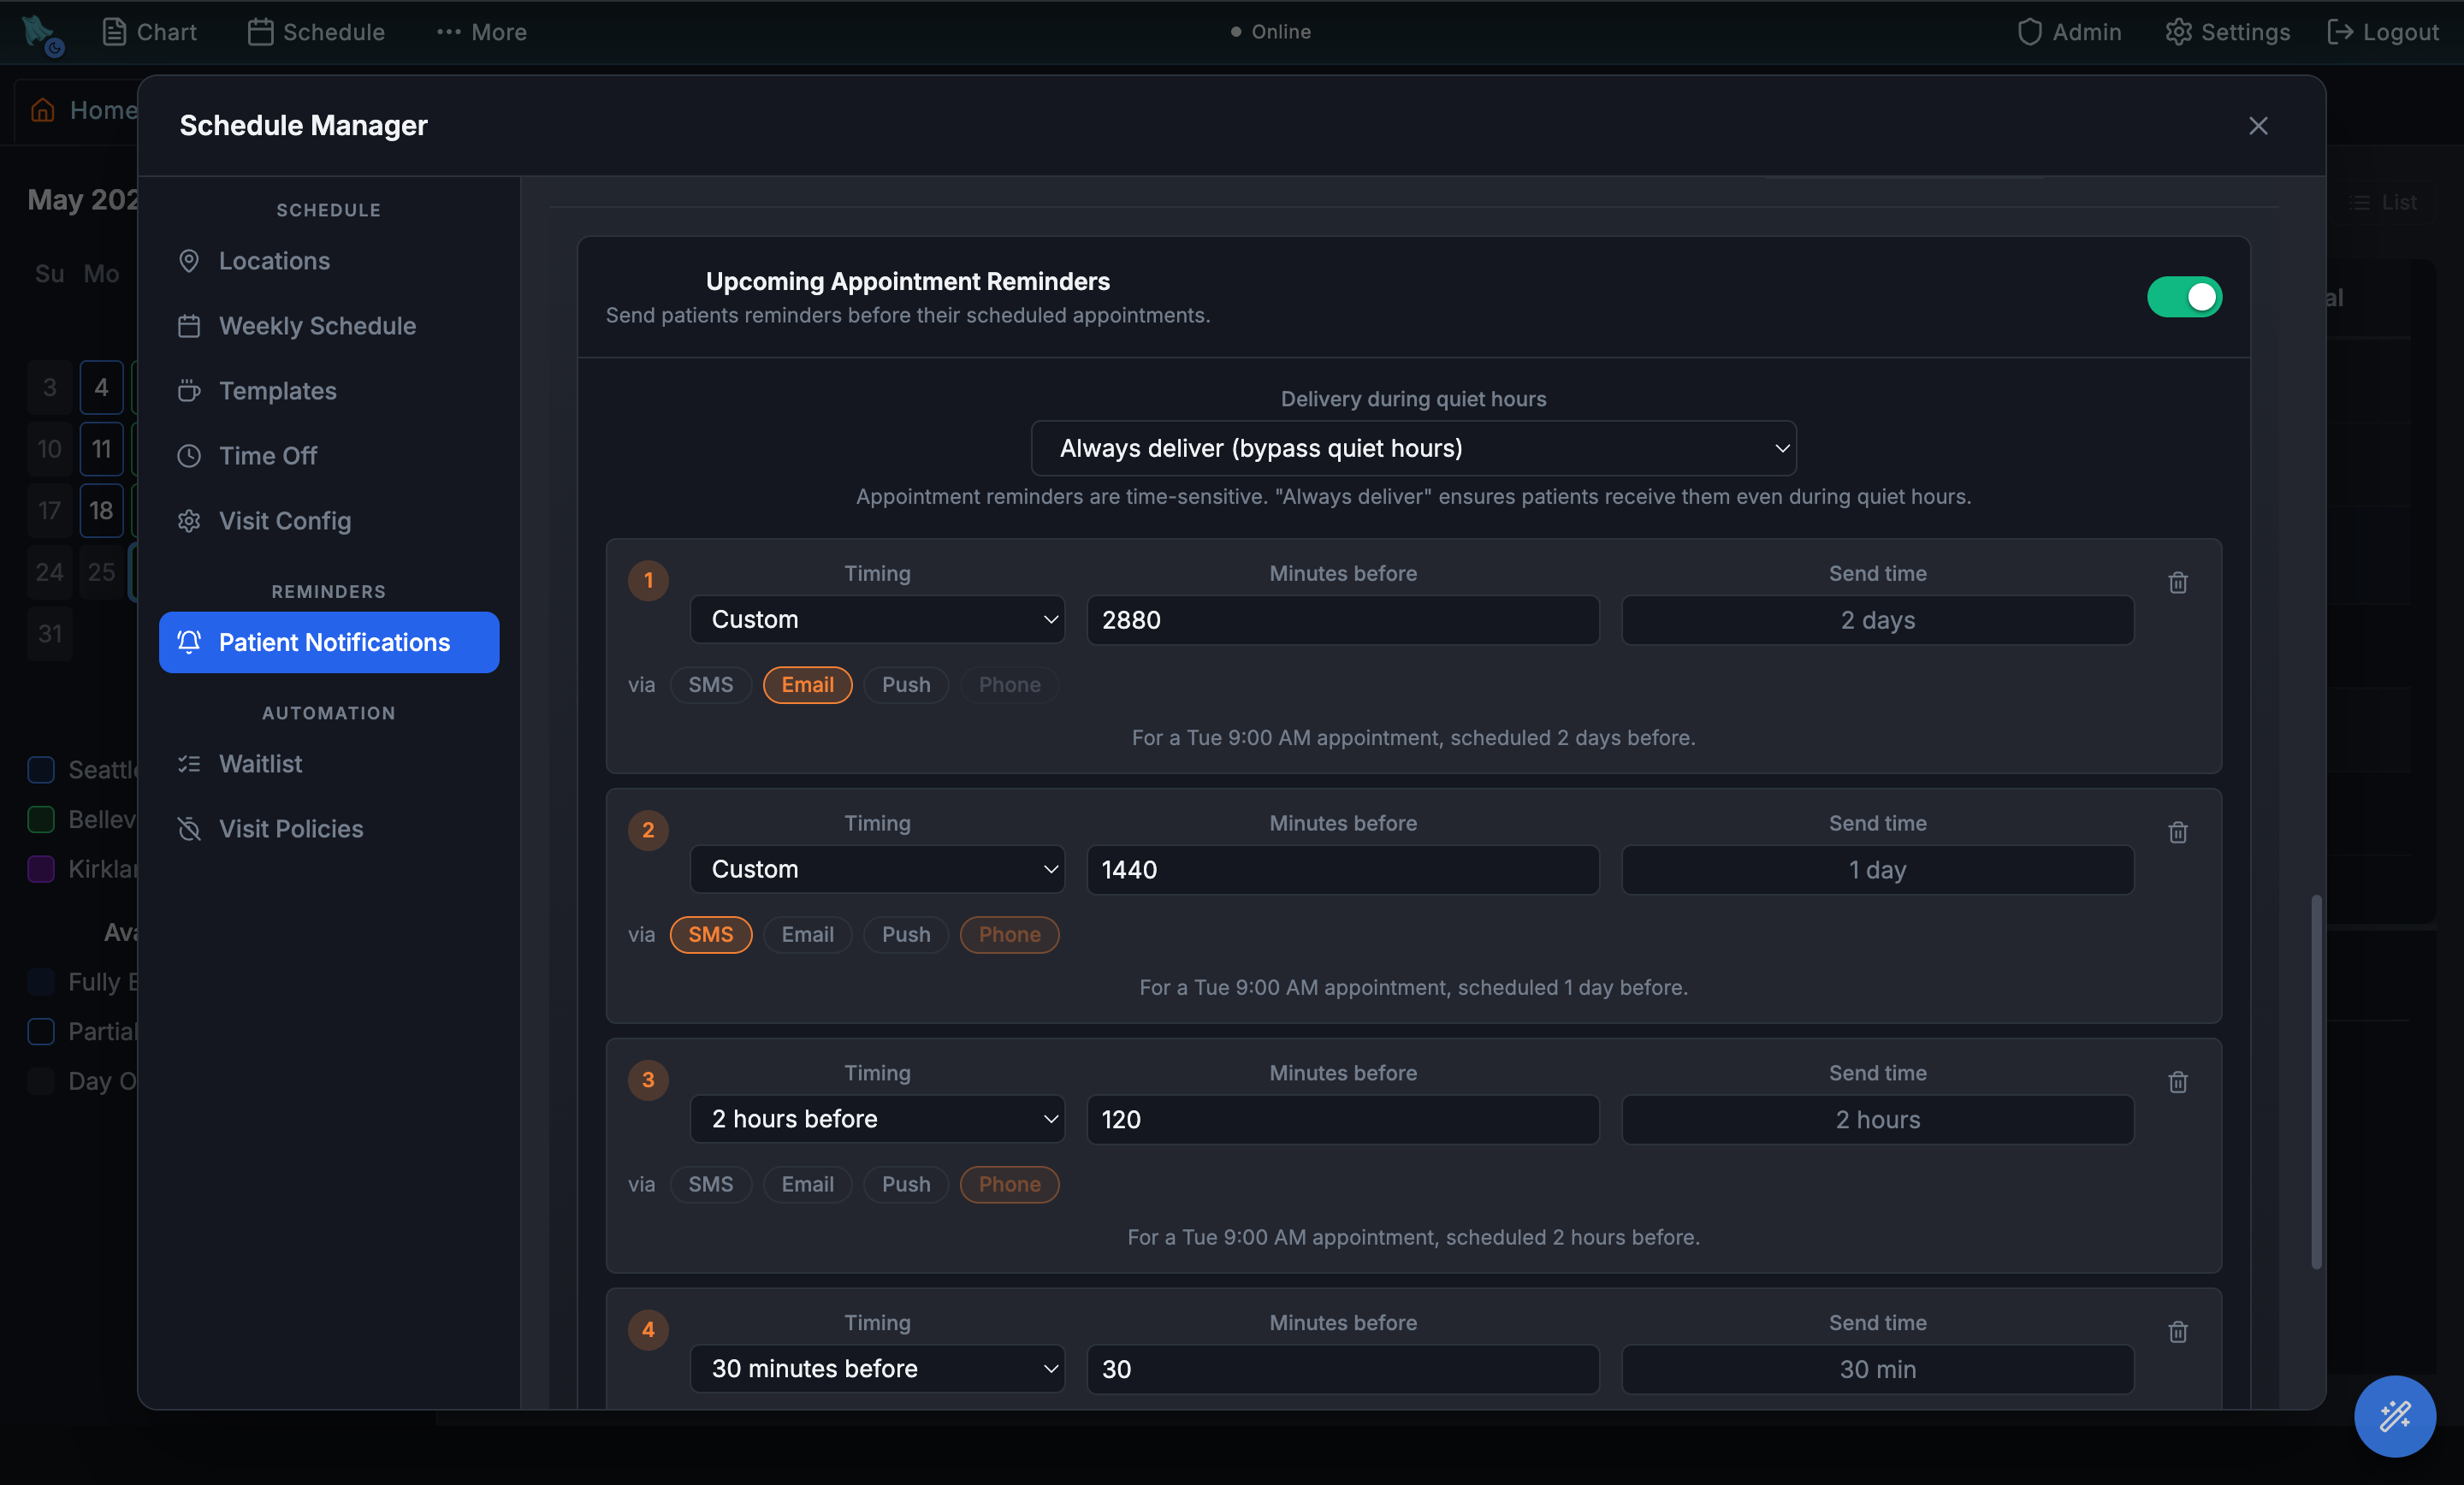
The Appointment Reminder Policy is a ladder of nudges. Add as many as you like — a 1-week email, 2-day email or SMS, night-before text, 2-hour heads-up, or your own cadence — each on its own channel. Save once and Hero rebuilds the reminder schedule for every upcoming appointment, Maria's included.
The day of the visit
Reminders did their job — Maria's appointment day has arrived. The Day view is where your front desk runs the day, one row per patient.
Step 4.1 Check Maria in on arrival
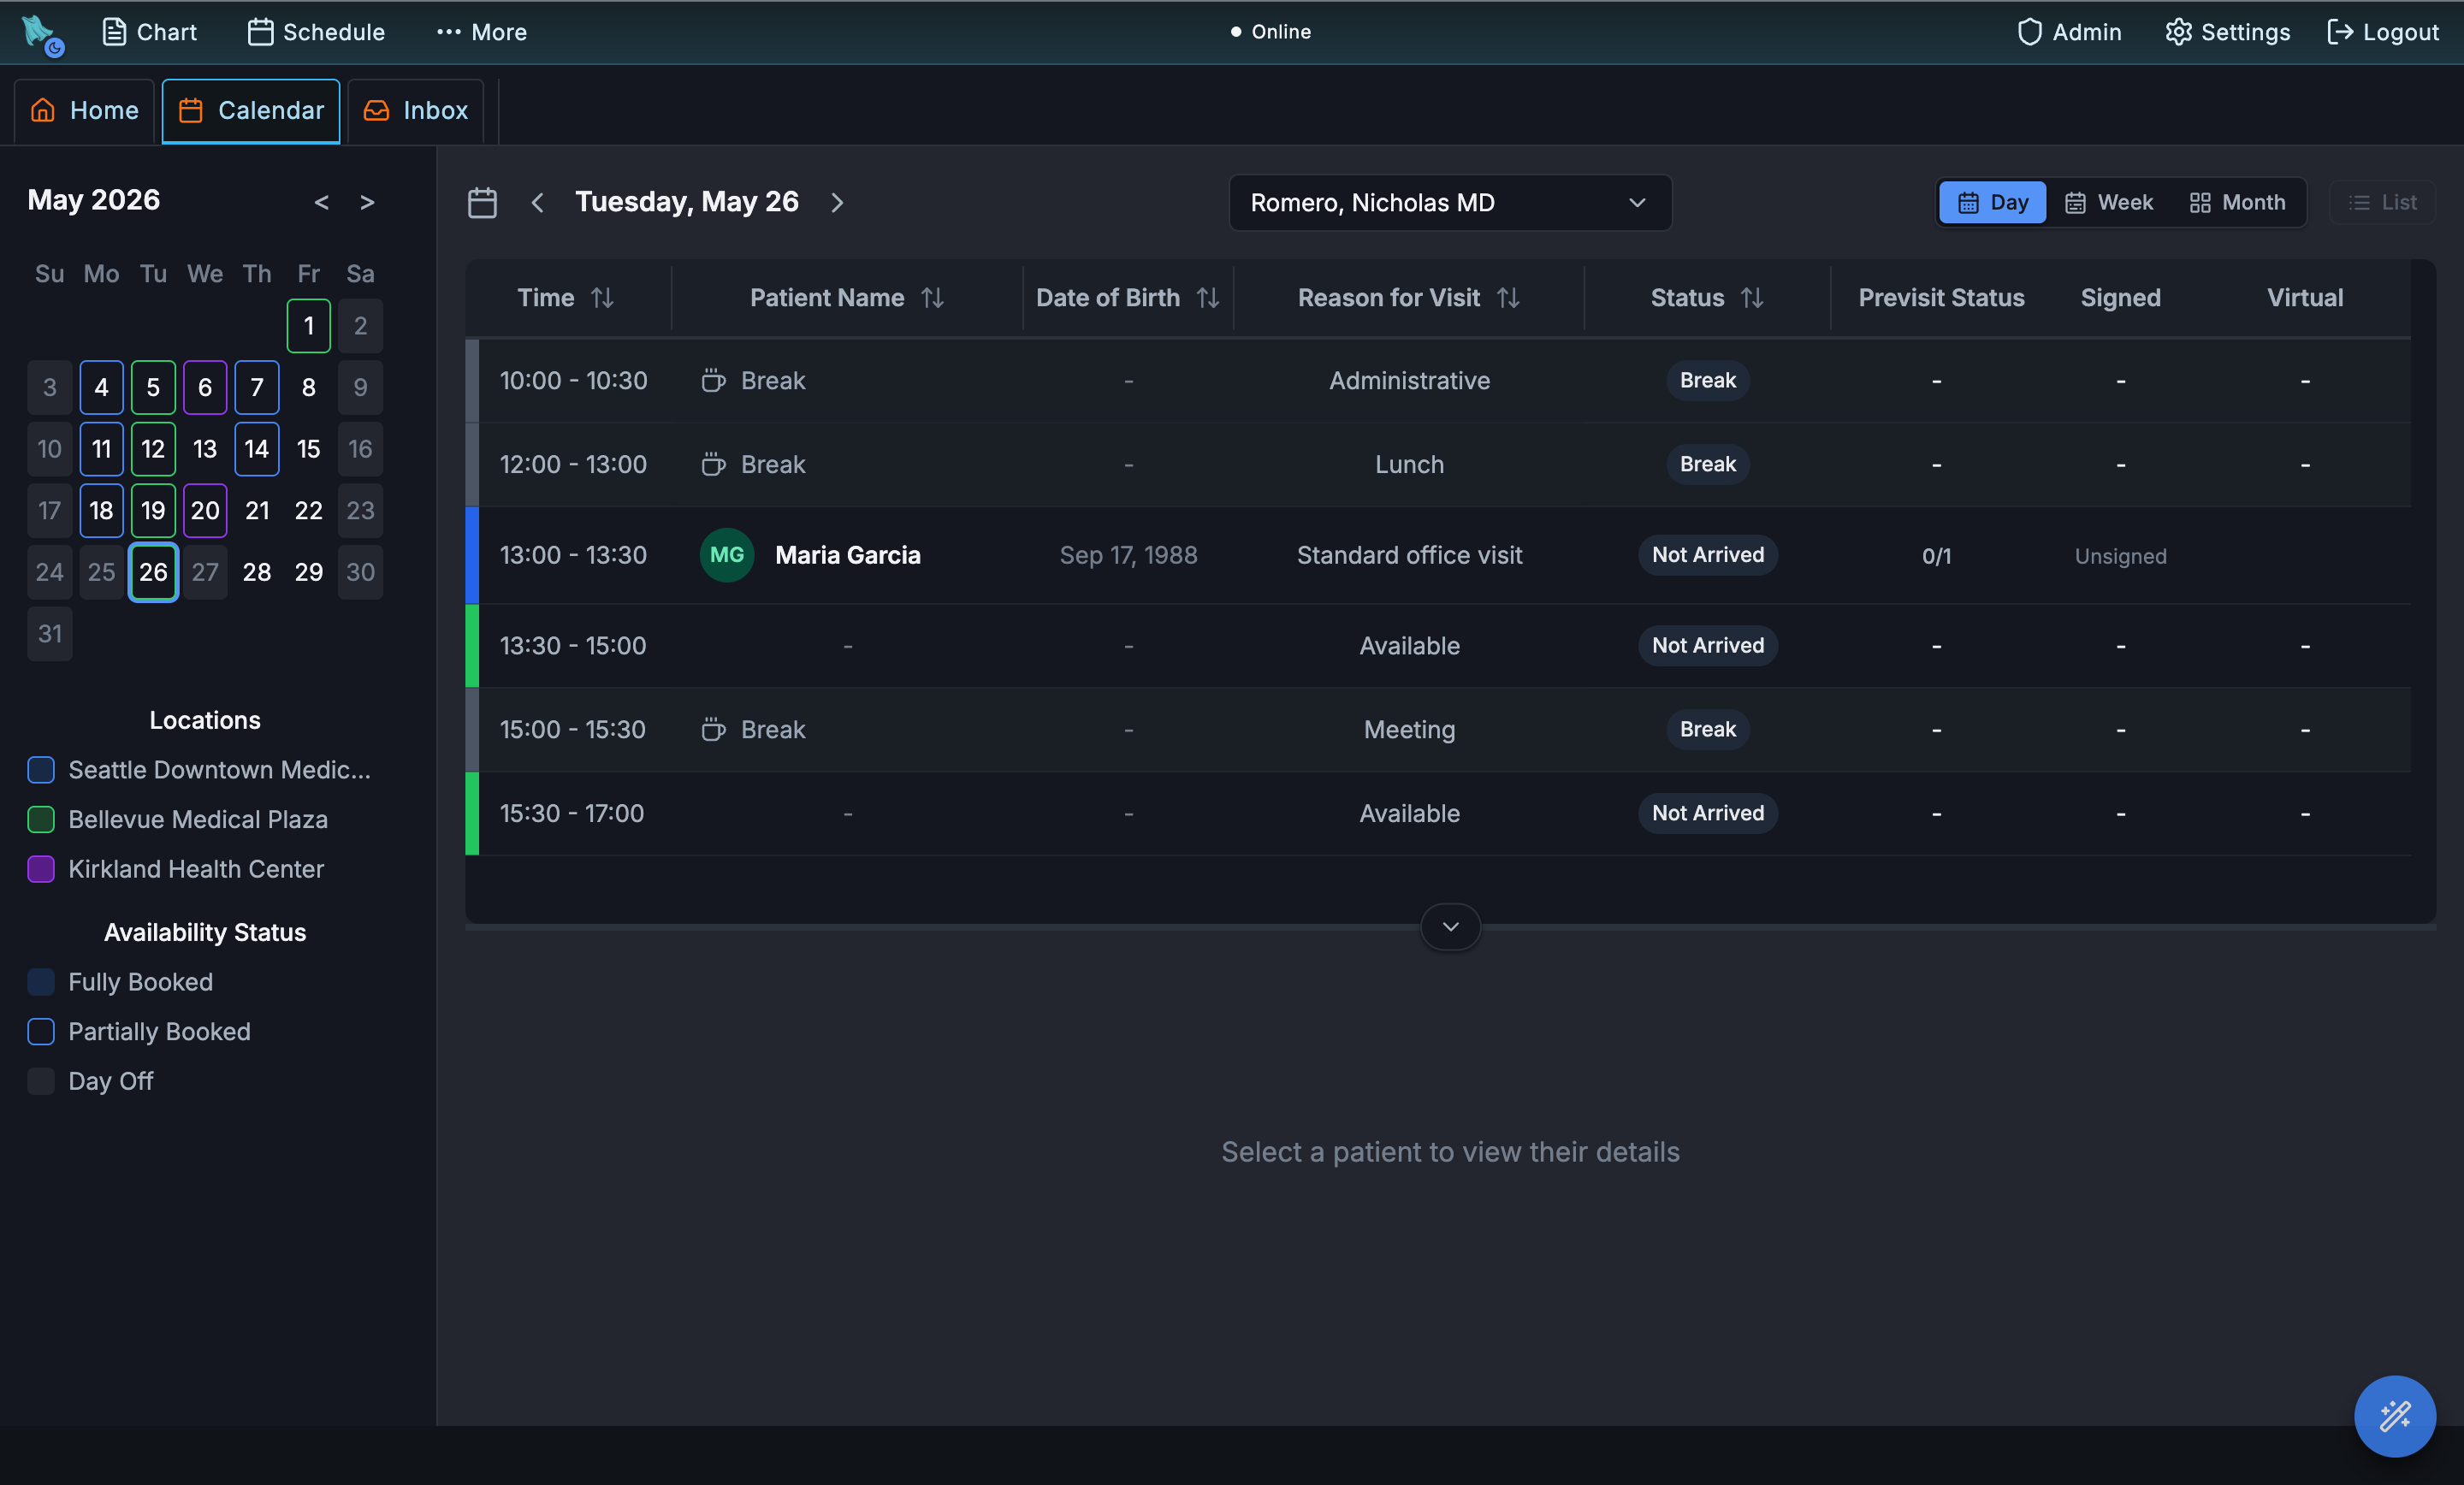
Open the calendar on Maria's appointment day. Her Standard Office Visit sits on the Day view, and every column is a piece of the day-of workflow:
- Status —
Not Arriveduntil the front desk checks her in, thenChecked In,In Progress, andCompleted. - Pre-visit — how many intake forms she's finished, so staff know what's still outstanding.
- Signed — whether the visit note has been completed and signed off.
- Virtual — a one-click Join button when the visit is telehealth.
When Maria walks in, the front desk marks her arrived; when the provider is ready, Begin encounter opens her chart.
Step 4.2 When plans change
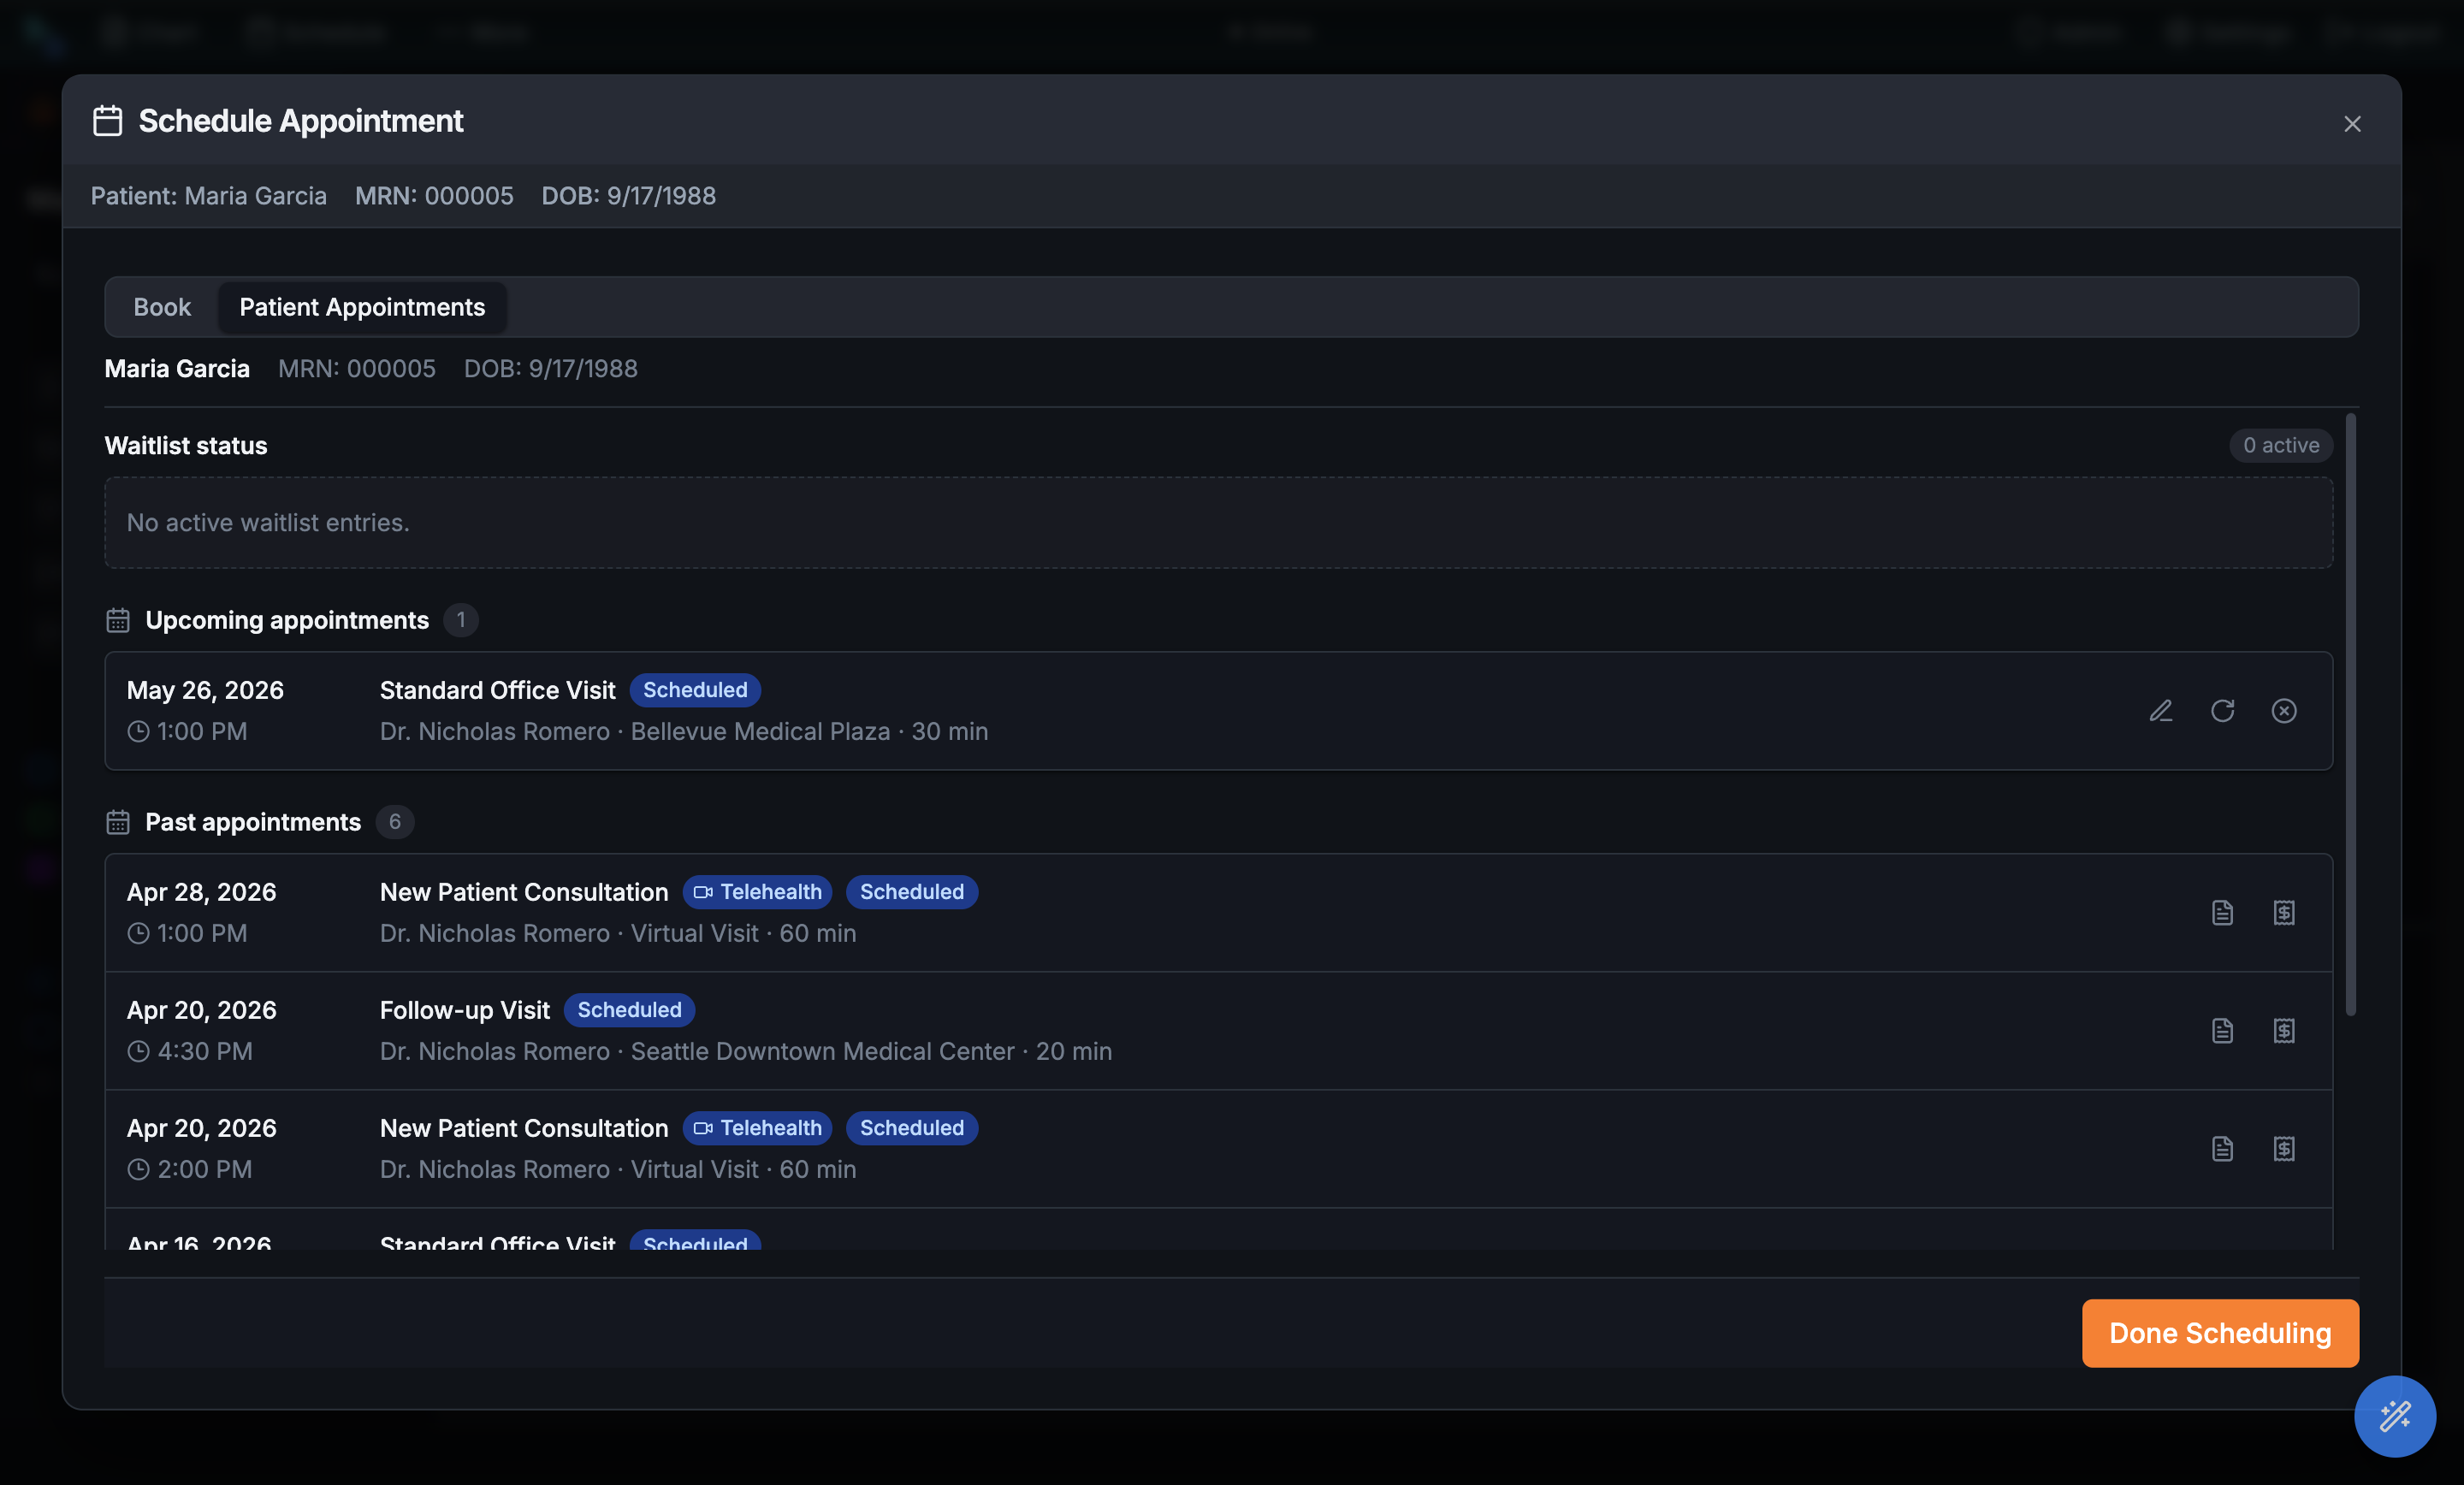
Patients reschedule — that's life. Open Schedule → Patient Appointments for Maria to see every visit she's had and every one coming up. Each upcoming appointment has one-click Edit, Reschedule, and Cancel, and her waitlist status shows whether she's holding out for an earlier opening.
The same scheduling loop starts from clinical work too. When a signed note says "follow up in 2 weeks," or an inbox message needs a return visit, Hero can create the follow-up request, send the patient a portal prompt, and route Schedule Now back into the same booking flow.
That's the full loop — booked from either side, filled by waitlist when needed, reminded automatically, and managed from one place.
One place to get paid.
Hero EMR makes billing part of the visit, not a separate chore. Code the encounter as you close it, send clean claims to insurance, and follow every dollar from billed to paid — all in one place. Here's a quick walk through the features.
What you'll see
Four features: coding a visit as you finish it, the billing dashboard, working the claims queue, and posting payments when the money comes in.
Step 1 Code the visit as you finish it
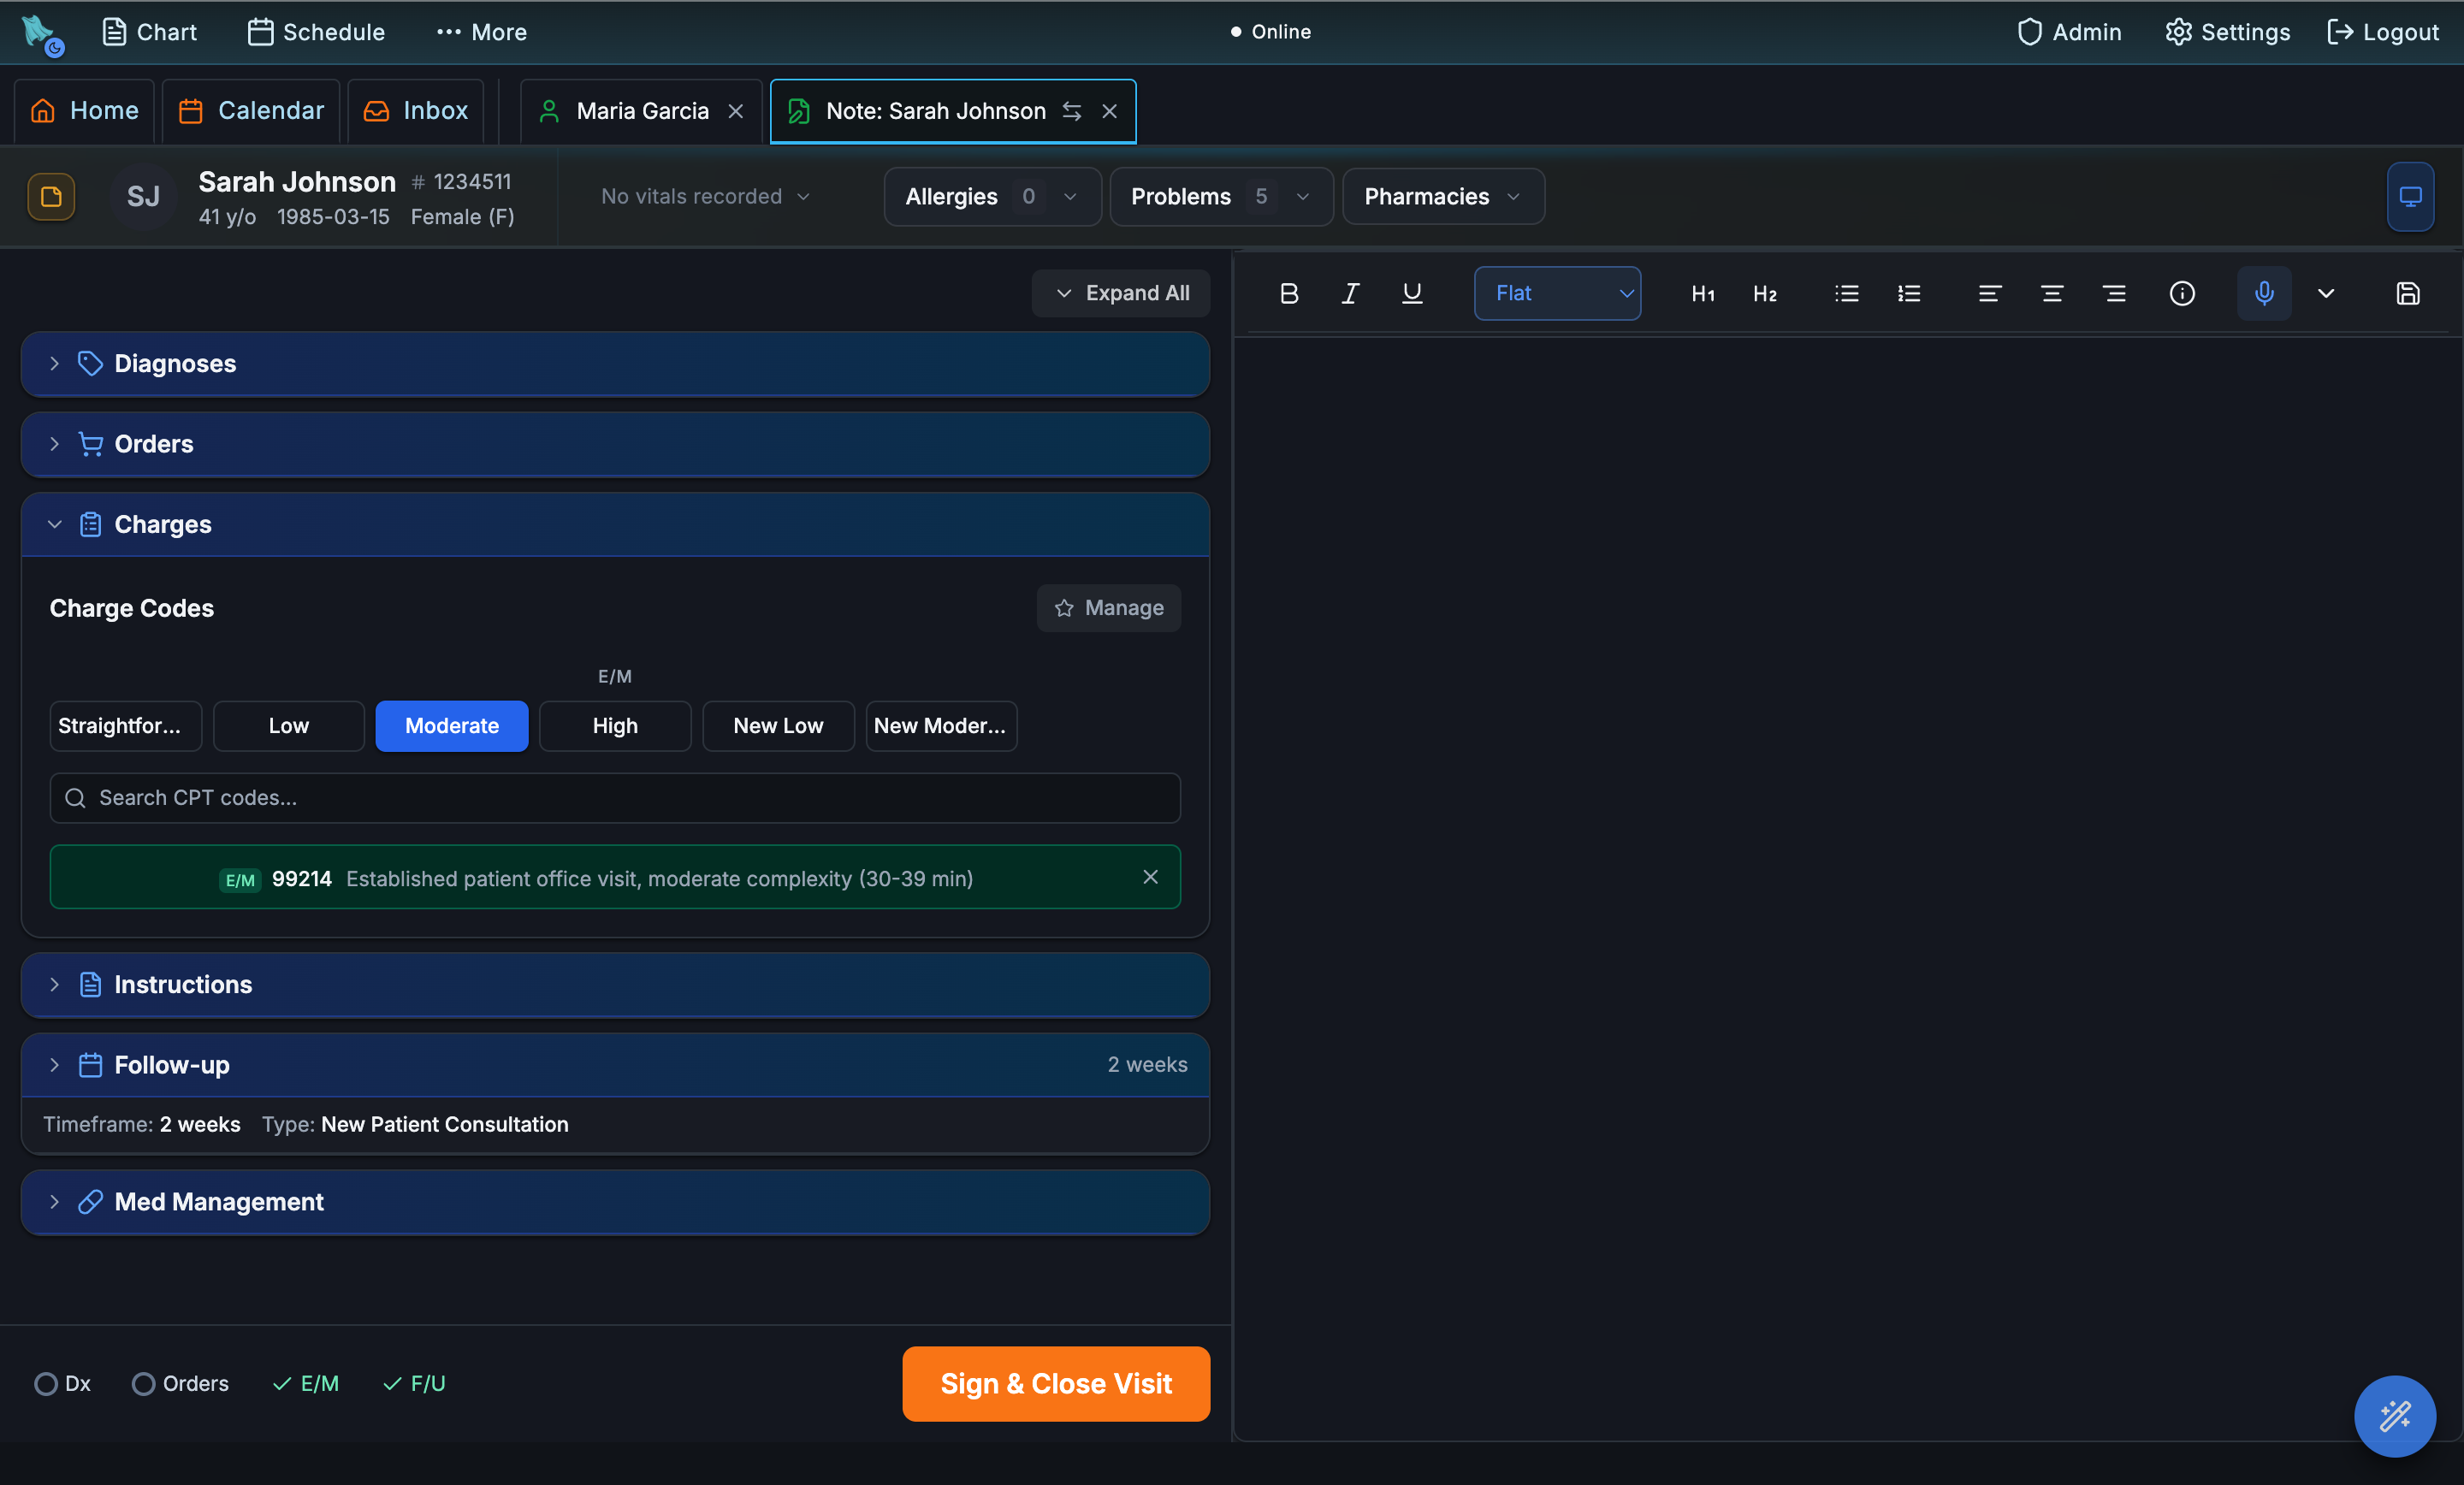
When you close an encounter, the Charges section is right there. Pick the visit level with one click — Straightforward, Low, Moderate, or High — and Hero fills in the matching billing code for you. Need more codes? Search and add them. No separate billing screen, no re-typing.
Step 2 See the money at a glance
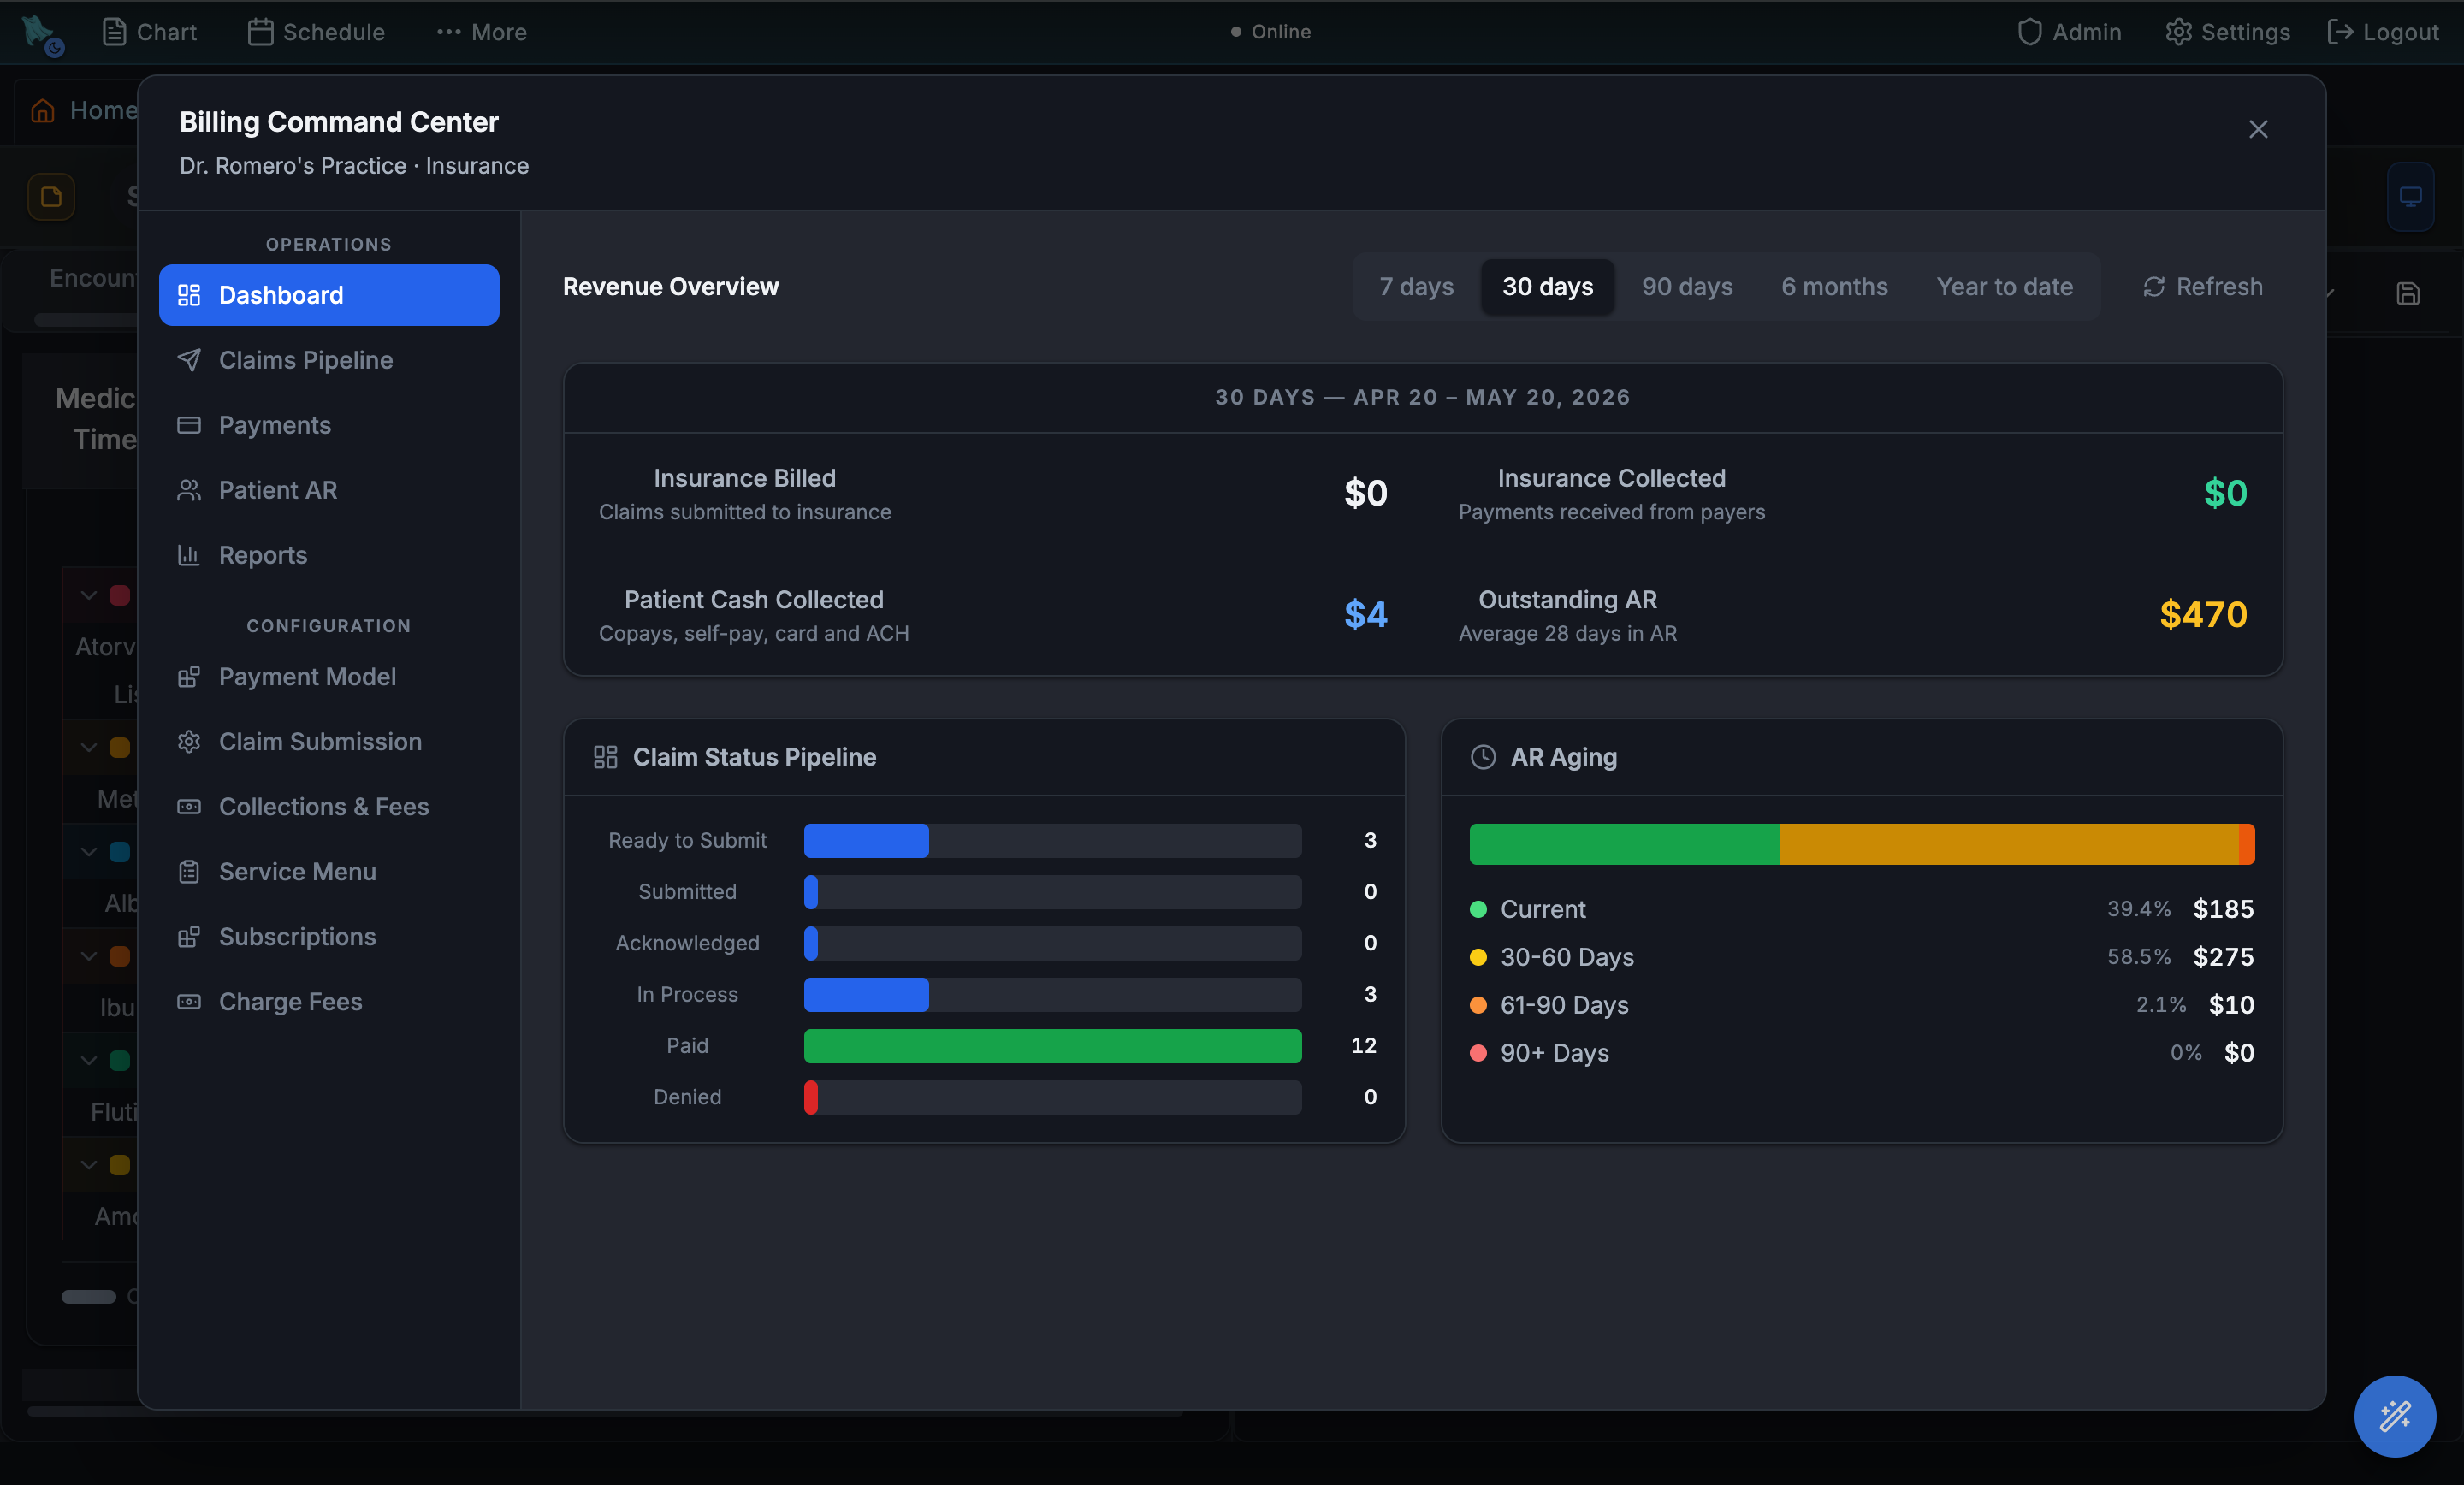
The Billing Command Center — under Admin → Billing — is your financial home base. In one look you see how much was billed to insurance, how much came back, how much patients have paid, and how much is still owed.
The claim pipeline shows where every claim stands, and the aging chart shows how long unpaid balances have been sitting.
Step 3 Work the claims queue
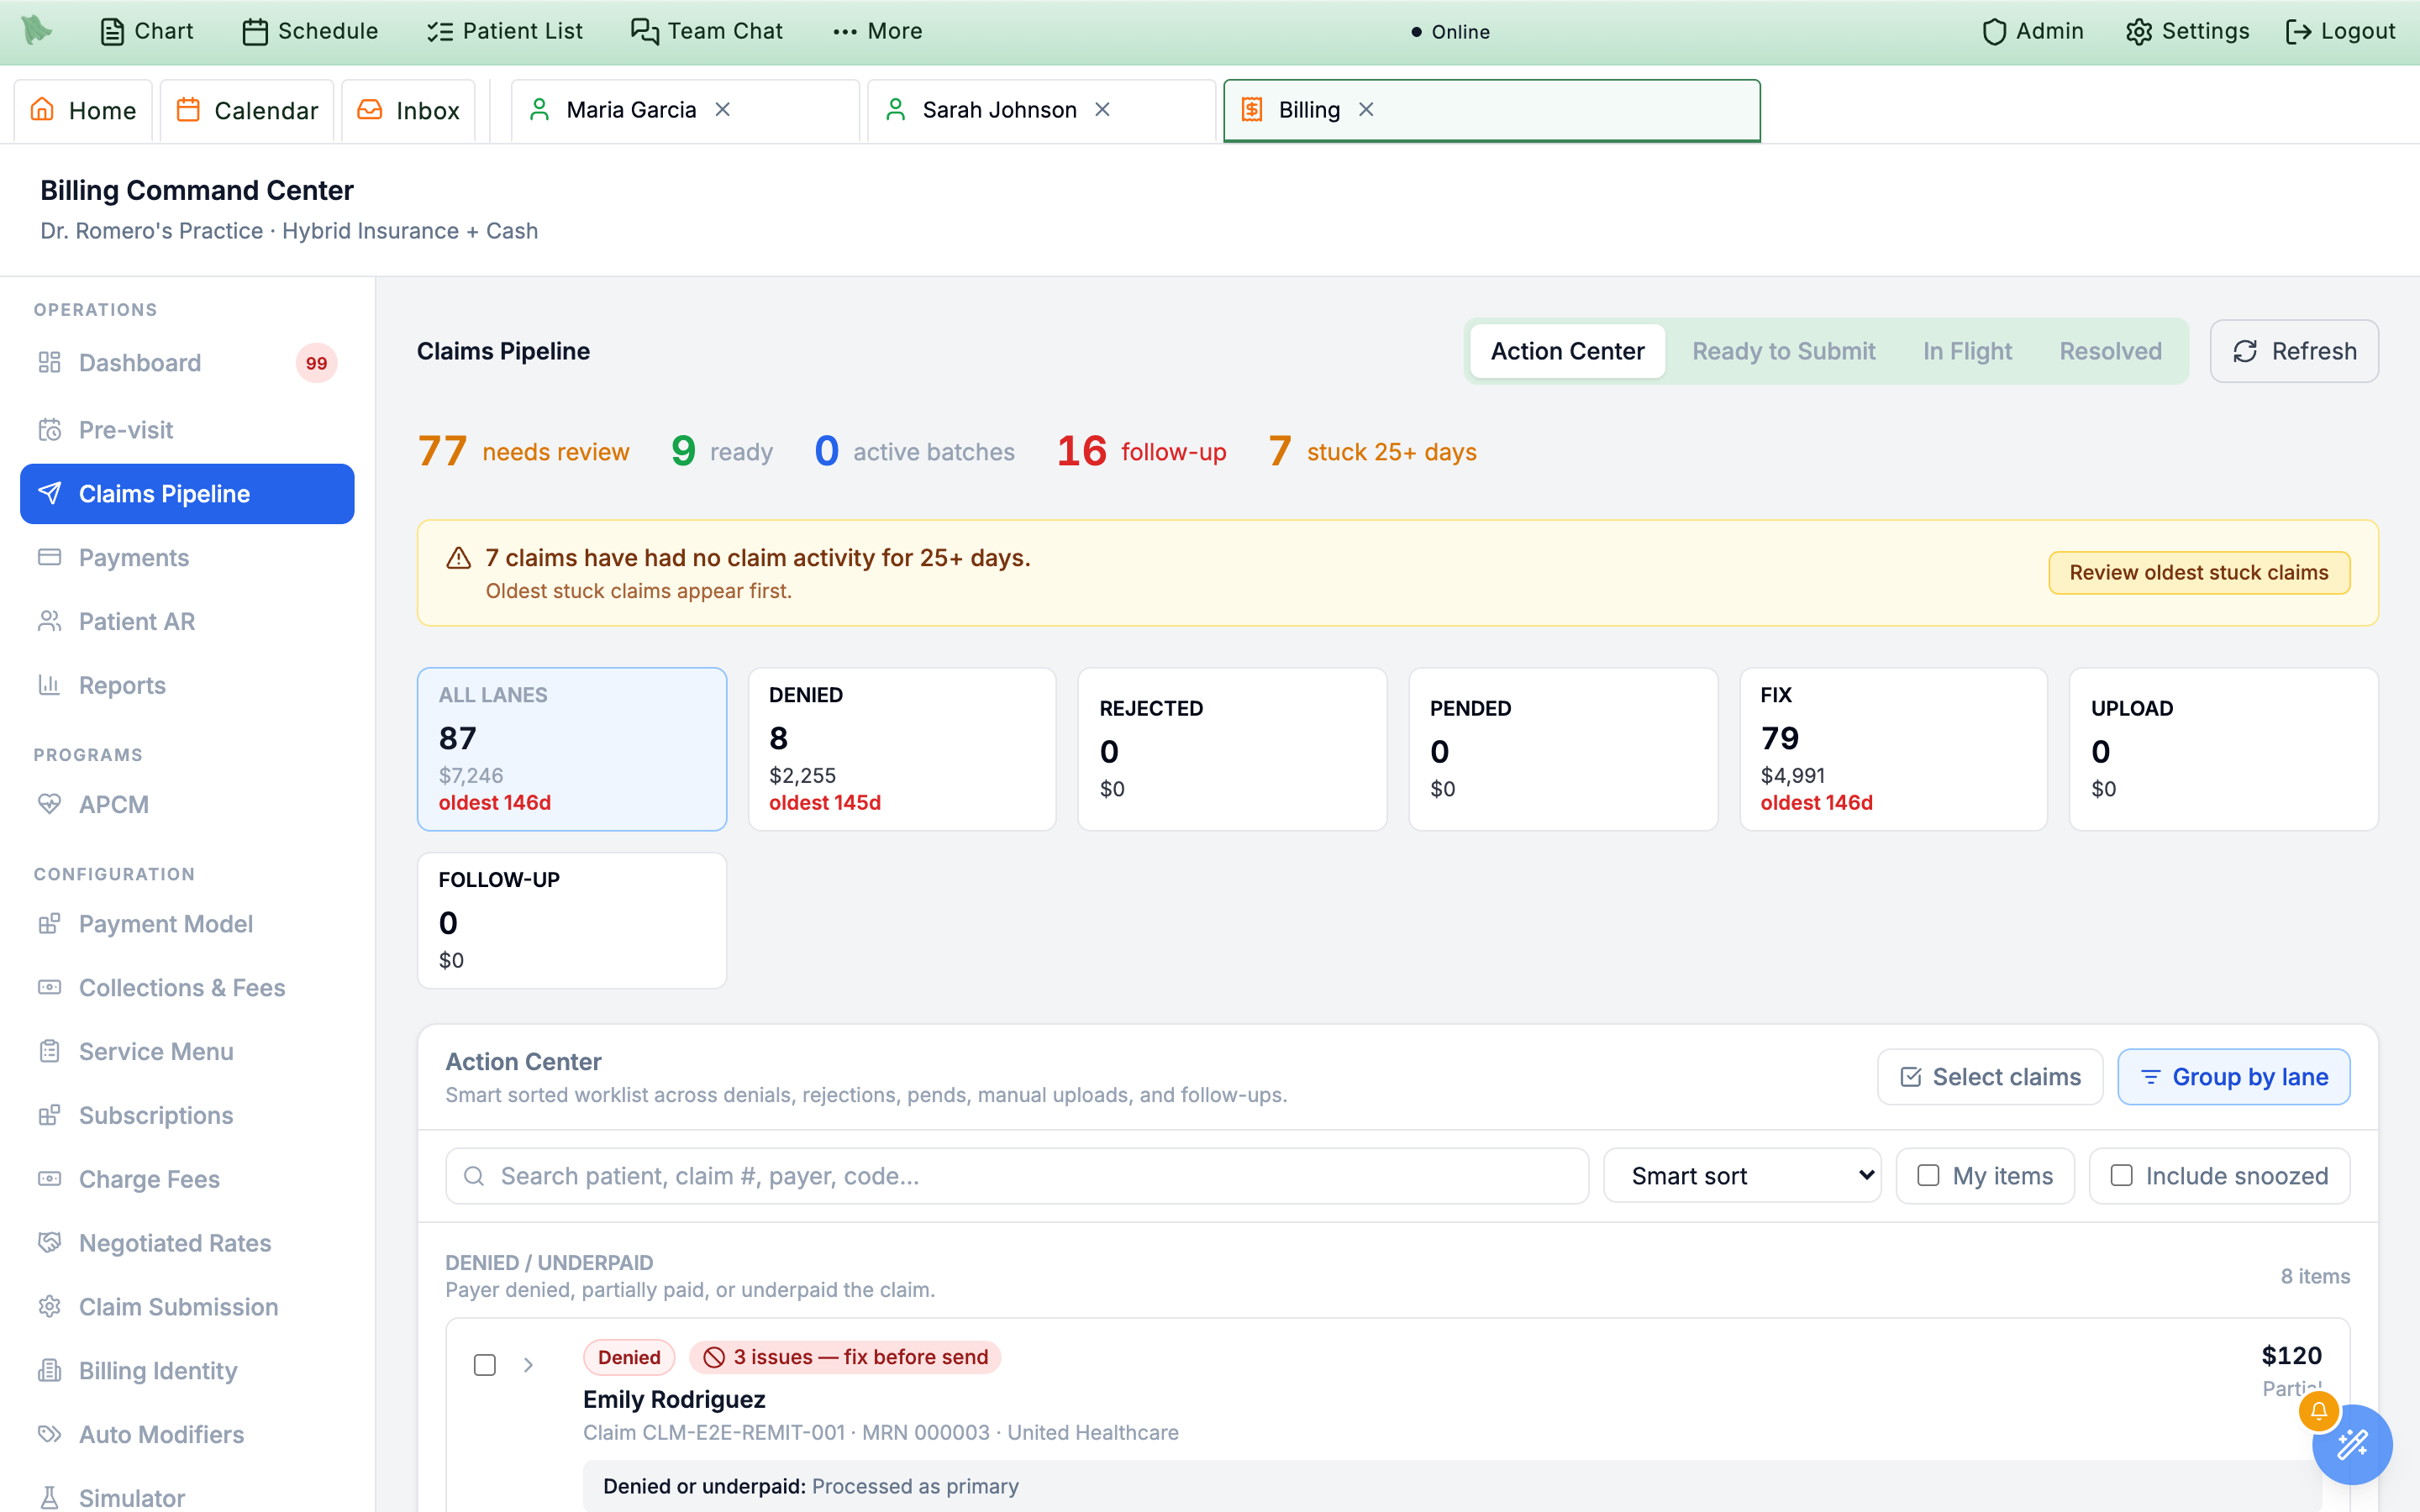
Open Claims Pipeline. Before anything goes to insurance, Hero checks each claim for problems — a missing diagnosis, an unmatched insurance plan — and flags them so the claim doesn't come back denied. Fix what's flagged, and the claim moves to Ready to Send.
Step 4 Post payments as they arrive
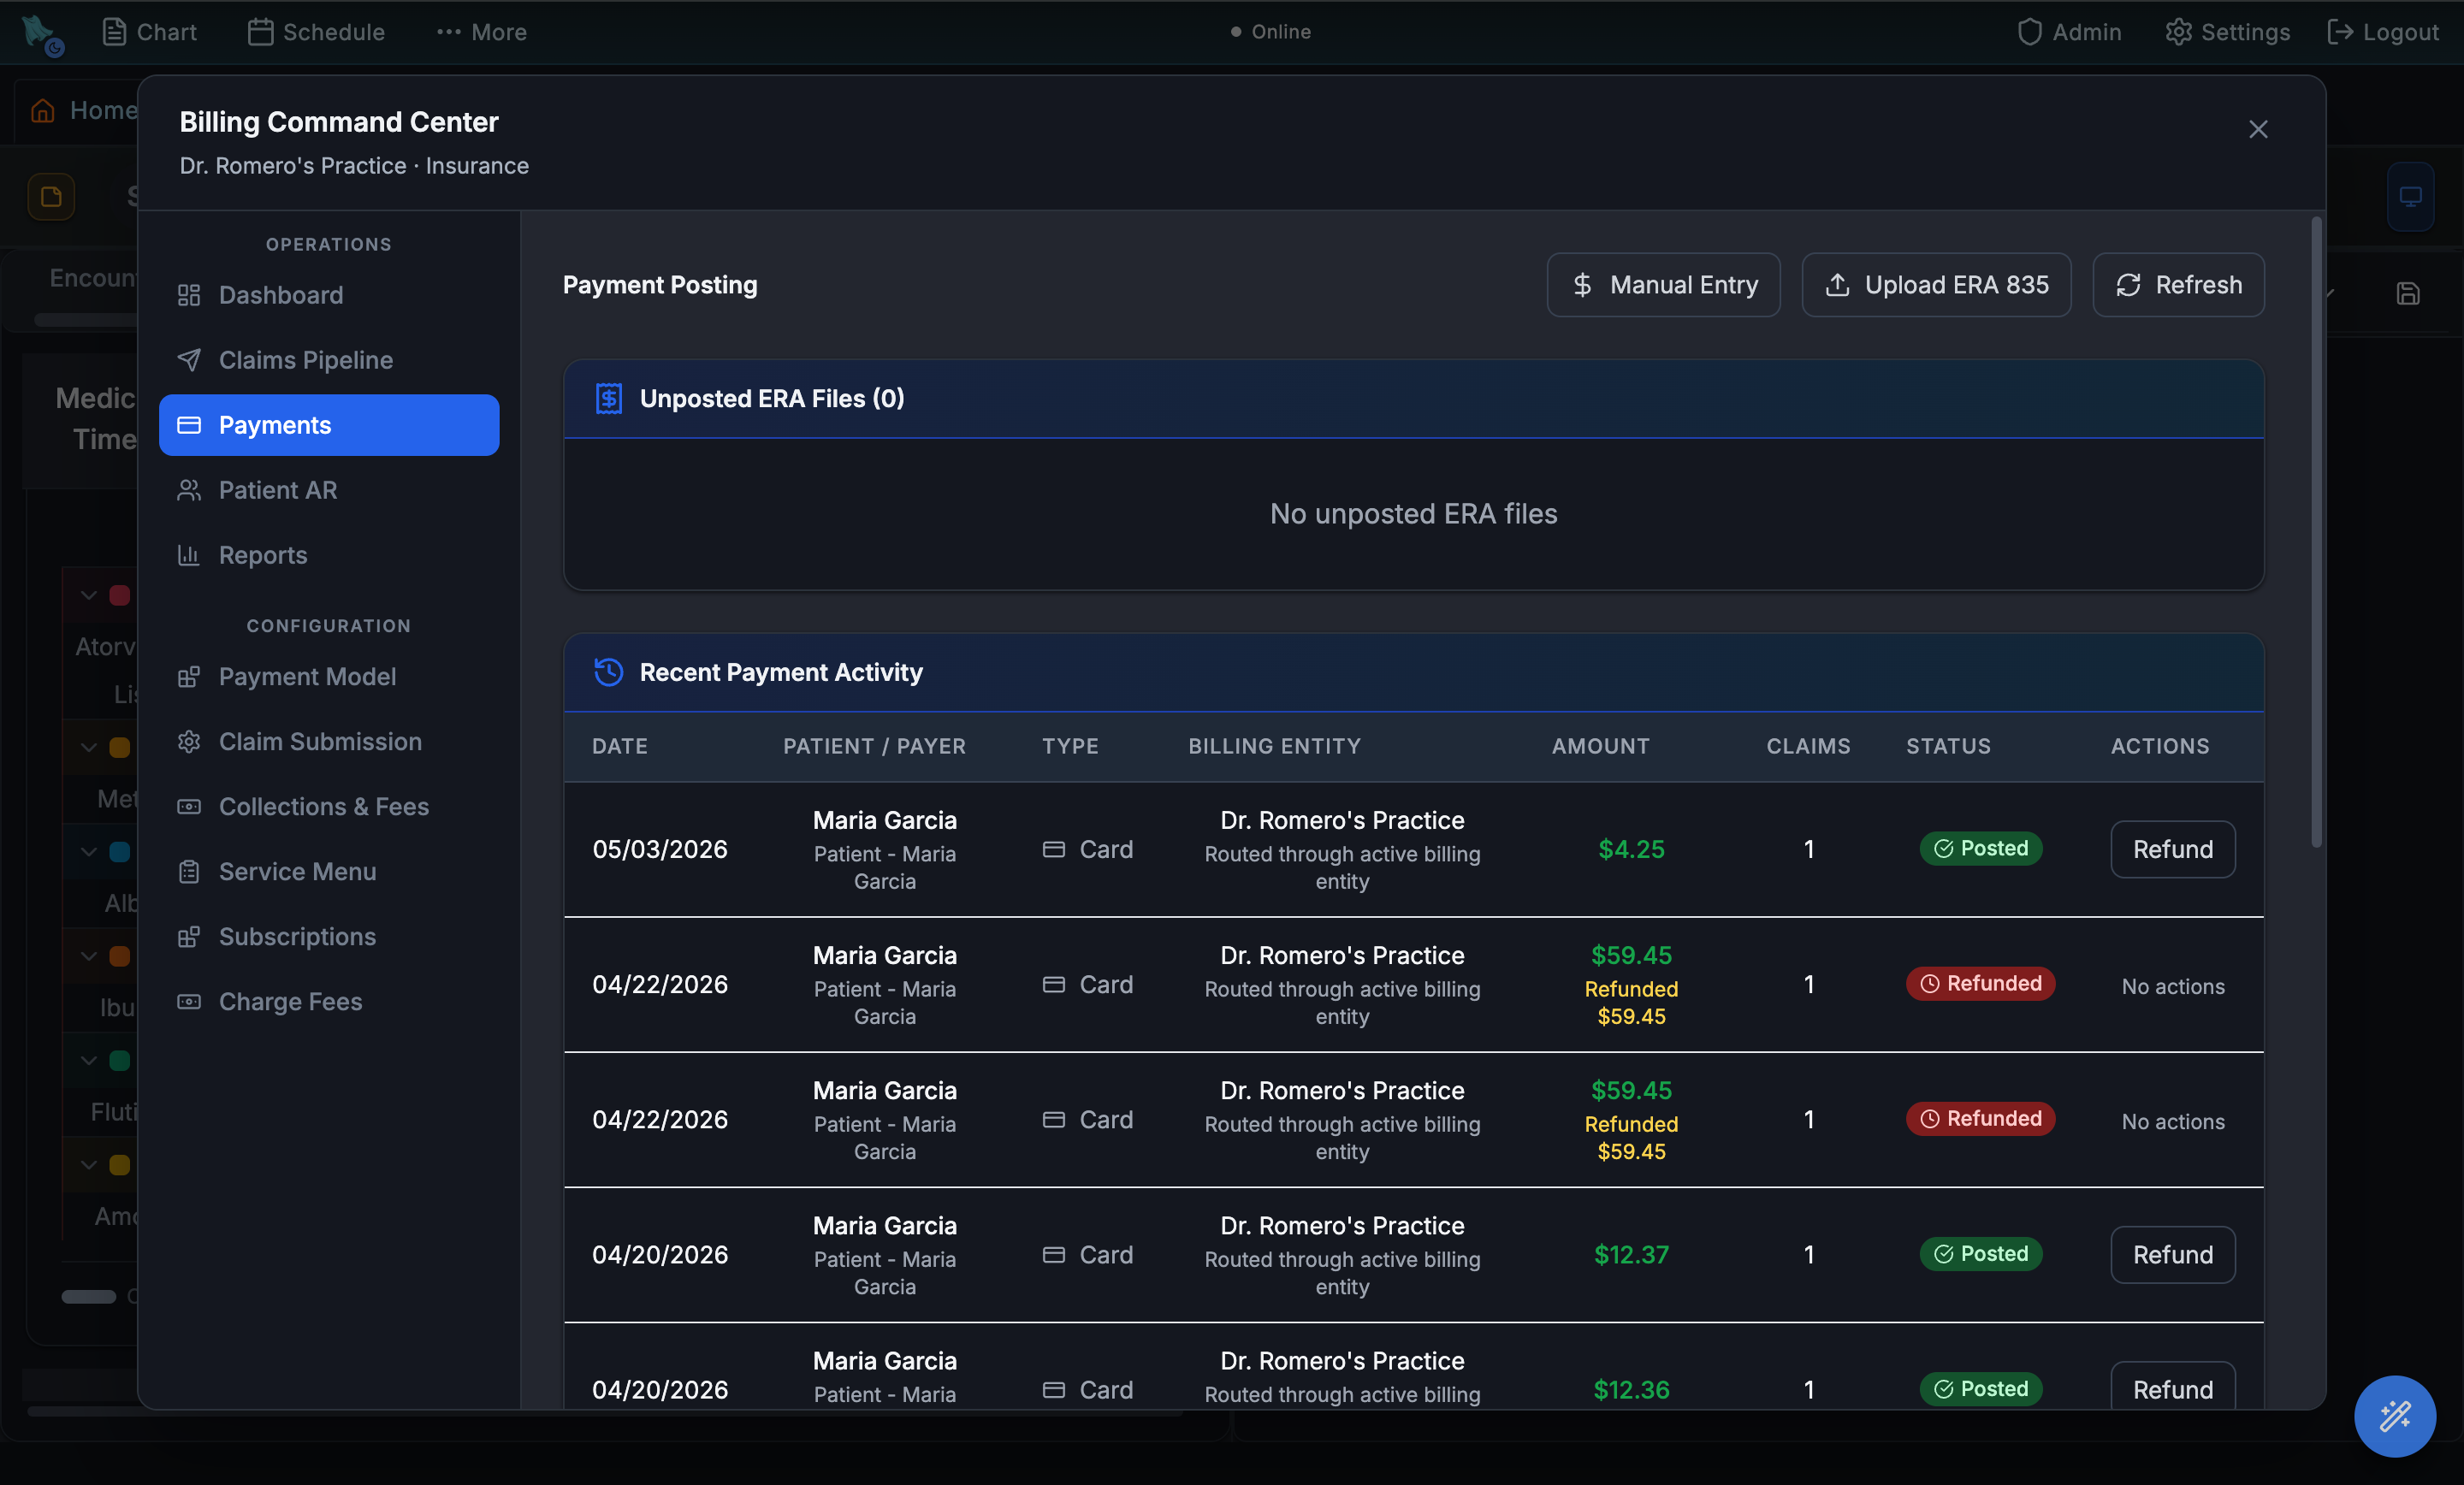
When an insurer pays, upload the payment file they send and Hero matches each payment to the right claim automatically. Card and cash payments from patients are recorded here too — so Payments is one honest record of everything that's come in, and a clear list of anything still outstanding.
Turn a SOAP note into reviewed orders.
This walkthrough tests the note-to-orders workflow in dev-1. Schedule a fresh visit, begin the encounter, type the .demonote1 dotphrase into Note Writer, then click the save (disk) icon in the Note Writer toolbar. Saving the note triggers Encounter Completion so Orders Hero can pull out diagnoses, orders, follow-up work, instructions, medications, and charges for clinician review.
What you'll test
A clean end-to-end scenario: create a new Maria Garcia visit, open a blank encounter, expand .demonote1, save the SOAP note, and inspect the generated Encounter Completion draft before anything is sent.
Create a fresh visit first
Start by booking a new appointment so the Orders Hero extraction is tied to a clean encounter instead of a visit someone has already tested.
Step 0.1 Open Calendar and schedule Maria Garcia
Click below to open the dev EMR. In Calendar, click Schedule, search for Maria Garcia, then create a new appointment in any open slot. A standard office visit is fine for this test.
Use a new slot each time you run the demo. The fresh visit makes it obvious that the diagnoses and orders you review came from the note you just saved.
Step 0.2 Begin the new encounter
Return to the day view for the appointment you just created. Open Maria's row, mark the visit in progress if needed, then click Begin encounter. You should land in a blank Note Writer for that appointment.
Write the short SOAP note
The demo dotphrase is already loaded in dev-1, so the user only needs to type the shortcut into the note body.
Step 1.1 Type .demonote1 in Note Writer
Click inside the blank note and type .demonote1. If the dotphrase picker appears, select the .demonote1 result. It expands into a short SOAP note with the diagnosis and order language Orders Hero should extract.
Do not paste a separate note for this scenario. The goal is to test the exact dev-1 dotphrase and make the generated Encounter Completion draft reproducible.
Step 1.2 Keep the note simple
Skim the expanded SOAP note and leave the test language intact. Orders Hero reads the assessment and plan text, then maps it into structured encounter work: diagnoses, labs, imaging, prescriptions, follow-up, patient instructions, and billing suggestions.
Save the note and let Orders Hero work
Saving the note is the trigger point for this scenario. Saving kicks off Encounter Completion from the note content.
Step 2.1 Save the note
After .demonote1 has expanded, click the save (disk) icon in the Note Writer toolbar. Wait for the save to finish. If Encounter Completion does not open automatically, switch to Encounter Completion from the visit controls.
Orders Hero reads the saved SOAP note and turns the clinical plan into a structured draft. This is where the user should see note text become editable review items instead of free text.
Step 2.2 Review diagnoses and orders
Open the Diagnoses and Orders areas in Encounter Completion. The diagnosis list, lab or imaging orders, prescriptions, follow-up timing, and patient instructions should be prefilled from the .demonote1 note.
Nothing is sent just because Orders Hero found it. The clinician can add, edit, delete, or decline each item before signing the encounter.
Follow the order through the chart
After review, orders and results stay tied to the same chart and encounter that created them.
Step 3.1 Check the Labs tab
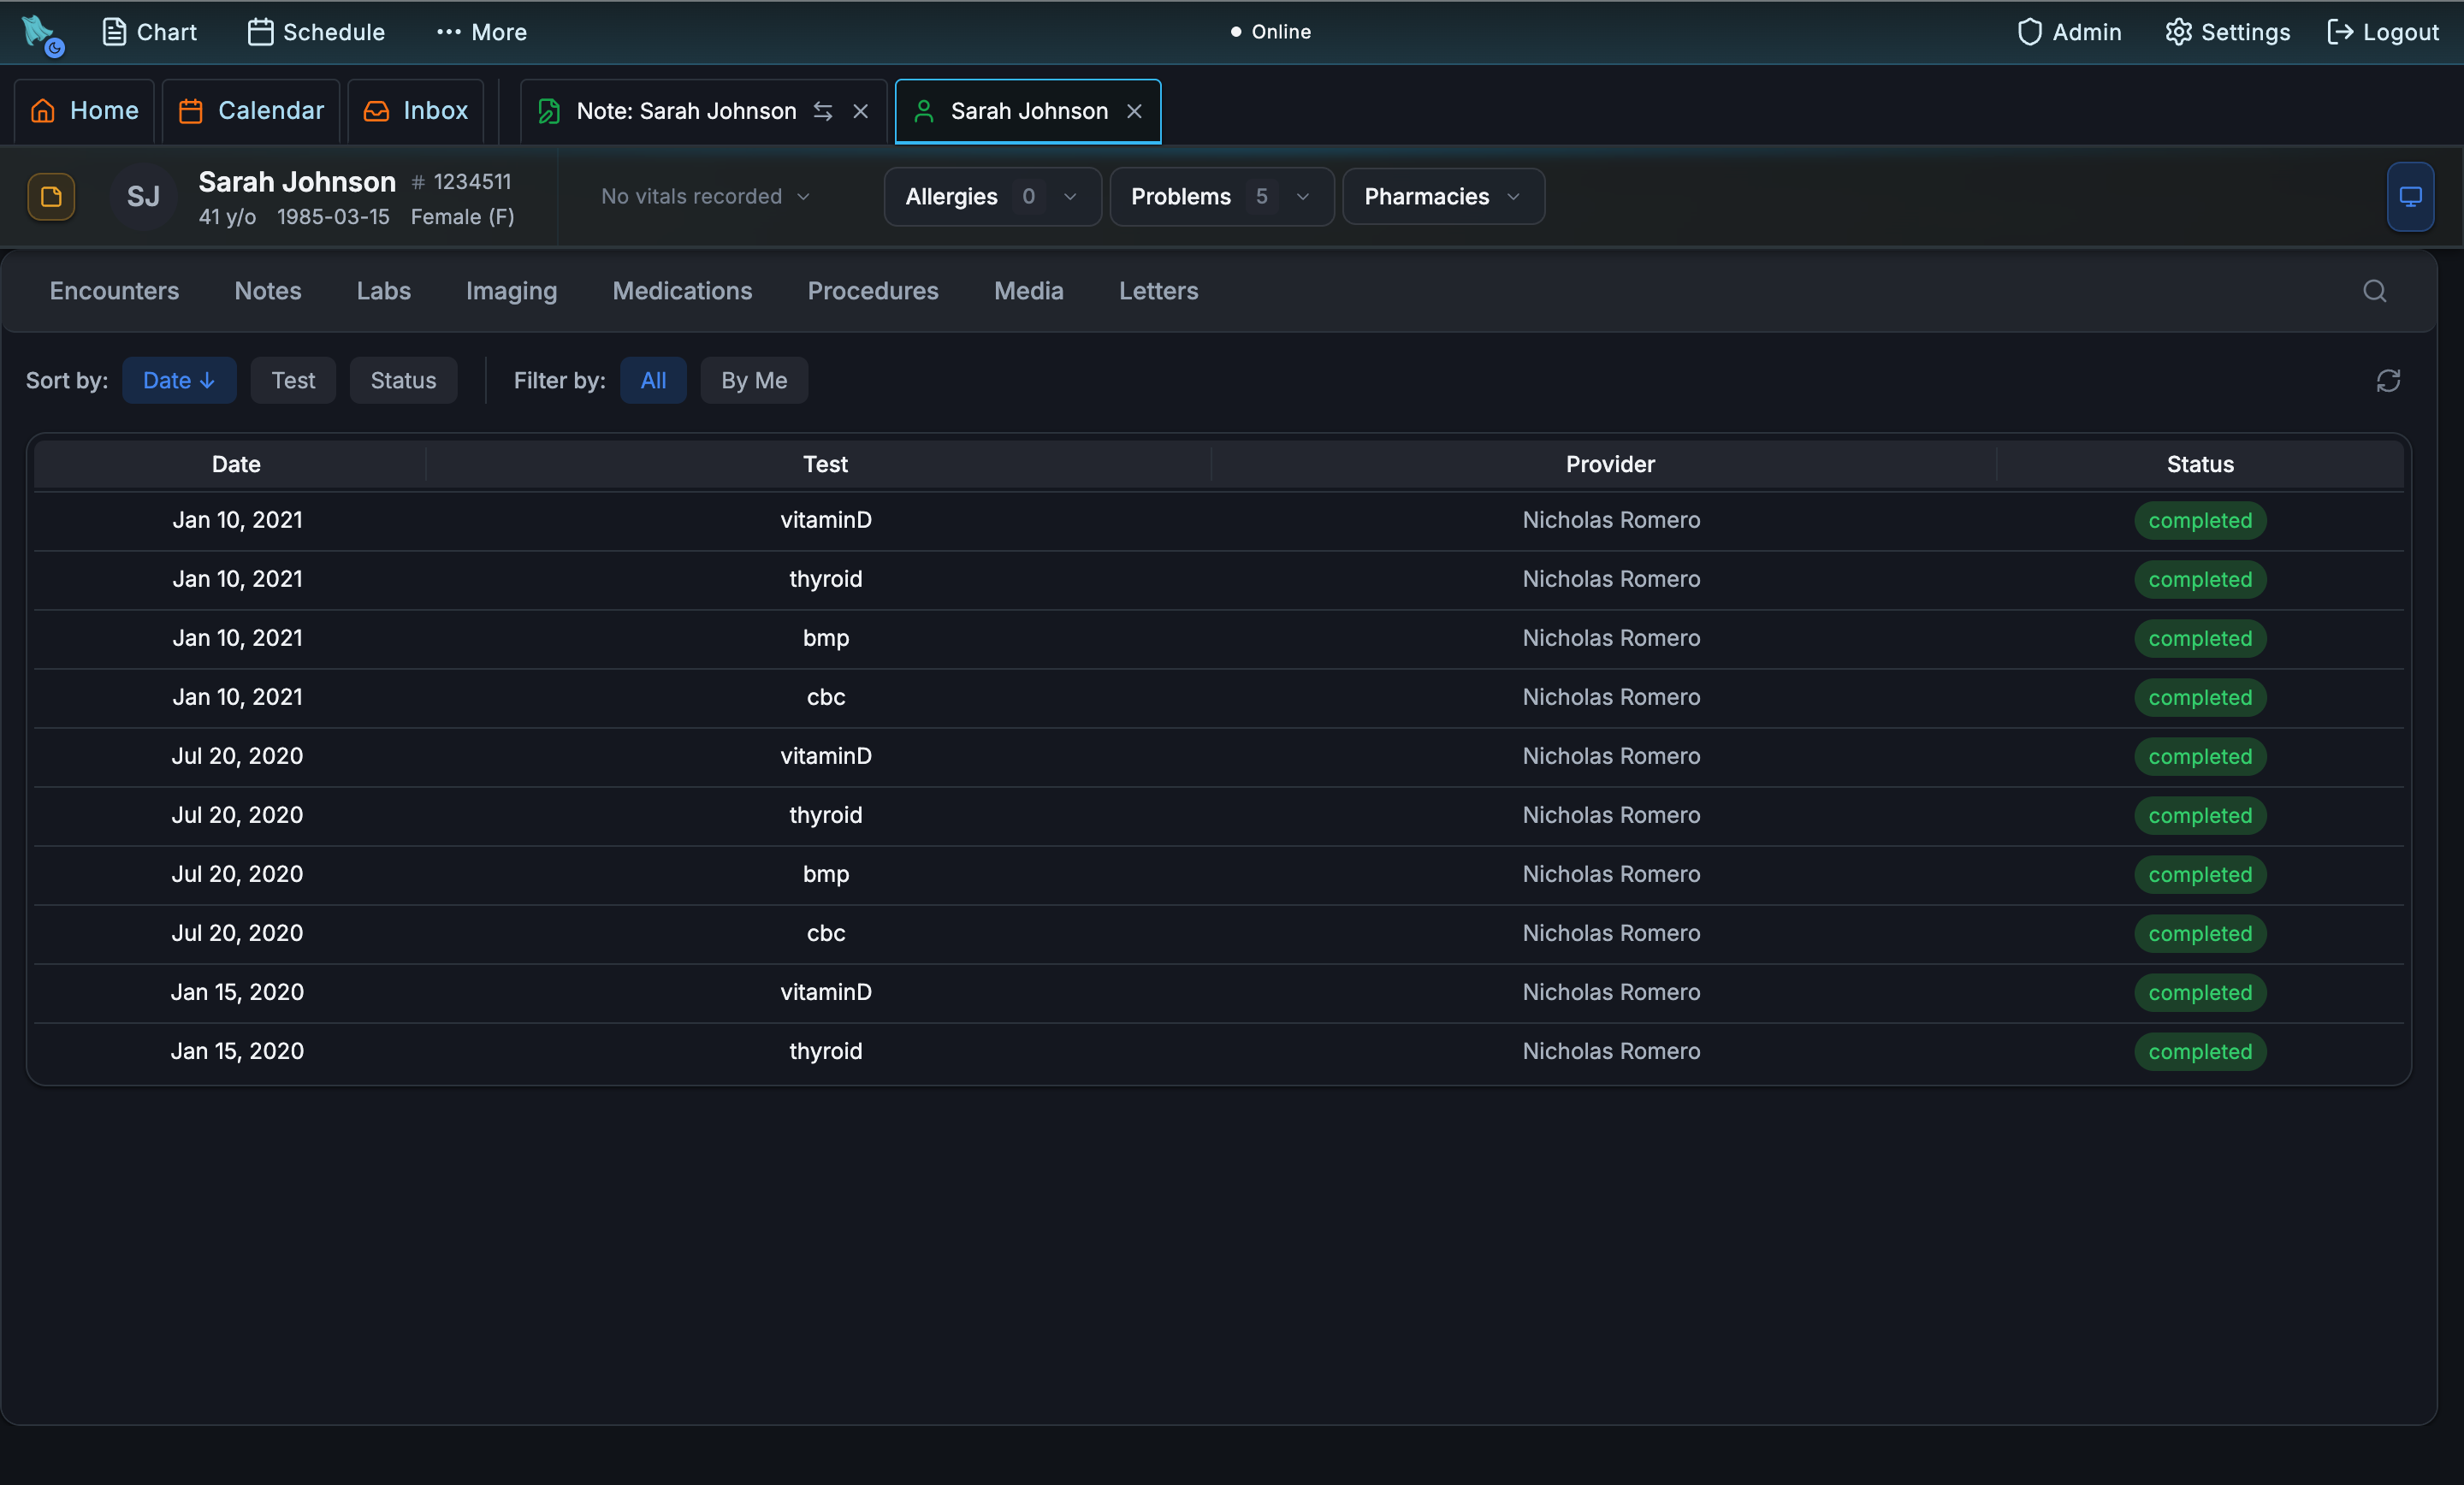
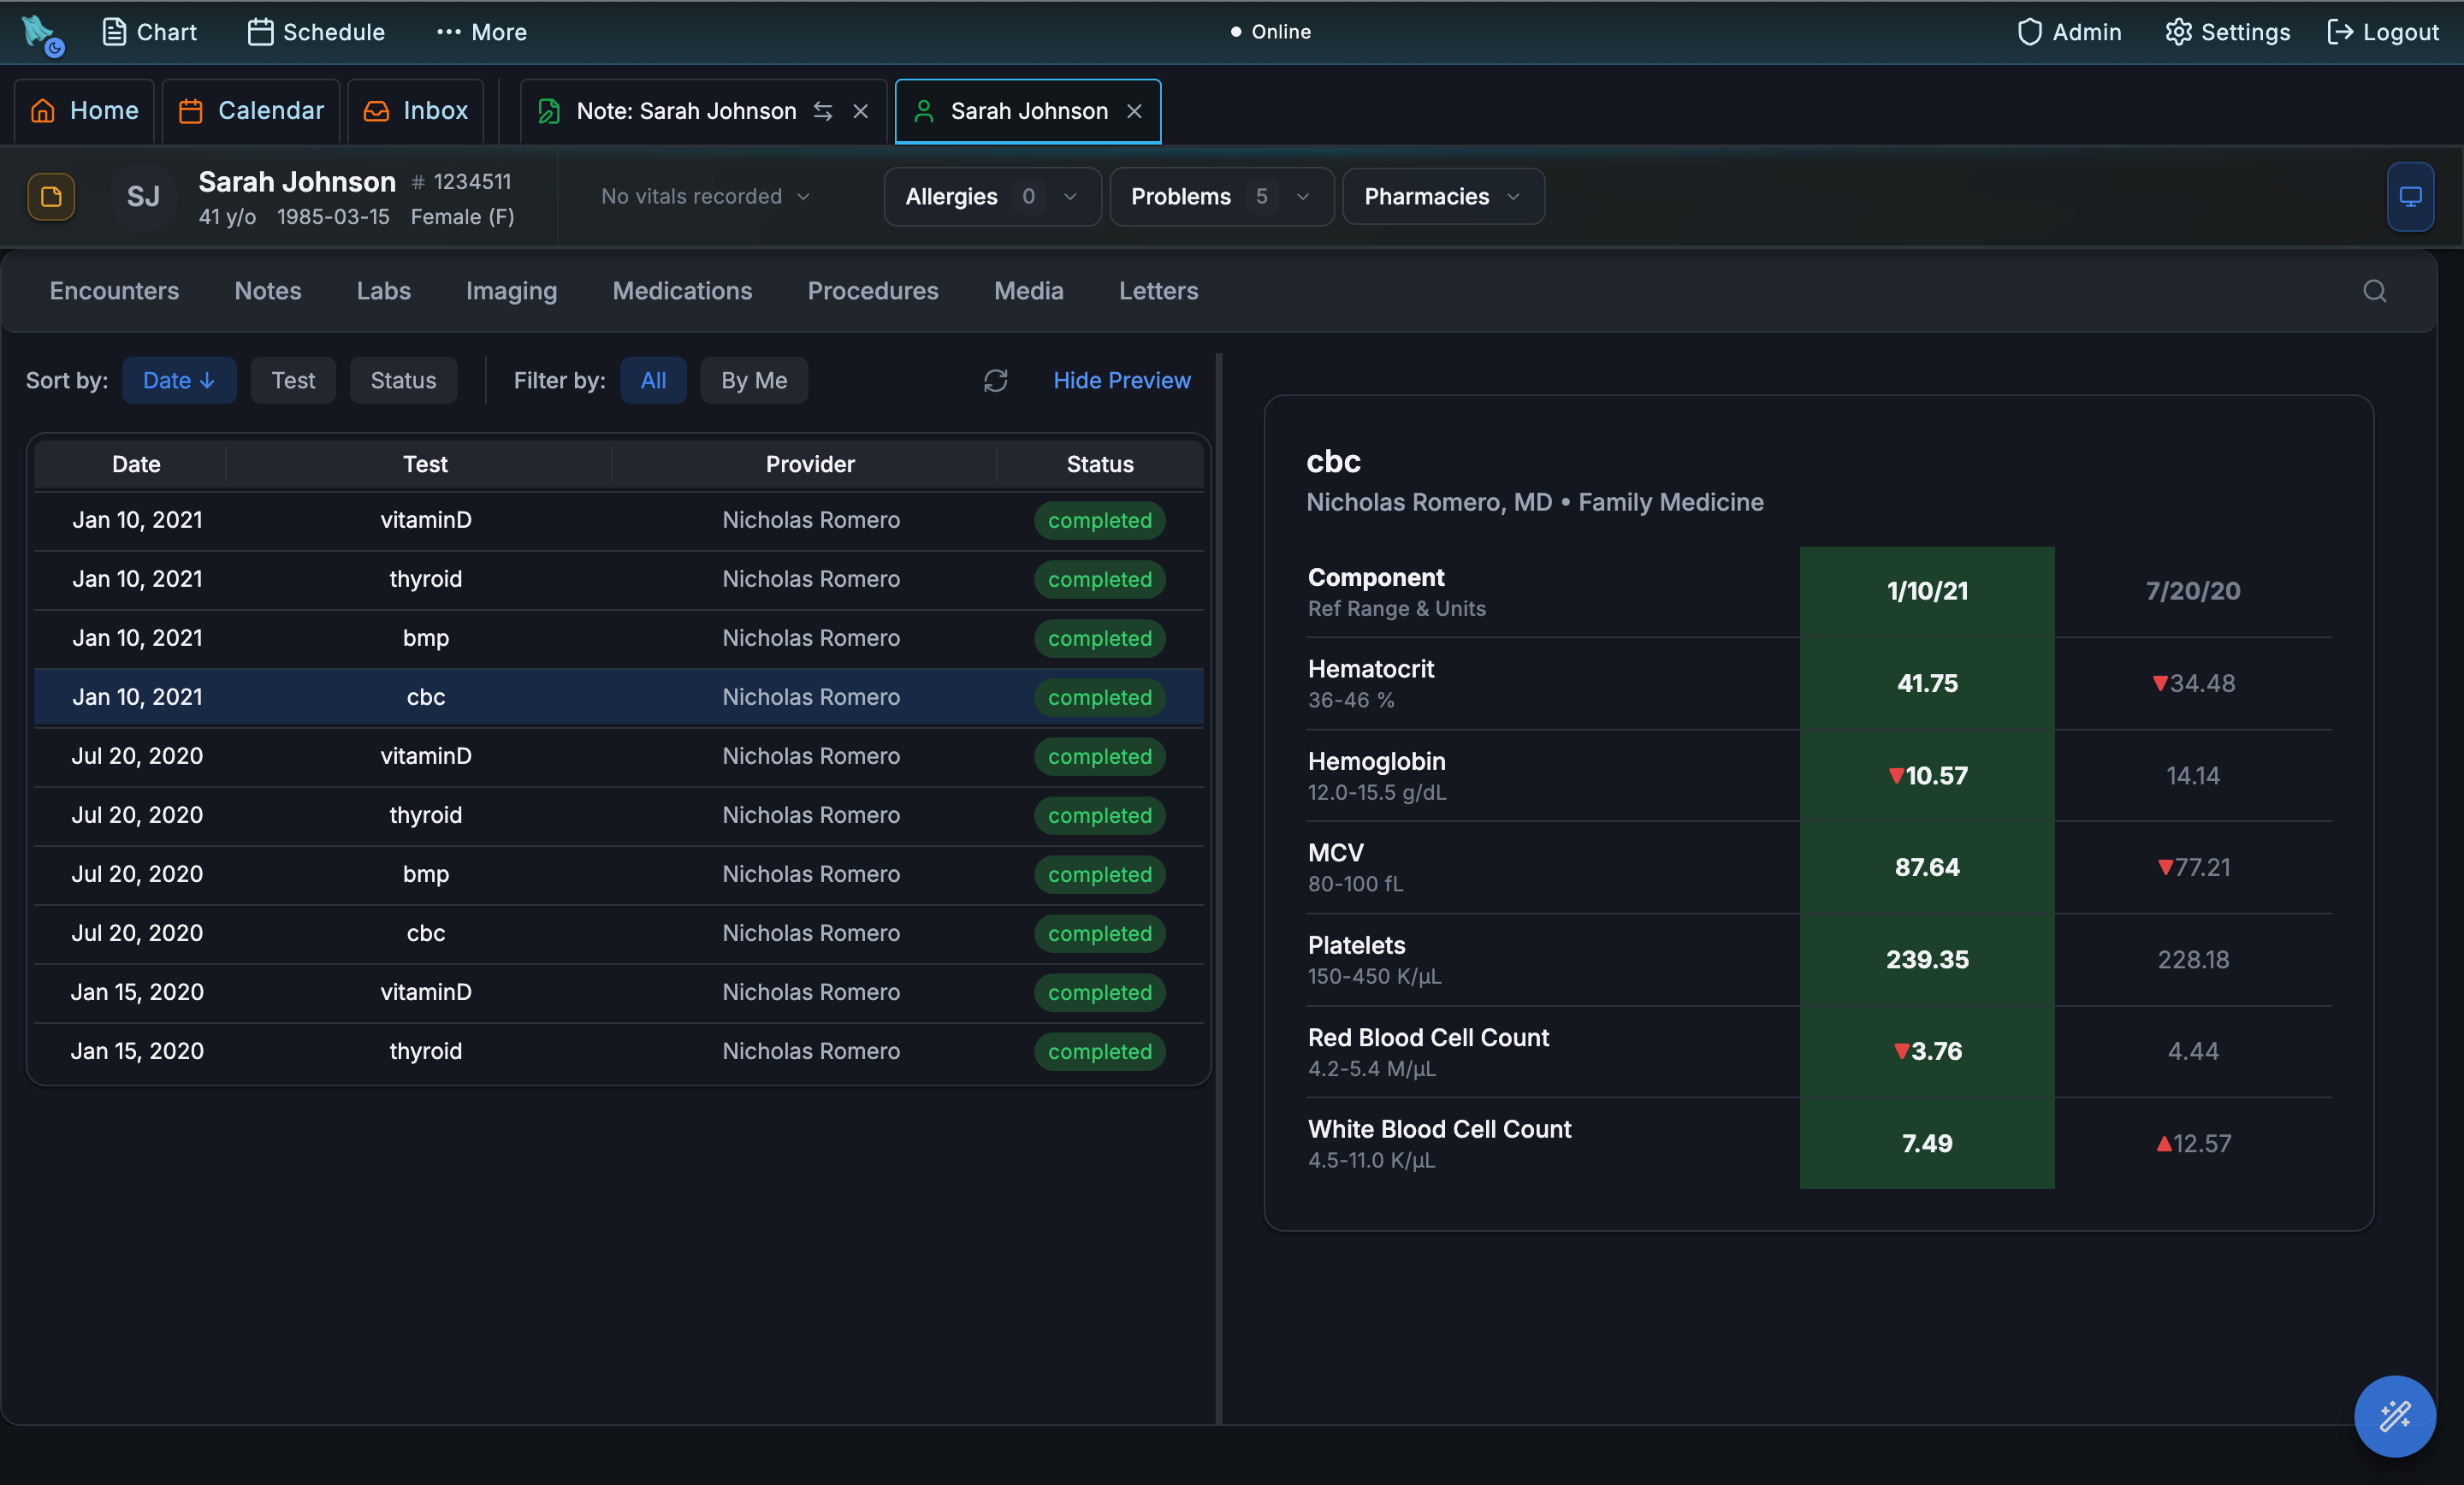
Open Maria's chart and click Labs. The patient's lab history shows each test with date, ordering provider, and status, so pending and completed orders stay visible after the visit.
Step 3.2 Review ranges, trends, and follow-up work
Open a completed result to see component ranges, abnormal flags, and prior values. From there, the same follow-up loop can create repeat orders, patient instructions, or a return visit from the result context.
The practice, in the patient's pocket.
The patient portal is the other half of Hero EMR — where patients schedule visits, message their care team, and review their records without picking up the phone. Everything they do here flows straight into the clinician's day. Here's a quick walk through it.
What you'll see
Three features: the patient's home base, two-way messaging with the care team, and self-service access to appointments and records. Sign in as test patient Maria Garcia to explore.
Step 1 One home for everything
Open the patient portal in a new tab and sign in as Maria with her test credentials:
- Email:
testpatient5@soaper.ai - Password:
testpatient5
The home page puts the essentials front and center — schedule a visit, message the care team, review records, and pay bills — in a calm, plain-language layout built for patients, not clinicians.
Step 2 Message the care team
Under Messages, the patient sees every conversation they've had with the practice in one list. They can reply to the care team or start a new message — and it goes straight into the clinician's inbox.
Step 3 Appointments and records, self-service
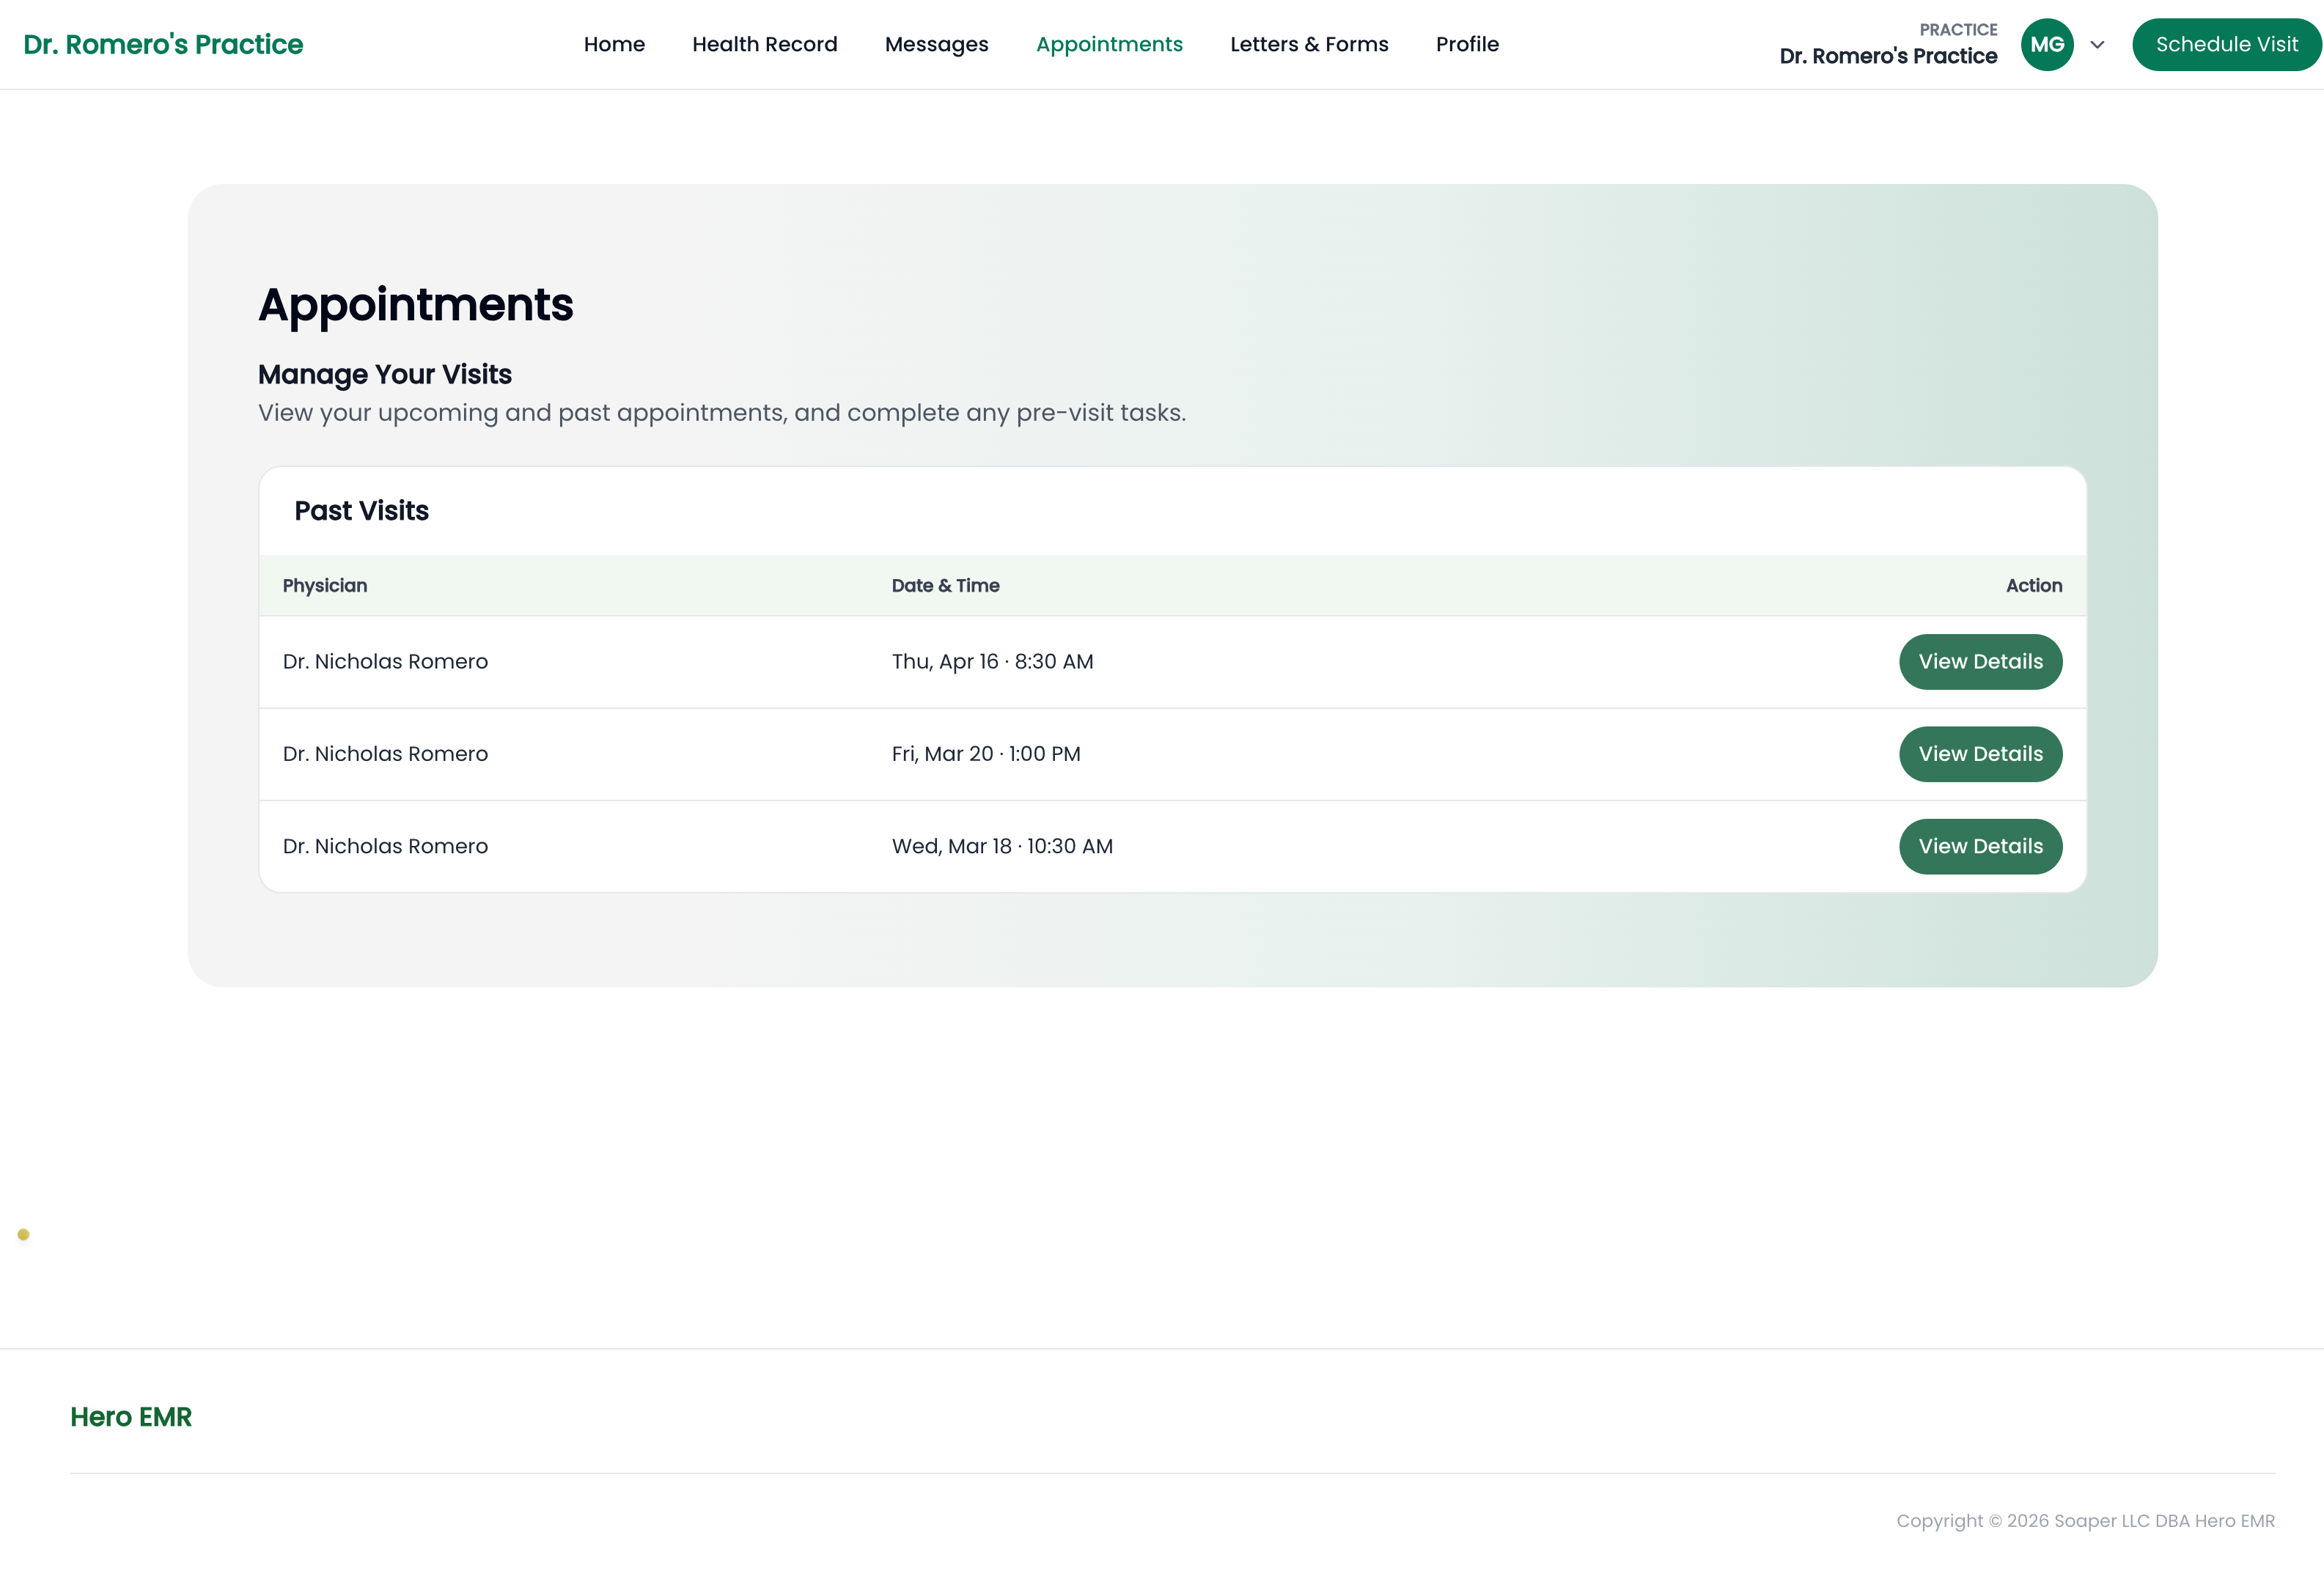
Under Appointments, the patient reviews past and upcoming visits and finishes any pre-visit tasks before they arrive. Health Record opens their visit history, lab results, imaging, and letters — and Bills & payments lets them settle a balance online.
Every one of these takes work off the front desk's plate.
Run the practice from one menu.
Everything it takes to run a practice — locations, providers, staff, billing setup, and outside connections — lives behind a single Admin menu. No separate admin app, no hunting through settings. Here's a quick walk through it.
What you'll see
Three features: one menu that opens every admin area, the practice's core record, and managing the people on your team.
Step 1 One menu, every setting
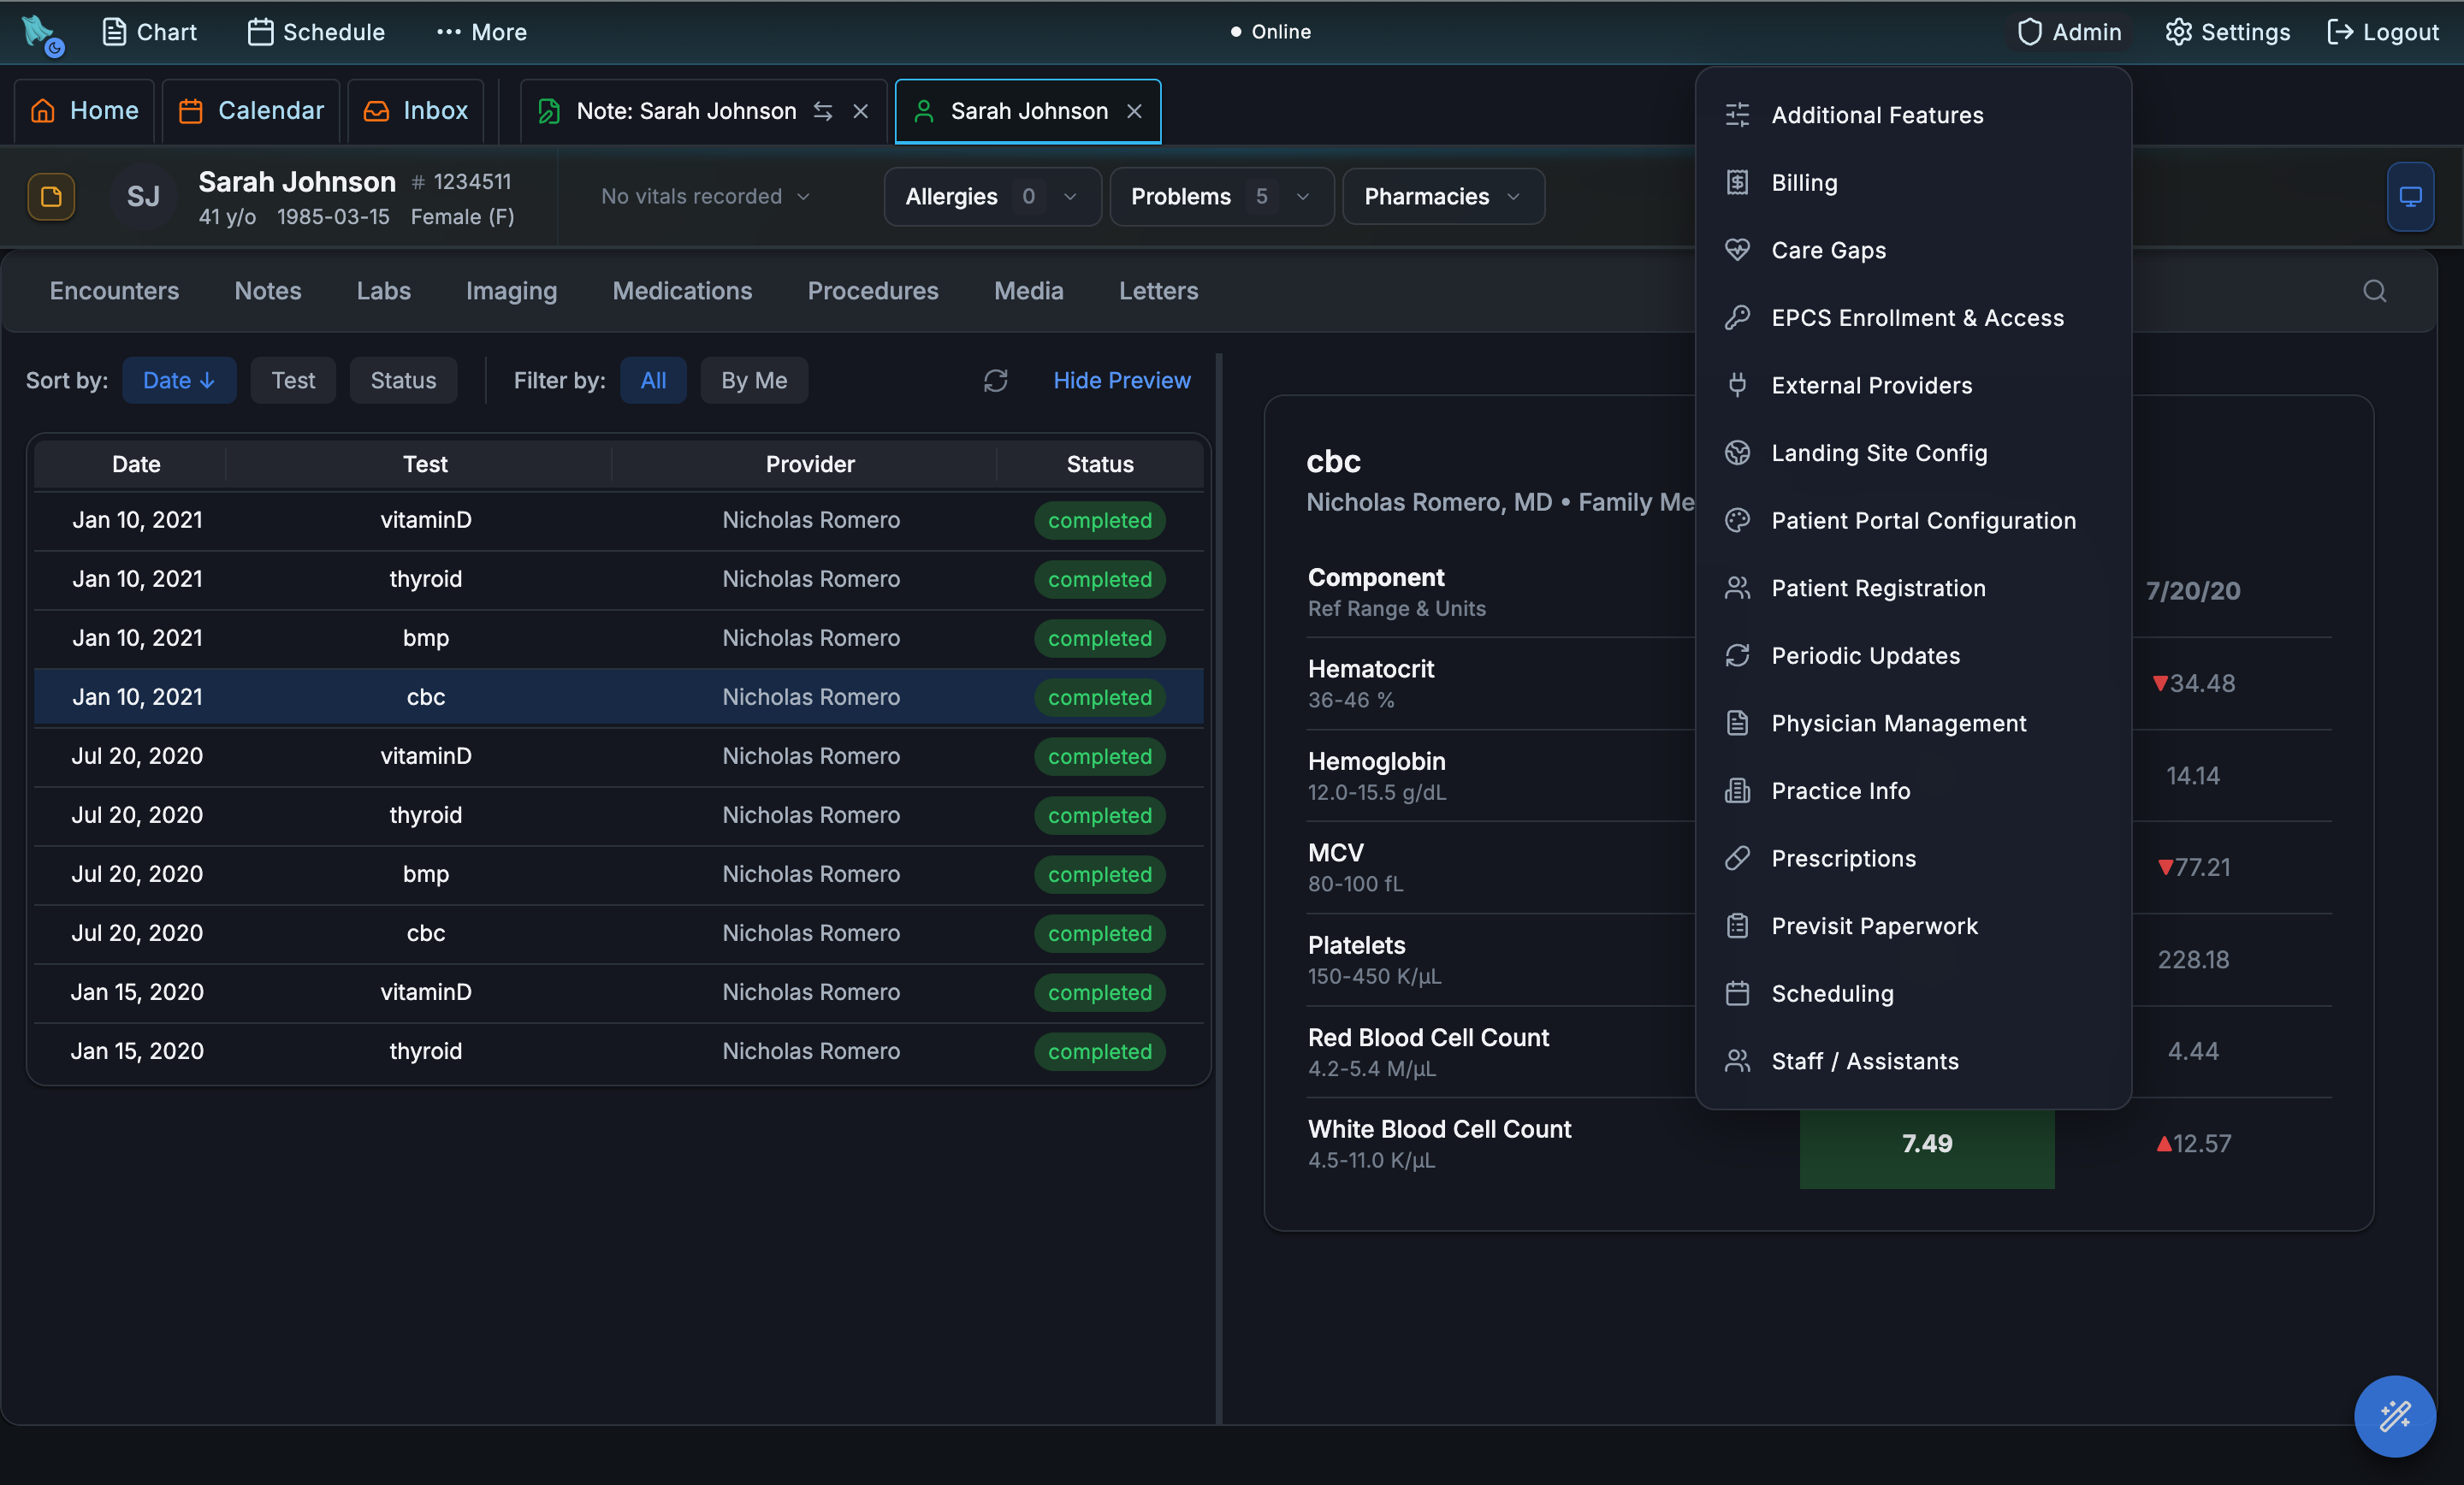
Click Admin in the top toolbar. One menu opens everything — Billing, Scheduling, Patient Registration, Physician Management, Staff, External Providers, Patient Portal Configuration, and more. Each opens in place, so you never lose your spot in a patient's chart.
Step 2 Your practice on record
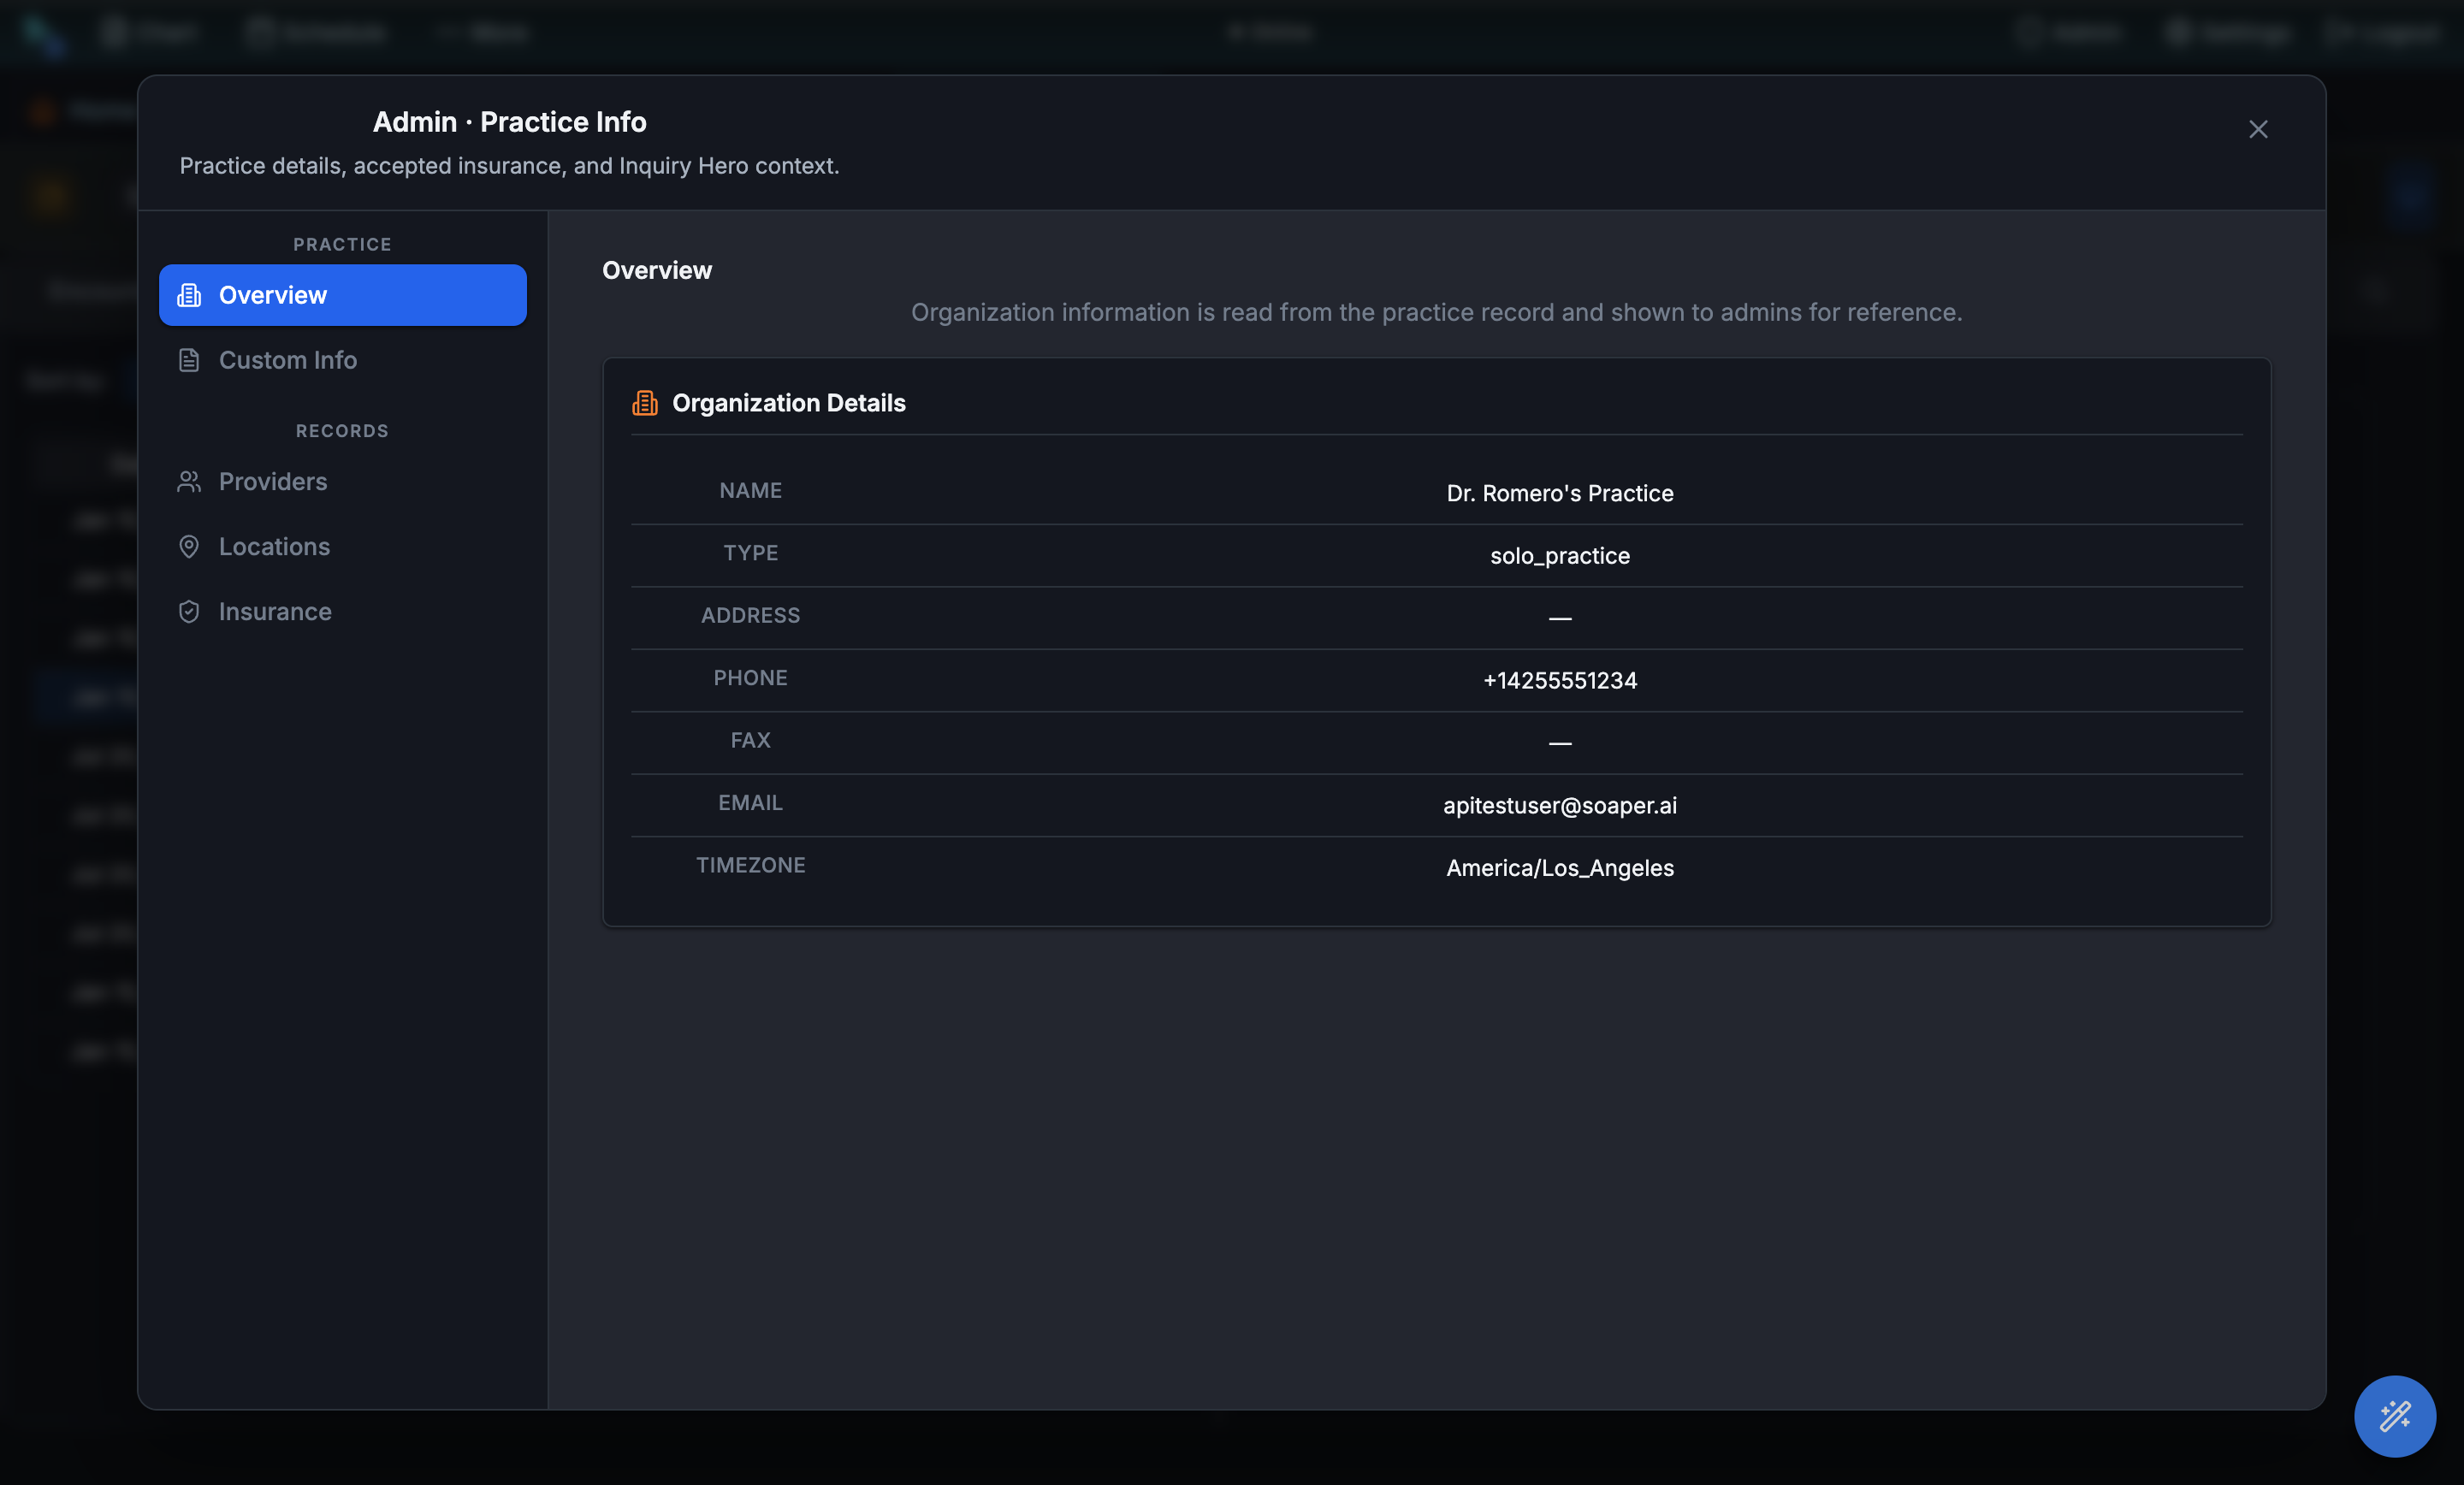
Practice Info holds the basics every other part of Hero relies on — the practice name and contact details, the providers who work there, the locations they see patients at, and the insurance the practice accepts. Set it once; the calendar, billing, and patient portal all read from it.
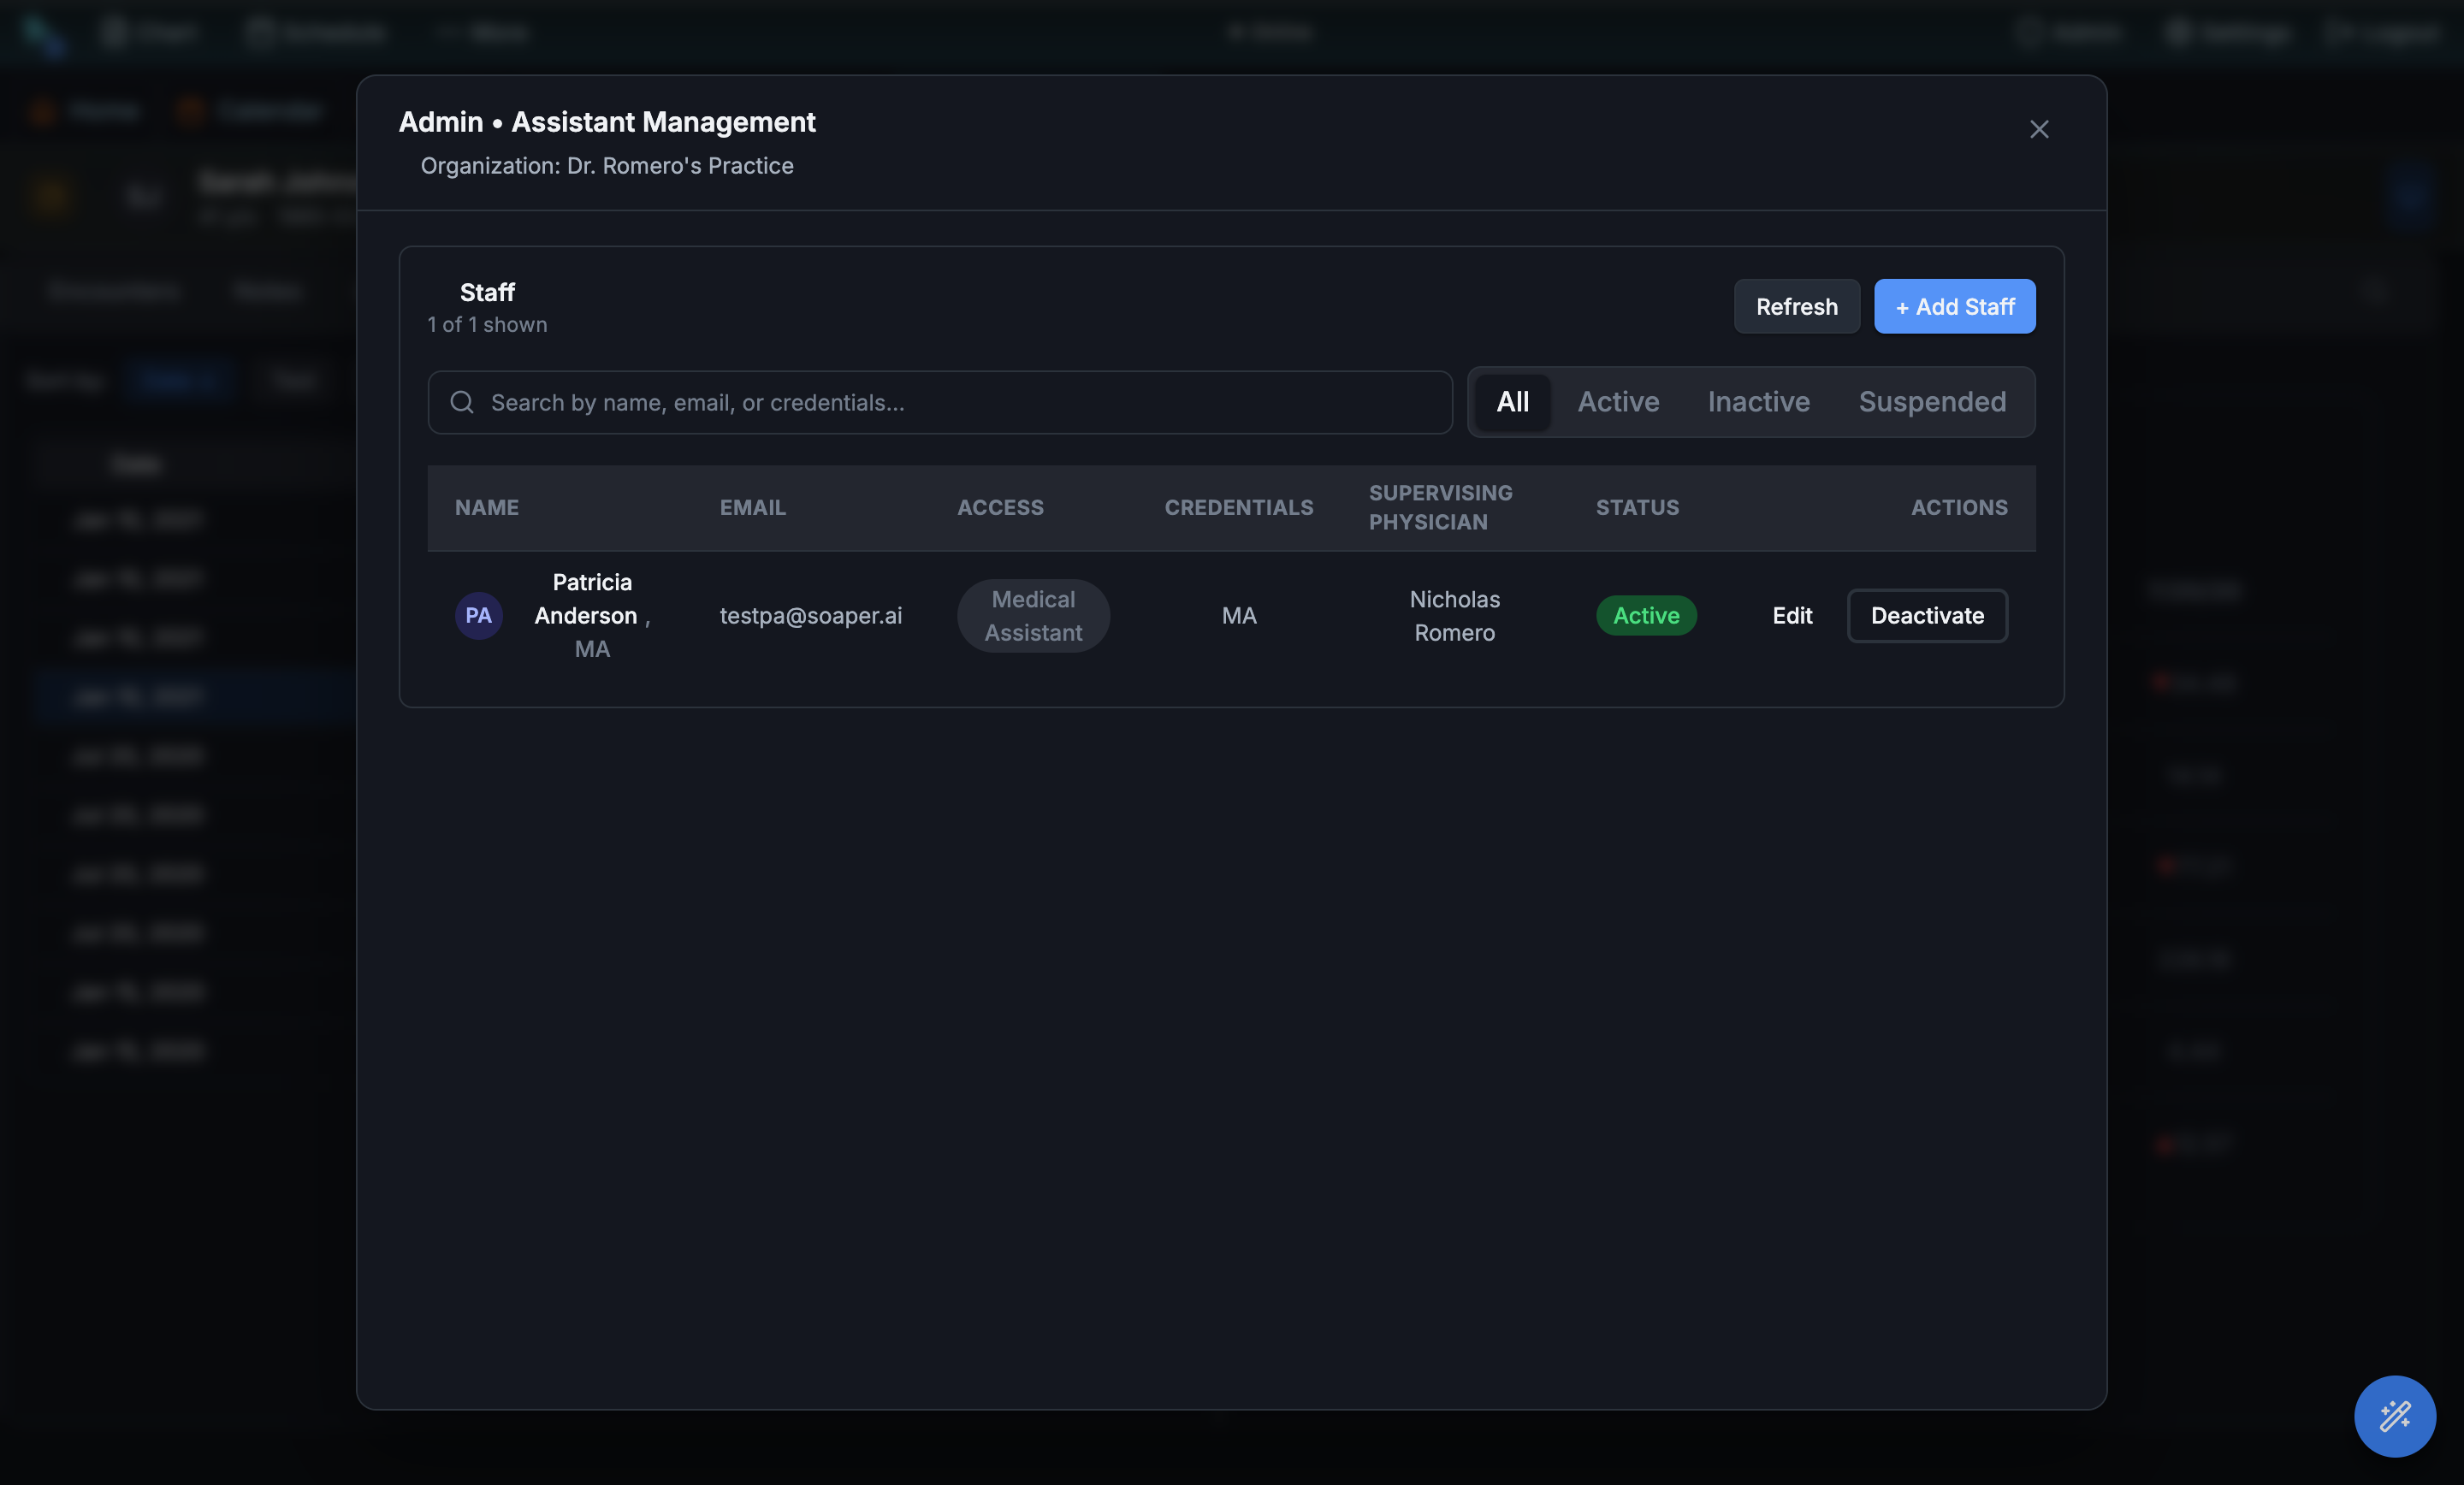
Step 3 Manage your team
Staff / Assistants is where you add the people who keep the practice running. Each staff member gets a role and access level, a supervising physician, and a status you can flip between active and inactive in one click — so access always matches who's actually on the team.