AI in Hero EMR
Where the AI lives, what it reads, and what you must verify: voice commands, clinical knowledge, product Q&A, note generation, dictation, prescription auto-fill, inbox drafting, and the magic-wand quick actions.
AI in Hero EMR
Where the AI lives, what it reads, and what you must verify: voice commands, clinical knowledge, product Q&A, note generation, dictation, prescription auto-fill, inbox drafting, and the magic-wand quick actions.
Run hands-free commands with the voice assistant
A round magic-wand button floats at the bottom-right of every Hero EMR screen; hover it and the label reads Voice assistant · F1, while the button’s full tooltip lists every action the wand offers your account. Press F1 anywhere (or click the wand) and speak. The assistant reads two things — your words and the patient whose chart is open — and turns them into a draft: every command ends in a pre-filled modal or composer for your review, never a direct action.
Every shortcut in this manual — F1 included — is a default. Remap any of them from Settings → Hotkeys (Ctrl+Shift+?), and the app’s own tooltips and flyout hints update to whatever you chose.
-
Start and stop recording.
Press F1 or click the wand. The button turns red with a stop square, a waveform animates, and a dark status bar expands to the left; press F1 or click again to stop, or let it auto-stop at 60 seconds. First use asks for browser microphone permission, and if a note dictation is already running you’ll see
Stop the active note dictation before starting Command Hero.— the two share one recorder. -
Watch the status bar.
It shows
Transcribing..., thenProcessing command..., then your transcribed words in quotes with a summary of what the assistant did underneath. Results clear themselves after about five seconds of inactivity. -
Confirm the patient.
With a patient chart or patient tabs open, the command applies to that patient. Otherwise the assistant opens the patient search modal and shows
Please select a patient to continue...before doing anything.
| You say | What opens | What’s drafted from your words |
|---|---|---|
| Prescribe a medication | Generating prescription details..., then an order modal titled Prescription from Command Hero | A fully drafted sig, built by the same engine as Prescription Auto-fill. |
| Order a lab | Lab Order from Command Hero | The test, matched against the lab compendiums your practice has enabled (see Orders); if nothing matches you get a No enabled lab compendium match found message naming the test. |
| Order imaging | Radiology Order from Command Hero | Modality, body part, and laterality — “right knee” sets laterality R. |
| Send a portal message | The New Message composer (see Composing messages) | Recipient, subject, and body, pre-filled for your review. |
| Edit the open note — start with “magic edit” | Nothing: the edits are applied to the note you already have open, with the changes highlighted | Say or type “magic edit change the follow-up to six weeks” and Hero rewrites just those words in place. If your instruction can’t be matched to text that is actually in the note — or the note changes while it works — nothing is applied and the status bar tells you so. |
| Create a reminder — “remind me to…” | The todo panel, with the new reminder in place | The reminder text becomes the title and the time you said becomes the due date on your practice’s clock — see Reminders by command. |
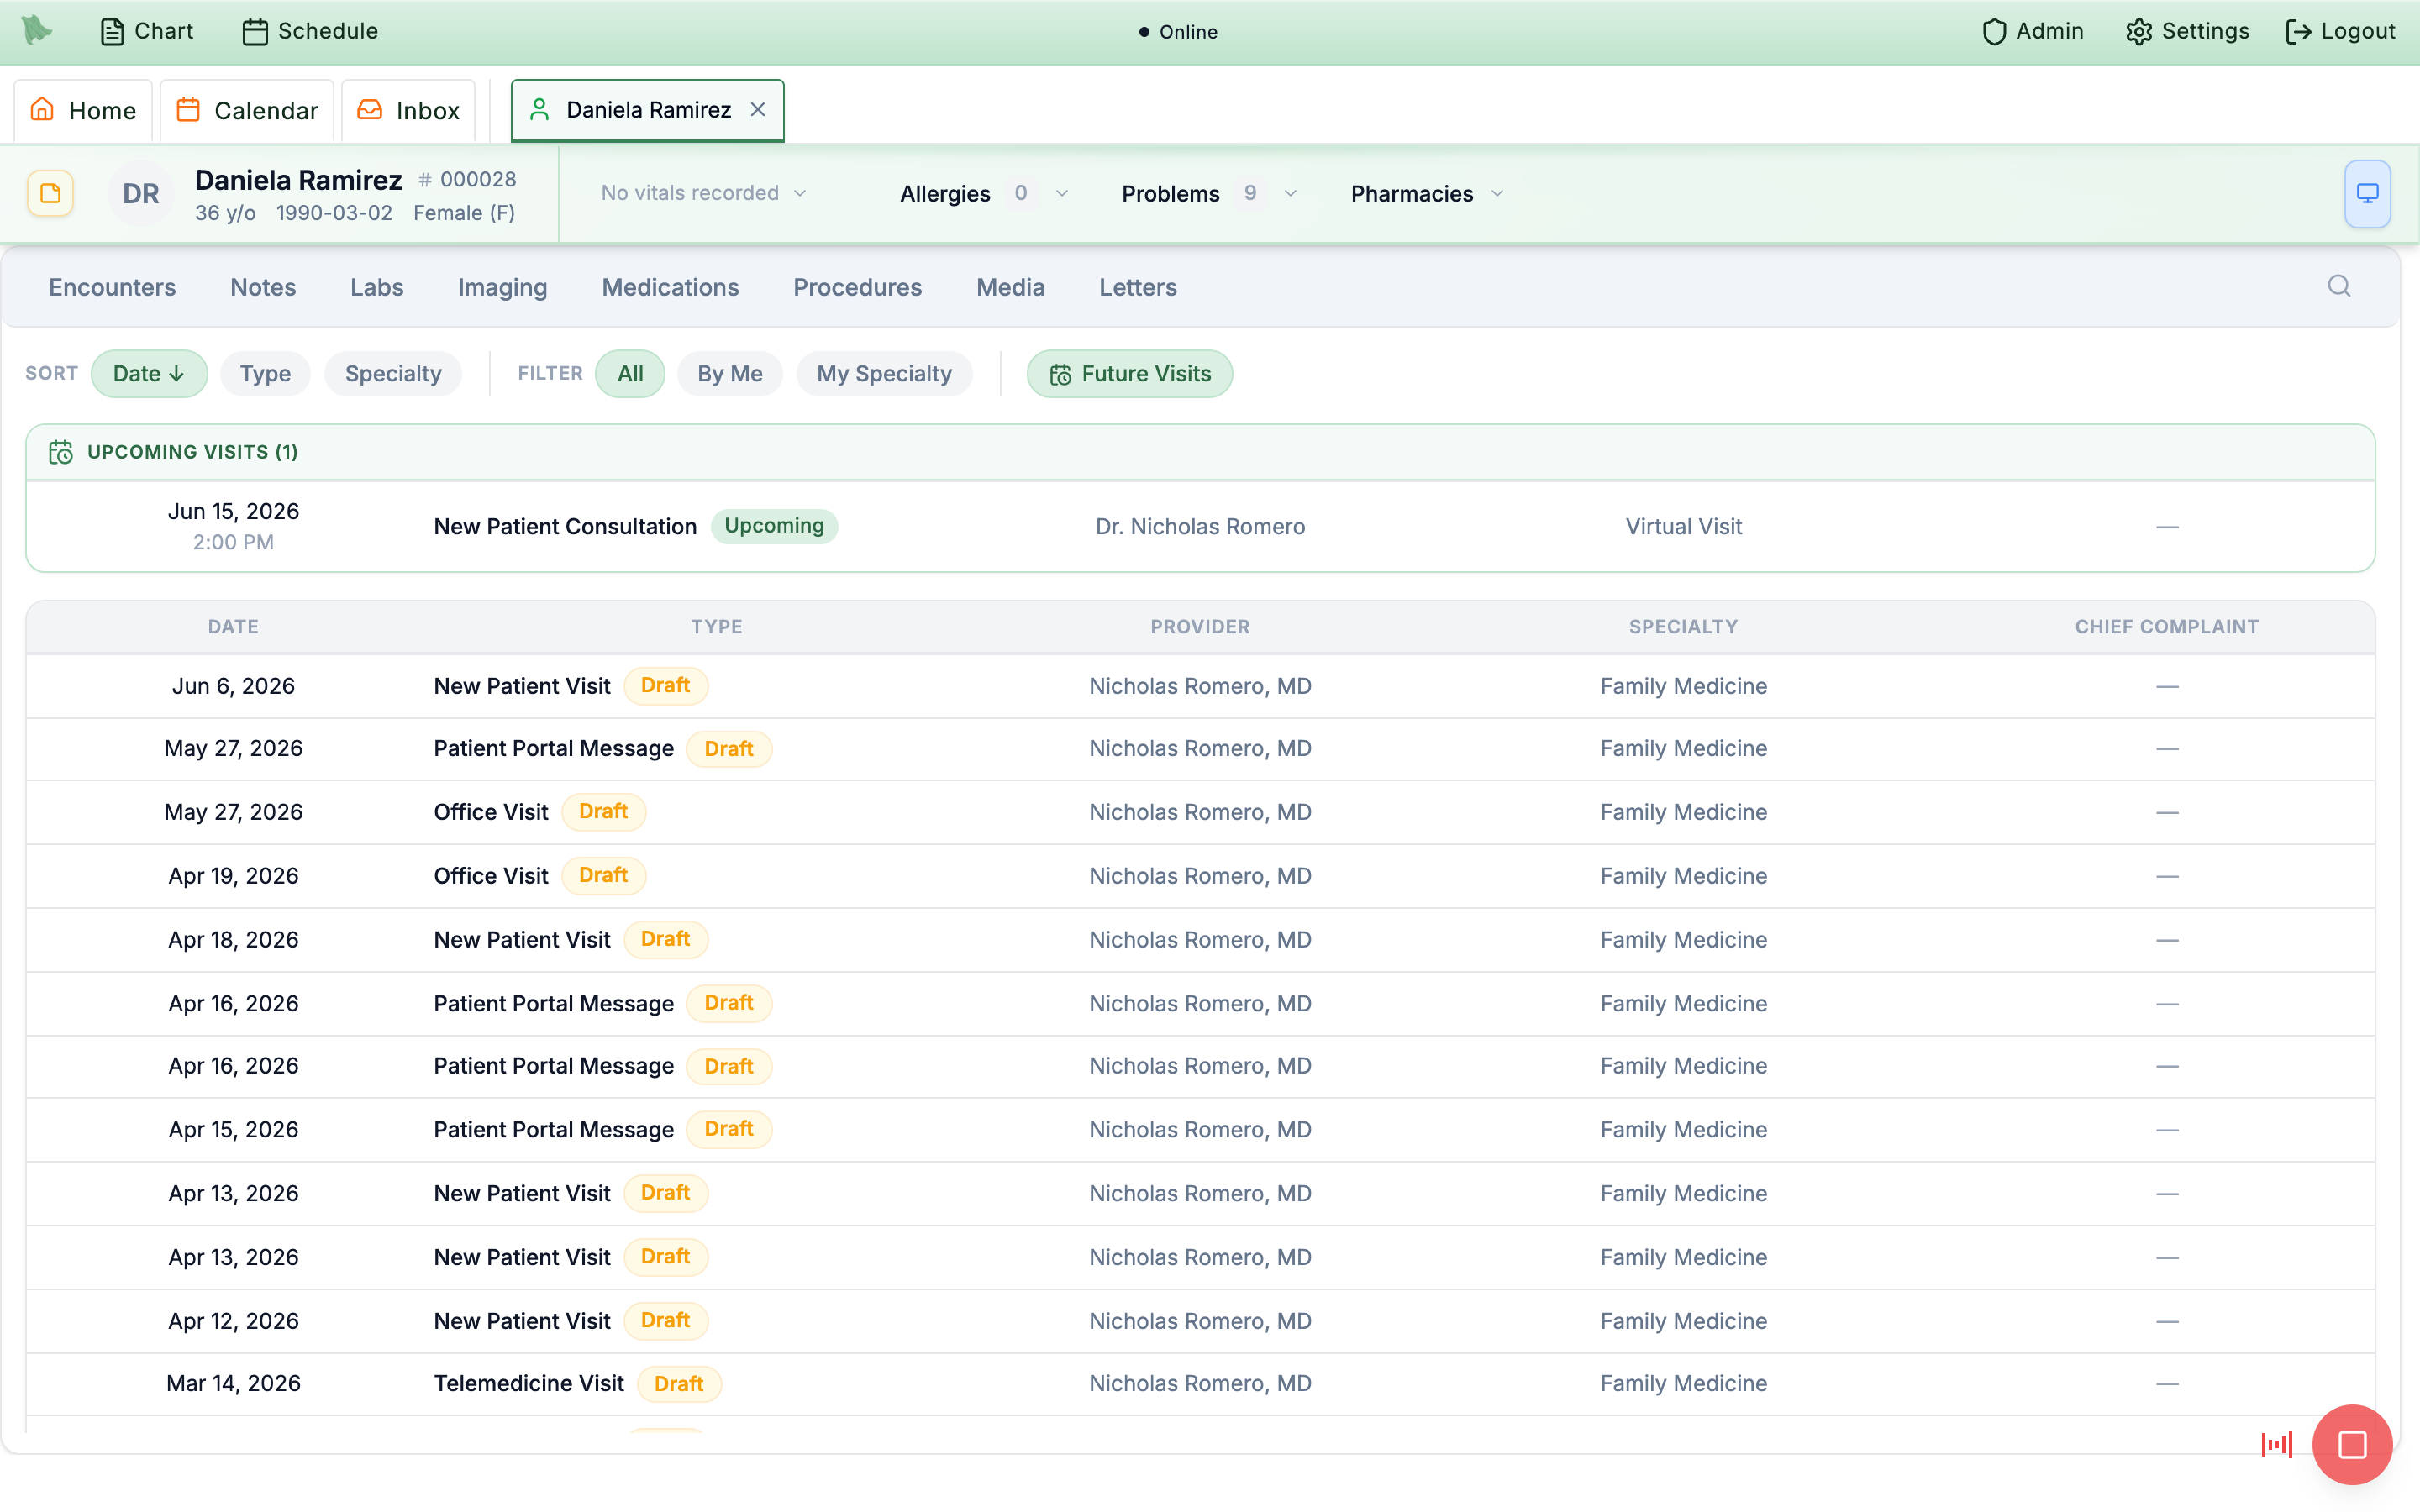
Ask clinical questions with Knowledge Hero
Ask a clinical question — first-line treatment, contraindications, diagnostic criteria — and Knowledge Hero answers it from your practice’s guideline library. The status bar turns emerald with Searching clinical guidelines..., then a panel slides in from the right titled Knowledge Hero, subtitled Clinical Decision Support. Ask it by voice with F1 or by typing the same question into the F2 command box — both run through one interpreter, and a clinical question routes here either way. (The F3 assistant is a different thing: it answers questions about the software, not clinical ones.)
-
Read the answer and its sources.
The panel shows
Your Question, the answer, and a numberedReferenceslist; header badges count the sources used (“N guidelines referenced”). Afterwards the status bar reportsFound answer using N guideline(s)orAnswer generated (no specific guidelines matched)— weigh an unmatched answer accordingly. -
Copy or close.
Copy Answer(it flips toCopied!) puts the answer on your clipboard;Doneor Esc closes the panel. -
Bring in patient context deliberately.
Chart data is included only when your question references the patient (“this patient”, “their history”) and a chart is open — the panel then carries a
Patient context includedbadge. General questions are answered without chart access, so phrasing matters when you want a chart-aware answer. -
Curate the guideline library.
Open the Settings gear and choose
Knowledge Hero Guidelines. On theGuidelineslist you can enable or disable individual guidelines, add and edit custom ones,Revert to Original, orDelete Custom Guideline. TheSettingstab holds one toggle —Enable previsit workup generation based on previsit interview?— which makes completed previsit interviews generate Knowledge Hero guidance automatically (see Questionnaires & paperwork).
References list before acting on one.
Ask how to do something in Hero EMR (F3)
Press F3 anywhere to toggle a compact chat panel above the wand button, titled Hero EMR Assistant with the subtitle How do I…? · F3. Use it for how-do-I questions about Hero EMR itself — setting up a workflow, where a feature lives, how a setting behaves. Its answers are drawn from this manual, the official Hero EMR provider manual, and each one ends with links back to the pages it used. It is not a clinical reference, and it does not read patient data.
-
Open it.
Press F3, or hover the magic wand and click
How do I…?— useful on a Mac, where F3 is often claimed by Mission Control. The assistant is available to admins and billing-capable roles; on an account without it, neither the key nor the flyout item appears. Dismiss it with Esc or theClose (Esc)button. -
Pick an example or ask your own.
The empty state says where answers come from —
Ask how to do something in Hero EMR. Answers come from the official Hero EMR manual, with links to learn more.— above clickable starters such asHow do I set up a cash-pay only price for one visit type?,How do I connect Zoom for a telehealth visit?, andHow do I build paperwork a patient signs before their visit? -
Send and read.
Type into
Ask a question…and press Enter (Shift+Enter for a new line). The panel showsLooking it up in the Hero EMR manual…while it works, then answers with headings, bullets, and numbered steps, closing with a compactLearn morerow of links you can click straight through to the manual page. Any errors render inline in the thread. -
Start a fresh question when the subject changes.
The pencil button in the header (
New chat) clears the transcript. Each question is answered on its own — the assistant does not carry the previous answer forward, so a follow-up like “and then?” will not land. Ask the whole question every time.
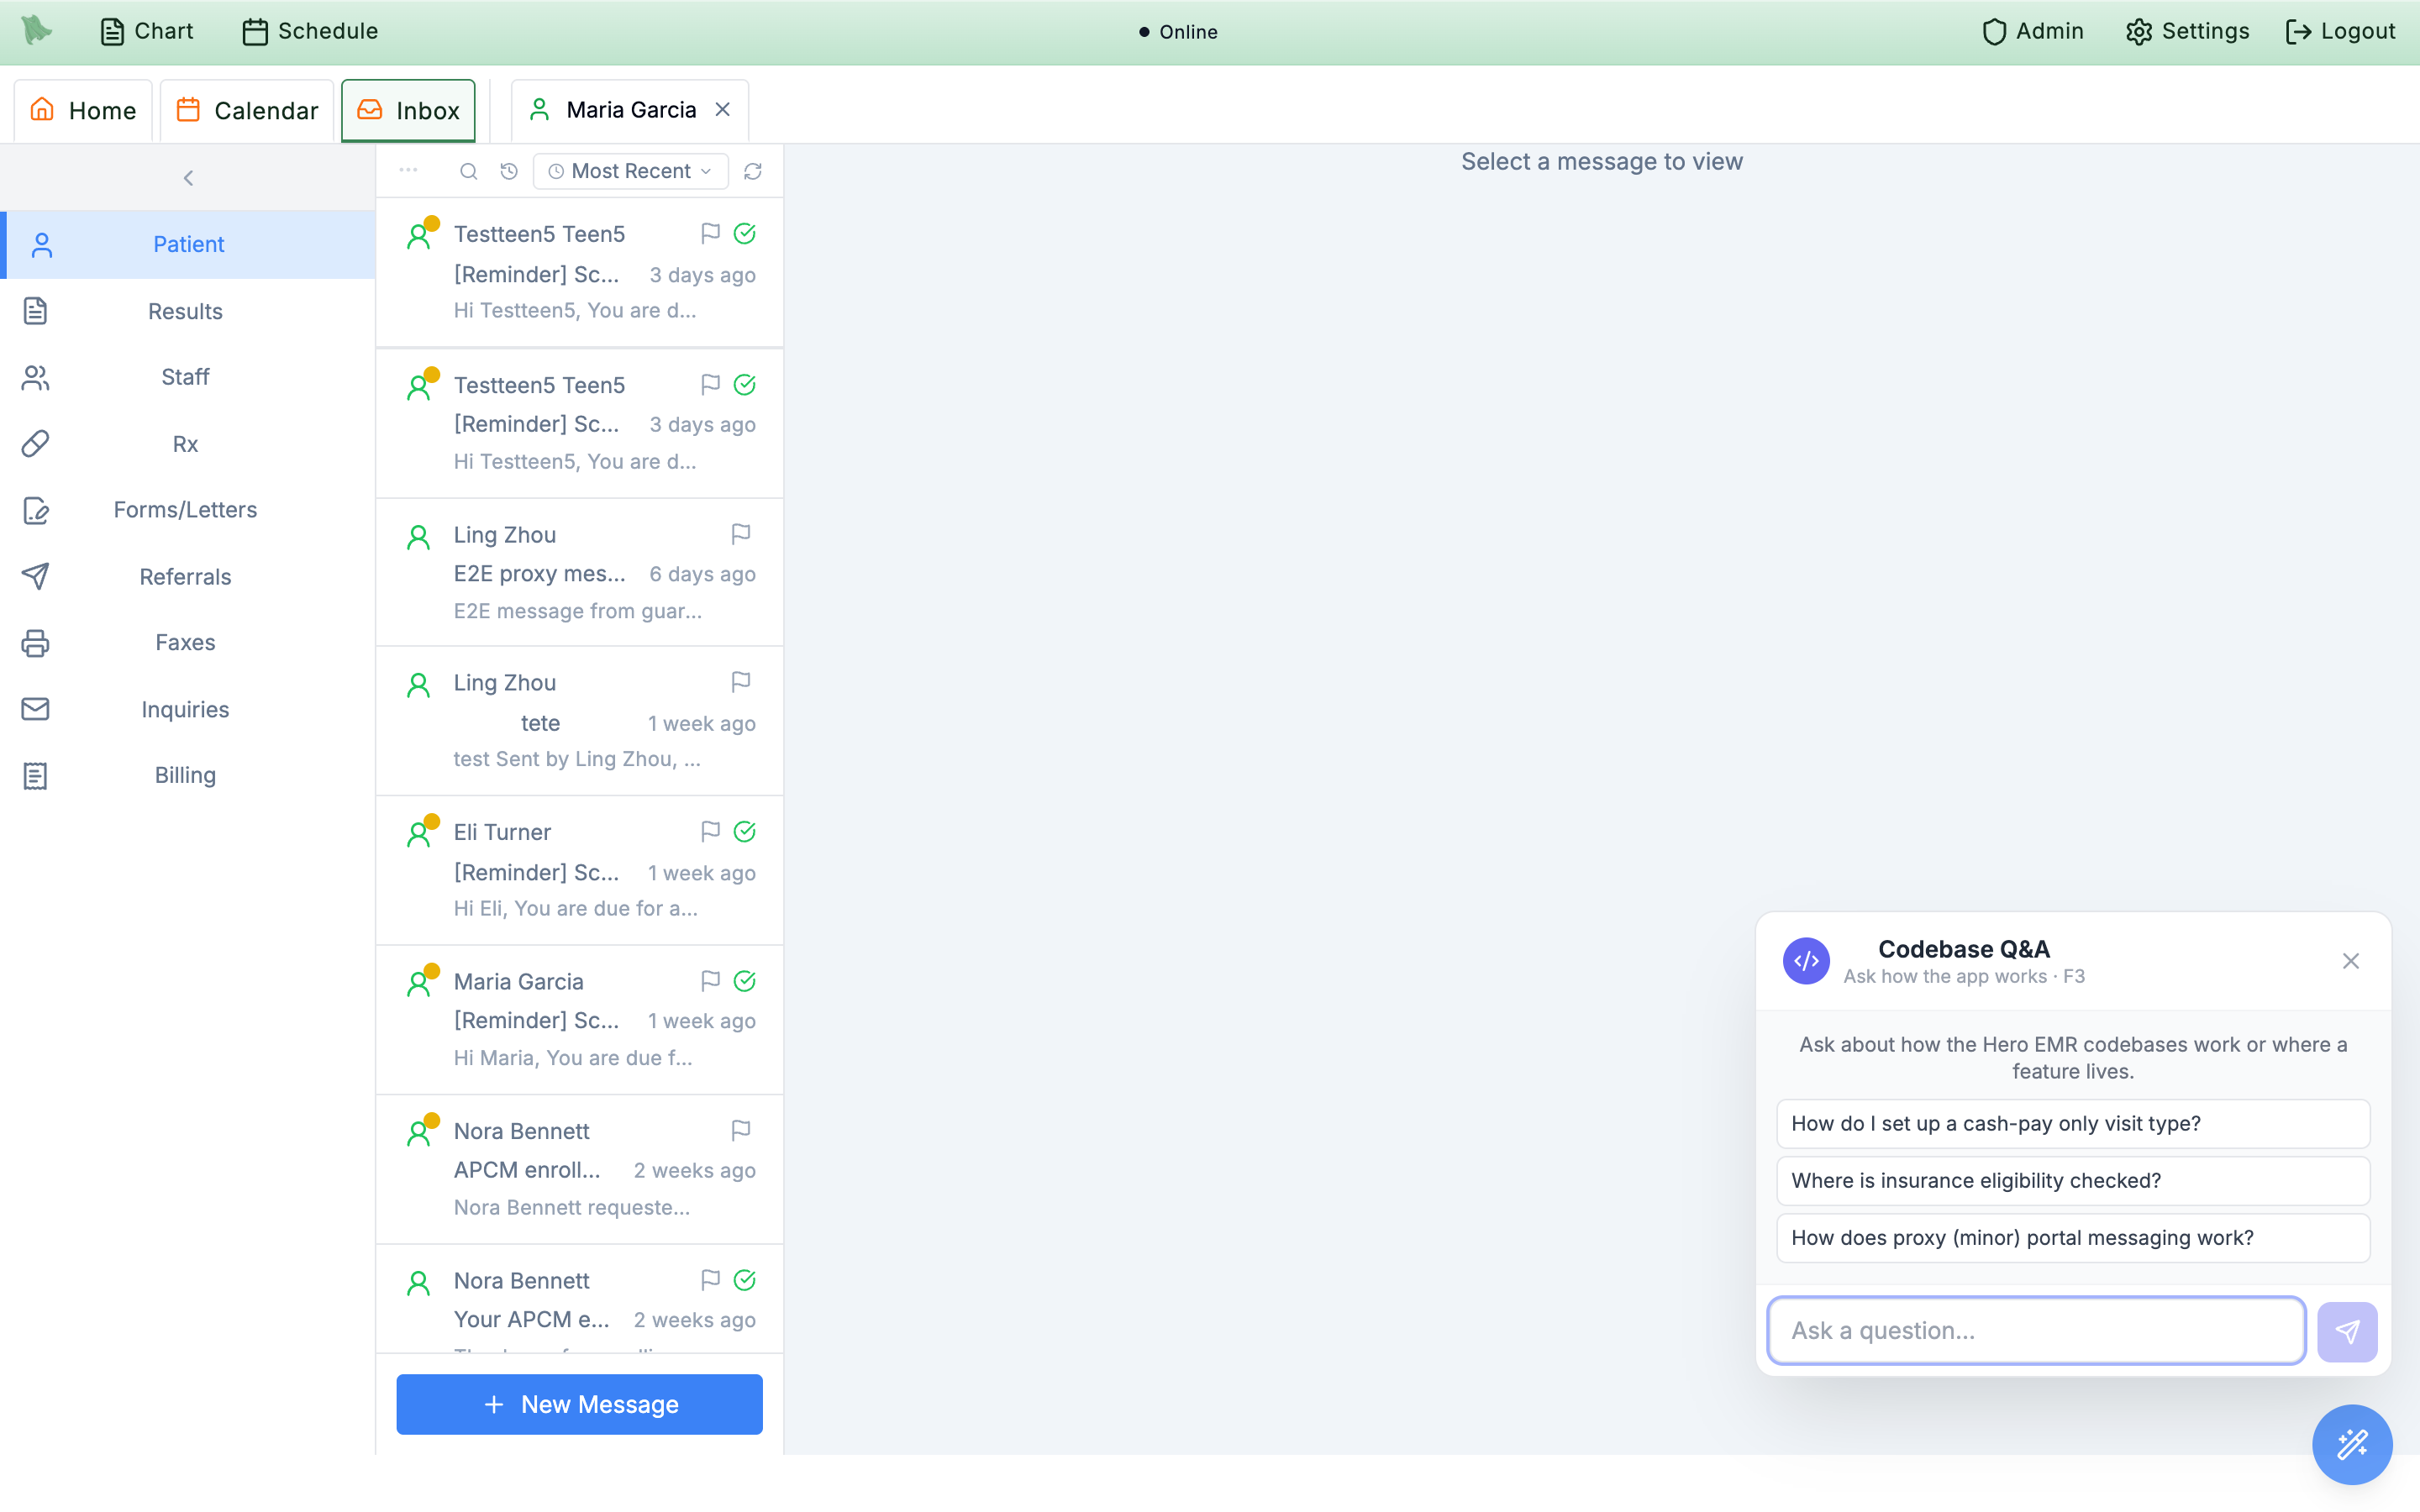
Ask a question… input.What can Hero do?). The one overlap: inside the Note Writer the note takes F2 over, jumping to the next template field (Shift+F2 goes back).
Learn more links whenever the exact steps matter — and if an answer ever disagrees with the page it cites, trust the page and let your Hero EMR contact know.
Generate note content with AI in the Note Writer
Two AI features live inside the note editor. AI Note Generation answers questions about the open patient while you write, via the .hero dot-phrase; Smart Encounter Completion extracts structured data from your note when you save. Both read the open patient’s chart and your note text — and both end in content you review before it counts.
-
Generate with
.hero. Type.heroin the editor followed by a clinical prompt. The dropdown readsType or select a question about this patient...and offers quick examples such as Summarize patient’s cardiovascular history, List all previous surgeries, and Summarize recent lab trends; your favorites and recent prompts are remembered..herois patient-bound — it reads the open chart, unlike Knowledge Hero, which answers general clinical questions. -
Know which dot-phrases use AI.
Among the data dot-phrases, only
.imagesumis AI-powered — it inserts anAI imaging summary(search promptSearch imaging summaries). The others (.lab,.imaging,.questionnaire,.media) insert chart data directly, with no model in between. -
Let dictation caption your skin photos.
.derm,.lastdermand.dphotosplace the pictures inside a Skin photos Smart Block — one row per photo with its thumbnail, body site and date, and an empty caption. Dictate the exam as you normally would (“left forearm, close-up: five millimeter dome-shaped brown papule, well defined”) and the ambient note generator writes each photo’s caption from your own words, matching photos by body site and by wide shot versus close-up, while the Physical Examination section is still written exactly as your template asks. AI-written captions carry a sparkle badge; a caption you type yourself is never overwritten. The block’s microphone dictates straight into it, and because the photos live in a Smart Block they survive a regeneration of the note. Insert.skinphotosin a note template to have the patient’s questionnaire photos pulled in automatically when the note opens. -
Correct the AI photo interpretation by dictating.
When the photos came from a questionnaire that ran the photo analysis, the block also carries a Photo interpretation section — category, morphology, colors, border, symmetry, size, notable features, differential, urgency, red flags and summary — pre-filled from the AI as a draft. Your dictated exam overrides it line by line: if the draft says brown papule, dermal nevus and you say “four millimeter pink macule, benign lentigo”, morphology becomes macule, colors pink, category and differential benign lentigo, and the lines you did not address stay as drafted, each change marked with the sparkle. Read the corrected lines and click
Mark as reviewedto sign them onto the photos (the same signature the questionnaire panel shows);Reset to AI draftrestores the analysis, andSign againappears when a line changed after signing. Lines you edit by hand are never refilled. -
Keep the built-in guide handy.
The toolbar Info button (
Note Writer info), or F8 from inside a note, opens theNote Writer Guide— tabsShortcuts,AI & Data,Dictation,Collab, andWorkflow— the in-app reference for everything in this section. (The Shortcuts tab also covers F2/Shift+F2 template-field navigation — while a note has focus the note owns F2, so it moves between fill fields rather than opening the assistant’s command box.) -
Save, then review the extraction.
Saving the note triggers Smart Encounter Completion — as the guide puts it, “When you save, AI automatically extracts structured data from your note”:
Diagnoses & ICD-10,Medications,Billing codes,Follow-up plan, andAfter-visit summary. A processing modal showsProcessing..., thenAI extraction completeandEncounter completion data has been refreshed.Everything lands in the Encounter Completion checklist for review — see Auto-completion.
E/M Code Suggestions panel in charge capture (with its Recommended badge) is rule-based by visit mode. The AI contribution to billing is the save-time extraction above — see Charges & E/M.
Dictate notes and capture telehealth audio
The round microphone button in the note header and toolbar records the visit. When you stop, the AI reads the transcript and your active SOAP template and generates a full note that streams into the editor — structured, templated prose, not your words verbatim. For telehealth, an audio-settings panel lets the same recording capture the Zoom side of the conversation. When you want your words verbatim instead of a generated note — a paragraph typed exactly as you say it — use raw dictation (Ctrl+D), covered in Magic wand quick actions.
-
Record, stop, and watch it generate.
Click the mic (
Start Recording/Stop Recording). The status runs Live →Transcribing→Generating note…→ Done as the note streams in. The mic and the F1 assistant share one recorder, so they can’t run at once; if nothing is heard you’ll see aNo speech detectedcountdown before recording stops on its own. -
Capture Zoom audio for telehealth.
The chevron next to the mic (
Show audio settings) opens theAudio Sourcepanel: aCapture Zoom audio (virtual device)checkbox, aMicrophonepicker, and aZoom / System Audio Inputpicker (Select a device (recommended: ZoomAudioDevice (Virtual))). The help text covers a BlackHole + Multi-Output fallback and warns: “Select a virtual audio input above to include Zoom audio in the recording.” Every computer’s audio setup is different — test yours before a live visit. Connecting and running Zoom visits is covered in Run telehealth visits. -
Turn on speaker labels if you need them.
Settings gear →
SOAP Notes→Settings→Note Writer Preferences→Speaker Diarization. As the setting itself says: “Leave this off unless you specifically want speaker-labeled transcription.” -
Navigate away safely.
Leaving the note mid-dictation shows a compact dock at the bottom-right with the patient’s name, a Live/Processing/Done badge, and
Complete record/Return to noteactions. The browser also warns before you close the tab while a dictation is in progress.
Retranscribe from cached recording menu appears next to the mic when cached sessions exist, and after a connection problem an alert offers Retranscribe now / Later — you don’t lose the audio.
Auto-fill prescriptions from your note (Medication Hero)
Wherever you build a prescription — encounter completion orders (Prescribing) or the standalone order flow (Standalone orders) — the Edit Medication dialog has an orange Auto-fill button (wand icon, tooltip Autofill using clinical context from your SOAP note). It sends the medication, your SOAP note, and patient context to Medication Hero, shows Loading..., and drafts the whole regimen. The same engine powers the F1 prescribe command (Voice assistant) and order extraction from faxes and inbox messages (Faxed orders, Inbox AI).
-
Document the plan first, then click
Auto-fill. Auto-fill quality depends on what’s in your note. Run it after the plan is written and the fields are derived from your documentation; run it before documenting and you get defaults, not chart-derived values. -
Review every filled field.
It fills action, dose and dose units, route, frequency, duration, dispense quantity and units, and a recommended NDC, and it can set the PRN state — ticking
As needed (PRN)and filling the reason field (As needed for... (e.g. pain, nausea, anxiety)). The regenerated sig preview mirrors exactly what the pharmacy will receive — read it the way the pharmacist will. -
Read the warning banners.
A
Medication Hero warningamber banner lists any safety flags from the analysis; if key values couldn’t be determined you’ll seeSome key information could not be determined, please check medication dosage and duration carefully. Controlled substances also show a PDMP status box — see Safety checks. -
Controlled drugs stay structured.
For Schedule II–V medications the
Use Free Text Prescriptiontoggle is disabled (“Free-text prescriptions are disabled for Schedule II-IV medications. Use the structured prescription fields instead.”), so AI suggestions land in discrete, reviewable fields — nothing hides in free text. Signing them uses EPCS.
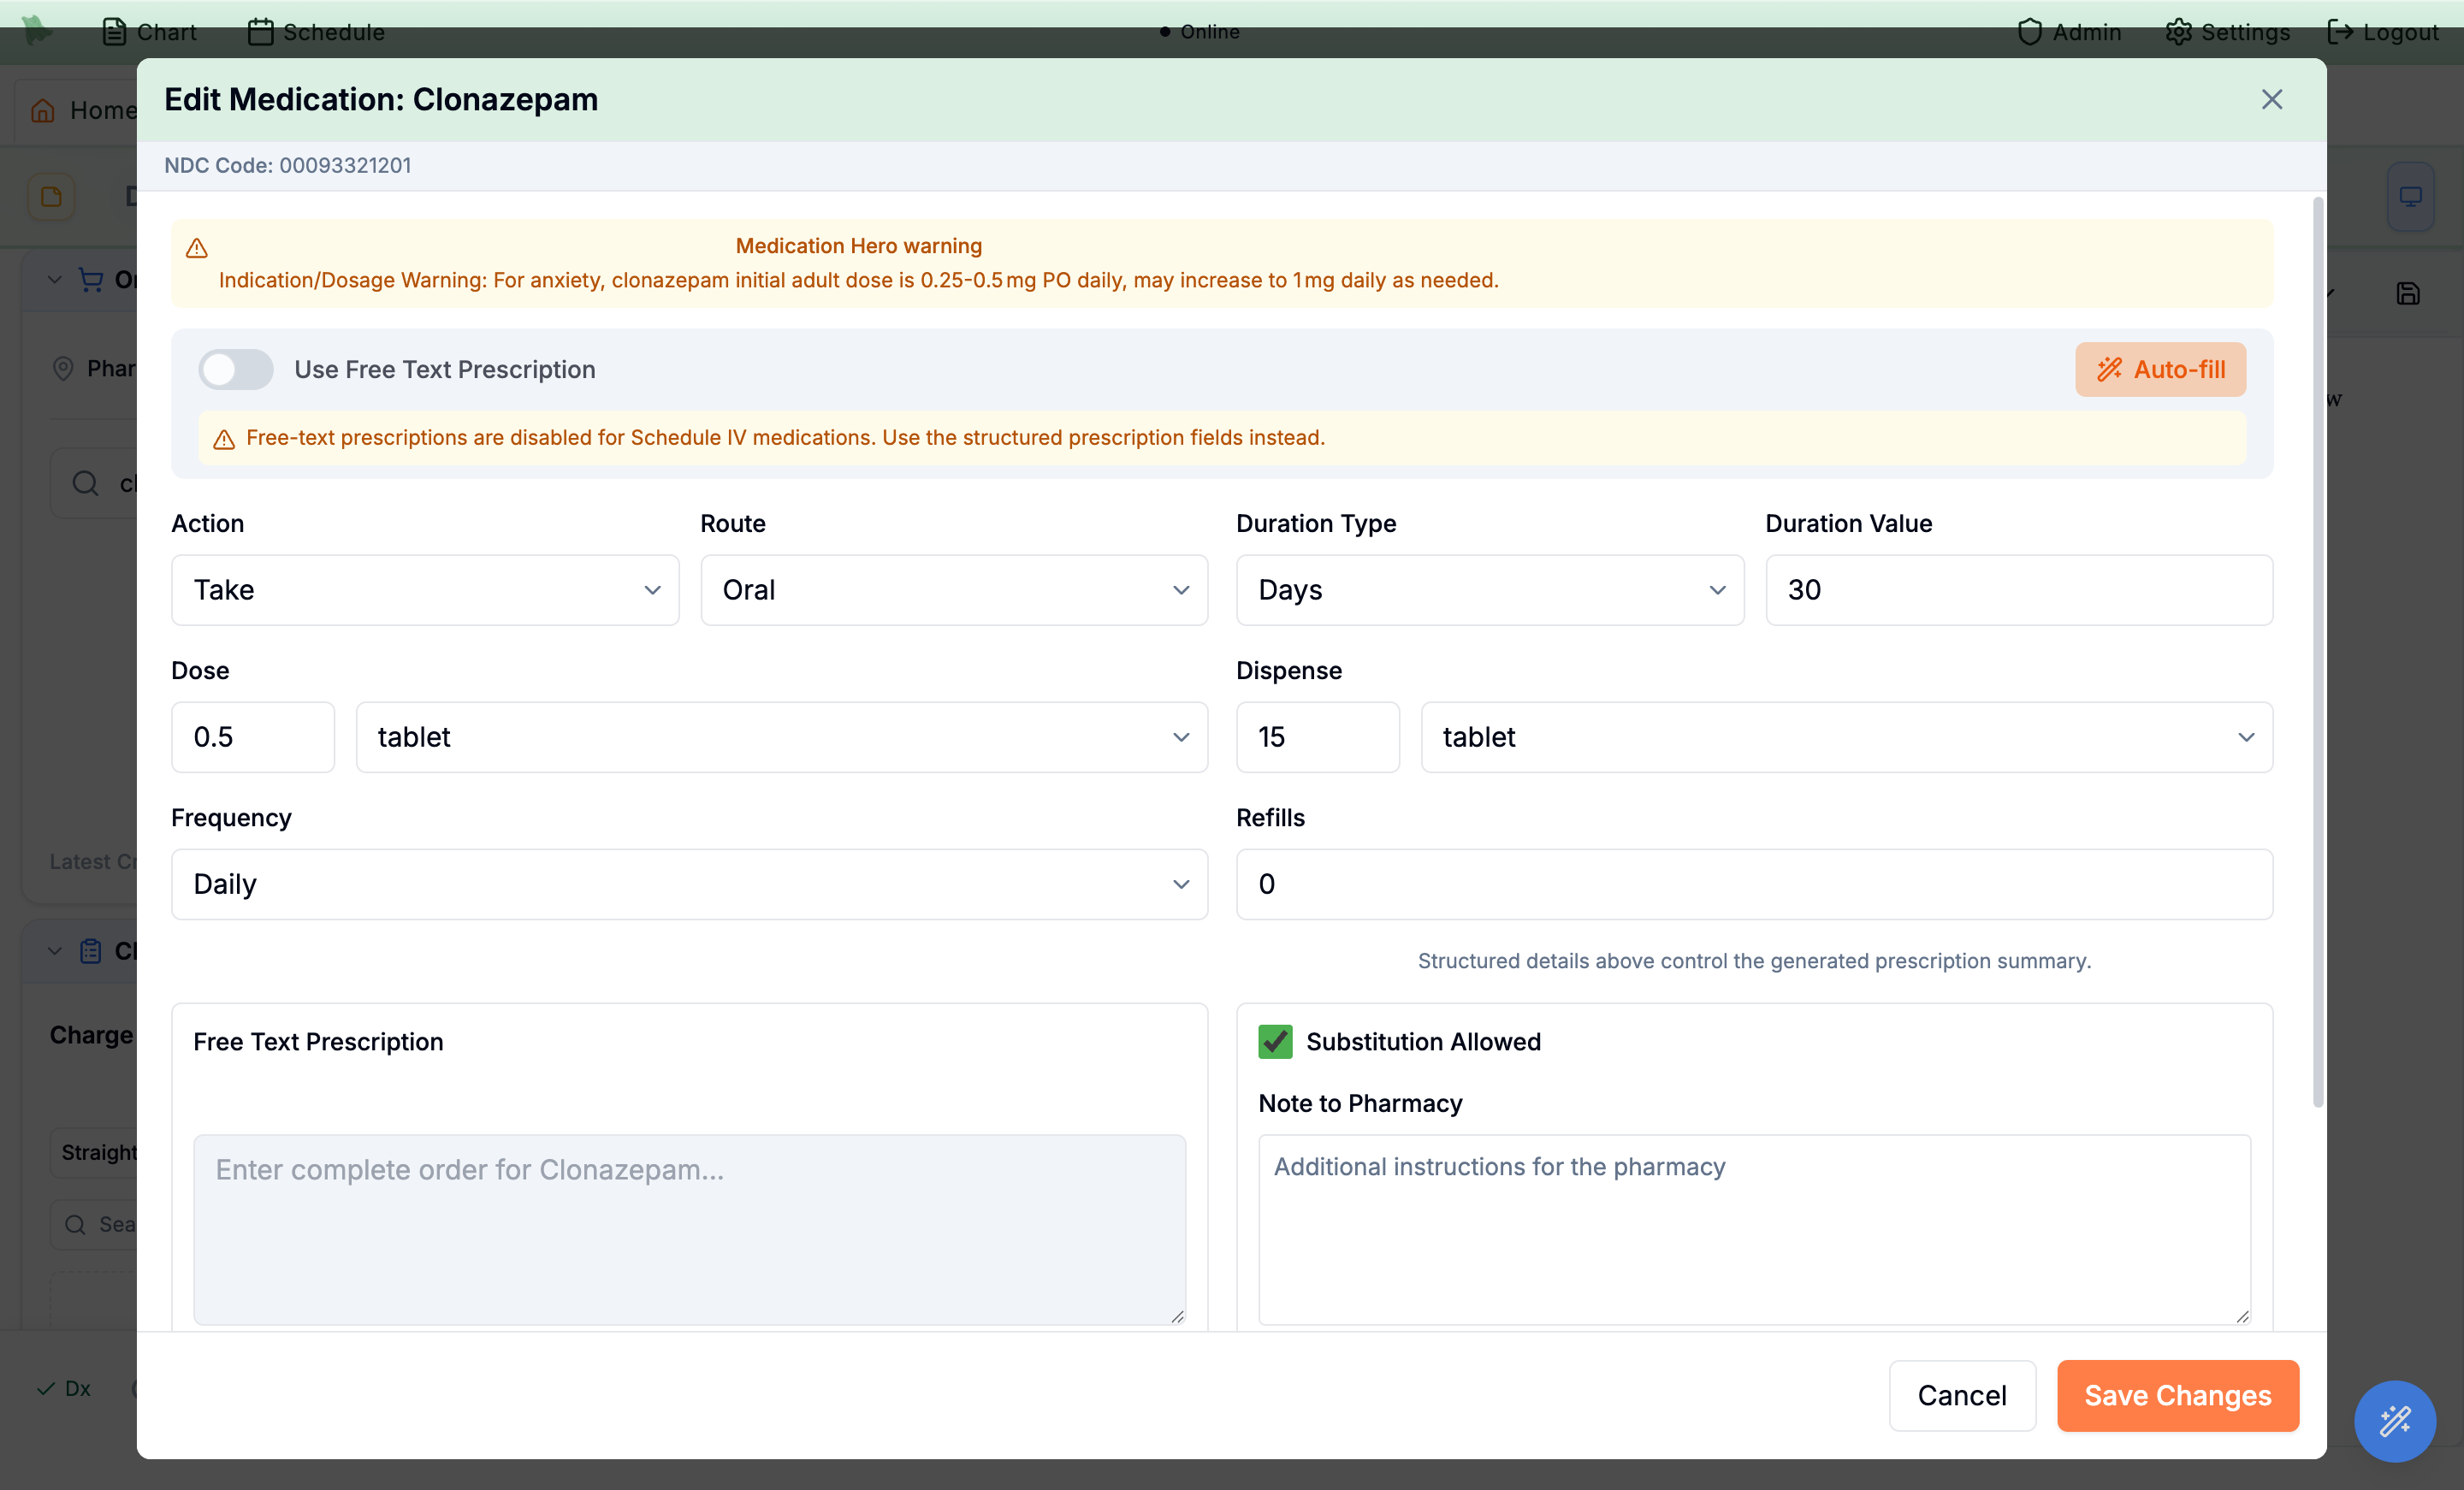
Auto-fill fills the structured sig and surfaces a Medication Hero warning with indication-specific dosing to check it against.Save Changes.
Auto-fill exists in the order-entry dialog (the one that ends in Save Changes). The renewal version opened from the Rx inbox via Approve with Changes has no Auto-fill button — see Refill requests.
Use AI in the Inbox: drafted replies & order extraction
Four Inbox surfaces carry an AI assist, and all of them follow one pattern: the model drafts, the draft lands in a composer or panel, and you edit and send. The click-by-click reply workflow lives in AI-assisted responses; this section maps where each control is, what each model reads, and what to check before sending.
| Surface | Where the control is | What the model reads |
|---|---|---|
| Patient messages | The purple wand (Generate AI responses) under Your Response to Patient; disabled with This message is not linked to a conversation thread on unthreaded items | The conversation thread and chart context, steered by the optional instruction box (Optional: Tell AI how to respond (e.g. 'reassure, schedule follow-up in 3 months')). |
| Order extraction | A small wand (Extract orders) on each of your sent messages in a thread | The text of your sent message — the instructions you wrote to the patient, not the patient’s message. Phrase instructions completely if you plan to extract from them. |
| Result replies | The AI wand button in the results reply composer | The result and chart context, with the same optional instruction input; the chosen draft is marked Using AI Response #N. |
| Website inquiries | Generate under AI Suggestions on an inquiry | The contact-form inquiry, auto-analyzed on arrival into an AI Analysis card with Category and Summary. |
-
Generate and pick a draft.
On messages and results, an instruction gets you one tailored response and no instruction gets two alternatives, opening in the
AI Suggested Responsesmodal asResponse 1/Response 2cards with a one-line rationale. On inquiries, the draft appears underAI Suggestionson the inquiry itself and a toast confirmsInquiry Hero drafted a response. -
Edit, then send it yourself.
Clicking a card drops it into the composer. Nothing is ever sent automatically — you press
Send to Patient(messages and results) orSend Response(inquiries) after editing. A closed inquiry showsThis inquiry is closed. Reopen it from the status dropdown to send a response. -
Treat extracted orders as drafts.
Extract ordersparses your message into draft diagnoses, medications, labs, imaging, referrals, questionnaire orders, and a follow-up timeframe in collapsible panels with counts (for example3 orders). It needs the thread linked to an encounter (This message is not linked to an encounter) and the message fully sent (Wait for the message to send before extracting orders); the drafts then go through the normal order review and safety checks — see Safety checks.
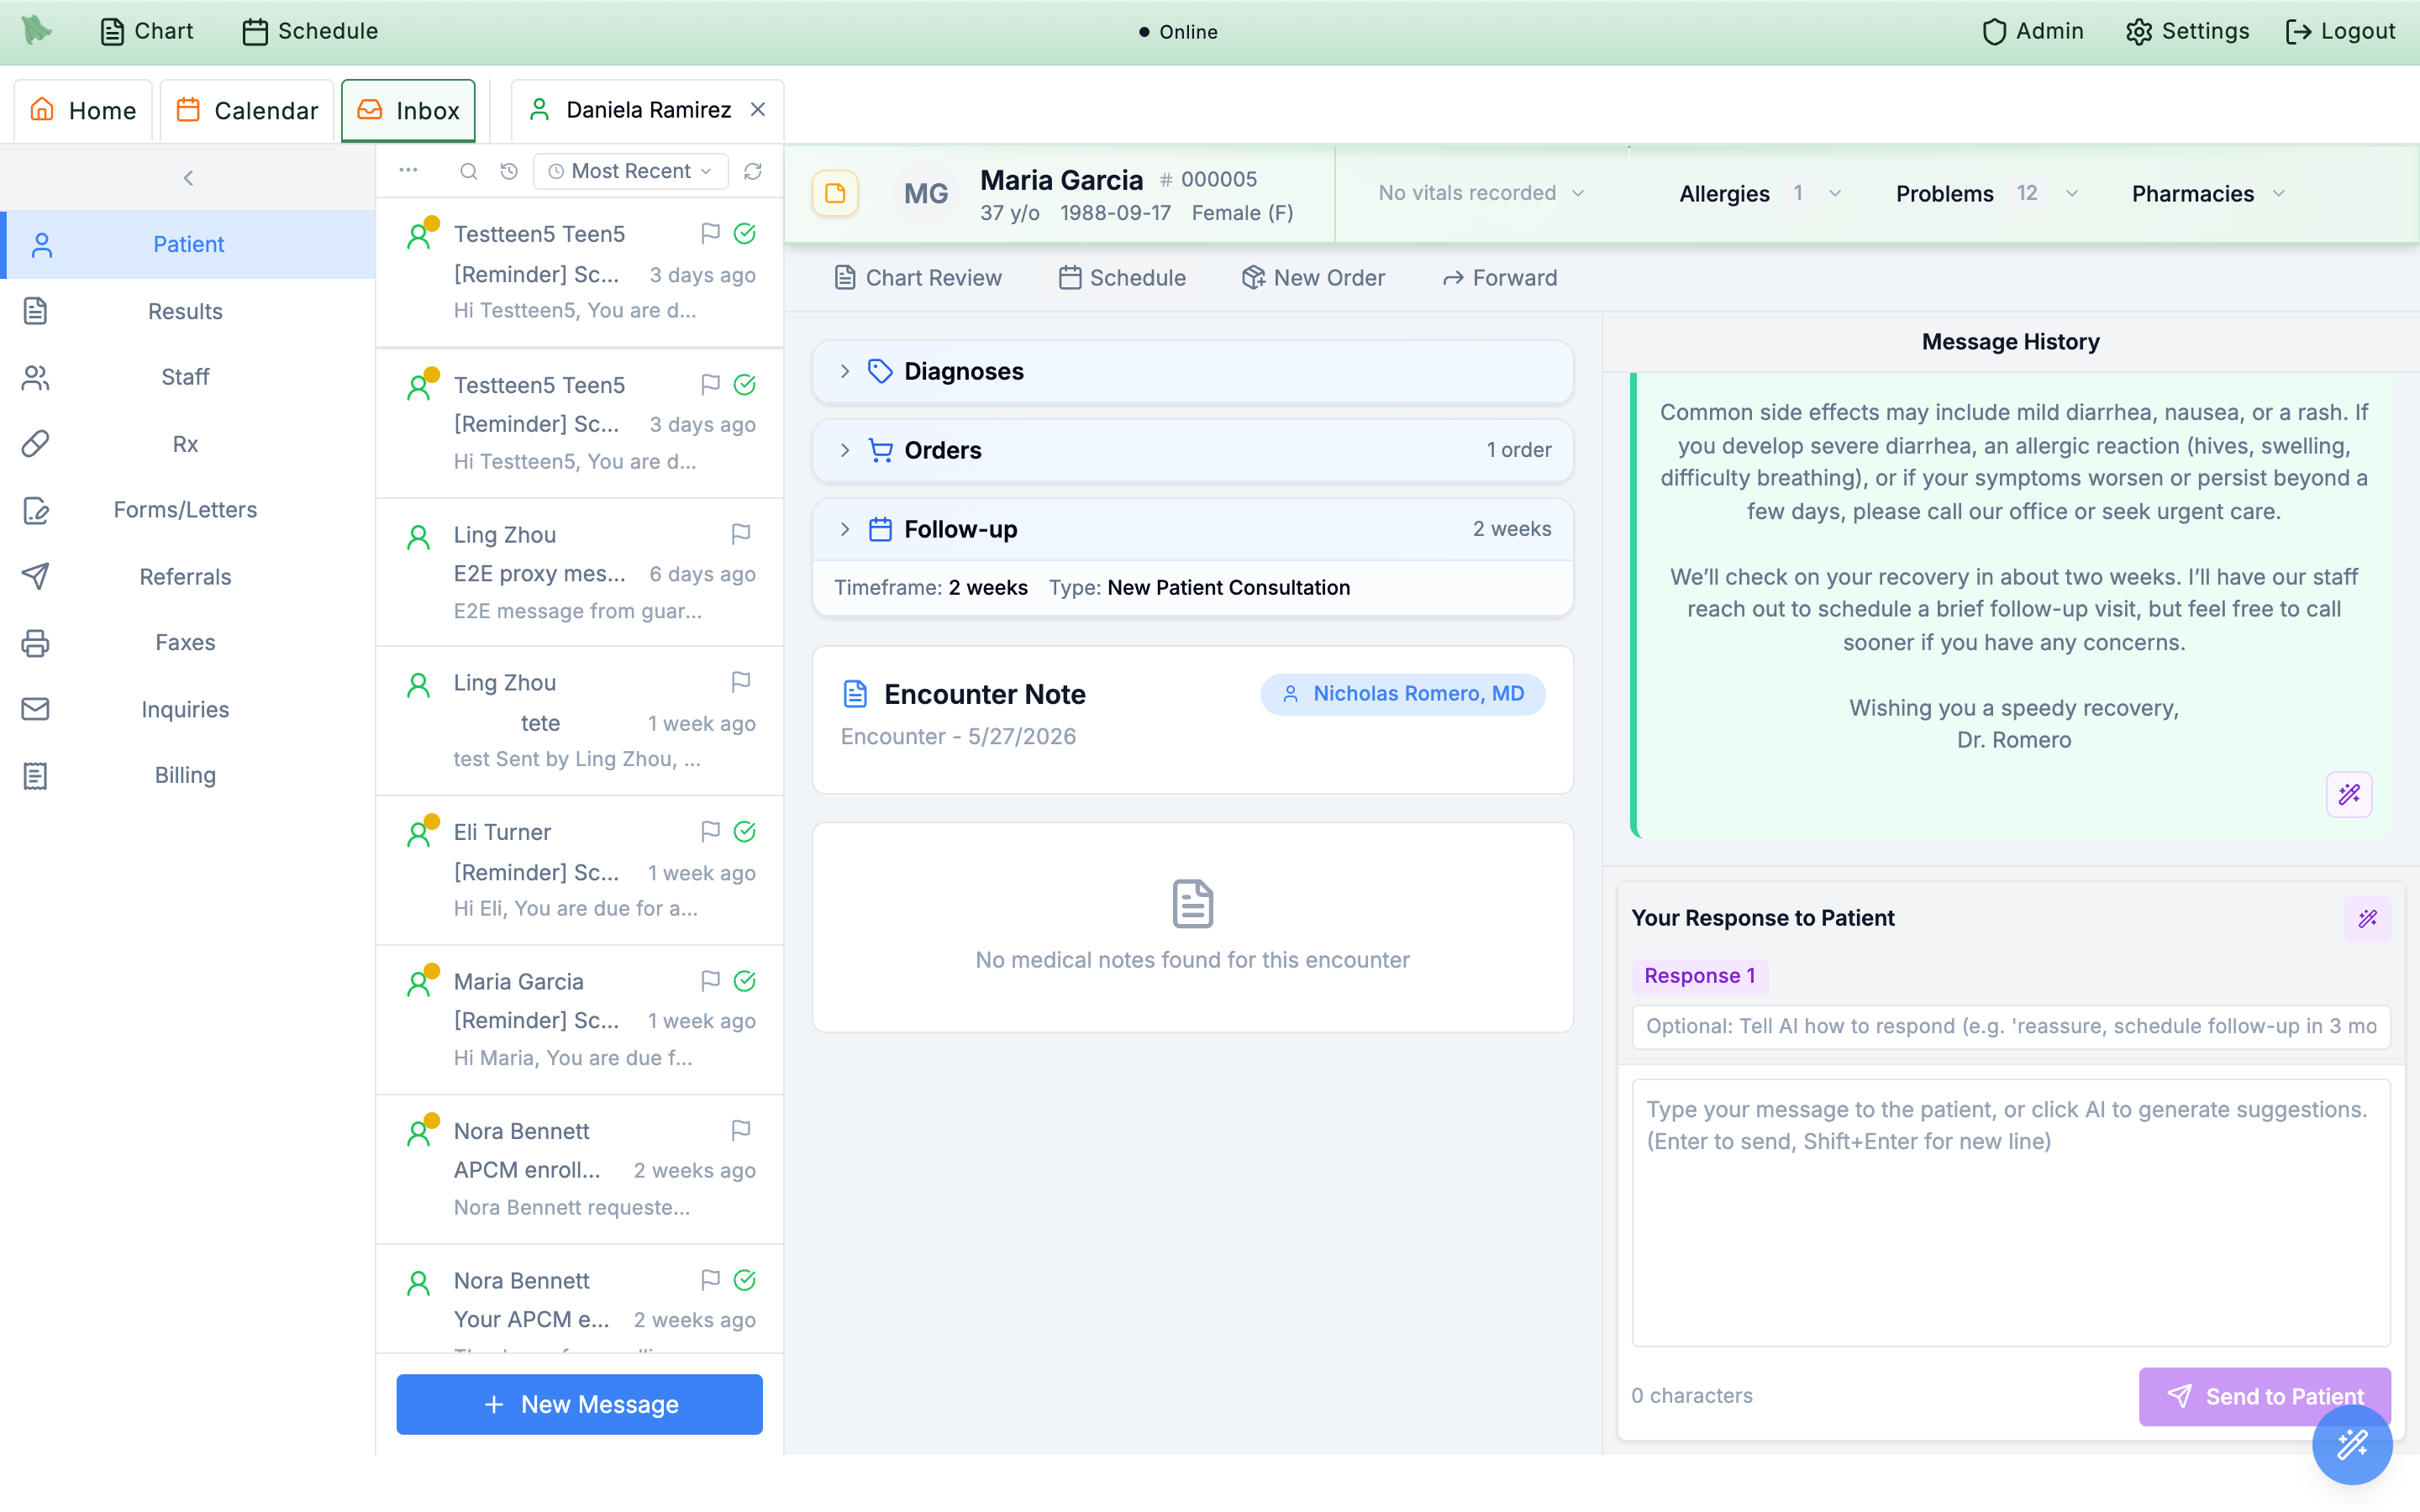
Your Response to Patient — the Response 1 chip marks its origin; you still edit and send.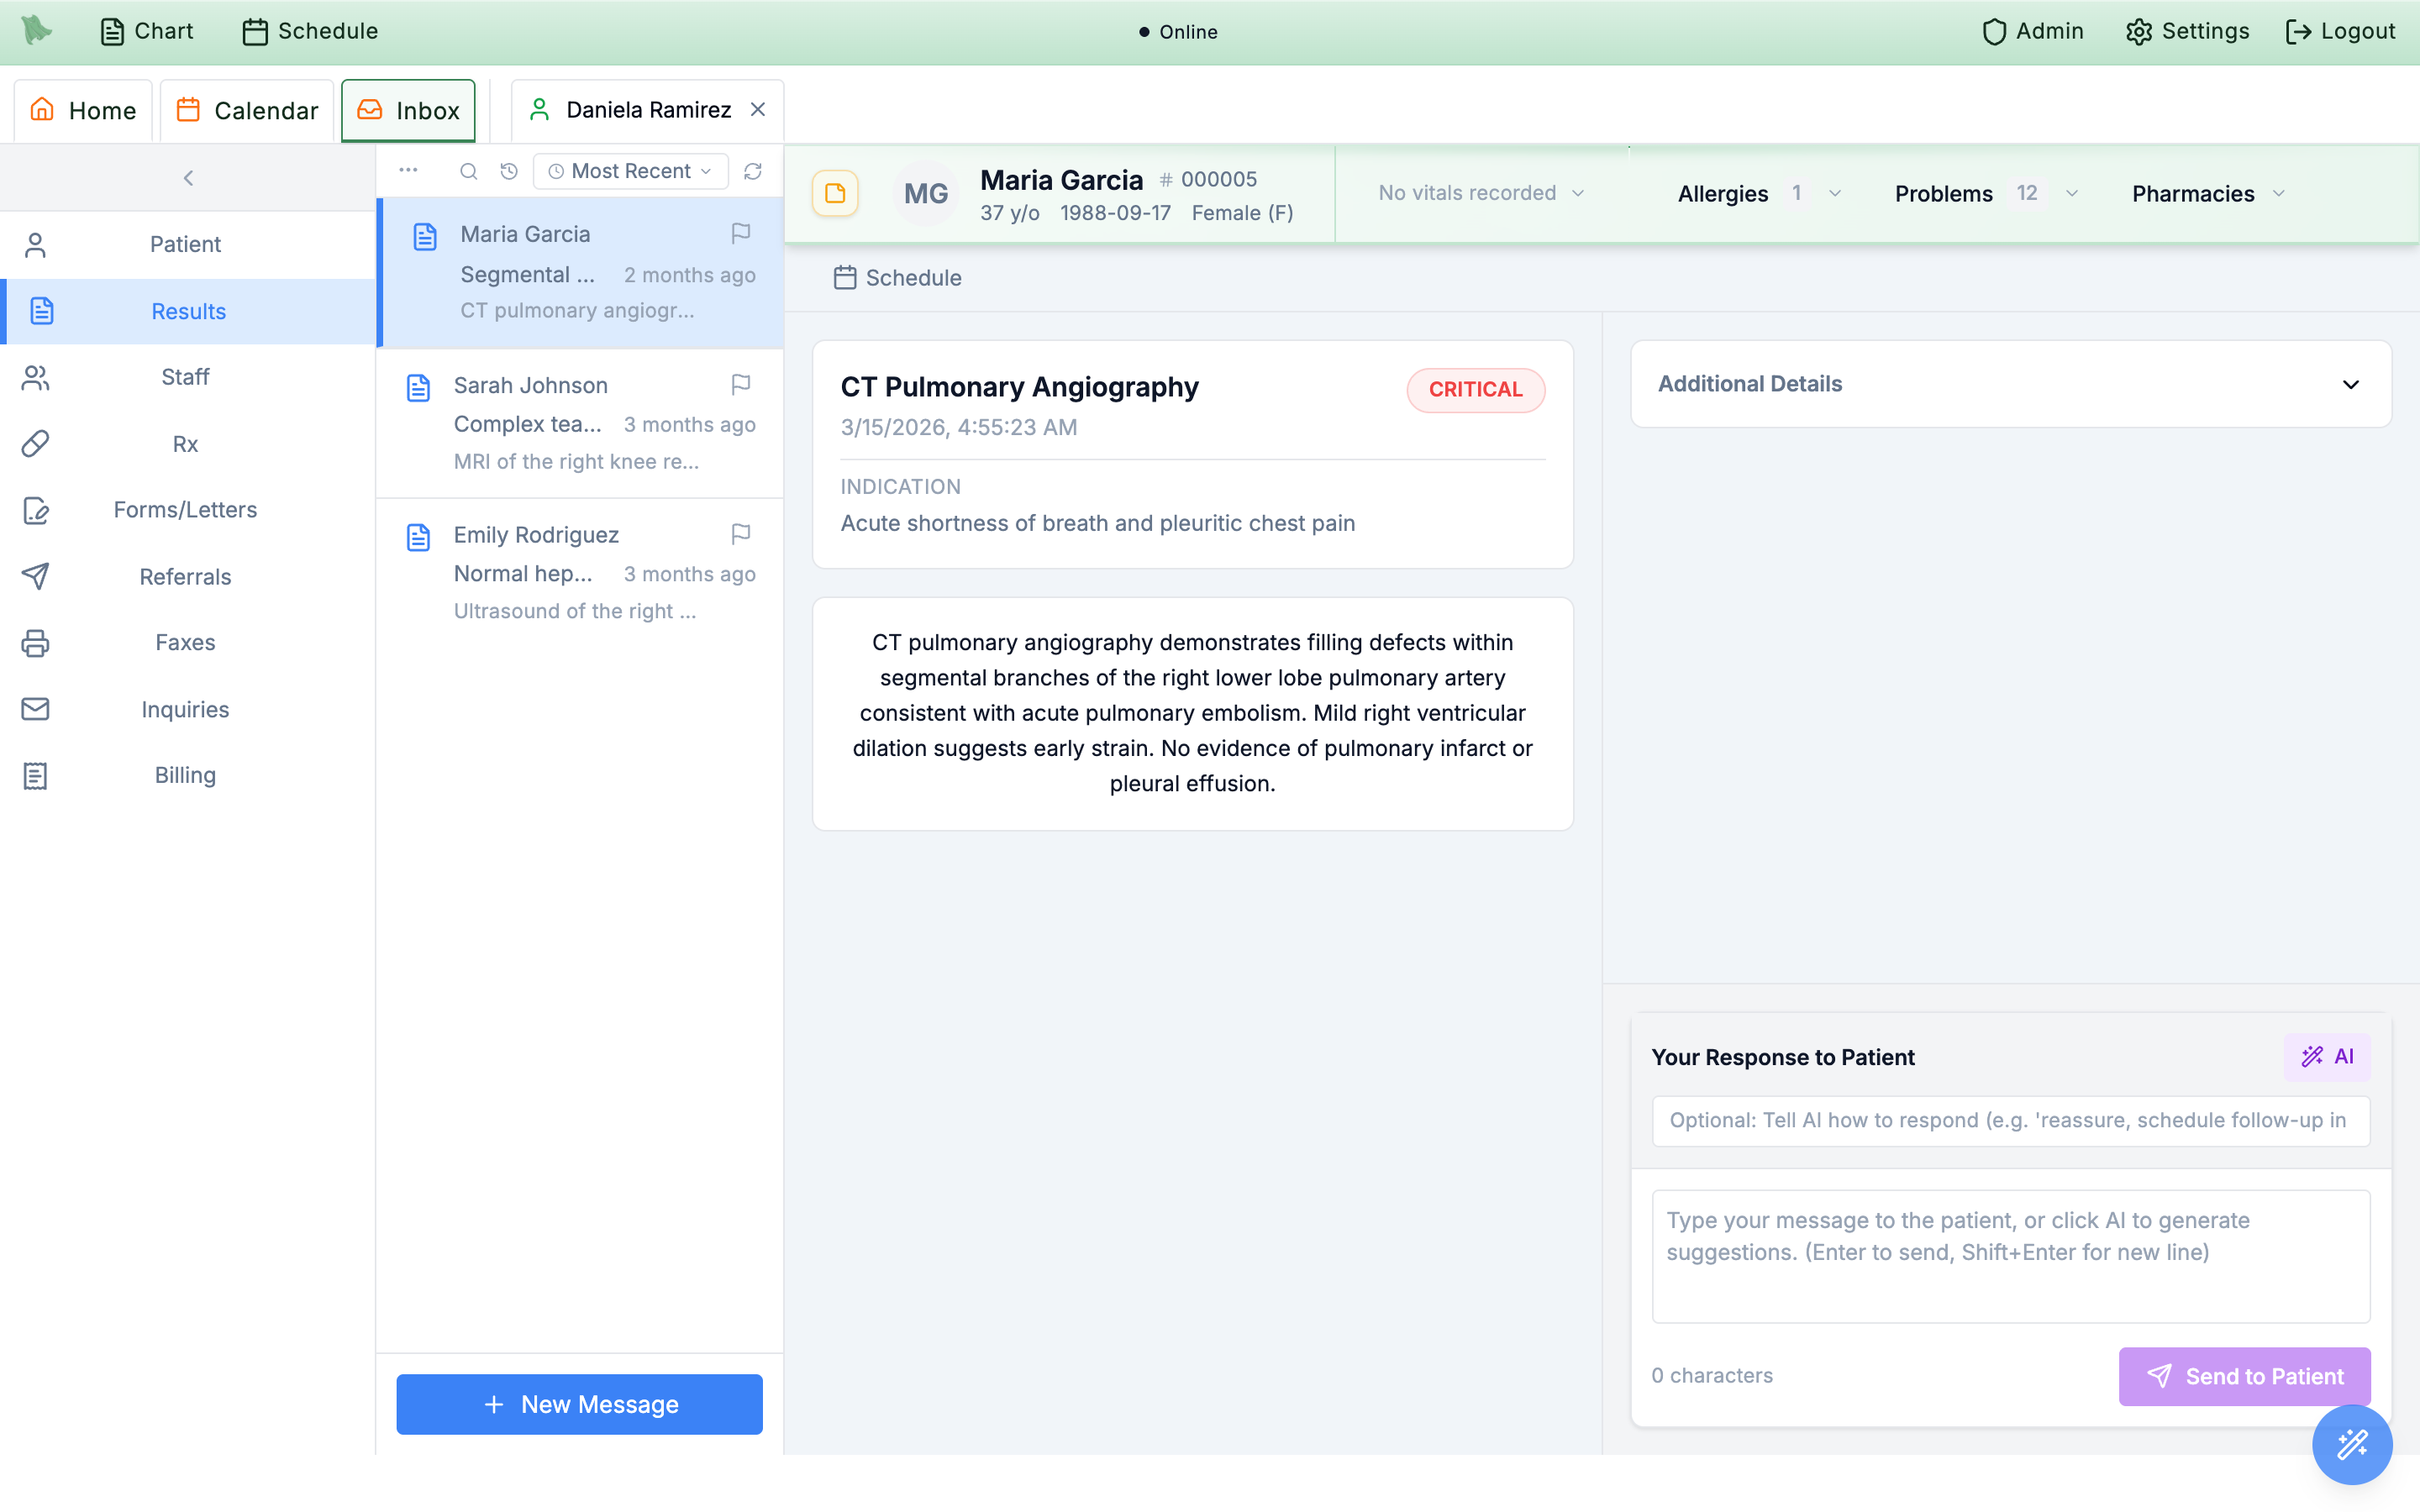
AI button drafts a patient-friendly explanation of the result.Reach Command Hero from the magic wand — hover, type, or click
The round magic-wand button at the bottom-right of every screen is more than the F1 voice trigger. Hover it (or tab into it) and a labelled menu rises above it — one row per action, each with its current shortcut printed on the right. Clicking the wand itself still starts and stops the voice assistant — the menu simply adds typed and click entry points to the same command engine, so you never have to speak to use it.
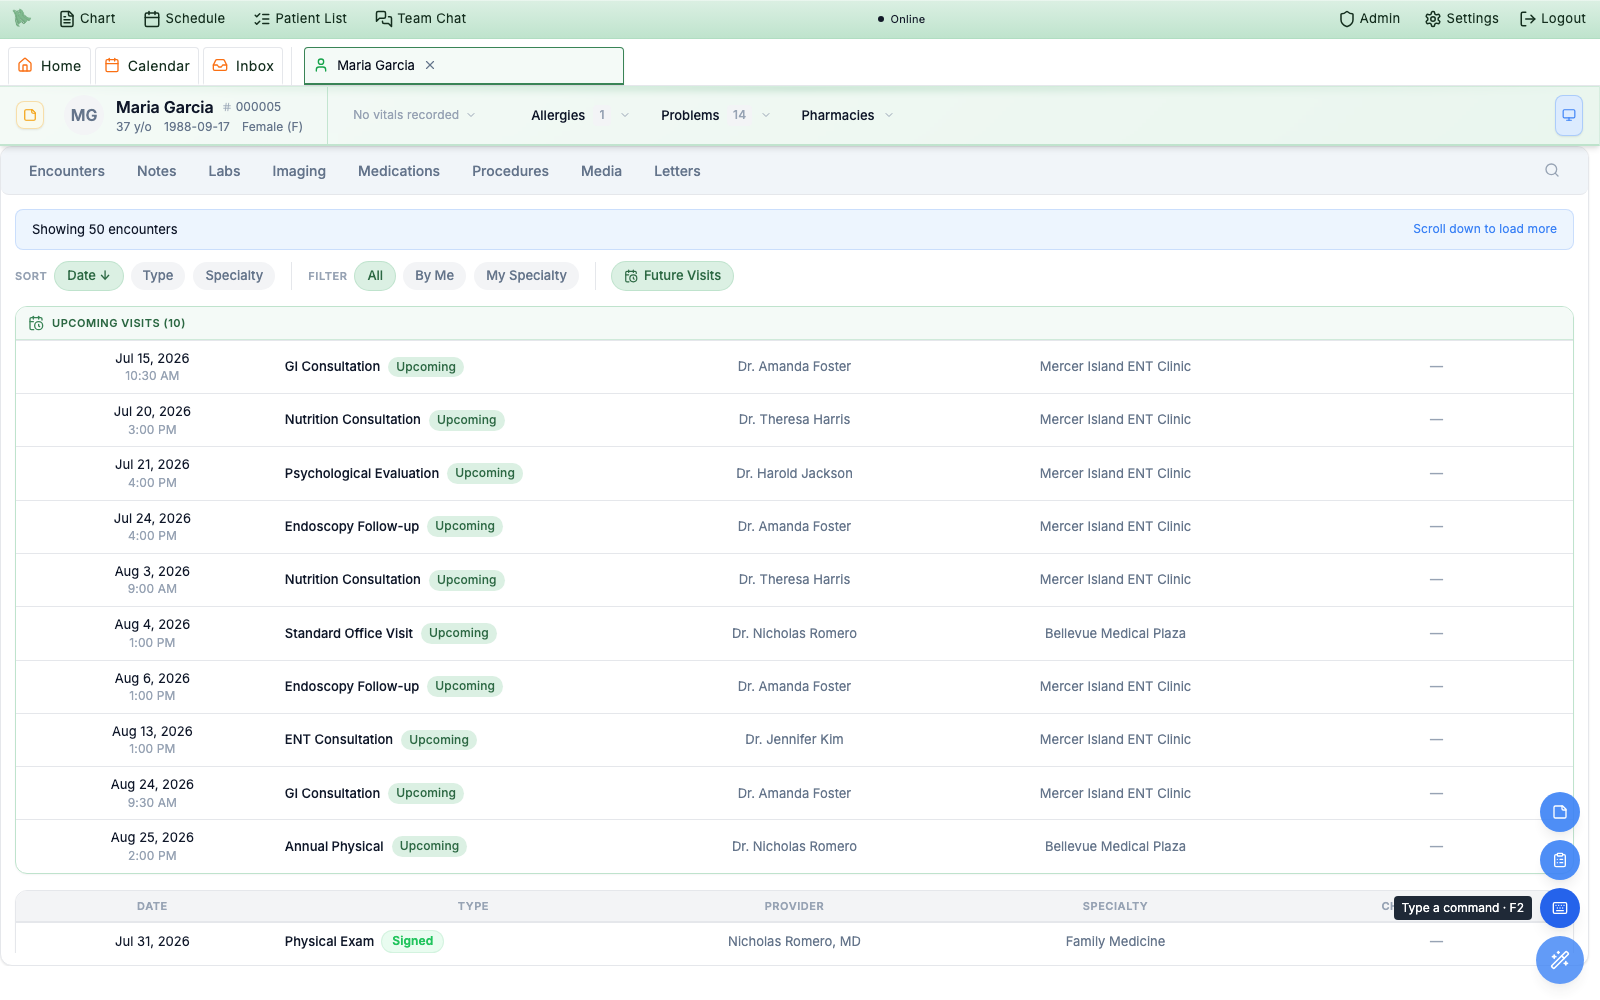
Type a command with F2.What the menu holds depends on your account — rows appear only when you have the matching access:
| Row | Shortcut | What it does |
|---|---|---|
What can Hero do? | F4 | The command guide — the in-app list of everything you can say or type to the assistant. |
How do I…? | F3 | The Hero EMR Assistant, for questions about the software. Admins and billing-capable roles. |
Todo list | ` | Opens the todo panel, with a red badge for the todos that need you today. |
Soaper Phone | Ctrl+P | Opens the softphone dock, badged with missed calls and voicemail. Practices using Soaper Phone. |
Quick note | Ctrl+N | A notes-only note filed straight to the chart. Physicians only. |
Create orders | Ctrl+O | The standard order-entry dialog. Hidden for staff roles. |
Raw dictation | Ctrl+D | Dictates your exact words into the field you were typing in. |
Type a command | F2 | The typed twin of the voice assistant. |
-
Type a command — F2.
Press F2 (or click the
Type a commandrow) and a smallType a command for Herobox opens just above the wand. Whatever you type runs through the same pipeline as the voice assistant — “order a CBC”, “prescribe amoxicillin 500 mg”, “message John Smith that his labs look fine” — and ends in the matching drafted order, prescription, or message for your review. Enter sends, Esc closes, and the dark status bar to the left of the wand showsProcessing…and the result exactly as it does for voice. The footnote says it plainly:Same commands as the voice assistant · Enter to send · Esc to close.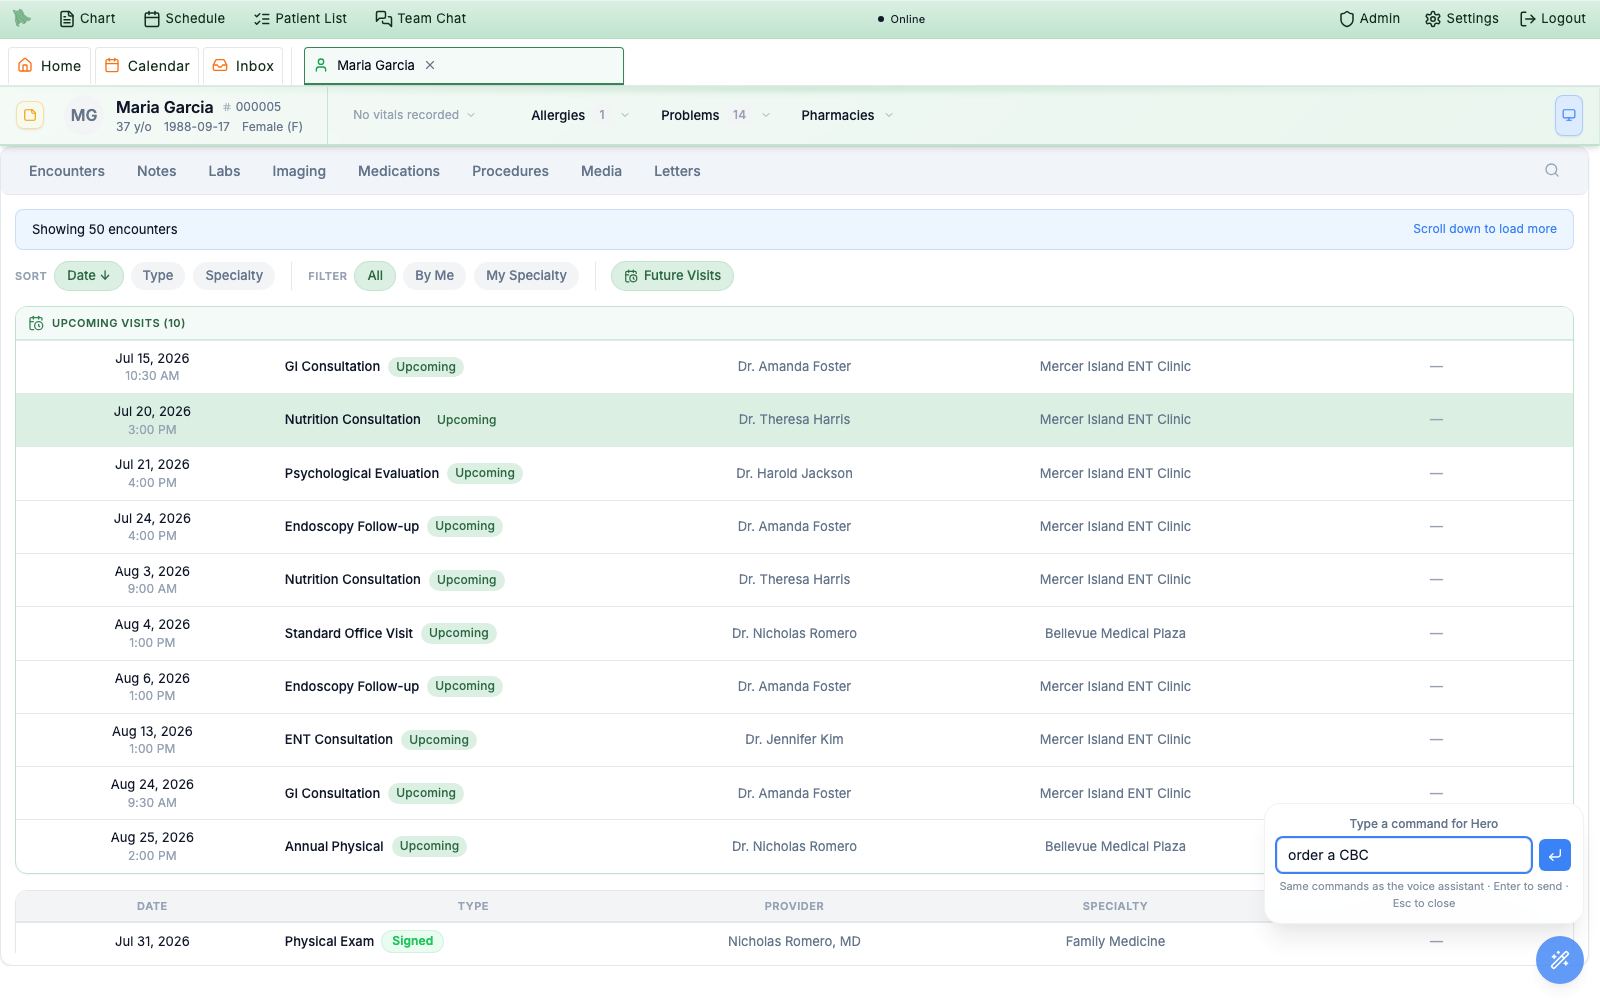
The F2 box takes the same phrasing you would speak — type it, press Enter, and review the draft it opens. -
Raw dictation — Ctrl+D.
The microphone row records your exact words anywhere in the app, cleans them up with AI — punctuation, false starts, run-on sentences — and inserts the result at your cursor, in whatever field or note you were typing in when you started. A small
Raw dictationpanel tracks the run:Recording…, thenTranscribing…andImproving transcription…. If the text has nowhere unambiguous to land — no field was focused, or the cleanup failed — the panel keeps it in an editable box withCopy textrather than dropping it somewhere you didn’t put your cursor. A dictation runs up to ten minutes (voice commands stop at 60 seconds), and it shares the one recorder with F1 and note dictation, so only one of the three can run at a time. -
Create orders — Ctrl+O.
The
Create ordersrow (or Ctrl+O) opens the standard order-entry dialog,Create Orders, for medications, labs, imaging, screeners, and forms. With a patient chart open, that patient is already selected — the dialog carries their name in its title; with no patient in context it opens the patient search first, exactly like a voice-driven order. This action is hidden for staff roles.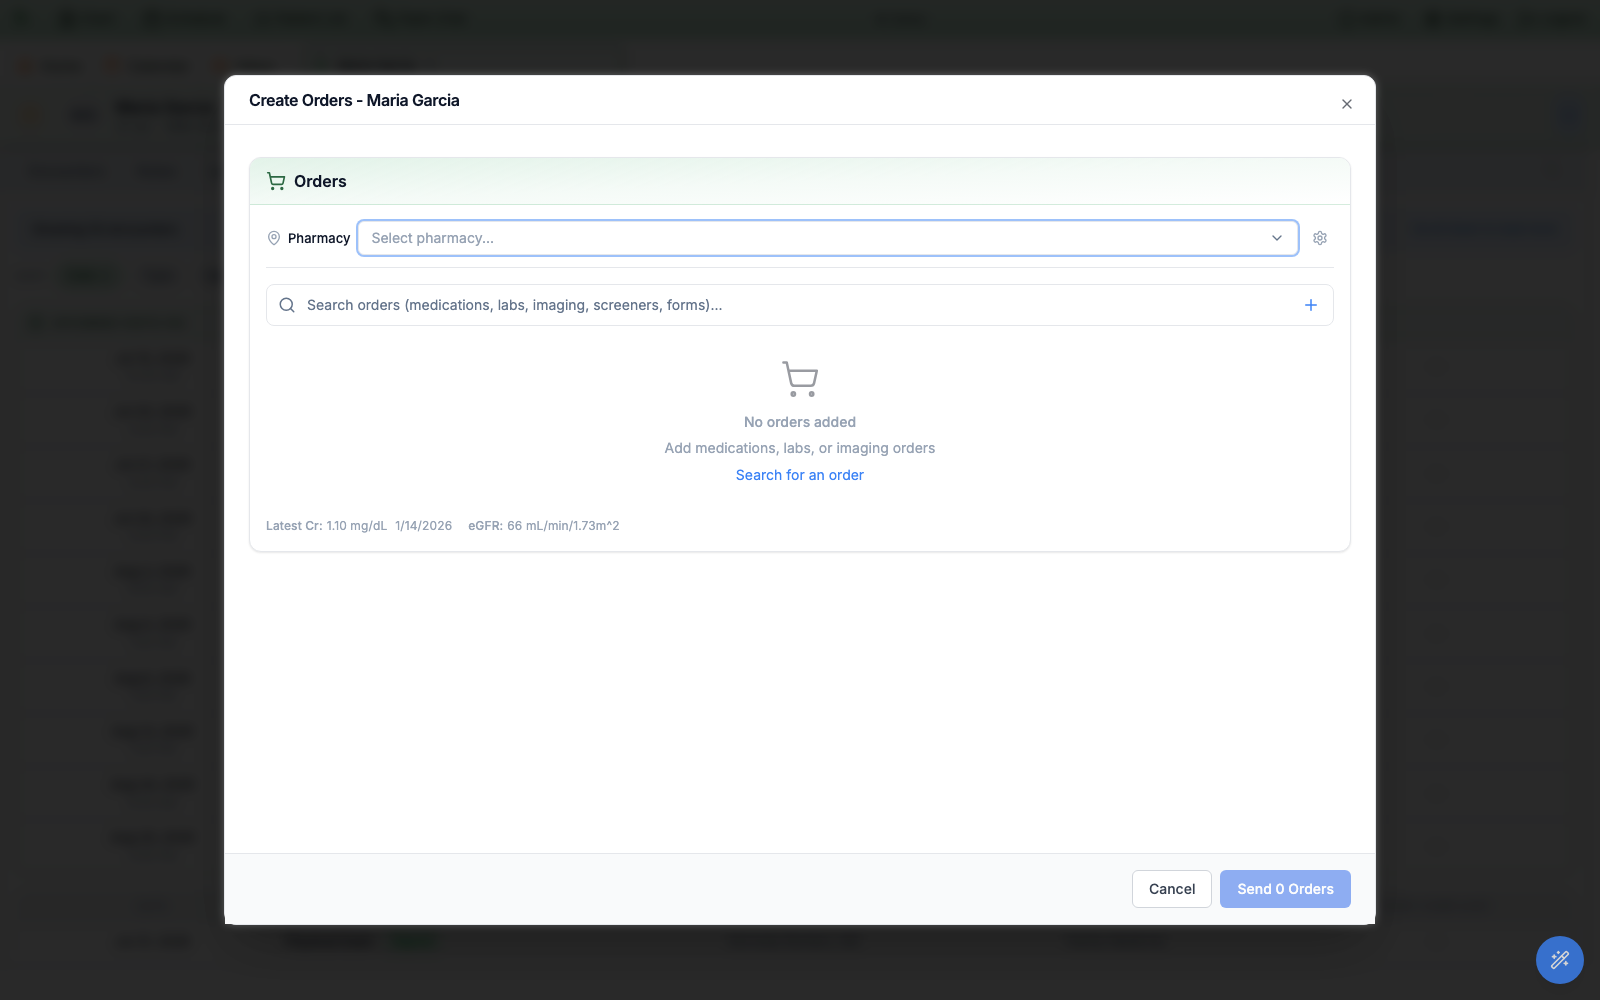
Opened from a chart, Create Ordersarrives with the patient preselected — the same dialog the voice assistant and encounter Orders use. -
Quick note — Ctrl+N (physicians only).
The
Quick noterow (or Ctrl+N) opens theQuick notedialog: a rich-text editor with aBold,Italic,Underline, and bulleted/numbered-list toolbar. Its subtitle spells out where the note goes —… files to the chart under a new notes-only encounter. As with orders, no patient in context opens the patient search first. Quick note is available to physicians only.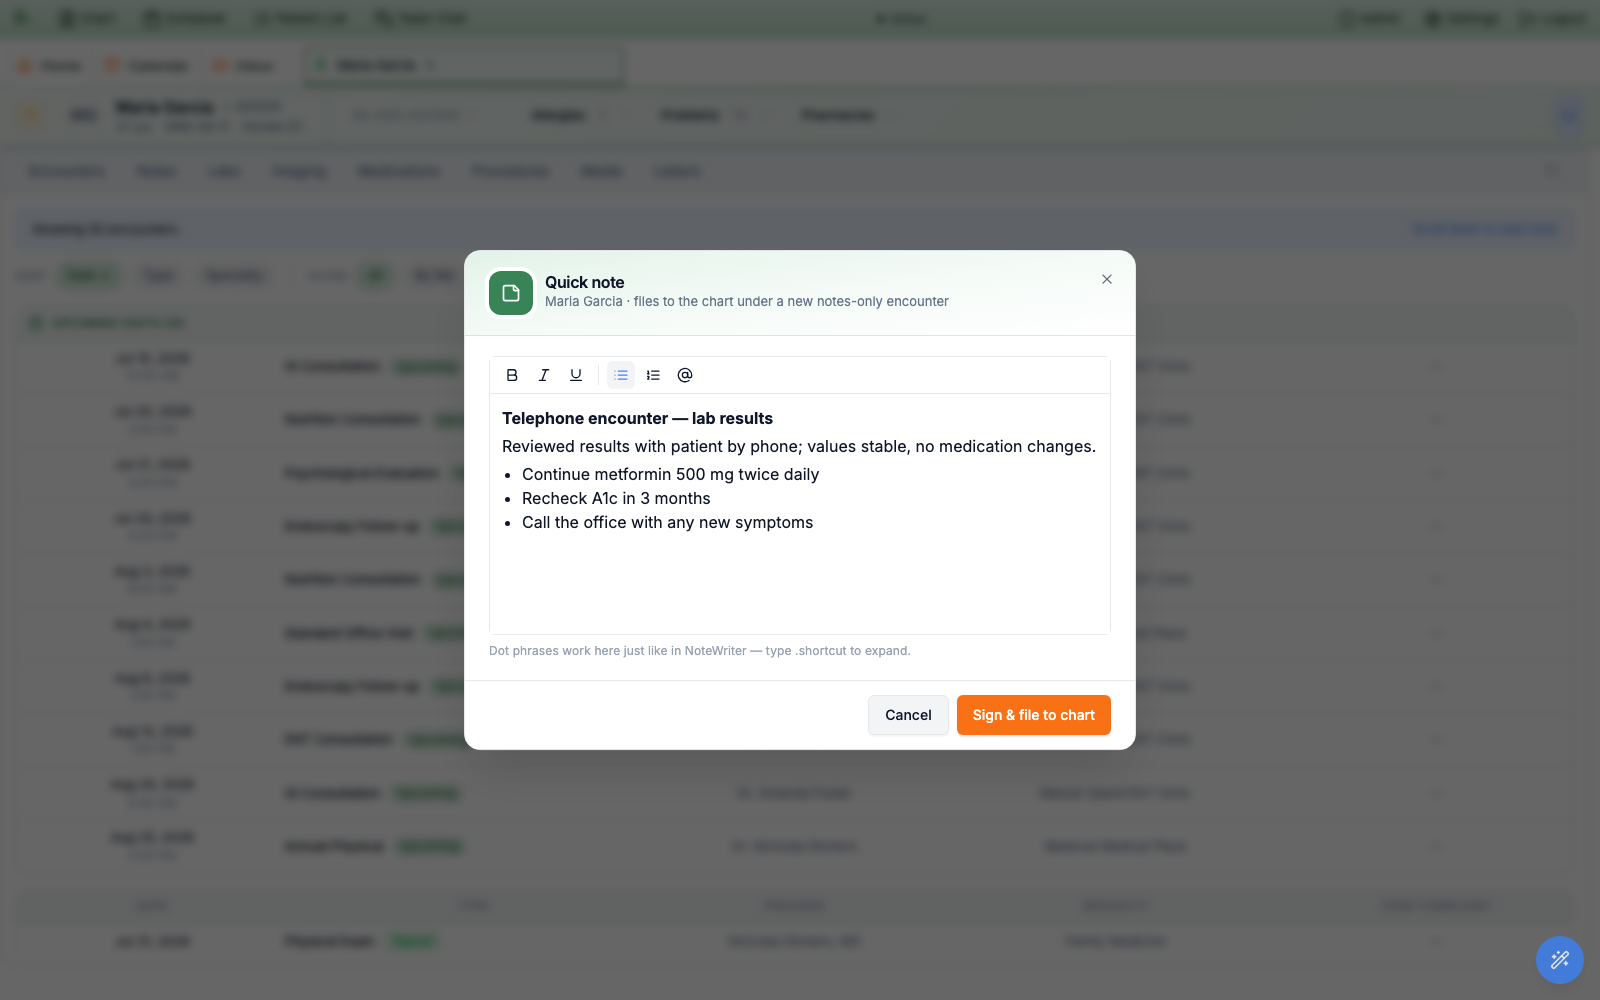
The Quick noteeditor with formatting applied — a bold heading and a bulleted plan.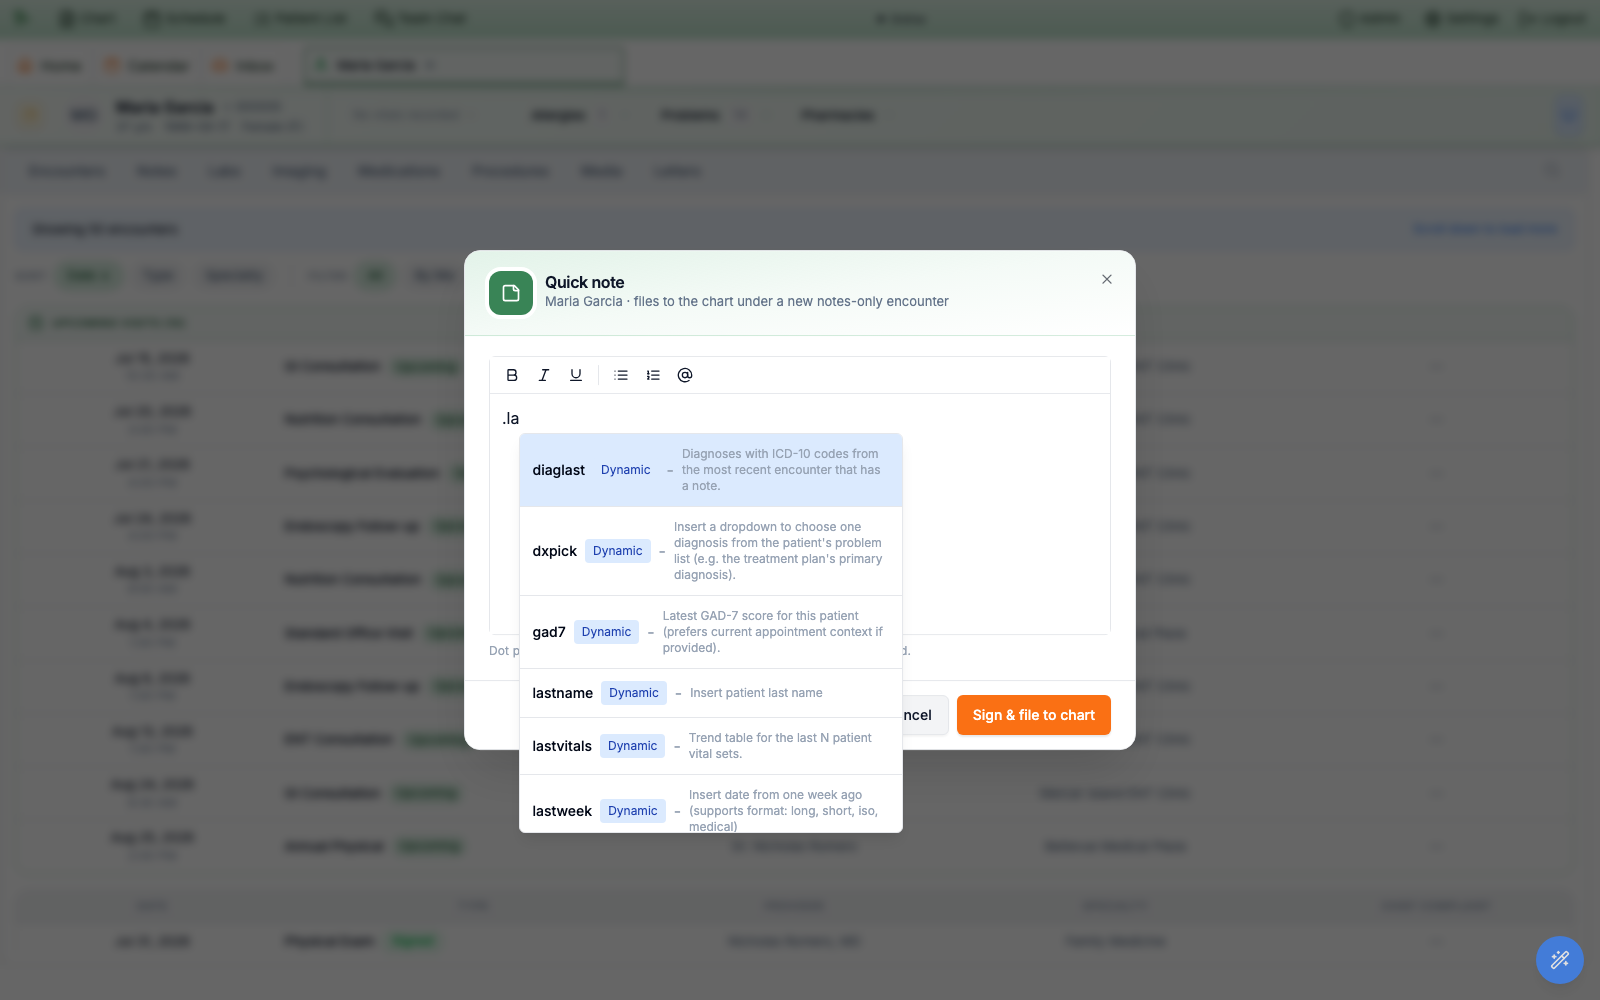
Dot phrases work here just like the Note Writer — type a period and a few letters to open the phrase menu. -
File it, and it is on the chart.
Sign & file to chartcreates the notes-only encounter, signs the note, and confirms with a greenQuick note signed and filed to the chart.banner — filing is signing, with no separate step.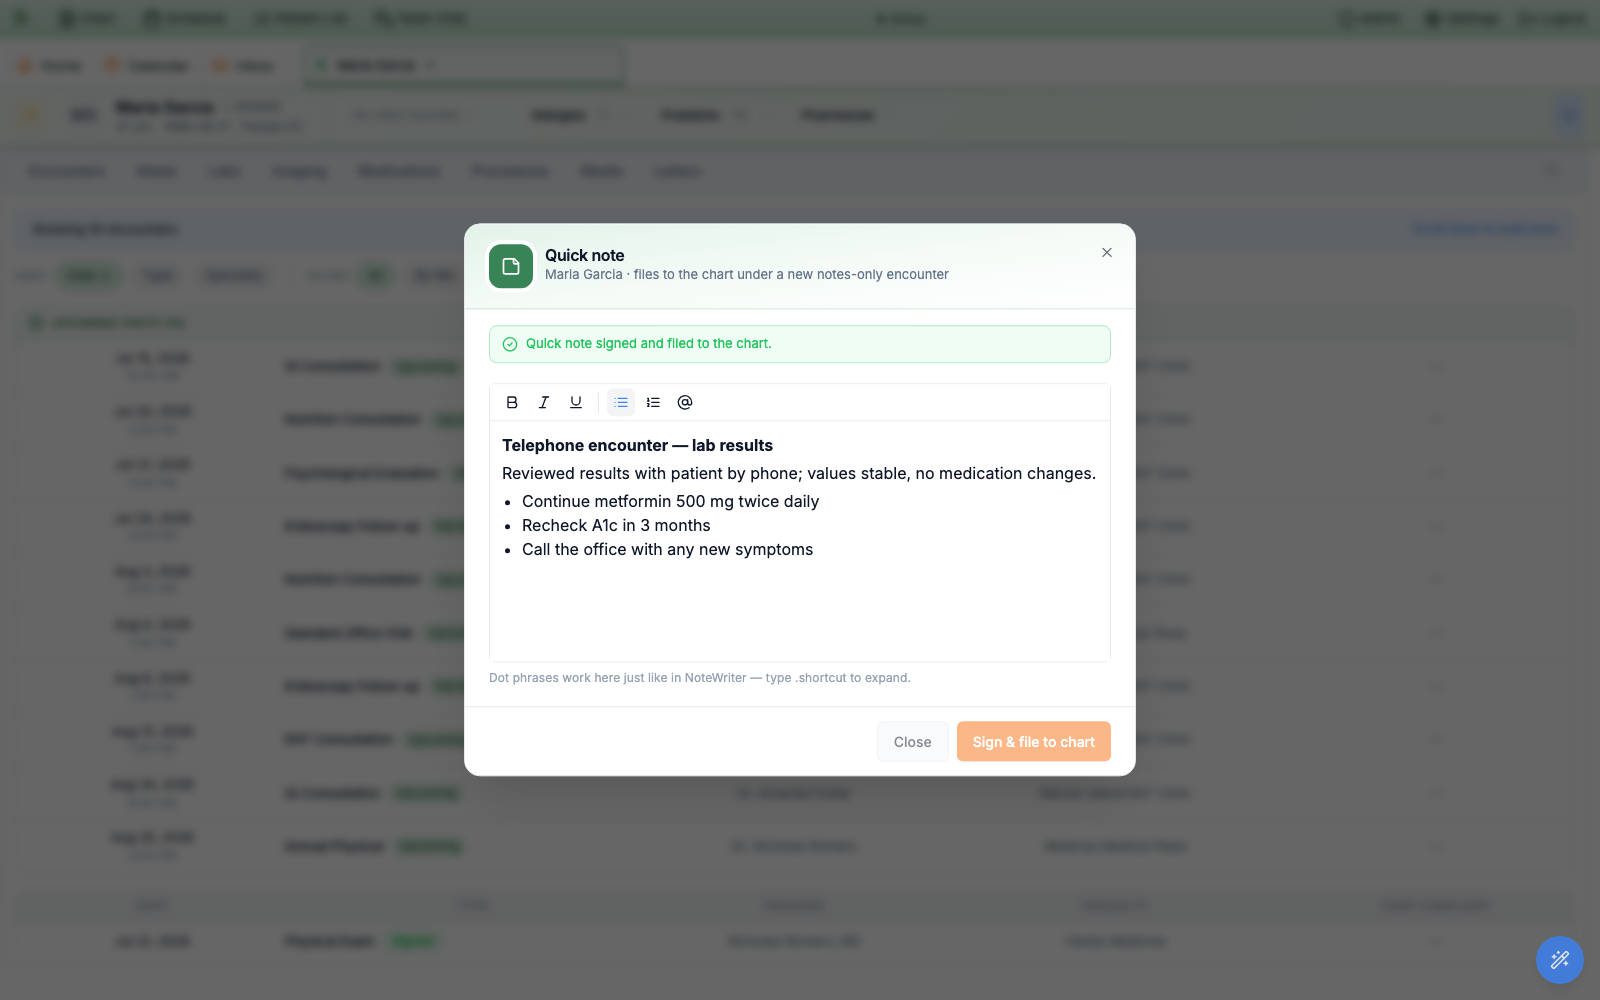
Filing signs the note and drops it onto the chart under a new notes-only encounter.
Quick note row, which always works on every platform, or bind quick note to a key Chrome doesn’t take — Settings → Hotkeys (Ctrl+Shift+?). The menu row then advertises whichever key you chose.
Need help? Email support@heroemr.com.