Encounter completion — the note & diagnoses
Document the visit and let Hero EMR turn it into a guided completion checklist: the note writer, auto-completion on save, and diagnoses.
Encounter completion — the note & diagnoses
Document the visit and let Hero EMR turn it into a guided completion checklist: the note writer, auto-completion on save, and diagnoses.
Open the encounter and meet the note writer
Every visit is documented in the note writer — a two-pane workspace. The left pane is the patient’s chart; the right pane is the note. You write the note on the right, and when you save, the left pane turns into a guided Encounter Completion checklist that walks you through diagnoses, orders, charges, follow-up, and medications before you sign.
-
Start the encounter.
On the dashboard agenda, hover the patient’s appointment row and click the small ▶ play button that appears on the right (its tooltip reads Begin encounter) — the same button sits on the calendar’s appointment list. Double-clicking the appointment row does the same thing. From the chart, open the
Encounterstab, single-click a row in theUpcoming visitspanel and useBegin encounterin the preview’s action strip. The note opens on a tab labelled Note: <patient>.- Once a visit is signed or complete the ▶ button stops appearing on hover — that is deliberate, not a fault. Double-click the row to open a signed visit and add an addendum.
-
Know the two panes.
- Left — Chart Review. Tabs for
Encounters,Notes,Labs,Imaging,Medications,Immunizations,Prenatal,Brain Health,Procedures,Media, andLetters, plus the patient header strip (vitals, allergies, problems, pharmacies).Immunizations,Prenatal, andBrain Healthonly appear when the matching organization feature is switched on under Admin → Additional Features — andPrenataladditionally needs an existing pregnancy episode on file for this patient. - Right — the note editor. A rich-text editor. Its toolbar runs bold/italic/underline, a
Formatdropdown holding headings, lists, alignment, and the note’s display style, then the note-type pill (for exampleProgress Note),+ New note, aVisiblecontrol for patient-portal visibility, dictation (microphone), and save.
- Left — Chart Review. Tabs for
- Switch panes whenever you need to. The small ⇆ icon button inside the note’s own tab in the tab strip flips the left pane between chart and completion — hover it and the tooltip reads Switch to Encounter Completion or Switch to Chart Review depending on where you are. It shows only on the active note tab, so you can flip back to the chart mid-visit without losing the completion you’ve started. Staff users don’t get the toggle, because they don’t complete encounters.
***) and Shift+F2 goes back, and F8 opens the Note Writer guide. These are the defaults — remap any of them under Keyboard Shortcuts in Settings.
Co-edit a note with another clinician
Collaborative editing lets two or more clinicians work on the same saved encounter note and Encounter Completion screen at once, the way several people edit one shared document. Changes merge live over a websocket, so a supervising physician and a resident — or a scribe and a clinician — can build the note together without overwriting each other. It is off by default and is a per-clinician setting (not org-wide): the clinician who owns the encounter must have it enabled for a shared session to be allowed.
-
Turn it on (encounter owner).
Open the top-toolbar
Settingsgear, chooseSOAP Notes, then theSettingstab in the Template Manager and checkEnable Collaborative Editing. It saves immediately. The same Note Writer Preferences panel also holdsSpeaker Diarizationand yourDefault Note Display Style.- Co-editing only works on a saved encounter. A brand-new, unsaved standalone note can’t be co-edited yet — press
Save Notefirst (see Auto-completion).
- Co-editing only works on a saved encounter. A brand-new, unsaved standalone note can’t be co-edited yet — press
-
Edit together.
When a second clinician opens the same encounter, they briefly see “Connecting… Waiting for collaboration sync”, then a presence bar appears across the top of the note: a green
Connecteddot, an “N people editing” count, and a colored avatar with each editor’s initials (hover an avatar for the full name and Active now).- Sections that someone is editing highlight with a colored border and lock to whoever is in them, so two people don’t type over the same paragraph. You can unlock a colleague’s section if you need to take it over.
- Toasts announce when someone joins, leaves, or starts signing.
- Finalize without collisions. When one clinician begins signing/finalizing the visit, everyone else sees a signing-in-progress lock so two people can’t sign at once. If a signing lock is held too long it can be force-unlocked, then the visit closes through the usual Sign & close step.
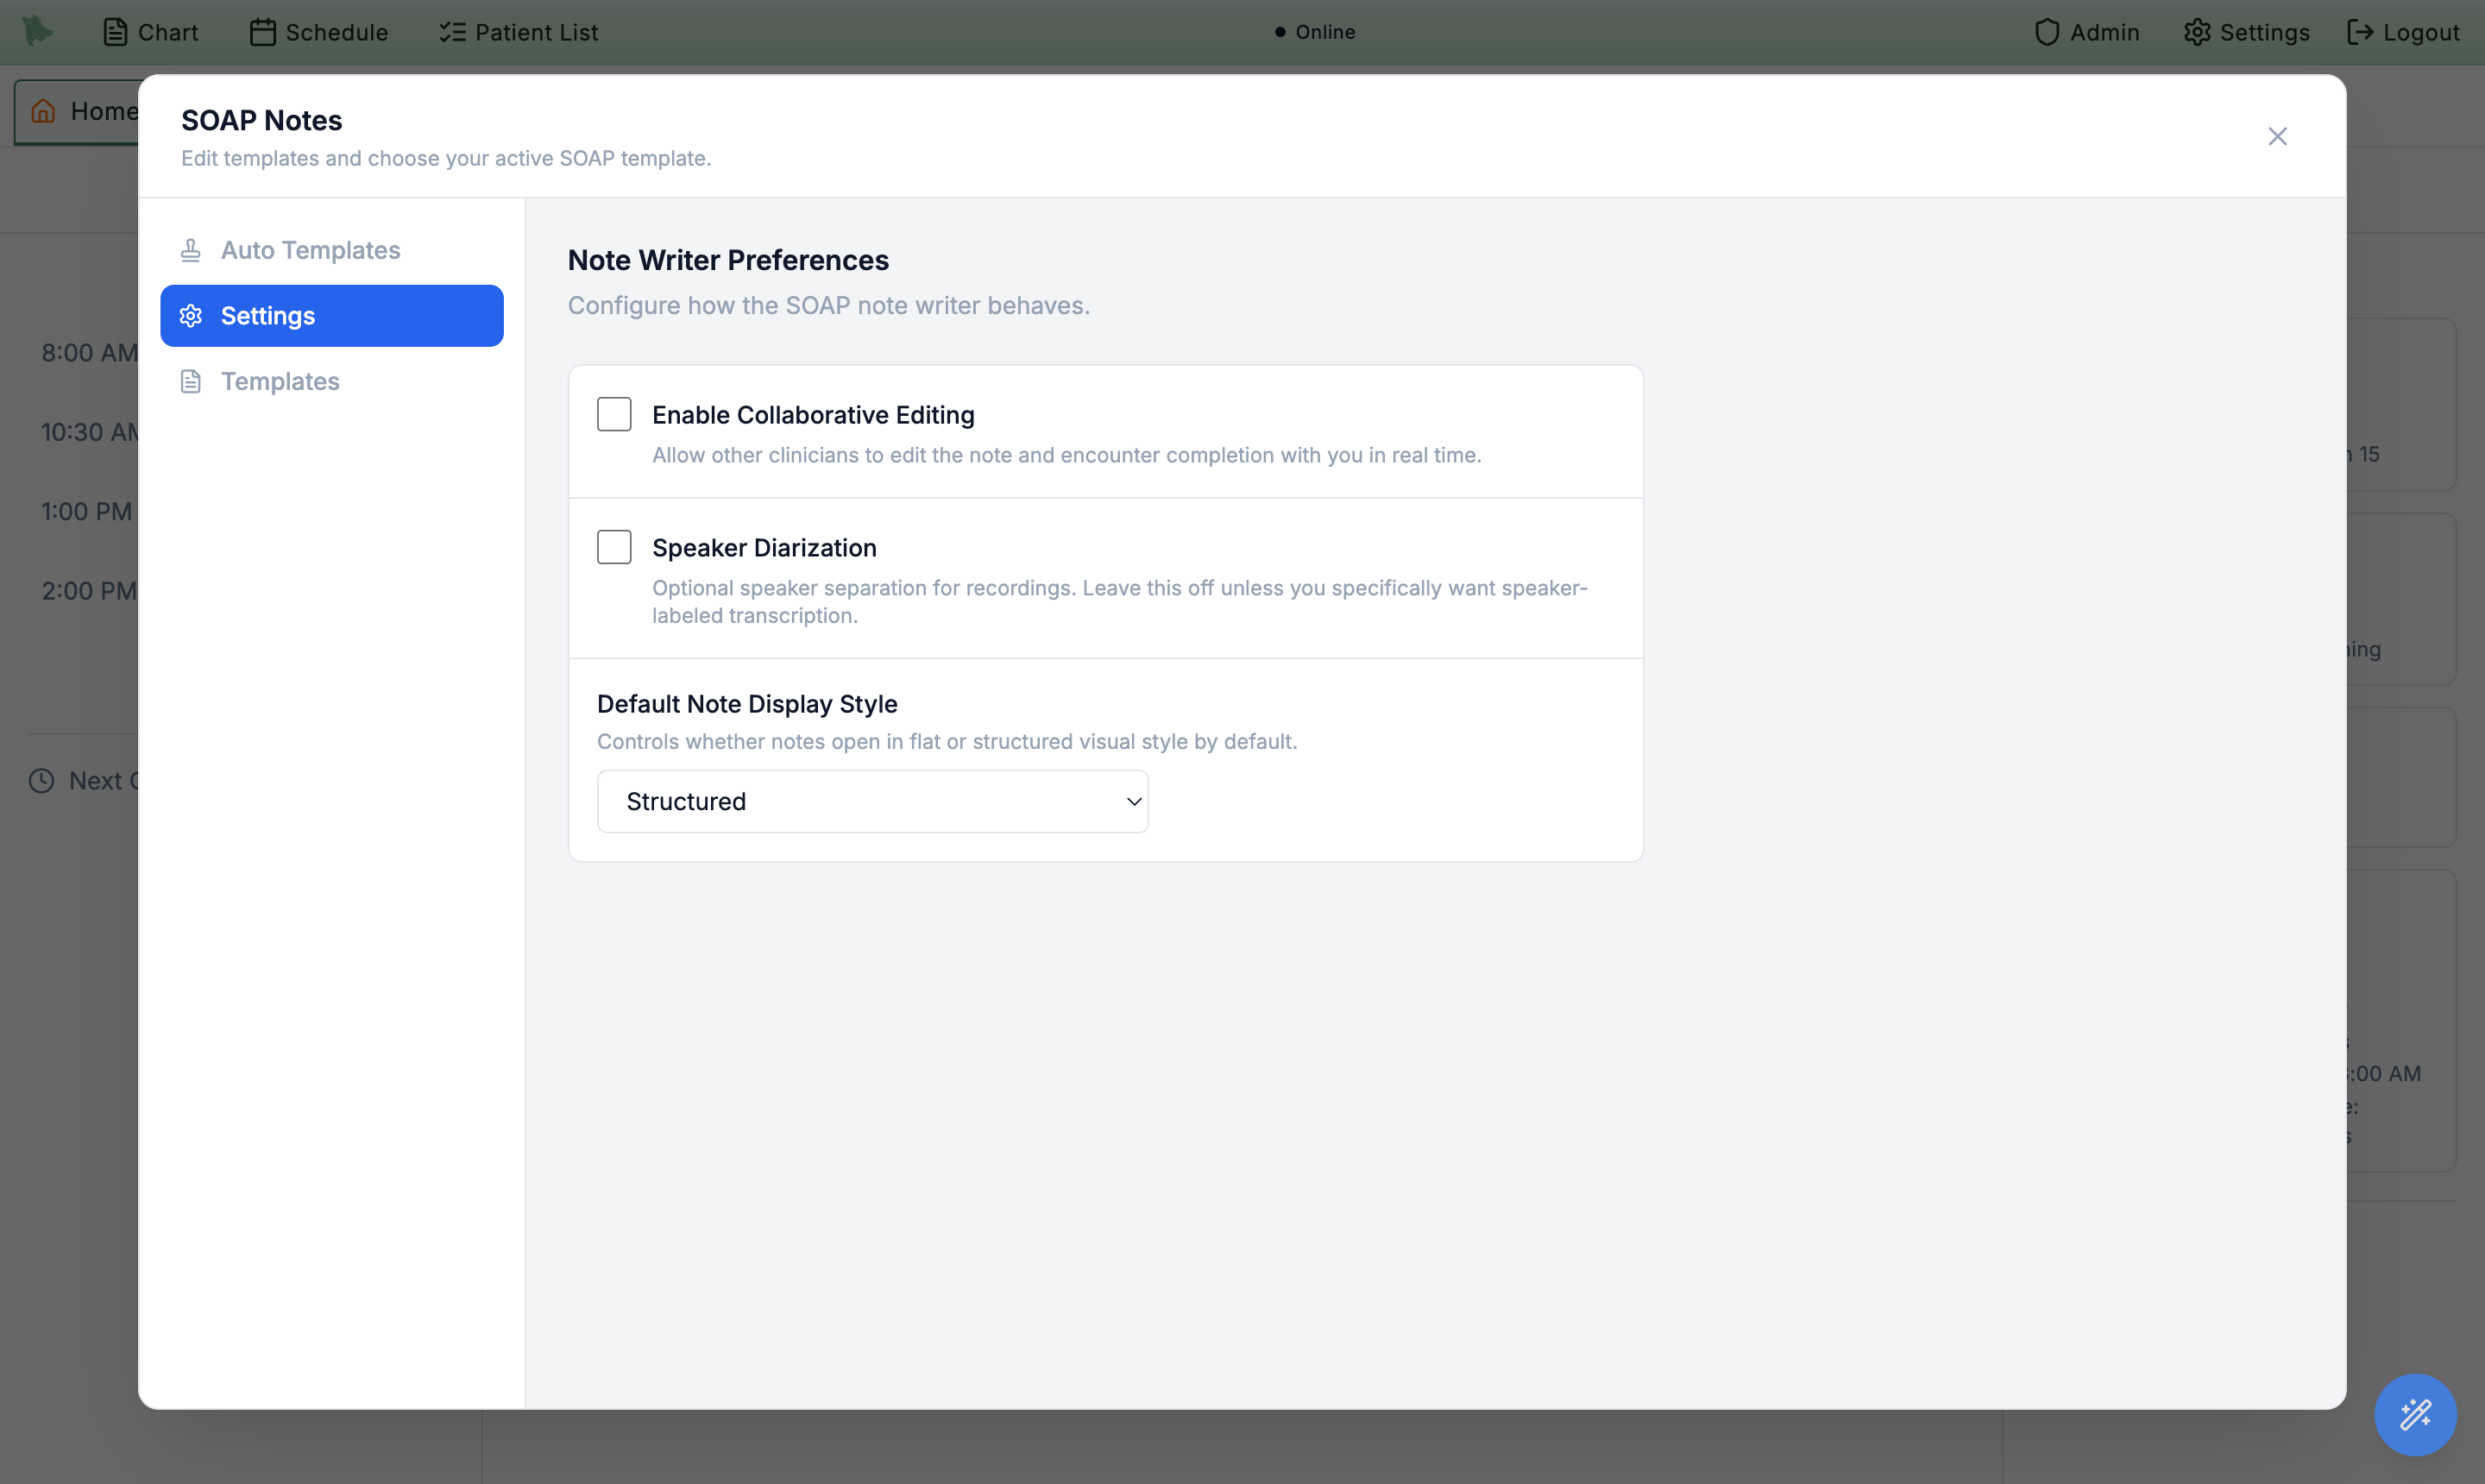
Settings → SOAP Notes → the Settings tab; the encounter owner must have this checked.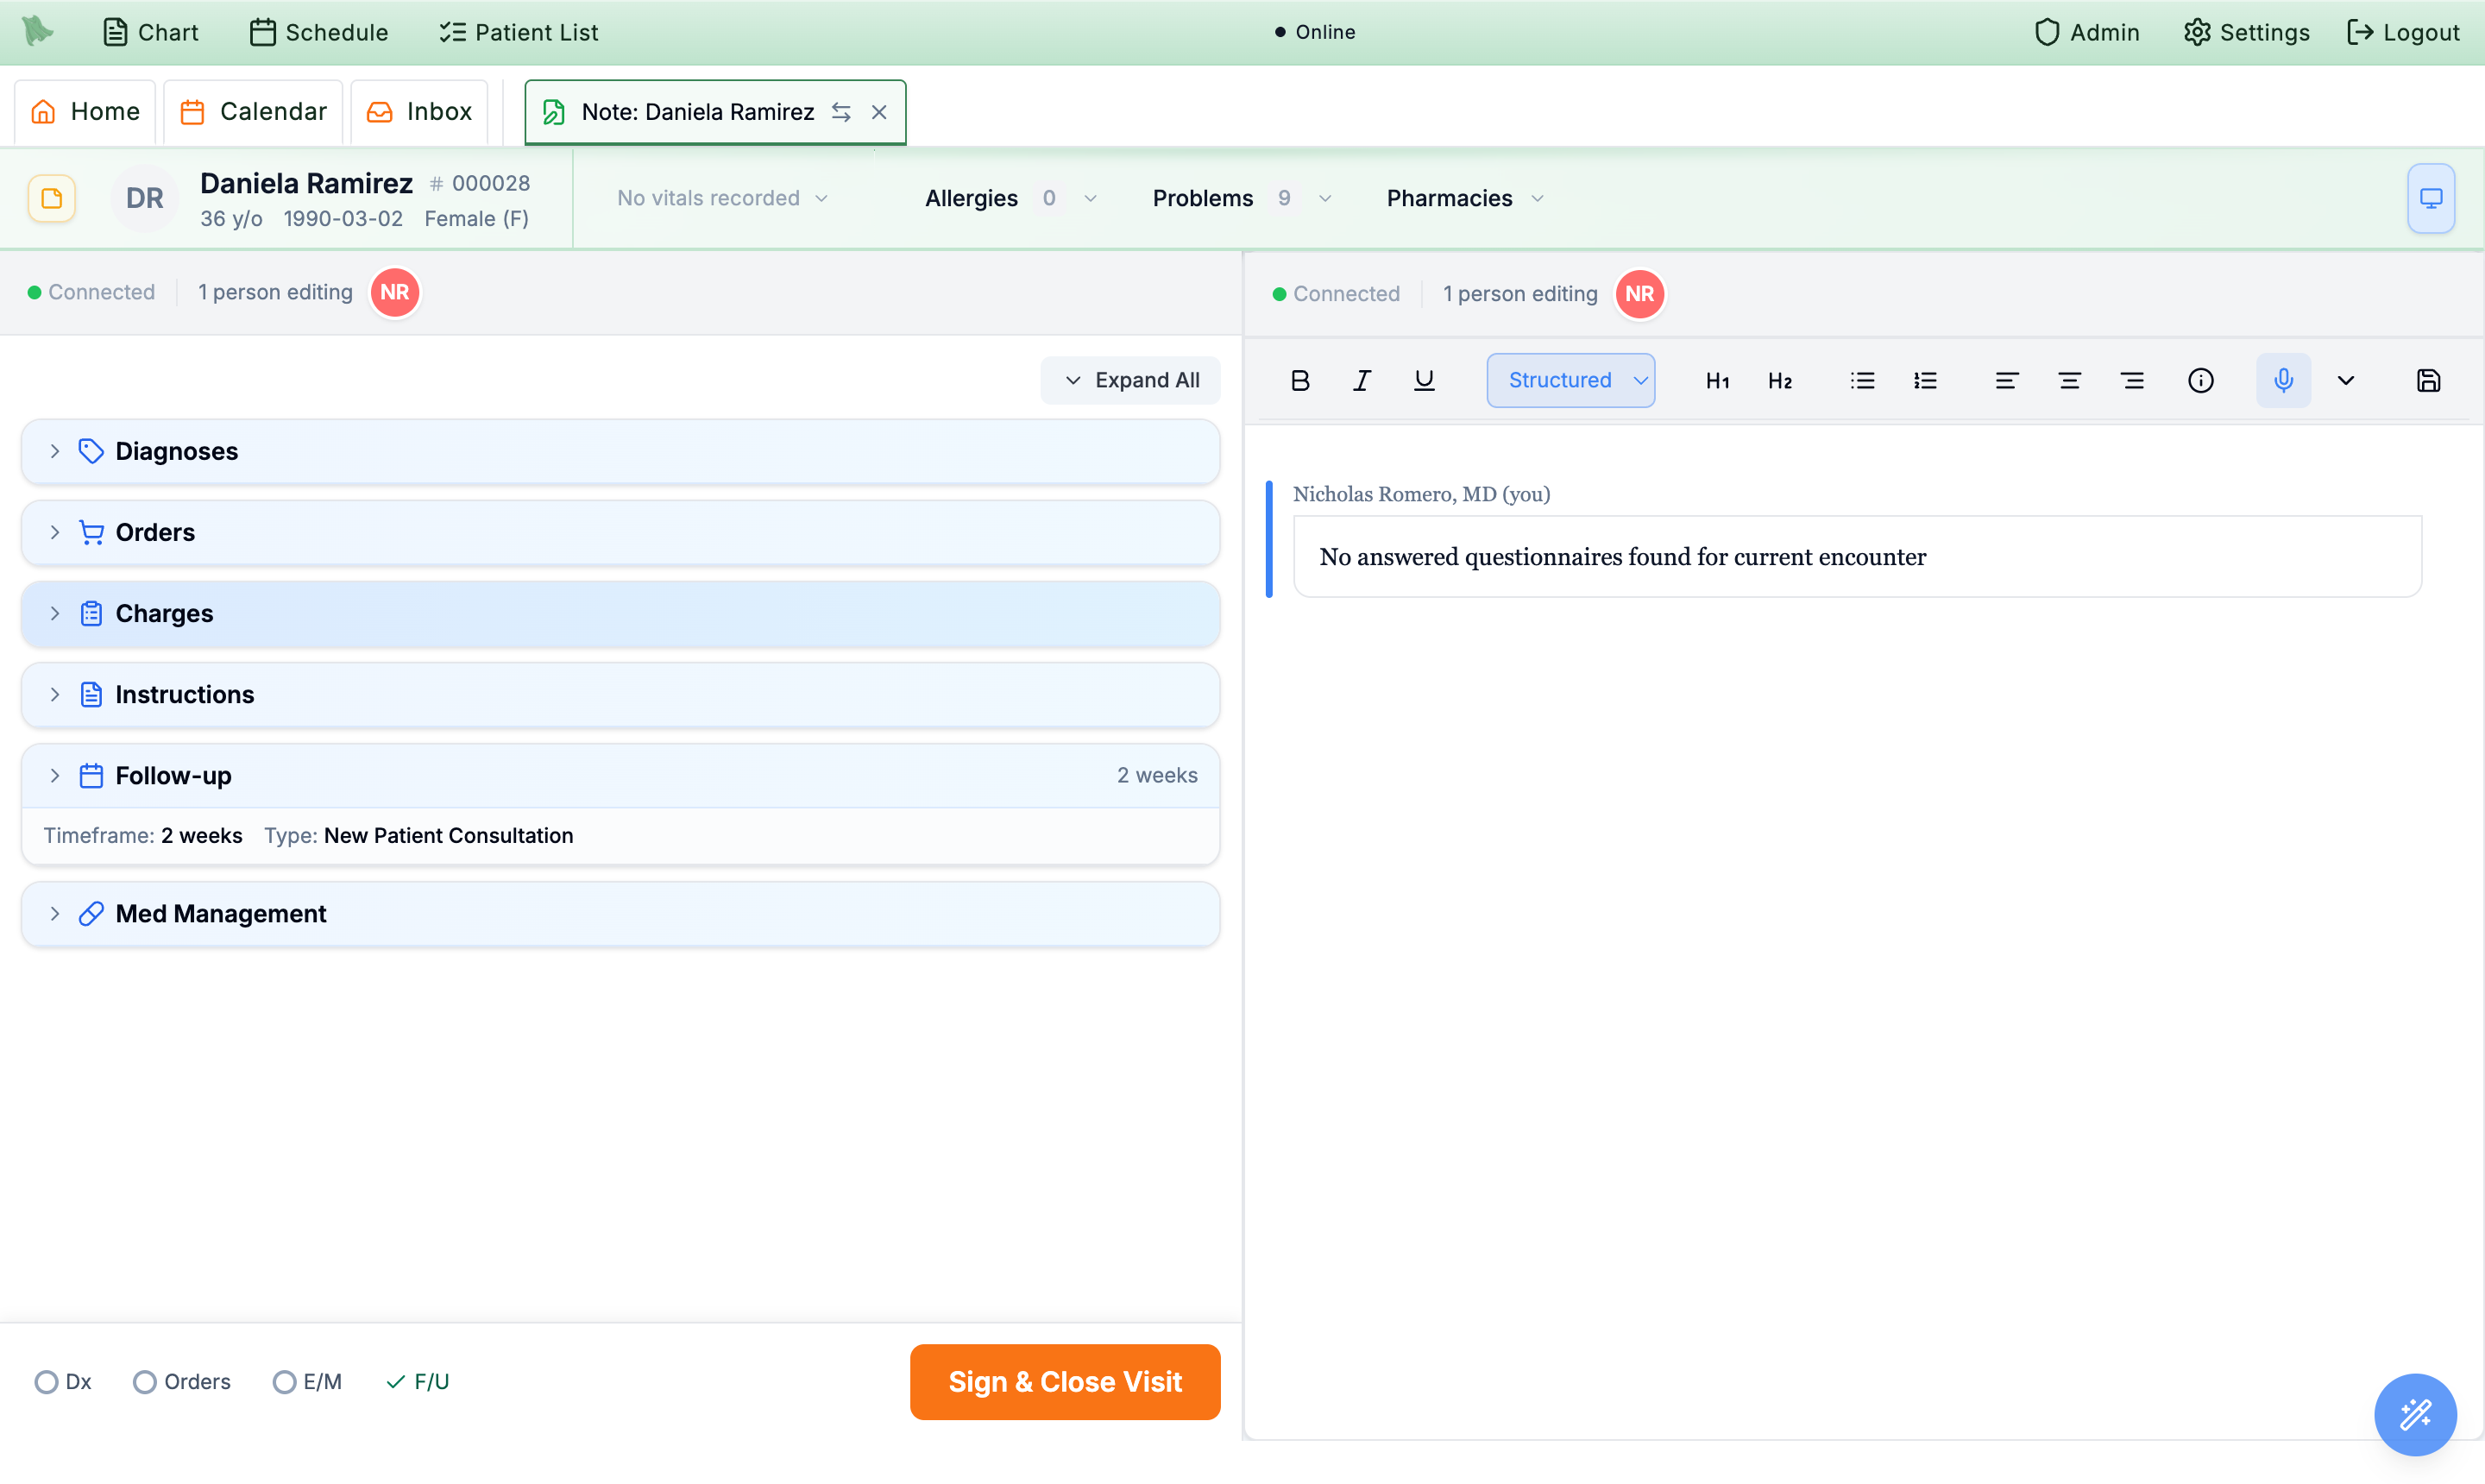
Connected dot, the editor count, and an initial-avatar. As more clinicians join, additional avatars appear and the count rises to “2 people editing,” and so on.With a second clinician in the note the presence bar shows two avatars and any section they’re working in carries their color — their cursor and edits stream in live as the two of you write, and either of you can hand a locked section back and forth.
Enable Collaborative Editing, a shared session won’t start even if everyone else has it on.
Write the note, hit Save, and the encounter completes itself
As soon as there is text in the note and you press Save Note, Hero EMR reads what you wrote and automatically switches the left pane into Encounter Completion, pre-filling each section from the note. A plan that says “follow up in three months” sets the follow-up; an assessment of “generalized anxiety disorder” is ready to drop in as a diagnosis. You review and adjust rather than start from a blank form.
-
Type your note and click
Save Note. Any free text or dictated/structured content counts. Saving is what triggers completion, and the note needs at least 25 characters of text: an empty or very short note still saves, but produces no diagnoses, orders, charges, follow-up, or instructions. -
Confirm a re-run if the encounter already has completion data.
The first save fills the sections straight away. If you save again on an encounter that already has completion data, a
Refresh encounter completion?dialog asks first —Keep existingleaves your reviewed work alone,Run extractionre-reads the note and replaces the existing draft diagnoses, orders, charges, follow-up, and patient instructions. An addendum is different: the same dialog then reads “This addendum will be analyzed without clearing the encounter’s existing diagnoses, orders, charges, follow-up, or patient instructions” — it adds what it finds instead of replacing, leaves the visit’s charges and after-visit instructions alone, and never disturbs an order you already sent. See Change a visit after you’ve signed it. -
The completion checklist appears.
The left pane now shows collapsible sections:
Diagnoses,Orders,Charges,Instructions,Follow-up, andMedications. Suggested values (for example a 2-week follow-up) are already in place. -
Work top to bottom, or jump around.
Use
Expand All/Collapse Allat the top to open every section at once. The footer chips —Dx,Orders,E/M,F/U, andMeds(plusLinkedonce you have both a diagnosis and an order) — are a live progress tracker: each turns green when that part is complete and doubles as a jump link. -
Finish with
Sign & Close Visit. The big button at the bottom finalizes the visit in one step. If something required is still missing, clicking it tells you what to fix instead of signing (see Sign & close the visit).
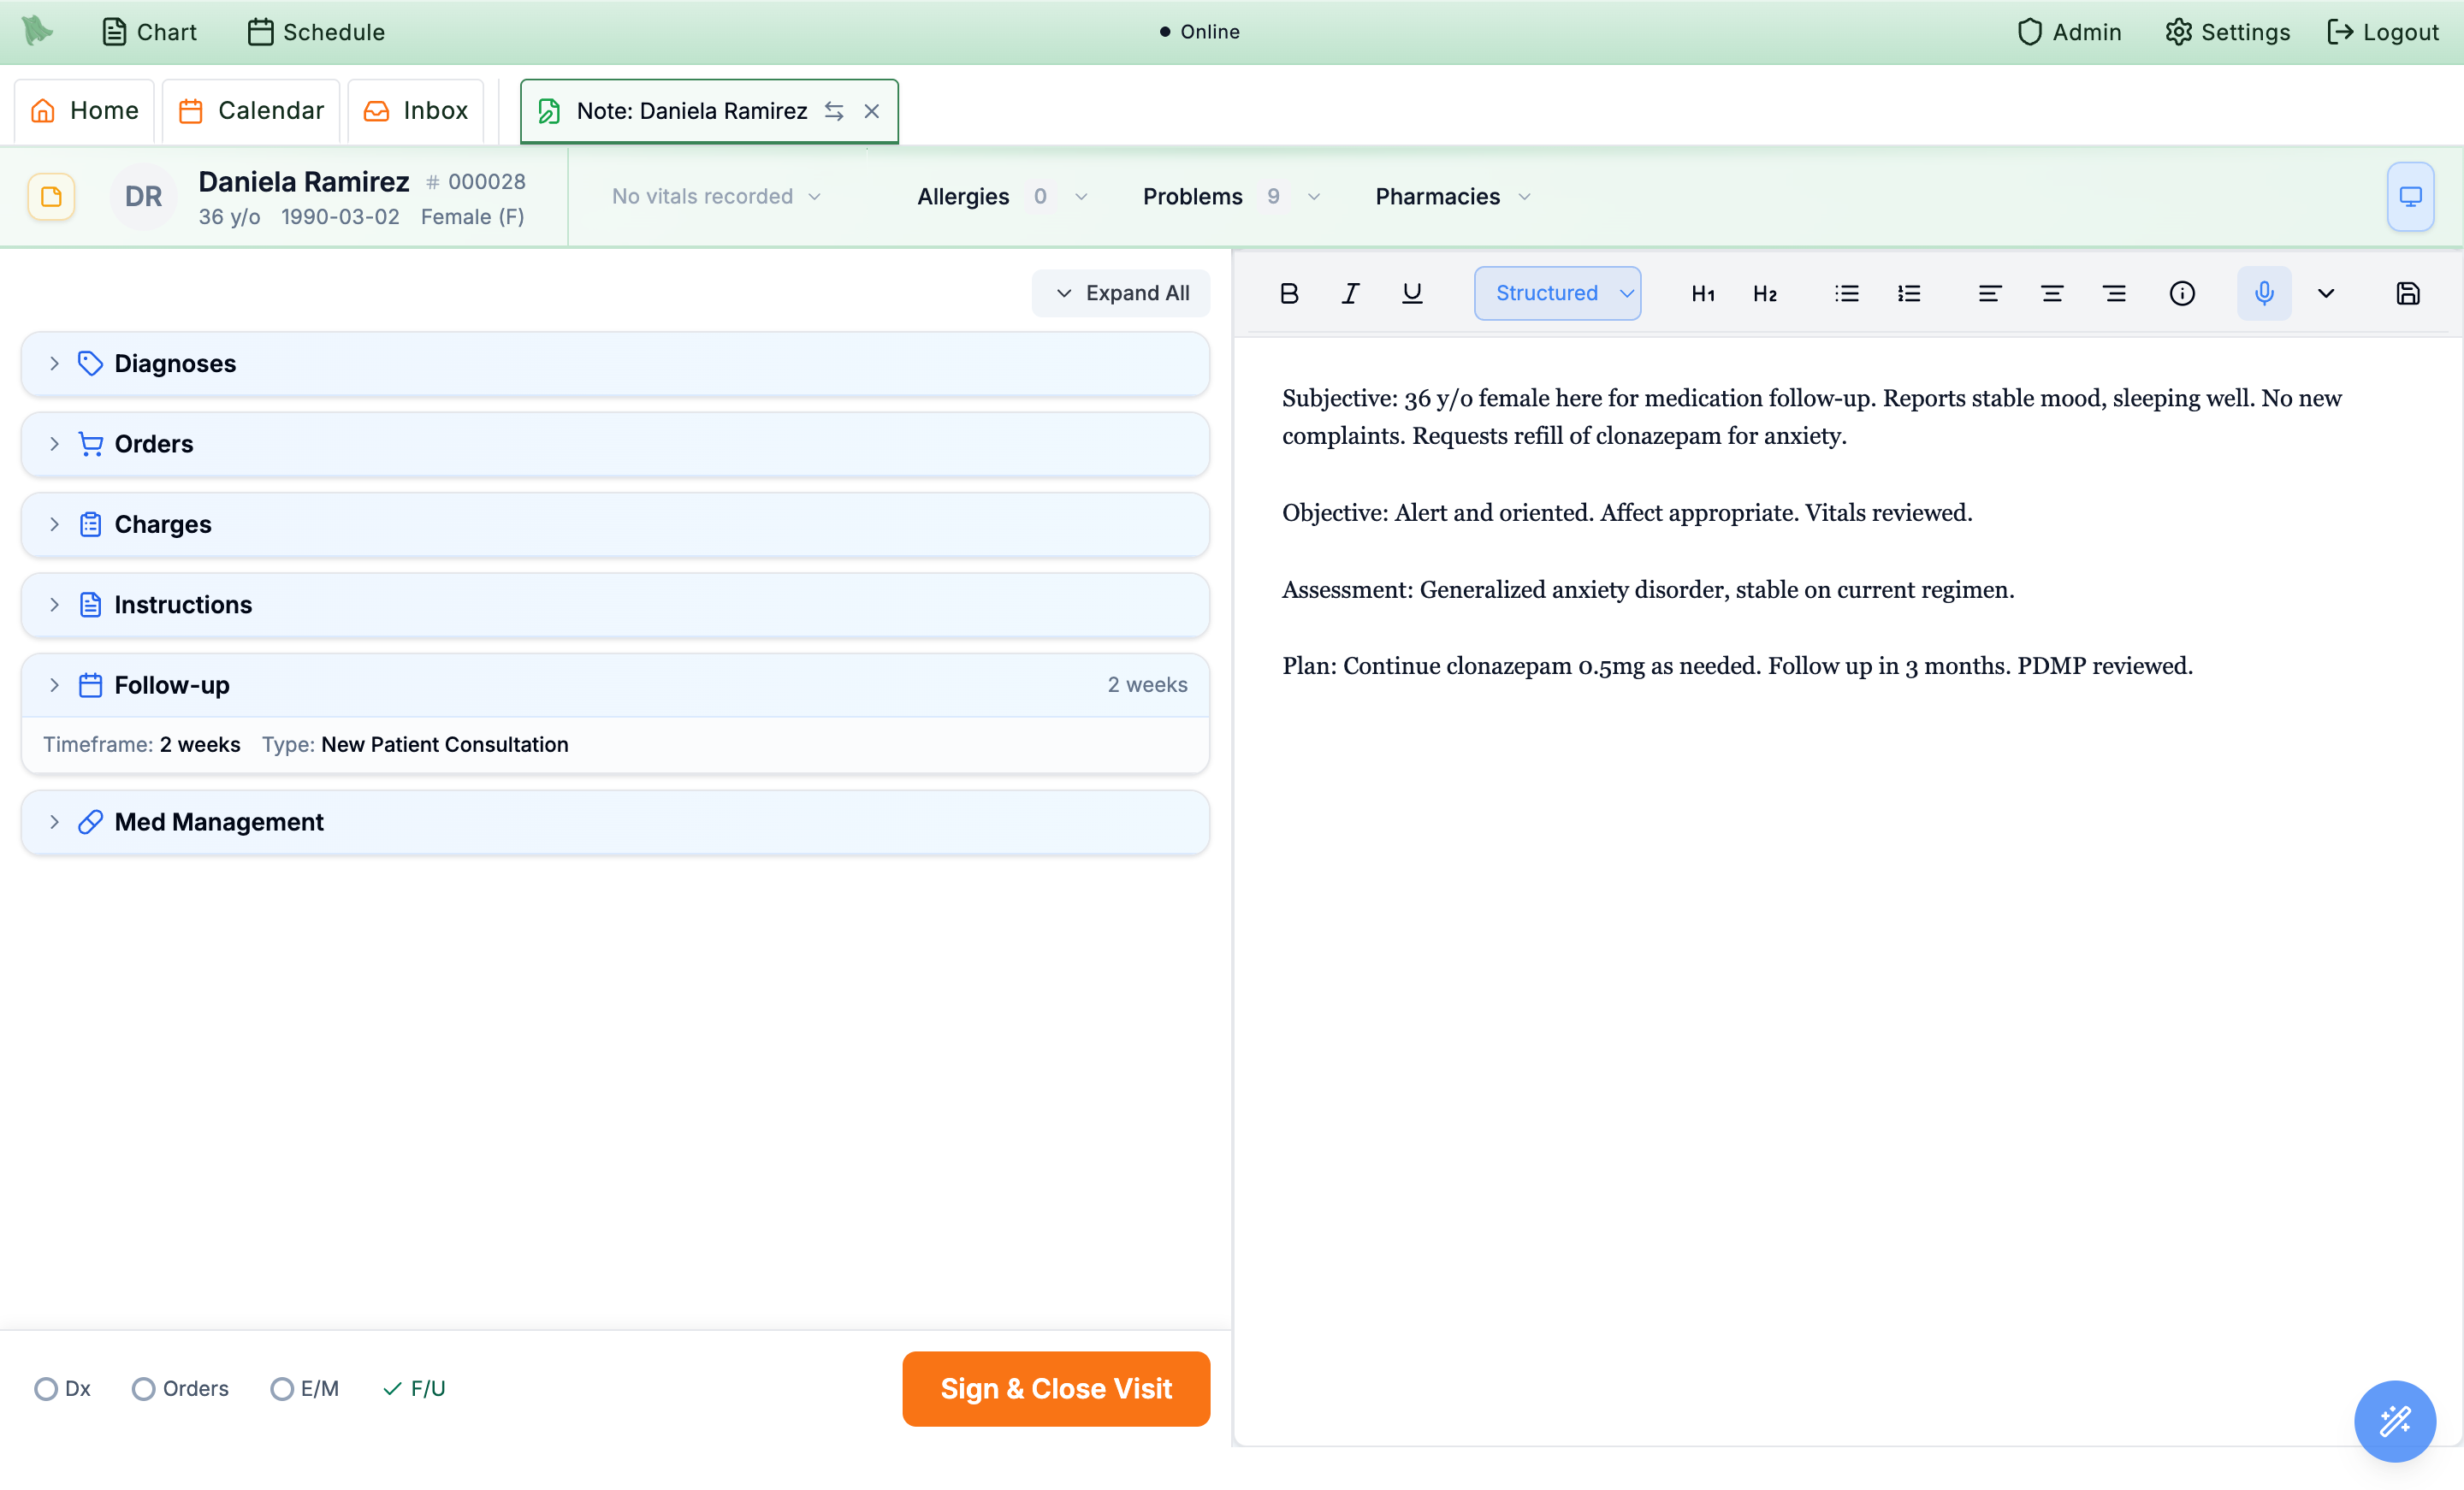
Sign & Close Visit. Individual orders are different: every prescription, lab, imaging, and referral row carries its own Sign & Send button, and pressing it transmits that order immediately — controlled prescriptions through the EPCS two-factor flow. Once an order shows as sent it has already left the EMR, whether or not the visit is signed.
Keyboard Shortcuts in Settings.
Add diagnoses (ICD-10)
The Diagnoses section captures the ICD-10 codes for the visit. You can search the full code set, click a frequently-used or favorite code, and reorder the list to set the primary diagnosis.
-
Search by code or description.
Type into
Search ICD-10 codes…(for example anxiety or F41.1) and press Enter, or click the + button in the box. Either opens the Search ICD-10 Codes window — the inline box itself doesn’t list results. Click a row there to add it to the visit.- In that window,
Billable codes onlyhides category headers that a payer would reject, and the specialty filter narrows the list to one specialty’s codes. - A green ⓘ next to a description marks an HCC relevant code.
- In that window,
-
Or use the quick lists.
- Frequently Used Diagnoses — one-click chips for the codes your practice uses most.
- My Favorite Diagnoses — your personal shortlist. Manage it with the gear or
Add favorites(see Favorites).
-
Set the primary and order.
Added codes appear under
Current Diagnoses. The first one is taggedPrimaryand every other row carries aSecondarybadge — click that badge to promote the row to primary. You can also drag the handle to reorder, star a row to favorite it, or click×to remove it. Adding the first diagnosis turns theDxtracker chip green.
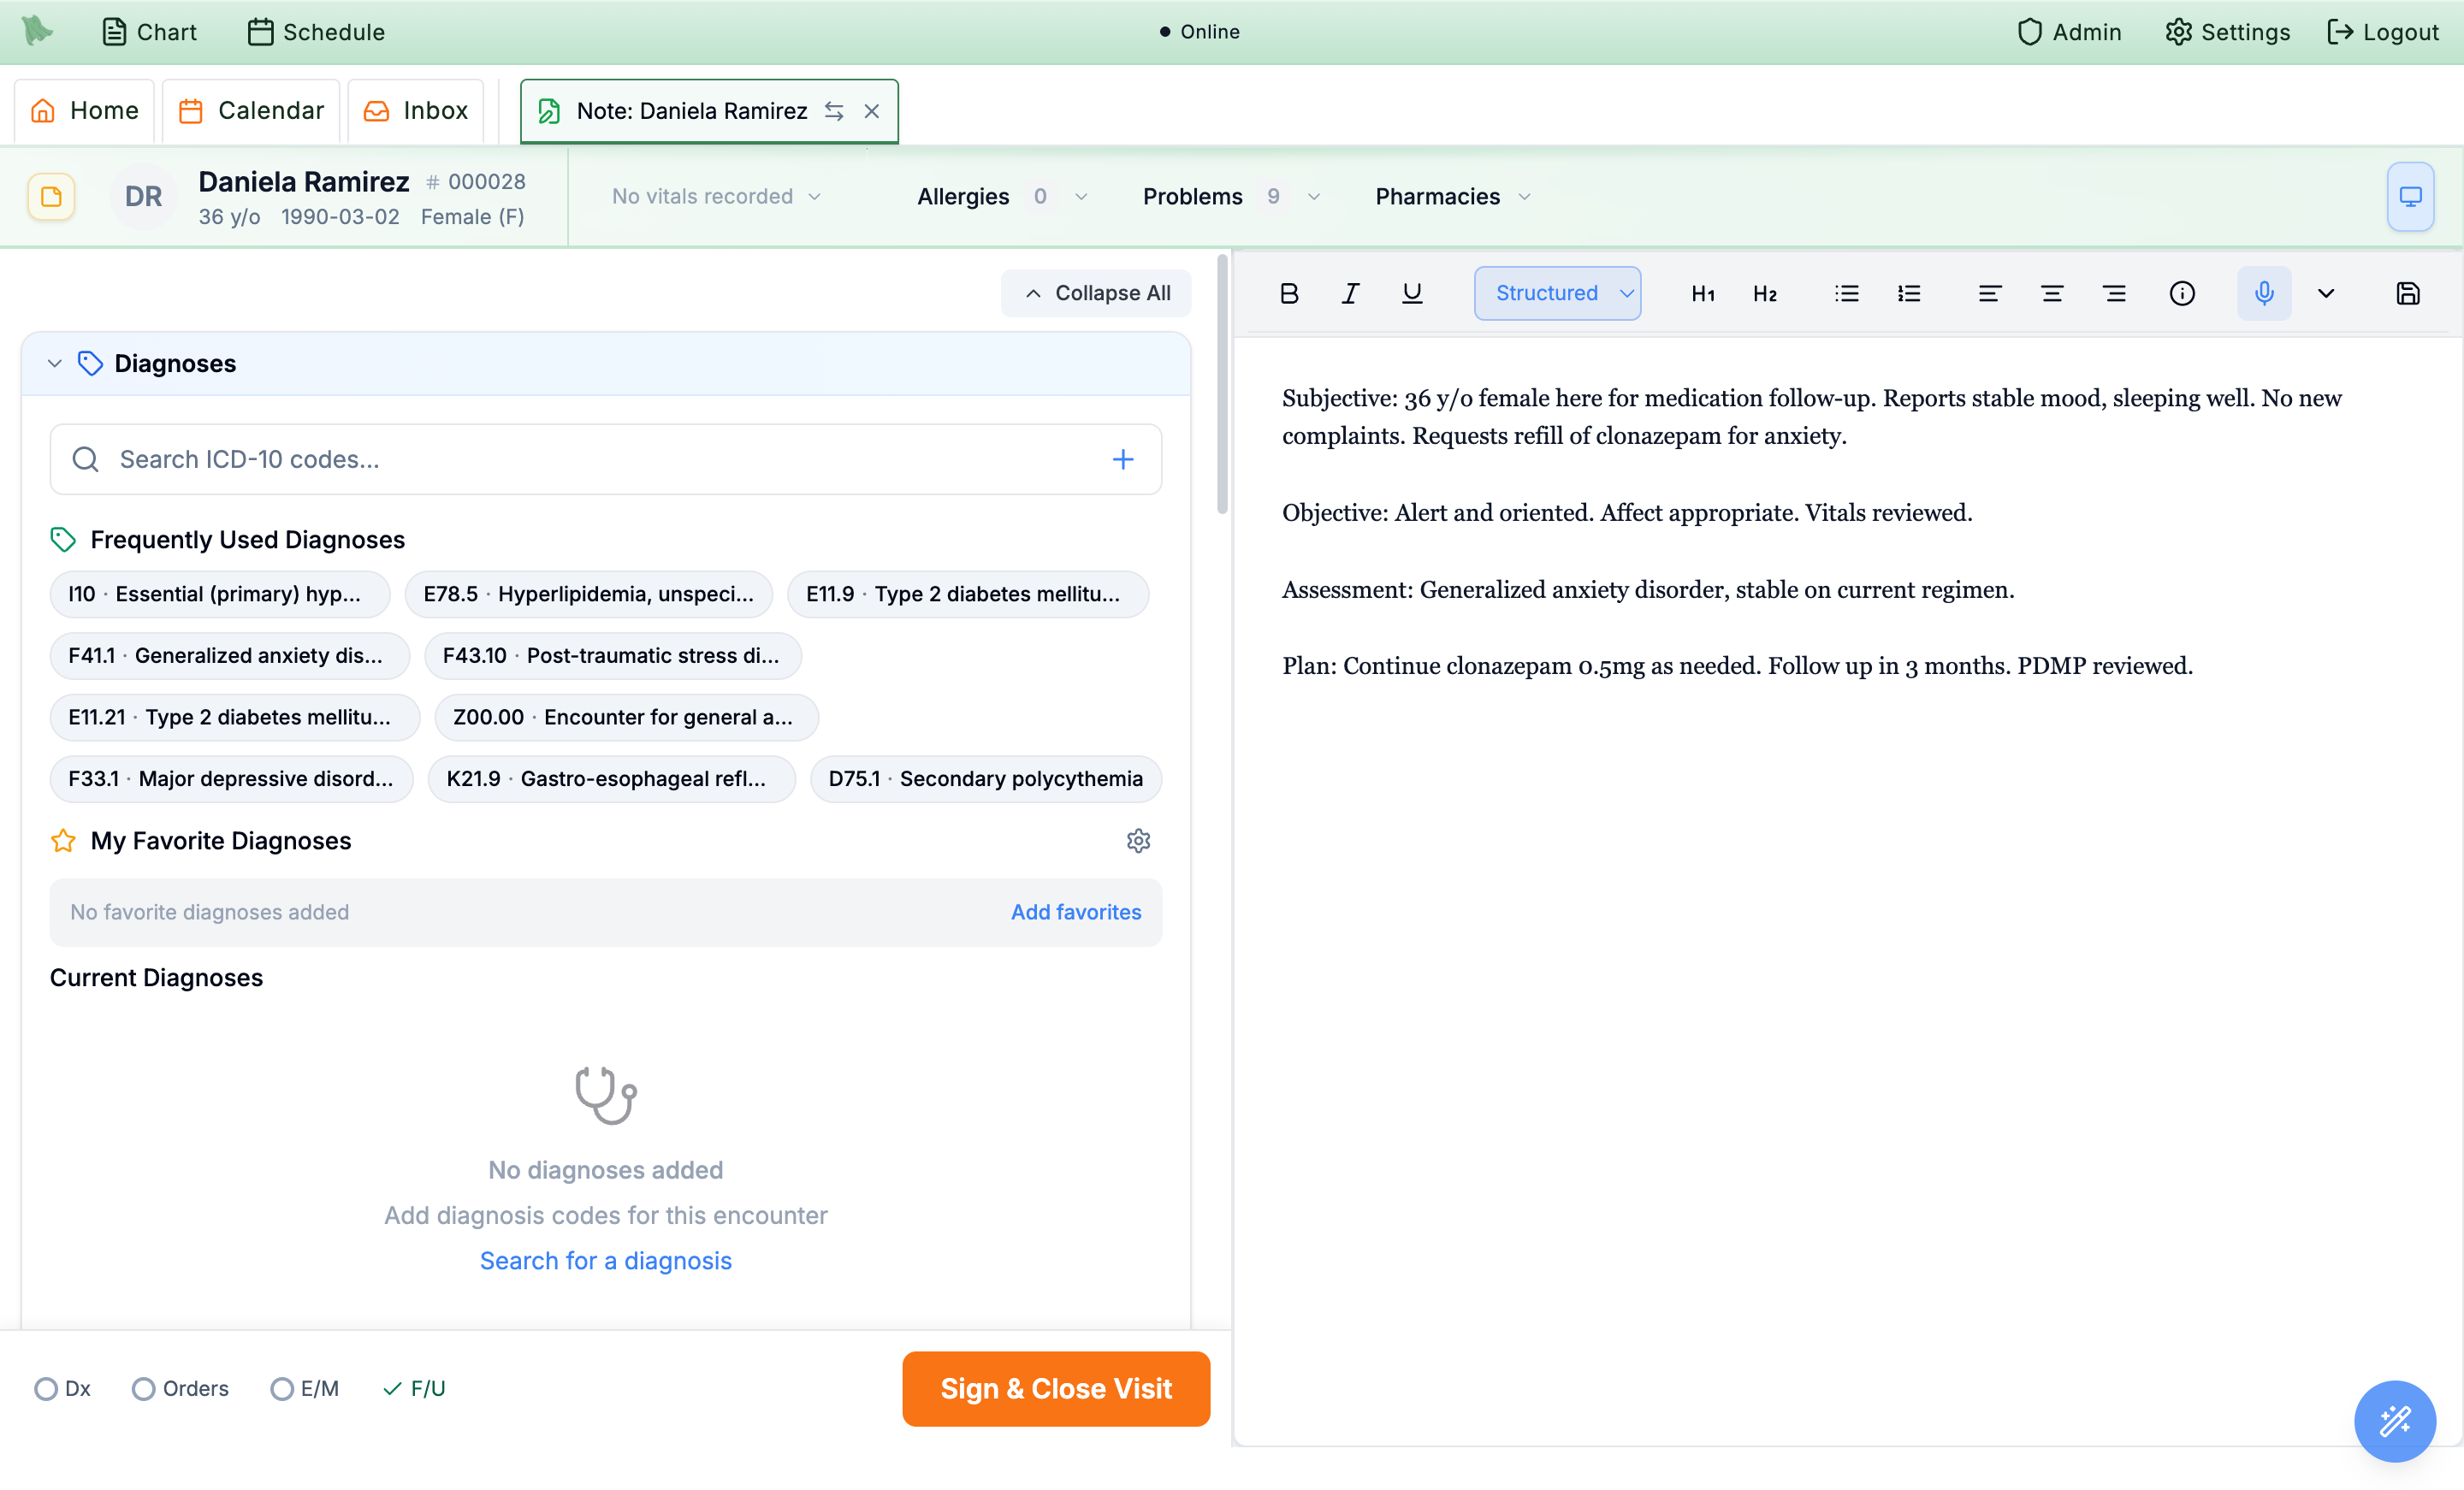
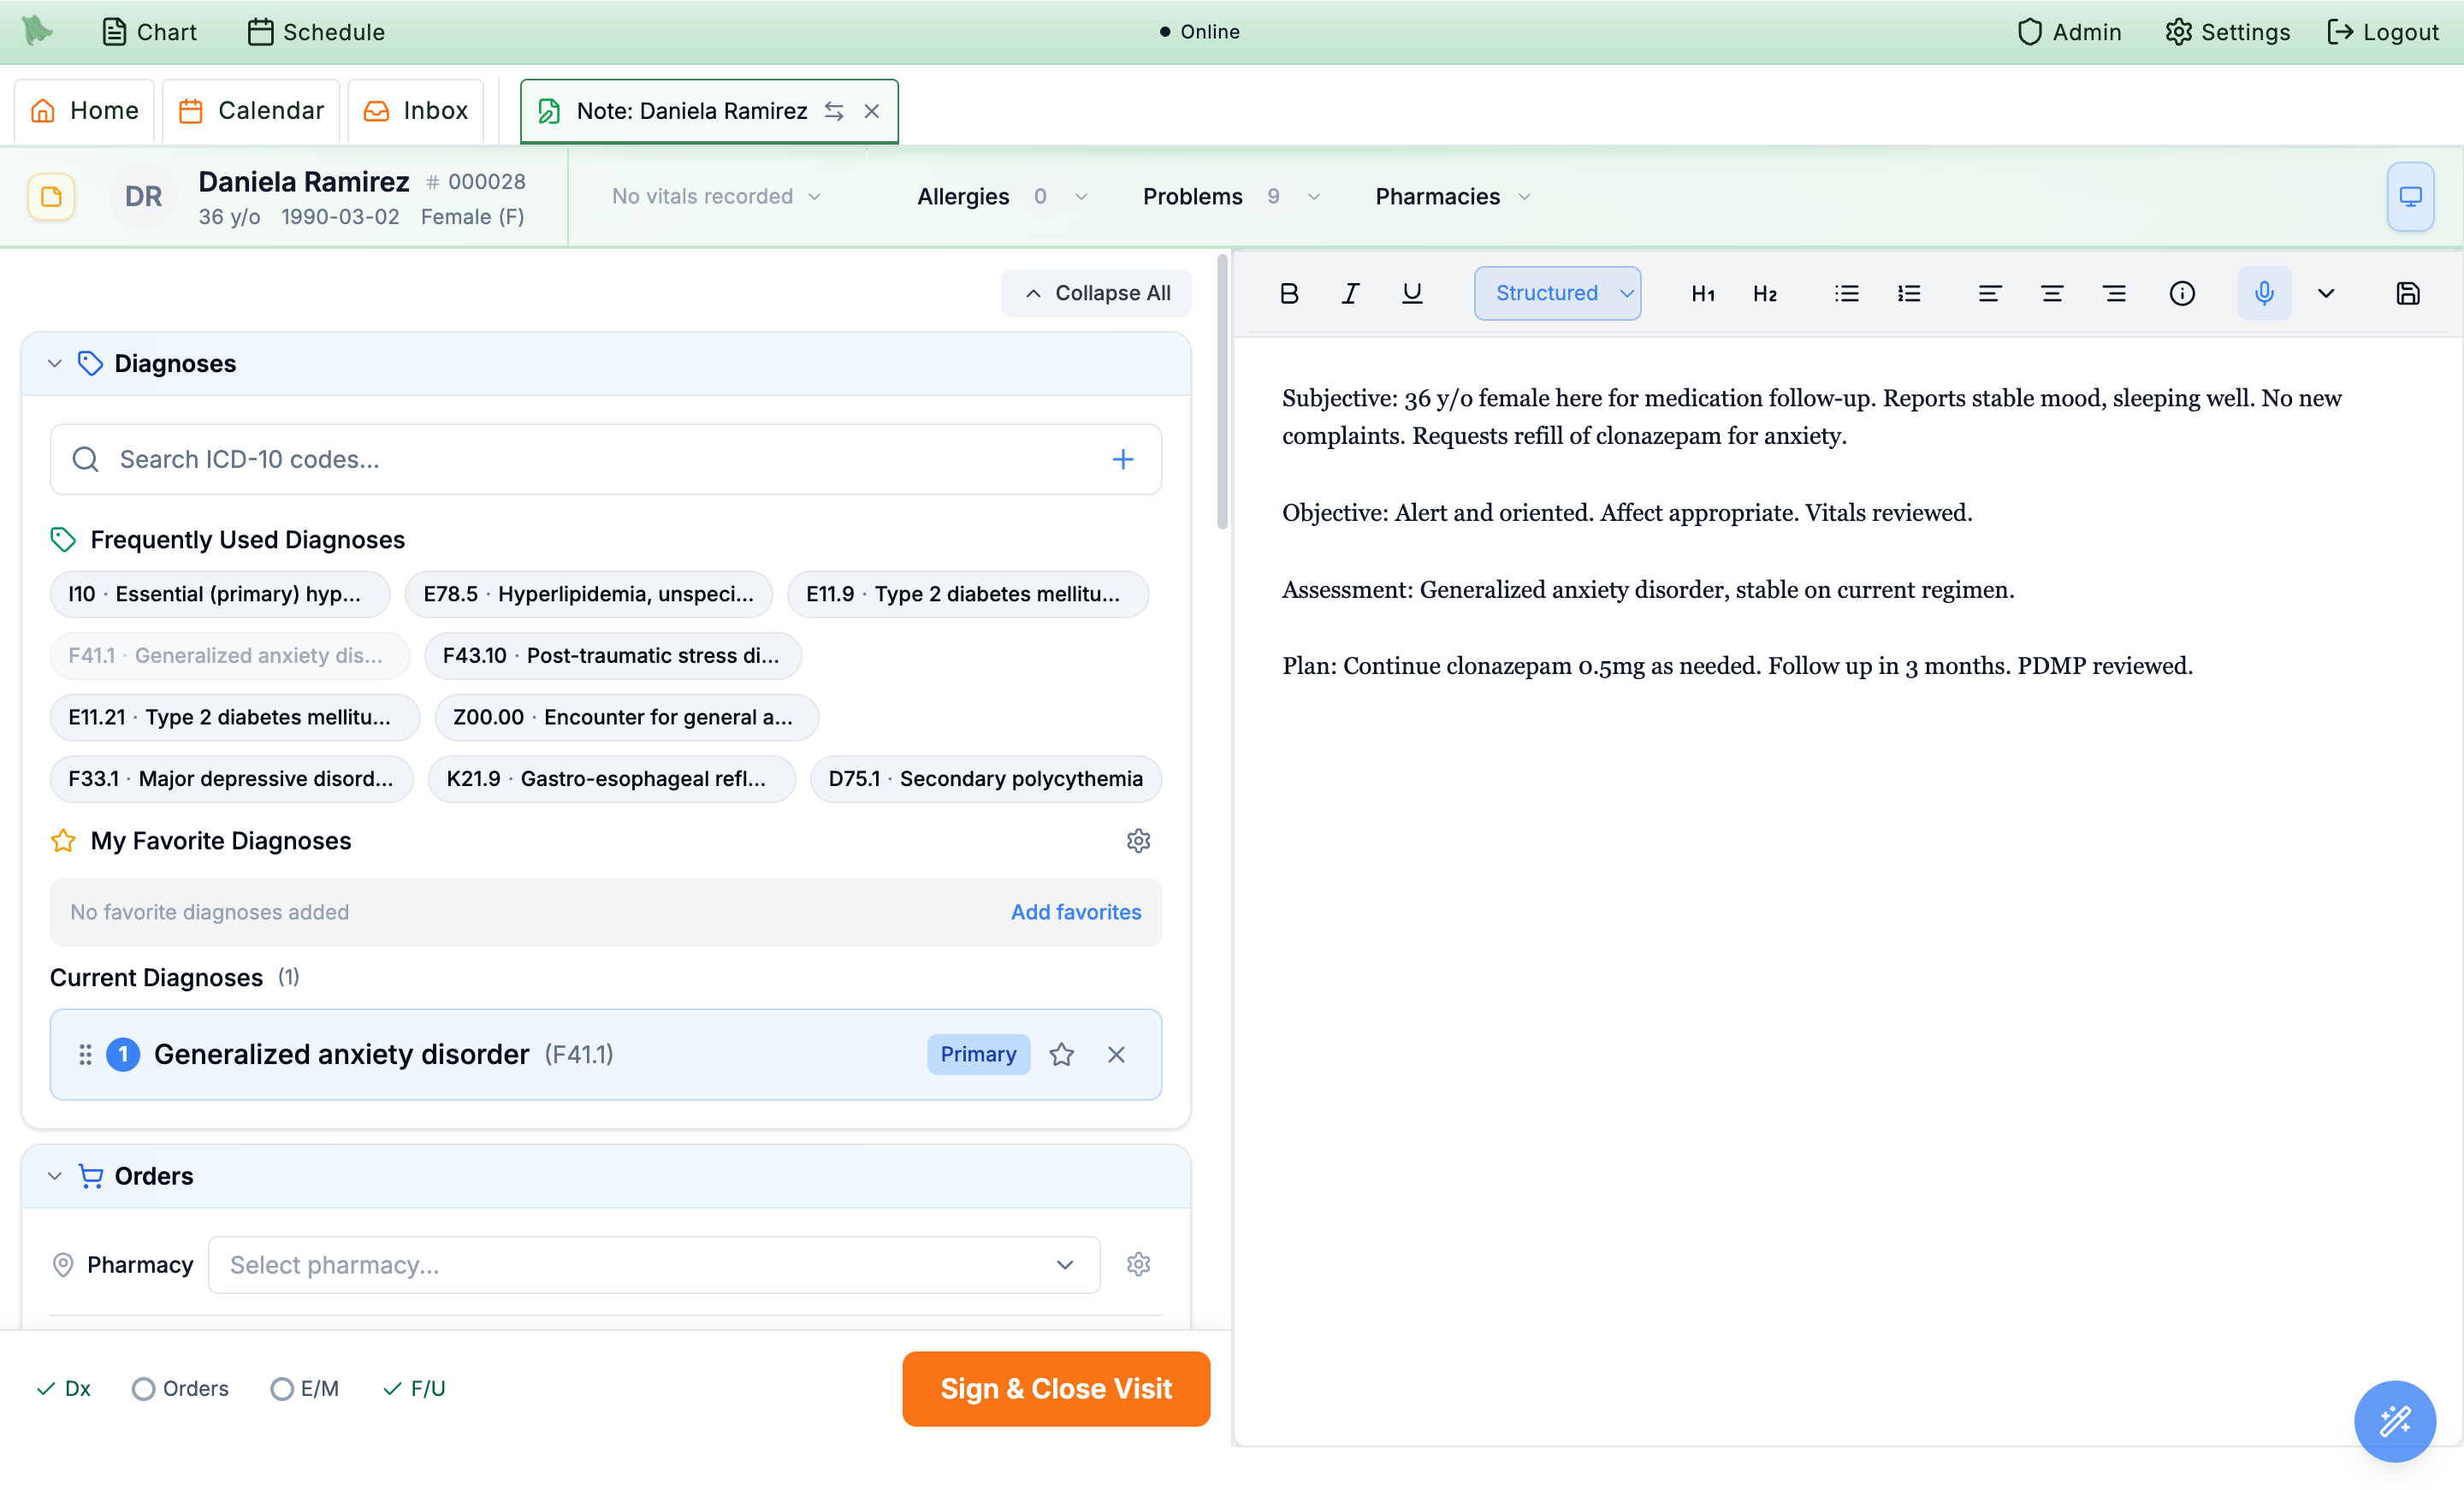
Primary; drag to reorder and the Dx chip turns green.Need help? Email support@heroemr.com.