Urgent care & walk-in
Turn the practice into a modern walk-in clinic: a sign-up patients finish in a handful of taps, a Waiting Room board where one button moves each patient forward, insurance verified for urgent care on the spot, and copays collected while people wait.
Urgent care & walk-in
Turn the practice into a modern walk-in clinic: a sign-up patients finish in a handful of taps, a Waiting Room board where one button moves each patient forward, insurance verified for urgent care on the spot, and copays collected while people wait.
Switch on Urgent Care & Walk-in
Urgent Care & Walk-in is an organization-level feature for clinics that see patients without appointments. It adds three things: a Waiting Room board where staff run the day, a walk-in sign-up patients open from their phone or a tablet at the door, and an Admin > Urgent Care page that sets the hours, safety questions, insurance and copay behaviour, texts, and rooms. Everything else — the chart, the note, paperwork, questionnaires, eligibility, billing — is the Hero EMR you already use: a walk-in is a same-day visit like any other.
-
Open the feature switch.
Go to
Admin>Additional Featuresand find the Urgent Care & Walk-in card. It ships off. -
Flip it on and read the
IMPACTED SURFACESline. It lists what appears: the Waiting Room board and its+ Walk-inbutton,Admin>Urgent Care, the patient portal’s/walk-inpage, walk-in text updates, and urgent-care benefit checks. - Finish setup before the first patient. The board and the sign-up page stay paused until the readiness checklist in 21.2 is green.
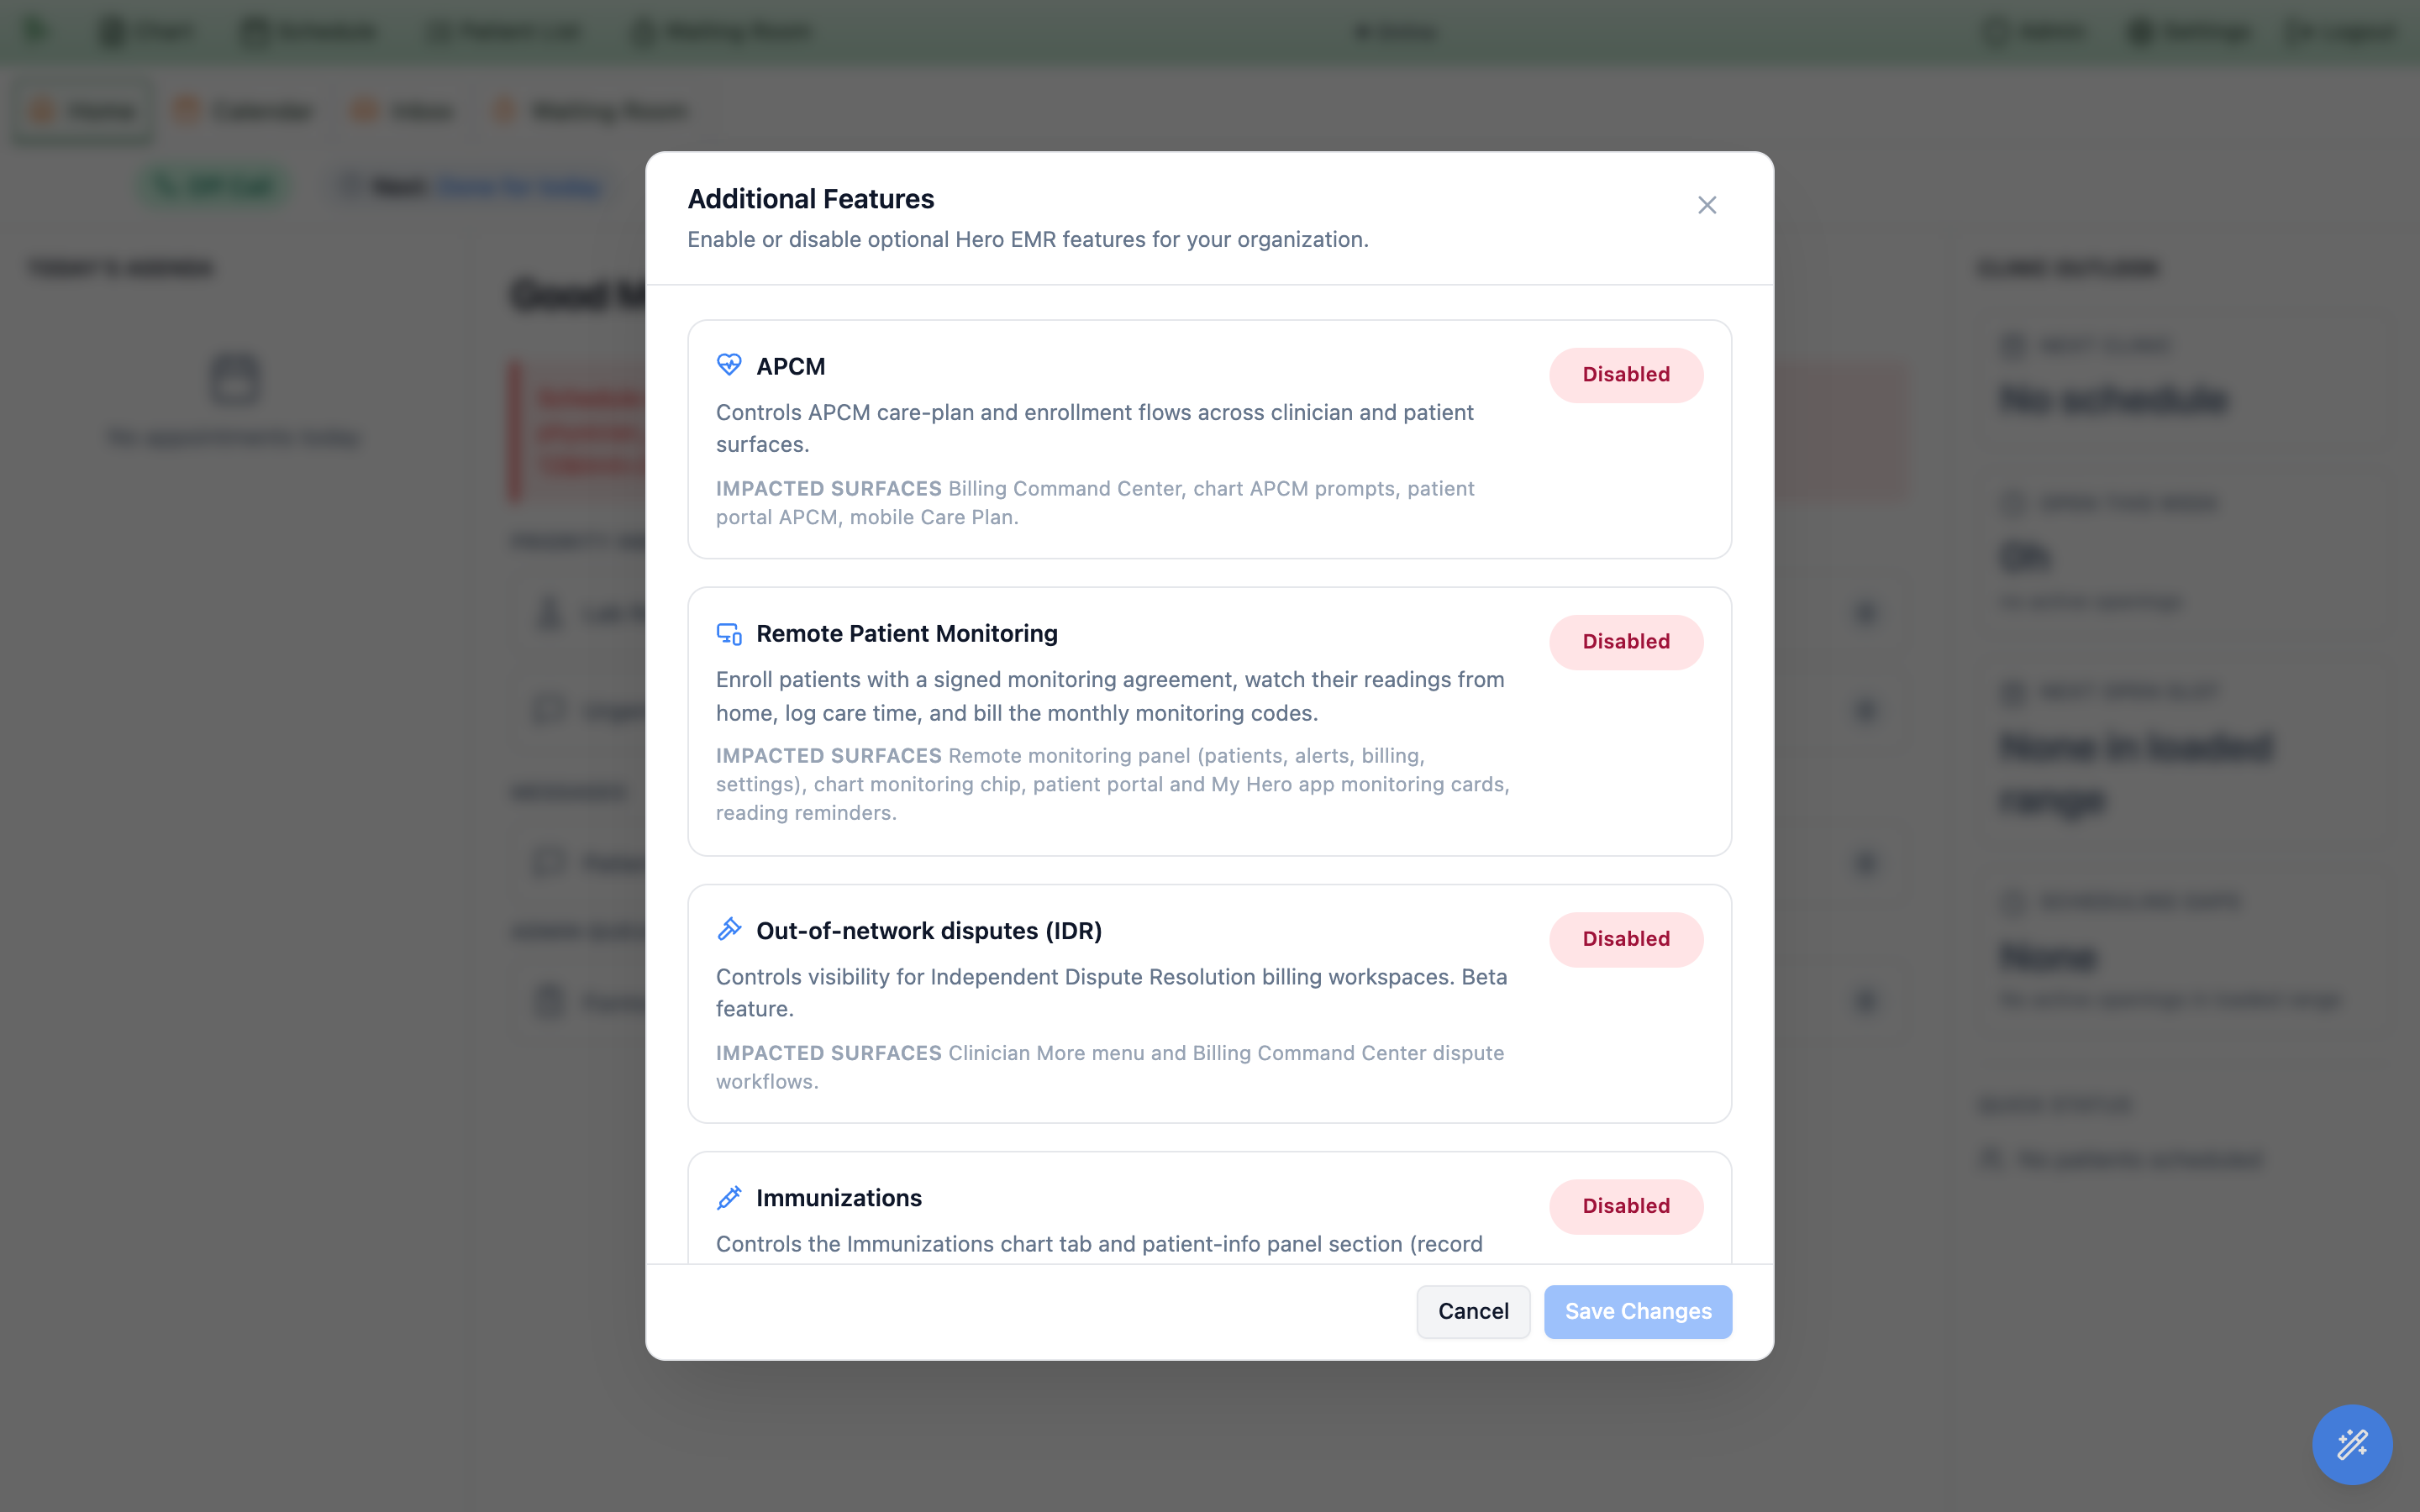
Admin > Additional Features. Default off.urgent_care.view and urgent_care.manage permissions (added to those presets). Collecting a copay on the board additionally needs the existing billing.payments.collect. Changing settings needs admin.urgent_care.manage or an admin role.
Admin > Urgent Care
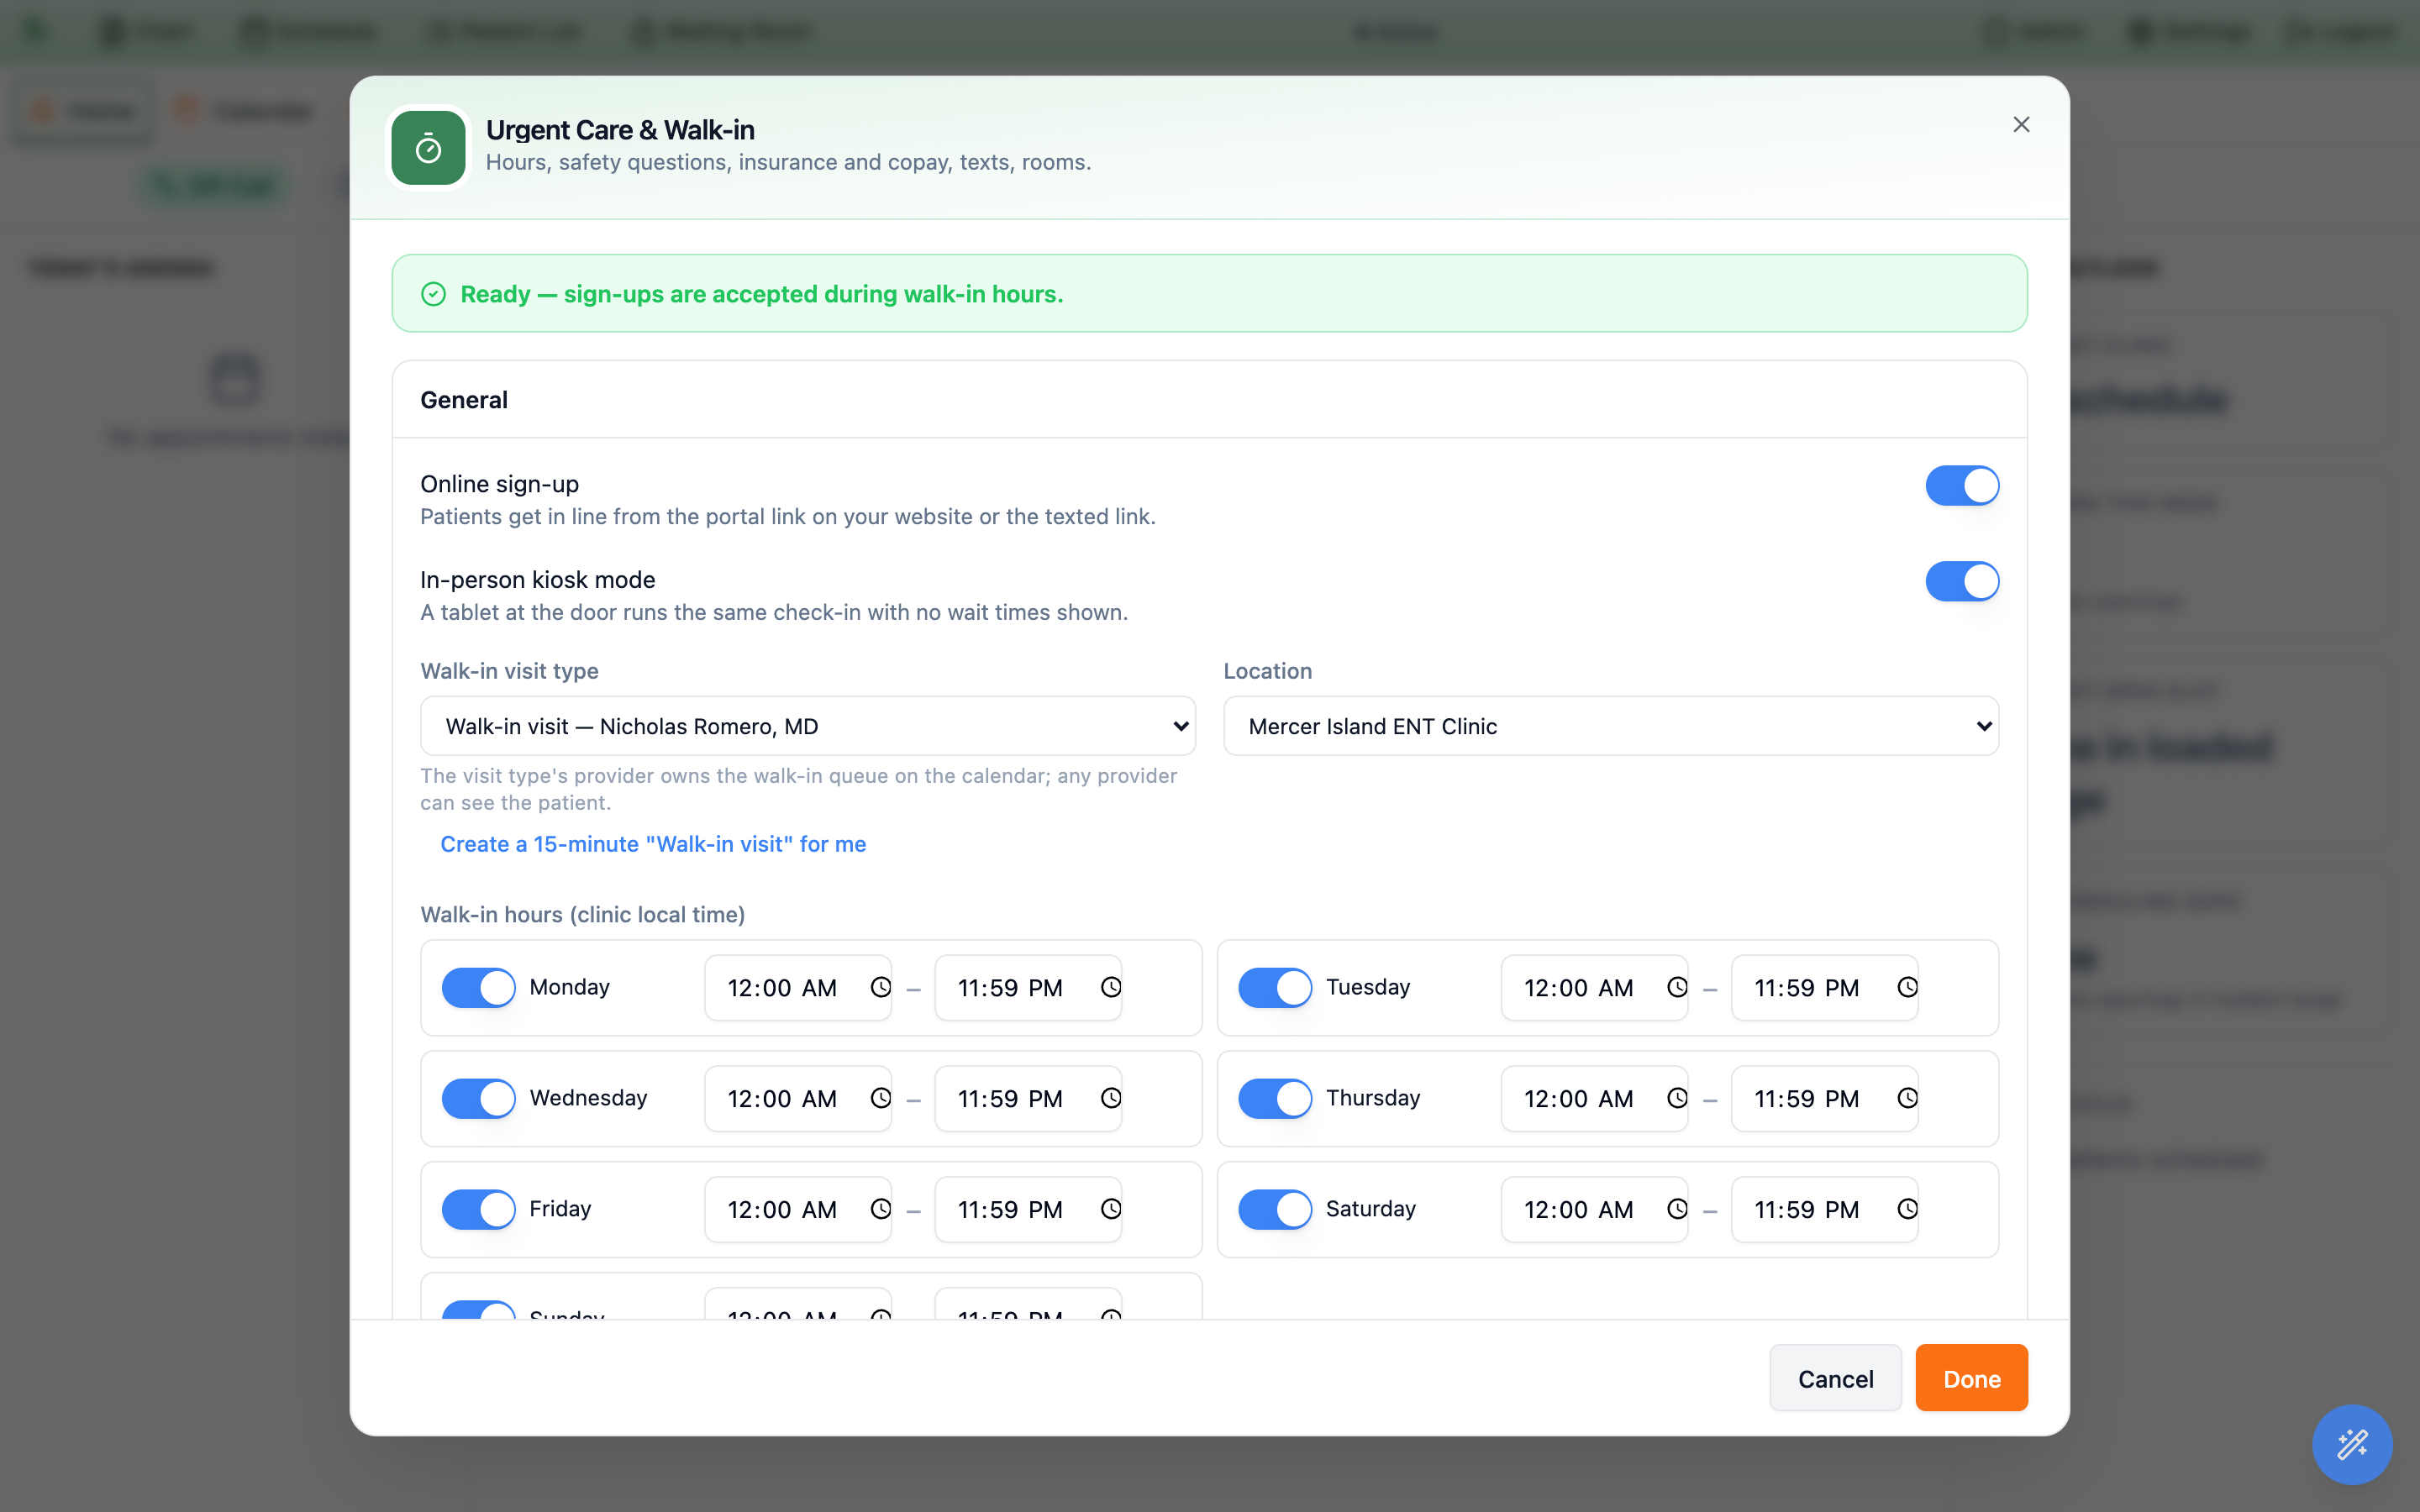
Open Admin > Urgent Care. The readiness checklist at the top tells you exactly what is still missing; until it reads Ready, patients see “Online sign-up is not set up yet” and the board shows a paused banner.
| Section | What to set |
|---|---|
| General | Online sign-up and in-person kiosk mode; the walk-in visit type (one click creates a 15-minute “Walk-in visit” for you — its provider owns the walk-in queue on the calendar); the location; walk-in hours per weekday in the clinic’s local time; how many minutes before close to stop new sign-ups; an optional maximum line length. |
| Triage & safety | The acuity scale (Low / Medium / High, or ESI 1–5); the safety questions every patient answers at sign-up (chest pain, trouble breathing, stroke signs, and so on — edit or add your own); whether a “Yes” shows ER advice, whether the patient may stay in line afterwards, and the nearest ER’s name, address and phone. |
| Insurance & payment | Verify insurance at sign-up (runs an urgent-care benefits check); accept any payer or only your accepted list; warn or refuse out-of-network plans; collect the copay while the patient waits, and by which methods (online card on the patient’s phone, cash or check at the desk). The self-pay price comes from the walk-in visit type’s billing rule. |
| Messages | Text updates on or off; when to send “You’re up soon”; the wait-shift threshold that raises the board alert; the quick messages staff can send with one tap. |
| Rooms | The exam rooms the board offers when you room a patient. |
Create the walk-in intake account again.
Getting in line from a phone
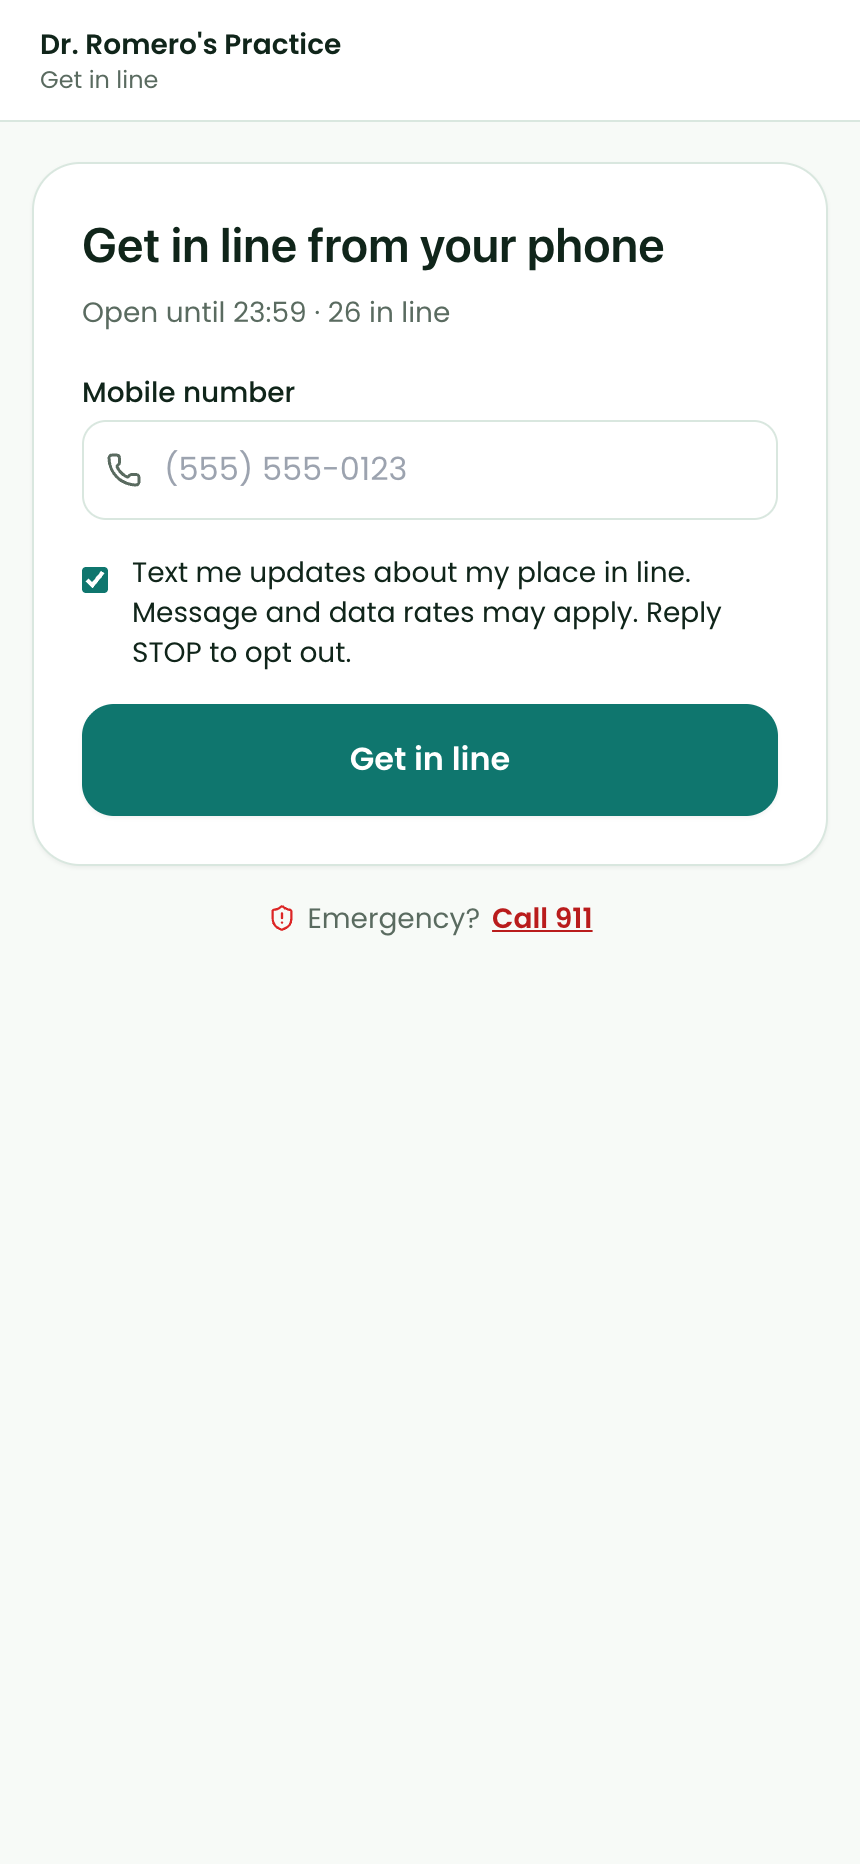
Patients open <your portal address>/walk-in — link it from your website (“Get in line”) or print it as a QR code at the door. The whole sign-up is one screen at a time, with big buttons, and a returning patient reaches their ticket in about seven taps. The ticket is issued before insurance: the paperwork, insurance and copay are a checklist the patient works through while waiting.
- Phone number. The first screen shows the clinic, whether the line is open, how many are waiting, and the estimated wait. The patient enters a mobile number and taps
Get in line; a six-digit code confirms it. Text updates are on by default and can be declined. - Who is this visit for?
MeorMy child, then last name and date of birth. If the phone number and those details match a chart, the patient is recognised (“Maria G. · Returning patient”). If not, the same screen asks for the rest — first name, sex, and for a child the parent’s name — and Hero creates the chart. - Reason for visit. One tap on a category (cold/flu, injury, rash, UTI…) and an optional line of detail. Staff see it on the board; it is never texted.
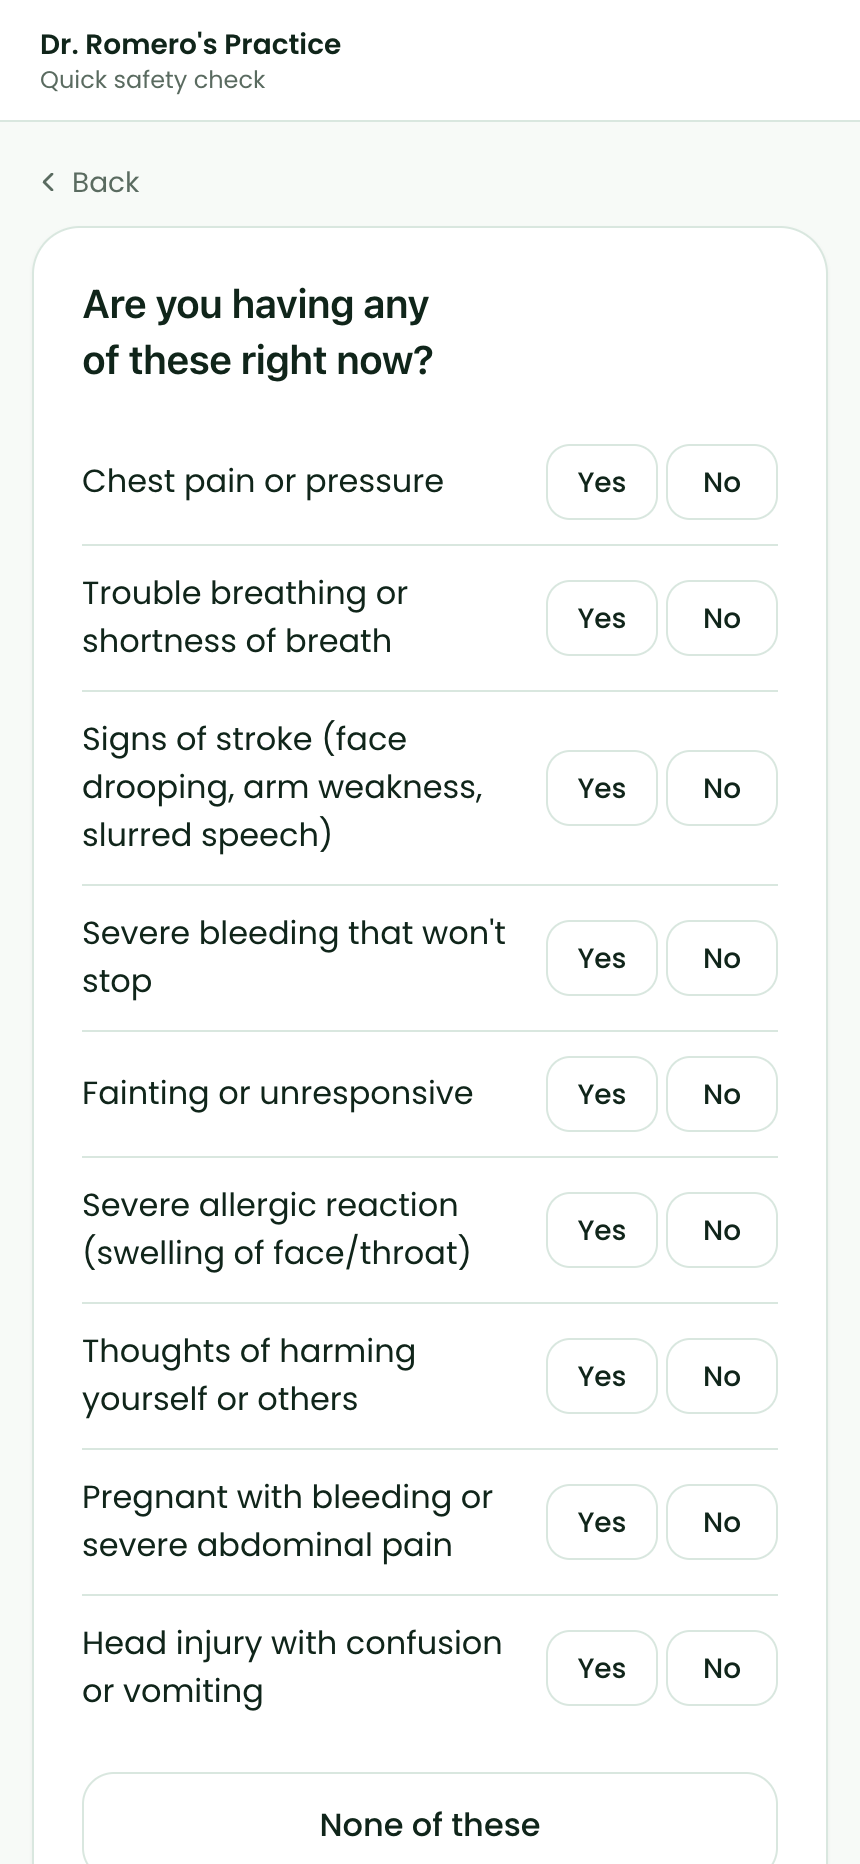
- Quick safety check. Your safety questions, each answered Yes or No, or
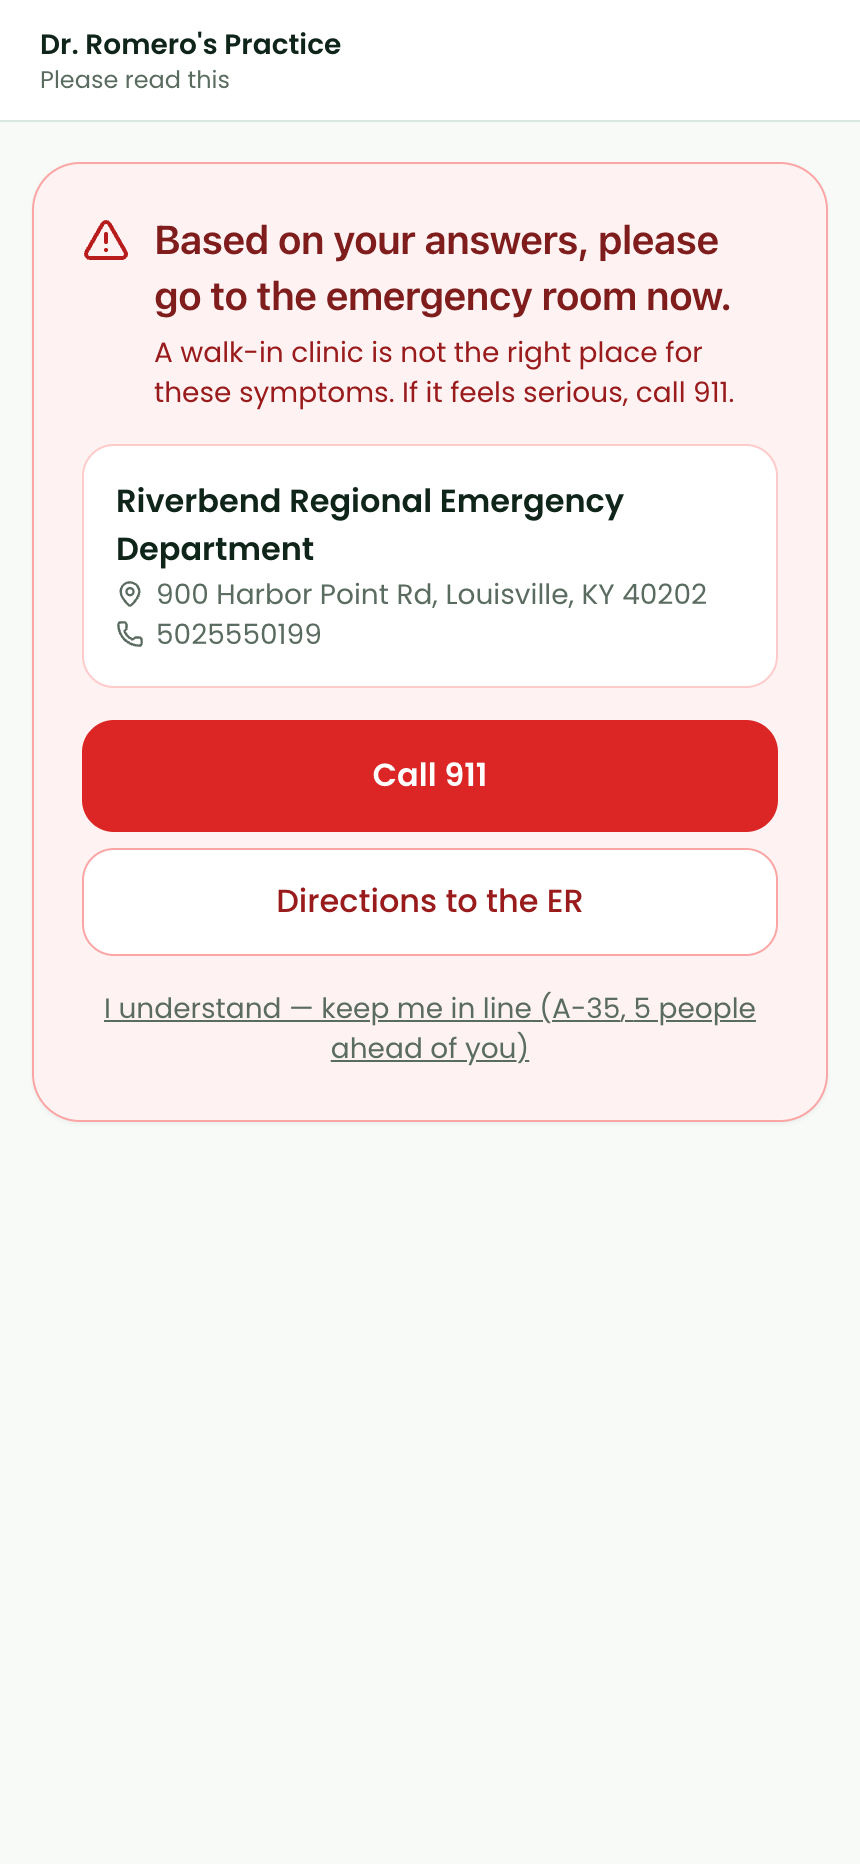
None of thesein one tap. A “Yes” shows the ER advice screen with your configured ER, aCall 911button and directions; the patient can keep their place in line if you allow it, and the board flags them in red either way. - The ticket. “A-17 · 3 people ahead of you”, the estimated wait once they have arrived, messages from the clinic, and the while-you-wait checklist: Insurance, Consent forms, Questions for the visit, and Copay. Patients who signed up from home see an
I’m herebutton; tapping it checks them in.
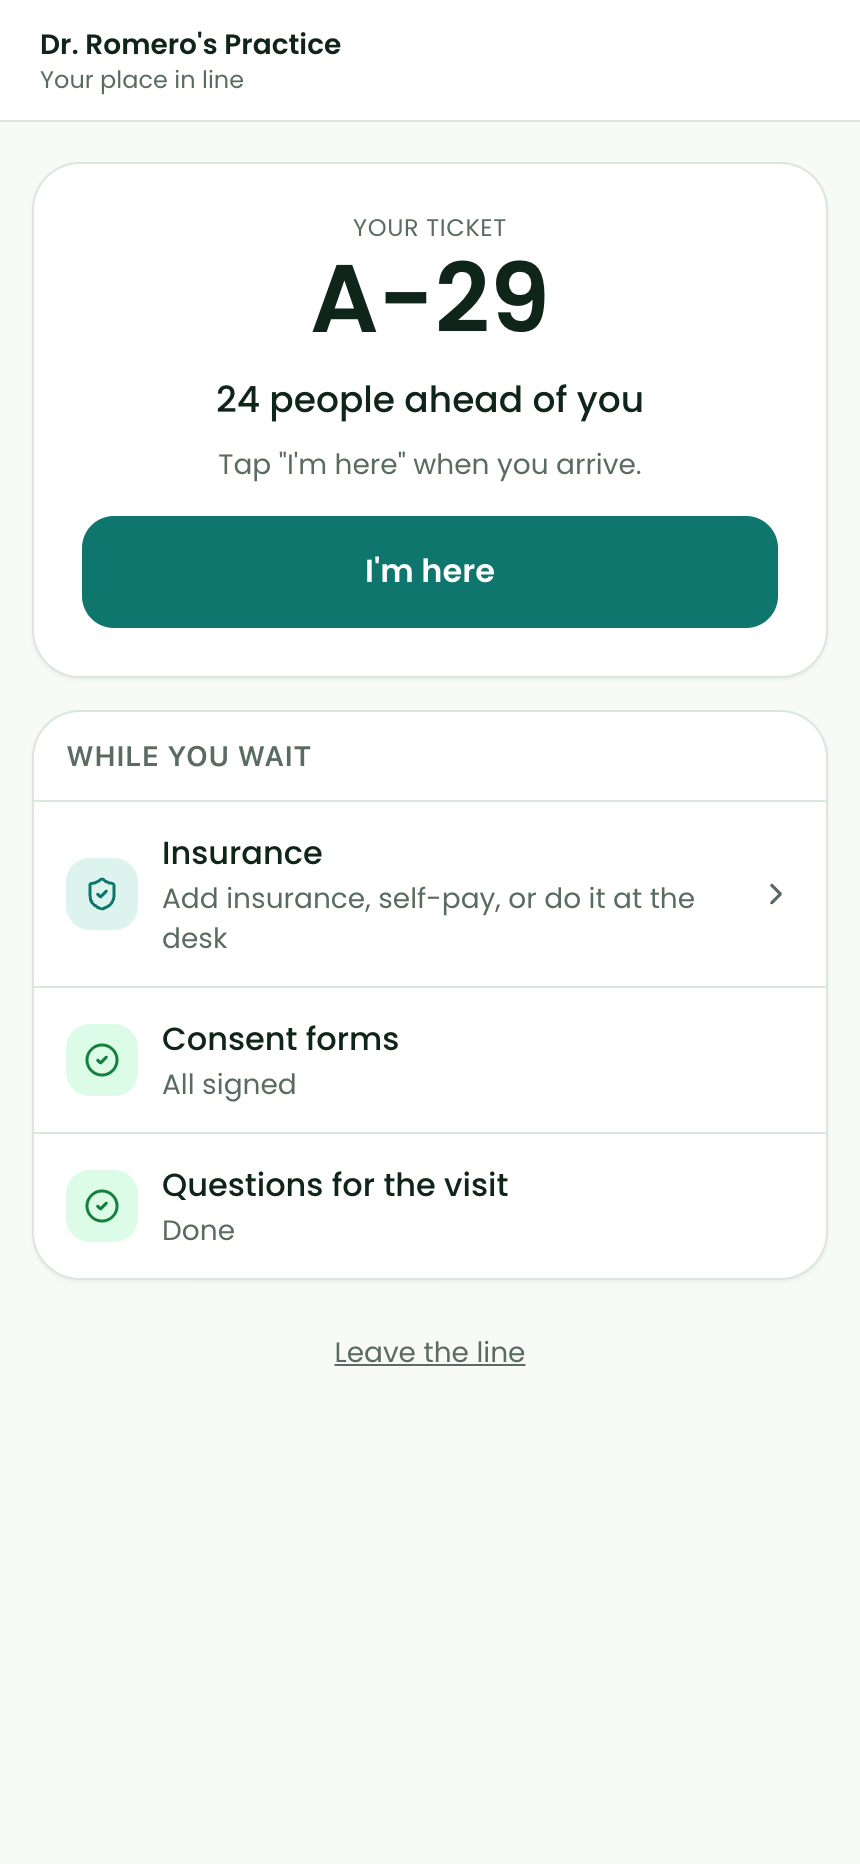
Insurance and the copay. The Insurance row offers Use the insurance on file, Add insurance (scan the card or type the member ID), Self-pay, or I’ll do this at the front desk. When a plan is added or confirmed, Hero runs an eligibility check that asks specifically for urgent care benefits. A verified urgent-care copay shows as “Copay $40 — Pay now” and the patient can pay on their phone; if the payer only returned an office copay, the patient sees “about $30 — the front desk will confirm” and staff confirm it on the board before anyone is asked to pay.
Text messages. Patients who opted in receive short, fixed texts: when they join (with the link back to their ticket), when they are up soon, when you call them (“We’re ready for you — please come to the front desk”), when waits move and you choose to tell them, when you send a custom message, ER advice, and a portal invitation after discharge. No text ever contains the reason for the visit or a room number, and every one goes only to the number the patient verified.
Kiosk mode. Open /walk-in?kiosk=1 on a tablet at the door. It is the same sign-up without wait times; after the ticket it shows “Have a seat — we’ll text you” for twenty seconds, signs the patient out, and returns to the first screen. Nothing is stored on the device.
Running the day
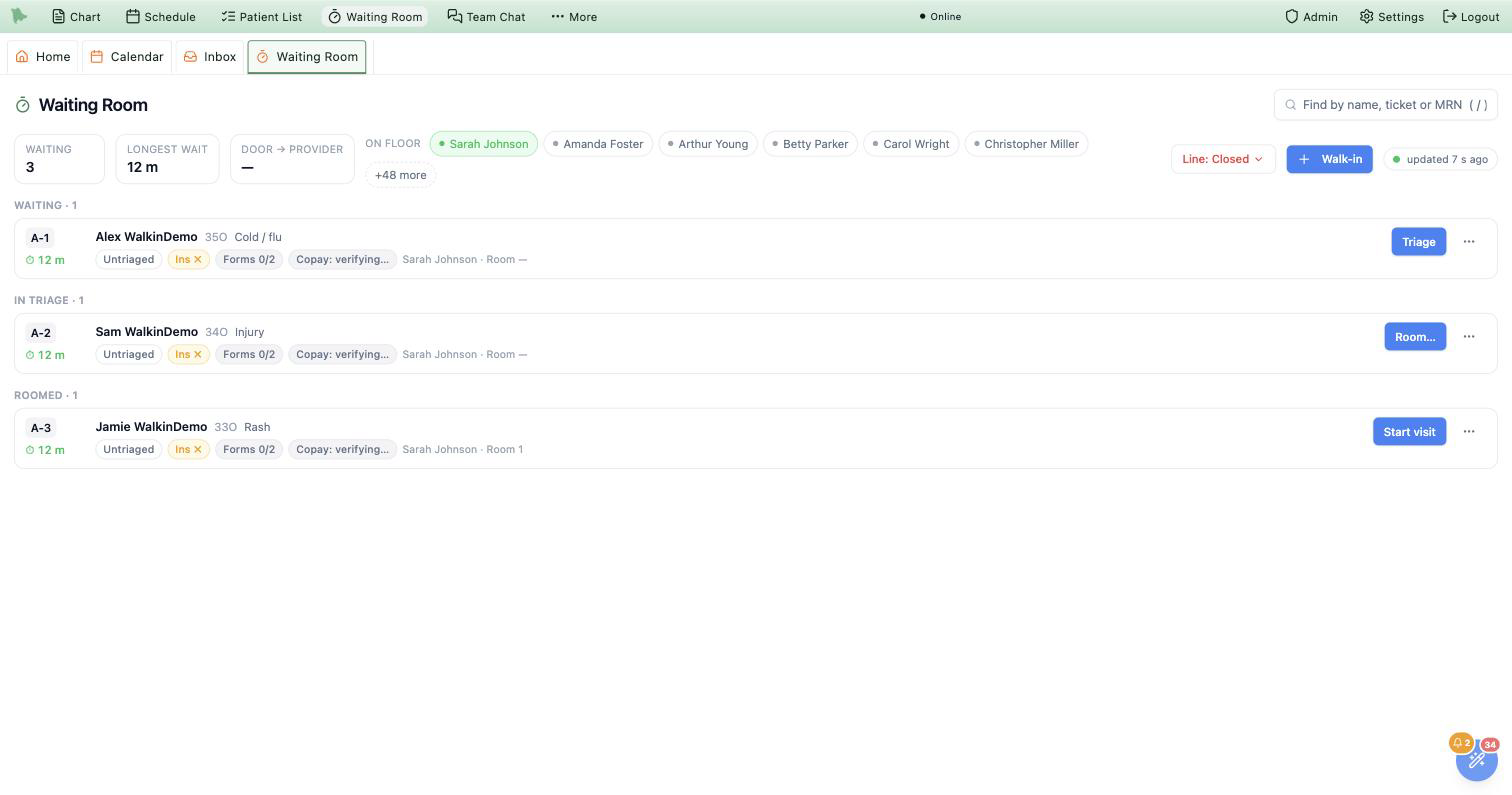
Open Waiting Room from the toolbar (it also appears as a tab). One page, no sub-tabs. It refreshes every five seconds while you are looking at it; the dot at the top right tells you how fresh it is.
- The strip at the top. How many are waiting, the longest wait, today’s median door-to-provider time, and Providers on floor — click a name to mark a provider on or off. This drives the wait estimate patients see, so keep it honest.
Line: Openswitches to Closing (no new sign-ups, everyone in line is still seen) or Closed. - Alerts. A red bar names anyone who answered Yes to a safety question — triage them first. An amber bar appears when waits moved past your threshold for people already in line:
Text themsends one honest “waits just moved” message to everyone waiting who opted in. - The line. Grouped in order: Not here yet, Waiting, In triage, Roomed, With provider, Done today. Within Waiting the sickest come first (acuity, then anyone you moved to the top, then arrival time). Each row shows the ticket, the wait timer, the reason, the acuity chip, insurance and forms readiness, the copay state, the provider and room.
- One button moves a patient forward.
Mark arrived→Triage→Room…(pick a room; occupied rooms are greyed) →Start visit(opens the note in a tab) →Discharge. The⋮menu holds the shortcuts and corrections: skip triage, skip the room, back one stage, send to the ER, transfer to the ER after assessment, left without being seen, remove from the line, move to the top, assign a provider, copy the status link. - Talk to the patient without leaving the board.
Calltexts “we’re ready for you” without changing their stage.Messageopens your quick messages plus a free-text box; Enter sends. - Collect the copay. Click the copay chip: charge the card on file, text a pay link, record cash or check, or Defer (one click, with Undo). An estimated copay shows
Confirmfirst — nobody is asked to pay an amount the payer did not verify for urgent care.
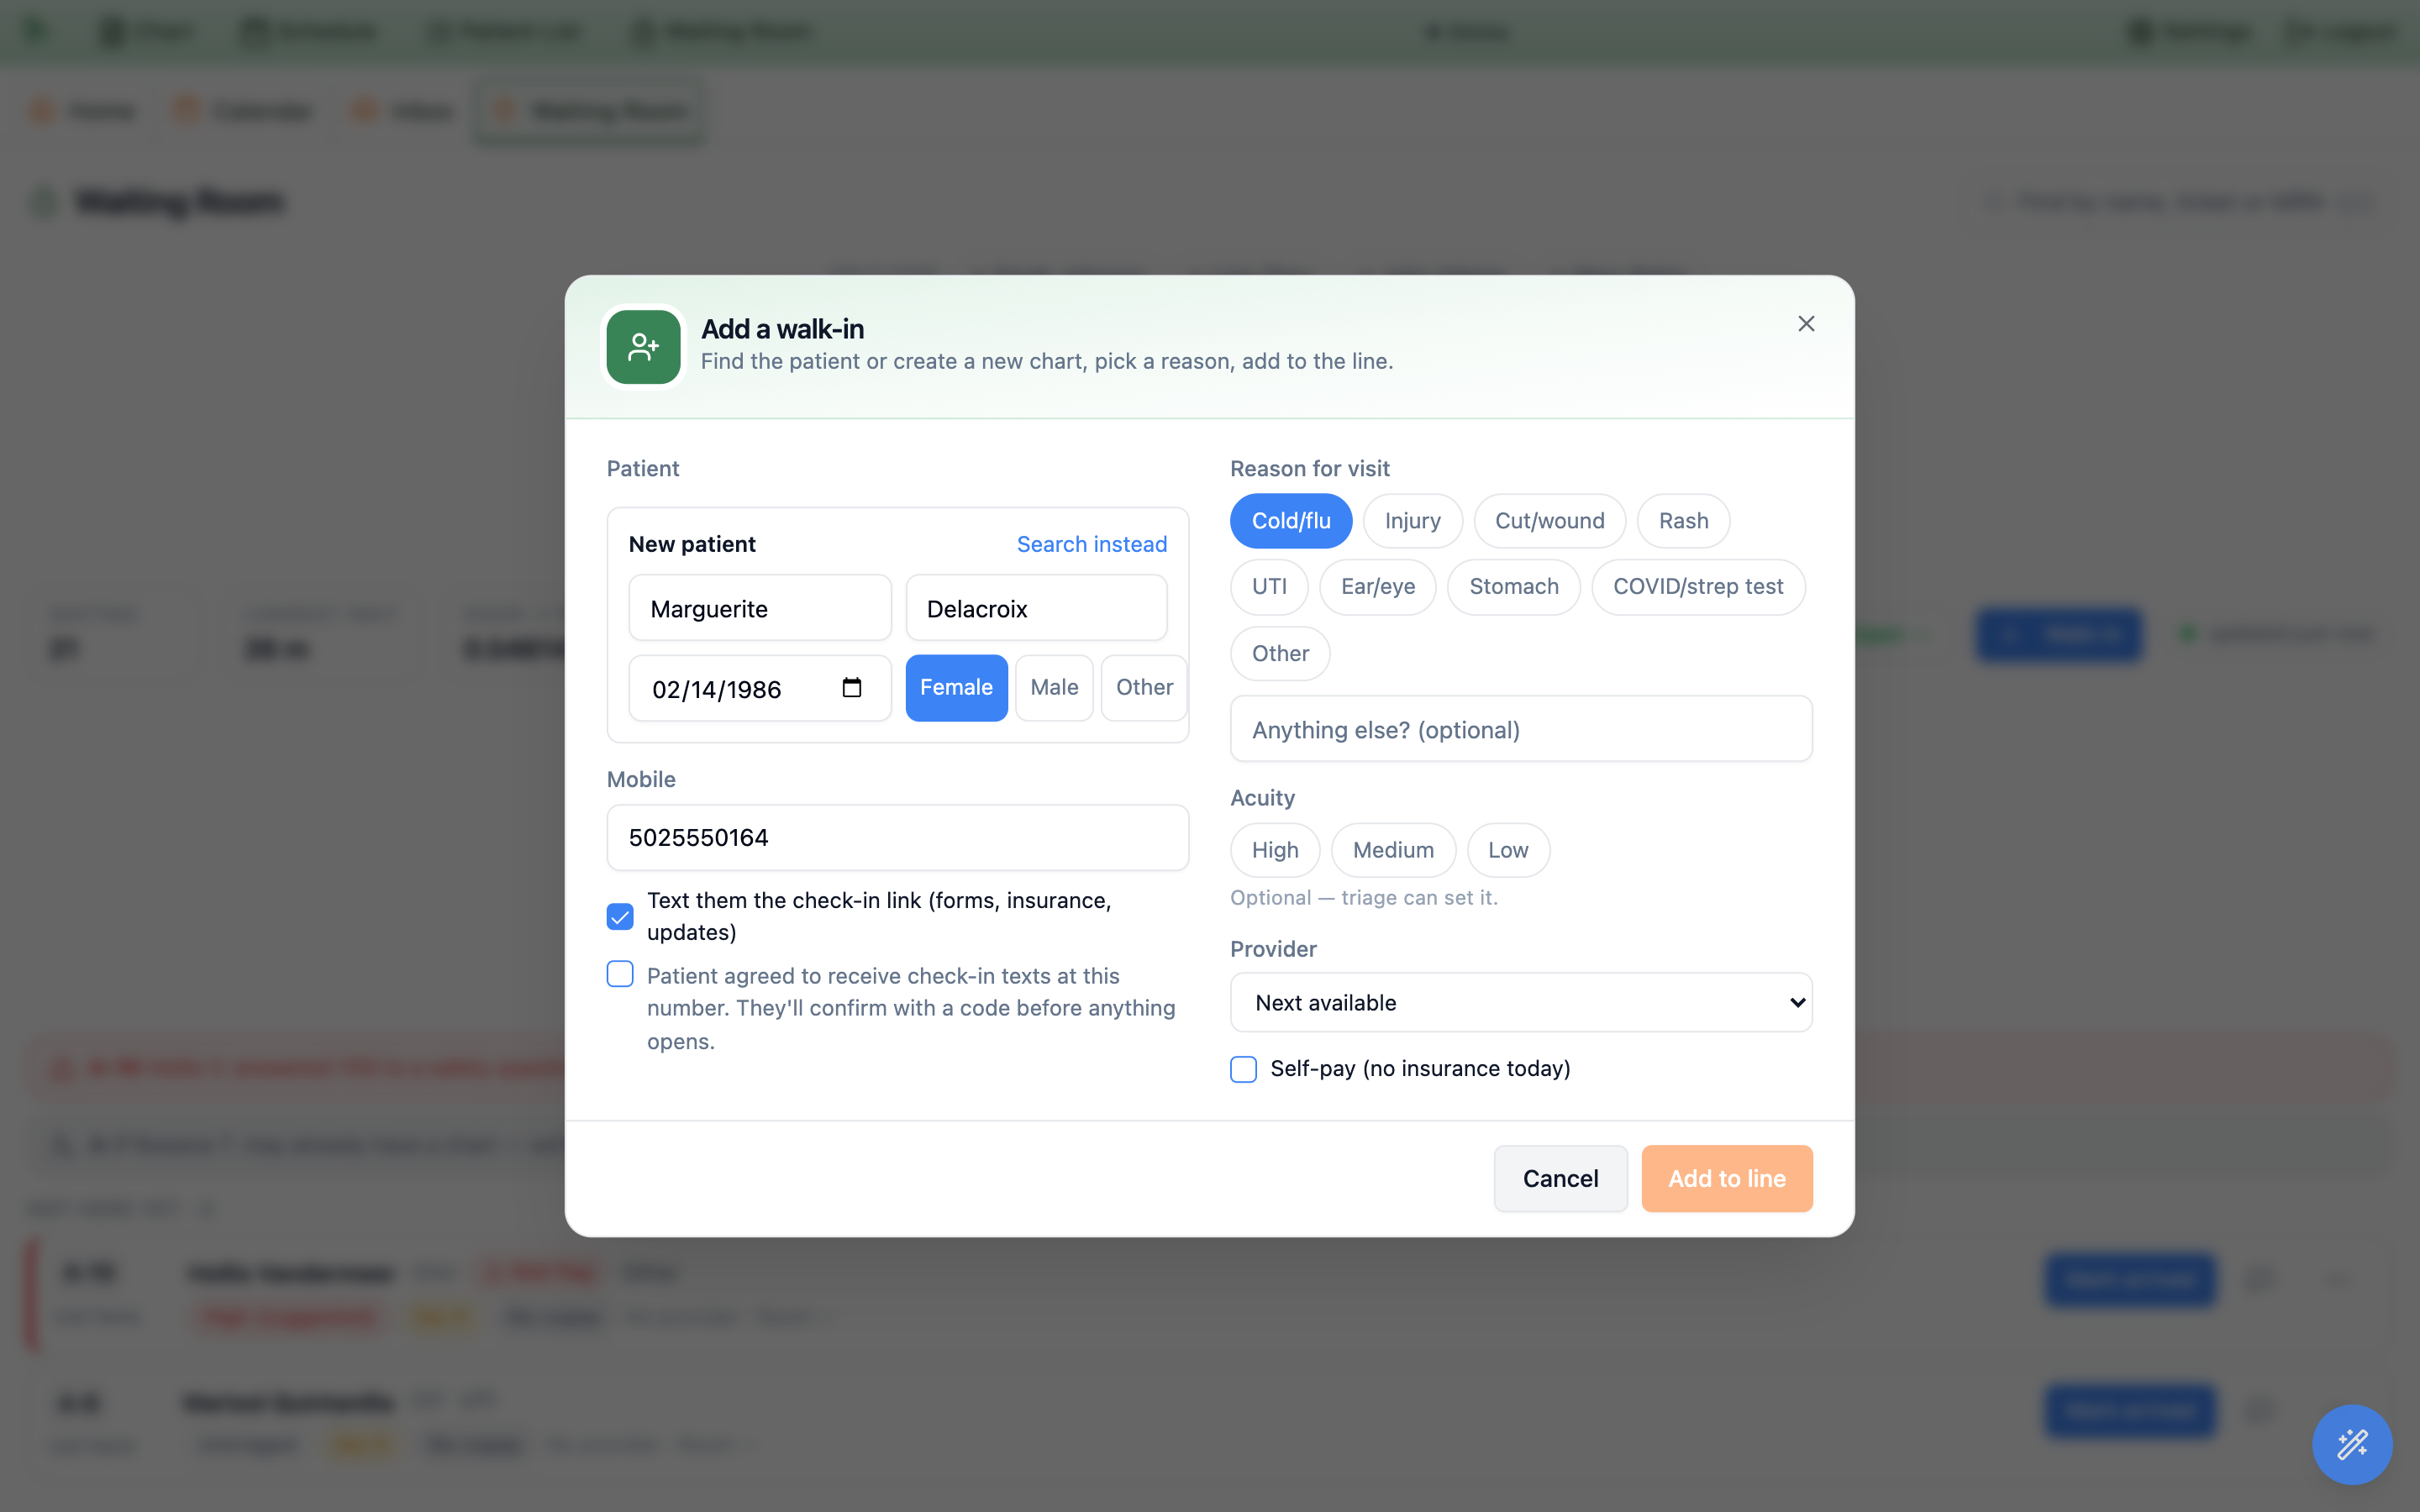
+ Walk-in (or press n): find or create the patient, pick a reason, add to the line.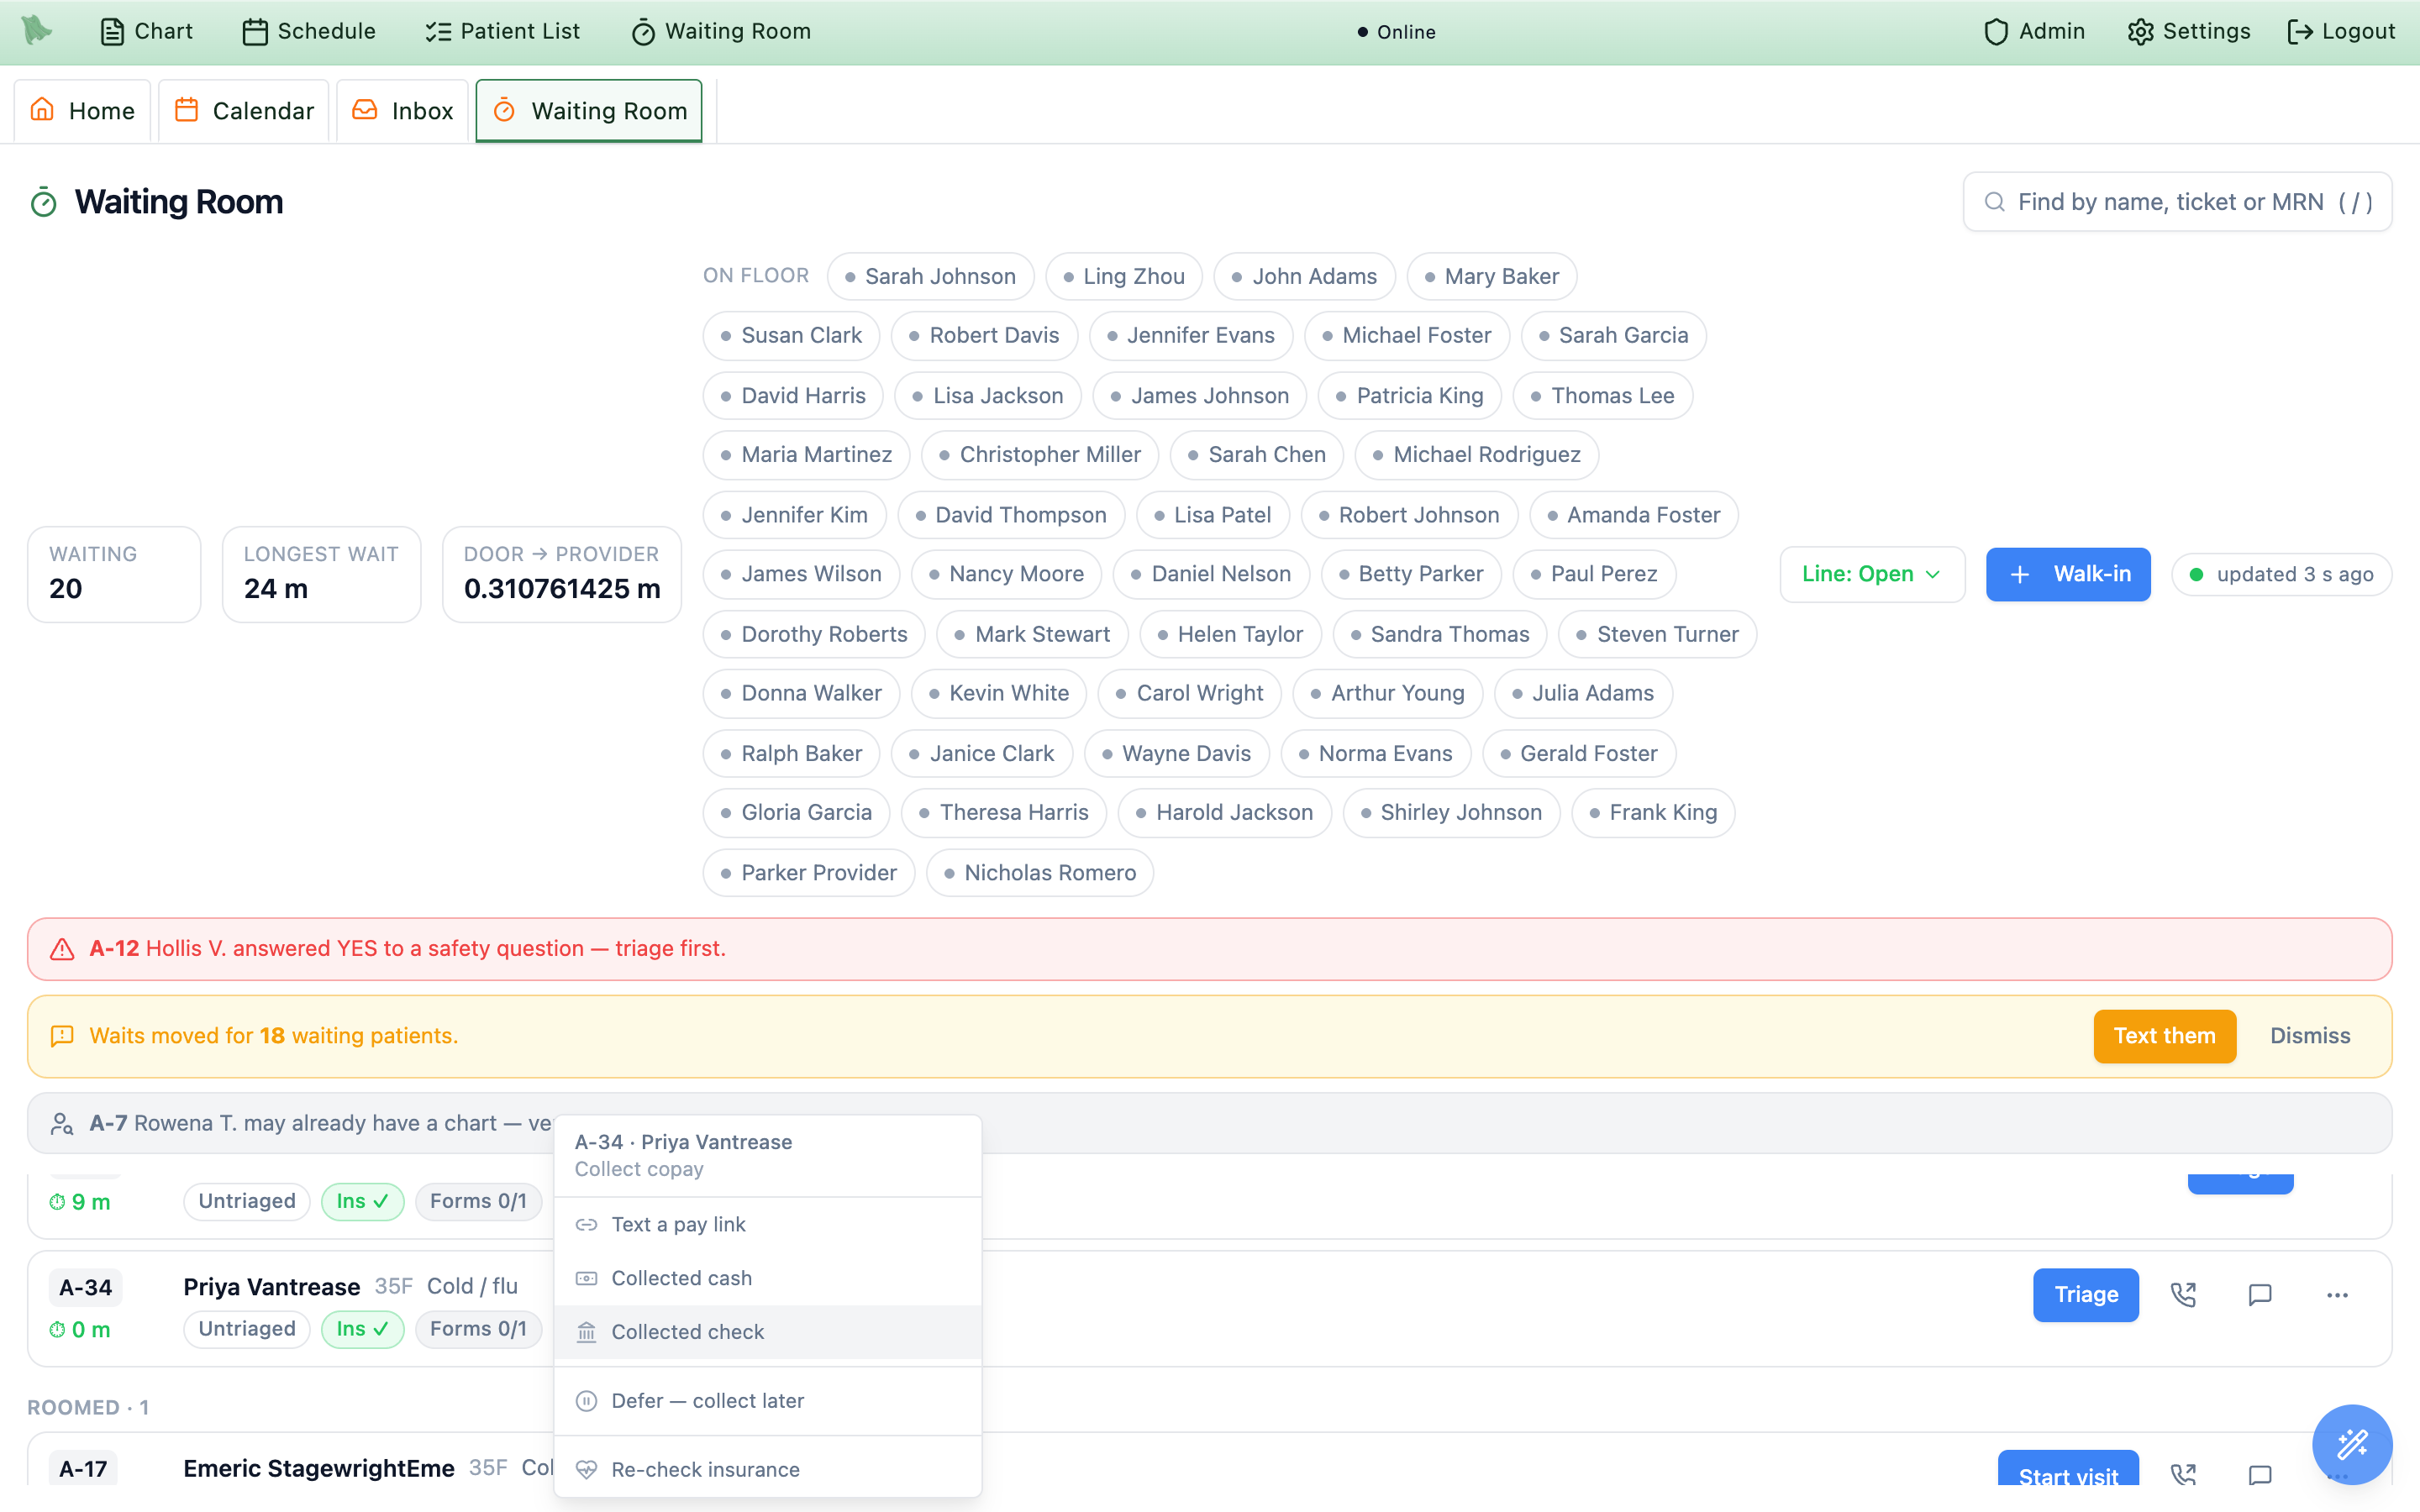
Adding someone at the desk. + Walk-in finds an existing chart (name, phone, DOB or MRN) or creates one in four fields. Check Text them the check-in link and record their spoken consent: the text carries a link that asks for a code before it shows anything, so the phone proves itself first. Patients without a phone can finish forms and insurance on the check-in kiosk (Admin > Kiosk must be on) via the row’s kiosk hand-off.
Start visit becomes the encounter’s provider. If someone completes or cancels the visit from the chart or the calendar, the board catches up on its own.
Keyboard. / jumps to the search box, n opens + Walk-in. Neither fires while you are typing in a field.
Need help? Email support@heroemr.com.