The patient portal
The patient's side of Hero EMR — and what staff need to support it: the portal tour, getting patients registered, sign-in help, booking, messaging, payments, and records.
The patient portal
The patient's side of Hero EMR — and what staff need to support it: the portal tour, getting patients registered, sign-in help, booking, messaging, payments, and records.
Tour the portal: what your patients see
The patient portal is the patient-facing companion to Hero EMR — a separate site where your patients book and manage visits, message the care team, pay bills, complete pre-visit paperwork, and read their records. It carries your practice’s logo, colors, and name (set under Portal branding), so to patients it looks like your portal. The desktop navigation runs across the top, with a Schedule Visit button on the right and an avatar menu holding Sign Out, Notifications, Payments & Billing, and Profile.
-
Home greets and orients.
The patient lands on
Welcome back,their first name, with two calls to action:Schedule appointmentandMessage care team. Once a visit is booked, aNext visitcard shows the date and time in your practice’s time zone (with the patient’s local time labelled when it differs), the provider, and either the office location orVirtual visit · join from this portal. -
Tasks surface themselves.
Below the hero sit a pre-visit checklist for the next appointment’s questionnaires and paperwork, a forms-to-sign card for practice-sent agreements (
2 forms from your care team to sign), a questionnaires-to-complete card beside it for questionnaires sent without an appointment (1 questionnaire from your care team to complete),Follow-ups to schedulewith per-itemSchedule nowbuttons, andQuick actions(Schedule Appointment,Manage Prescriptions,Health History,Letters & Forms). While pre-visit work is pending, an amber banner counts the remaining tasks with aView Alllink. -
Profile holds the patient’s own record-keeping.
The
Profilepage is tabbed:Personal Info,Allergies,Medications,Health History,Pharmacy,Guarantor,Insurance, andSettings. Three of those come and go:Health Historyshows only when your practice collects a history category this patient is allowed to answer,Insuranceonly when insurance self-service is enabled, and an extraComplete Setuptab sits just beforeSettingswhile any orientation step is unfinished. Billing is no longer a Profile tab — it has its own page (see Portal payments), and old?tab=billinglinks redirect there. Personal Info autosaves as the patient types; the address ZIP code is validated on the spot — both here and during registration, only a 5-digit ZIP or 9-digit ZIP+4 is accepted (typos like a 4-digit ZIP are flagged immediately), which keeps the chart address clean enough to bill from. On first sign-in an orientation wizard walks up to seven setup steps — allergies, medications, health history, pharmacy, guarantor, insurance, billing — with health history, insurance, and billing dropping out when your practice hasn’t enabled them; if the patient skips it, Home shows aComplete your patient profilereminder with aGo to profilebutton — handy when you ask a patient to finish intake before a visit. -
One login can manage a family.
A single account can hold multiple patient profiles; a patient selector appears in the header when there’s more than one. Under Profile
Settings, a Family section offersAdd MyselfandAdd Child(which creates a minor profile). When a parent acts for a child, Home is labelledProxied bythe account name.
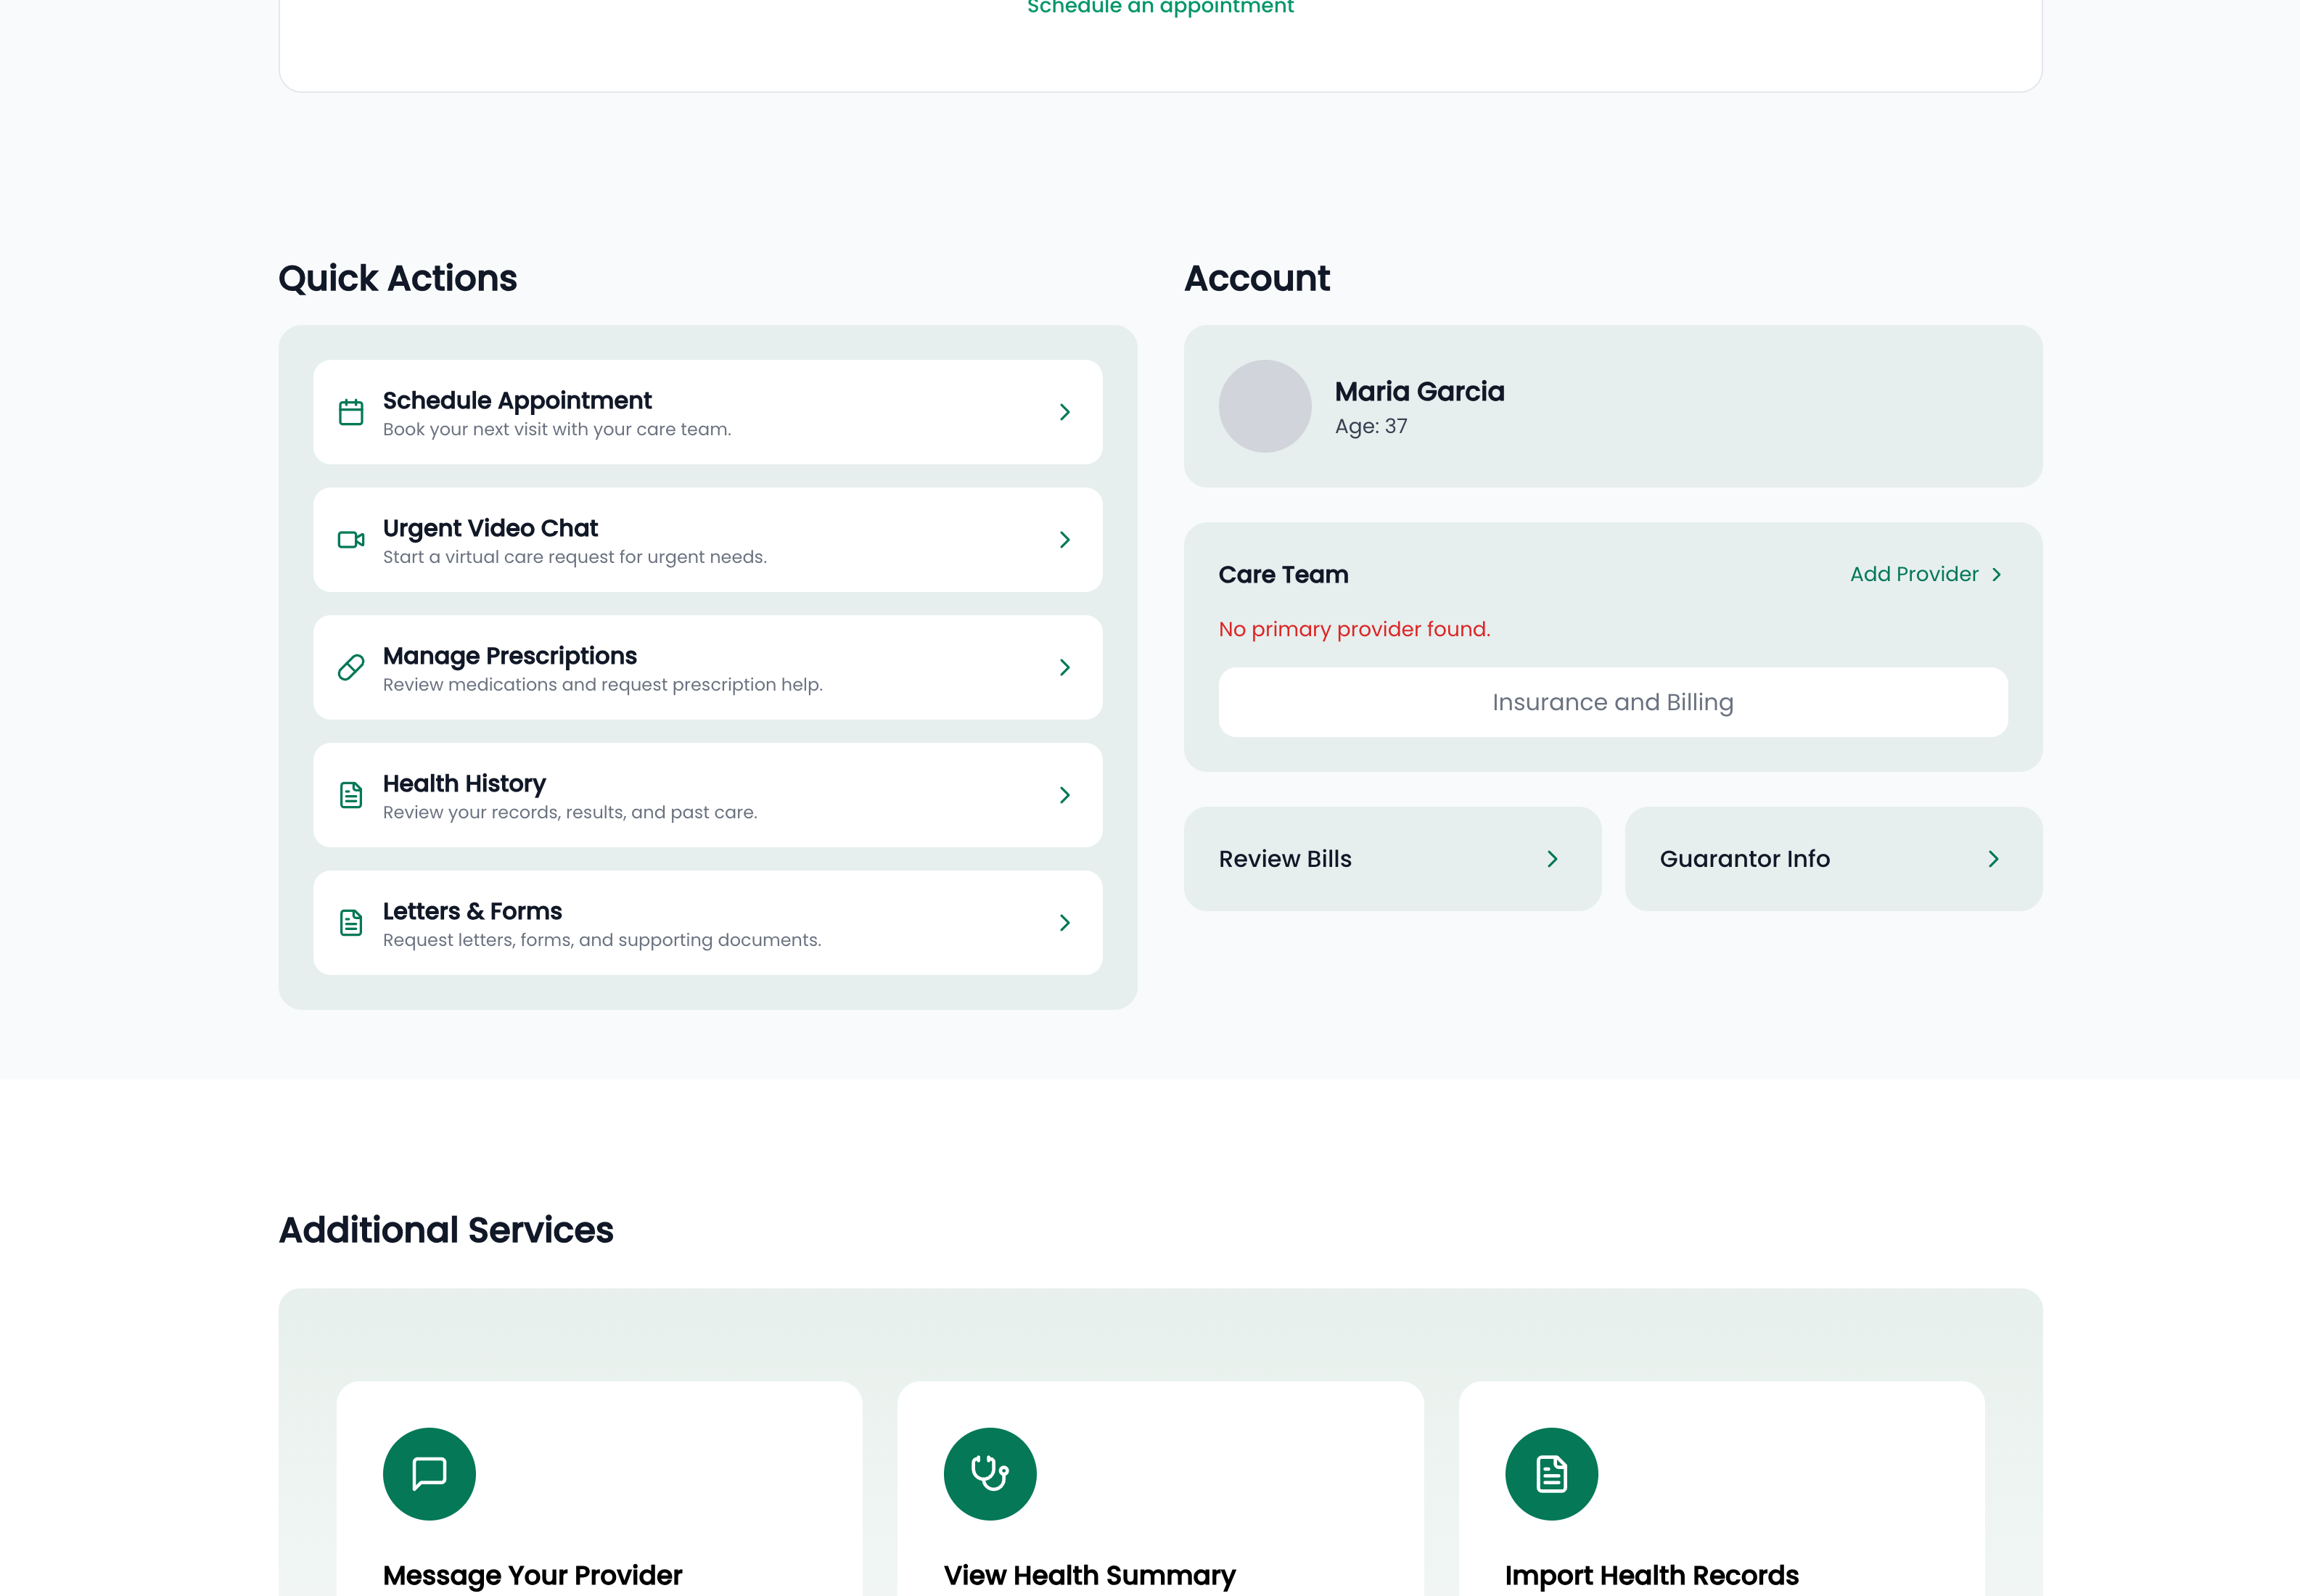
Messages tallies follow-ups awaiting scheduling, not unread mail — which is why it can persist after a patient has read everything. The Appointments badge counts pending pre-visit tasks. Payments & Billing carries a red ! rather than a count — it means the patient has a past-due balance. The pre-visit checklist itself is driven by your questionnaire assignments — see the patient experience of paperwork.
Quick actions shortcut on Home, the matching Profile tab, and the matching orientation step — and switching off self-scheduling also hides the Schedule Visit button. Check what your practice actually has enabled before telling a patient to “go to the Messages tab”; on some practices it isn’t there.
How a patient gets registered
Patients can’t self-enroll in the portal — access starts with an invitation your practice sends from the admin-only Patient Registration workspace. The staff-side mechanics (status pills, the invite dialog, delivery channels, teen account modes) are documented in Patient registration; this section follows what the patient experiences from the moment the link arrives.
-
The link arrives.
The patient receives the signup link by email, by text, or directly from your staff — the invite dialog can generate a
Portal signup linkwith aCopybutton for handing over in person. Invitations expire in 30 days; after that, staff useResend invite. -
They verify identity on
Complete Signup. The link opens the portal’s signup page with the patient’s name shown read-only. They confirm theirDate of Birth, then create credentials — an email and password, orContinue with Google/Continue with Apple. -
They walk the registration steps.
Registration collects insurance and personal details (teen flows add a parent step), then a review, and lands on a success screen showing their Medical Record Number and a
What’s Next?list. From there the orientation wizard in the portal tour takes over. - Abandoned signups can resume. A patient who created a login but stopped partway is routed to a resume-registration screen on their next sign-in — or staff can simply resend the invite.
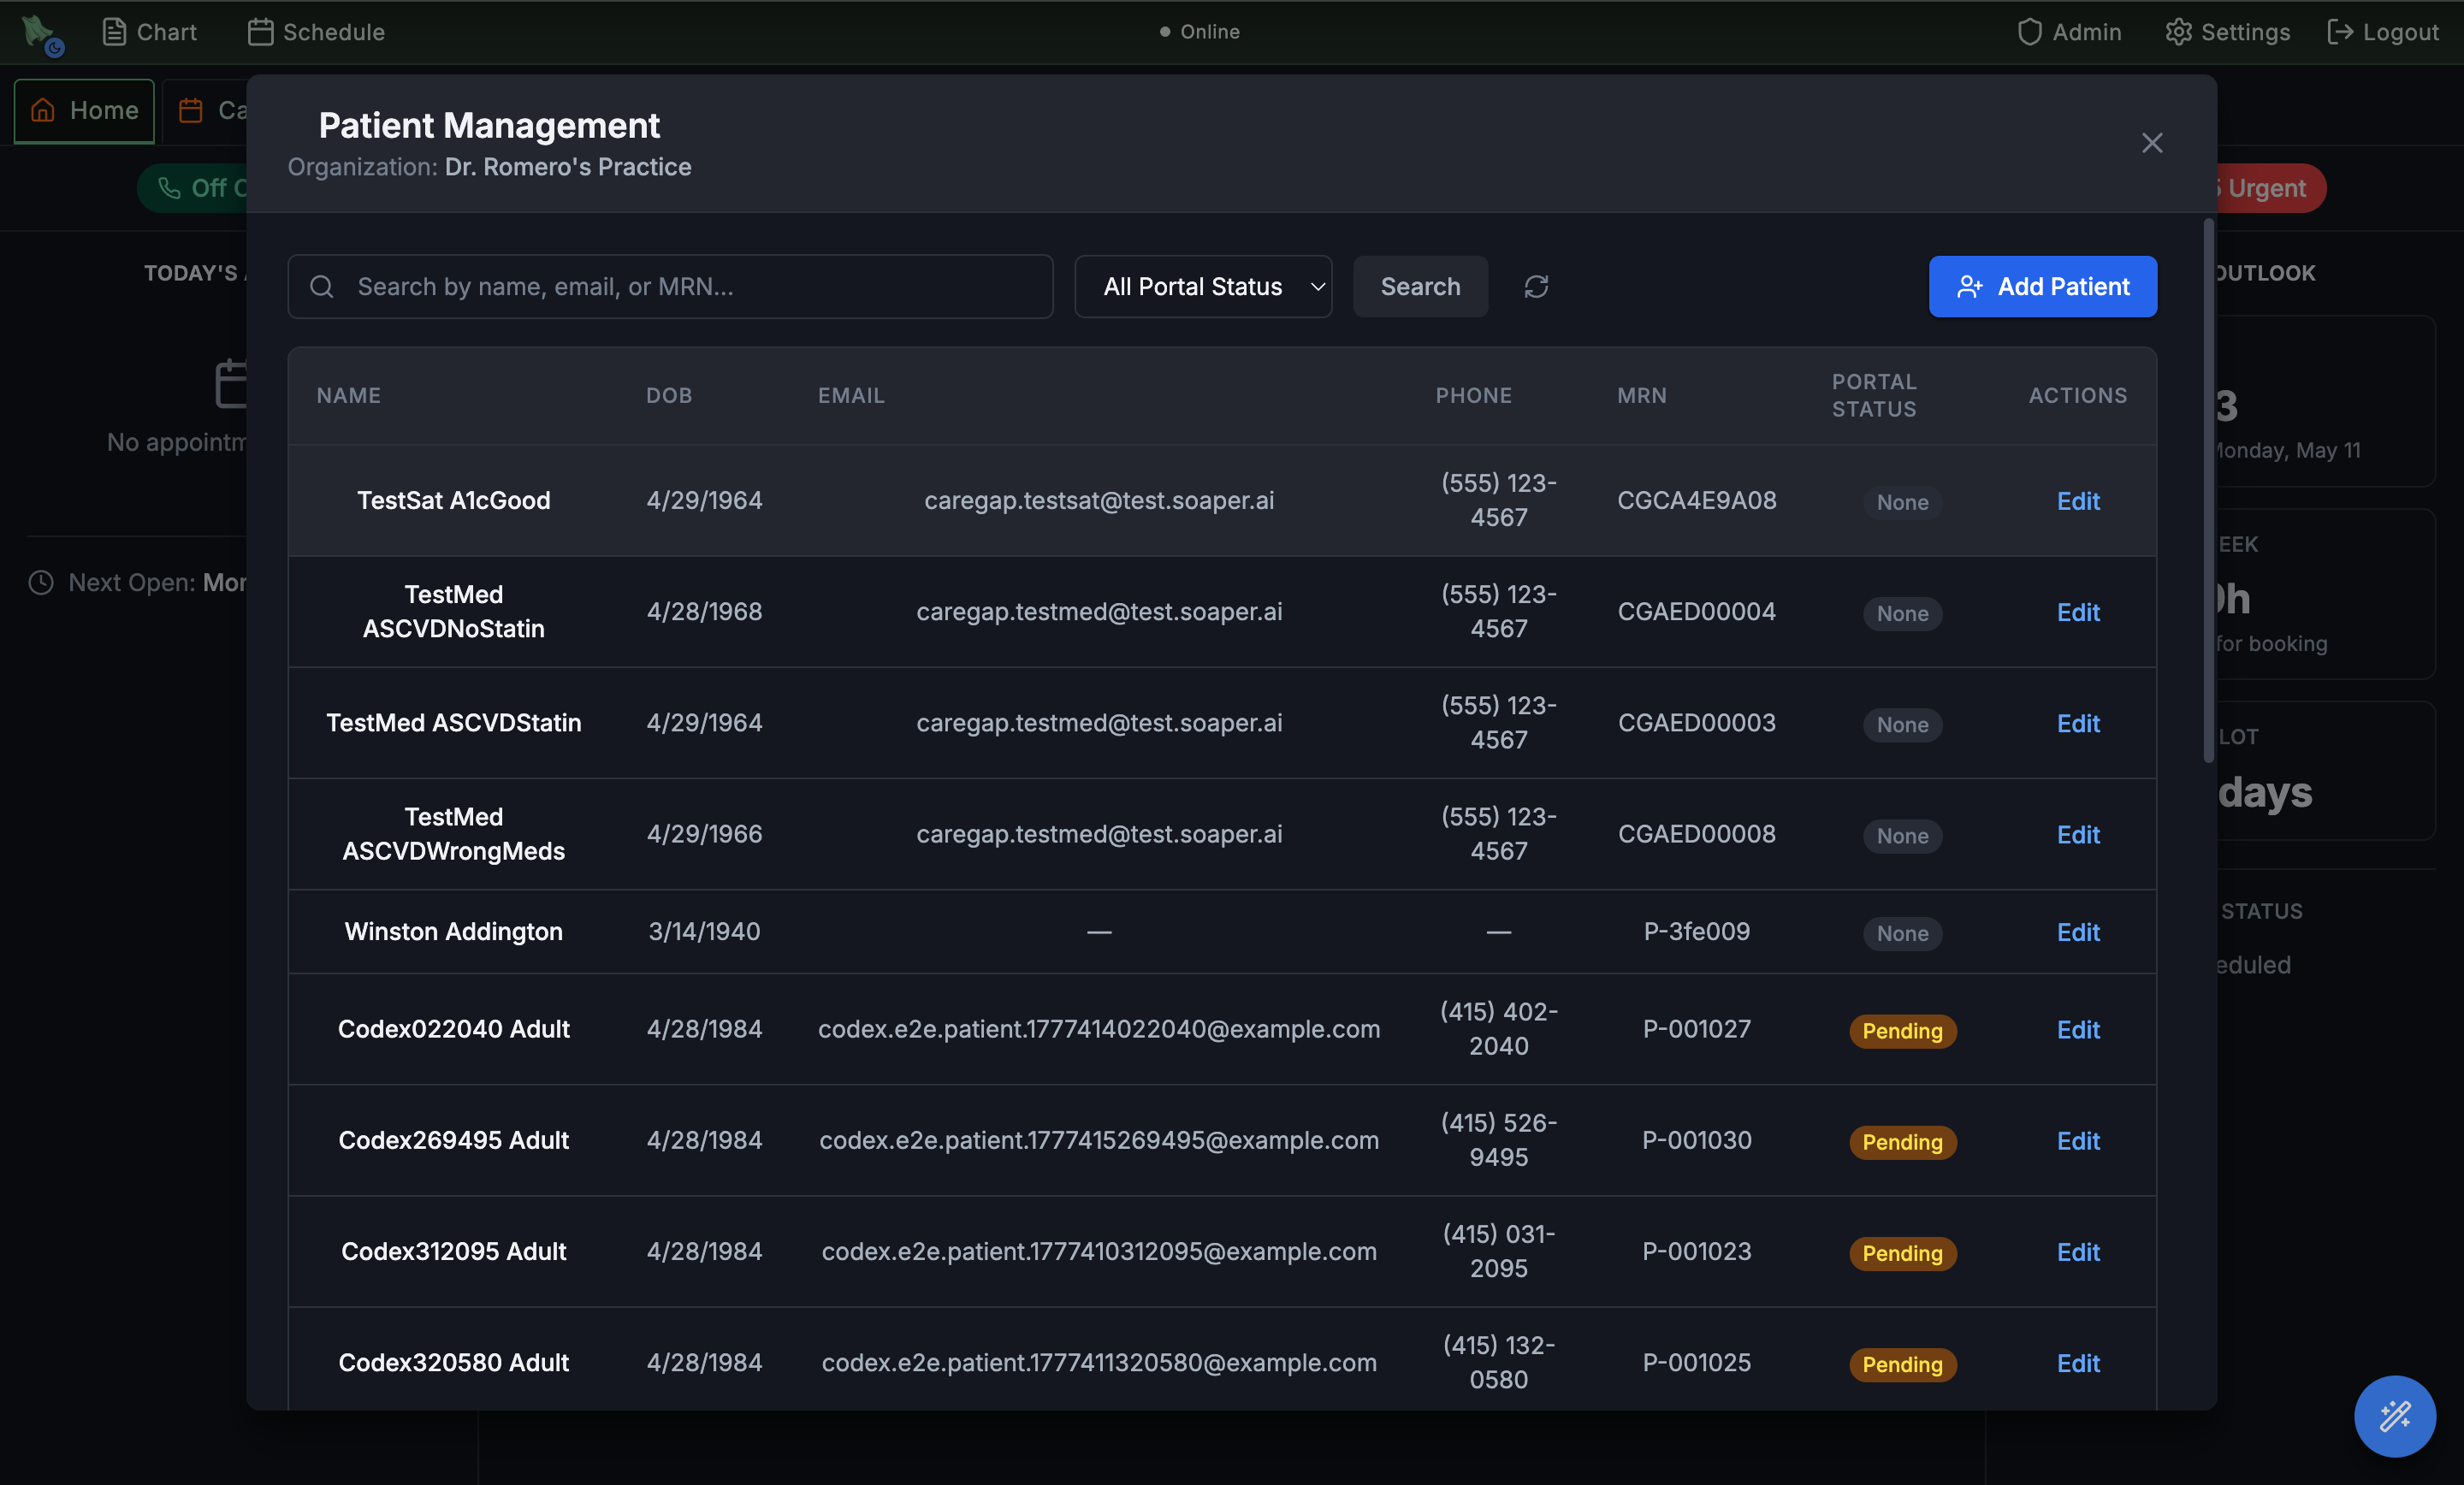
Admin → Patient Registration.Parent-managed mode the parent does both; in Teen private mode the teen signs in and a parent or guardian email is collected separately for consent paperwork. Choosing or switching the mode is part of patient registration.
Passwords, passkeys, and verification codes
Portal sign-in is Email Address + Password + Sign In, with Continue with Google and Continue with Apple as alternatives. Depending on how your practice’s portal is configured, patients may also see passkey sign-in and a second-step verification code. Knowing the patient’s-eye view here is what lets your front desk troubleshoot “I can’t log in” calls quickly.
-
Password recovery is self-service.
The
Forgot your password?link on the login page emails the patient a reset link. That emailed link is the only reset path — there is no staff-side button that sets or resets a patient’s password. -
Passkeys, where enabled.
On practices with passkeys enabled, returning patients get an automatic prompt (
Checking for your passkey… or start typing to sign in another way.) plus a manualSign in with passkeybutton. Patients add or remove passkeys under ProfileSettings→Passkeys(“Sign in faster with your face, fingerprint, or device PIN”), and a dismissible banner after sign-in offersSet up now. Browsers without passkey support show a “not supported” notice — don’t promise passkeys on every device. -
Verification codes, where required.
Practices can require a second step at sign-in: the patient sees
Check Your EmailorCheck Your Phone, enters a 6-digitVerification Code, and tapsVerify and Continue. Helpers includeResend Code,Text me a code instead/Email me a code instead, andUse a Different Account. Where trusted devices are enabled, a checkbox offers:Trust this browser on this portal so you do not need an email code on every sign-in. -
Text-message codes are the patient’s choice.
Under Profile
Settings→Cell phone verification, the patient tapsAdd phone, verifies it withSend code→Verify, and controls the toggleText me a code when I sign in (you can turn this off anytime). SMS verification is patient opt-in — never forced by the practice. Verified numbers list masked, with aRemove numberaction.
| Patient says… | What to do |
|---|---|
| “I forgot my password” | Point them to Forgot your password? on the login page — the reset link arrives by email. Staff cannot reset it for them. |
| “My signup link doesn’t work” | The invitation likely expired (30 days) or was never completed — use Resend invite in Patient Registration. |
| “It says an account already exists” | They originally signed up with Google or Apple. Tell them to use the matching Continue with… button instead of a password. |
| “The code never arrives” | Confirm the email on file matches what they’re typing, and have them try Resend Code or switch channels with Text me a code instead. |
| “I belong to two practices” | That’s expected — after authenticating they pick a practice and tap Open Portal. |
How patients book, change, and join appointments
Portal booking is self-service direct booking — when a patient confirms a slot, the visit is created on the physician’s calendar immediately, marked as coming from the patient portal. There is no approval step and no request queue to work. Confirmation email and your reminder policies fire automatically (see Notifications).
-
Pick the visit, provider, and time.
From
Schedule Visit(or Home’sSchedule appointment), the patient togglesIn-office visitorRemote visit, picks aPhysician— groupedSeen beforevsOther physicians— aLocationfor office visits, and a slot underAvailable Timeson a month calendar. Only physicians and visit types you’ve enabled for online booking appear; a physician with no virtual offerings shows “This physician does not currently offer virtual visits.” -
See the cost up front.
When visit billing policies apply, the confirm dialog states the money terms plainly — an amount required to hold the appointment, due before the visit, due at check-in, or billed afterward — or
Your care team will confirm pricing before the appointment.If pricing changes mid-flow the patient must review and confirm again. -
Confirm.
Confirm appointment(orConfirm reschedule) books the slot; on success the patient canAdd appointment to Calendar(an .ics download) andGet Directions. A slot grabbed by someone else fails safely:This time slot is no longer available. Please select a different time. -
Manage everything from
Appointments. AnAction Neededpanel lists pending questionnaires, the next appointment is featured with its pre-visit task list, later visits sit underComing Up, and history underPast Visits. Cancelling shows aCancel appointment?dialog with a refund/fee preview beforeConfirm cancellation; rescheduling reuses the scheduling screen. -
Join telehealth from the portal.
Virtual visits show a
Join video visitbutton that activates 15 minutes before the start time and stays open for about an hour after. If required pre-visit tasks are incomplete, the button readsComplete previsit to joininstead. The clinician side of the video visit is covered in Run telehealth visits.
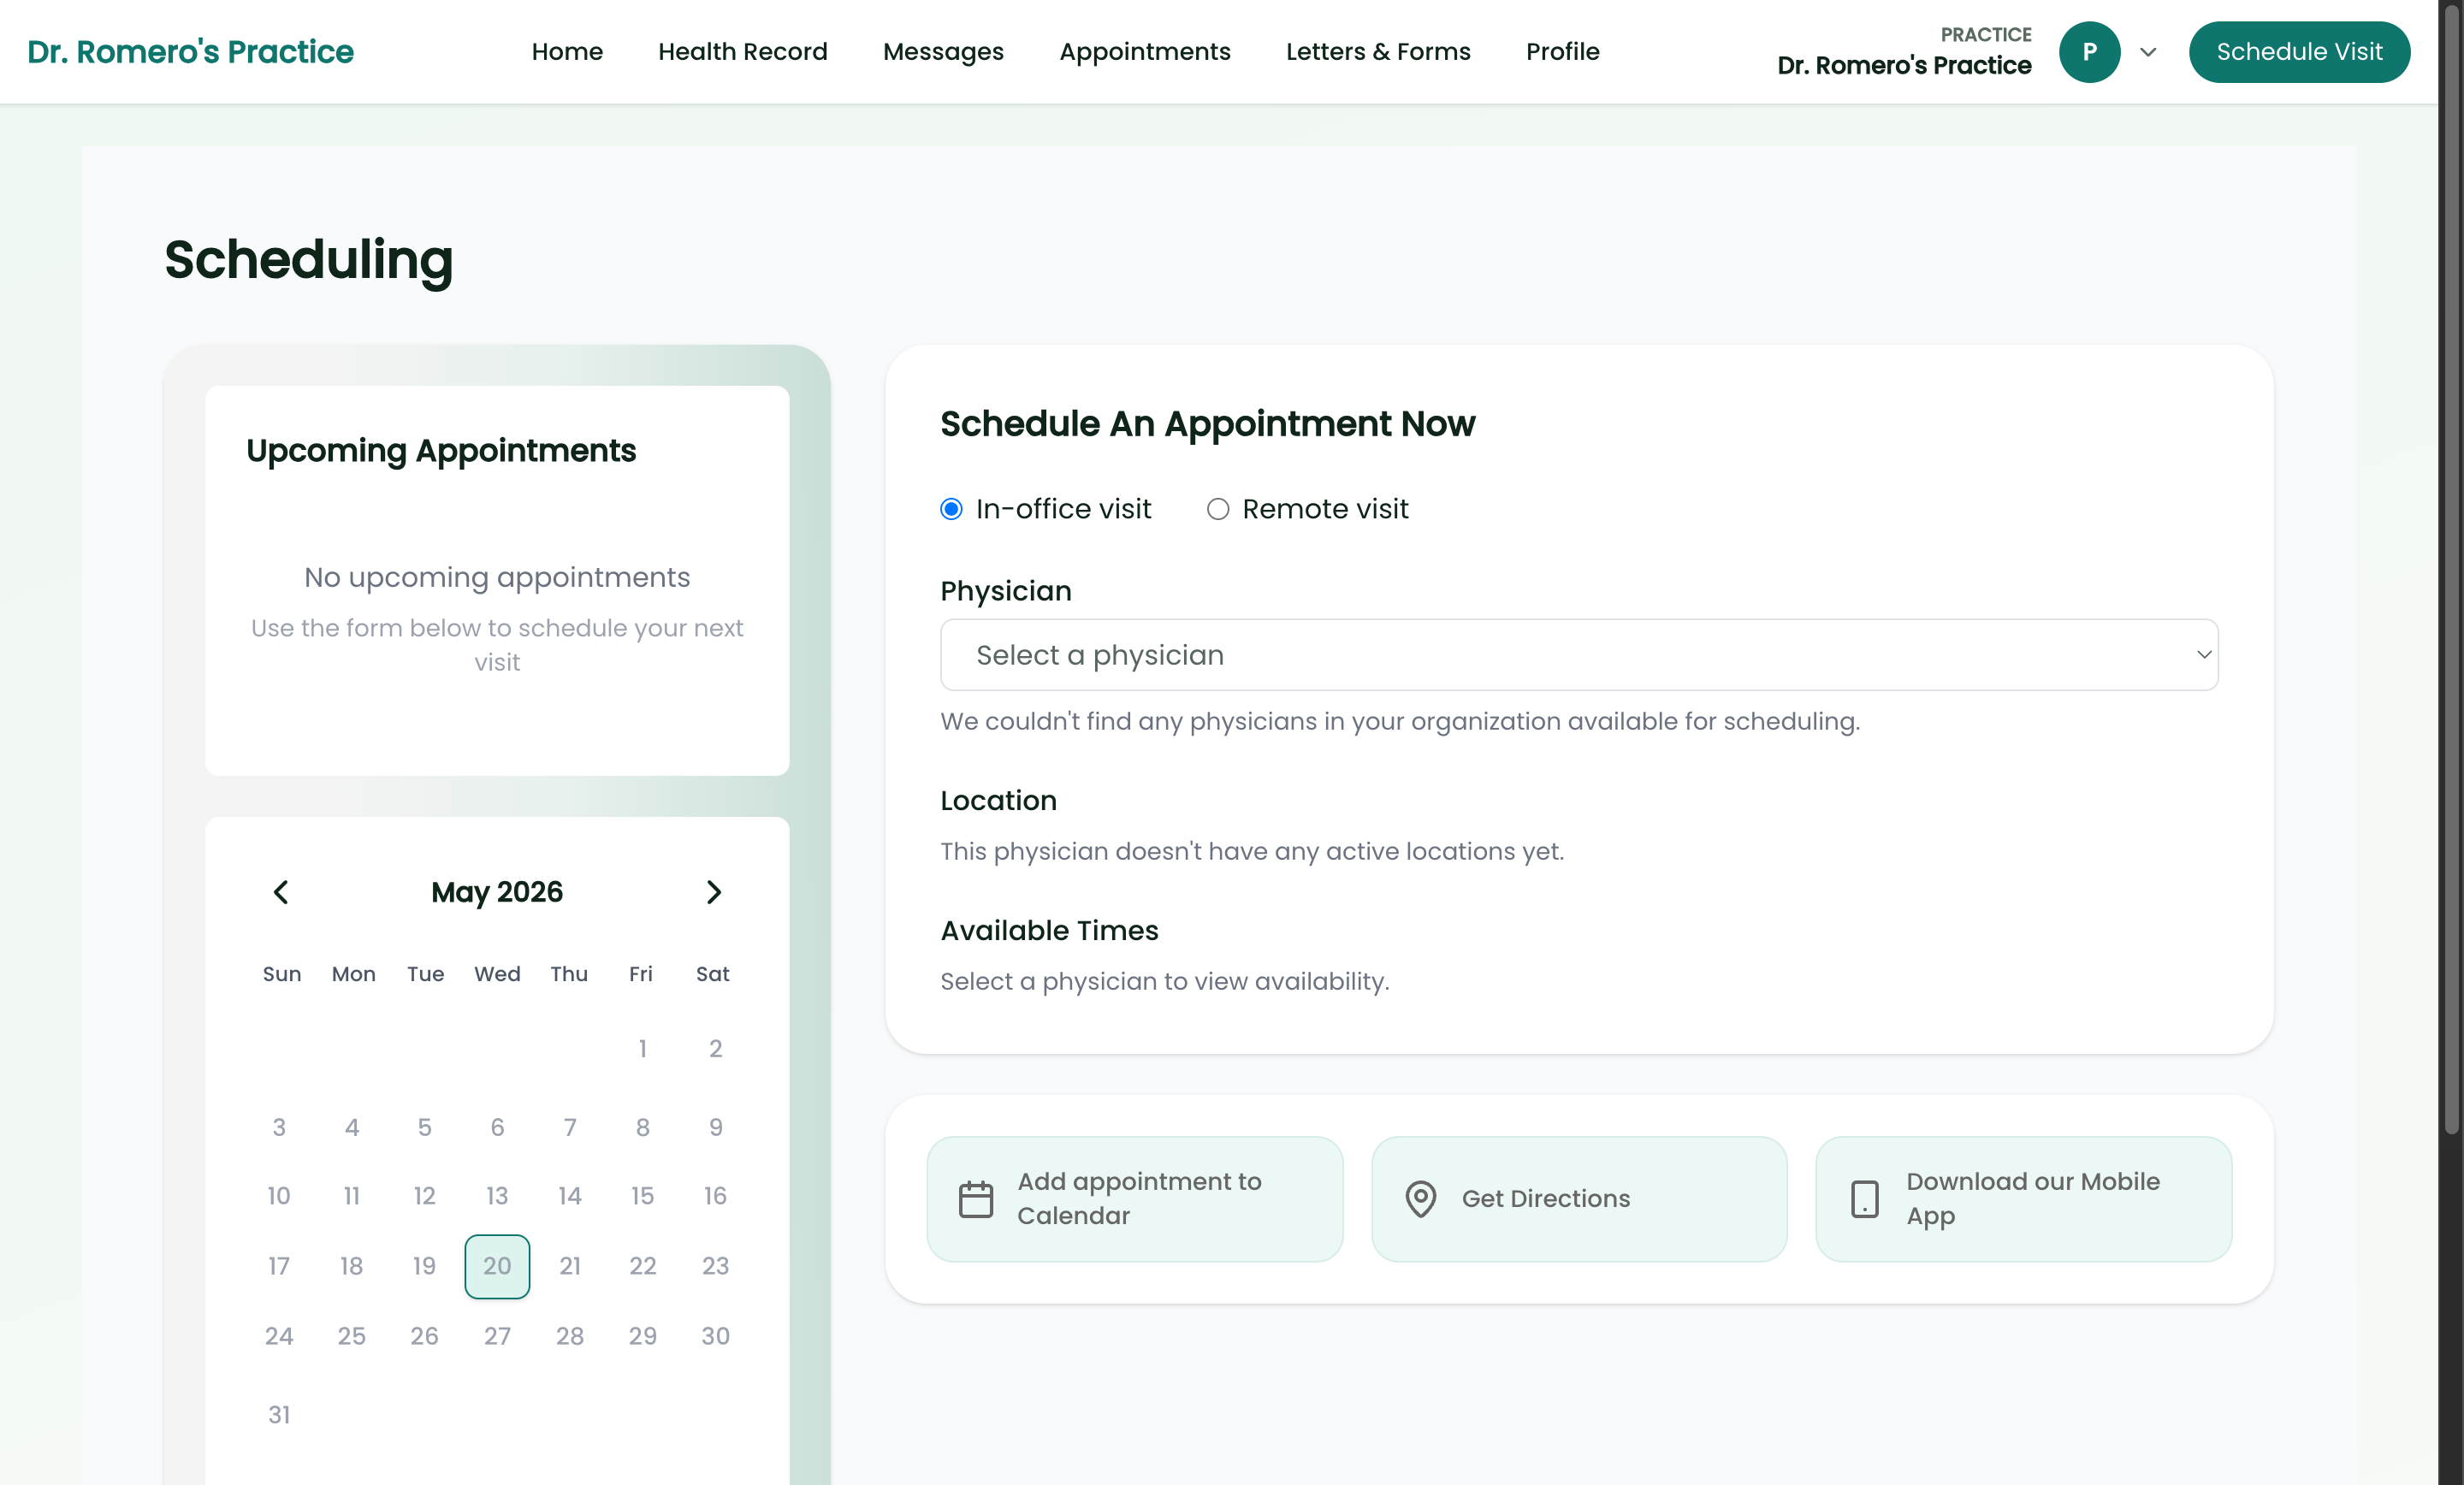
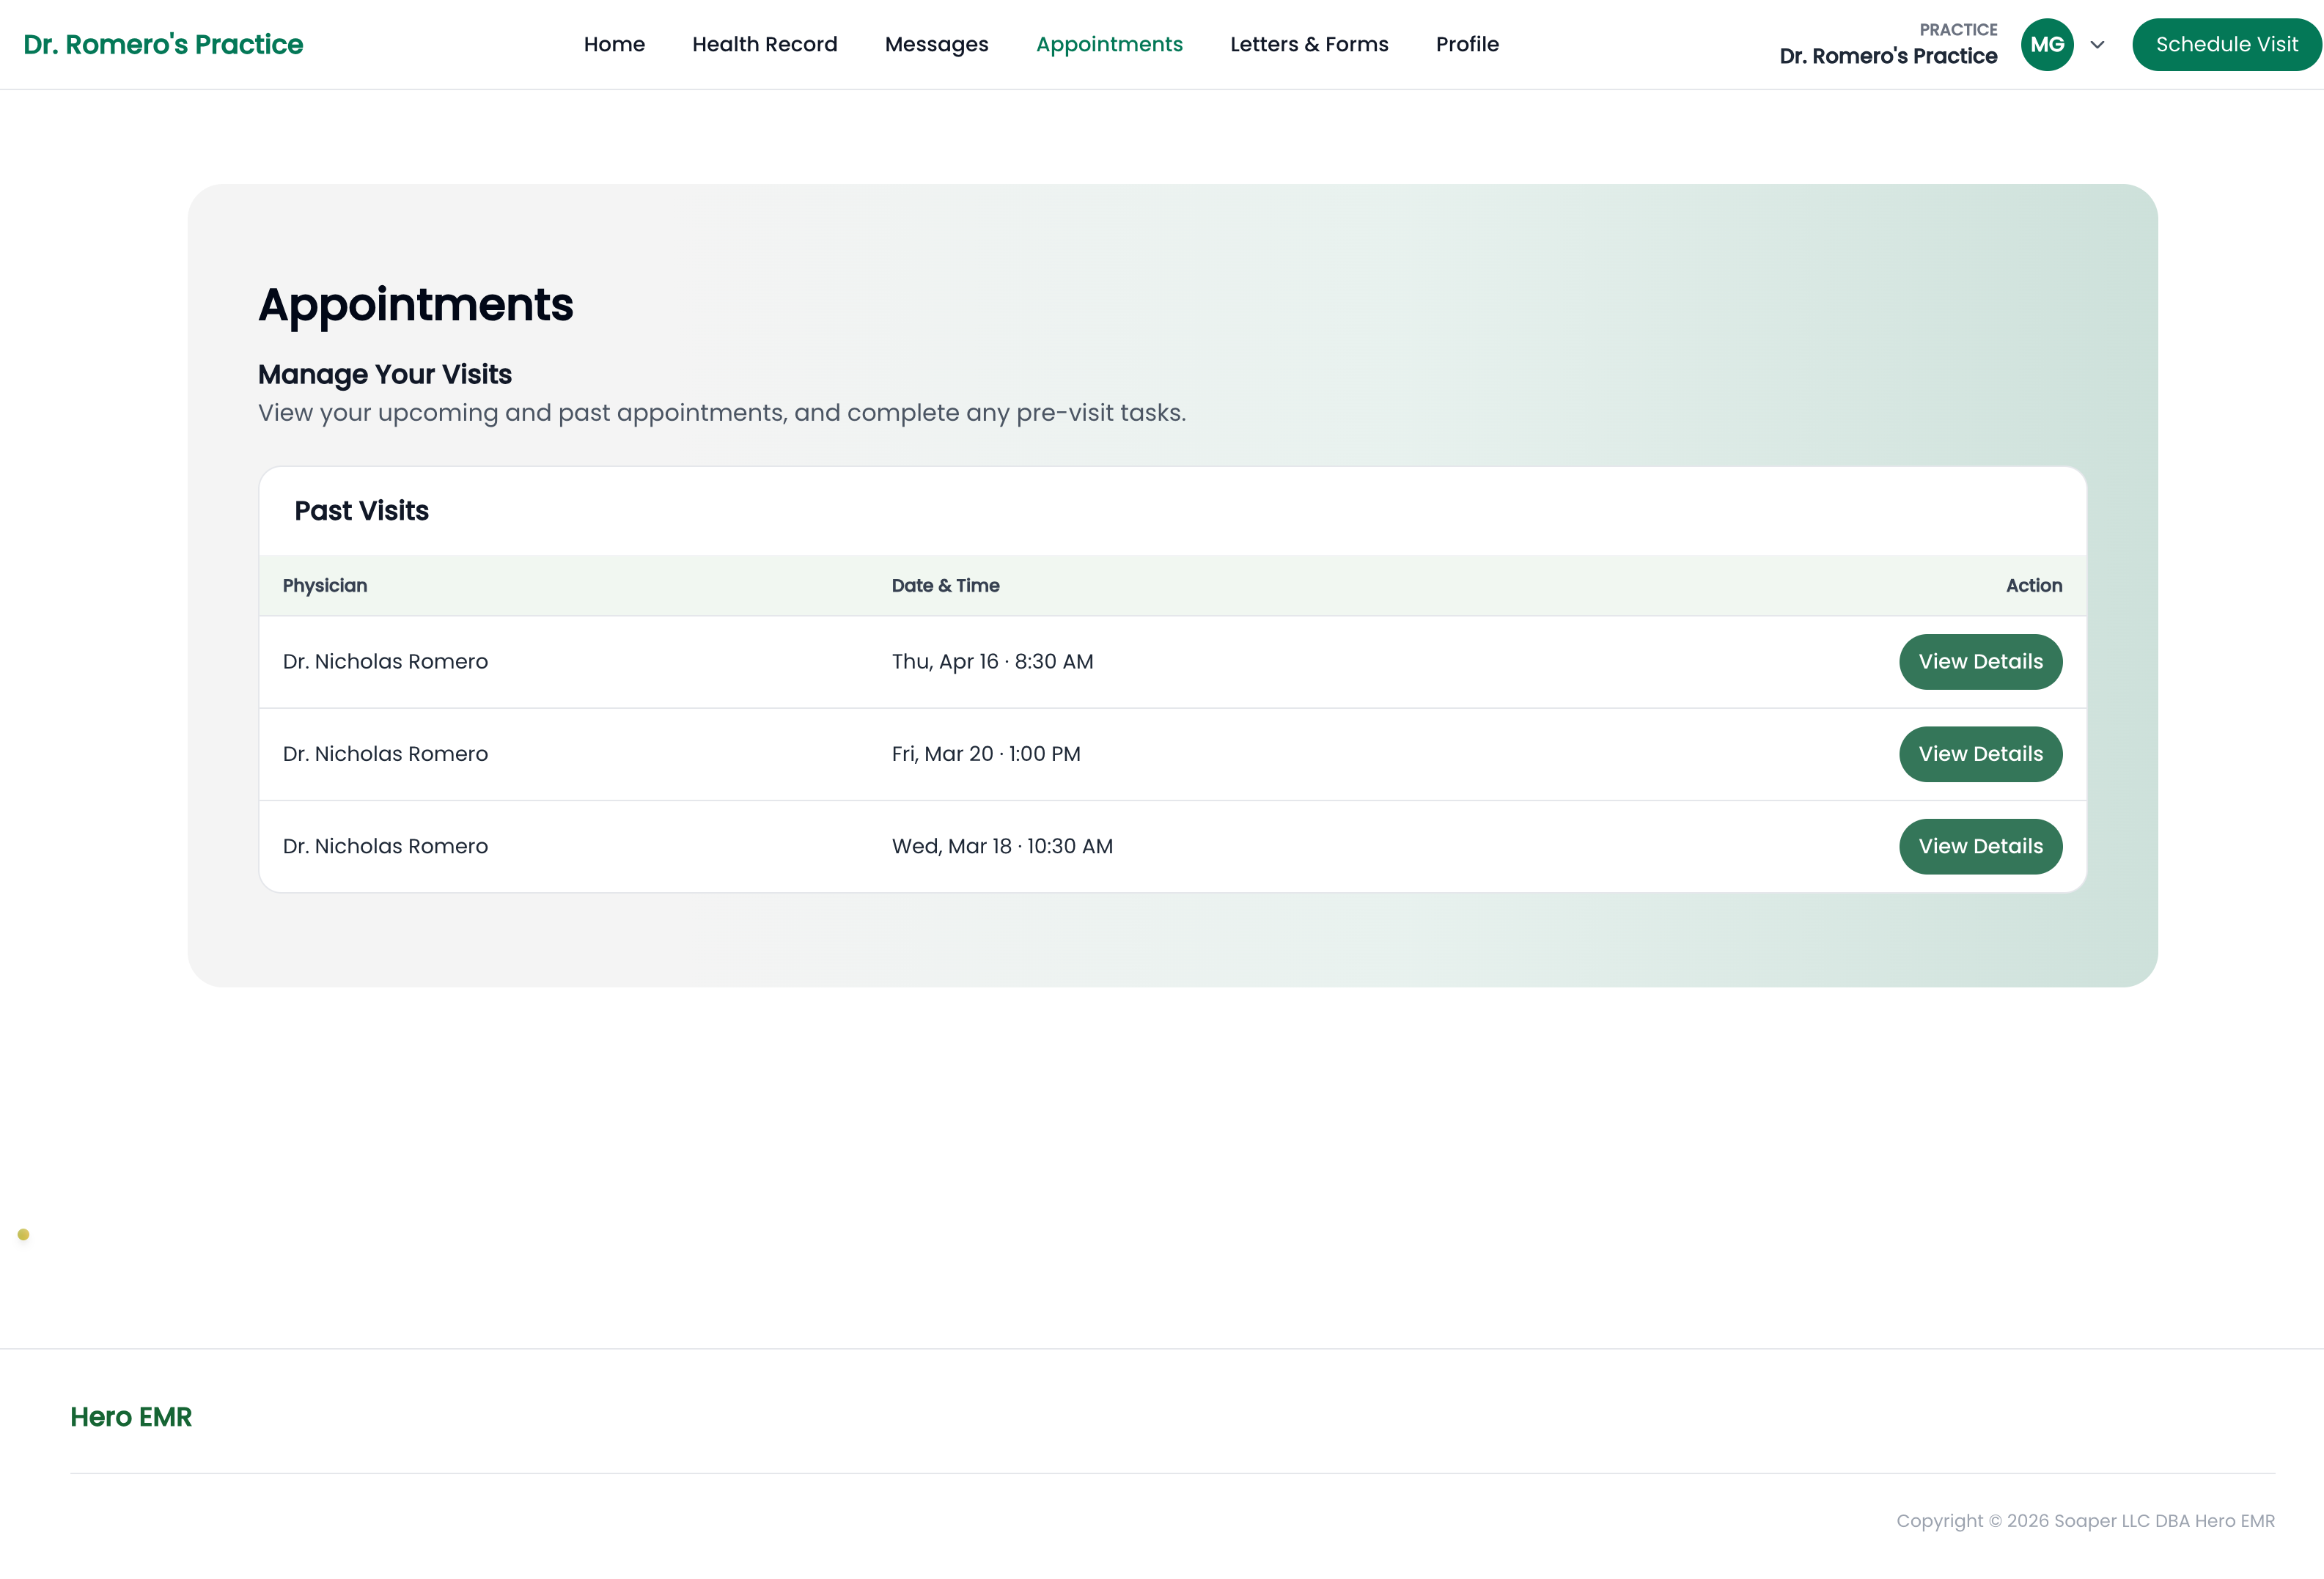
Appointments tab manages what’s booked — pre-visit tasks, cancellations with a fee preview, and reschedules.Follow-ups to schedule cards with Schedule now links (see Schedule the follow-up), and waitlist offers appear on the Appointments tab under Active Waitlist with Claim this time / No thanks (see Waitlist).
Message the care team — and where it lands
Patients read and write secure messages under the portal’s Messages tab — Your Message Inbox, with a Search messages… box and a New Message button. Every message a patient sends arrives in your clinician Inbox, routed by category, so nothing depends on someone remembering to check a separate system.
-
The patient composes with structure.
New messages require a category —
ClinicalorBilling support— and a priority —RoutineorUrgent / safety— plus a recipient chosen via theSelect Physicianpicker. They enter a subject and message, canAdd attachment, and hitSend. -
It lands in your Inbox by category.
Clinical messages arrive in the Inbox’s
Patientfolder; billing questions arrive inBilling. Opening a thread shows the fullMessage Historywith linked-encounter context and aYour Response to Patientreply box withSend to Patient. Triage, forwarding, and reply mechanics live in Inbox threads; AI-drafted replies in AI responses. -
Patients tune their own alerts.
Under the avatar’s
Notificationspage, patients control email, text, and push alerts (Messages from your care team, reminders,Quiet hours). Notification emails are alerts only — the portal reminds them “Full message details stay in your secure portal inbox.” — a privacy point patients often ask about.
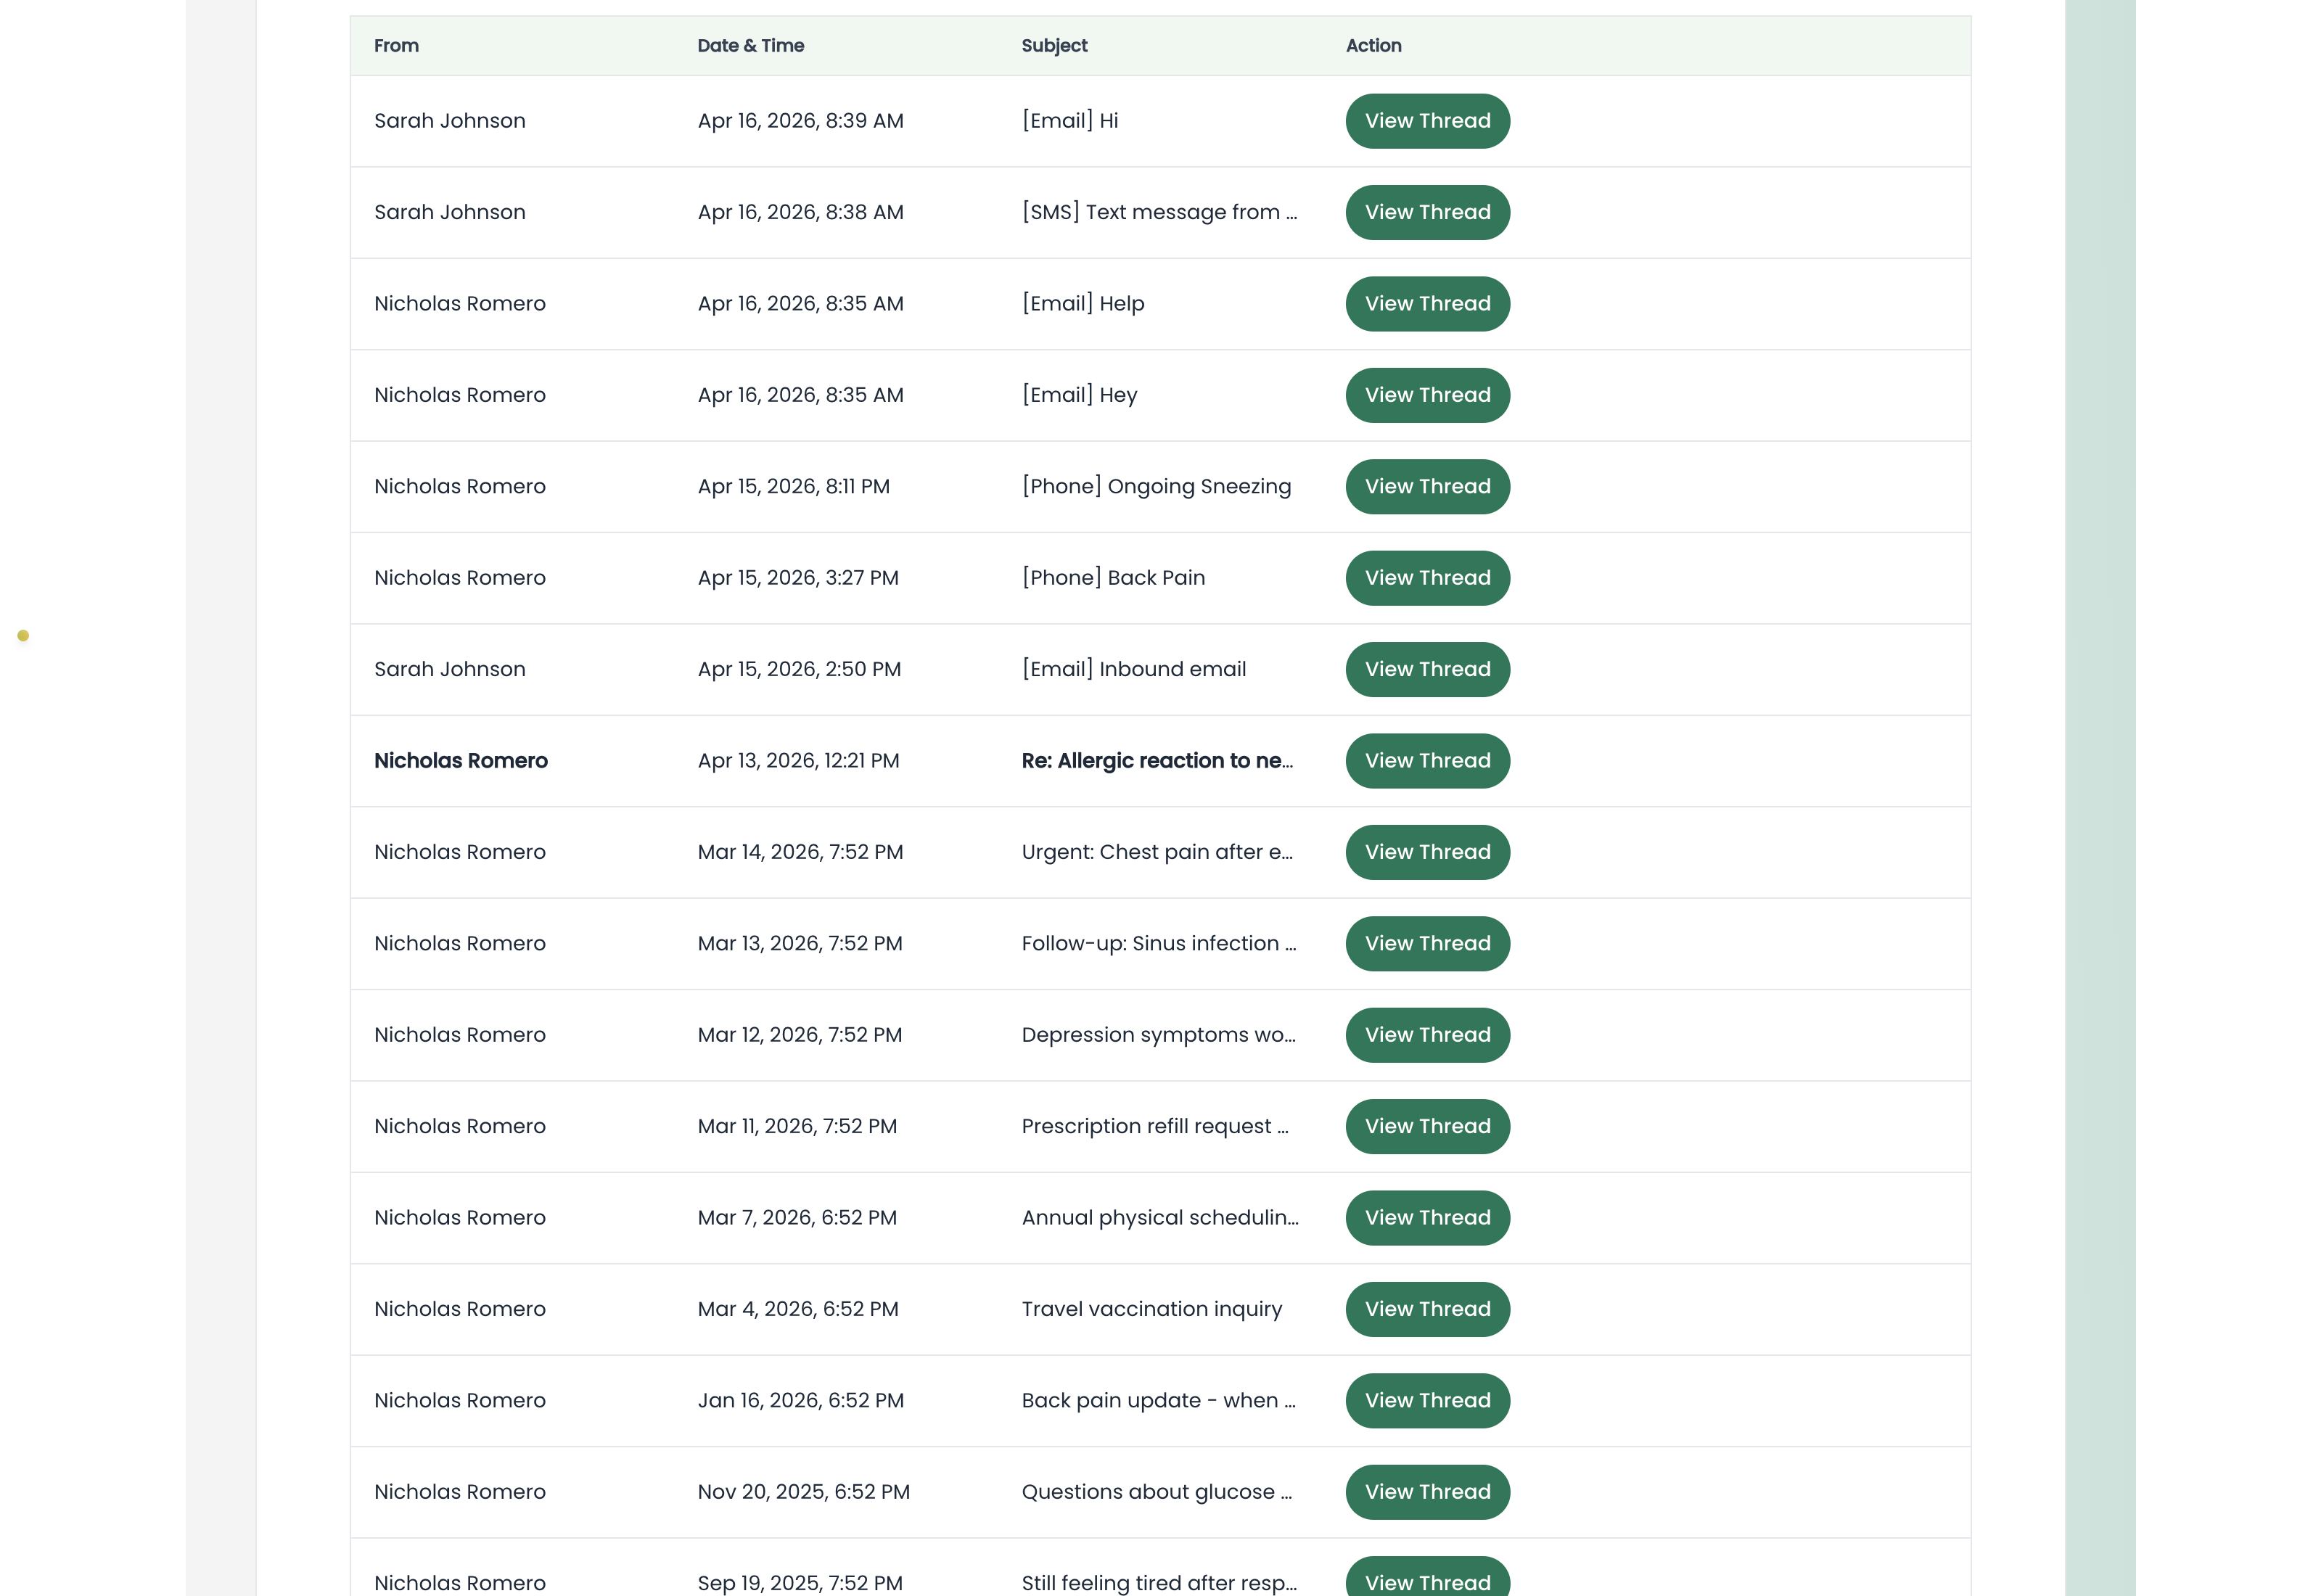
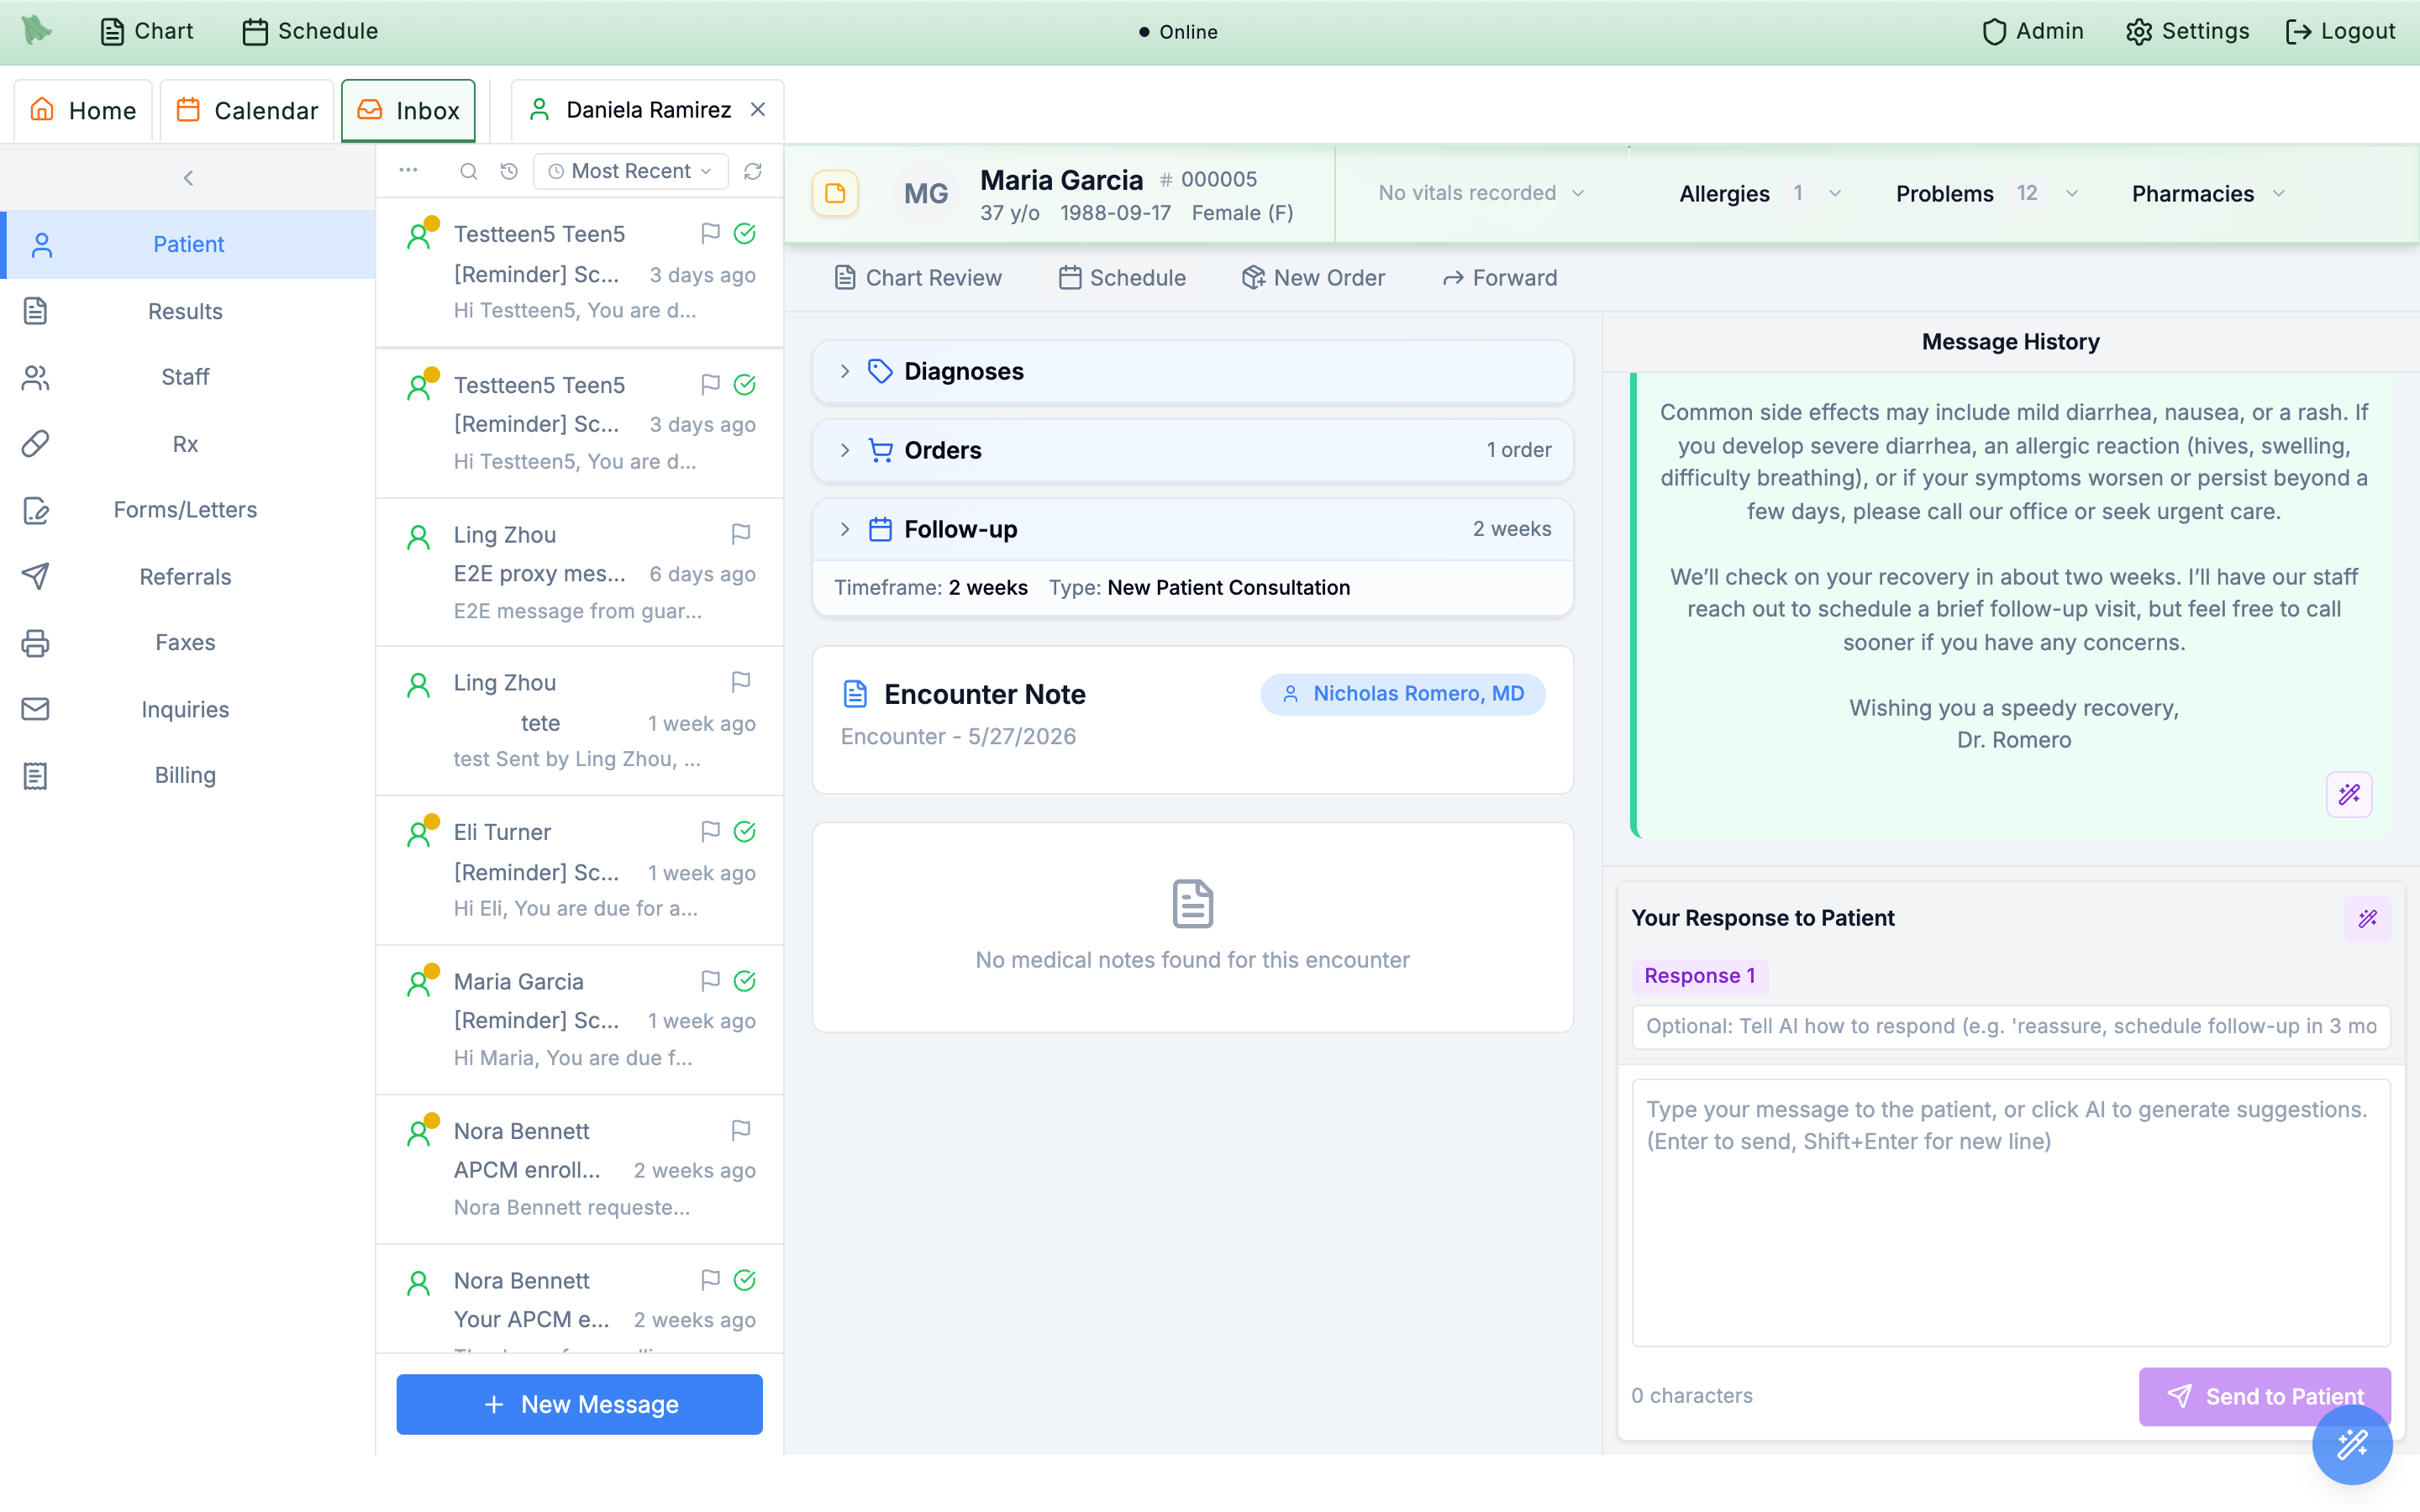
Patient folder, with thread history and the Send to Patient reply box.Urgent / safety is a triage flag, not an emergency channel. The portal is not monitored in real time — make sure your patient-facing materials say emergencies go to 911 or urgent care, not a portal message.
How patients pay their bills
Patients reach billing three ways — the Payments & Billing tab in the top navigation, the Bills & payments row in Home’s Account → Billing & Insurance panel, or Payments & Billing in the avatar menu — and all three open the same page. It leads with the Account balance and a Pay balance button, a snapshot rail (past due, due soon, Open charges, “Secured by Stripe”), and a Transactions view split across Open / Pending / Paid tabs, with an Insurance tab alongside. This section covers the patient-side checkout only — staff-side balances, statements, and collections live in Patient AR.
-
Pay a charge.
Pay chargeshows theAmount dueand aPay withchoice betweenSaved cardandLink or new card, plus anExpress checkoutrow (Apple Pay, Google Pay, Link, or card) — all powered by Stripe.Charge detailsitemizes theOriginal charge,Paid so far, status, and provider so the patient can see exactly what they owe. -
Store a card for pre-visit billing.
Add a cardsaves and authorizes a default card — this is the card your visit billing policies charge against for holds and pre-visit payments. The patient sees “Securely stored for next time.” -
Review history and statements.
Lower on the page,
Payment historycollects payments, refunds, and in-progress billing updates automatically, andStatementskeeps anything the practice has sent available for reference. -
Manage a membership, if your practice offers one.
Practices with recurring plans get a
Membershipsection with enrollment,Billing history,Invoices, payment-recovery prompts, and aCancel membershipflow that asks for a reason. Plan setup and the staff-side view are owned by Memberships.
Online payments are unavailable. The charges patients pay here are the ones produced by encounter charges and your billing policies. Trust messaging shown at checkout — “Encrypted · PCI-compliant via Stripe — This practice does not retain saved cards.” — is a useful line for your front desk to echo.
Cancel appointment? dialog (see Booking & visits), not on the billing page — point patients there if they ask what cancelling will cost.
Records, letters, and documents patients can access
The Health Record tab is the patient’s window into the chart. Everything here is downstream of clinician work: signed notes, patient instructions, and orders published by Sign & close, plus lab and imaging results released to the chart (see Results in the portal) and documents from the Media tab. The page organizes it all under pill tabs:
-
Browse the visit history.
Past Appointmentsis a searchableVisit history. Opening a visit showsPatient instructions(“Care guidance from this visit”), theVisit note, the message exchange,Diagnoses, medications from the visit, and lab/imaging orders that deep-link to their own tabs. The instructions are the ones you drafted at encounter completion. -
Pull in outside records.
An
Import Recordsbutton opensImport Medical Records, where the patient searches for their outside health system and connects via Epic to bring external records into the chart. Availability depends on the outside system supporting Epic patient access, so set expectations accordingly. -
Request letters and forms.
Letters & Formsis the patient-initiated document desk.Request New Medical Form / Letterwalks Visit → Type → (Dates) → Review, with types includingWork Excuse Letter,School Excuse Letter,FMLA Form,Paid Leave Certification,Disability Form,Travel Medical Clearance,Accommodation Request, andCustom Form Upload(the patient uploads their own PDF).My Request Historytracks submissions, and aHow it workspanel explains the flow. -
You approve; they download.
Requests arrive in your clinician Inbox under
Forms/Letters(see Inbox queues), where the physician reviews the generated PDF, can quick-edit corrections, and approves with their saved signature embedded — or rejects with a reason. Completed documents then appear to the patient underLetters & Formsand Health Record’sLetterstab with view and download actions.
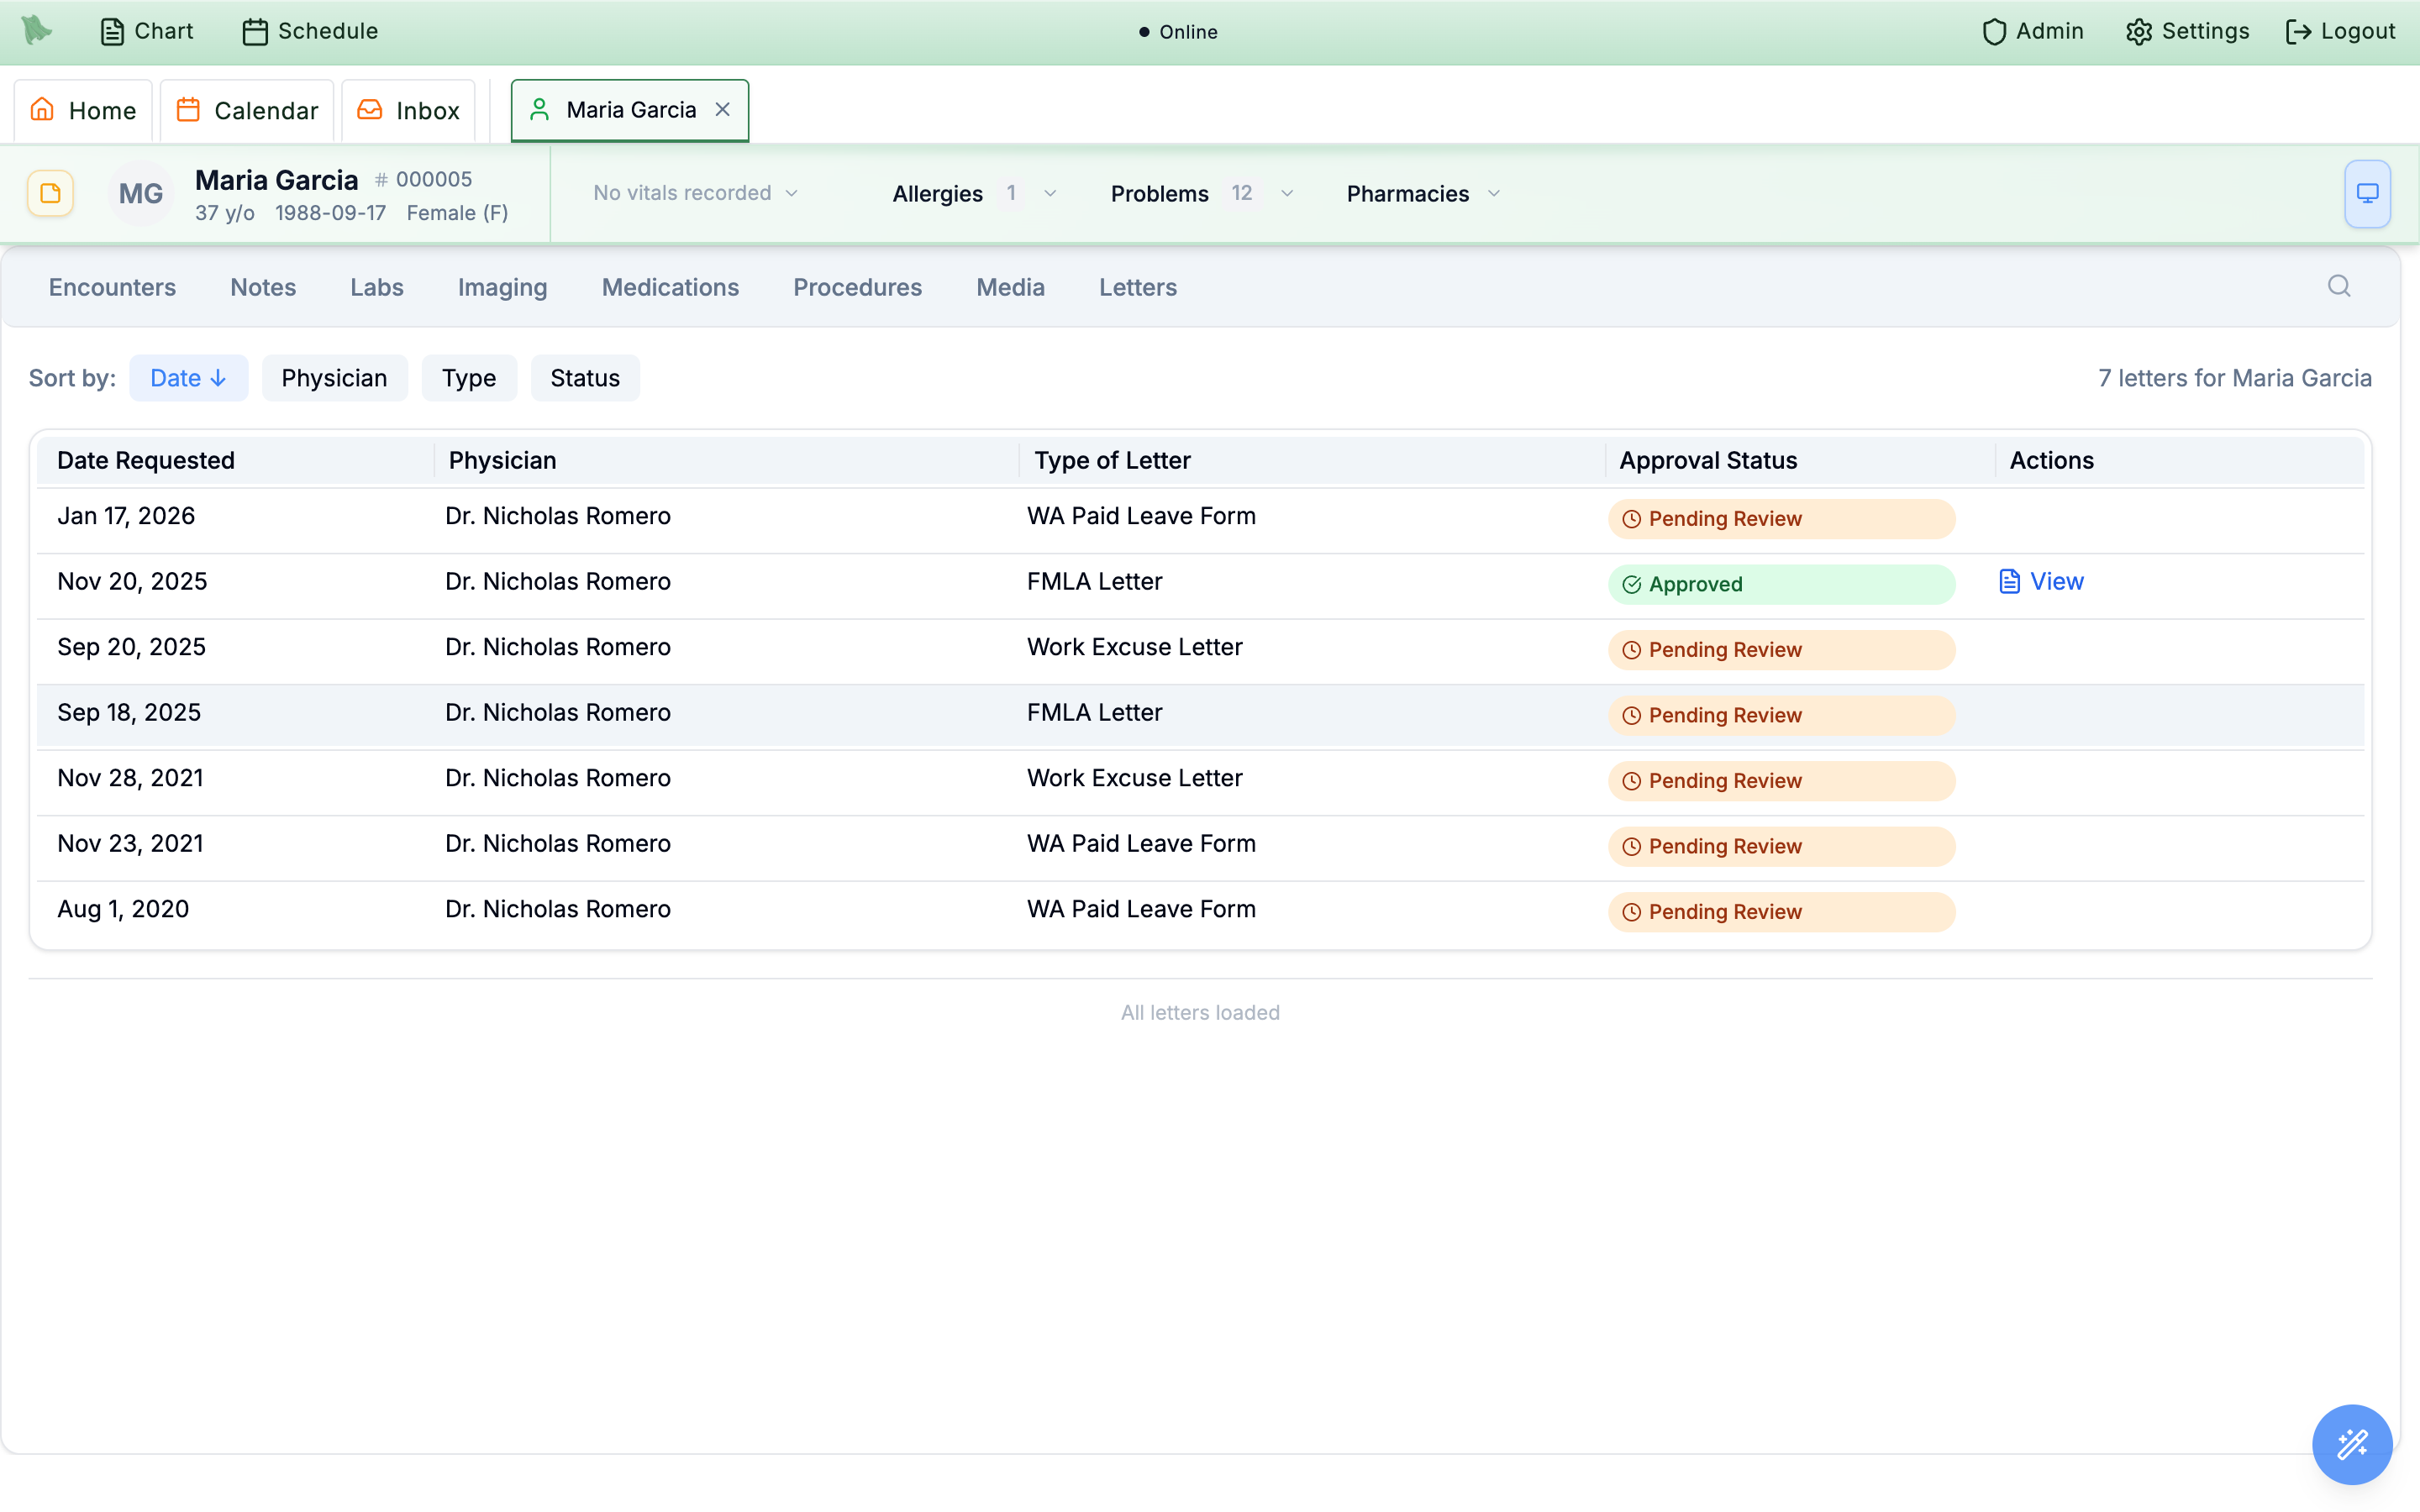
Pending Review to Approved.APCM Care Plan page (Goals, Interventions, billing history) reached from APCM surfaces on Home — it exists only when APCM is enabled for the practice (see APCM).
Need help? Email support@heroemr.com.