Lab & imaging results
Where results land and how they get back to the patient: the Results inbox, lab reports with trends, imaging reports, acknowledgment, and patient notification.
Lab & imaging results
Where results land and how they get back to the patient: the Results inbox, lab reports with trends, imaging reports, acknowledgment, and patient notification.
Find new results in the Results inbox
When a lab or imaging order comes back, Hero EMR delivers the report to two places at once: a Results folder inside your Inbox, for triage and patient notification, and the patient’s chart (Labs and Imaging tabs), for longitudinal review. Reports file themselves — Quest lab results are checked automatically throughout the workday, Genova functional-medicine results arrive as PDF reports, and radiology reports flow in from your imaging vendor. Placing the orders these results come back from happens in the encounter — see Order medications, labs, imaging & more.
-
Open the Results folder.
Click
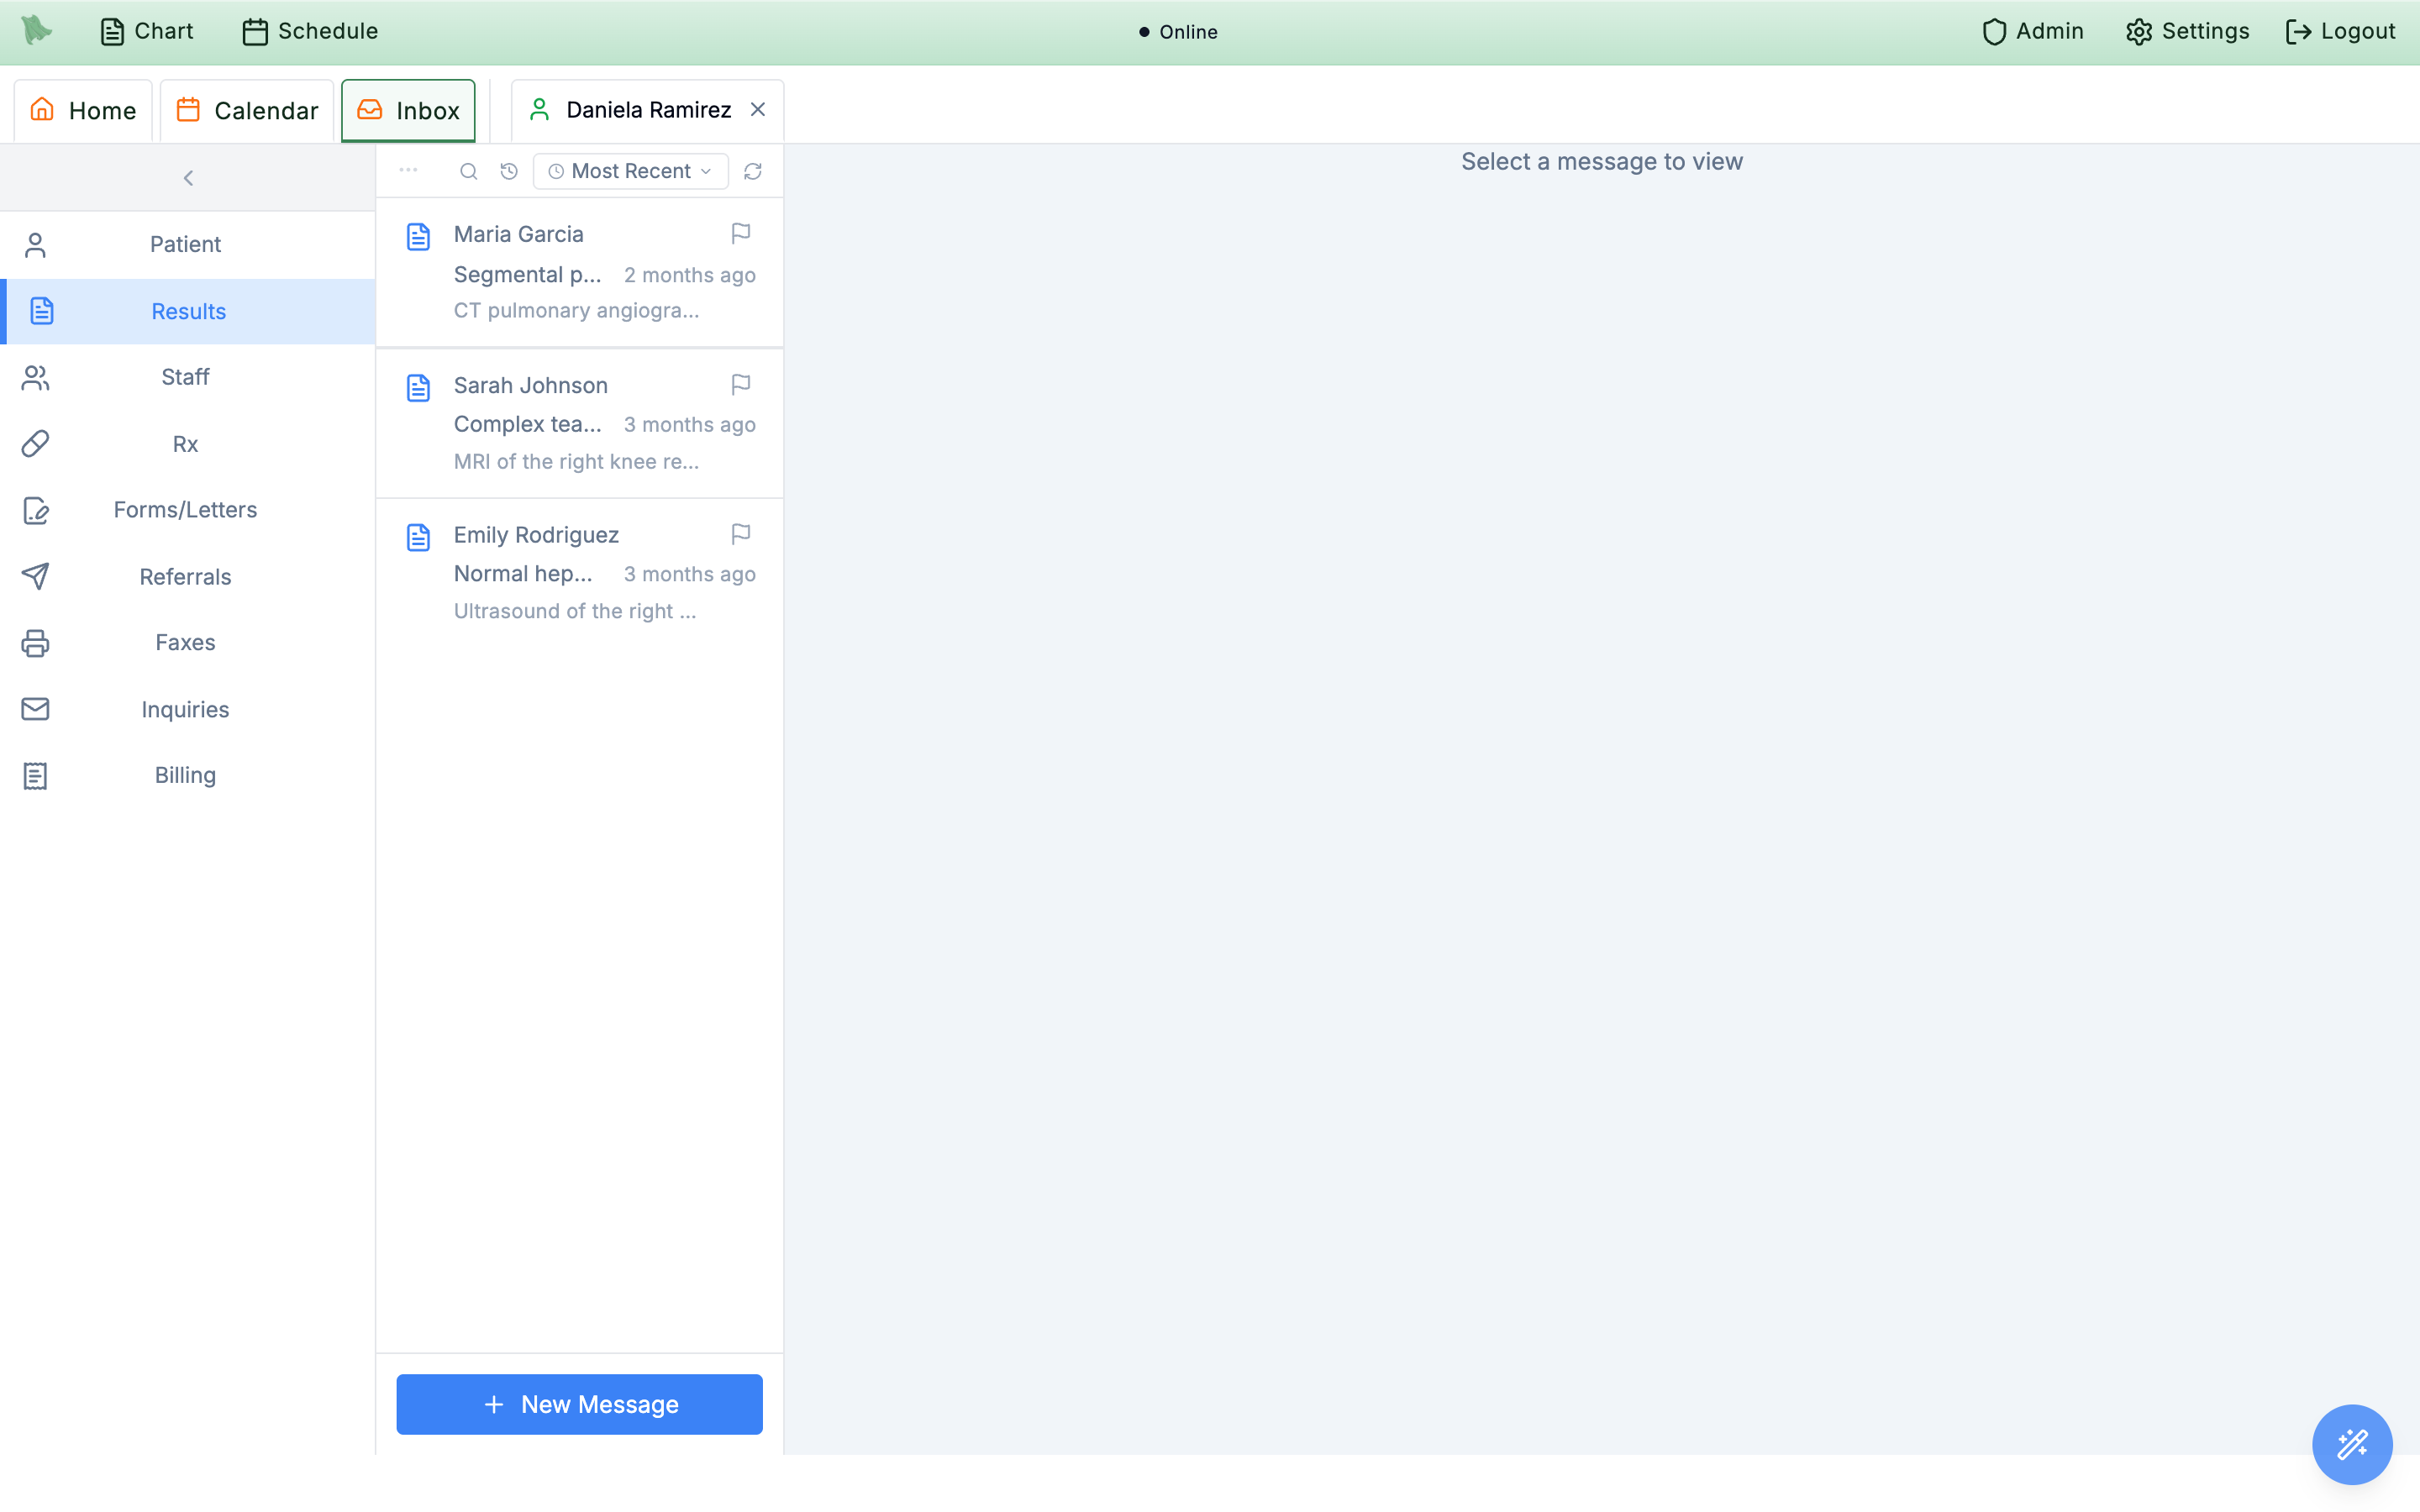
Inboxin the top tab bar, thenResultsin the left sidebar — its badge counts your unread results. The Lab Results row in the Home dashboard’s priority queues jumps straight here too (see Dashboard queues). - Scan the list. Each row shows the patient’s name, a summary built from the result (the abnormal analytes, or the study description), a relative time, and a severity pill. Unread entries are bold; opening one marks it read automatically. The list holds your 50 most recent results — anything older is on the patient’s chart.
-
Sort, search, and refresh.
The action bar offers a sort dropdown (
Most Recent,Unread First,Flagged First), a search popover (Subject, sender, body…), a refresh button (Refresh messages), and a history clock that togglesShow completed messages/Hide completed messages.
| Severity | Pill | What it means |
|---|---|---|
Normal | Green | Nothing flagged — every value in range, no concerning findings. |
Abnormal | Amber | At least one value or finding carries an abnormal flag. |
Critical | Red | Any critical-flagged value makes the whole entry critical — triage these first. |
Review a lab report and trend the values
A lab result lives in two views: the Results inbox entry shows the full analyte report for the draw you’re reviewing, and the chart’s Labs tab puts the same analytes in a multi-date trend table so you can see where each value is heading.
-
Open the report.
Click the entry in
Inbox → Results. The header shows the summary title, completion date, and anyRequisition:/Accession:identifiers, with an uppercase severity pill (NORMAL/ABNORMAL/CRITICAL). -
Read the
Test Resultstable. One row per analyte, with columnsTest(the LOINC code sits under the name),Result,Unit,Reference Range, andFlag. Out-of-range rows are tinted and marked — an amber up arrow for high, a blue down arrow for low, and a red warning triangle for critical values — and aCritical valuesorAbnormal valueschip banners the table when anything is flagged. AnAdditional Detailssection collapses the remaining metadata. -
Open the original PDF when there is one.
Labs that return a document (Genova results, for example) add a
View PDF reportbutton that opens the original in the document viewer. -
Trend it from the chart.
The chart’s
Labstab lists every lab order withDate/Test/Provider/Statuscolumns (statuses:pending,in_progress,completed,cancelled). UseSort by:Date,Test, orStatus, andFilter by:AllorBy Me(orders you placed). -
Use the trend preview.
Click a row to open the split preview (double-click for full screen;
Hide Preview/Show Previewcollapses the pane). The preview is not a single report — each component is matched across all of the patient’s lab orders, giving one column per result date with the selected date highlighted. Rows showRef Range & Unitsunder the component name and red up/down triangles on out-of-range values, so a calcium drawn alone trends against the same analyte inside a CMP.
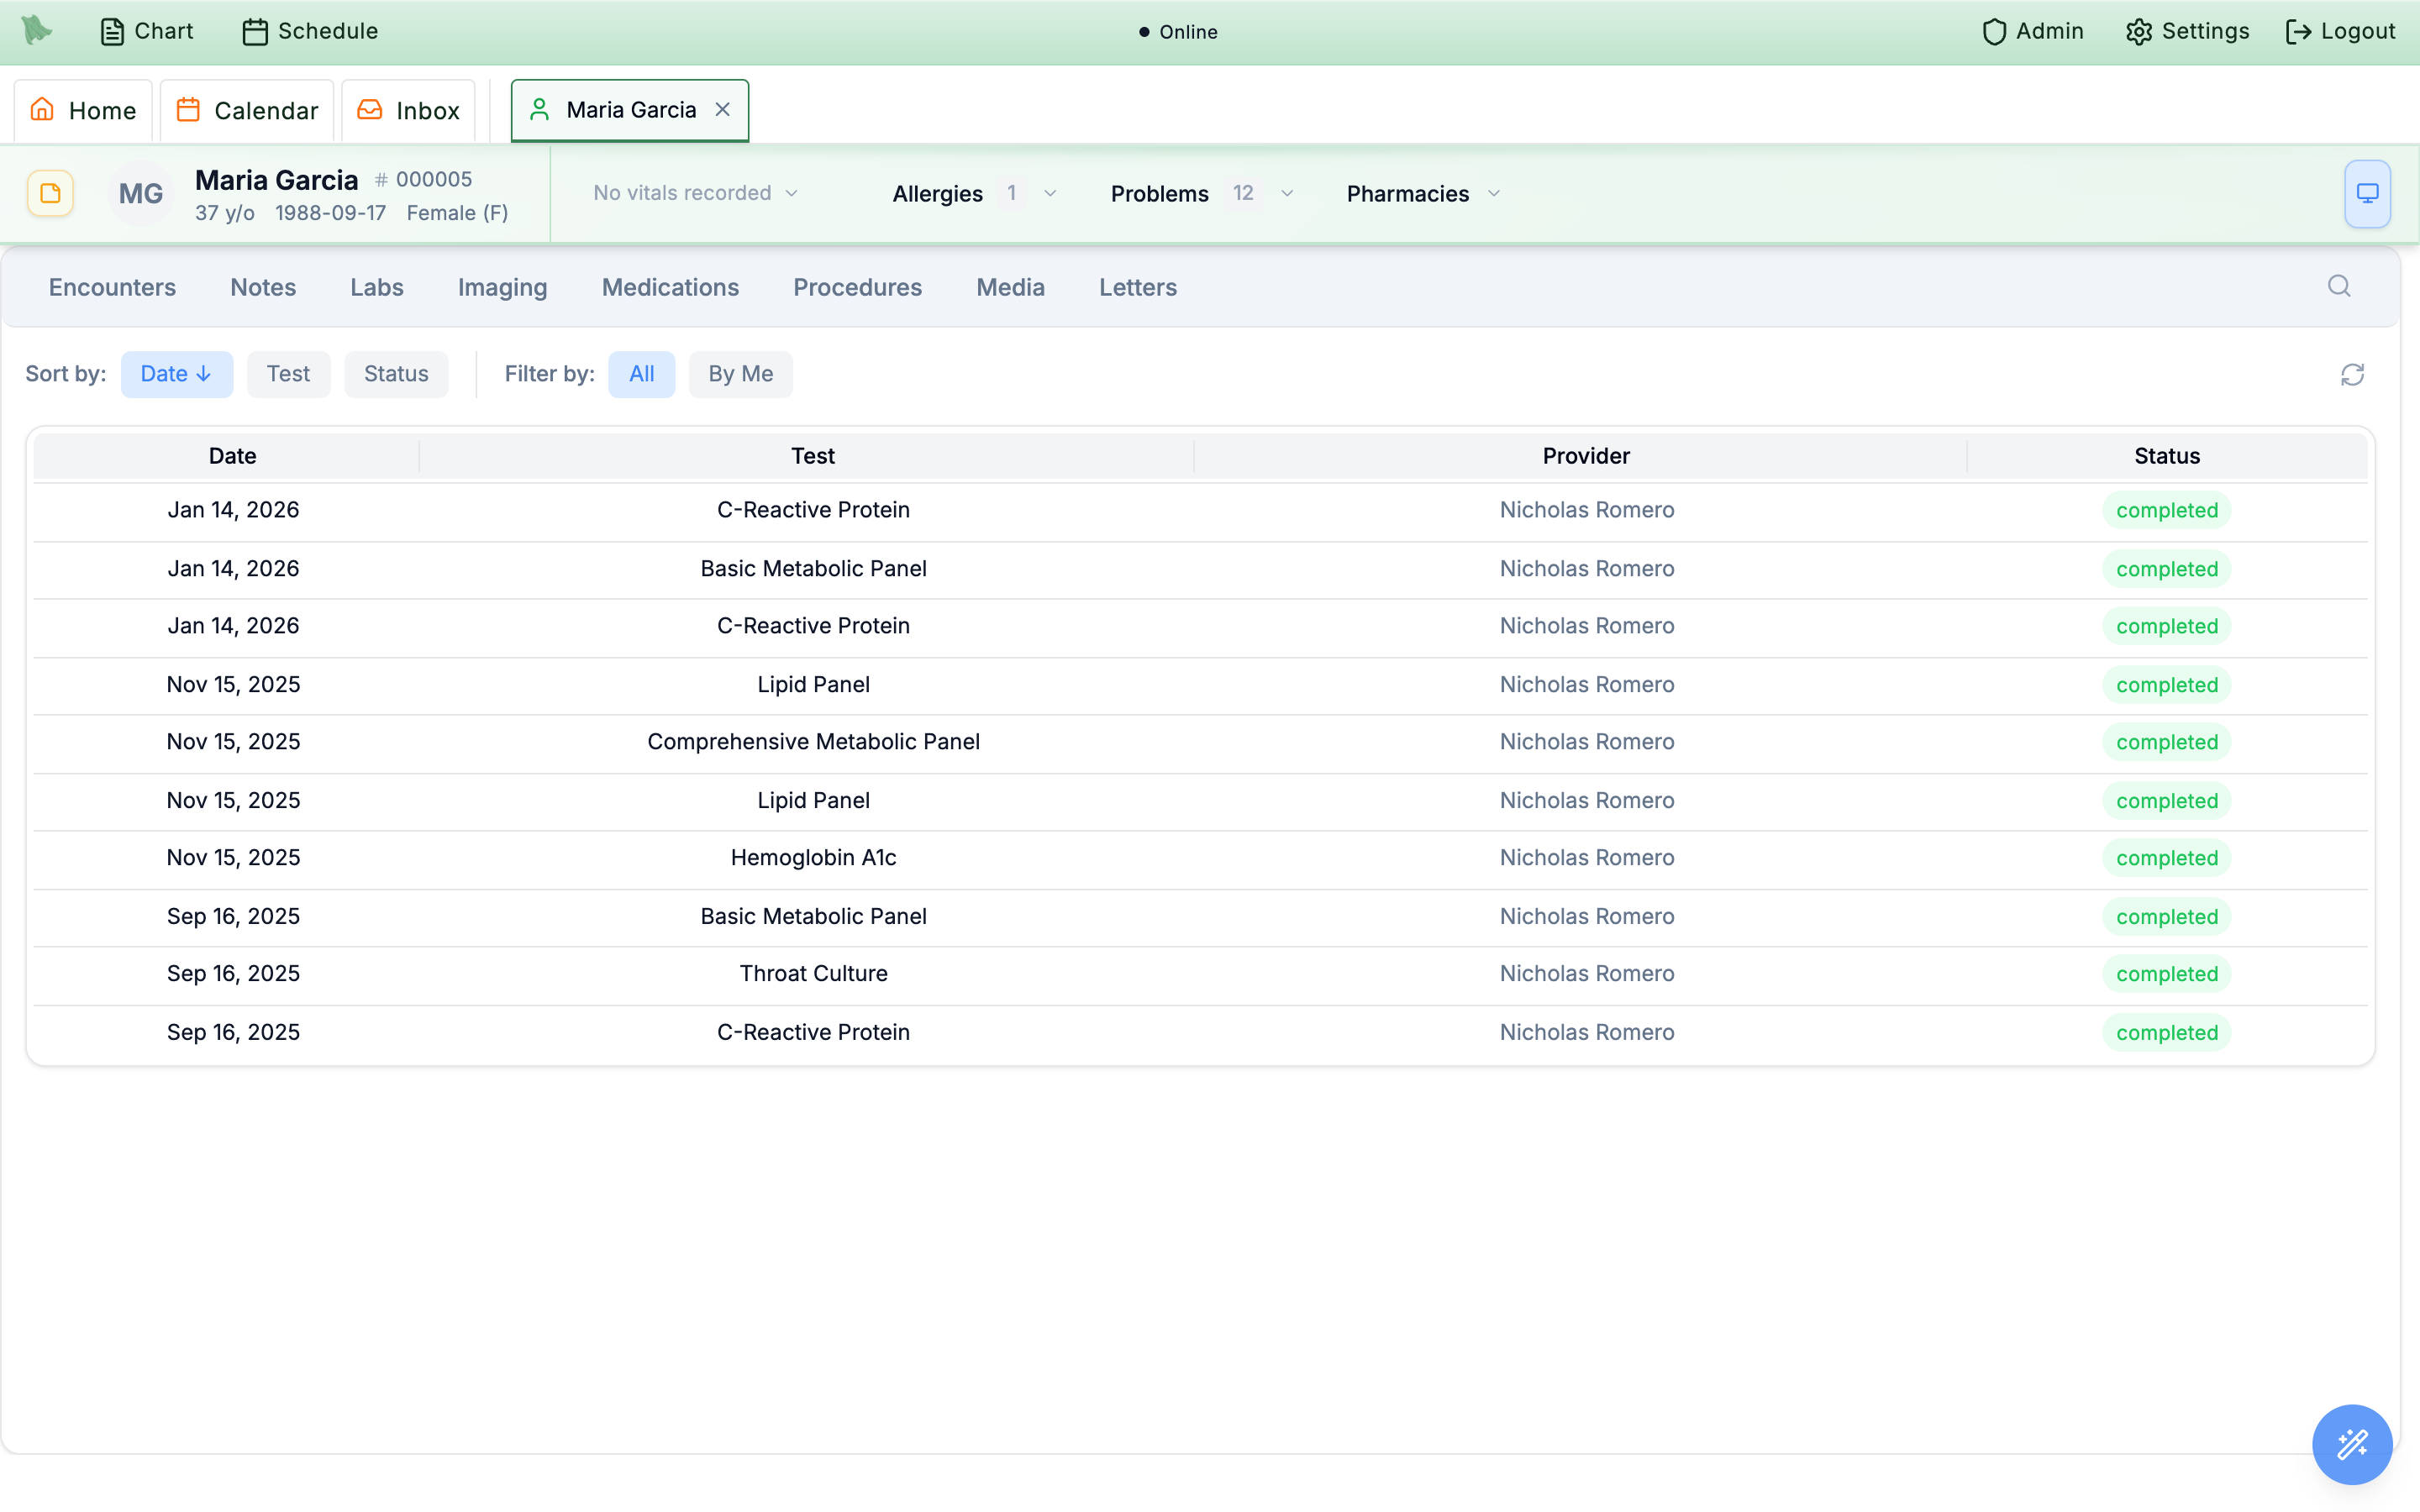
Labs tab: every order with its status, sortable and filterable to just your own.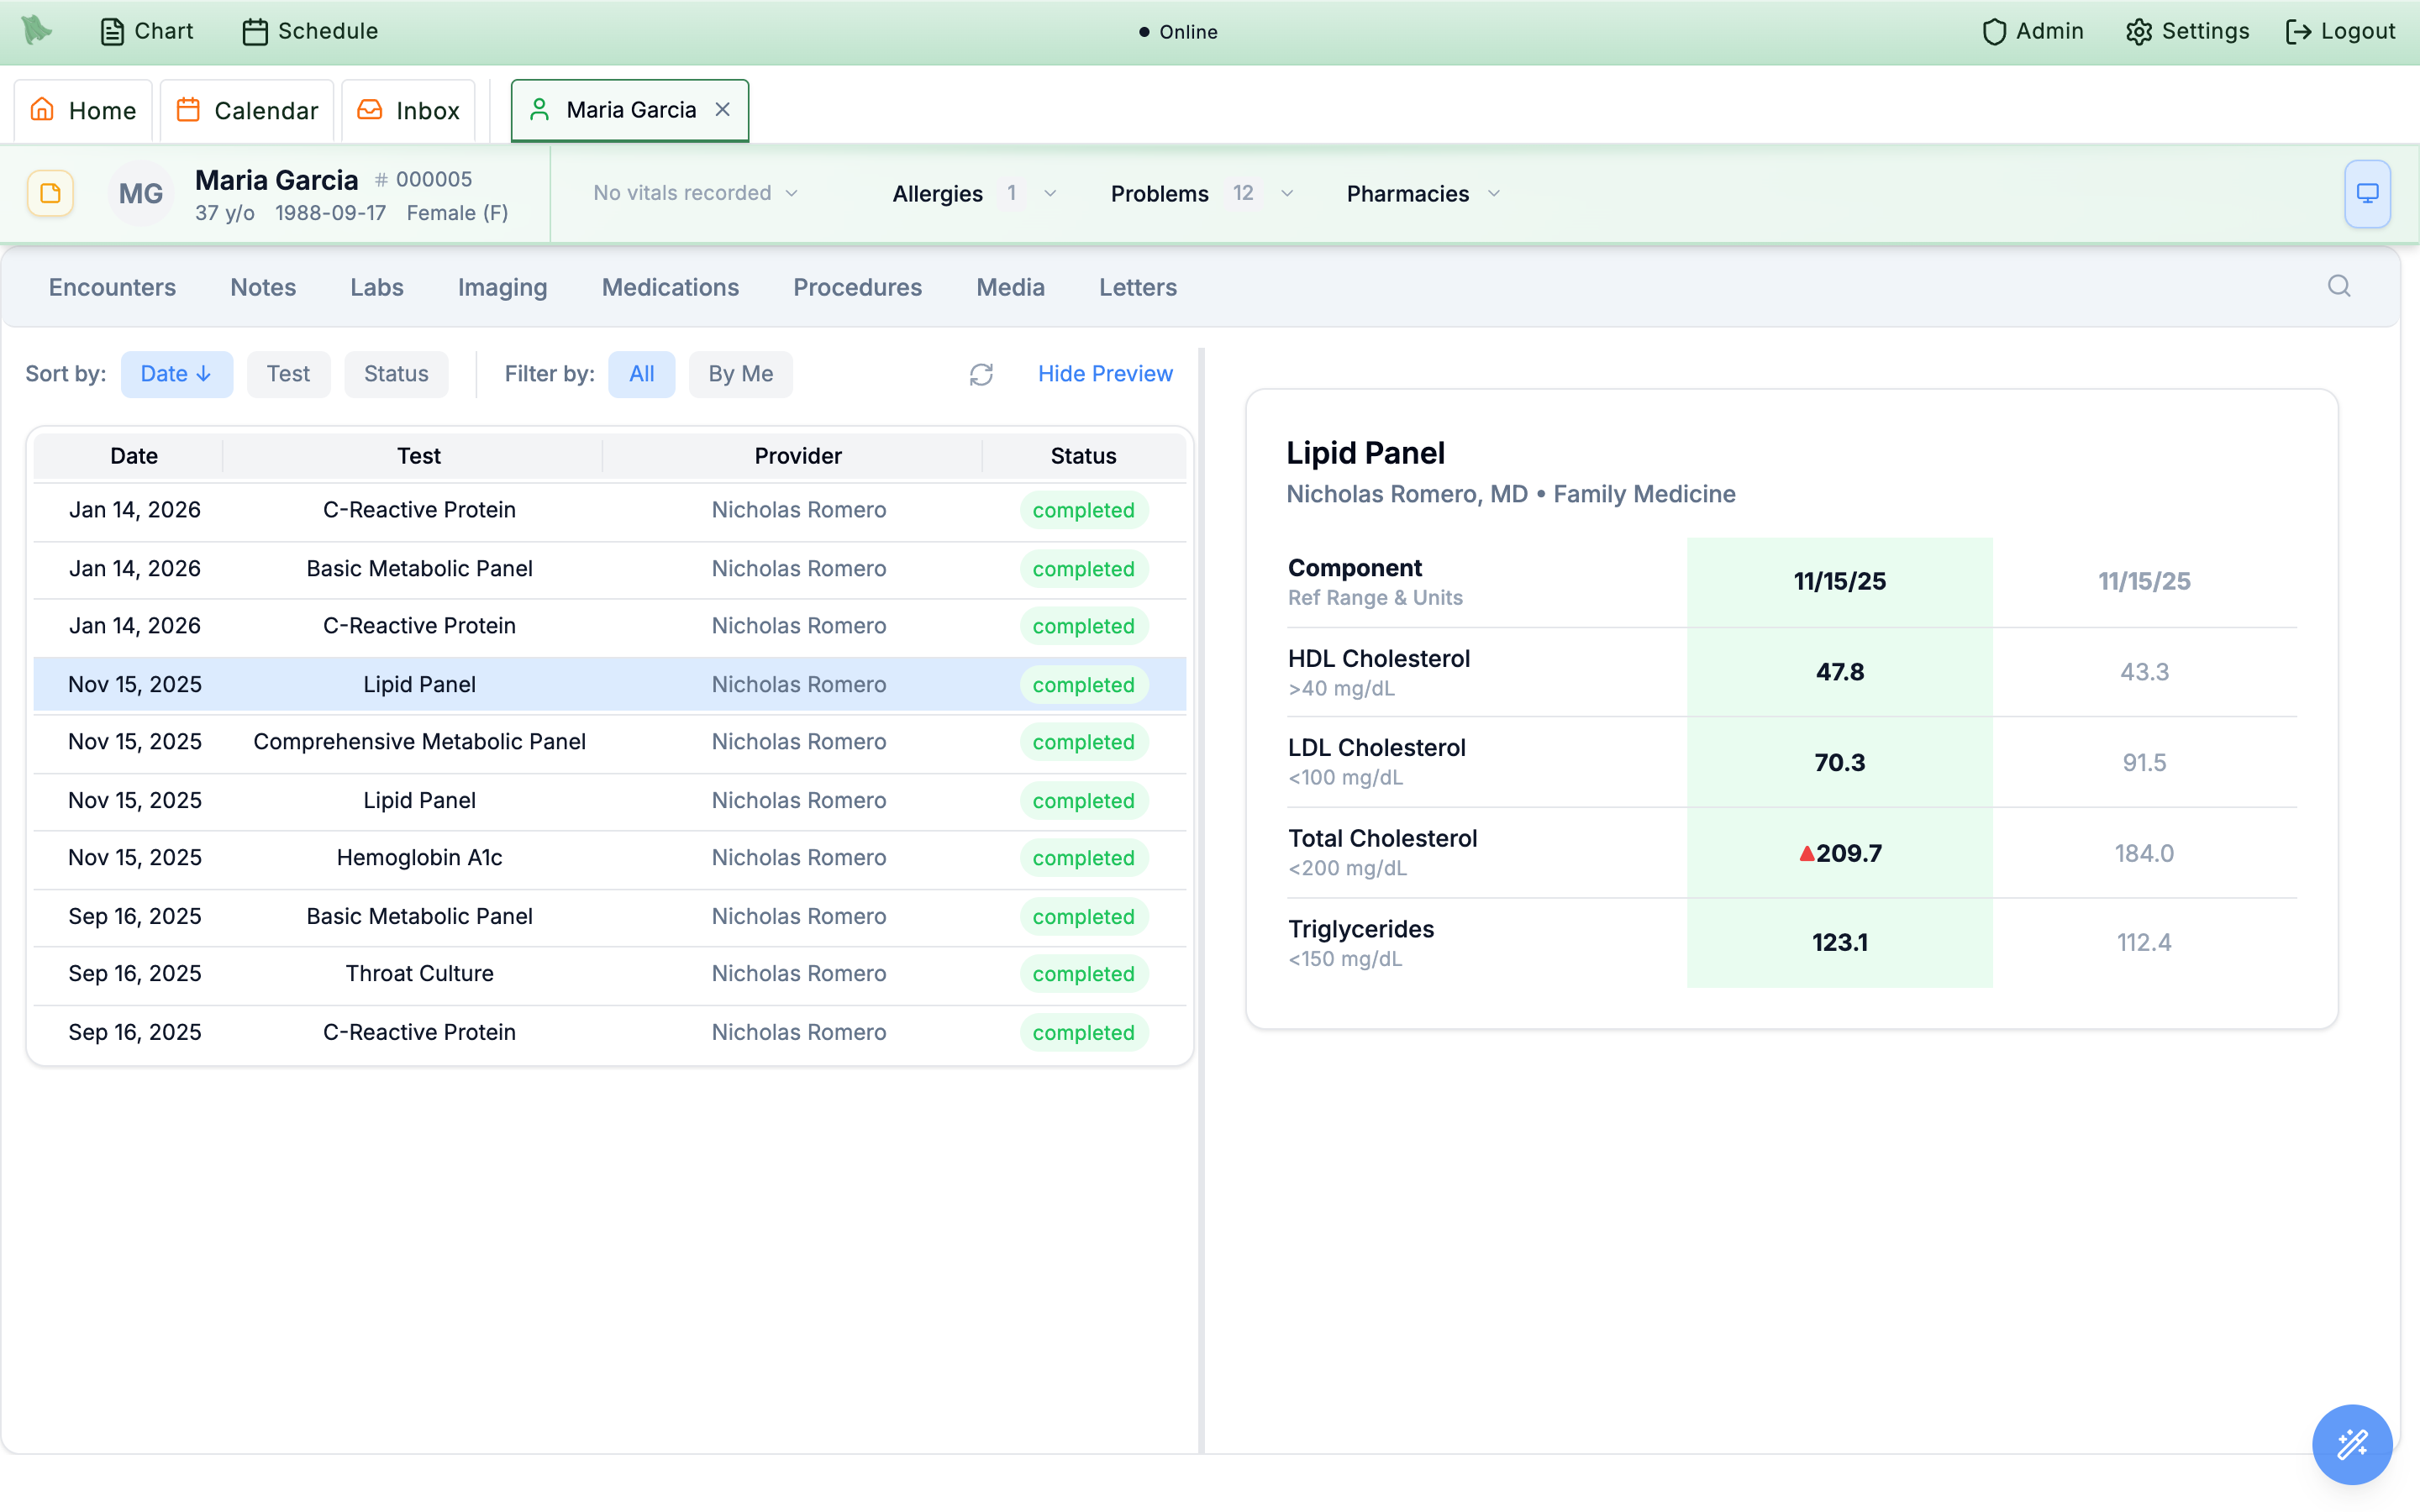
Refresh all Quest order statuses — forces an immediate re-check.
Add to Note button on a lab panel only appears when you open it from inside the note writer, not in plain chart review.
Review imaging studies and radiology reports
Imaging follows the same two-surface pattern: the chart’s Imaging tab tracks every study across its lifecycle, and when the radiologist’s final report comes back it also lands in your Results inbox as its own entry.
-
Scan the
Imagingtab. Studies list withDate/Modality/Study/Provider/Status/Contrast/Actionscolumns, withSort by:Date,Modality, orStatusandFilter by:AllorBy Me. Contrast readsWith Contrast,Without Contrast, orWith & Without Contrast. The list loads as you scroll, ending withAll imaging studies loaded. -
Know the lifecycle.
The
Statuspill walks each study through its life:pendingsubmittedscheduledimagedcompletedreviewedcanceledfailedTracking outstanding orders and chasing studies that stall belongs to referral & order tracking. -
Open the report.
Click a study for the split preview (double-click for full screen). The report card splits the radiologist’s text into
Technique:,Findings:, andImpression:sections (or a singleReport:block), plusAccession Number:,Technical Details:from vendor metadata, and a Read by line naming the radiologist. Concerning studies are marked under the title with a warning icon —URGENTfor critical flags orAbnormal Findings— and studies brought over from Epic carry anImported from Epicbadge. -
Watch the Results inbox for finals.
When the radiology vendor returns the final read, you get a Results entry with the study description, date, severity pill, an
Indicationsection, and the full report text — triage it like any other result.
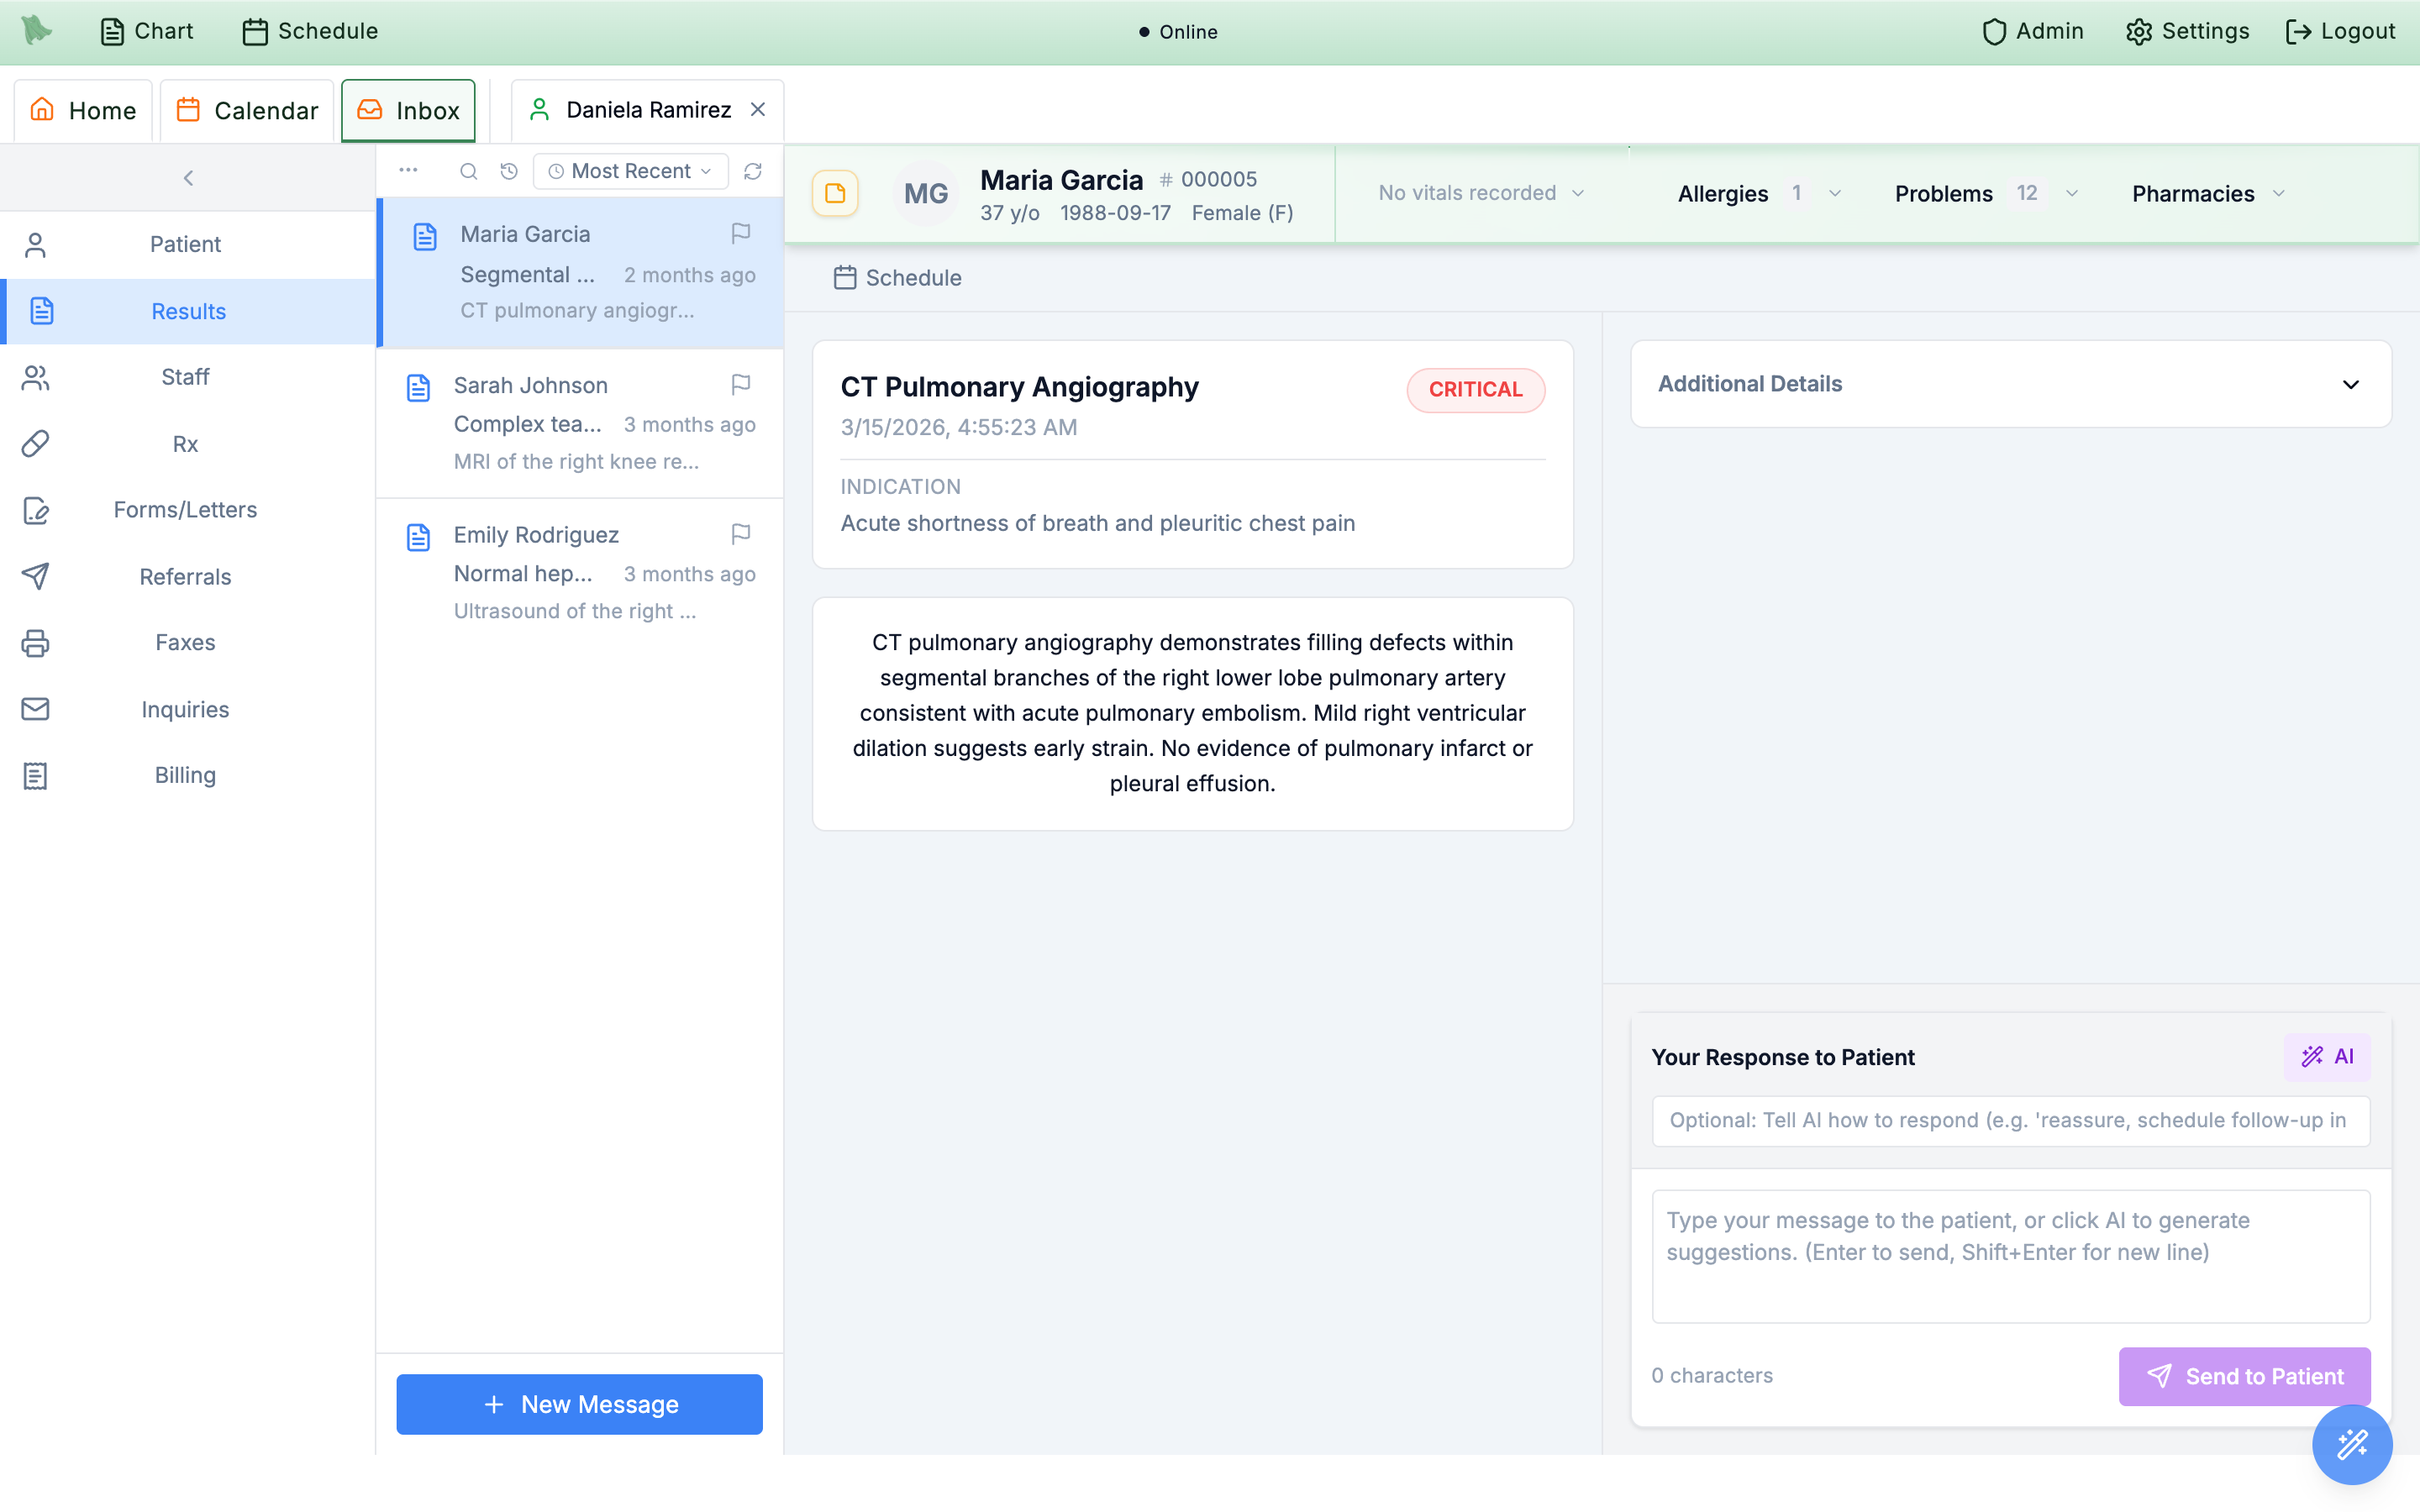
CRITICAL badge, indication, and full report, with the patient-reply panel below (see Notify the patient).Order transmission failed: <study>) with an Order Transmission Error banner explaining why. Treat these as work items — re-send or phone the order rather than assuming it went through.
Acknowledge, flag, and complete results
The Results folder is a worklist, and each entry carries its own read, flag, and completion state. Opening an entry marks it read immediately and decrements the sidebar badge; everything else lives in the right-click context menu on a list entry, or the More (…) menu in the action bar.
| Action | Where | What it does |
|---|---|---|
Mark as read / Mark as unread | Right-click menu (More menu: Mark as Unread) | Toggles the read state — marking a result unread restores its bold style and badge count if you opened something you’re not ready to handle. |
Flag / Remove flag | Right-click menu (More menu: Flag Message / Remove Flag) | Marks an entry that needs follow-up; the Flagged First sort lifts flagged entries to the top of the list. |
Mark as complete | Right-click menu (More menu: Mark as Complete) | Files the entry out of the working list when you’re done with it. |
Mark as incomplete | History view (Show completed messages) | Reactivates a completed entry back onto the working list. |
After you reply to the patient from a result (next section), a green Response Sent confirmation with a timestamp appears under the compose box — your record that the result was communicated. Read, flag, and response states are stored per entry on the server, so they survive reloads and stay consistent across your devices.
Mark as Complete just files the entry. It hides the result from your working list and records a completion timestamp — it is not a separate clinical attestation. The Response Sent record is what shows the patient was told.
Notify the patient of a result
Every result entry ends with a built-in compose panel, Your Response to Patient, so you can close the loop without leaving the report. Write the message yourself or start from an AI-drafted suggestion — either way, nothing goes out until you send it.
- Write the message. Type into the compose box — Enter sends, Shift+Enter adds a line, and dot-phrases work here just like in other message boxes.
-
Or let AI draft it.
The purple
AIbutton opens theAI Suggested Responsesmodal. Leave the optional instruction field blank for two contrasting drafts, or steer it (Optional: Tell AI how to respond (e.g. 'reassure, schedule follow-up in 3 months')) for one tailored draft. Each card is labelledRecommended,Conservative, orProactive, explains its rationale in italics, and may cite aSupporting Evidencelist. Normally the modal showsGenerating responses...for a few seconds while it drafts; if your practice has background pre-generation enabled, drafts are prepared as each result is ingested and the modal opens with them already waiting. -
Pick, edit, and send.
Click a card to load it into the compose box — a
Using AI Response #1tag shows which draft you picked — then edit freely and clickSend to Patient. The message goes out with subjectRE: <result summary>, the entry is markedResponse Sentwith a timestamp, and any reply continues as a regular thread in the Patient folder. -
Arrange follow-up care if needed.
The
Schedulebutton in the toolbar above the result opens the standard scheduling modal for that patient, so an abnormal result can become a booked visit on the spot.
What the patient already sees in the portal
Patients with records access see their own results in the portal’s Health Records screen: a Lab Results tab that expands each order into analyte values with normal/abnormal/critical coloring, and an Imaging tab (Imaging Studies) that shows study status and the radiology report text once it’s final. Your reply from the Results inbox arrives in the portal’s Messages as a normal secure thread. For the patient-side tour and how records access is granted, see Records in the portal.
Need help? Email support@heroemr.com.