Documents & media
The chart's filing cabinet: browse the Media tab, upload files, let automated import extract data, group multi-page documents, view and edit details, and find signed forms.
Documents & media
The chart's filing cabinet: browse the Media tab, upload files, let automated import extract data, group multi-page documents, view and edit details, and find signed forms.
Browse a patient’s documents
The Media tab on the patient chart is Hero EMR’s document home: scanned records, clinical photos, signed forms, and imported faxes all live here, as single files or multi-page grouped documents. The header reads Patient Media with a live document count, a Refresh button, and the primary Upload Media button. Every document carries one of ten types:
-
Open the tab.
In the chart tab bar,
Mediasits betweenProceduresandLetters. A chart with no documents shows No media files found for this patient with anUpload First Filebutton. -
Filter with the chips.
Two chips sit above the list:
AllandPaperwork.Paperworknarrows the list to signed previsit forms only (see Signed forms & patient visibility). -
Read the table.
Columns are
Document Name,Type,Date,Pages, andActions, with a color-coded icon per document type (green for a Lab Report, blue for an Imaging Report, and so on). TheDatecolumn shows the clinical document date when one was captured, otherwise the upload date. Grouped multi-page documents and single-file uploads share one list — thePagescolumn tells them apart. When everything has loaded, the list ends with All documents loaded. -
Open a document.
Single-click selects a row; double-click it — or click the eye icon (
View) — to open the document viewer.
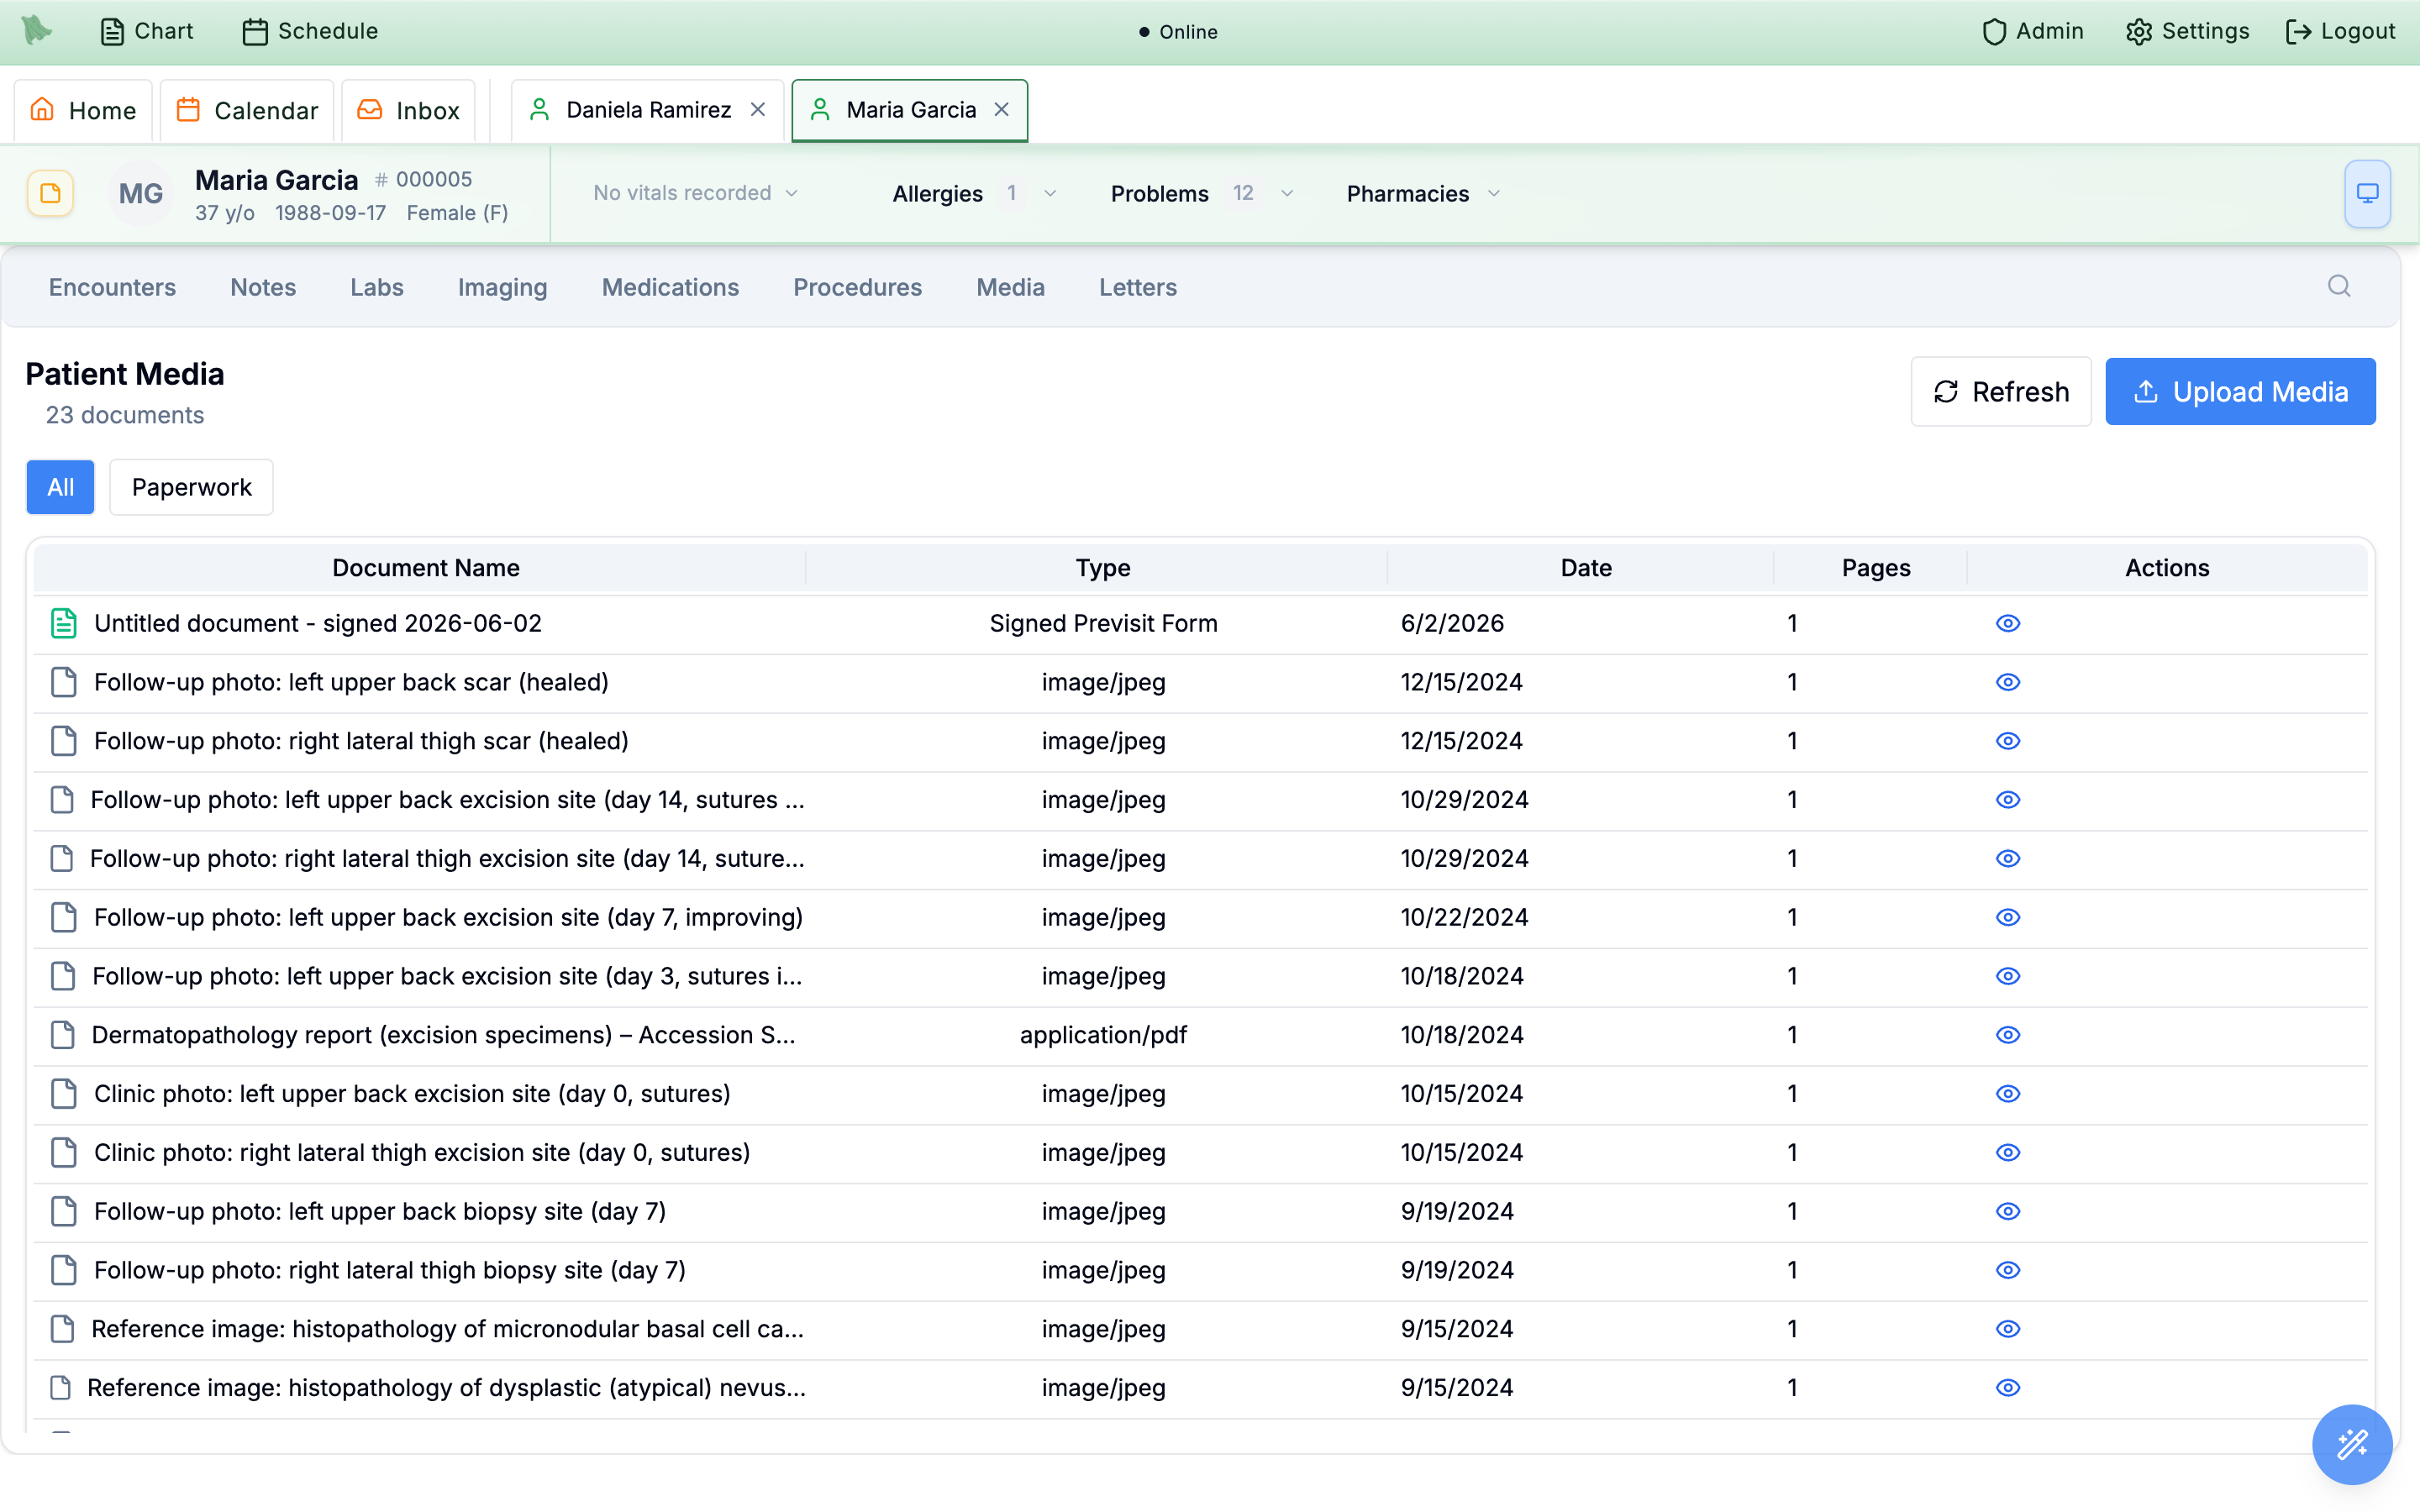
Upload Media in the header.Read fax inbox and external record import jobs., Link, forward, and complete document triage., or Import documents into the medical record. — granted under Staff & assistants.
Upload files to the chart
Upload Media opens a dialog titled Upload Media for the patient, and the first choice is the Upload Mode: let Hero EMR read the file and extract clinical data, or just store it.
Automated — Extract data
- Pre-selected by default. The file picker accepts PDF, JPEG, PNG, WebP, HEIC/HEIF, and plain-text files. A multi-file batch is stricter: it also accepts TIFF but rejects text files with Unsupported file type, so send a
.txtthrough on its own. - “Automated import extracts medical data from PDFs, images, and text files. The extracted records will be reviewed before adding to the patient’s chart.”
- One file runs the Automated Import review; two or more run batch grouping.
Manual — Store file only
- Stores the file with no data extraction.
- Adds a
Media Typepicker —Clinical Photo(JPEG/PNG/GIF),Medical Document(PDF),Video Recording(MP4),Audio Recording(MP3), orOther— and aDescription (Optional)field. Helper text previews the saved name, e.g. “Will be saved as: Medical Document - <description>”. - Multiple files are stored as separate single documents — only Automated mode can group pages into one document.
-
Add your files.
Click the dashed drop zone (
Click to select file(s) or drag and drop) or drag files onto it — the drop target is the zone inside the dialog, not the Media list itself. With several files added, the zone shows N files selected with a per-file list, a trash icon (Remove file) on each, and aClear all fileslink. -
Start the upload.
Cancelbacks out;Continuestarts an Automated import, while Manual mode showsUpload(orUpload N files, with a progress bar for multi-file batches). -
Check for failures.
Files that fail processing collect in a
Failed filespanel with per-file reasons and aClear listlink, so a partial batch failure is visible without losing the dialog.
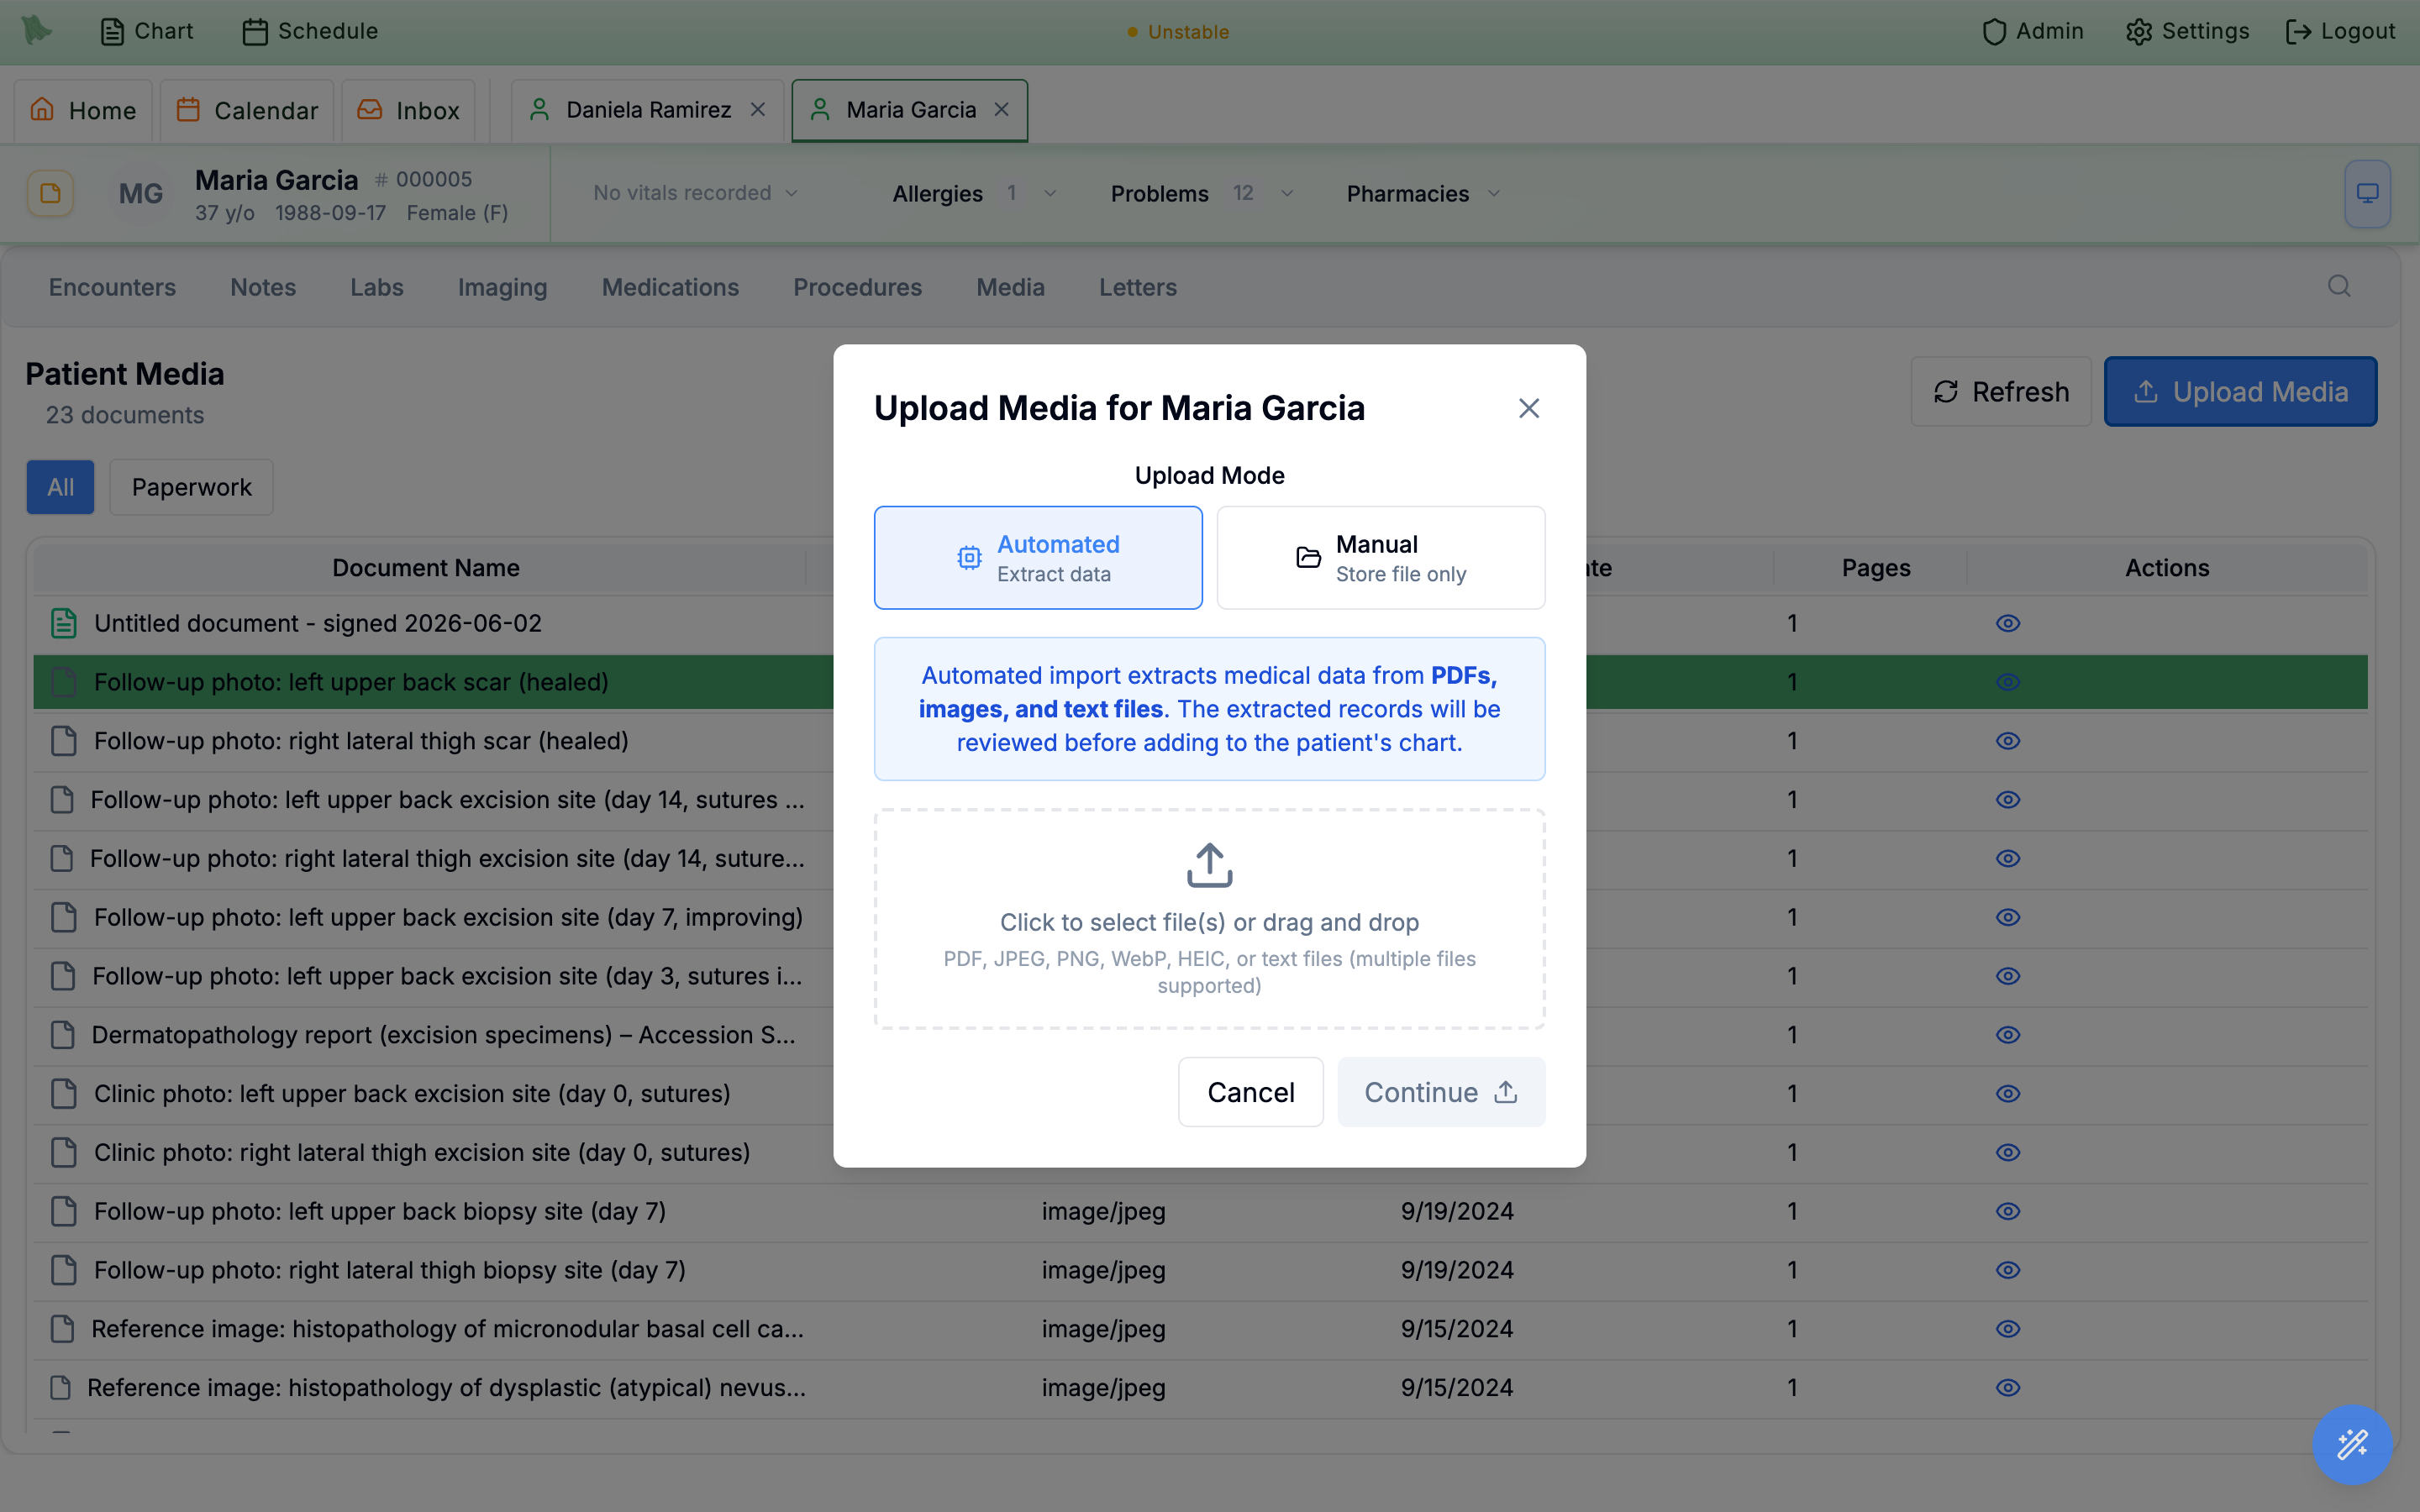
Automated mode — switch to Manual to store a file without extraction.Media Type — a PDF dropped while Clinical Photo is selected is rejected.
Import data automatically from a document
Upload a single file in Automated mode and Hero EMR runs the Automated Import flow: the AI reads the document, checks it belongs to the open chart, and shows you every structured record it found before anything touches the chart. You stay in control — Save File Only is always available as a bail-out that stores the document without importing data.
-
Let it process.
The modal steps through
Uploading DocumentandProcessing Documentwhile the AI reads the file. Closing the modal mid-processing asks for confirmation (Leave Anyway/Keep Processing) so an accidental click doesn’t abandon the job. -
Verify the patient.
The
Verify Patientstep compares the name and DOB found in the document against the open chart. A match shows Patient information matches (“The document information matches the current patient.”); otherwise you see Patient Mismatch Detected. Continue withContinue to Review— which becomesContinue Anywayafter a mismatch — or chooseSave File Only. -
Review the extracted records.
Review Extracted Recordslists everything the AI found — lab results and orders, imaging studies, medications, allergies, problems, vitals, immunizations, procedures, and clinical notes — each with a High/Medium/Low confidence badge. The instruction is the rule: “Compare the source document against the extracted text before importing records into the chart.” -
Import your selection.
Use
Select All/Deselect Allor the per-record checkboxes, then clickImport Selected (N). The flow finishes withImporting RecordsandImport Complete.
Continue Anyway proceeds even after Patient Mismatch Detected — the verify step is the safety net, so read it before you click through.
Group multi-page uploads into documents
Select two or more files in Automated mode and Hero EMR runs the batch flow: the AI scans every page, classifies it, and proposes how the pages assemble into documents — a five-page hospital packet becomes one five-page document instead of five loose files. Inbound faxes imported from the Inbox arrive in the Media tab the same grouped way (see importing faxes).
-
Let the scan run.
The modal steps through
Uploading FilesandScanning Documentswhile the AI classifies pages. -
Answer the grouping question.
A
Grouping Decisionstep may ask Are all pages part of one encounter packet? ChooseYes, one encounter packet(“Import as one continuity document anchored to the first informative page.”) orNo, multiple studies/documentsto continue to manual review and split or merge groups yourself. -
Review the document groups.
Review Document Groupsshows the AI-suggested groups; any classification warnings appear in a yellow banner at the top. Per group you can rename it (pencil icon,Edit name), change the document type,Splita multi-page group into separate documents, or remove the whole group (Remove group). Within a group, reorder pages withMove up/Move downor pull one out withRemove from group; clicking a page shows it in the right-handPreviewpanel. -
Confirm.
Confirm & Uploadcreates the documents — the modal showsCreating DocumentsthenUpload Complete(“N documents have been added to the patient’s chart. Data extraction has started.”). The grouped documents appear in the Media list with their page counts.
Refresh. If batch processing fails outright, the Upload Failed screen offers Upload Manually to fall back to a plain manual upload. And note that removing every group leaves No document groups. All files have been removed. with Confirm & Upload disabled.
Confirm & Upload. Walk away from the review step and the batch is discarded 24 hours after upload, so a batch you meant to finish tomorrow morning is safe, but one left over a long weekend is not. Nothing reaches the chart until you confirm; re-upload the files if a batch has aged out.
View documents and edit their details
Double-clicking a row (or clicking the eye View icon) opens the shared document viewer — a large dialog whose header shows the document name with its type and page count (for example “Lab Report • 3 pages”). Multi-page documents get a thumbnail sidebar on the left for jumping between pages. PDFs and images render in-line; stored video and audio show Preview not available for this file type.
-
Navigate the pages.
Use the previous/next arrows with the
Page X of Ncounter. PDFs get an extra inner control —PDF X/N— that steps through pages inside the PDF file itself. -
Zoom, rotate, pan.
Rotate (R), zoom in/out buttons, and a zoom dropdown fromFitup to 200%. Zoomed past Fit, drag the page to pan (a Drag to pan hint appears on hover). -
Go fullscreen for reading.
The expand button opens a black fullscreen mode with the same controls plus a thumbnail strip along the bottom;
Exit Fullscreen (Esc)returns to the dialog. -
Edit a grouped document’s details.
For grouped documents, the pencil button (
Edit metadata) opens an edit panel to change the document name,Document Type(a dropdown withSelect type...plus all ten types),Document Date,Author, andFacility.Savecommits,Cancelbacks out, and the saved date, author, and facility show in a footer strip below the page.
| Keys | What they do |
|---|---|
| ← → (or ↑ ↓) | Previous / next page |
| Home / End | Jump to the first / last page |
| + / - | Zoom in / out |
| 0 | Return to Fit |
| R | Rotate |
| Esc | Exit fullscreen, or close the viewer |
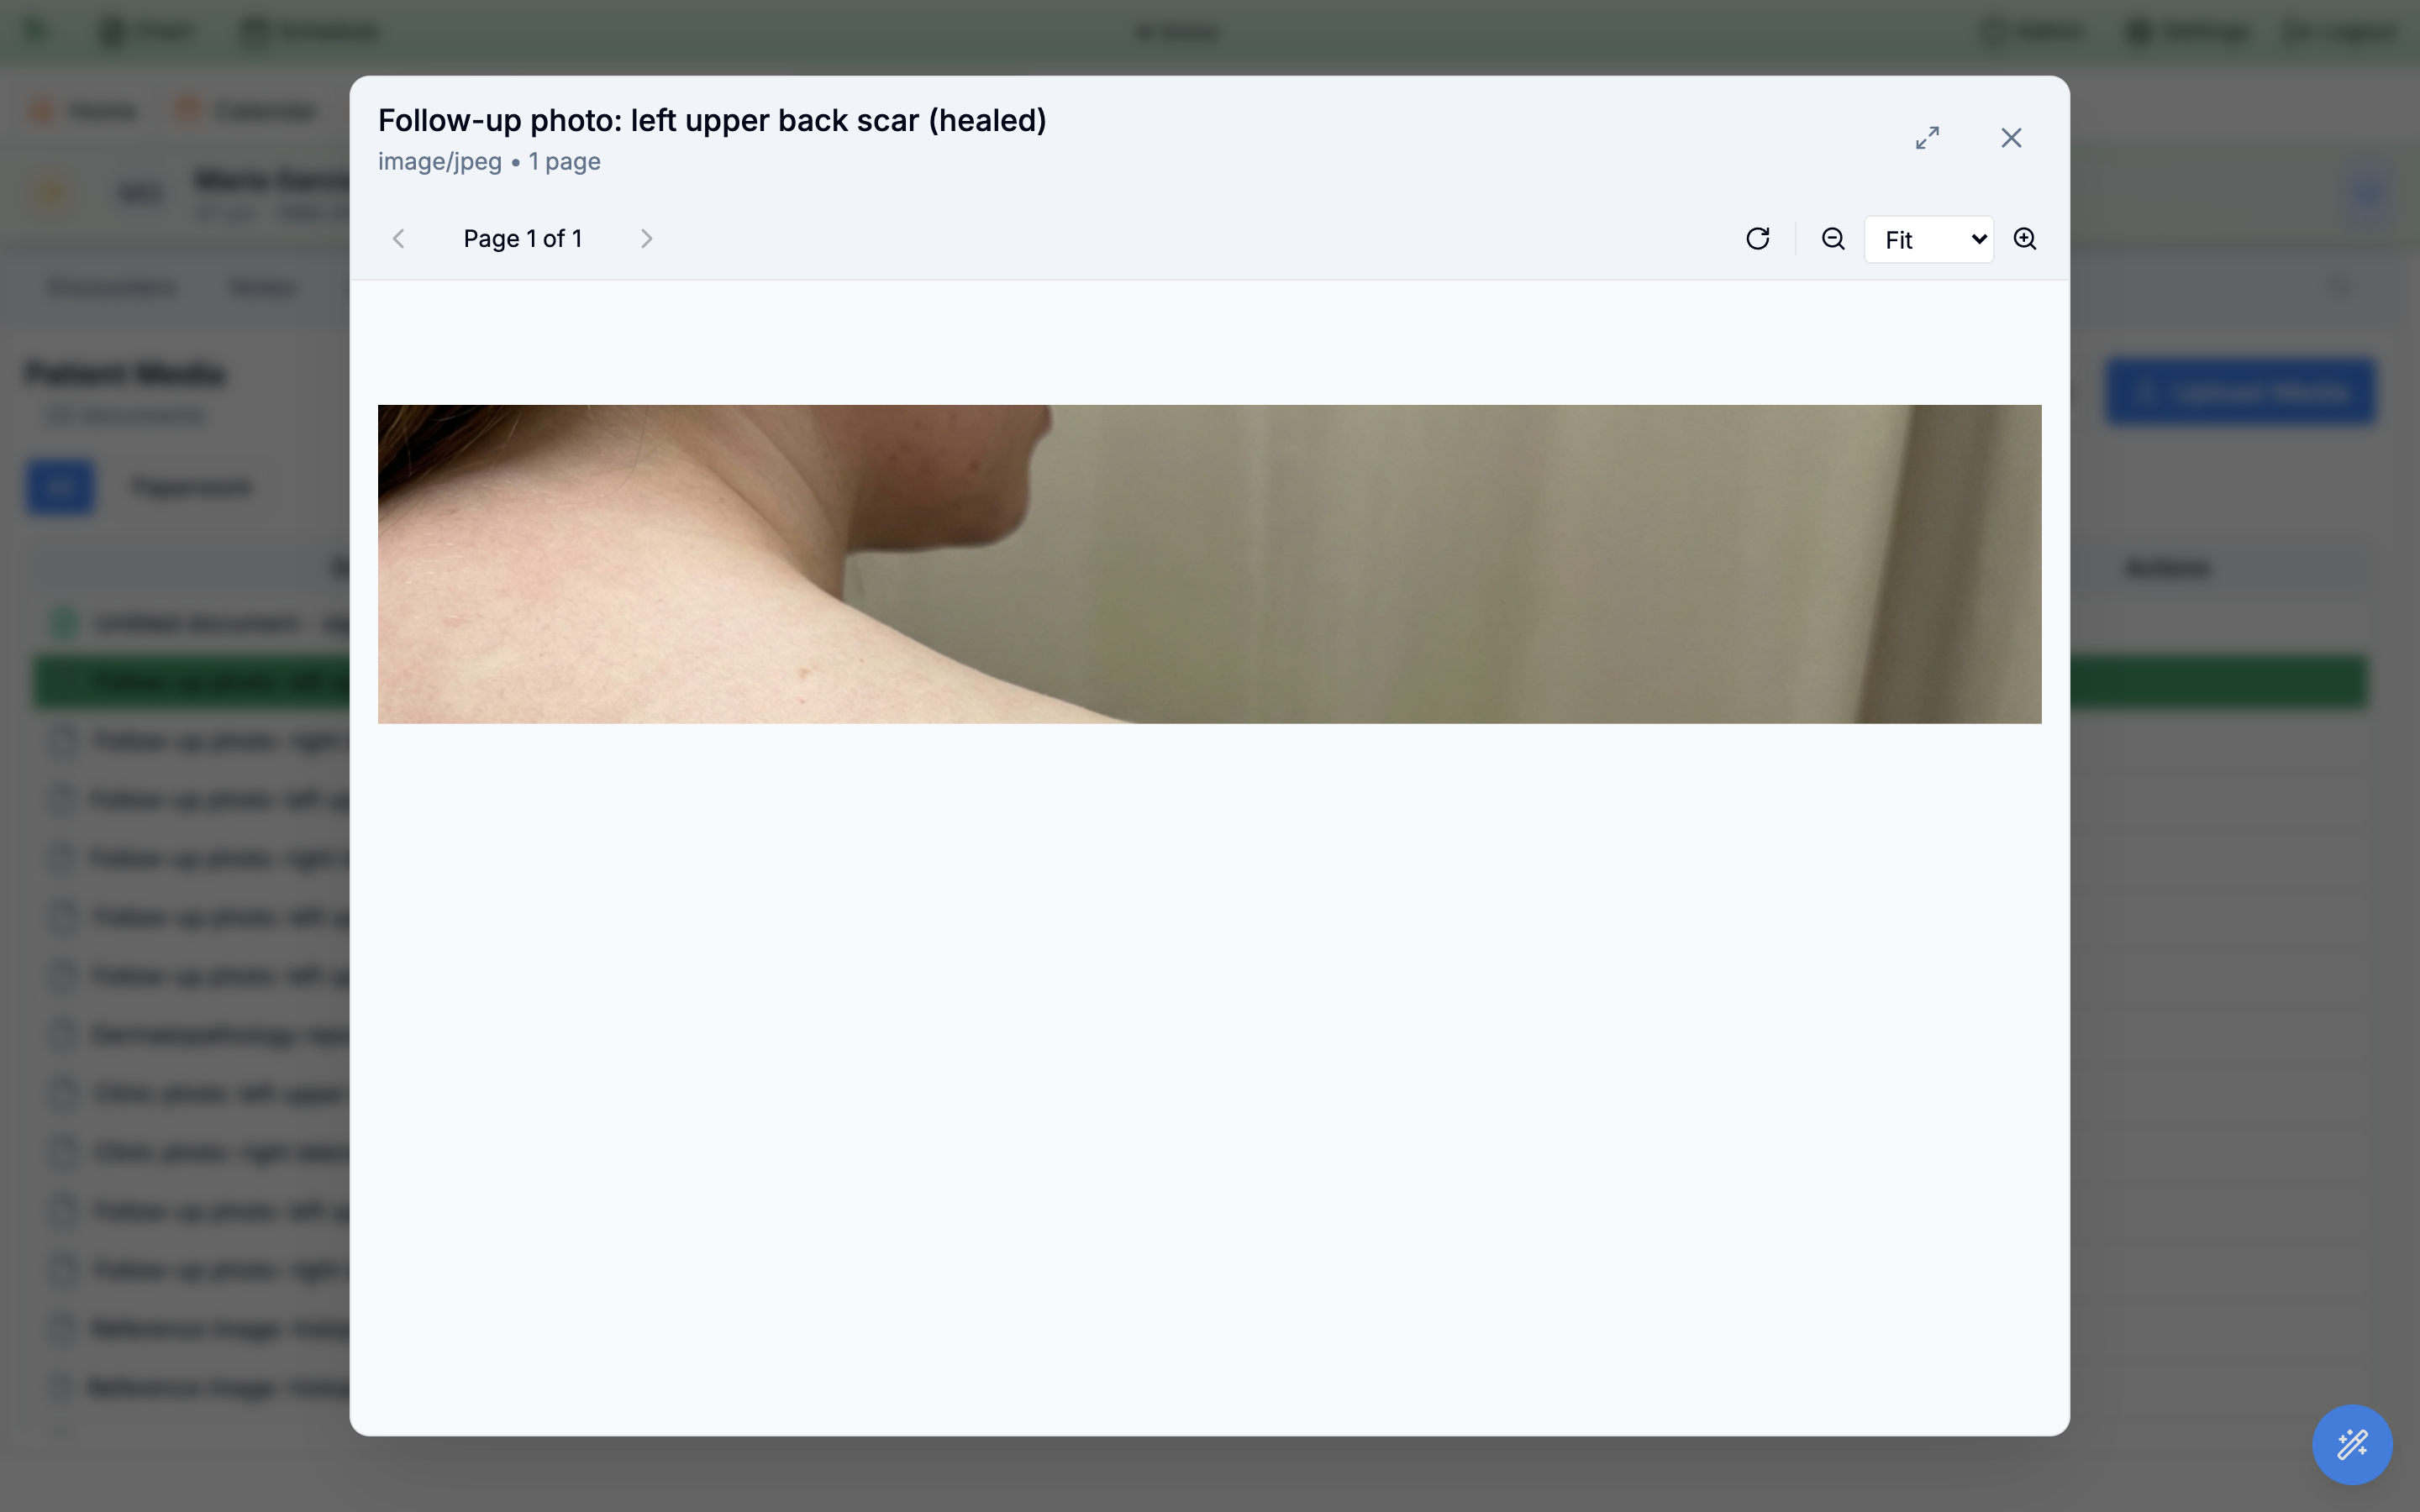
Fit dropdown, and fullscreen.Edit metadata panel appears only on grouped documents; single-file manual uploads open in the same viewer without an edit button.
Signed forms, agreements & what patients can see
E-signed paperwork files itself. When a patient signs assigned previsit paperwork, the PDF lands in Media automatically — no scanning, no uploading — and the Paperwork filter chip surfaces exactly those forms.
Signed previsit forms
- Typed
Signed Previsit Form, named <Template name> - signed <date>. - These are what the
Paperworkchip matches; with none on file it shows No signed previsit paperwork found for this patient. - Authoring and assigning the paperwork itself lives in the questionnaire & paperwork chapter.
APCM agreements
- A signed enrollment generates a PDF typed
APCM Agreement, named Advanced Primary Care Management Agreement — signed <date>. - These stay under the
Allchip — thePaperworkfilter matches signed previsit forms only. - They’re financially gated: only staff holding a billing-view permission (
billing.dashboard.view,billing.reports.view, orbilling.ar.manage) see them in the Media list at all, and a direct link returns not found for anyone else. That’s the usual reason two people see different document counts on the same chart. - Enrollment itself is run from the APCM program.
Documents flow the other way too: patients can upload files from the portal’s media area (and the patient mobile app’s camera scanner), and those uploads appear in the chart Media tab alongside staff uploads — so check the upload date and document name when triaging. Faxes connect in one direction only: inbound faxes are imported into the chart from the Inbox with Link patient & import, which creates a grouped document here (see importing faxes). There is no action to fax a Media document out — outbound faxing exists only for orders during encounter completion.
Health Records, where they can search, preview, and download their files (see the patient’s view of their records). There is no per-document share toggle on the Media tab itself: the two things that do hold a document back are org-level and encounter-level, not per-file — an administrator can switch the portal’s Health Records feature off for the whole organization, and a document produced by an encounter is hidden from the portal while that encounter’s documentation is restricted (the Restrict or release encounter documentation in patient portal views permission). A document you upload straight to the chart has neither of those brakes on it. And the Media tab exposes no delete control — the only row action is View — so a document you upload is one you plan to keep. Treat the Media tab as part of the record the patient reads: don’t upload internal-only working documents.
Need help? Email support@heroemr.com.