Billing operations
Work the money day to day: how the pipeline fits together, the Billing Command Center workspace, the Billing Monitor, the pre-visit readiness queue, claims, payment posting, patient balances and statements, memberships, and the APCM program.
Billing operations
Work the money day to day: how the pipeline fits together, the Billing Command Center workspace, the Billing Monitor, the pre-visit readiness queue, claims, payment posting, patient balances and statements, memberships, and the APCM program.
How billing works end-to-end
Before working the individual tabs, it helps to see the whole pipeline. Hero EMR is built so that money follows the chart on its own: every hand-off below happens automatically, and the system only asks for a person when it hits something it can’t fix itself.
- A visit is signed. Billing starts the moment the clinician signs and closes the encounter (see Sign & close) — there is no separate “send to billing” step.
- Charges are priced. The visit’s E/M and CPT codes become charges, priced by your layered billing setup — organization defaults, service overrides, negotiated rates, and per-patient exceptions.
- A claim is built and checked. For insured visits Hero EMR assembles the claim and runs readiness checks, so coding, demographic, and policy problems surface as fix before send issues in your queue instead of as payer rejections weeks later.
-
Claims batch to the clearinghouse.
Ready claims go to your configured clearinghouse channel — Office Ally, Availity, or a manual portal file — as 837P batches. The clearinghouse answers with acknowledgements — a 999 for the file and a per-claim 277CA verdict — confirming each claim actually arrived and was accepted for processing. A claim the clearinghouse bounces at this step shows as
Rejected: it never reached the payer, so there is no decision to appeal — you fix the data and refile it (see the claims pipeline). - The payer adjudicates — and the money posts itself. The payer decides what it pays, what it writes off, and what the patient owes, then sends back an electronic remittance (an 835 / ERA file). Hero EMR ingests it automatically and posts the payments and contractual write-offs to each claim.
- What’s left becomes patient responsibility. Only after adjudication does the remainder — copay, coinsurance, deductible — move onto the patient’s balance, where statements and collections take over. Patients are never billed amounts insurance is still deciding.
Open and navigate the Billing Command Center
Day-to-day money work happens in the Billing Command Center — one workspace for pre-visit readiness, claims, payment posting, patient balances, and recurring-revenue programs. The header shows your organization name and the active payment-model label (Insurance, Pure Cash, DPC, Hybrid Insurance + Cash, or Not Set), and the whole workspace adapts to that model and to each user’s permissions — so two staff members can legitimately see different tabs.
-
Open the workspace.
Staff whose permission profile includes any billing permission get a dedicated
Billingbutton in the top toolbar — and staff with only billing permissions land here directly after login. Admins reach the same page from theAdmintoolbar menu →Billing. Other parts of Hero EMR deep-link in too: the calendar’s appointment window can jump straight to a visit’s billing records, opening the Claims Pipeline focused on that encounter (see the calendar). -
Learn the sidebar groups.
Operations—Dashboard(the Billing Monitor, the pipeline-health view covered in Monitor billing health),Pre-visit(the upcoming-visit readiness worklist — see Visit readiness),Claims Pipeline,Payments,Patient AR, andReports, which offersQuick Reportswith date-range and group-by controls, aGenerate Reportbutton, and one-clickCSV/Excel/PDFexport. The payer denial-rate report counts only claims the payer actually adjudicated and denied; claims the clearinghouse bounced before the payer saw them are broken out in their ownRejected Before Payercolumn, so routine transmission fixes never inflate your denial rate.IDR— a narrow out-of-network dispute workflow under the No Surprises Act — appears here only if your practice enables it underAdditional Features.Programs—APCM, covered in APCM billing, andMaternity, the global maternity-package worklist where proposed obstetric episodes are reviewed (Pending review,Pending facts,Confirmed,Dismissed), their facts and linked visits checked, and the global package confirmed into a claim. Both appear only when enabled —Maternityneeds obstetrics turned on underAdditional Features, and confirming an episode additionally requires the claims-management permission.Configuration—Payment Model,Collections & Fees,Service Menu,Subscriptions,Charge Fees,Negotiated Rates,Claim Submission,Billing Identity,Auto Modifiers, andSimulator. This is the setup material covered in Billing setup — exceptSubscriptions, the day-to-day membership workflow documented in Memberships. If you switch tabs with unsavedCollections & Feesedits, anUnsaved changesdialog asks before discarding (Keep editing/Discard).
-
Understand why tabs differ per person.
Tab visibility follows the payment model first — Pure Cash and DPC practices don’t see
Claims PipelineorNegotiated Ratesby default — and is then filtered by each staff member’s billing permissions (assigned in staff permission profiles). A staff member with no matching permission seesNo billing tools are available for this staff profile.Admins can reveal every tab with the sidebar footer toggleShow all tools/Use model defaults.
Show all tools is admin-only and remembered per browser, so it doesn’t follow you across machines.
Monitor billing health (the Billing Monitor)
The Dashboard tab is the Billing Monitor — one live picture of the organization’s billing pipeline over a window you pick (7d / 30d / 90d, plus Refresh). Instead of hopping between tabs to ask is billing healthy?, you read one strip left to right and click whatever looks wrong.
-
Read the lifecycle strip.
Eight linked stages mirror the end-to-end pipeline:
Signed→Charges→Claims→Submitted→Acknowledged→Adjudicated→Posted→Patient balance, each with its count or dollars for the window. A dashed amberNo billing / Cashtile sits directly afterSigned, counting signed visits that never enter the insurance pipeline (no claim) — it is informational, not an exception chip, so there is nothing to click and nothing to work. Every stage is clickable and jumps to the tab that works it — the claim stages open the Claims Pipeline, the money stages open Payments or Patient AR. - Work the exception chips. Chips appear under a stage only when something there needs attention, colored by severity and stamped with the age of the oldest problem (oldest Nd). A clean strip means a clean pipeline — there is nothing to dismiss. Each chip deep-links to the tab where you fix it; the table below shows what can surface where.
-
Scan the Billing Inbox rollup.
The
Billing Inboxpanel summarizes the alert rail without leaving the workspace: anN activebadge, one chip per alert type and severity (for example charge ar drift 17), and the newest alerts with timestamps.Open billing inboxjumps to the main Inbox’sBillingfolder (see Inbox queues), and the same active count shows as a red badge on theDashboardtab in the sidebar — visible from anywhere in the workspace. -
Read the money row.
Three cards along the bottom:
Insurance AR (awaiting payer)— submitted claims awaiting the payer, aged0-14/15-30/31+ days;Patient ARwith its aging buckets; andCollected in windowsplit into insurance and patient collections, with a footer showing ERA ingestion health — how many remittance runs landed in the window, by source and status, and when the last one ran. -
Expand the Revenue Overview for trends.
The classic collapsible
Revenue Overview(titled Collections Overview for pure-cash and Membership Overview for DPC practices) now sits collapsed at the bottom of the tab, with period buttons from7 daystoYear to date, summary cards such asInsurance BilledandOutstanding AR, aClaim Status Pipelinechart, and anAR Agingbreakdown.
| Stage | Exception chips that can appear |
|---|---|
Signed | Unbilled insured — insured visits signed but never billed, including ones whose claim was deleted or that carry custom fees; Self-pay review — self-pay visits left with an open balance. |
Claims | Readiness blocked — claims failing pre-submission checks; Duplicate live claims — two live claims covering the same visit. |
Submitted | Rejected unworked; Batch failures; Voids unconfirmed; Voided, payer-live — a claim you voided that the payer still shows as active. |
Acknowledged | Stale in-flight — no acknowledgement 14 days after submission, or no adjudication 25 days after acknowledgement; Missing 277CA acks. |
Adjudicated | Denials unworked; Unposted ERAs; Orphan/reversal ERAs — remittances that match no claim or take money back; Filed outside EMR. |
Patient balance | Charge/AR drift — bookkeeping drift between charges and the patient ledger; Stuck payments — payment attempts that never completed. |
Behind the monitor, automated checks sweep the whole pipeline nightly — unbilled insured visits, self-pay balances, stale in-flight claims, claim-integrity problems (duplicates, void confirmations, orphan charges, bookkeeping drift), payment-posting problems, claims a claim-file run had to leave out (see the claims pipeline), and statement, refund, and batch failures — and file each finding as a billing-inbox alert. The chips and the rollup are two views of that same alert rail.
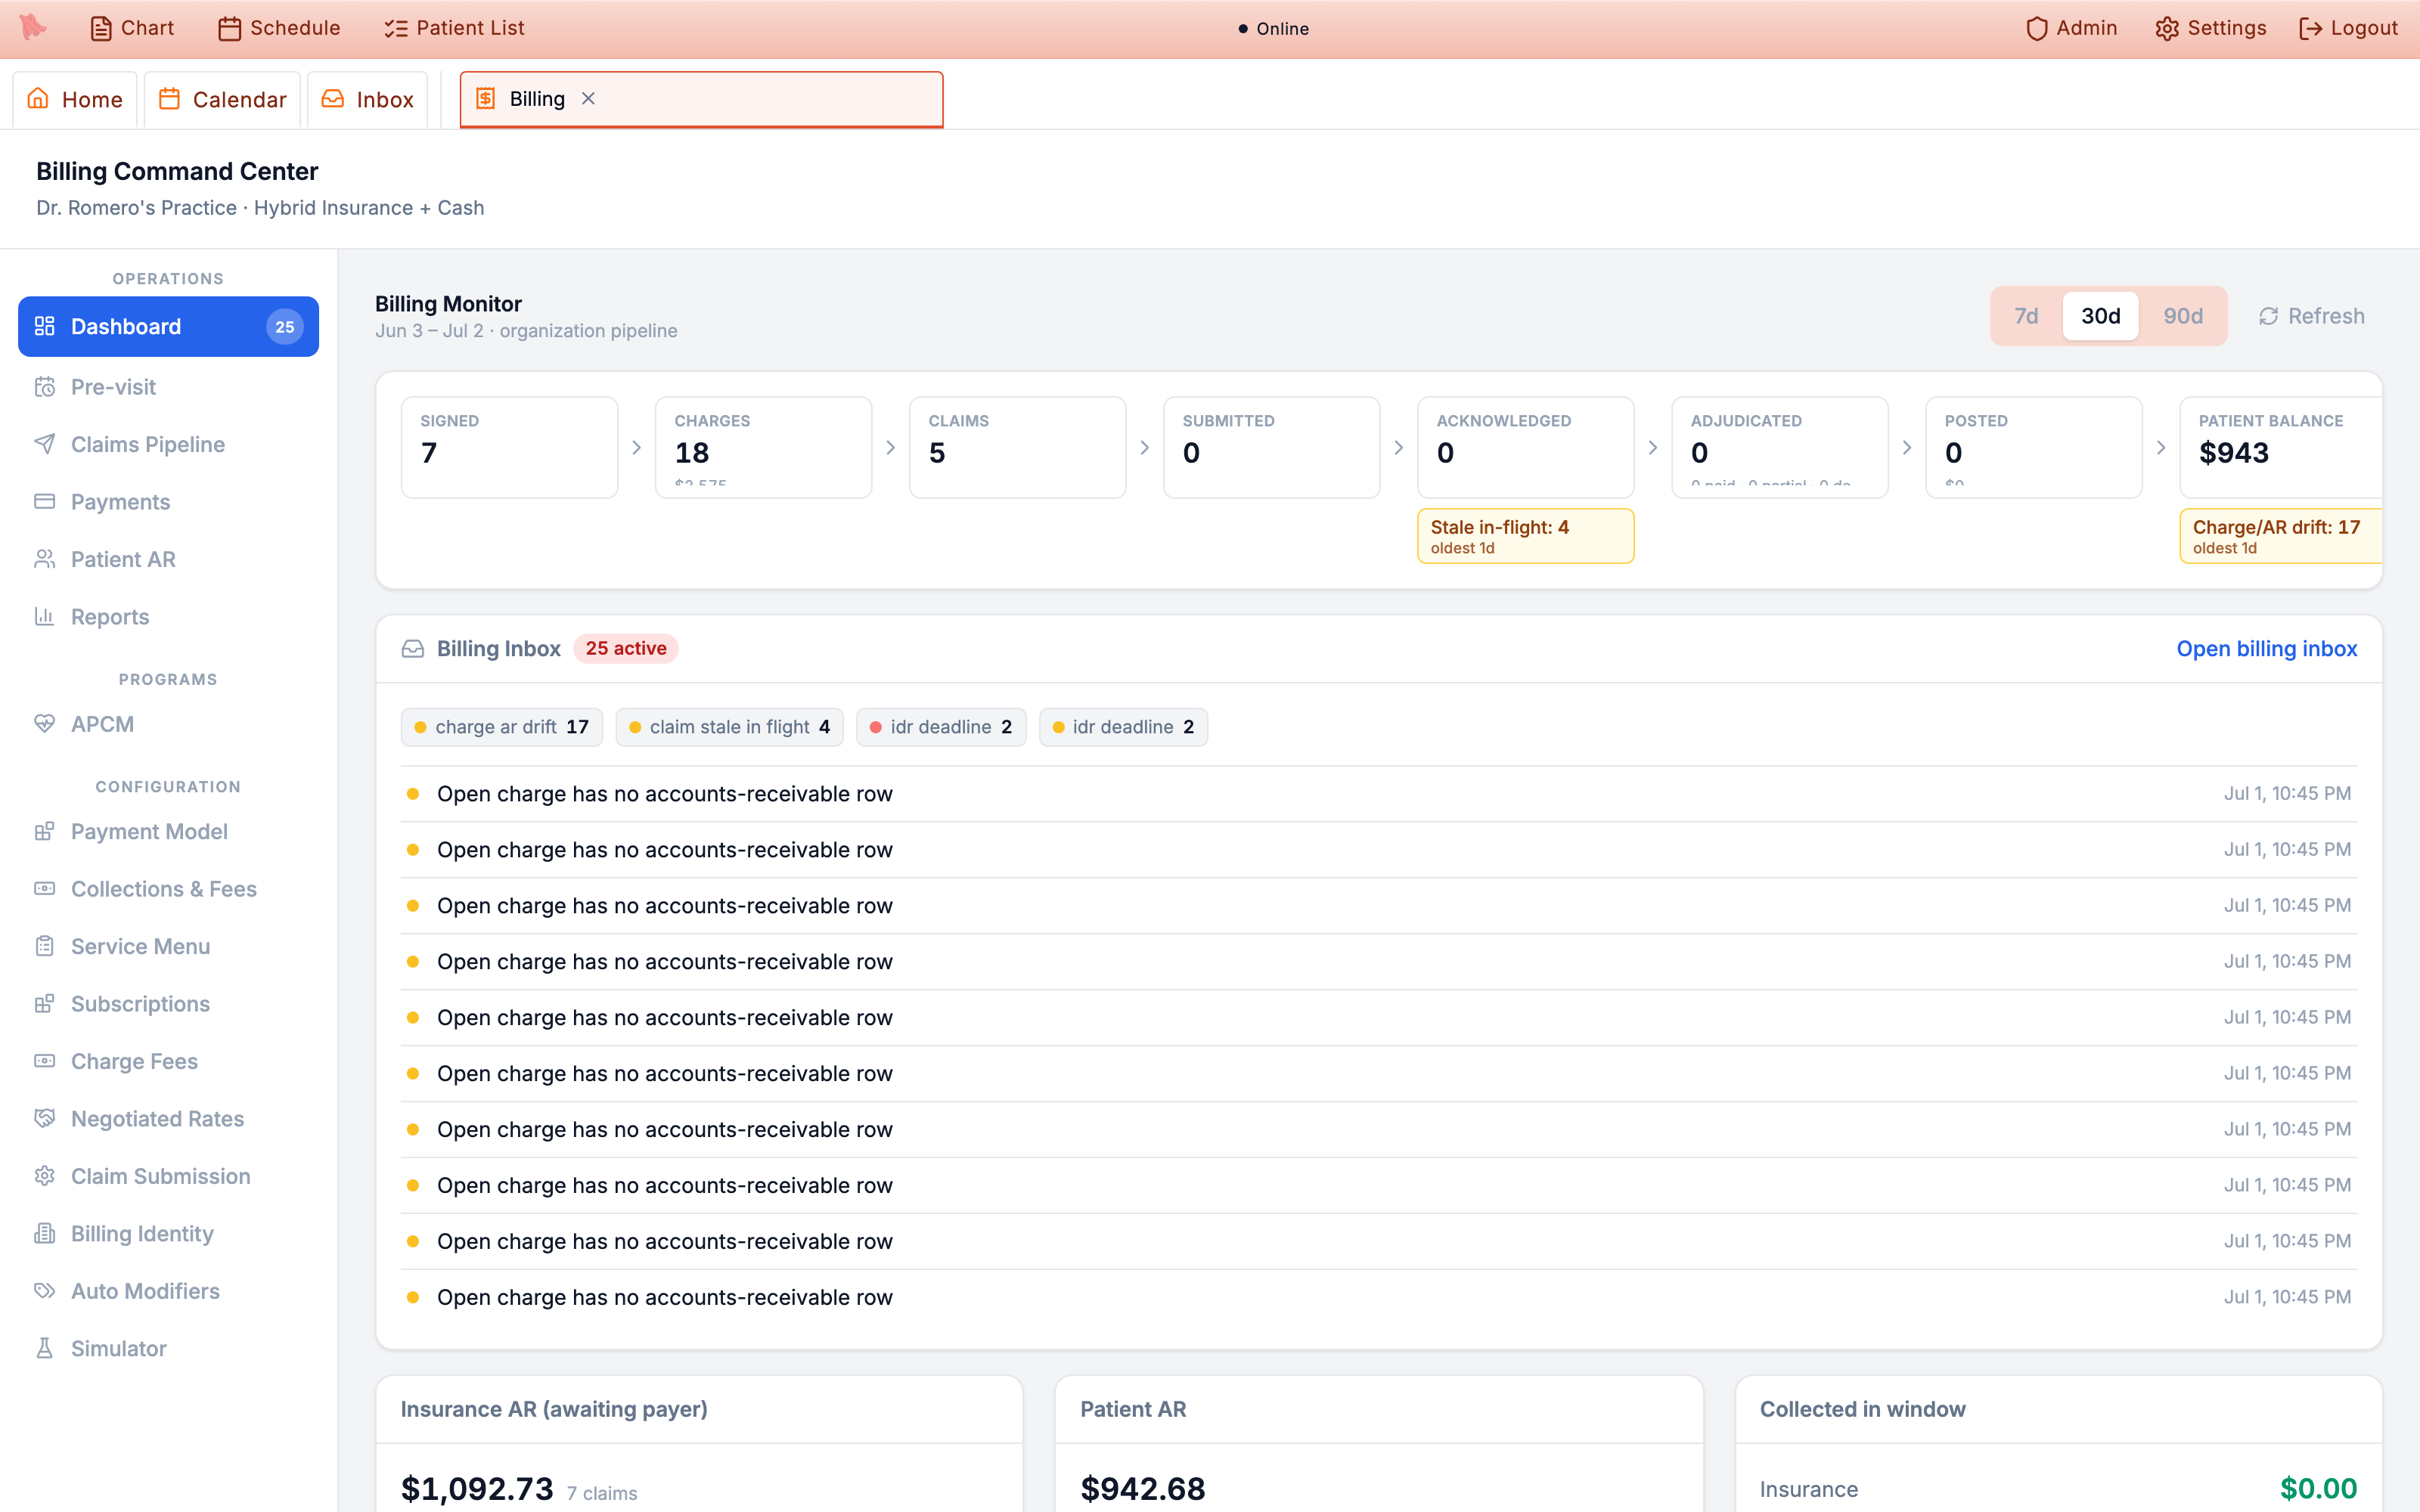
Billing Inbox rollup, and the money row along the bottom.Dashboard sidebar tab counts the alerts still active, so a quiet badge genuinely means a healthy pipeline.
Billing folder with charge and error details plus Chart and Patient AR jump buttons — see Inbox queues.
Work the pre-visit billing readiness queue
The Pre-visit tab is the Upcoming Visit Readiness worklist — every scheduled visit in the next 14 days (by default), built to catch eligibility and insurance problems before the patient arrives. It used to lead the Dashboard tab; it now has its own sidebar tab, unchanged in behavior, so the Dashboard can be the Billing Monitor. The header shows the date range plus Filters, CSV, and Refresh buttons.
-
Scan the chip strip.
Summary chips count
Upcoming,Missing elig.,Stale elig.,COB missing,Open problems, andIn progress, plus payer-class chips forMedicare,Medicaid,Private, andUnknown.Filtersnarrows byStart date,End date,Payer search(Aetna, BCBS…),Provider,Visit type,Payer class, eligibility status (Any eligibility),Problem(Any problem state/No problem/Open/Resolved),New patient(New patient only/Established only), andSecondary insurance(Has secondary/Primary only).Reset filtersclears the lot. -
Run eligibility checks.
Each row’s
Eligibility checkaction queues a live eligibility verification with the payer (via Office Ally) for the patient’s primary policy — you’ll see Eligibility check queued. On rows without an active primary policy the action is greyed out and can’t be clicked at all — hover it for the reason (No active primary policy). Checks run in the background, so results don’t appear instantly;Refreshafter a few minutes. -
Run a COB check, and act on the answer.
The row’s network-shaped
Run COB check ($1)action queues a paid coordination-of-benefits check against the visit’s primary policy — the same check, confirmation dialog, and cost as the one on the patient’s Insurance tab. It needs the COB permission (Requires the COB check permission) and an active primary policy. While one is running theCOBcell readsChecking…; a check the payer refuses leavesFailedwith the reason on the row. When a result finds other coverage the cell grows an amberReview orderbutton that opens the same coverage-order dialog, so you can fix primary/secondary from the worklist without opening the chart. Once applied it readsOrder applied. -
Flag what needs a human.
Flag billing problemopens a dialog asking “What needs human resolution before this visit?” withReason,Priority, andNotesfields; flagged visits later show aResolve problemaction. Both actions require billing AR permission (tooltip:Requires billing AR permission). -
Open the detail drawer.
Clicking a row opens a drawer with
Visit & patient,Eligibility,Insurance policies,Coordination of benefits,Work items,Billing messages, andBilling notes— notes are visible to billing staff only. TheCoordination of benefitspanel repeats the determination and coordination order, lists what the payer reported, and carries its ownRun COB checkandReview coverage orderbuttons; it says plainly when a result is in hand but the chart’s primary/secondary order has not been updated yet.
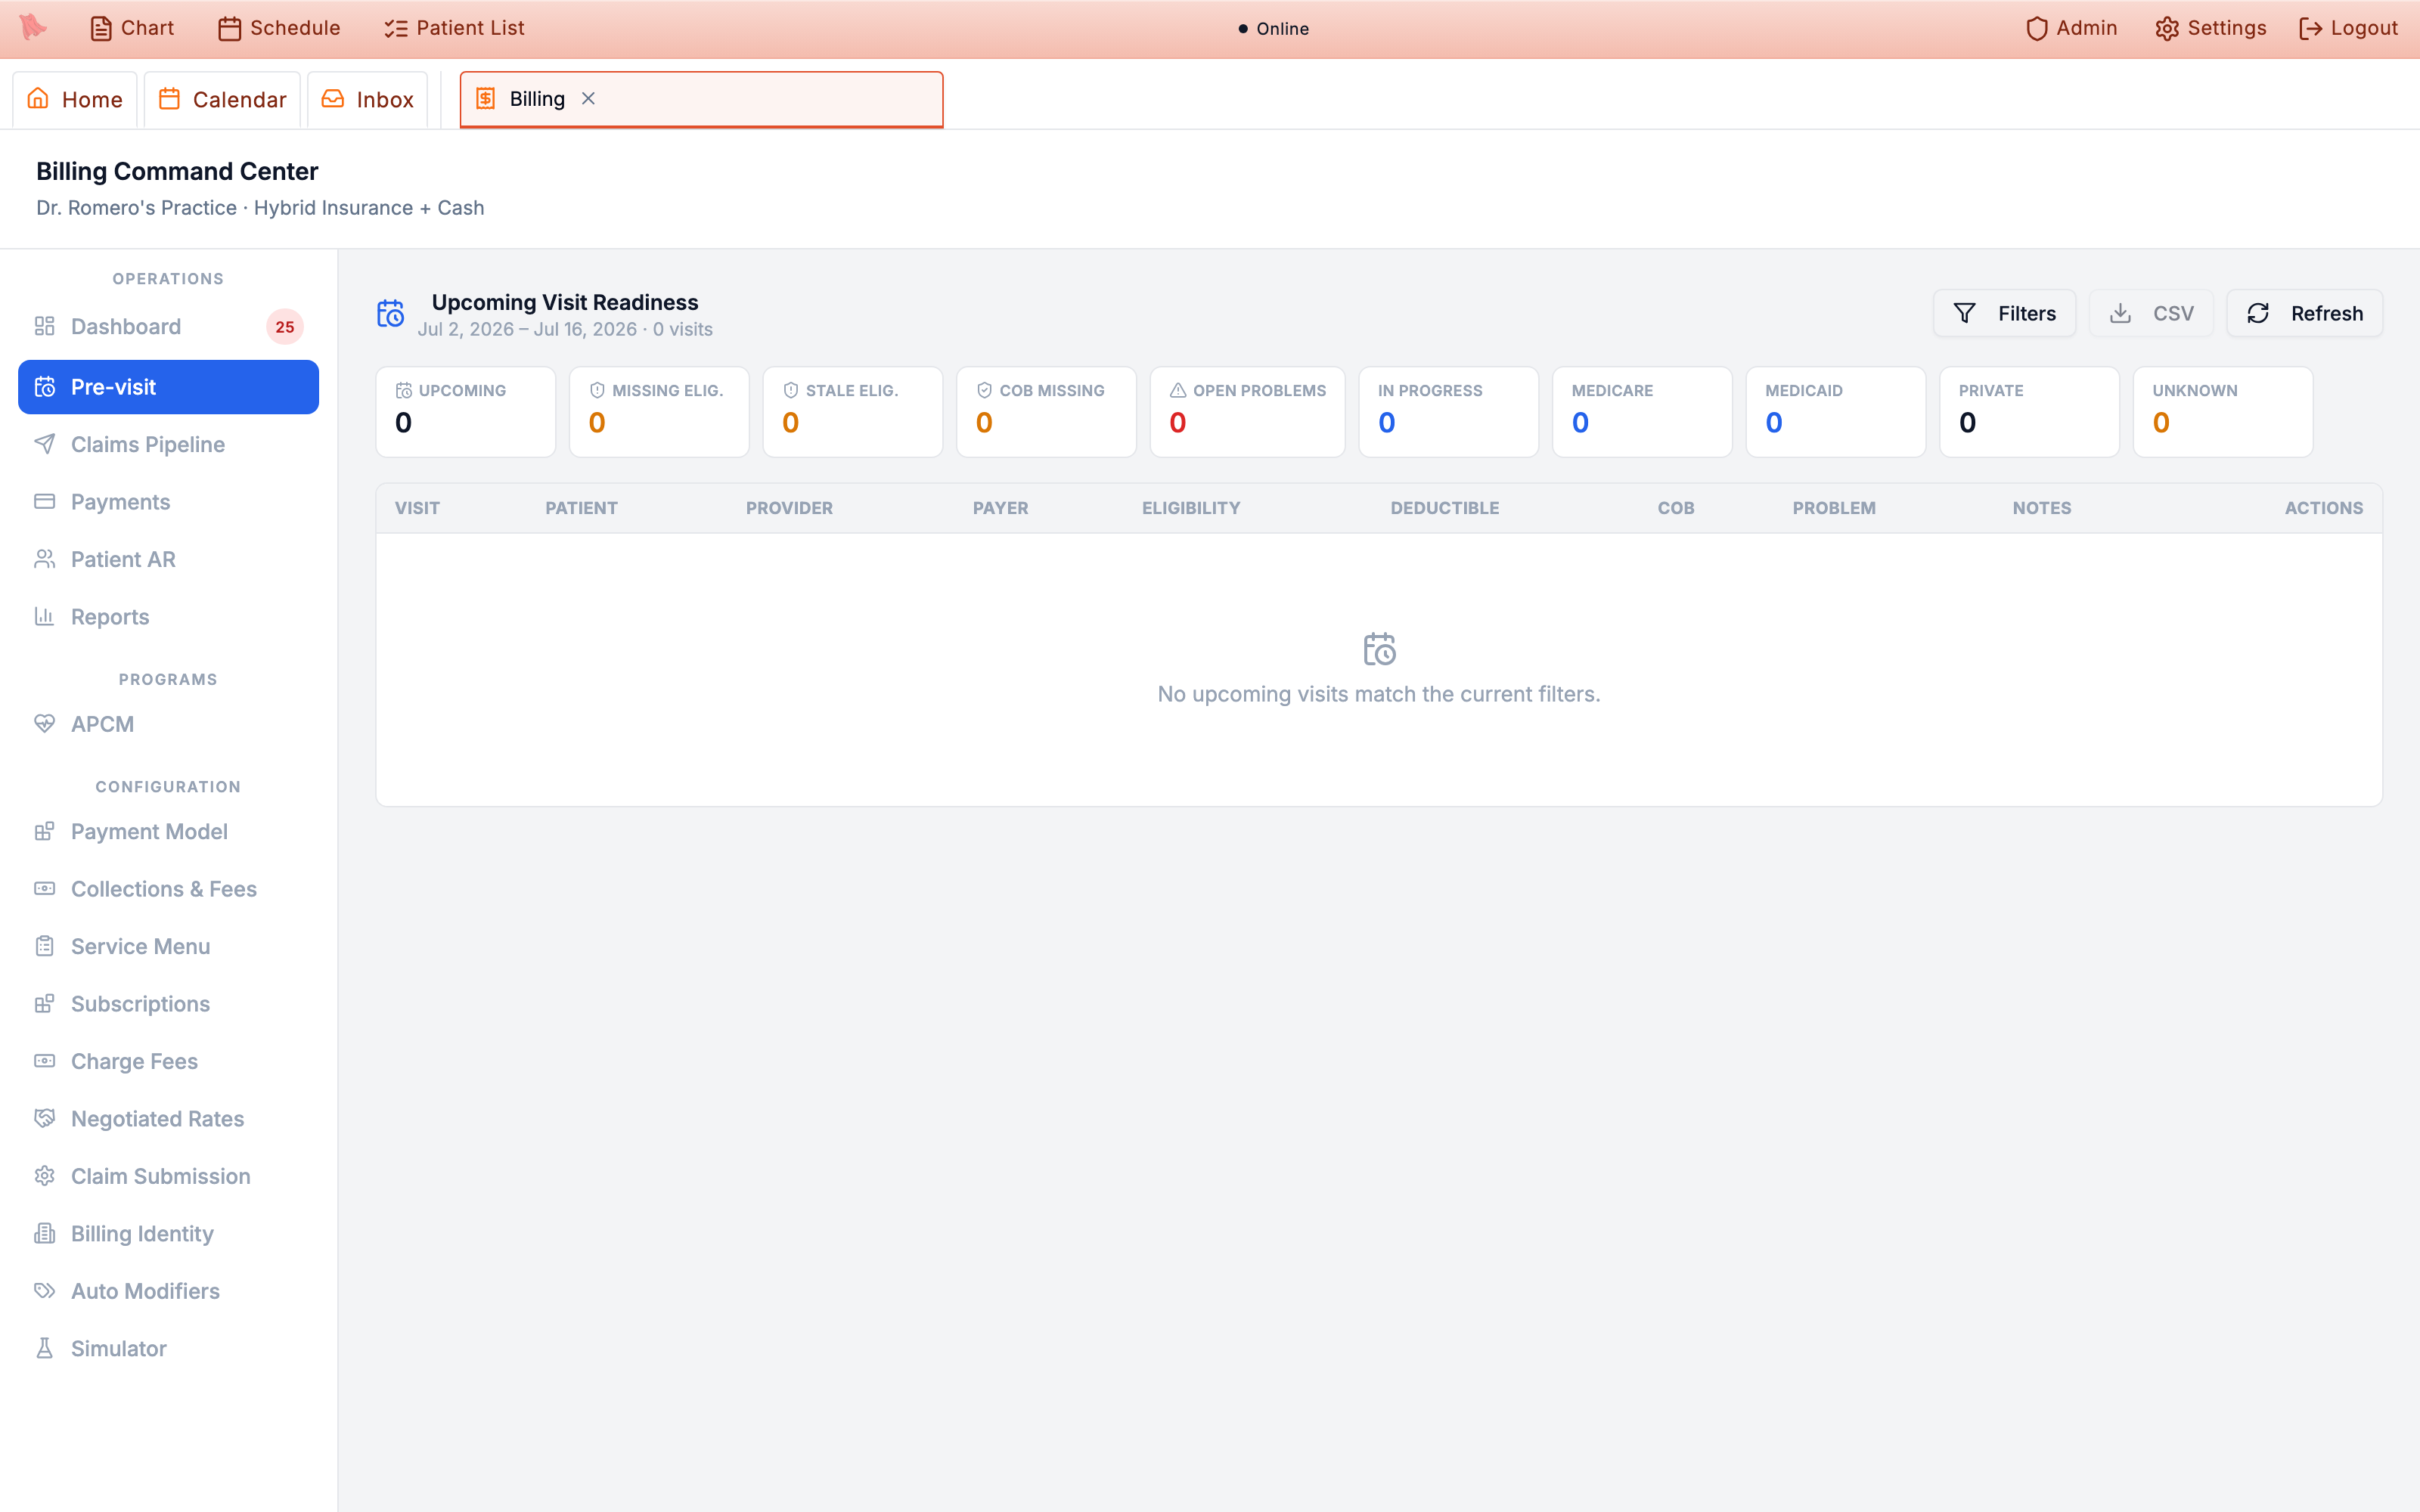
Pre-visit tab — the same worklist, chips, and detail drawer as before, just moved out of the Dashboard.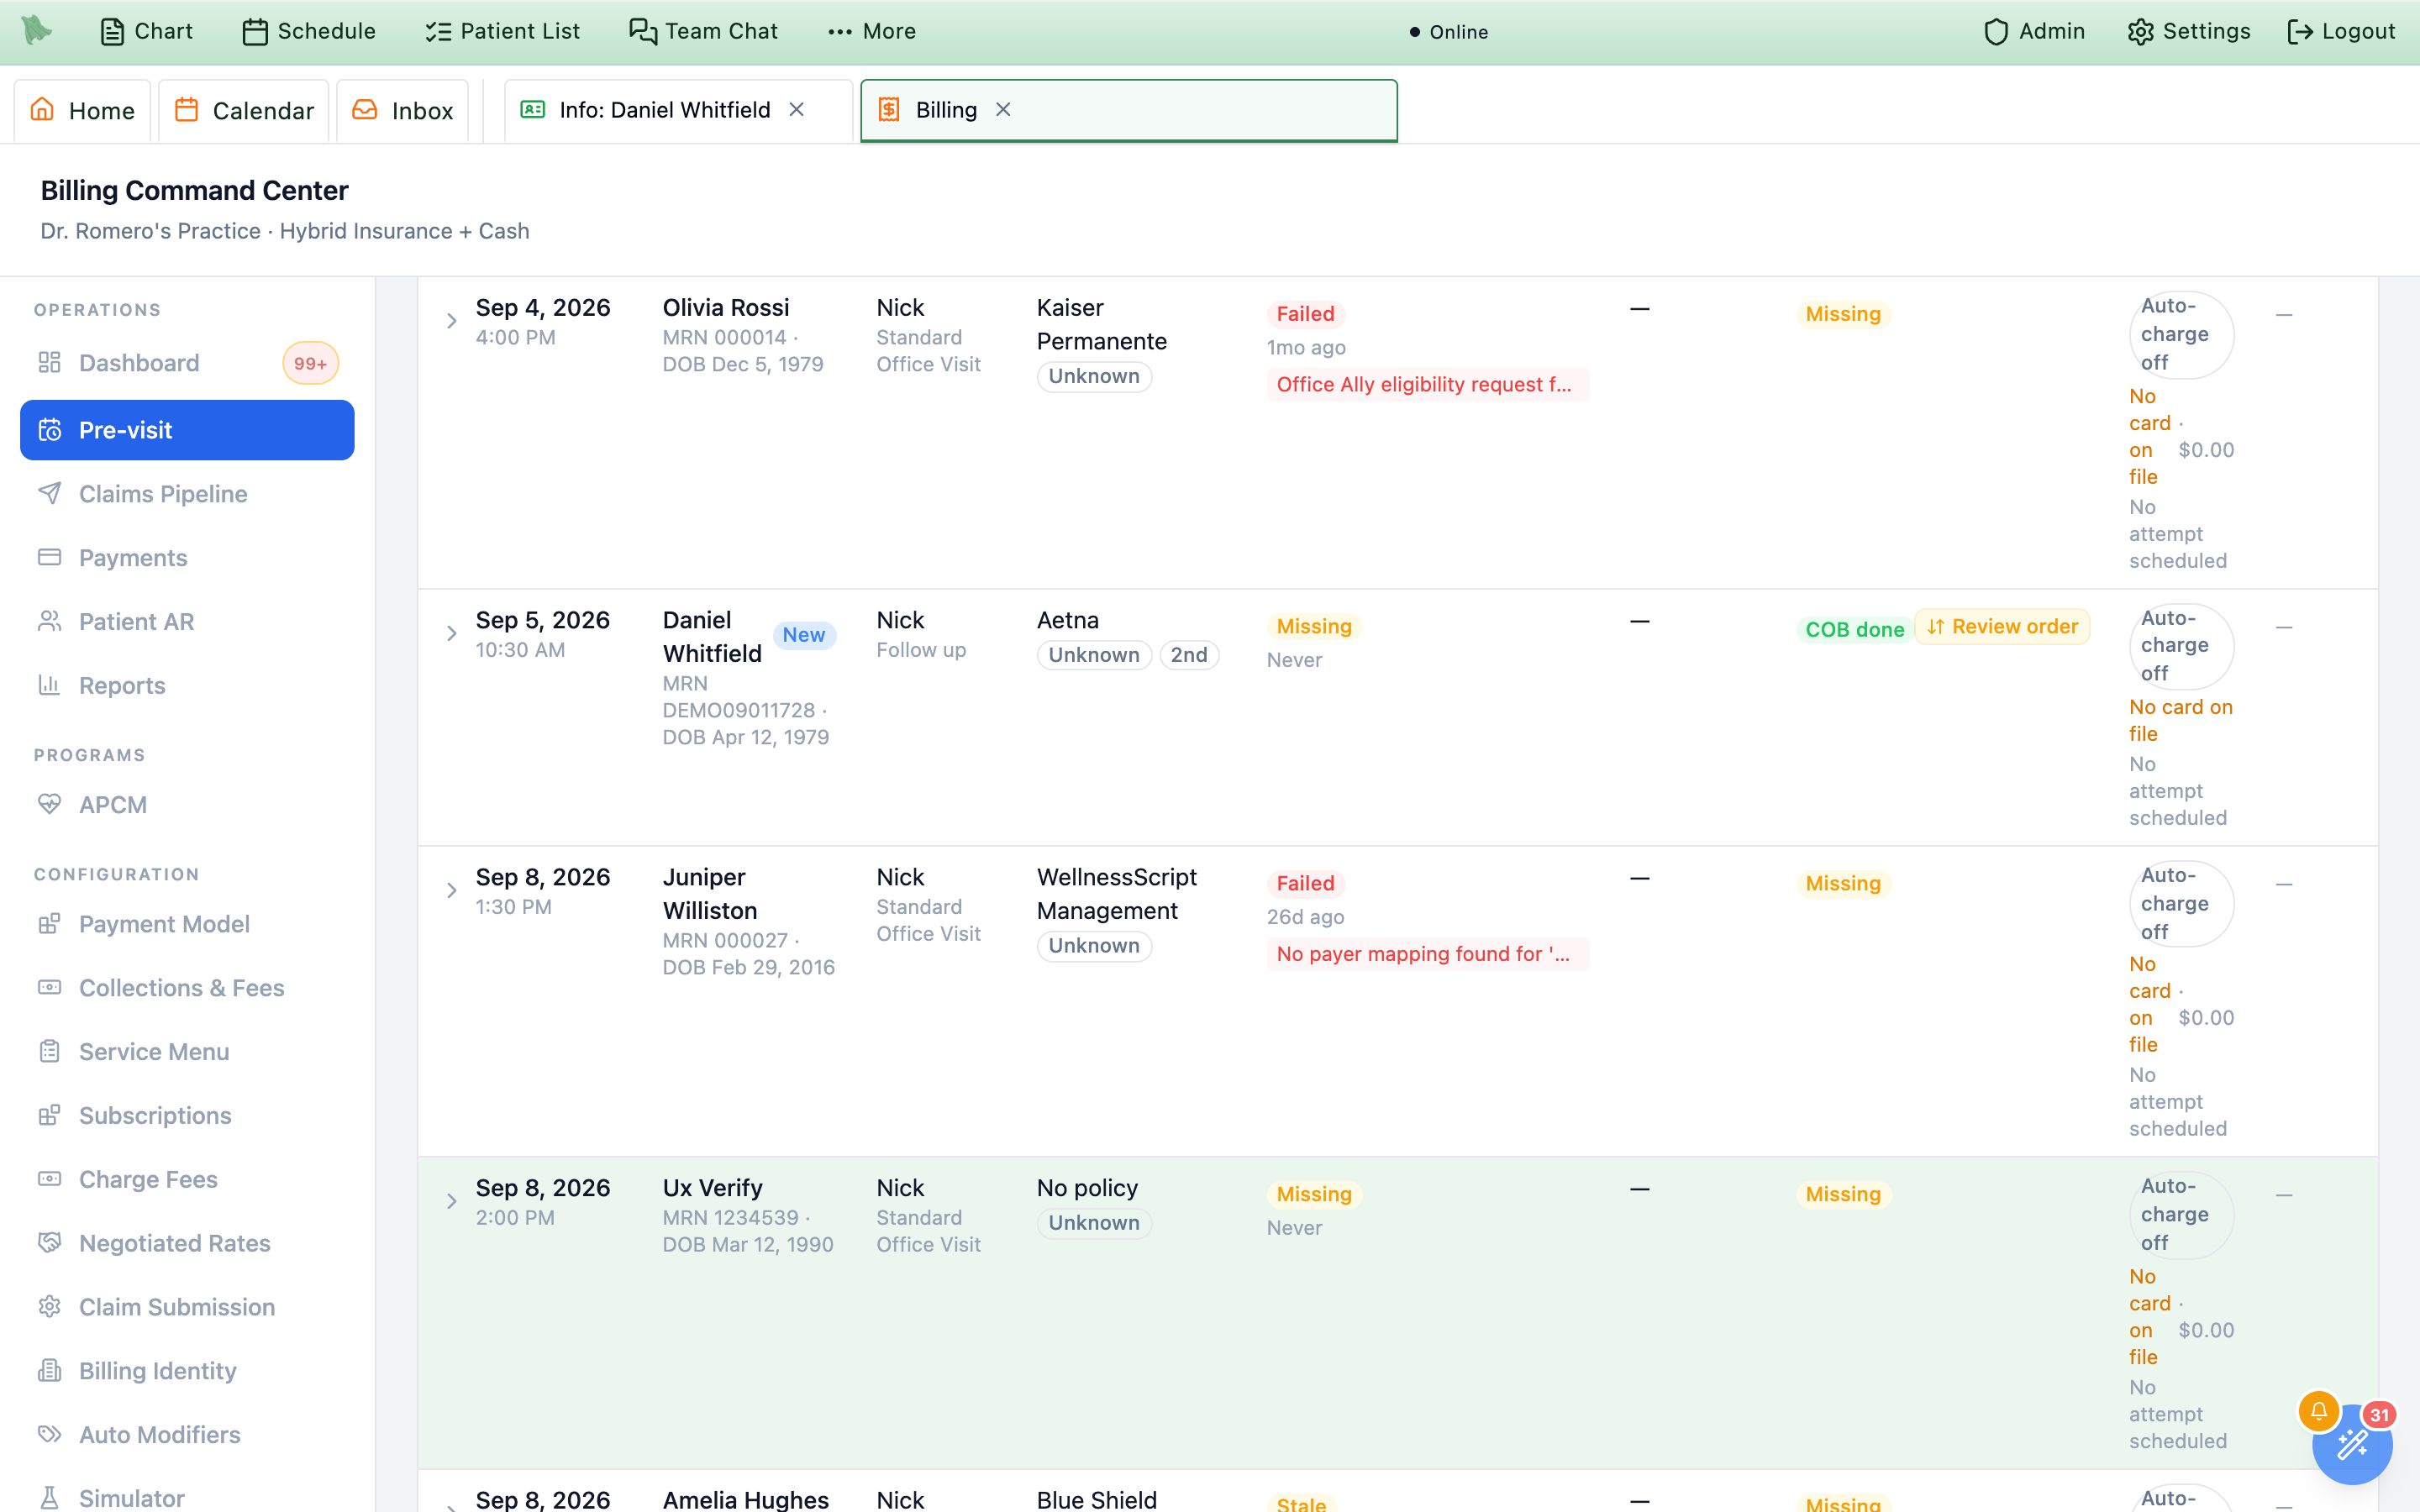
COB cell into Review order — the coverage-order dialog opens straight from the worklist.Pre-visit tab; the Dashboard is now the Billing Monitor. Nothing else changed — the chips, filters, eligibility checks, and detail drawer all work exactly as before.
Review charges and run the claims pipeline
Charges created when a visit is signed and closed (see Charges & E/M) flow into the Claims Pipeline, which moves them from review through submission to resolution. The tab has four views — with clickable summary stats (needs review, ready, active batches, follow-up, stuck 25+ days) that jump you to the matching slice.
-
Review new charges.
Ready to Submitsplits intoNeeds Review— charges carrying issue badges such as coding or demographic problems — andReady to Send. Fix the issue, then useMark readyon the charge’s work item in the Action Center. -
Create a batch.
In
Ready to Send, tick charges (orSelect all) and pick theClaim submission channel:Office Ally SFTP,Availity SFTP, orManual portal— unconfigured channels show- setup required. ClickCreate Batchfor an integrated channel, orCreate Claim Filefor manual (“Creates a downloadable 837P file for external portal upload.”). -
Track what’s in flight.
The
In Flightview lists batches with per-batch actions:Download 837P, submit to the channel,Mark manual portal upload complete, andCheck acknowledgements. Each batch sums up its acknowledgements as one plain-language chip —Clearinghouse receipt ✓,Clearinghouse receipt ✗, orClearinghouse receipt pending— instead of raw TA1/999 codes; the control numbers and raw acknowledgement text are still there for support calls, tucked into a collapsedTechnical detailsdisclosure inside the expanded batch. Expanding a batch also shows the per-claim roster: every claim in the batch with a plainAcceptedorRejectedverdict (no more ack-code legend to decode), the status message that came back, and a link that jumps straight to that claim’s Action Center item. A claim moves throughDraft,Ready,Submitted,Acknowledged, andIn Process, then resolves toPaid,Denied,Partial,Pended,Appealed, orClosed— and a claim the clearinghouse bounced shows asRejected, stays in this view tinted red, and carries aCorrect & Refilebutton right on its row (the one exception is a rejected void — a claim you were cancelling has nothing to refile, so it reconciles from the batch view instead). Rows also print the last submission error as readable text rather than hiding it behind an icon, and the status filter only offers statuses the view you’re on can actually contain. Claims with no activity for 25+ days raise an amber banner with aReview oldest stuck claimsfilter. -
Tell rejections from denials.
Hero EMR treats these as two different problems, because they need two different responses.
Rejectedmeans the clearinghouse (or the transmission itself) bounced the claim before the payer ever processed it — no one adjudicated anything, so there is nothing to appeal; fix the underlying data and send a corrected claim withCorrect & Refile.Deniedmeans the payer processed the claim and decided not to pay — a real adjudication you work withLog Appeal,Resubmit as-is, orWrite Off. Earlier versions of Hero EMR showed both as “Denied”; if you learned the pipeline then, the practical change is that a rejection is routine data-fixing on the way to the payer, not a lost decision. -
Work the Action Center.
The
Action Centeris a smart-sorted worklist across six lanes (table below). The lane cards across the top show each lane’s count, dollar total, and the age of its oldest item (oldest Nd) — so a lane that’s quietly aging stands out at a glance — and each claim row carries a readiness badge that leads with the first blocking problem by name —Patient ZIP code is invalid, say — with the issue count beneath it, so you know what to fix before you even open the claim (a claim with nothing blocking simply readsReady). Search bySearch patient, claim #, payer, code…, sort bySmart sort/Newest update/Highest dollars, and narrow withMy items,Include snoozed, orGroup by lane. Selected claims take bulkSnooze 7d/Flag; each item also offersFlag,Note,Assign me,Snooze,Mark ready(charges), andMark uploaded(manual batches). -
Resolve a claim.
Expanding a claim shows
Exact Problems(denial and rejection issues with codes, financial impact, and appeal deadlines — denial codes are decoded into plain language by a glossary the server builds from your payers’ actual responses, e.g. CO-16: “Claim is missing information or has invalid information.”; codes it can’t decode still appear with their raw code rather than being dropped), anIssues & fixespanel (the same readiness checks behind the row badge, each issue with its own fix button),Codes(editable diagnoses and per-line CPT/modifier edits with save-and-resubmit),Financials,Submission, and aManual Submission PackagewithShow Raw 837P/Copy raw 837P/Download raw 837P. Denied claims offerLog Appeal(it records an appeal you filed with the payer out of band — nothing is transmitted electronically),Resubmit as-is, andWrite Off; rejected claims offerCorrect & RefileandResubmit as-is.Resubmit as-isis the action formerly labelled “Correct & Resubmit” — the new name says what it always did: it re-sends the claim unchanged, so make your corrections first. And buttons that aren’t available are no longer silently greyed out — hover a disabledEdit Codes,Regenerate, PDF editor, orMark Manually Submittedbutton and a tooltip says exactly why (for example “Locked: this claim already reached the payer — use Correct & Refile to change it.”). -
Fix demographics without leaving the claim.
Patient-address problems — the most common reason a claim blocks or bounces — are now fixed in place. On the claim’s
Issues & fixespanel, and on the blocker list inside theCorrect & Refiledialog, demographic issues carry anEdit demographicsbutton that opens the patient’s demographics editor right there, already in edit mode — no jump to the chart, no lost context. Save the correction and the claim, its row badge, and its worklist item all refresh on their own. Billing staff who manage claims but not the full patient record get a trimmed editor limited to address and guarantor fields (which is all their save can change); staff who can’t view patient records at all see anOpen chartlink instead. Once the data is right, a demographic issue on a claim that hasn’t reached the payer also offersRebuild claim, which rebuilds it from the corrected chart; a claim that has already reached the payer routes throughCorrect & Refileinstead, so payer tracking is preserved. -
Trust what the claim-file viewer tells you.
The raw 837P viewer labels what you’re looking at:
Transmitted file from batch Nfor bytes that actually went out,Stored file (not yet transmitted)for a built-but-unsent file,Upload outcome unknown — this file may have reached the clearinghousewhen a hand-off was interrupted, orLive rebuild — not yet transmitted. If the chart changed after the file was built, an amber banner warns that the file is not the current claim content, with aView current rebuildbutton beside it — so “the file still shows the old address” confusion is over. When a preview can’t be generated, the viewer prints the reason instead of failing silently, and the CMS-1500 preview does the same: blank boxes come with an explanation (for example “Address boxes are blank: the patient chart has no complete address on file.”).
| Lane | What lands there |
|---|---|
Denied / underpaid | Claims the payer denied or paid below the expected amount. |
Rejected | Claims the clearinghouse bounced before the payer saw them — fix the data and Correct & Refile. |
Pended | Claims the payer is holding in a pended status. |
Fix & submit | Charges with review issues to fix and mark ready. |
Awaiting manual upload | Manual-portal claim files waiting to be uploaded and marked complete. |
Follow-ups due | Claims whose follow-up date has arrived. |
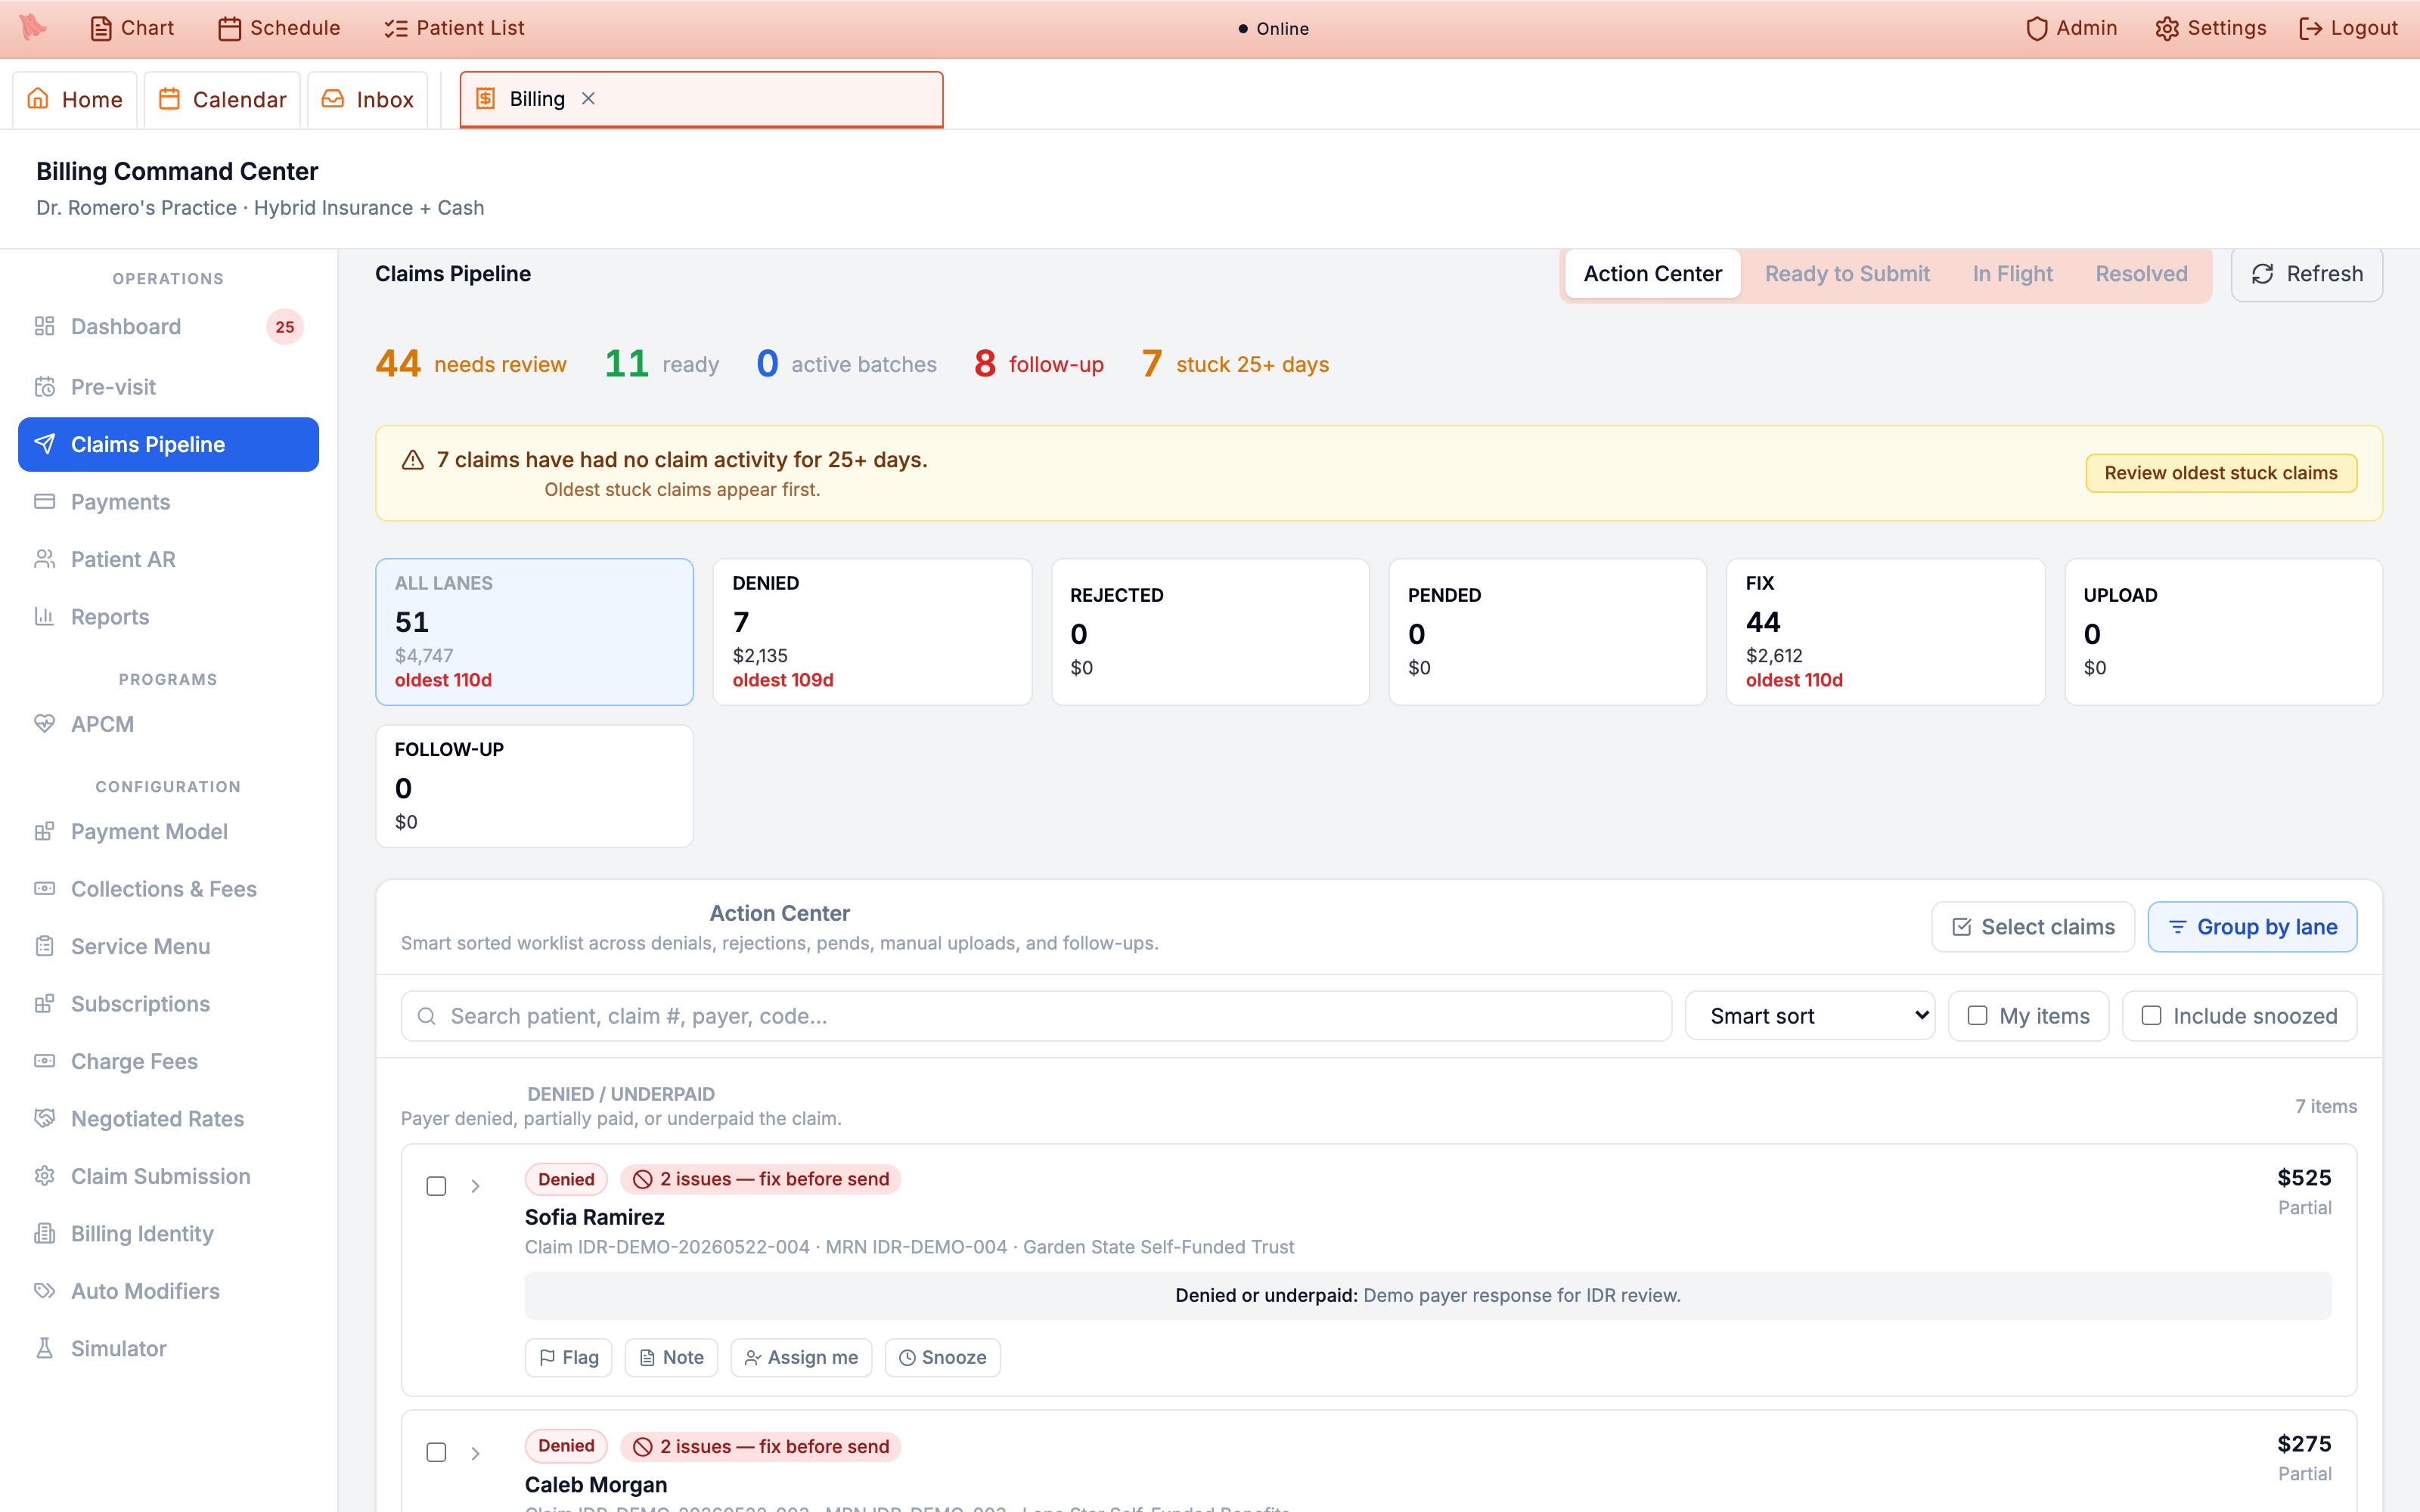
2 issues — fix before send.Write Off is hidden entirely without the sensitive-billing permission. Assign staff permission profiles to match who does what.
410561234 stores 41056-1234). An empty ZIP is allowed at intake, but an insured claim will not transmit until the address is complete and valid — the readiness check names the problem (Patient ZIP code is invalid) and links straight to the fix, and the same check watches your practice’s own billing address (Billing ZIP code is invalid points you at Billing Identity). If a scheduled claim-file run has to leave a claim out over a data problem, it files a billing-inbox alert — Claim excluded from claim file — naming the claim and the error instead of letting it sit; and a claim wedged behind a blocked claim file raises an immediate Claim stuck after blocked claim file alert.
Post ERAs, manual payments & refunds
The Payments tab is headed Payment Posting, with Manual Entry, Post EOB, Upload ERA 835, and Refresh buttons across the top. It’s where insurance remittances and hand-keyed payments get applied to claims — and where refunds are issued. An Overpayments & credit balances panel sits above the header whenever there are cases open: detected overpayments tracked to a return, each with its 60-day deadline, that you either confirm as real (starting the return clock) or dismiss.
-
Upload an ERA.
Upload ERA 835accepts .835, .edi, and .txt files, then parses and auto-matches the remittances. The result message reports what happened — for example “3/5 claims posted (4 payments, 2 adjustments).” — with unmatched claims left staged for review rather than blocking the post. -
Post queued remittances by payer check.
Electronically received remittances wait in
Unposted Remittances (N), grouped by payer check — the 835 trace number. Each check group shows the check total, the unposted amount, and the posted/other variance, so a check whose money doesn’t add up stands out before you post; expand a group for its per-claim rows (Claim, Billed, Paid, Patient Resp, Status). Rows markedReady to posttakePost; reversals and takebacks instead carry an amberNeeds review (reversal/takeback)badge with the reason, and theirPostbutton stays disabled until you resolve the claim state. A row badgedHeld: original was voidedis the one exception: the payer really did pay, but the claim it paid was voided inside Hero EMR.Post to claim of recordis the escape hatch — type a reason (required) and confirm, and the payment is recorded against the visit while the inert duplicate claims are closed. -
Post a paper or portal EOB.
When a payer sends a mailed or portal EOB instead of an 835,
Post EOBopensPost Insurance EOB. Pick the claim with the same live search picker, then key what the EOB says:Payer paid,Allowed,Patient resp. (total),Deductible,Coinsurance,Copay, andContractual write-off, plus aWrite-off CARC(e.g.CO-45), aDenial CARC(e.g.CO-16) with theDenied amount, thePayer claim # (ICN),Check #,Payment date,EOB date, and aNote. Submit withPost EOB. A CARC-coded denial entered here starts the appeal clock just as an 835 denial would. -
Enter a manual payment.
Manual Entryopens theManual Payment Entryform:Claim #(required),Payment Type(Insurance Payment,Patient - Cash,Patient - Card,Patient - ACH),Payer,Check #,Amount(required),Payment Date, andNote— thenPost Payment. TheClaim #field is a live search picker — type a couple of characters of the patient, claim number, or payer and pick the claim from the results; no more pasting exact identifiers. -
Reconcile the edges.
Two collapsible panels keep the odd cases honest.
External / filed outside EMR (N)lists remittance and status references that match no claim in Hero EMR — typically claims filed directly at the clearinghouse portal (Office Ally references likeC###P##) — with source, payer, service date, and amounts, so money arriving for them is tracked instead of vanishing.Recent ERA Ingestion Runsshows one row per 835 file processed by the pollers or a manual upload — received time, source, status, and matched / posted / unmatched counts — your proof that remittances are actually flowing in. -
Look up any check.
Remittance Historyis the ledger of every payer check/EFT received, posted or not. Search byCheck #, payer, or claim #, narrow withFrom/Todates and a status ofFully postedorNeeds attention, and page through the results. Each row shows the payment date, check/EFT number, payer, method, check total, claim count, posted amount, and status — and expands into the per-claim EOBs behind that check, down to CPT-level adjudication. This is where you answer “did we ever get paid for this?” -
Audit and refund.
Recent Payment Activitylists the latest 200 payments with Date, Patient / Payer, Type (ERA-835, Insurance, Cash, Card, ACH), Check #, Billing Entity, Amount (with any Refunded sub-line), Claims, and Status (Posted / Pending). Refundable payments show aRefundaction that opens theIssue Refundmodal — remaining refundable balance,Refund amount, andRefund reason, confirmed withRefund Payment. Card refunds flow back through Stripe automatically.
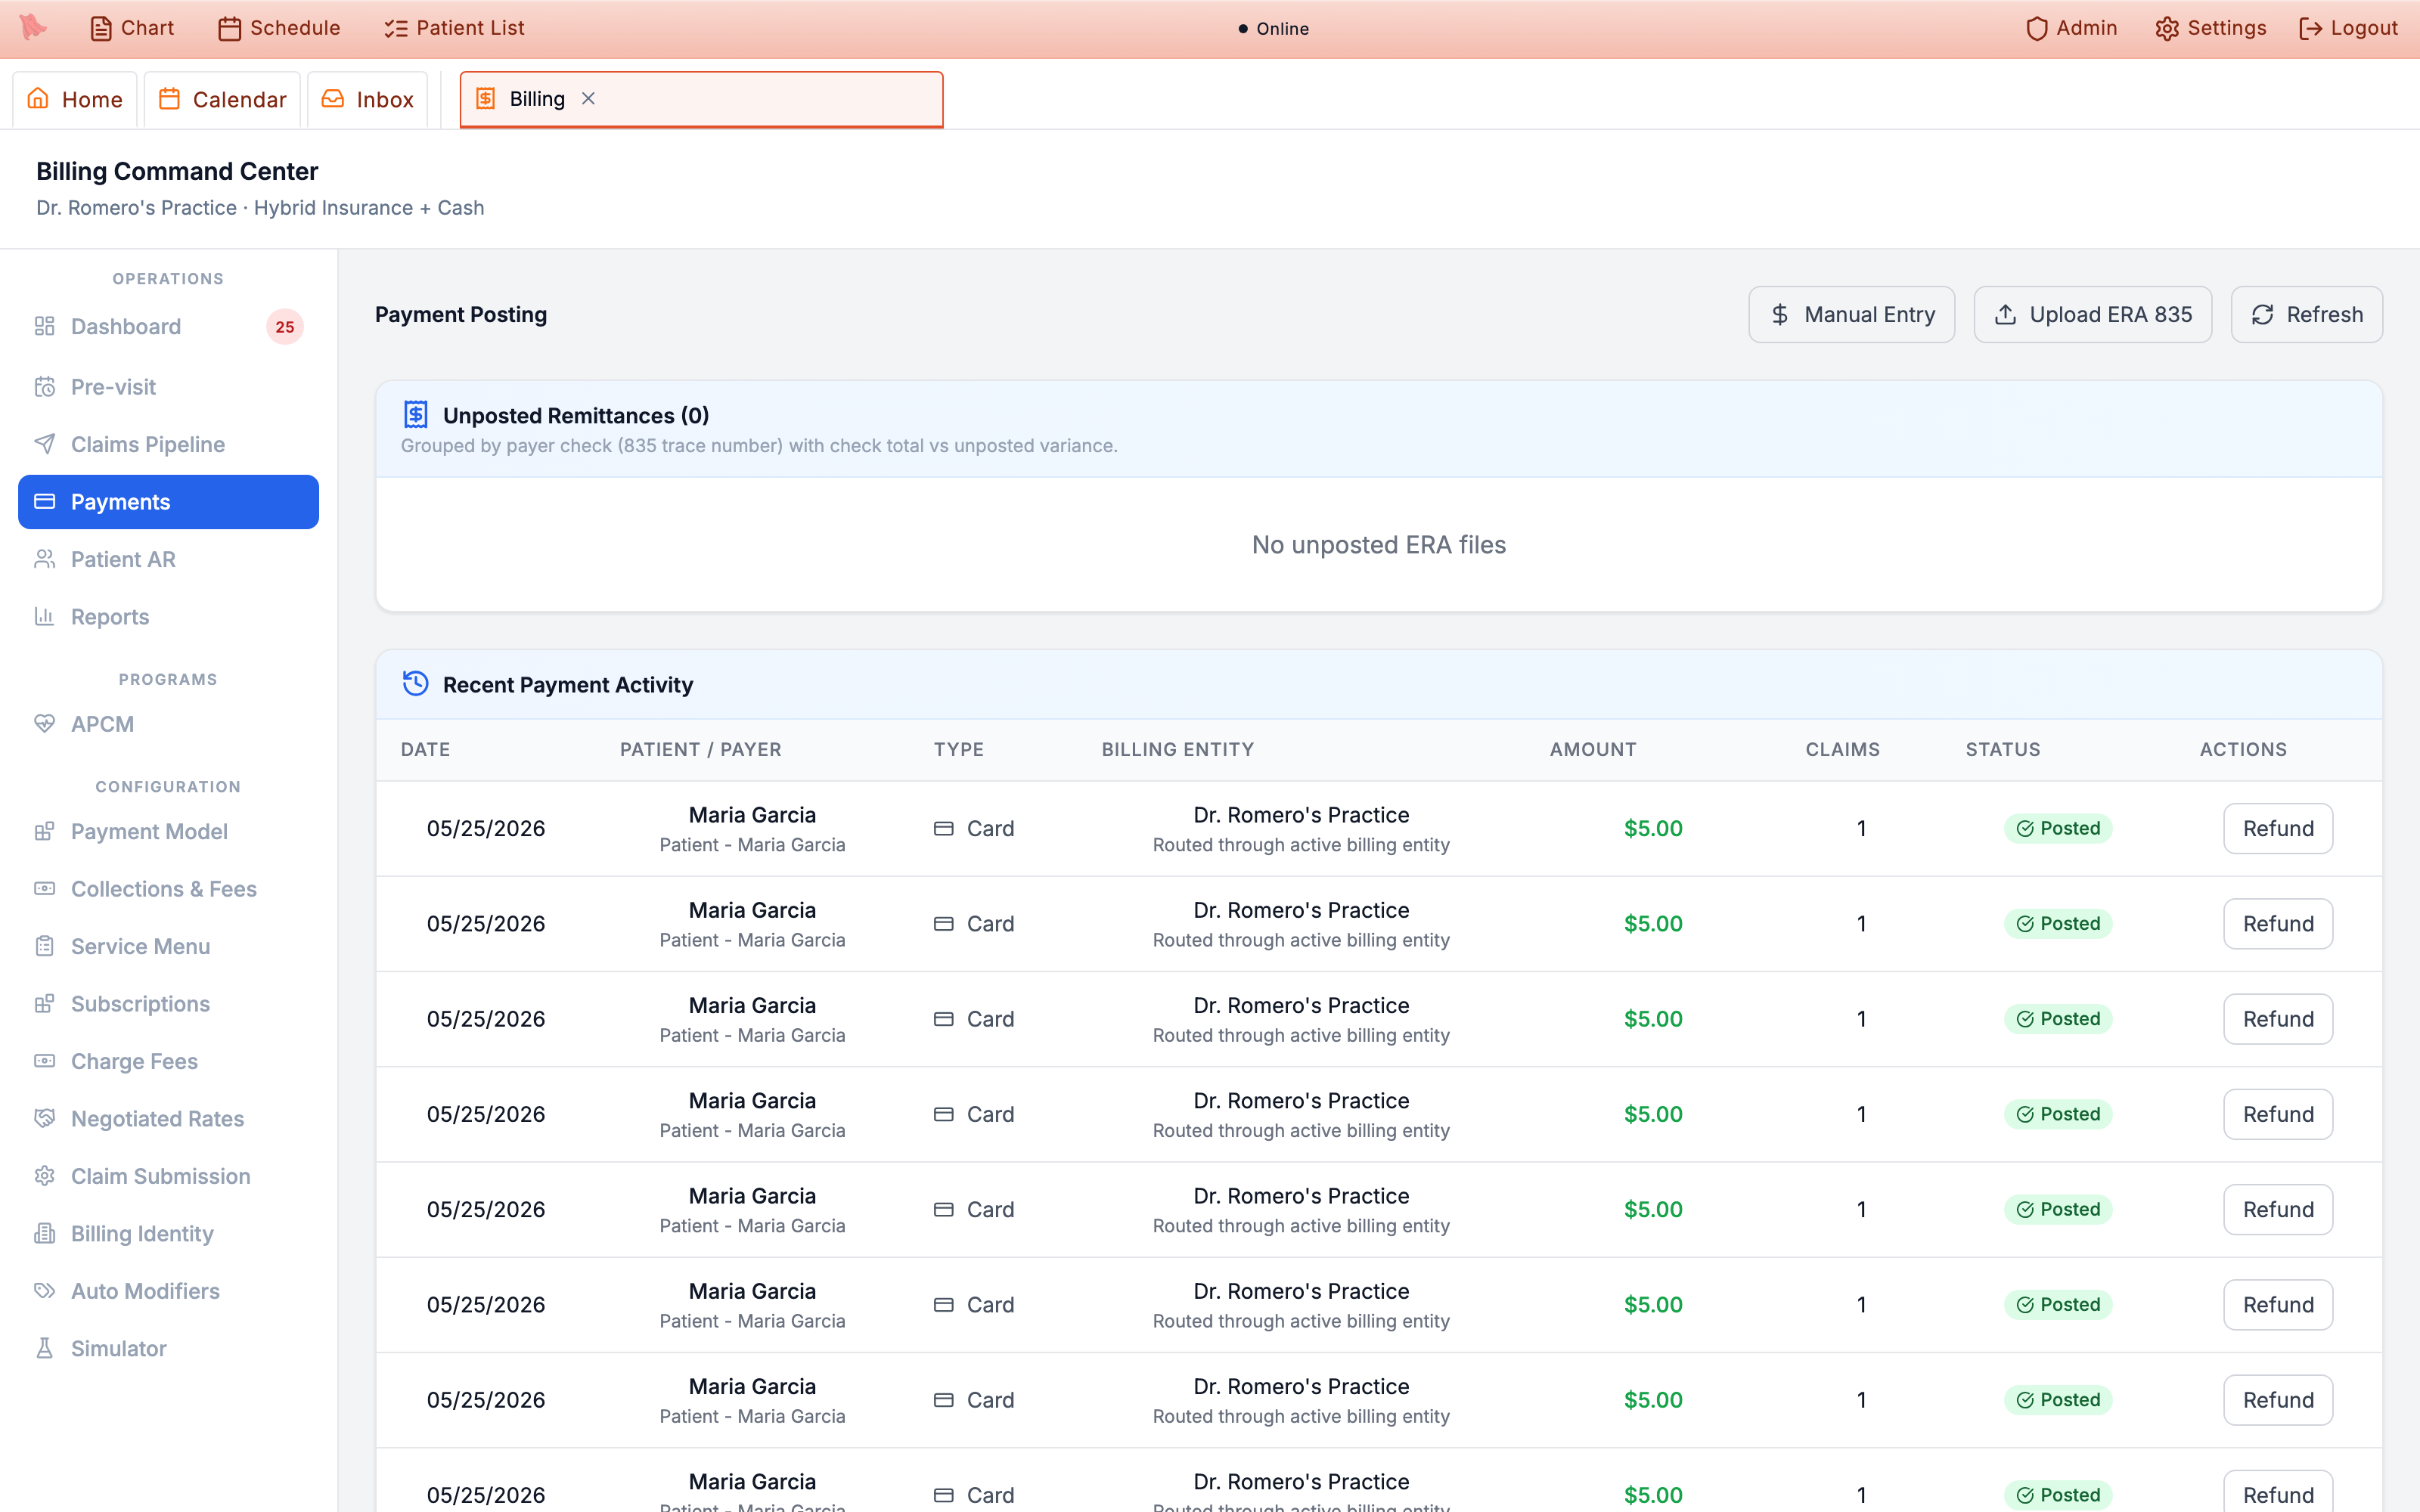
Unposted Remittances queue — grouped by payer check with a check-total variance — up top, Recent Payment Activity below with per-row Refund actions.Manage patient balances, statements & collections
The Patient AR tab opens the AR Workspace, which summarizes total outstanding (for example $1,601.51 across 10 patients) with Filters and Refresh buttons and a Search by patient name or MRN… box; practices with multiple billing entities also get a Billing entity switcher. Billing-inbox alerts about a specific patient deep-link straight here with that patient already filtered, so you land on the account in question rather than the whole roster. A toggle flips between three views — Aging, Day Sheet, and Invoices (the last one only for staff who may read patient invoices):
Aging — who owes what
- One row per patient: Balance (with Copay / Coins / Ded / Credit / Held breakdowns), Last Statement, Last Payment, and an aging badge —
Current,30-60 Days,61-90 Days,90+ Days,120+ Days. - Status filters include
Current,Past Due,Payment Plan,Credit Balance, andCollections Warning;Aging FiltersaddsMin Balance,Max Balance, andAging Bucket— note the bucket list stops at90+ Days, so a120+ Daysrow can be seen but not filtered for. - Row actions:
Statement,Plan(beta),Timeline, andCollections— plus a checkbox per row for bulk statement sends.
Day Sheet — one day’s money
- The front-desk view for a single date:
Previous Day/Today/Next Dayplus weekday quick-pick chips, with filters for visit status,Provider,Location, andOnly issues. - Each visit row shows cash
Owed/Paid, credit and held-credit lines, the pre-visit collection state (e.g. Optional prepay or Collection due amounts), claims owed/paid, membership status, and issue flags. - Row actions:
Statement,Plan(beta),Fees,Activity, andCollections.
Invoices — every invoice, two ways
- A grouping switch chooses
By patient— an accordion of patients, scoped toOpen balancesorAll invoices— orBy invoice, a flat organization-wide table. - The
By invoicetable lists Invoice, Patient, Service date, Status, Billed, Ins. paid, Patient paid, and Balance, filtered by status chips (Open,Partially paid,Paid,Cancelled,Pending insurance,Insurance review),Service from/Service todates,Min amount/Max amount, and aSortof newest, oldest, amount, or balance.Clear filtersresets them. - Results are paged from the server —
Load morereports how many of the total you’re seeing. Expanding any row opens the same invoice detail as the chart’sCharges & Creditstab, so staff read one invoice record everywhere.
-
Send a statement.
Statementopens theStatement Preview— practice and patient addresses, line items with Charges / Insurance / You Owe columns, andTOTAL AMOUNT DUE:at the bottom. Deliver it withPrintorEmail— those are the two working options. The footer also shows aDownload PDFbutton that is not wired up yet and does nothing when clicked; usePrintand save to PDF instead. -
Send statements in bulk.
In the
Agingview, tick the checkbox on each row you want and clickSend Statements (N)to email them all at once. The result reports per patient — for example Sent 12, failed 2 with the failing names — and the failed patients stay selected so you can fix the issue (say, a missing billing email) and retry without double-sending anyone who already got theirs. -
Open the billing timeline.
The
Timelinerow action opens theBilling Timelinedrawer: the patient’s outstanding balance and available credit up top, then every billing event in one chronological view — charges from their visits, claims, payments, refunds, and statements. It’s the fastest way to answer “what happened with this patient’s money?” without hopping between tabs. -
Offer a payment plan (beta).
Plan— badgedBetain the UI — opensCreate Payment Planwith a frequency choice and an installment preview before you commit. -
Review fees and payment activity.
On the Day Sheet,
Feesopens theFee Reviewmodal listing no-show and late-cancellation fees generated by your visit policies, with a permission-gatedWaive Feebutton that requires a waive reason.Activityopens thePayment Activitymodal — the receipts and credits hub: receipt numbers, amounts, refunded amounts, payment methods, aStatement history(delivery method and status per statement), andIssue Refund,Hold Credit,Apply Held Credit, andRelease Held Creditactions (all require the sensitive-billing permission). Available credits auto-apply to future balances; held credits stay off the balance until you apply or release them. -
Escalate to collections.
Collectionsappears once a patient carries $100 or more in the90+ Daysbucket. It asks you to confirm sending the patient to collections, then moves the account into the collections workflow.
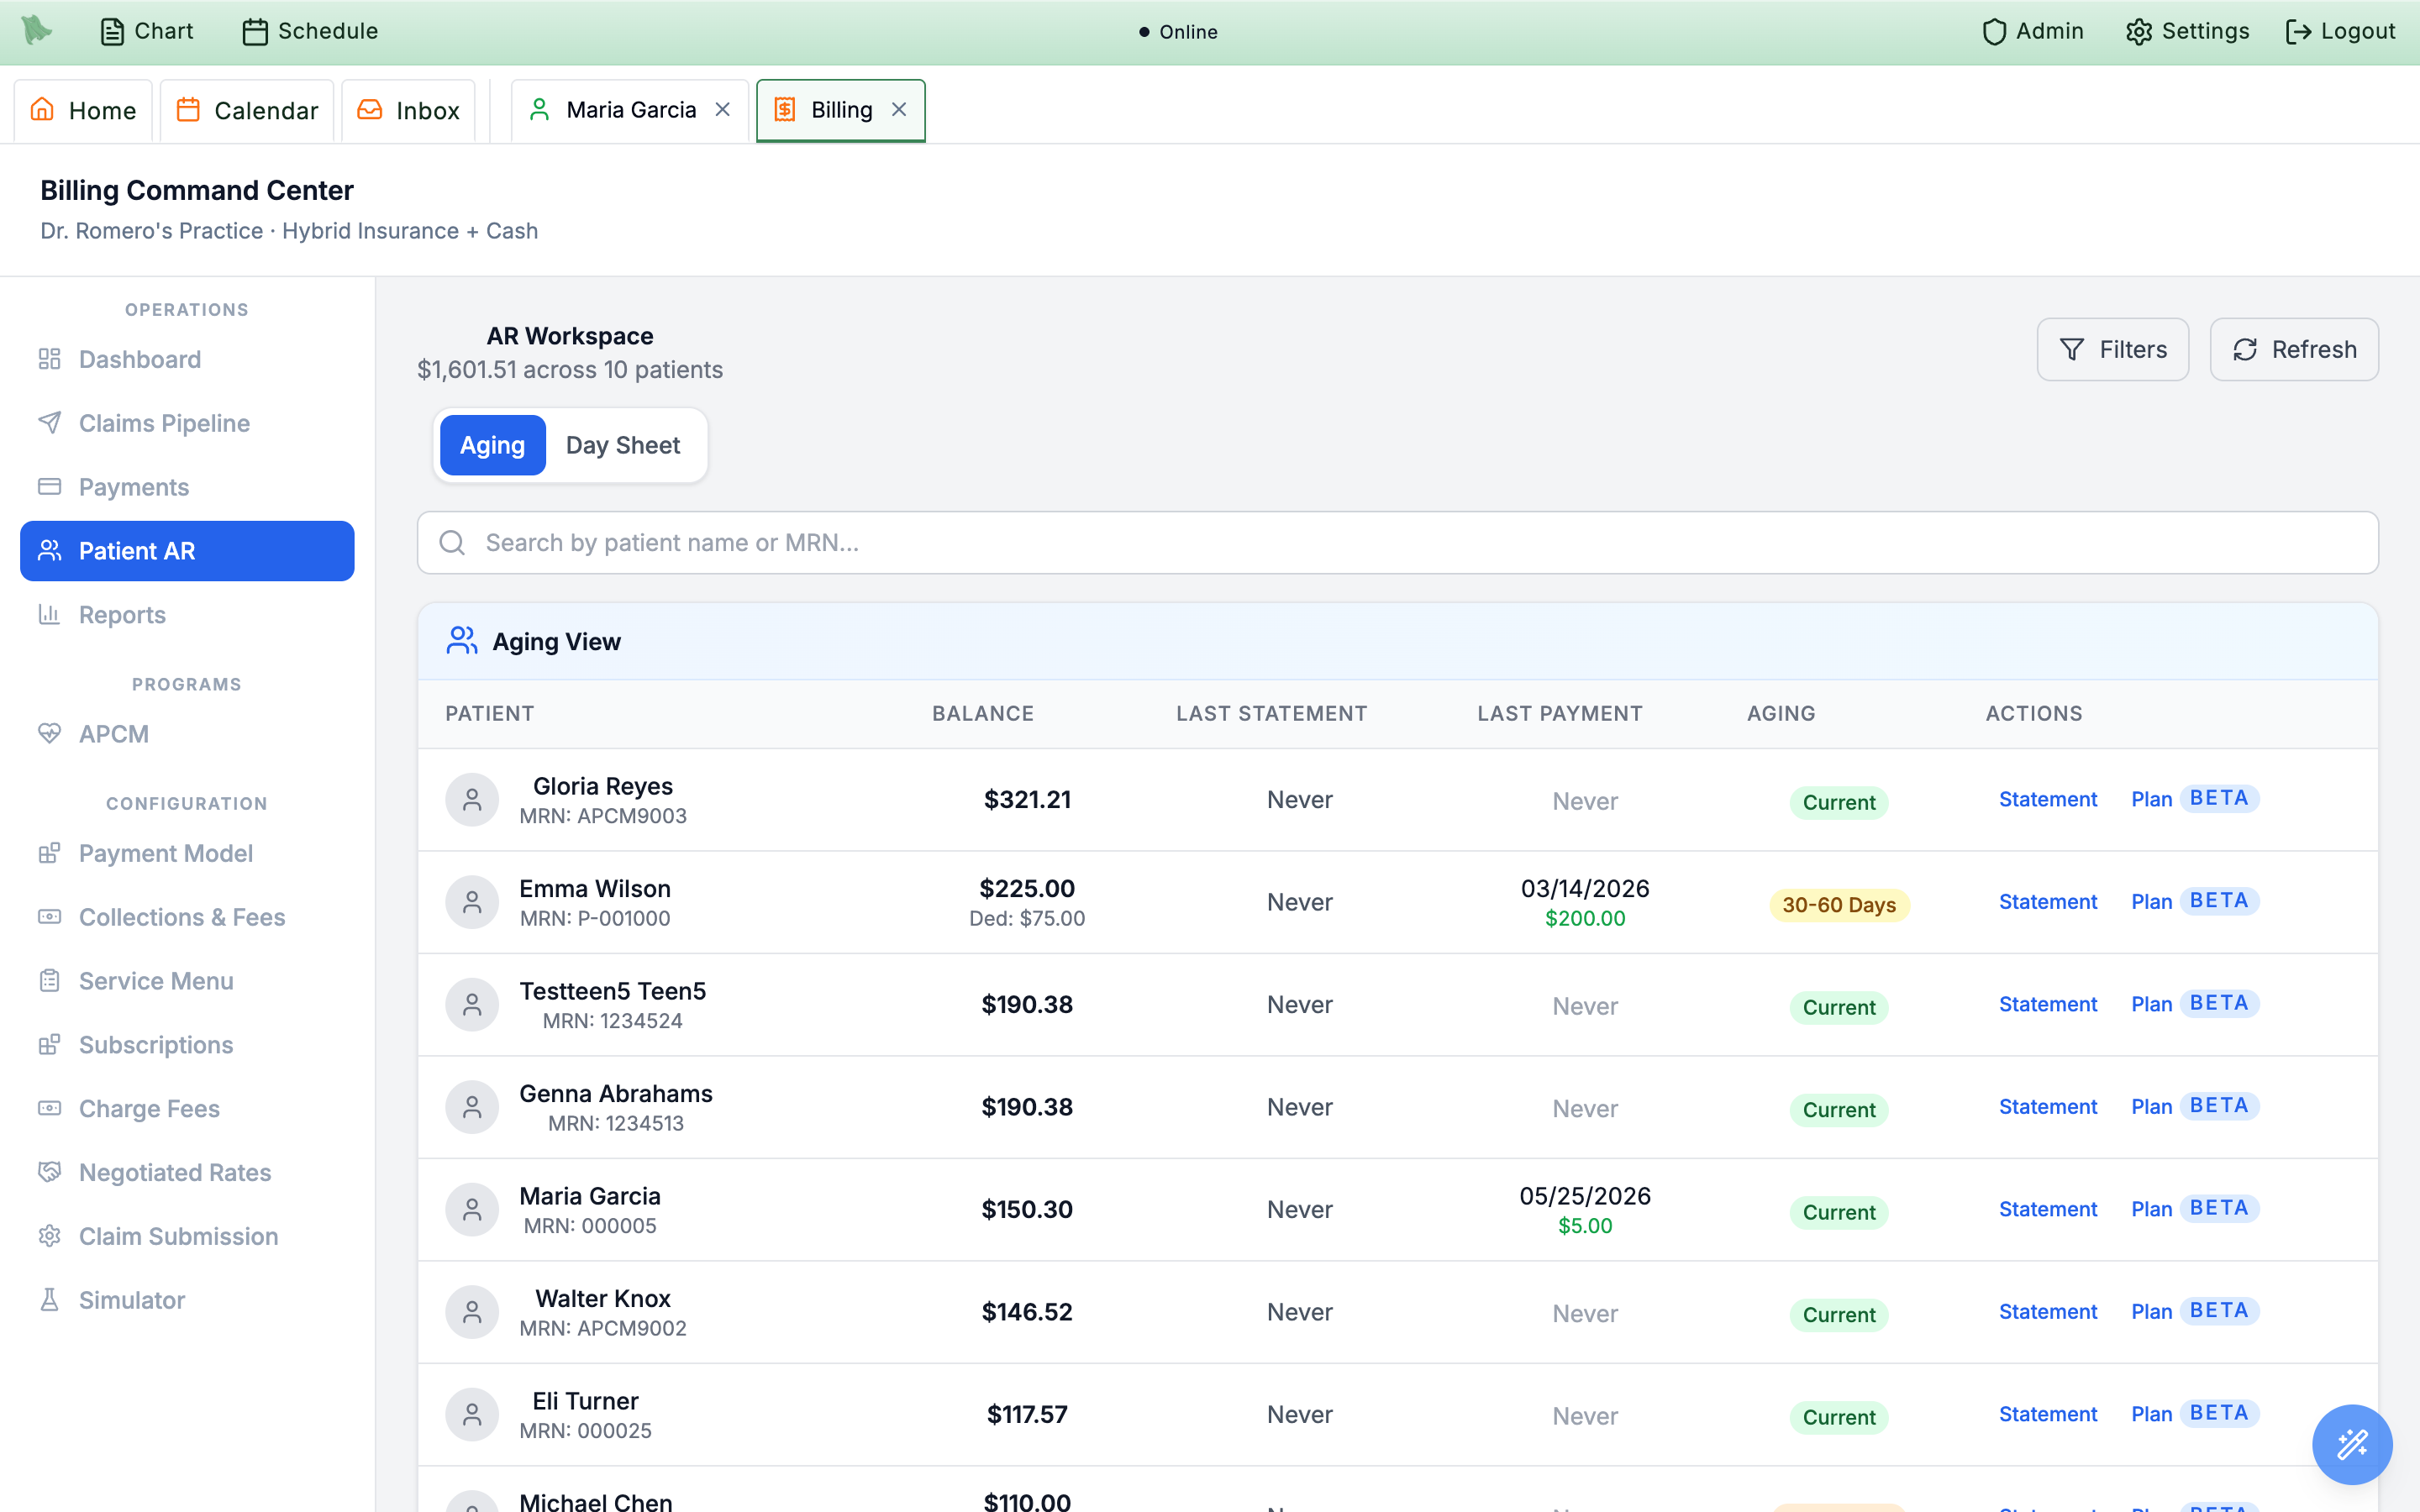
Aging view — balances, aging badges, and per-patient Statement and Plan (beta) actions.Plan action is explicitly badged Beta — expect the workflow to evolve, and double-check installment schedules before promising them to patients.
Collections & Fees policies from Billing setup; the patient-side experience is covered in Portal payments.
Run membership & subscription billing
The Subscriptions tab — “Manage recurring membership plans and patient billing.” — is the home of recurring revenue, and the primary billing workflow for DPC practices. All money movement runs through your connected Stripe account, so complete Stripe Connect onboarding first.
-
Turn on subscriptions.
The
Subscription Settingscard gates everything: anEnable subscriptionstoggle,Allow patient self-cancelfor portal self-service, and a cancellation-timing choice ofAt end of billing periodorImmediately. If Stripe Connect isn’t active you’ll see: “Stripe Connect is not active. Plans cannot be published until Stripe is configured in Admin > External Providers > Stripe.” -
Build your plans.
Under
Membership Plans,New Planopens the plan form —Plan name,Amount,Currency, anEverybilling-interval selector, and an optional trial. Plan cards support edit, publish/unpublish, and archive. Editing a published plan’s price, cadence, or trial shows a versioning warning: existing members keep the price they accepted, and the new version applies only to new enrollments. -
Enroll members.
The
Member Roster(“Monitor active subscriptions and resolve billing issues.”) lists Member, Plan, Status, Renews, Billing, and Actions, with aSearch by name or planbox plus status and plan filters. To enroll, enter a Patient ID, choose a plan, and copy theEnrollment link— the patient completes checkout in the patient portal (see Portal payments). -
Manage each member.
Per-member actions:
Detailsexpands anInvoice timelinewith per-invoice status and hosted Stripe invoice links;Cancelopens theCancel membershipmodal with a proration/access preview, a reason selector (Patient requested,Payment issue,Plan fit,Staff review,Other), and a typed confirmation;Resumeundoes a scheduled period-end cancellation;Collectretries the open invoice immediately (enabled only while the latest invoice is open); andPayment linkcopies a hosted payment link for the patient. -
Work the recovery queue.
The
Payment recovery queuehighlights members with failed invoices; rows flagPayment recovery needed,Cancels at period end,Plan no longer offered, andSnapshot needs staff review, alongside Stripe sync health. Staff with the access-override permission can useRecord overrideto grant temporary access while billing is being fixed — care continues, the invoice gets chased.
Membership Health card — active paying members, gross MRR, trialing members, past-due-after-grace and grace-period counts, scheduled cancellations, canceled this month, top churn reason, and failed invoice recovery. Net MRR and MRR at Risk aren’t on that card; they are summary cards in the DPC block above it, alongside Active Paying Members and One-off Patient AR. The Membership Report quick report exports the roster, snapshots, invoices, and cancellation reasons (see the Billing Monitor).
Bill the APCM program
APCM (Advanced Primary Care Management) is an opt-in module: the tab is absent until an admin enables it under Additional Features, and it shows only for users with billing dashboard or AR permission. Once on, it manages the full monthly cycle — enrollment, consent, care plans, and G-code billing — across four sub-tabs:
-
Watch the dashboard.
The
Dashboardsub-tab shows tier counts —Enrolled,G0556,G0557,G0558— plusMonthly Revenue, anAlertscard, and anUpcoming Generationcard with a month picker andPreview Generation/Generate Nowbuttons. -
Enroll patients.
Enrollmentshas three views:Enrolled (N),Pending review (N), andEligible (N). From Eligible, select patients and clickEnroll selected (N); from Pending review, bulkApprove (N)orReject (N). Each enrolled row shows Tier,Chronic conditions, Last appt,Coordinating provider, Status, andConsentbadges, with aManagelink to the enrollment detail. An auto-enrollment settings card can scan for eligible patients automatically or on demand (Scan now); the Eligible table showsEst. tierandEst. / morevenue. -
Capture consent.
Patient consent is a formal e-signed agreement. The
Consentbadge on each enrollment reflects pending vs. obtained consent (with method and date), and the signed consent PDF files to the patient’s media tab. -
Generate and track billing.
Generate Now(orPreview Generationfirst) creates the month’s APCM billing events. TheBilling Historysub-tab lists them by month with Patient, Code, Amount, Status, and Generated columns and aRefreshbutton. Generated events flow into the normal claims pipeline as G-code charges. -
Keep care plans current.
The
Care Planssub-tab manages each enrollment’s plan —Goalswith+ Add goal,Interventionswith+ Add intervention, andSave Care Plan— and surfaces aMissing Care Planslist, since care-plan documentation supports the billed codes.
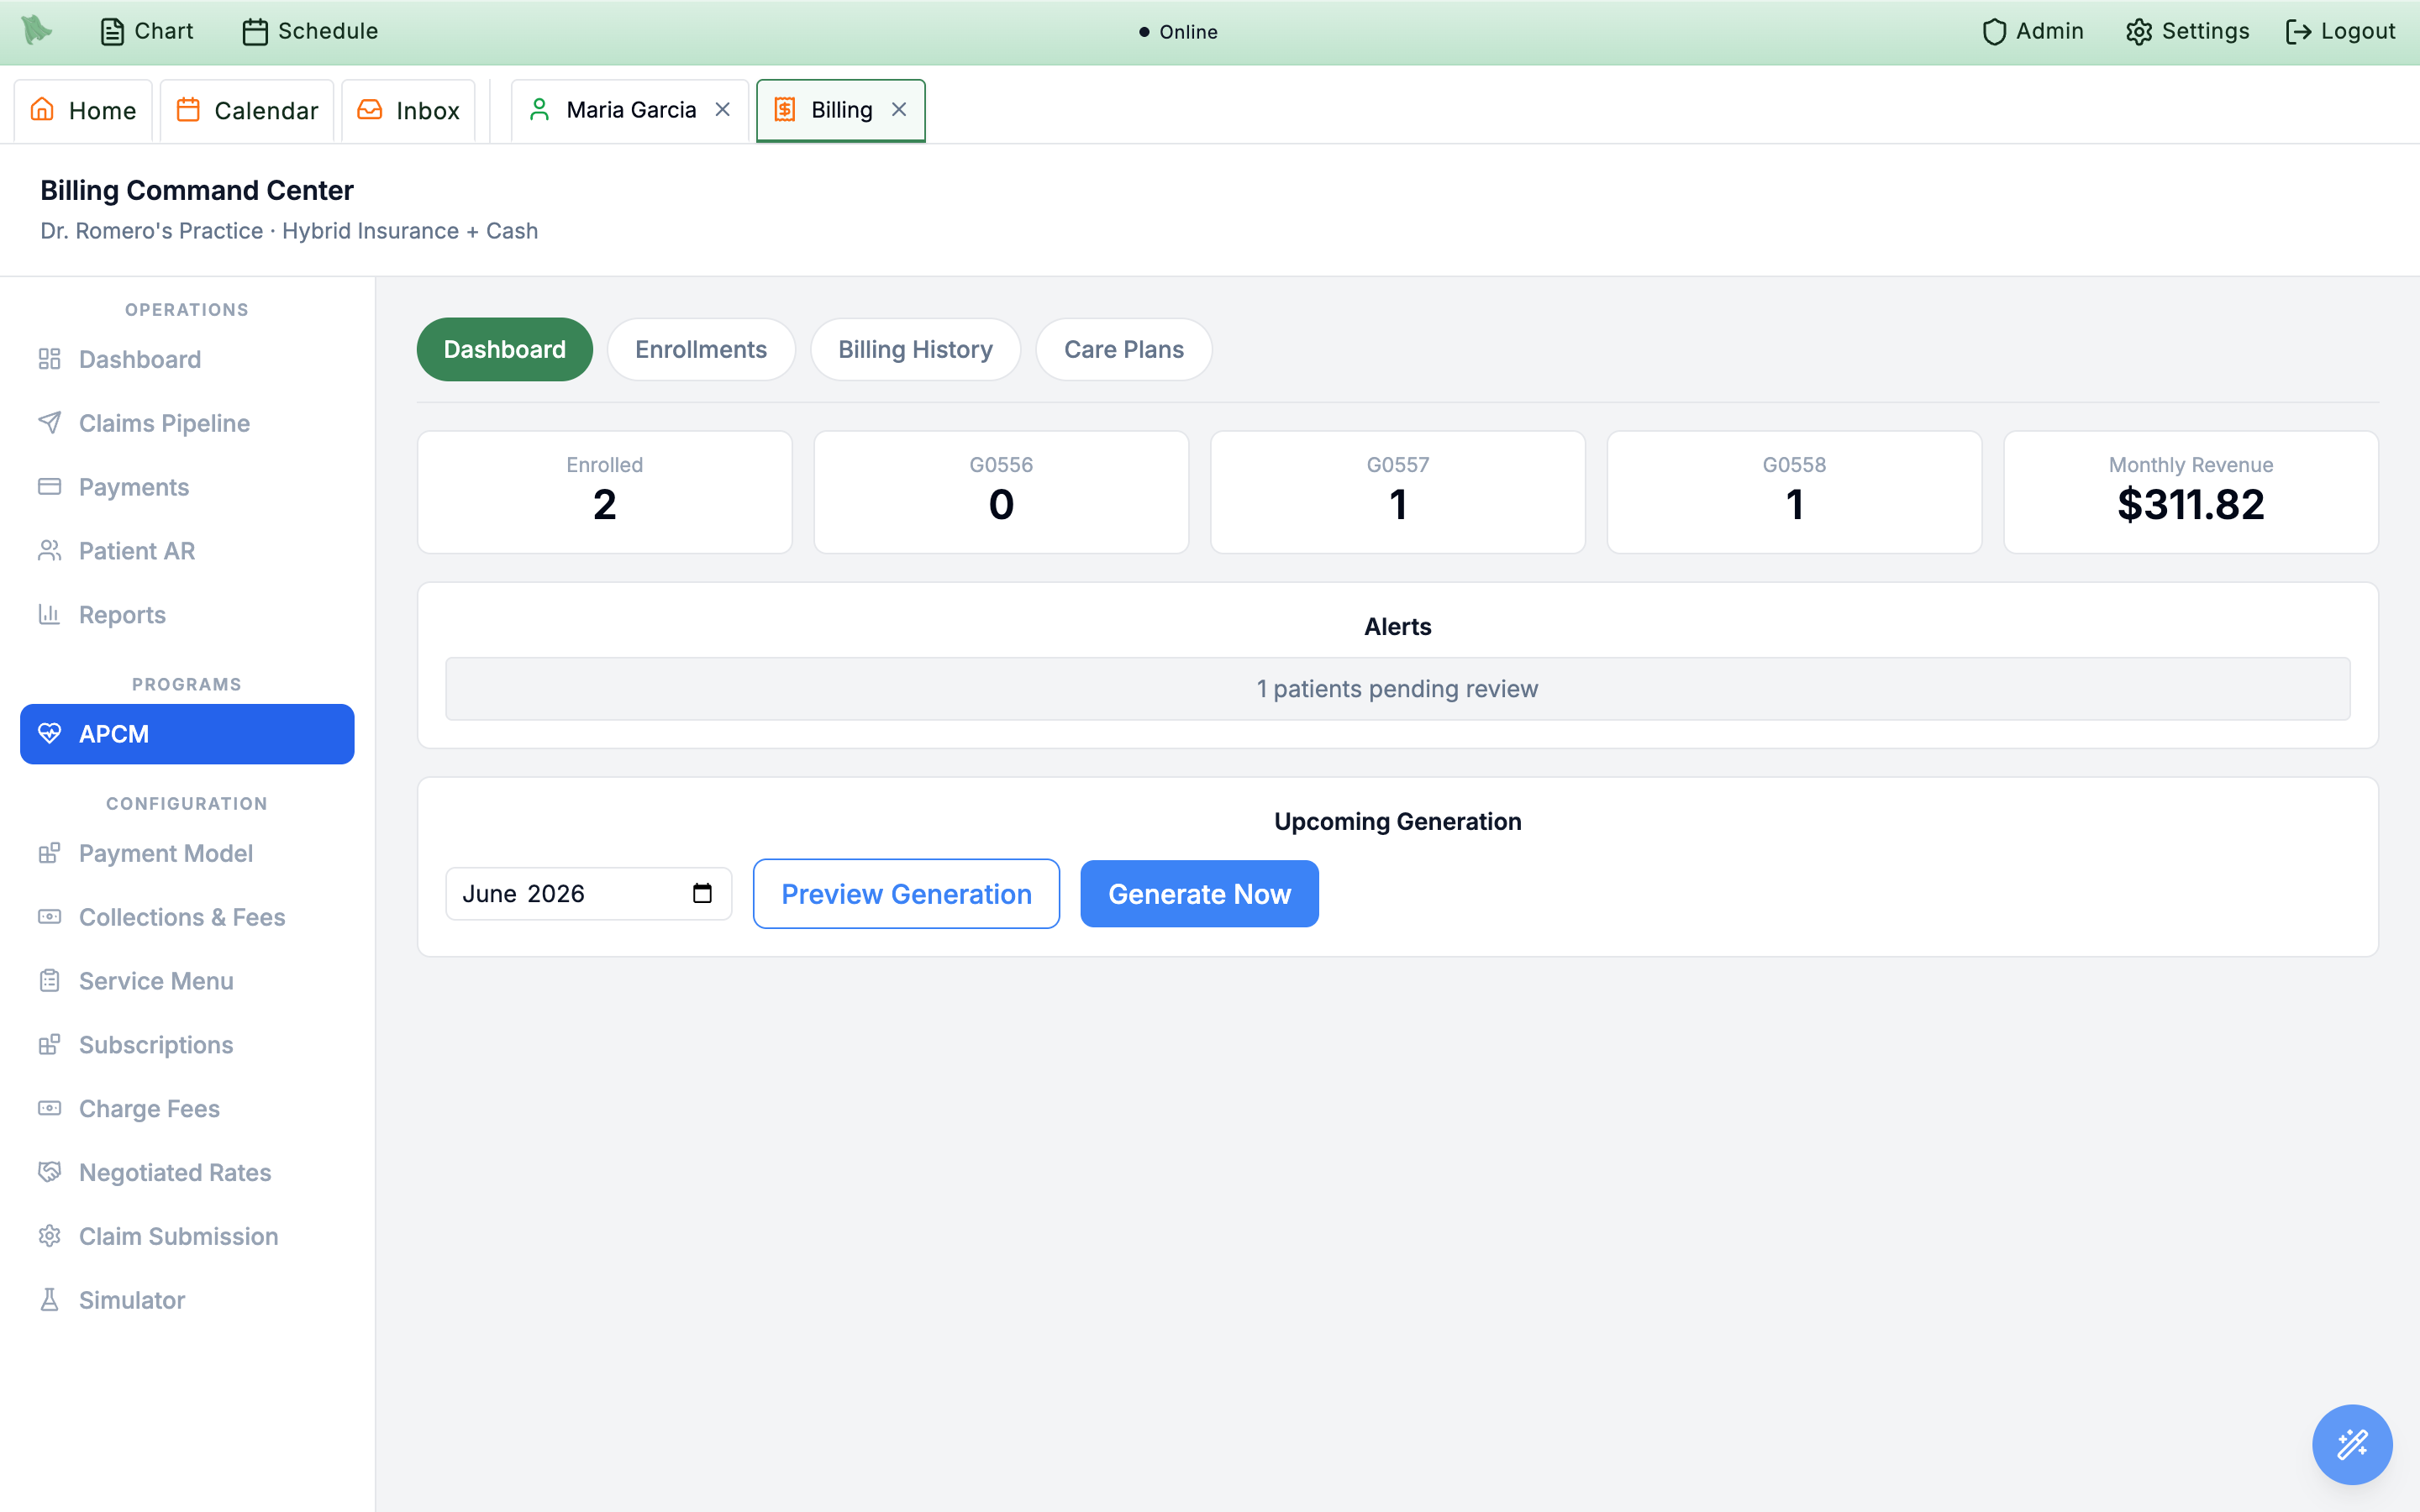
Upcoming Generation card that creates the month’s billing events.Need help? Email support@heroemr.com.