Refills & medications
Medication work between visits: pharmacy renewal and patient refill requests, prescribing without an open encounter, the chart's medication timeline, transmission statuses and errors, and pharmacies.
Refills & medications
Medication work between visits: pharmacy renewal and patient refill requests, prescribing without an open encounter, the chart's medication timeline, transmission statuses and errors, and pharmacies.
Work pharmacy renewal & change requests
Medication work that happens between visits arrives in the Rx view of the Inbox: pharmacy renewal requests, change requests, pharmacy-initiated new prescriptions, patient refill requests, cancellation denials, and transmission errors. The view is available to physicians and admins (staff accounts never see it), and the list refreshes itself every 30 seconds, so answered and newly arrived requests appear without a reload.
-
Open the Rx view.
Click
Inboxin the main tab bar, then theRxview (pill icon) in the inbox sidebar. List rows are titled by request type plus the medication’s NDC product code — open the message to see the drug name. -
Read the request.
The header card shows the drug, the patient, and a colored request-type chip, with a key-value grid for
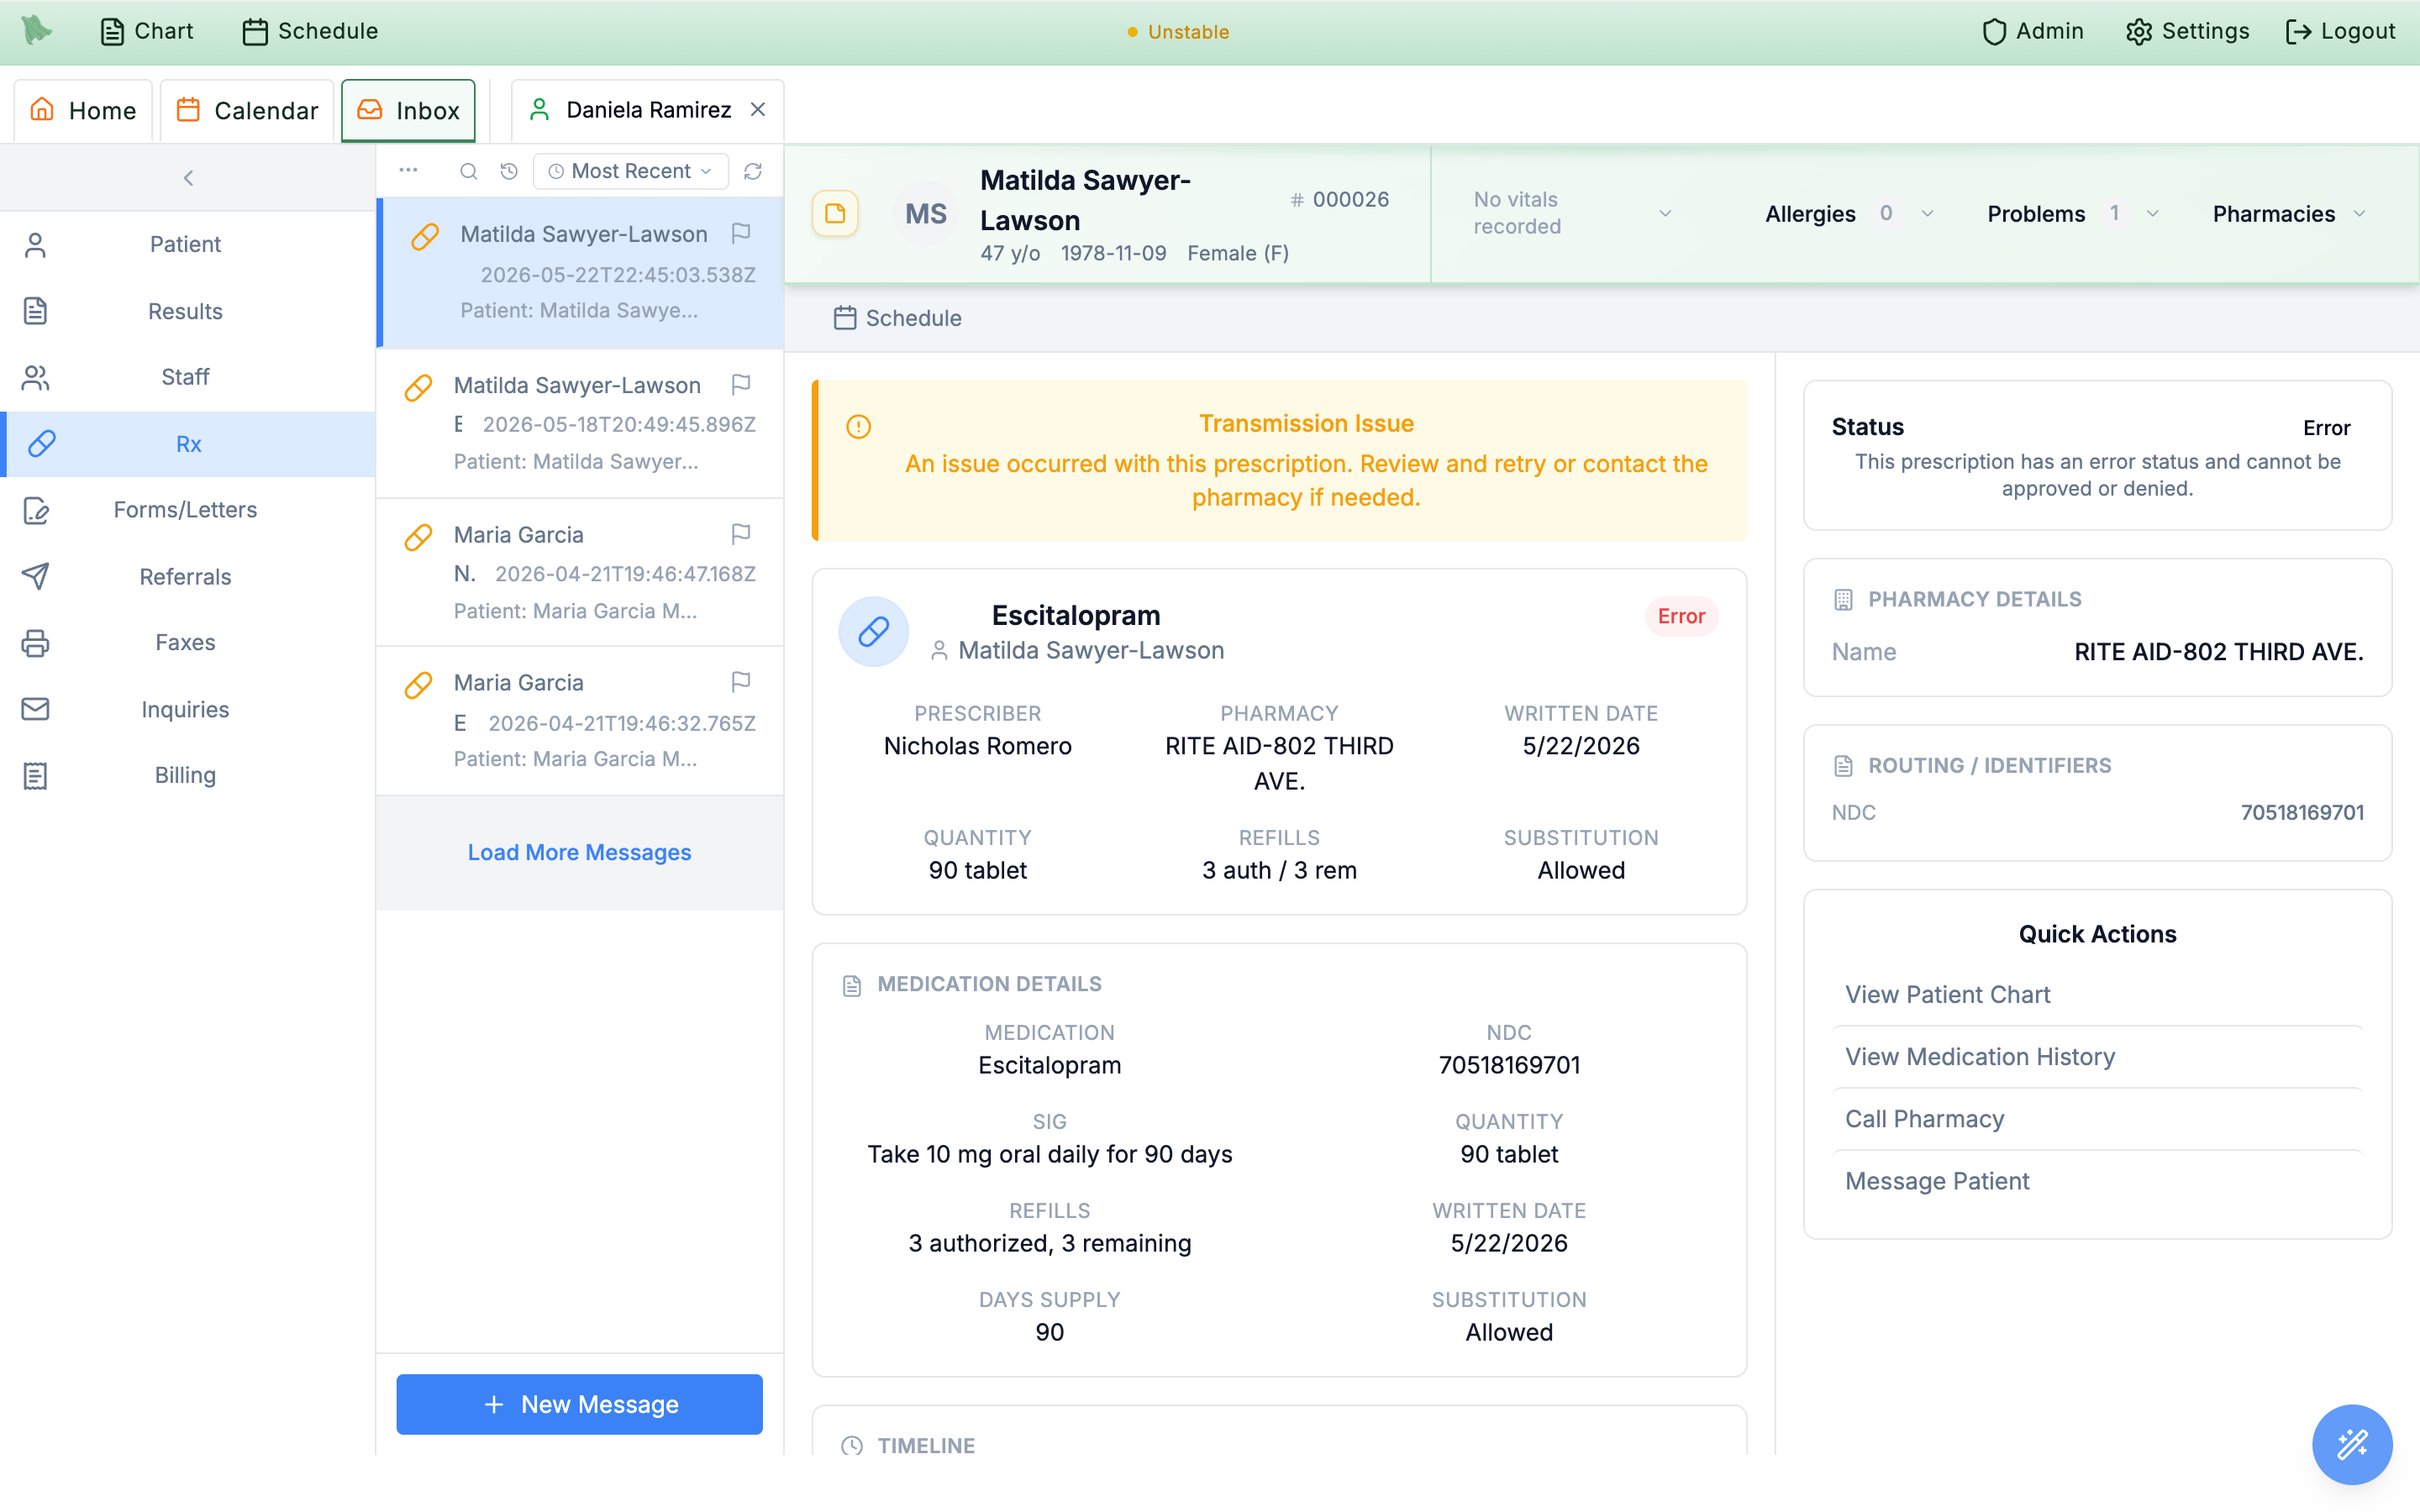
Prescriber,Pharmacy,Written Date,Quantity,Refills, andSubstitution. Below it sitRequest Info(for example “Pharmacy requests renewal (2 refills).”),Medication Details— on a change request that card is replaced by anOrdercard listing your original order’sMedication,NDC,Sig,Quantity,Days Supply,Refills, andSubstitution— and aTimeline. The right panel addsStatus, anAI Summaryof the request,Pharmacy Details, andRouting / Identifiers. -
Approve — as written or with changes.
Approveanswers the pharmacy as requested. To adjust the prescription first, openMore→Edit Medication; theEdit Prescription:dialog ends inApprove with Changes. Changing only the refill count sends the approval with the new count; any other edit sends your version back as a replacement prescription. For change requests,Morealso offersValidate, which returns a validated response to the pharmacy — the status card then readsChange request validated. -
Or reject with a reason.
Rejectreveals aSelect denial reasondropdown listing the twelve standard Surescripts denial reasons — among them “Patient unknown to the prescriber”, “Patient has requested refill too soon” (the pre-selected default), “Refill not appropriate”, “Medication is discontinued”, and “Other” — and anAdditional details (optional)box.Confirm Denialsends it; the status card then showsRenewal request deniedwith “Denial sent to the pharmacy. We’ll refresh if they respond.”
| Request chip | What it is | Your actions |
|---|---|---|
Renewal Request | The pharmacy asks you to renew a prescription that is out of refills. | Approve, Approve with Changes, or Reject |
Change Request | The pharmacy proposes a change; the detail pane shows your original order in an Order card. | Approve, Validate, Approve with Changes, or Reject |
New Prescription | A pharmacy-initiated request for a new prescription. | Approve or Reject |
Patient Refill Request | A refill request submitted from the patient portal. | Create Rx or Deny — see Patient refill requests |
Cancel Request Denied | The pharmacy declined your electronic cancellation. | Informational — see Status & errors |
Error | A prescription failed transmission or verification. | Informational — re-issue; see Status & errors |
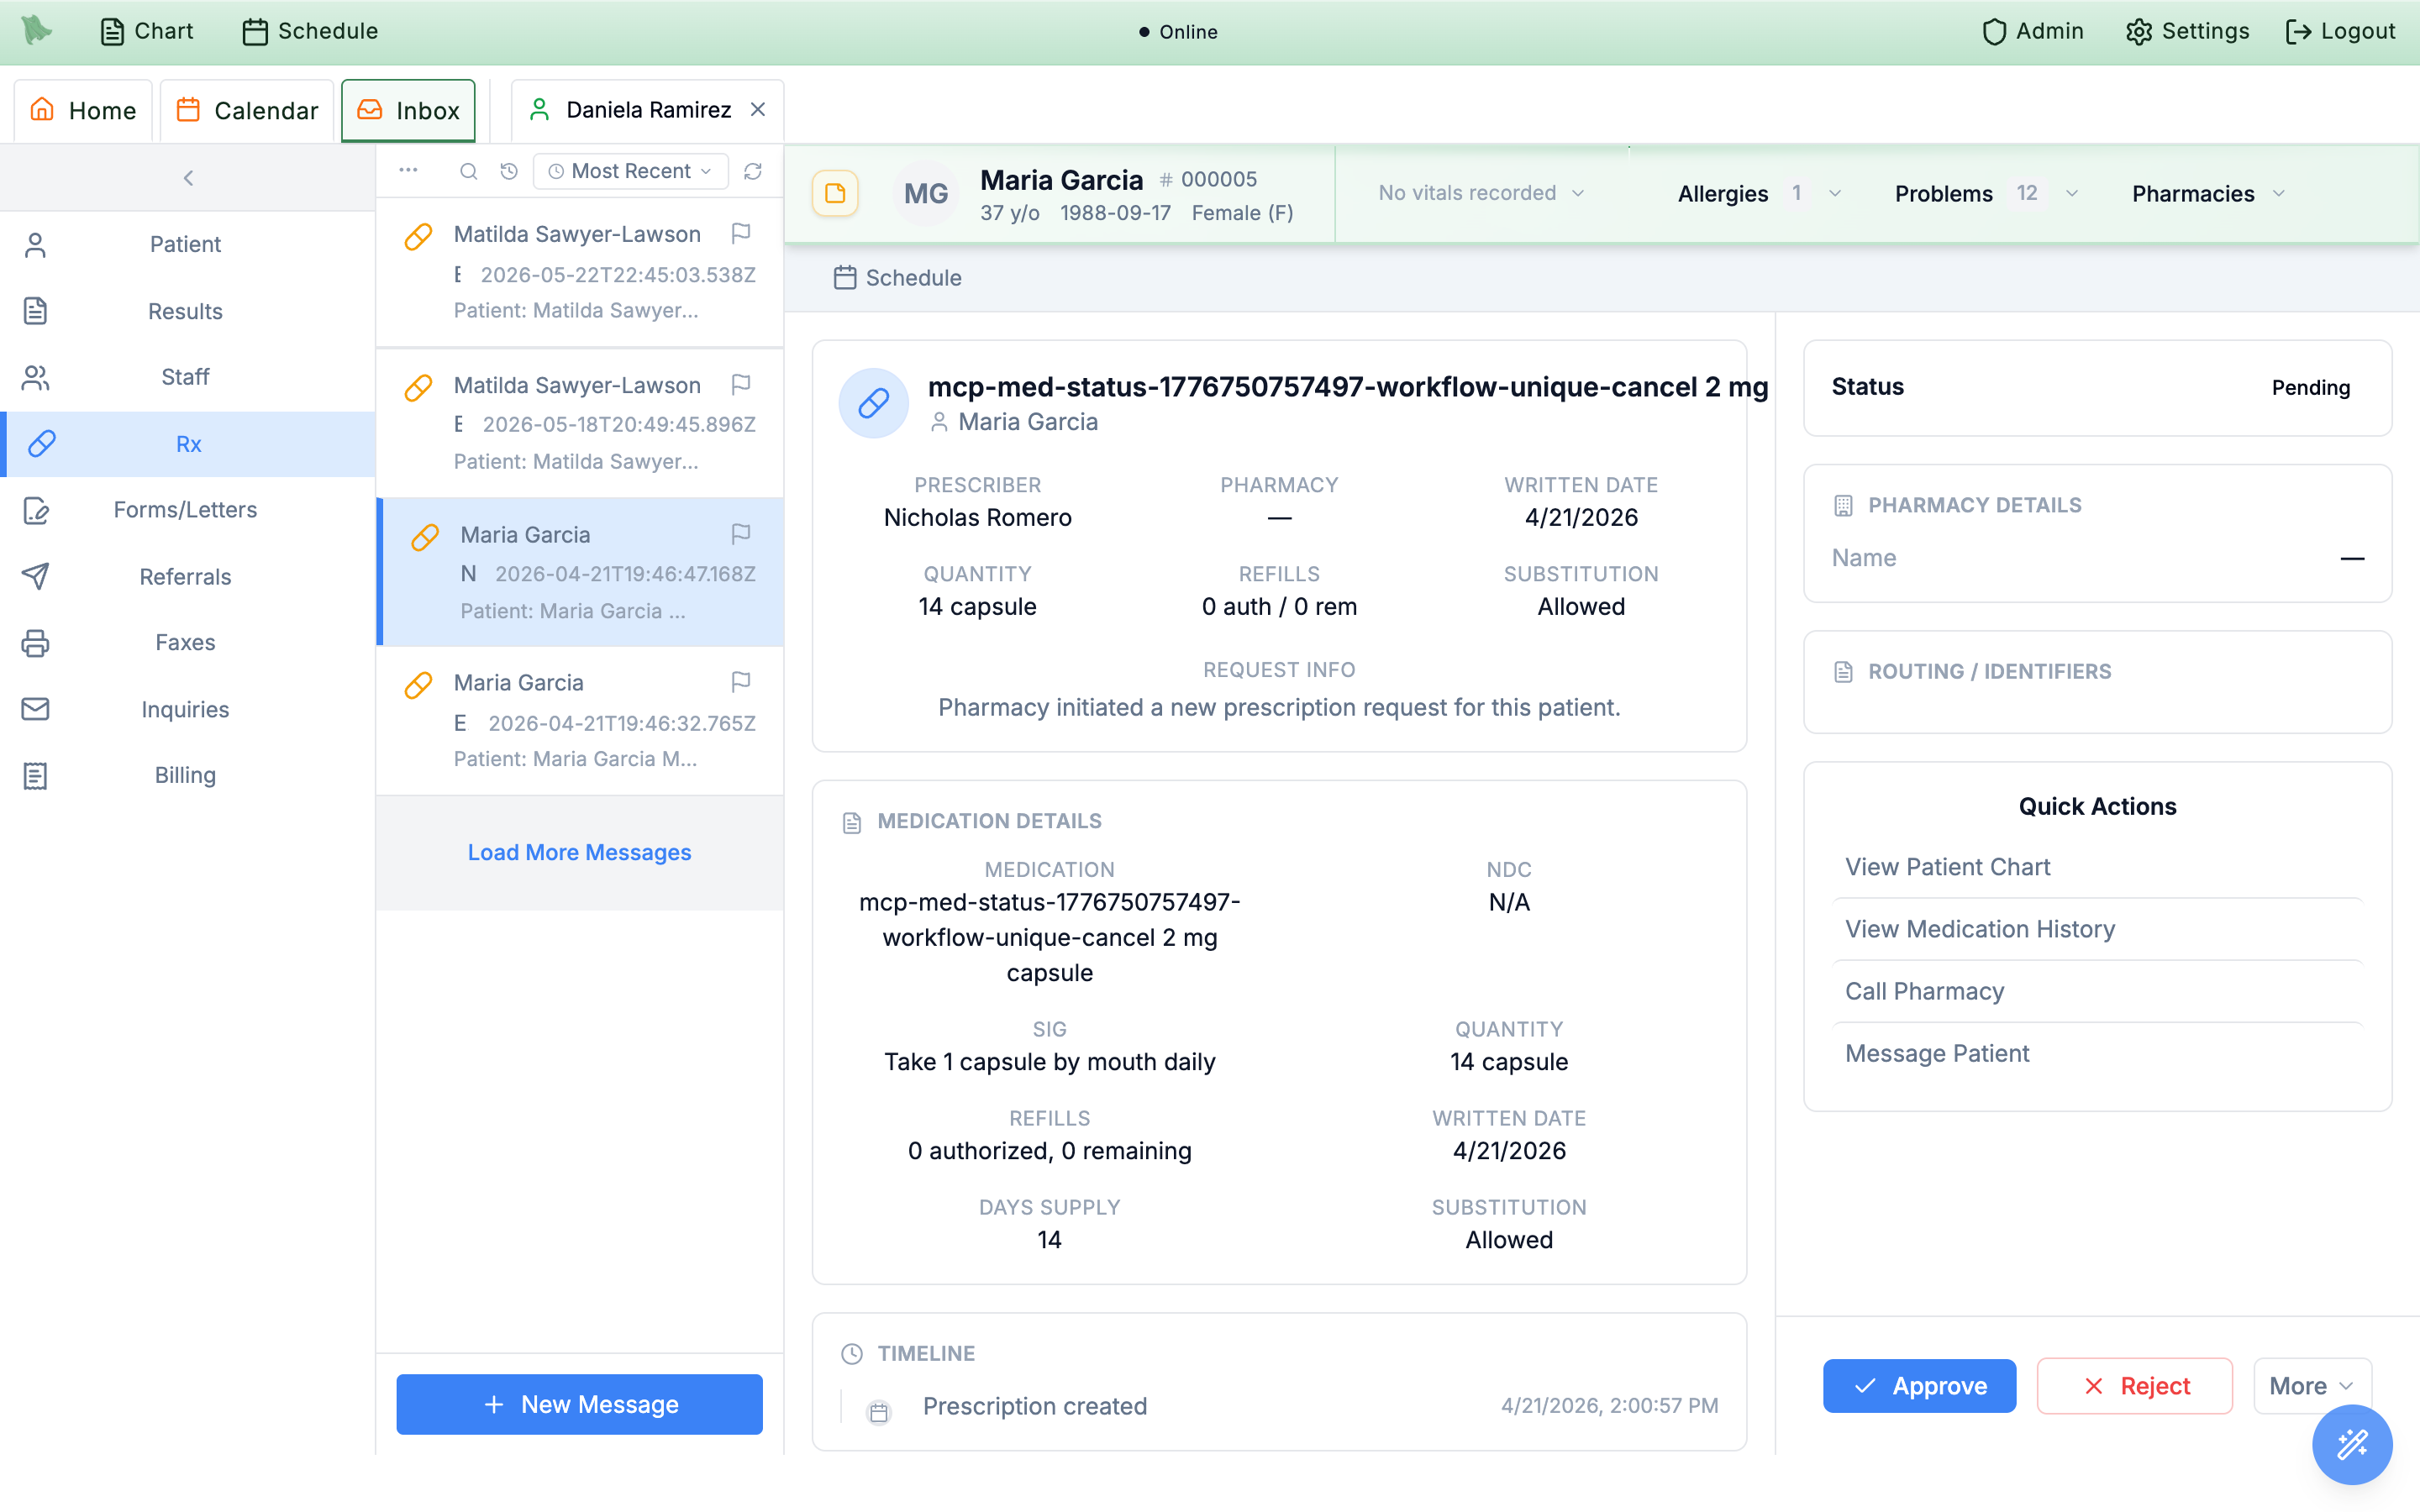
Approve / Reject / More action bar.Status card records the outcome — for example Renewal request approved with “Approval transmitted to the pharmacy.”, or for a change request, “Change response sent to the pharmacy. Any pharmacy follow-up will appear here.”
Controlled substance banner — “Approving requires passkey (EPCS) verification. Denials do not require passkey.” Approving opens the same passkey verification used for in-encounter EPCS signing. Schedule II renewals are blocked outright (“Schedule II renewals cannot be approved. Deny the request and issue a new prescription.”), and Schedule II change requests must carry a days supply between 1 and 30 before approval is attempted.
Approve or deny patient refill requests
Patients ask for refills from the patient portal medications screen using Request refill. Their requests land in the same Rx inbox as pharmacy traffic, marked with an amber Patient Refill Request chip, and the message itself explains the model: “Patient requested a refill from the portal. Creating an Rx makes an internal draft for clinician review.” What patients are allowed to request is governed by your practice’s refill settings.
-
Review what the patient reported.
A dedicated
Patient Requestcard showsRemaining Supply(in days, or “Not provided”),Pharmacy Confirmed,Patient Attestation, andReview Status, plus any free-text note the patient added. -
Create the draft prescription.
For patient requests the action bar swaps labels: the primary button is
Create Rxand the deny button isDeny.Create Rxconverts the request into an internal draft — it copies the drug, sig, quantity, days supply, and refills, and sets the patient’s pharmacy from the request. The status card confirms withDraft prescription createdand “Review, sign, and send the draft prescription from the prescription workflow.” -
Or deny with a reason.
Denyuses the same denial-reason flow as pharmacy requests; the recorded outcome readsPatient refill request denied.
Create Rx sends nothing to the pharmacy. It produces a draft for clinician review — the prescription still has to be reviewed, signed, and sent from the prescription workflow before the patient gets their medication. Don’t treat a created draft as a completed refill.
Create Rx disabled (“This patient refill request is blocked by prescription policy.”); you can still deny it. Even an unblocked request is re-validated when you click Create Rx (pharmacy confirmation, attestation, medication eligibility, controlled-substance rules), so conversion can refuse with an explanatory error. Patient-reported medications still flagged Needs review on the chart can’t generate refill requests at all — see the Medications tab.
Prescribe from the chart with Create Orders
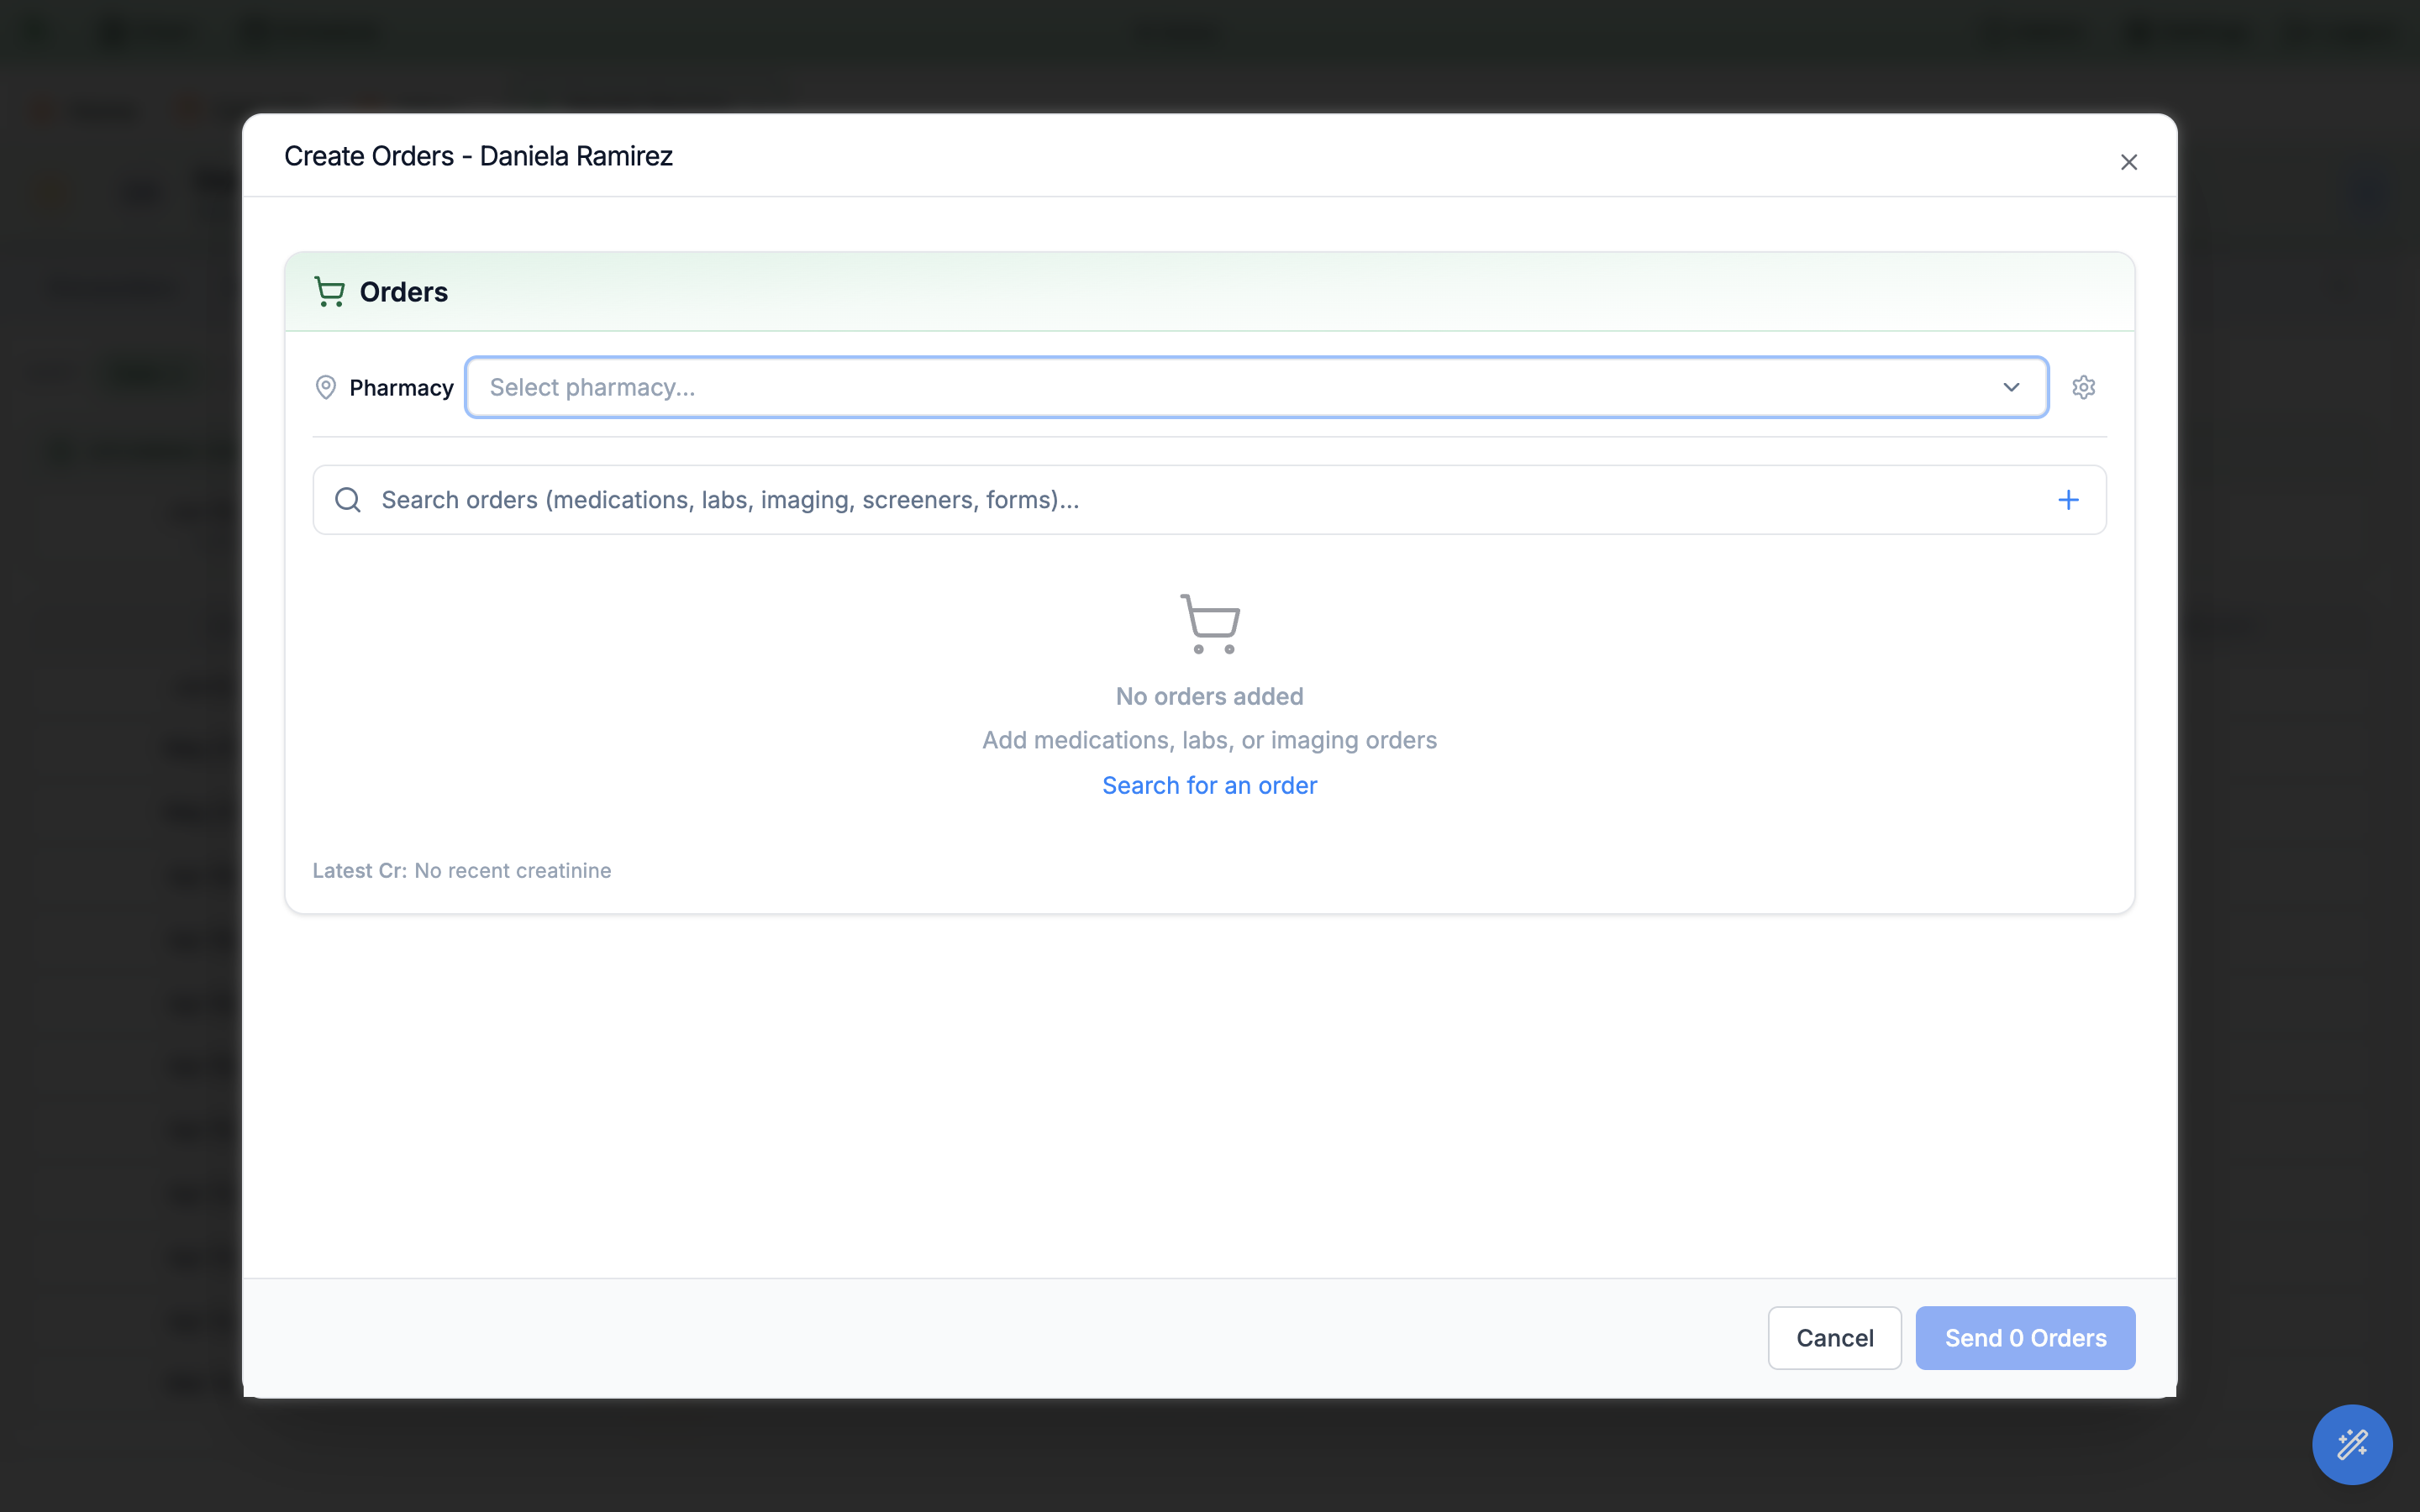
The Create Orders modal lets a physician prescribe — and order labs or imaging in the same send — straight from a patient’s chart, with no encounter open. It embeds the same order-entry workspace you use at encounter completion, so the search window, prescription builder, and safety checks all behave identically. There is no on-screen button for it: it opens from the keyboard or by voice, and the shortcut is physician-only.
-
Open it from the keyboard.
With a patient chart open, press F7 or Ctrl+O — the modal opens titled
Create Orderswith the patient’s name. You can also ask the voice assistant (“prescribe lisinopril 10 mg for this patient”) to open it pre-populated, titledPrescription from Command Hero; and inside a patient’s Inbox message, theNew Ordertoolbar button expands the same workspace as an inlineOrderspanel. -
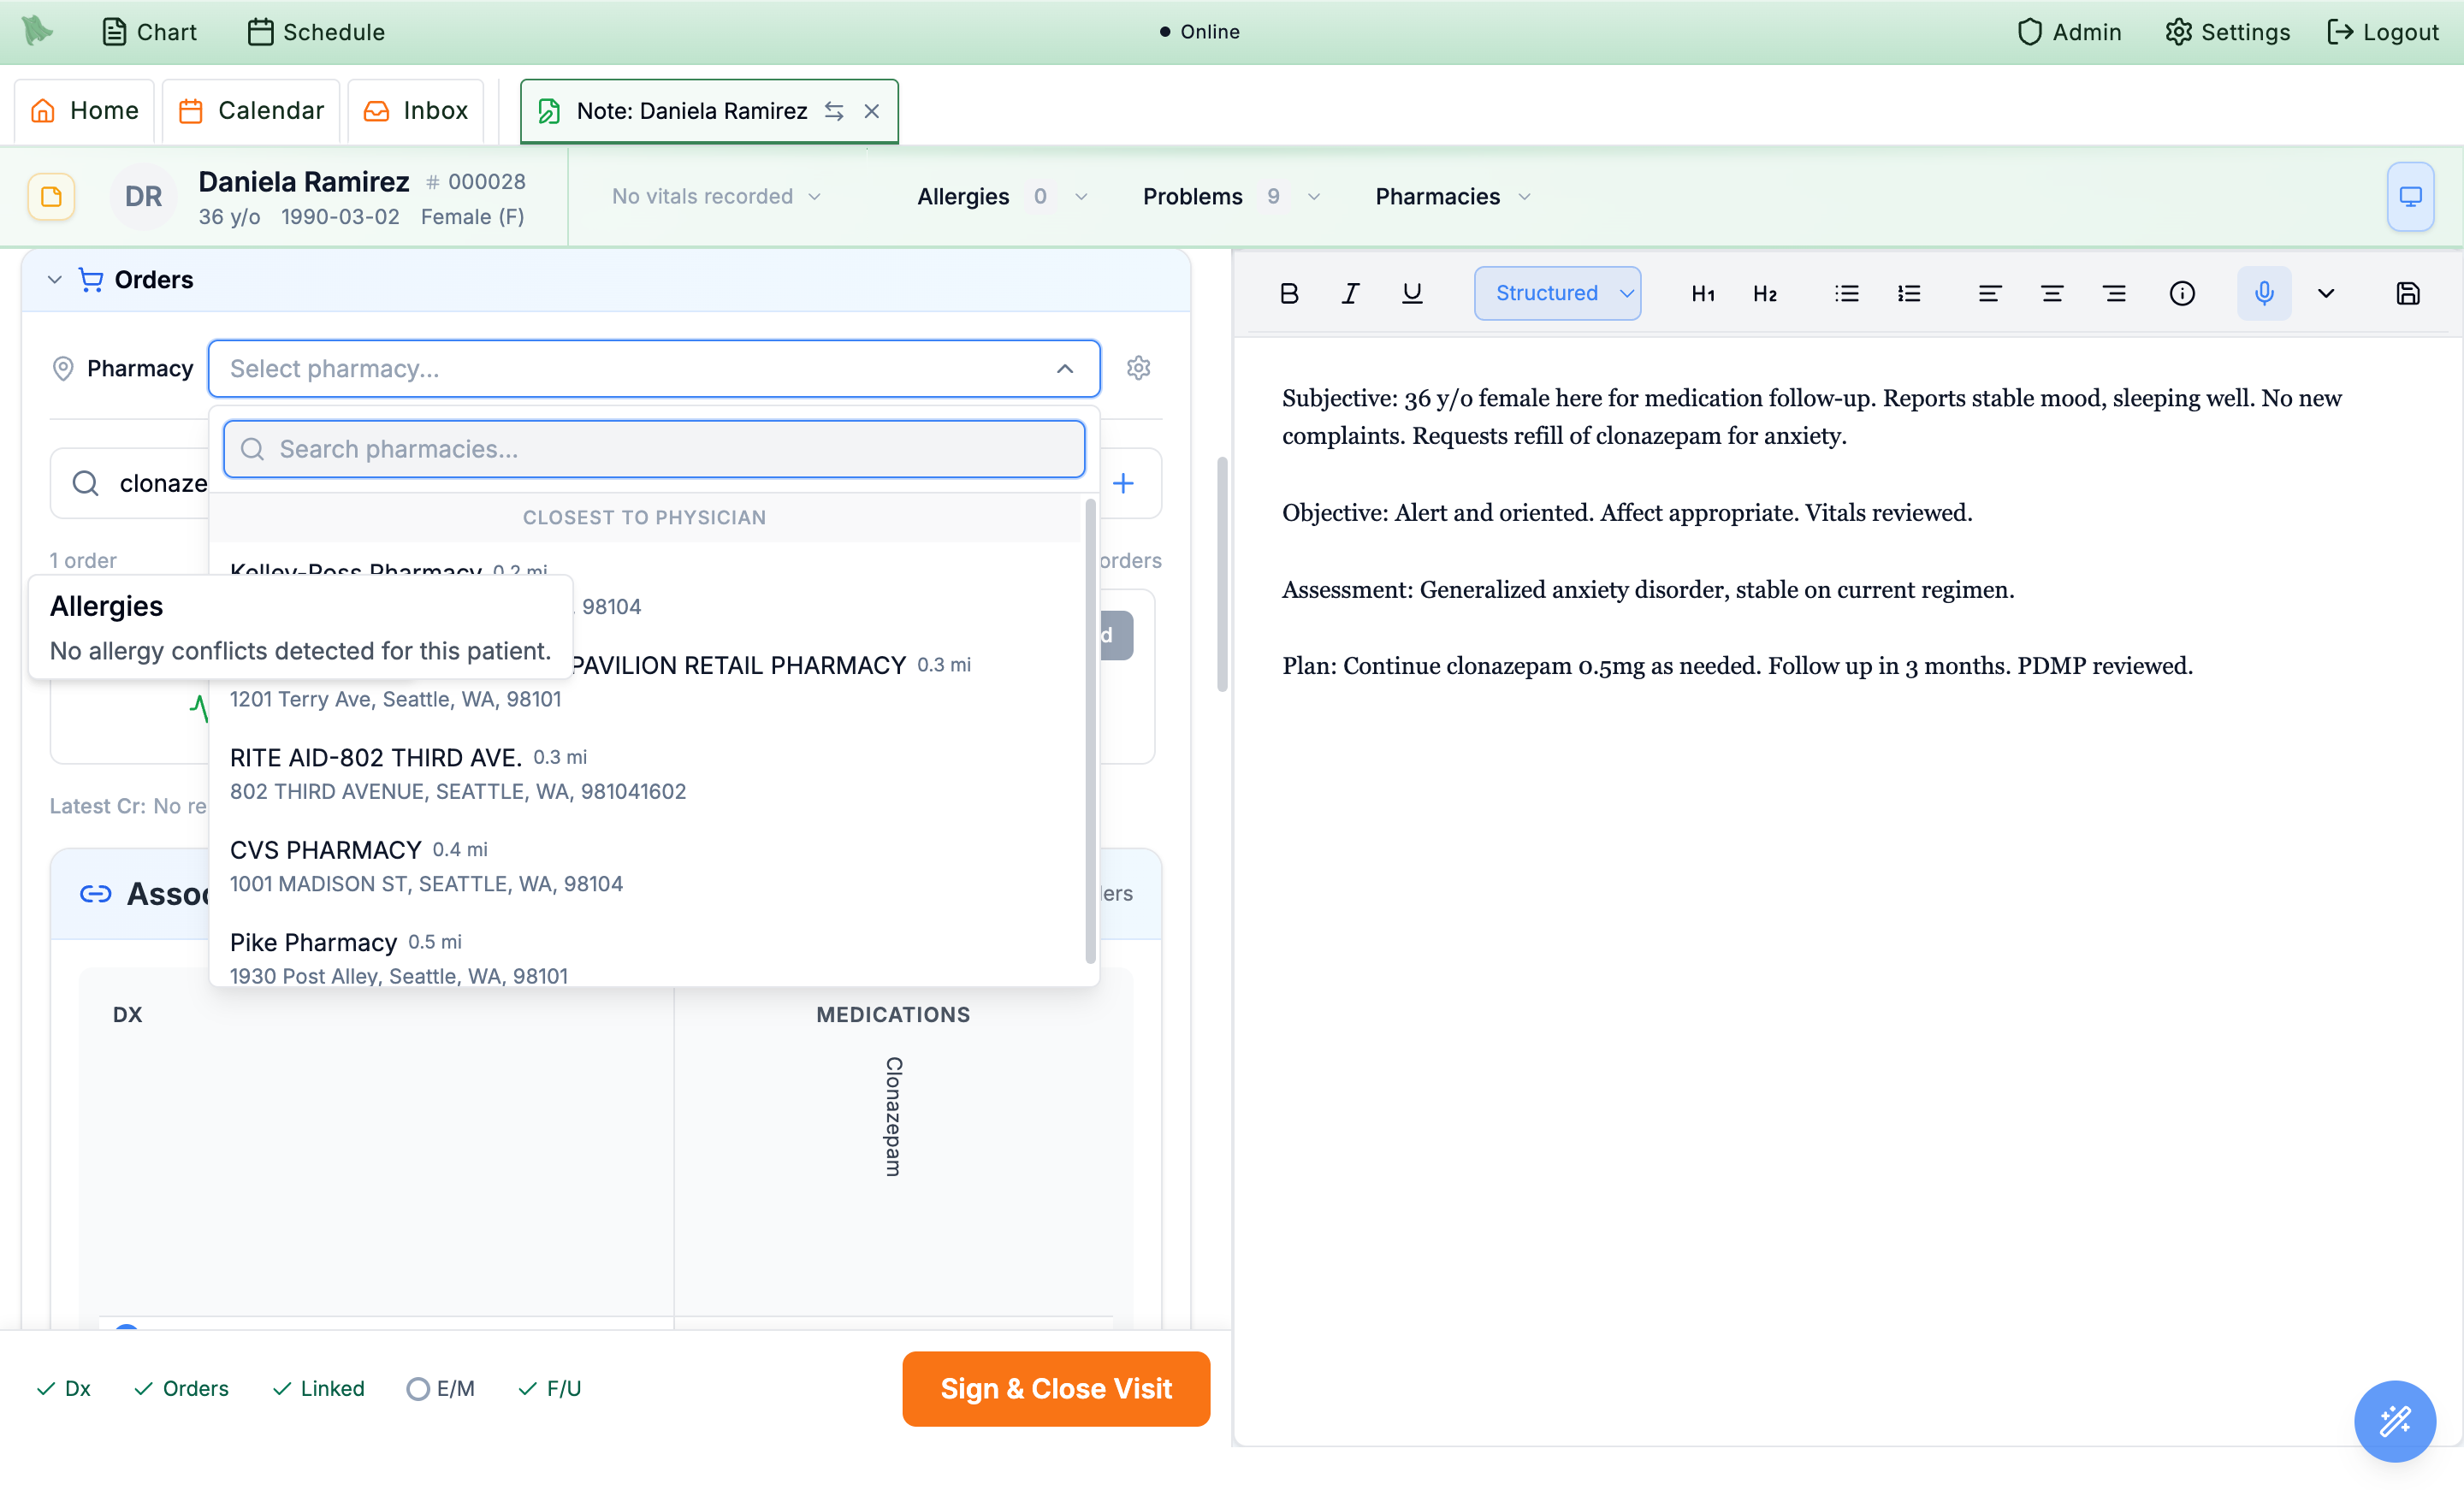
Pick the pharmacy.
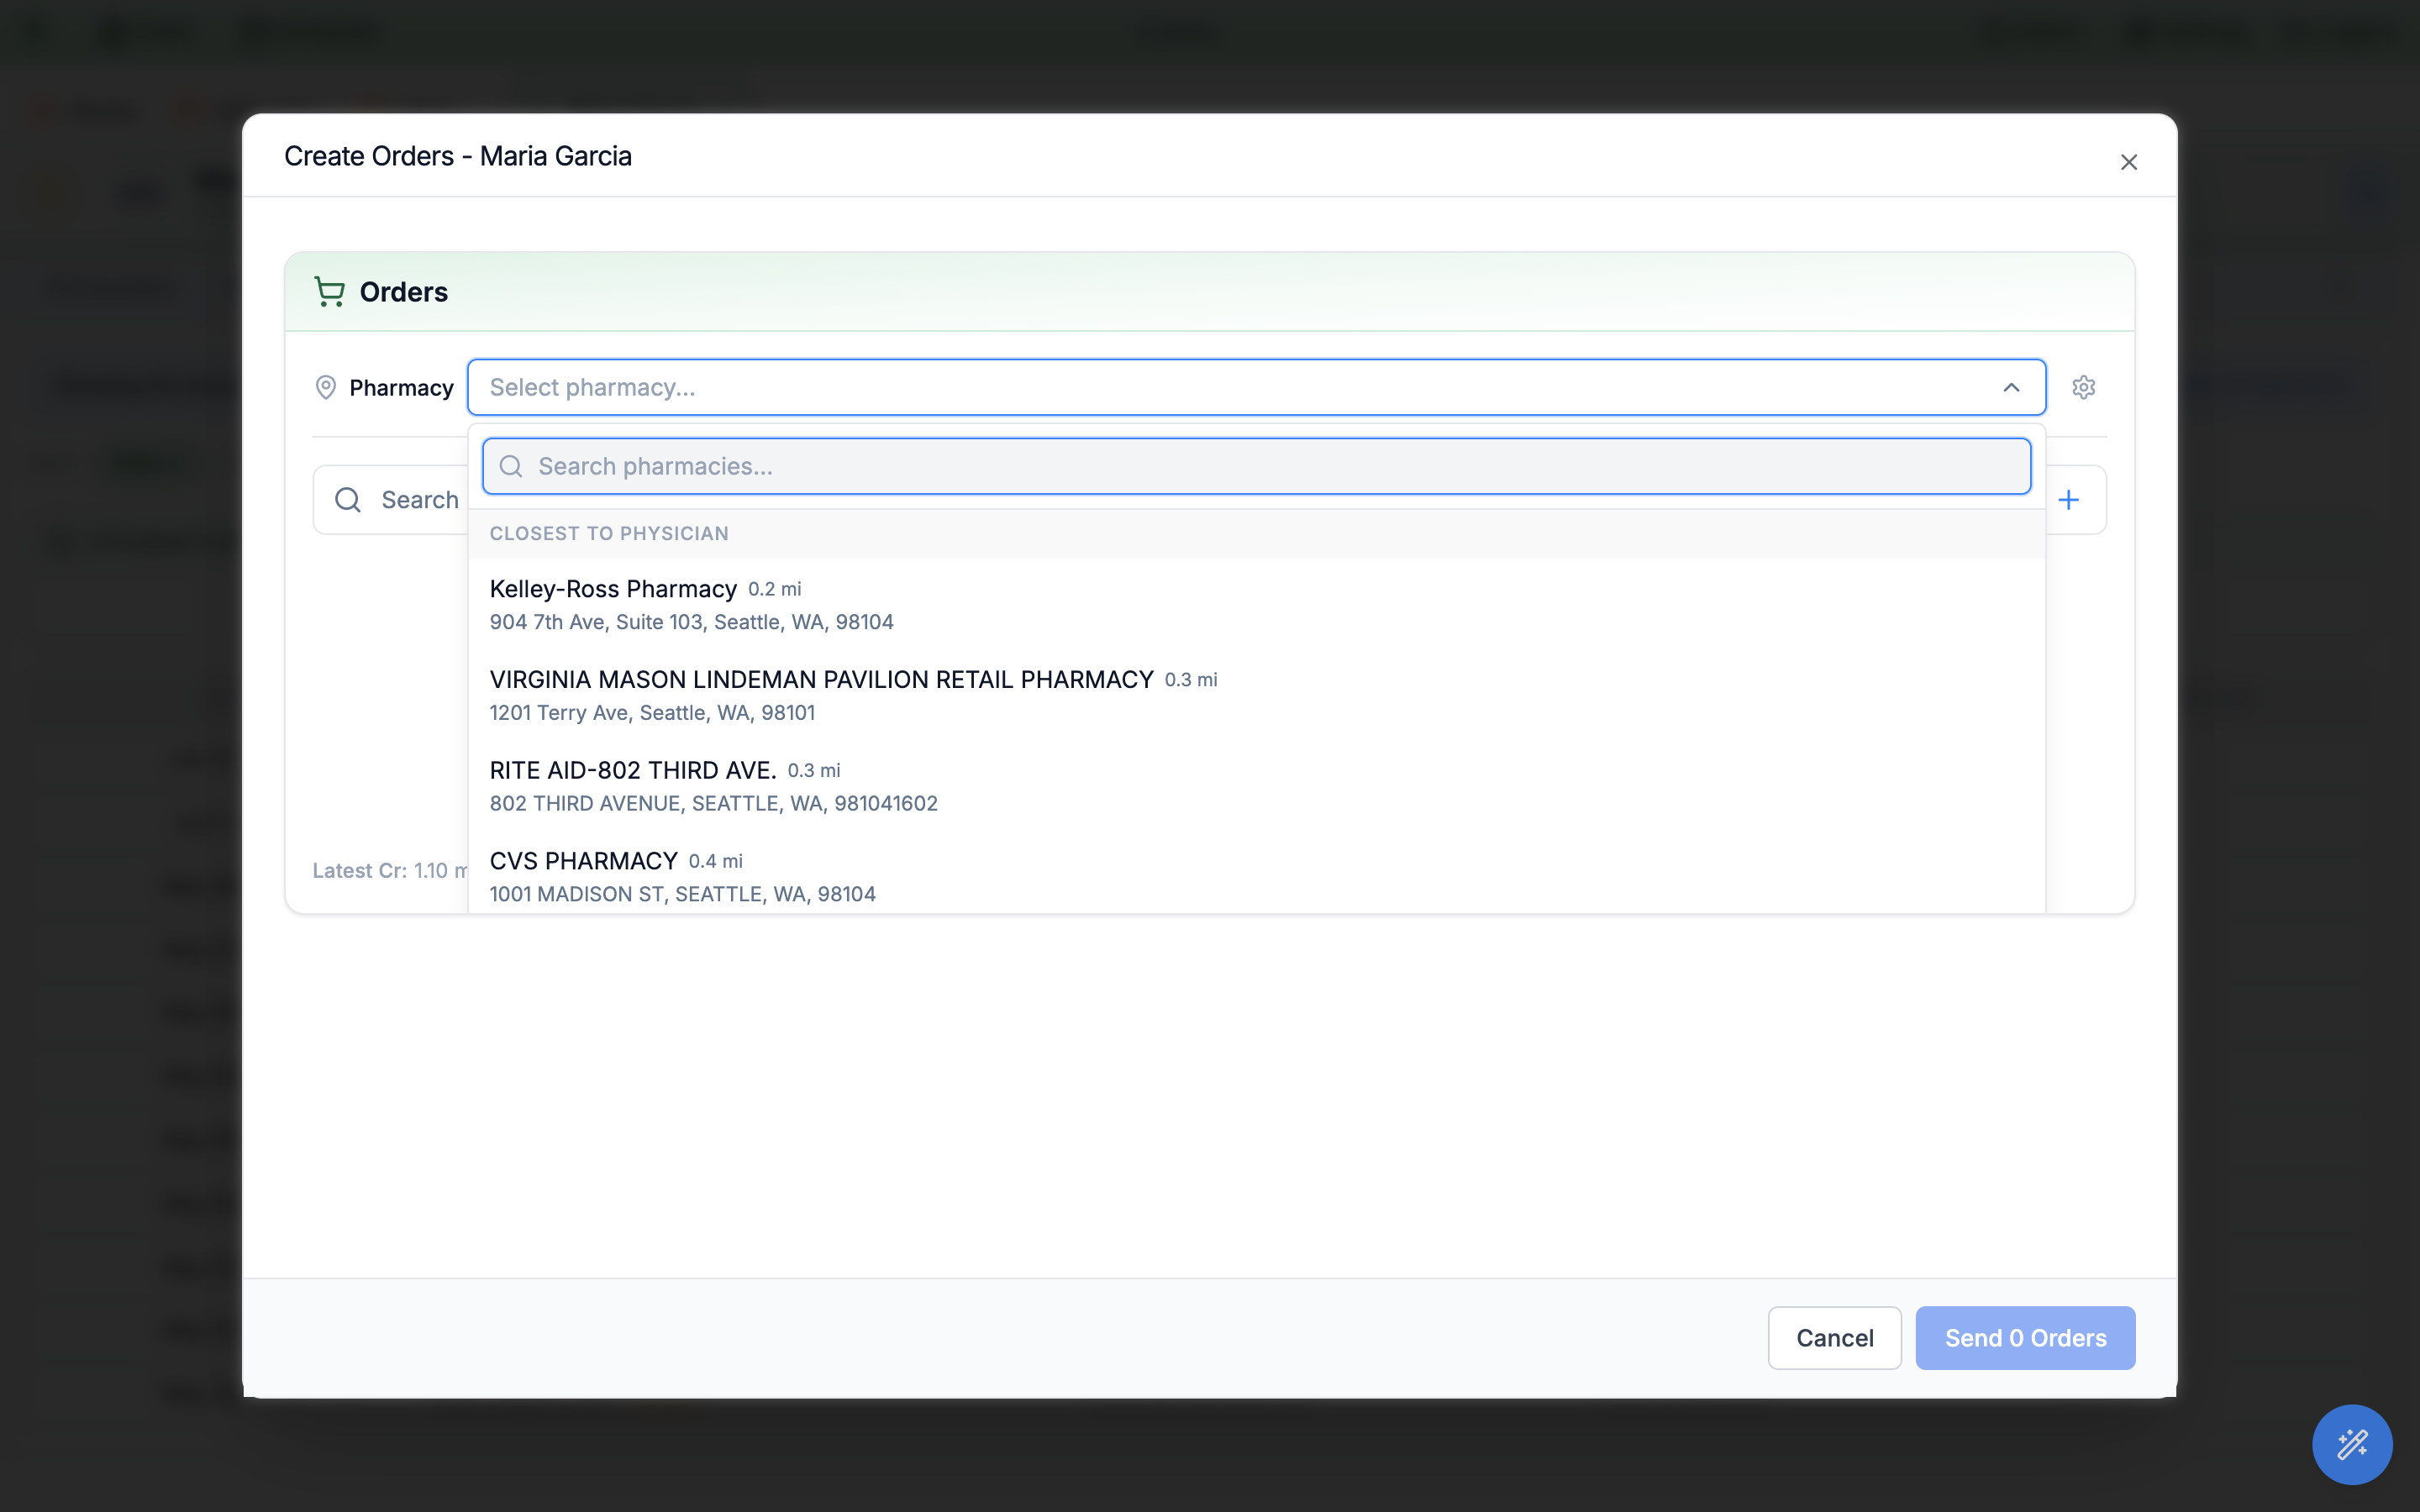
The
Pharmacyrow preselects the patient’s primary pharmacy and also surfaces recommended nearby ones; the gear beside it opens the patient’s pharmacy manager (see Patient pharmacies). A pharmacy is required whenever a medication is in the cart — otherwise sending stops with “Please select a pharmacy for medication orders”. -
Add and edit orders.
Type into
Search orders (medications, labs, imaging, screeners, forms)…to open the Search Orders window. Each added medication row has a pencil to edit (the full structured builder — see Write a structured prescription), a star toSave as favorite, a trash toRemove medication, and the usual medication safety check icons.Frequencyoffers the whole clinical range —Daily,Twice daily,Three times daily,Four times daily,Every 4 hoursthroughEvery 12 hours,Every morning (QAM),Every evening (QPM),At bedtime (QHS),Every other day (QOD),Every 48 hours,Every 72 hours,Weekly,Every 2 weeks,Monthly, andAs needed (PRN)— and every one of them is stored with the prescription, so a bedtime medication comes back asAt bedtime (QHS)when youReorderit rather than as a blank field. -
Add a clinical note (optional).
A
Clinical notebox sits underDiagnosisin the prescription dialog, and a matchingClinical notepanel with anAdd a notebutton sits under the diagnoses in the modal body — the same note, shown twice. Dot phrases work here: type.then a few letters and pick from the list. The helper line states the contract: “filed as a signed progress note on an Orders-only encounter when the order is sent · visible to the patient in the portal”. -
Send.
The footer offers
Canceland a live-counting send button (for exampleSend 1 Order); while it works, the button readsCreating encounter and sending orders…. Confirmation — and any per-order failure text — arrives as a plain browser dialog. -
Clear the diagnosis gate.
E-prescribing requires a diagnosis on every medication. If one is missing, clicking send opens the diagnosis-association dialog with the banner “1 medication needs a diagnosis before it can be sent to the pharmacy.” Pick from the patient’s problem list, common diagnoses, or an ICD-10 search, then
Save & send orderslinks the diagnosis and transmits in one step (the same association concept as in-encounter linking).
Sign & Send button on its own row (the passkey flow described under EPCS signing), which stays on the row for controlled medications only, then send the remaining orders. Sending is also held while a medication’s DEA schedule is still being resolved: “Still checking whether these medications are controlled substances. Please try again in a moment.”
Orders only visit is created for you. Because no encounter is open, the first order that actually goes out creates one draft encounter of type Orders only, whose chief complaint reads Orders only, and the orders are filed against it — one visit per trip through the modal, however many orders you send. Nothing is created if you close the modal without sending, or if every order fails. Labs and imaging in the same send still route through your usual lab and radiology integrations.Orders only visit as a signed progress note the moment at least one order goes out — never before, and never at all if the send fails outright. The panel then shows a green Filed badge; if the orders went but the note did not, it says Not filed — your orders were sent, the note was not. and offers Retry. Because it is filed signed, the patient can read it in the portal, and the prescription’s detail dialog in the Prescriptions tab shows Orders only · {date, time} with a Clinical note filed chip. The note editor is offered only for a genuinely standalone send — the inline Orders panel inside an Inbox message keeps whatever encounter it was given and has no note box.Review the chart’s Medications tab
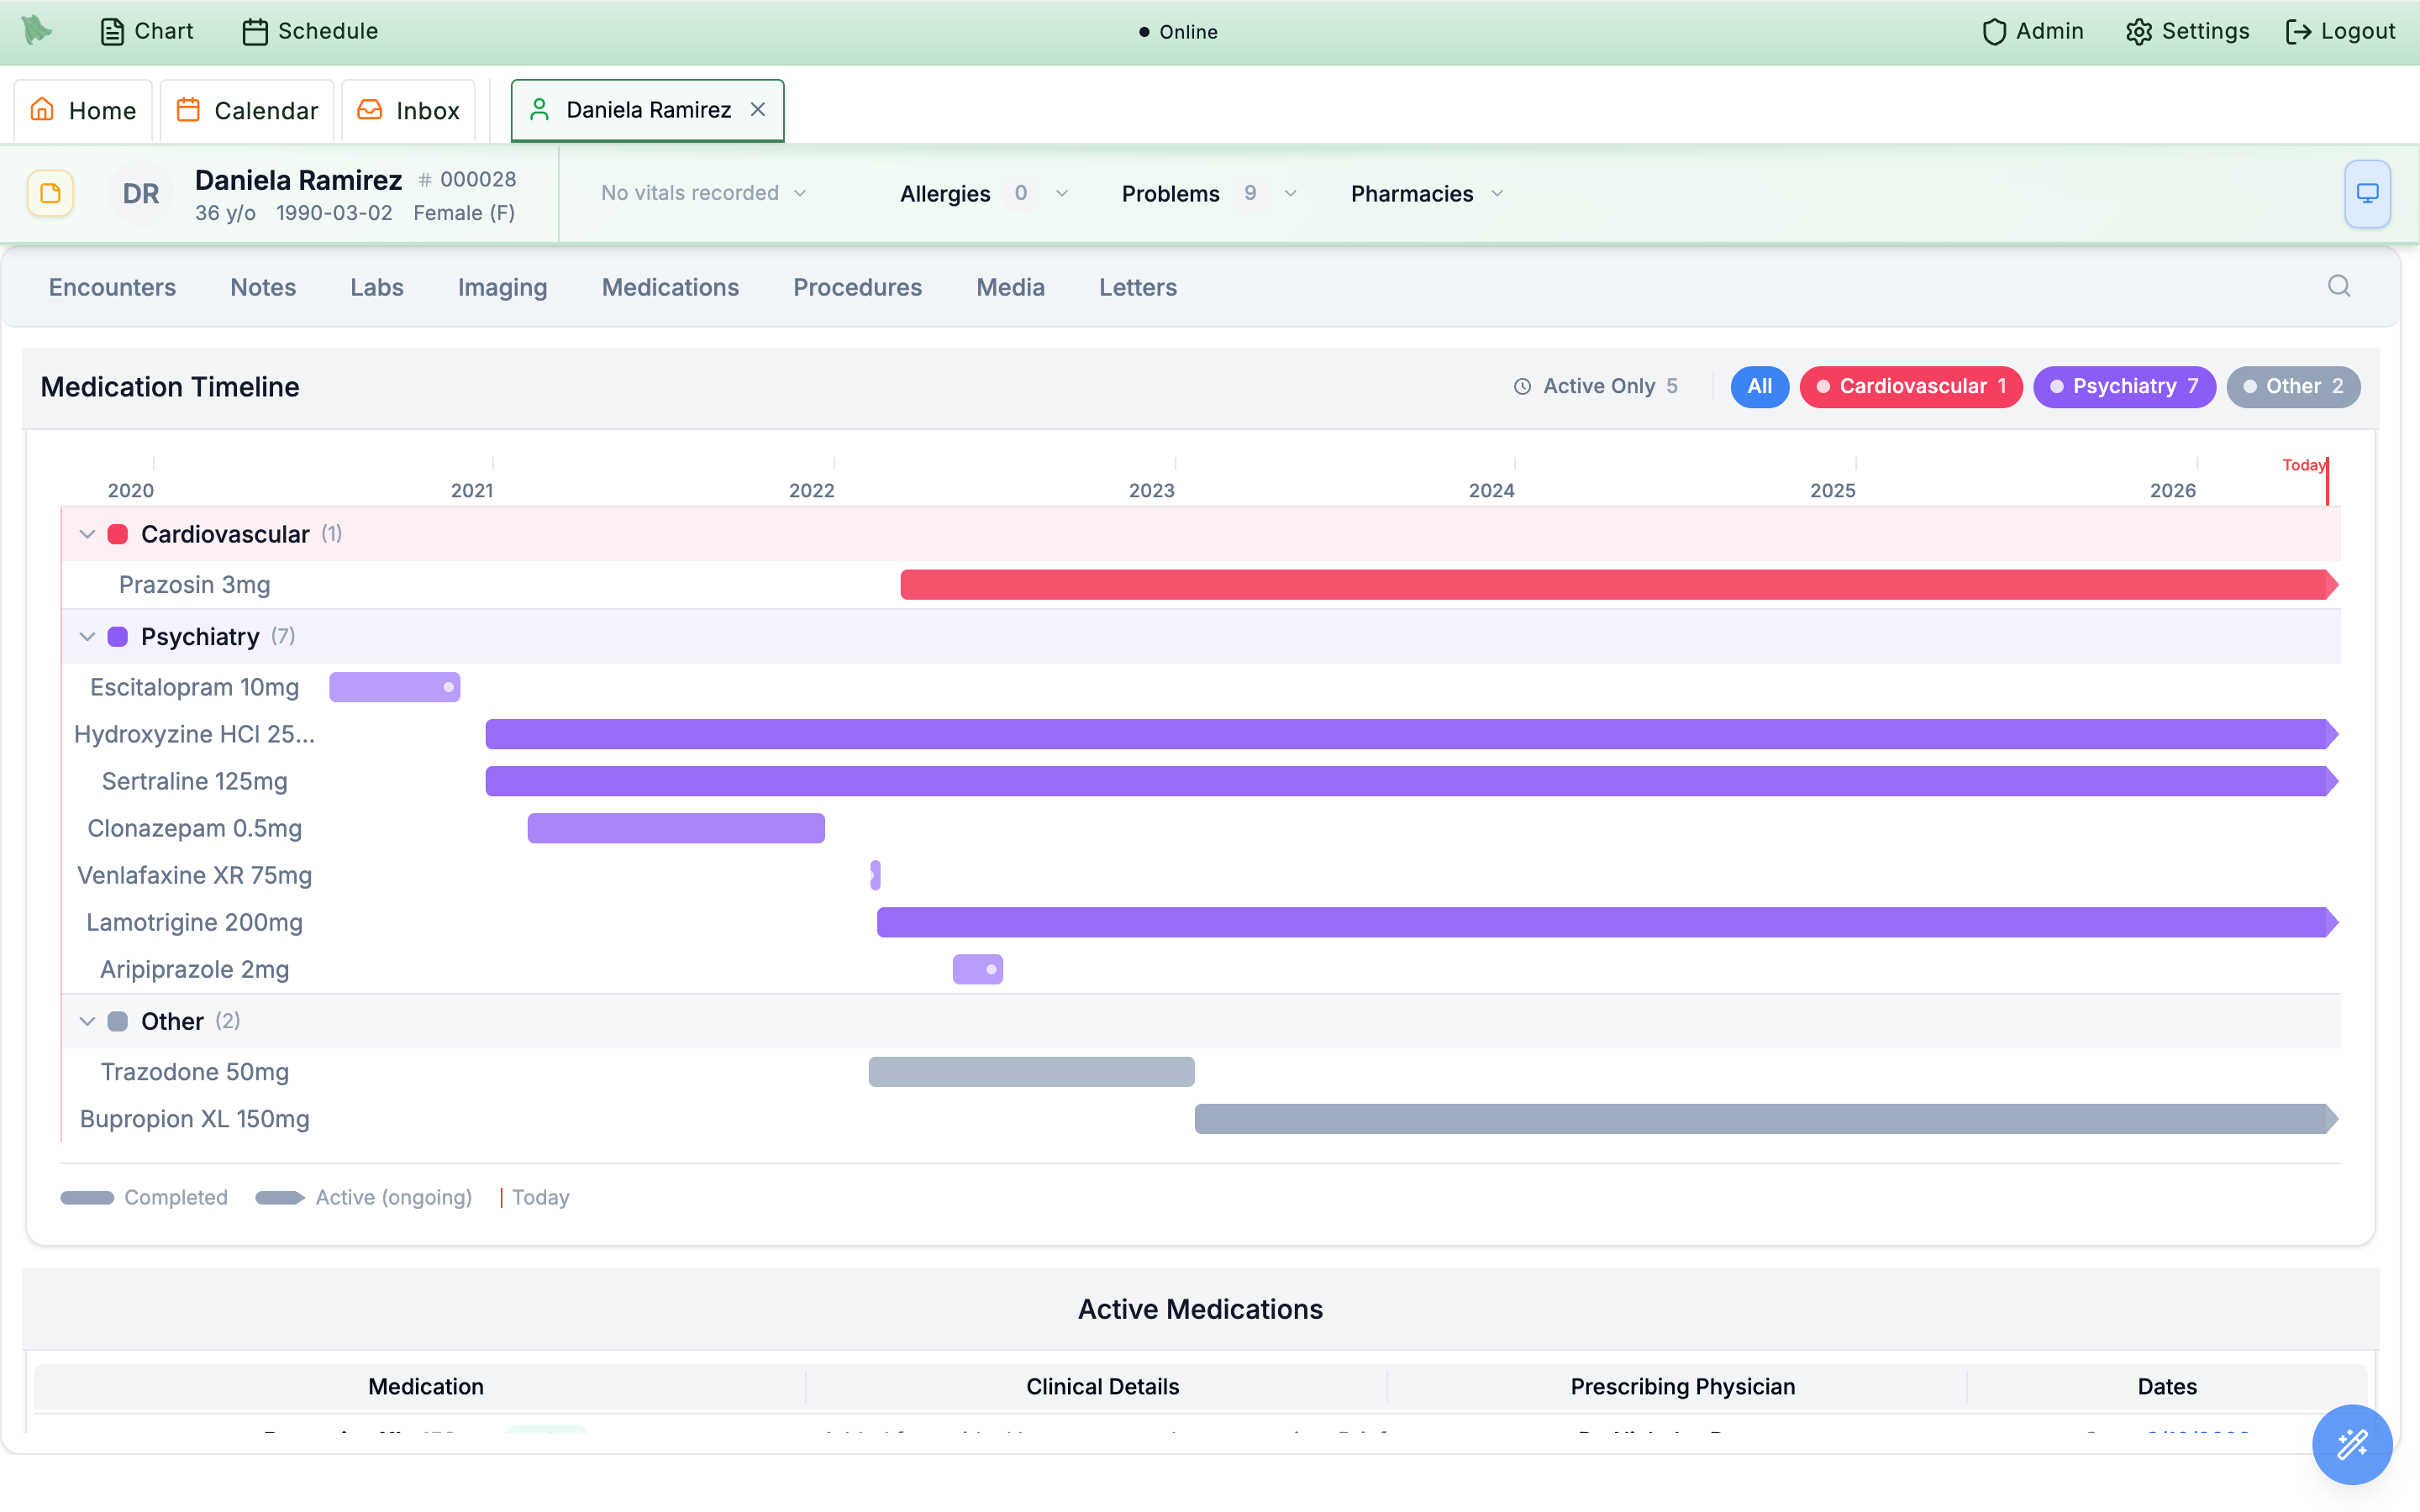
The chart’s Medications tab is the read-only picture of everything the patient takes and has taken: a visual Medication Timeline up top, then Active Medications and Medication History tables. Use it to orient before a refill decision or a renewal approval.
-
Scan the timeline.
The
Medication Timelinedraws each medication course as a horizontal bar across time. TheActive Onlytoggle limits it to current therapy; switch it off to see full history (the empty state reminds you: “No active medications to display.”). -
Read the tables.
Both cards share the columns
Medication,Clinical Details,Prescriber, andDates & refill. Rows show name and strength, the sig (No sig providedwhen missing), a status pill, the prescriber — imported records keep their attribution, e.g. “Imported from Epic” with the date — and dates such asStart:andLast fill:. -
Read the refill signals.
The
Dates & refillcolumn is also the at-a-glance refill status, so check it before acting on a renewal. Under the dates it carriesRx sentwith a date (or a greenRenewal prescription sentonce a renewal has gone out), then the due picture — an amberDue for refill, orNext duewith the date, orRefill due: unable to determinewhen there isn’t enough information — and finallyN refills remaining. Hover the due line for the reason behind it. -
Check the chips.
A red
Discontinuedpill carries a hover tooltip,Reason for discontinuation:, with the recorded reason (also repeated inline asReason:). An amberScheduledpill marks a future-dated prescription — one written with ado not fill untildate that hasn’t arrived yet — and its dates lead withStarts:rather thanStart:. An amberNeeds reviewchip marks a patient-reported medication not yet matched to the drug database — its tooltip reads “Review and match before refill requests are allowed.”, and until it’s matched the patient cannot request refills of it from the portal.
Track prescription status & resolve transmission errors
After you send a prescription it moves from queued, to transmitted, to sent once the pharmacy electronically confirms receipt. There is no global “all prescriptions” dashboard — status lives in two places: each Rx message’s Timeline card in the Inbox, and the medication row inside order entry.
| Stage | What it means |
|---|---|
| Pending | Queued and waiting to transmit. |
| Transmitted | Handed to the e-prescribing network; the Timeline records Prescription transmitted. |
| Sent | The pharmacy verified receipt — the prescription is at the pharmacy. |
| Error | Transmission failed or the pharmacy rejected the verification; an Error item appears in the Rx inbox with the reason. |
| Cancellation pending | You cancelled; waiting for the pharmacy to confirm. |
| Canceled | The pharmacy confirmed the cancellation. |
-
Audit from the Timeline.
Open any Rx message: the
Timelinecard listsPrescription created,Prescription transmitted, the request event, andLast filledwith timestamps. Pharmacy fill notifications update the record automatically — dispensed, partially dispensed, or not dispensed — feedingLast filledand the fill count. For support calls,Routing / Identifiershas theMessage IDandPharmacy Ref #. -
Resolve errors by re-issuing.
Failures surface as Rx inbox items titled
Error -plus the NDC, with aPrescription Errorbanner carrying the network’s error text (or a genericTransmission Issue). The status card explains: “This prescription has an error status and cannot be approved or denied.” There is no retry button — issue a new prescription (standalone or in-encounter) or call the pharmacy. -
Cancel a sent prescription.
In the order-entry workspace, a sent medication row shows
Rx ID:with its identifier and a redCancelbutton. Cancelling sends an electronic cancellation (CancelRx) to the pharmacy; the prescription sits in cancellation-pending until the pharmacy verifies, then flips to canceled. -
Read a cancellation denial.
If the pharmacy declines, a
Cancel Request Denieditem appears in the Rx inbox with aCancelRx Responsecard:Response Type,Received,Denial Reason,Reason Code,Prior Dispensing, andApproved/Denied Note, alongside theOriginal Cancel Requestdetails. A warning appears if transport clipped any fields.
Manage a patient’s pharmacies
Each patient carries a list of Preferred Pharmacies with one marked Primary — the primary is what the Pharmacy selector preselects every time you prescribe, in-encounter or via Create Orders. You manage the list from the chart’s patient-info panel, or from the gear next to the pharmacy selector inside order entry, so you can fix it mid-prescription without leaving the modal.
-
Find the panel.
The chart’s patient-info panel has a collapsible
Preferred Pharmaciessection listing each saved pharmacy card — name,Primarybadge, address, phone. The empty state readsNo preferred pharmacies set; compact layouts condense it toPharmacies (N)with the primary’s name. -
Open the manager.
The gear button (tooltip
Manage pharmacies) opens the Manage and Select Pharmacies dialog, with theCurrent Pharmacieslist and its count badge on top. -
Click a card to set the primary.
There is no separate radio or button — clicking a pharmacy card makes it the primary (green border plus the
Primarybadge). Hover a card to reveal the trash (Remove pharmacy); removing the primary automatically promotes the first remaining pharmacy. -
Add from the directory.
Add New Pharmacyopens thePharmacy Searchpanel — search byPharmacy nameand location against the national pharmacy directory and add results as preferred or primary. Duplicates are de-duplicated by name, address, and phone. -
Save.
Nothing persists until
Save Changes—Cancelor closing the dialog discards your edits. If saving fails, the dialog stays open with an alert so you can retry.
Set practice-wide refill rules
The admin-only Refill settings tab of the Prescriptions workspace controls what patients may request from the portal and how controlled-substance refills are reviewed — its subtitle says exactly that: “Control how patients request refills and how controlled substances are reviewed.” The rules you set here decide which patient refill requests arrive actionable, arrive blocked, or never get submitted at all.
-
Open it from the Admin menu.
In the top toolbar, open
Admin(shield icon) and choosePrescriptions. That opens the full-pagePrescriptionsworkspace in its own tab, with two tabs of its own —Prescription statusandRefill settings. PickRefill settings. Staff accounts granted the prescriptions-registry permission seePrescription statusonly;Refill settingsis offered to organization admins, because saving these rules requires the admin role. -
Start from a preset.
Start from a presetoffers four policies to apply and then fine-tune:Standard Primary Care,Conservative Controlled Substance,Maintenance Med Friendly, andPortal Disabled. -
Tune each group, then save.
Work through the setting groups below. A footer bar tracks your state —
Unsaved changeswhile you edit,All changes savedotherwise — withDiscard changesto roll back andSave changesto commit; the bar then confirms with “Refill preferences saved.”
Patient access
Allow patients to request refills is the master switch — off hides the portal refill flow entirely. Also here: Confirm pharmacy before sending, Require attestation, and Allow requests when refills remain (off routes patients who still have charted refills to their pharmacy first).
Timing & limits
Earliest request sets how many days before the expected runout a request may be made; Duplicate cooldown sets the minimum wait before re-requesting the same medication.
Recent visit rule
Require a recent visit with a Visit window, plus an If outside the window behavior — Advise only (the patient sees a reminder and the request proceeds normally), Allow, but flag for review, or Block the request.
Controlled substances
Schedule III/IV policy, Unknown schedule handling, Visit window override, Recent UDS window, EPCS-enabled approvers only (see EPCS enrollment), Require PDMP check, and Require signed controlled-substance agreement.
Routing & alerts
Route incoming requests to chooses where requests land — the Rx inbox (everyone on the Rx team sees them), the Prescribing provider (whoever wrote the most recent prescription handles it), or the Care team pool (a shared queue for the patient’s assigned care team) — with Notify the assigned provider and Notify the staff pool toggles for alerts.
Patient messages
Three optional copy templates the portal shows patients — When a request is blocked, When a visit is required, and Request received. Placeholders show the default wording, so leave them blank to use it.
Need help? Email support@heroemr.com.