Patient lists & patient outreach
Slice the panel into cohorts you can act on — ready-made preset lists, a custom criteria builder, hand-curated lists, and the columns that travel with them — then reach a whole cohort at once with tracked Communications campaigns.
Patient lists & patient outreach
Slice the panel into cohorts you can act on — ready-made preset lists, a custom criteria builder, hand-curated lists, and the columns that travel with them — then reach a whole cohort at once with tracked Communications campaigns.
Open the Patient List workspace
The Patient List workspace turns your whole panel into actionable cohorts — instead of opening charts one at a time, you slice the practice into groups like “diabetics overdue for an A1c” or “patients with no visit in 12+ months,” review them in a configurable table, and act on the whole group at once. It opens from the Patient List button in the top toolbar, just to the right of Chart and Schedule (route /dashboard/patient-lists).
-
Open the workspace.
Click
Patient Listin the top toolbar. It opens as its own tab in the workspace tab bar, with a left rail of lists and the selected list’s patient table filling the rest of the screen. -
Know the three kinds of list.
- Preset smart lists — ready-made cohorts that ship with Hero EMR and recompute live (see Preset lists).
- Custom smart searches — your own rule-based cohorts built in the condition builder; they also recompute live (see Custom search builder).
- Manual curated lists — hand-picked sets of patients you add by name and that stay fixed until you edit them (see Manual & shared lists).
-
Pick a list and work it.
Choosing a list in the left rail loads its patients into the table; the header carries the row count and the list’s actions —
Columns(shape the table),Snapshot(freeze a smart list into a manual one),Duplicate(make an editable copy), andExport(download to CSV). Click any patient row to open that chart.
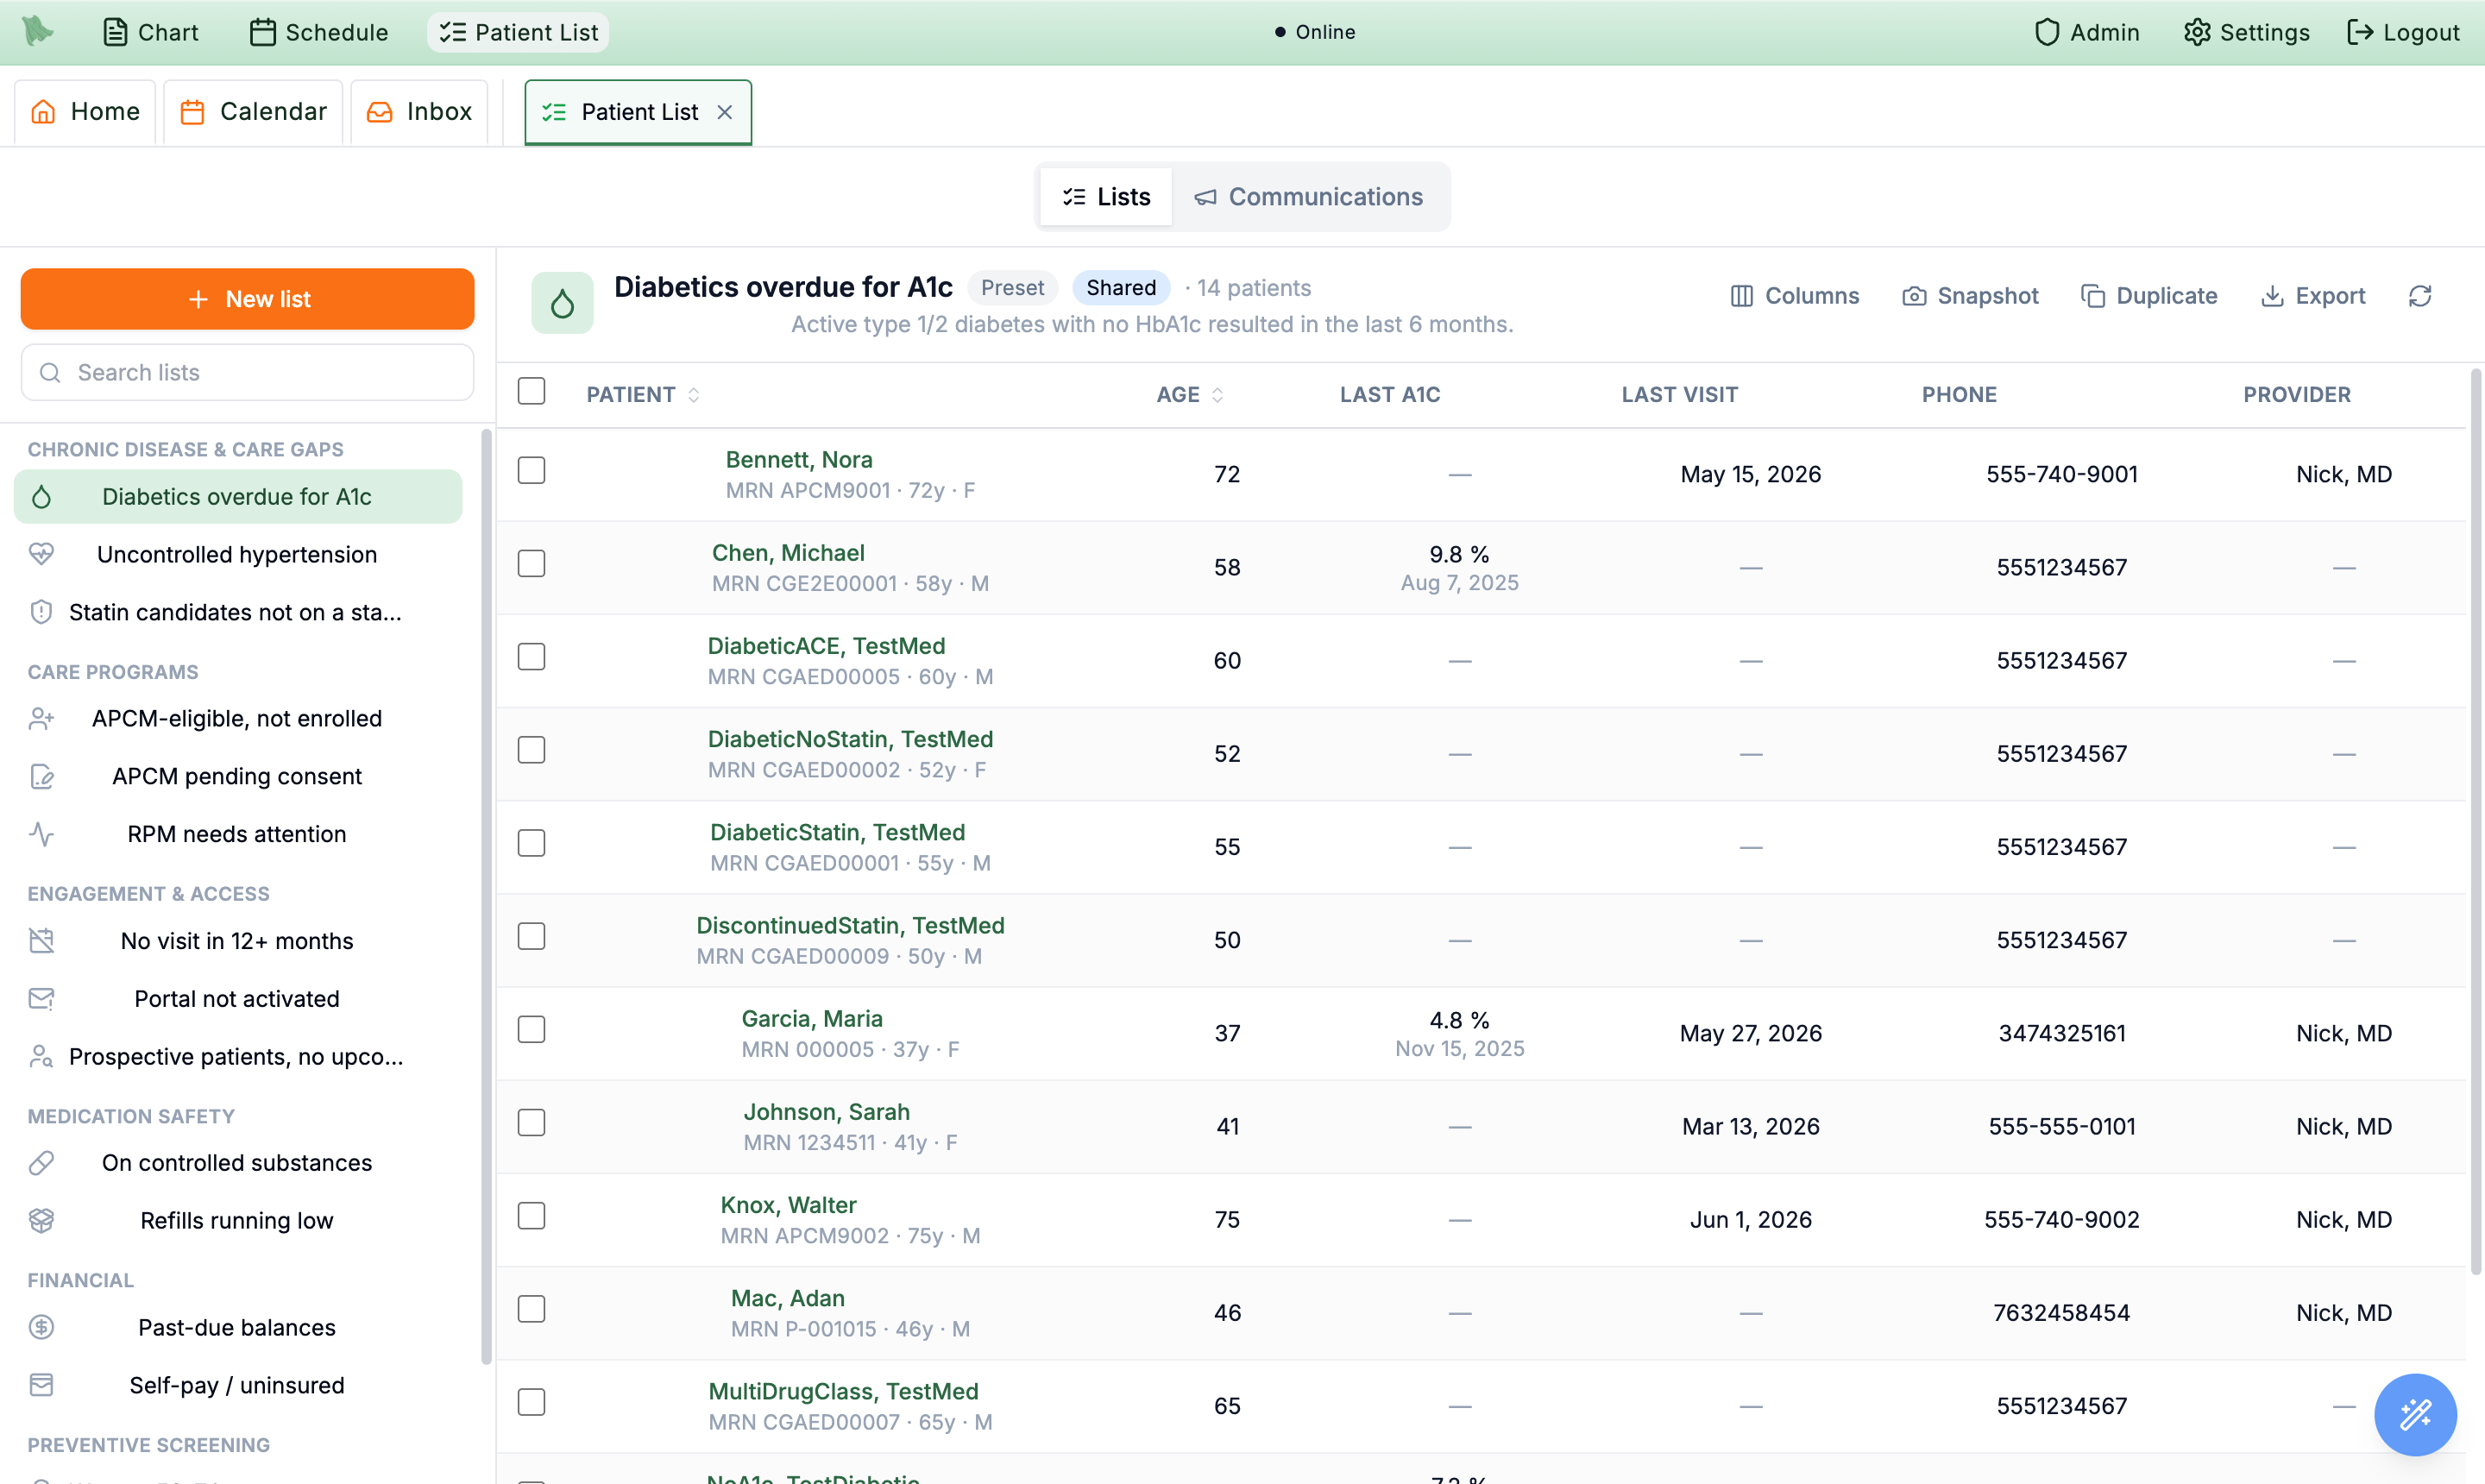
Columns, Snapshot, Duplicate and Export in the header.Patient List button. Staff need the Patient Lists permission, which is granted by default to Medical Assistant and Nurse profiles — other staff roles don’t see the button until an admin adds it (see Staff accounts & permissions).
Start from a preset smart list
Hero EMR ships with 17 ready-made smart lists grouped into six categories in the left rail. Each one is a saved rule set that recomputes live against your panel every time you open it — a patient who gets their A1c drawn drops off the “overdue” list on its own — so the presets always reflect the current state of the practice.
Chronic disease & care gaps
- Diabetics overdue for A1c — diabetic patients without a recent A1c result.
- Uncontrolled hypertension — hypertensive patients above goal blood pressure.
- Statin candidates not on a statin — patients who meet statin criteria but have no statin on their med list.
Care programs
- APCM-eligible not enrolled — patients who qualify for APCM but aren’t yet enrolled.
- APCM pending consent — enrolled patients still awaiting a signed consent.
- RPM needs attention — remote-monitoring patients with a data or review gap.
Engagement & access
- New patients (last 30 days) — patients registered in the last 30 days.
- Encounter signed in last 30 days — patients with a completed or signed encounter in the last 30 days.
- No visit in 12+ months — patients overdue for any contact.
- Portal not activated — patients who’ve never signed in to the portal.
- Prospective patients with no upcoming visit — prospects with nothing booked.
Medication safety
- On controlled substances — patients with an active controlled-substance prescription.
- Refills running low — patients whose medications are nearly out of refills.
Financial
- Past-due balances — patients carrying an overdue balance.
- Self-pay / uninsured — patients with no active insurance coverage.
Preventive screening
- Women 50–74 mammogram due — eligible women without a recent mammogram.
- Colorectal screening due 45–75 — patients in the screening window who are overdue.
Two header actions make the presets your own. Pin a preset you use often and it floats to the top of the rail as a favorite. Duplicate a preset to get an editable copy in the condition builder — the presets themselves are read-only, so duplicating is how you tweak a built-in cohort (loosen the A1c interval, add a payer filter) without disturbing the original.
Past-due balances and Self-pay / uninsured simply absent from the rail rather than empty. If someone needs them, an admin grants billing access (see Staff accounts & permissions).
Duplicate the preset and adjust its conditions in the custom search builder.
Build a custom smart search
When no preset fits, build your own cohort. A smart search is a saved set of conditions that recomputes live — patients flow in and out as their data changes — so it behaves like a standing query rather than a fixed list.
-
Start a new search.
Click
New list→Smart search. The condition builder opens with an empty rule and a live N patients match count that updates as you add conditions. -
Choose how conditions combine.
The match mode at the top sets the logic:
Match ALL(AND — every condition must be true),Match ANY(OR — at least one is true), orMatch NONE(NOT — exclude patients who match). -
Add conditions and groups.
Conditionadds a single rule (a field, an operator, and a value).Groupnests a sub-set of conditions with its own ALL/ANY/NONE mode — you can nest up to two levels — so you can express things like “diabetic AND (no A1c in 6 months OR last A1c above 9).” -
Pick from the field catalog.
Each condition draws from a 43-field catalog organized into ten categories — Demographics, Status & access, Care team, Insurance & financial, Visits & engagement, Problems & diagnoses, Medications, Labs & vitals, Care programs, and Preventive & history. Care team holds one field,
Seen by provider, and it is the way to narrow a cohort to a particular clinician’s patients — it matches on documented encounters, so it follows who actually saw the patient. Some fields take a parameterized code input — a lab condition asks for aLOINCcode, a procedure for aCPTcode, an immunization for aCVXcode — so you target the exact test, service, or vaccine. - Watch the count, then save. The N patients match banner tells you how big the cohort is before you commit. Name the search and save it; it joins your lists in the left rail and recomputes every time you open it.
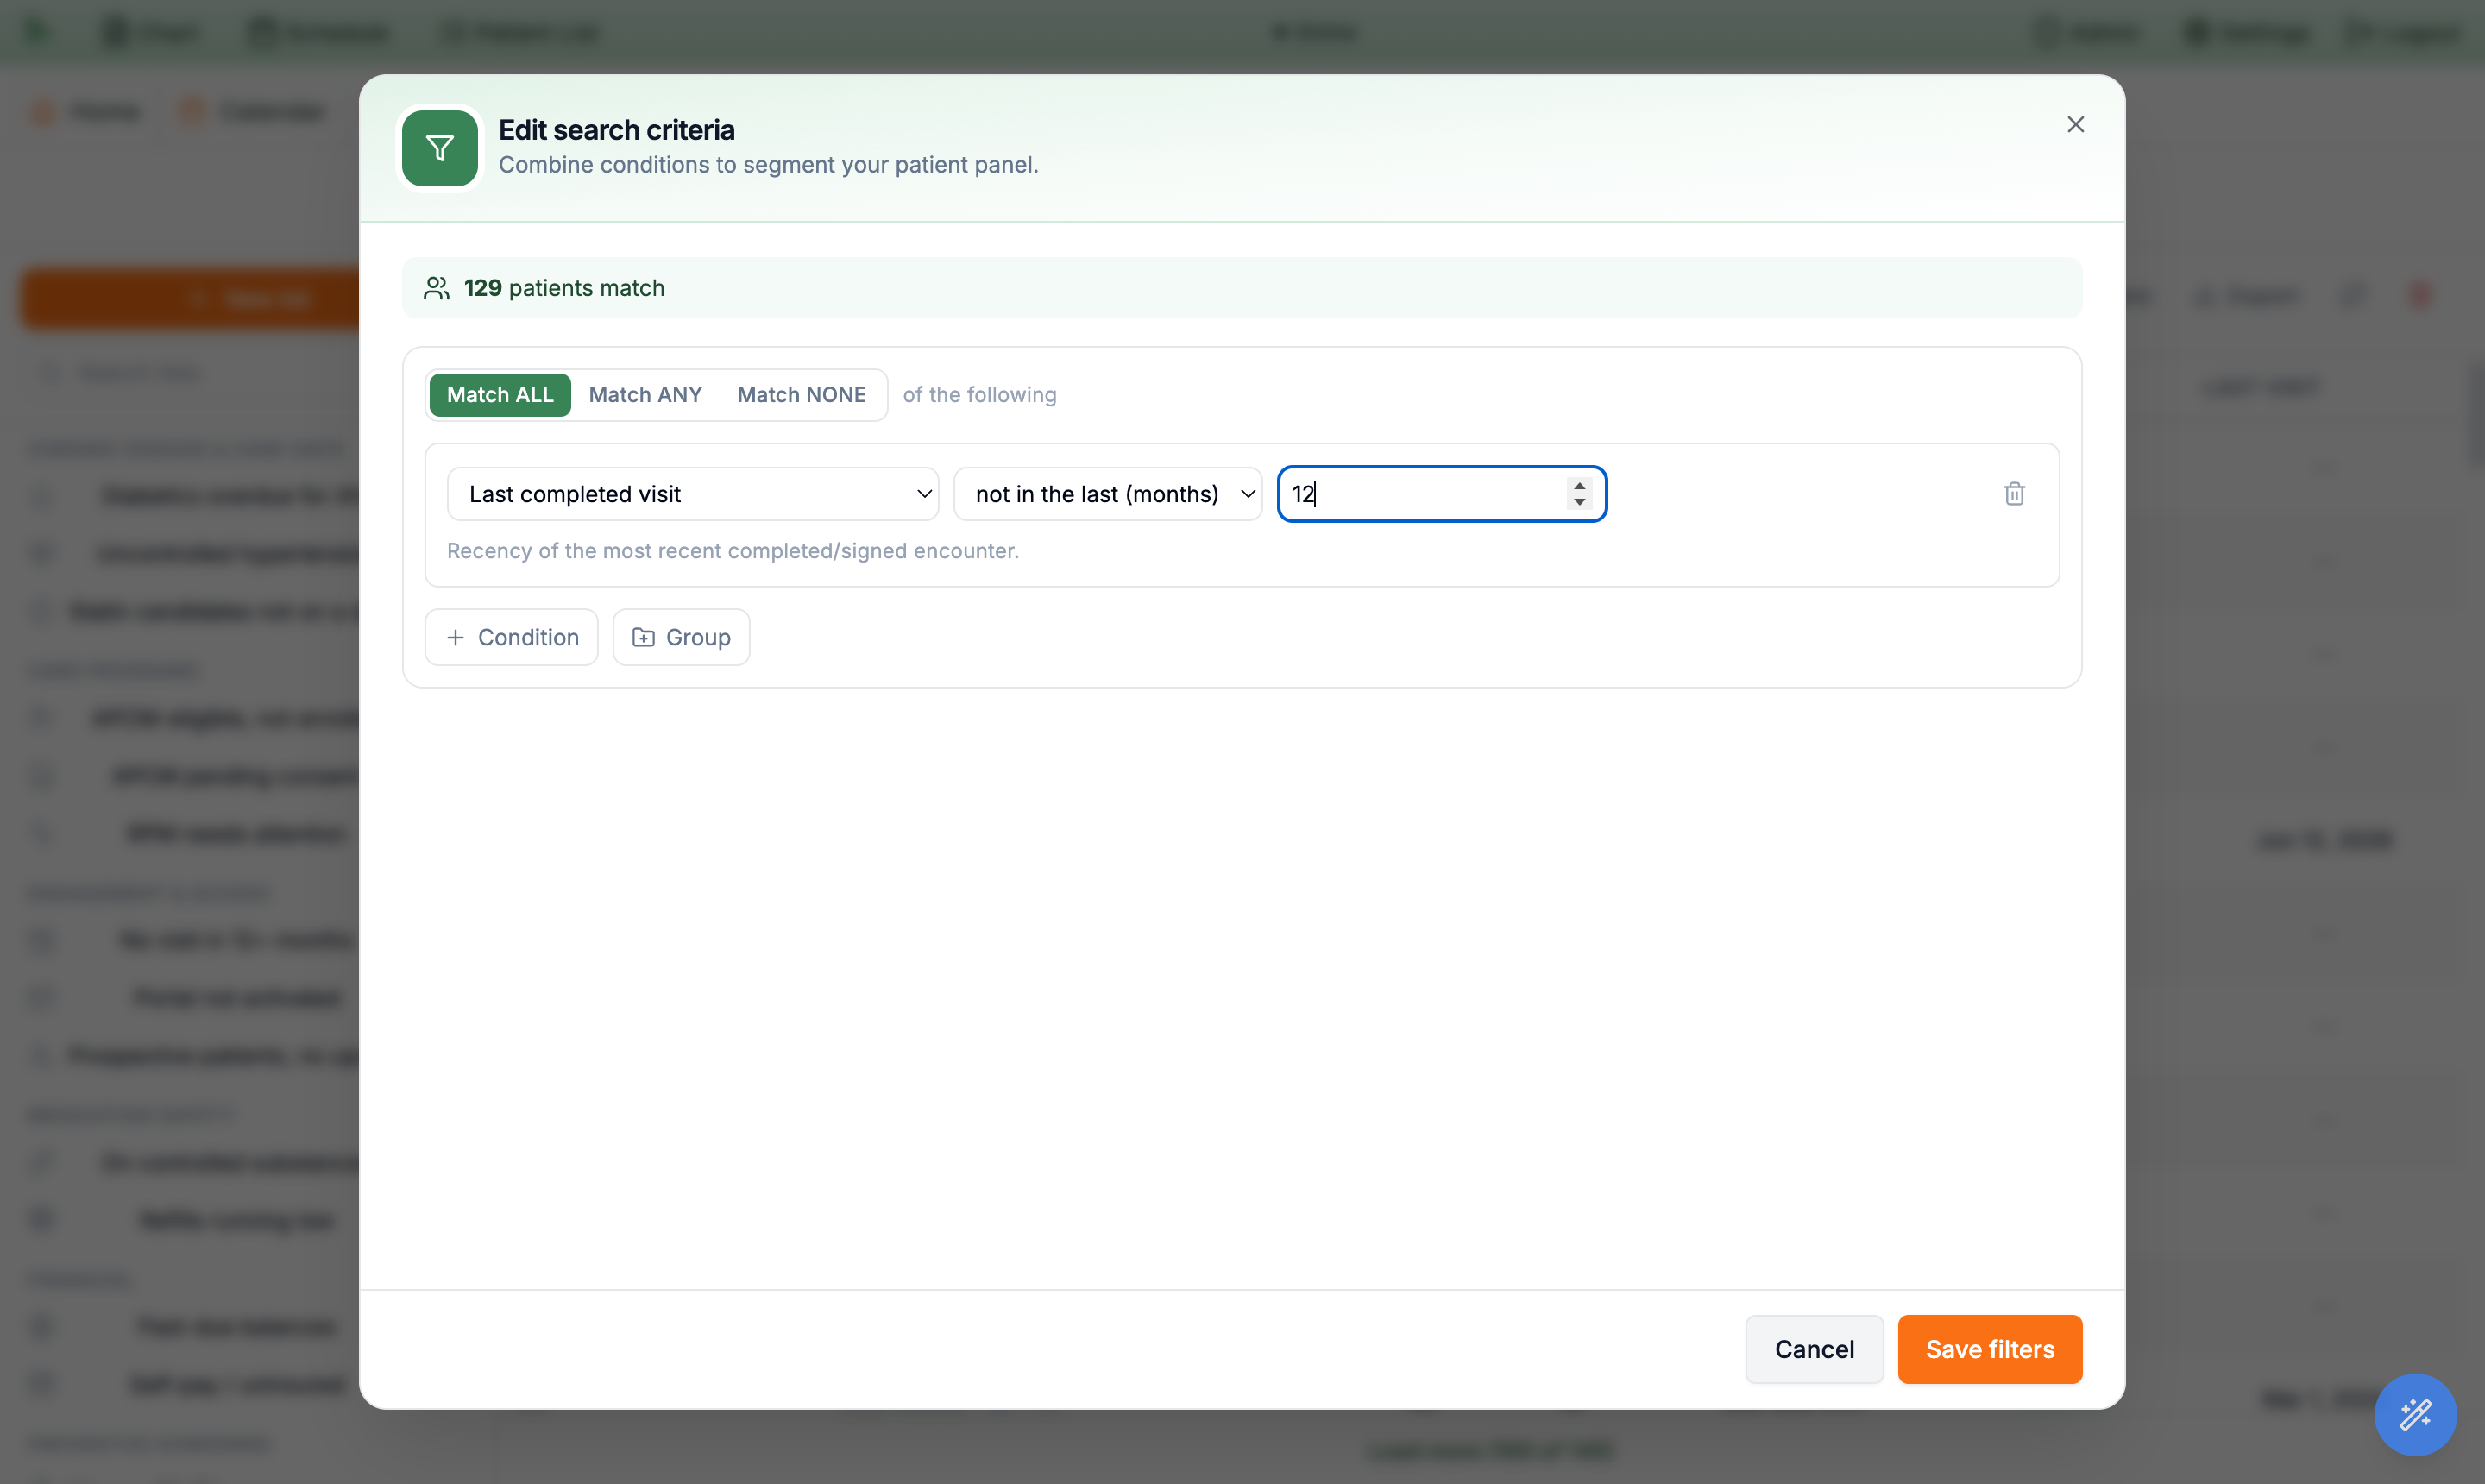
Last completed visit / not in the last / 12 months rule with the live 129 patients match count updating as you edit.Match ALL conditions or carve out exceptions with a Match NONE group — the live count keeps you honest about each rule’s effect.
Curate manual lists & share them
Not every cohort is a rule. A manual list is a hand-picked set of patients that stays exactly as you built it — useful for a recall batch, a study group, or any roster that doesn’t map cleanly to conditions.
-
Create the list.
Click
New list→Manual list, name it, then useAdd patientsto search for and add patients one by one. They stay on the list until you remove them. -
Drop a selection in from any list.
Check rows in any list (smart or manual) to reveal the bulk selection bar, then click
Add to a listto drop the selected patients into a new or existing manual list. This is the fast way to skim a smart cohort and hand-pick the ones you actually want to work. -
Freeze a smart list with
Snapshot. A smart list moves under you as data changes.Snapshotcaptures its current members into a brand-new manual list — a frozen point-in-time roster — without touching the live smart search it came from. -
Pin and share.
Pinfloats a list to the top of your rail.Sharetoggles a list between private andShared with org— a shared list is visible to everyone with Patient Lists access, so it’s how a care team works one roster together. Lists you haven’t shared stay private to you.
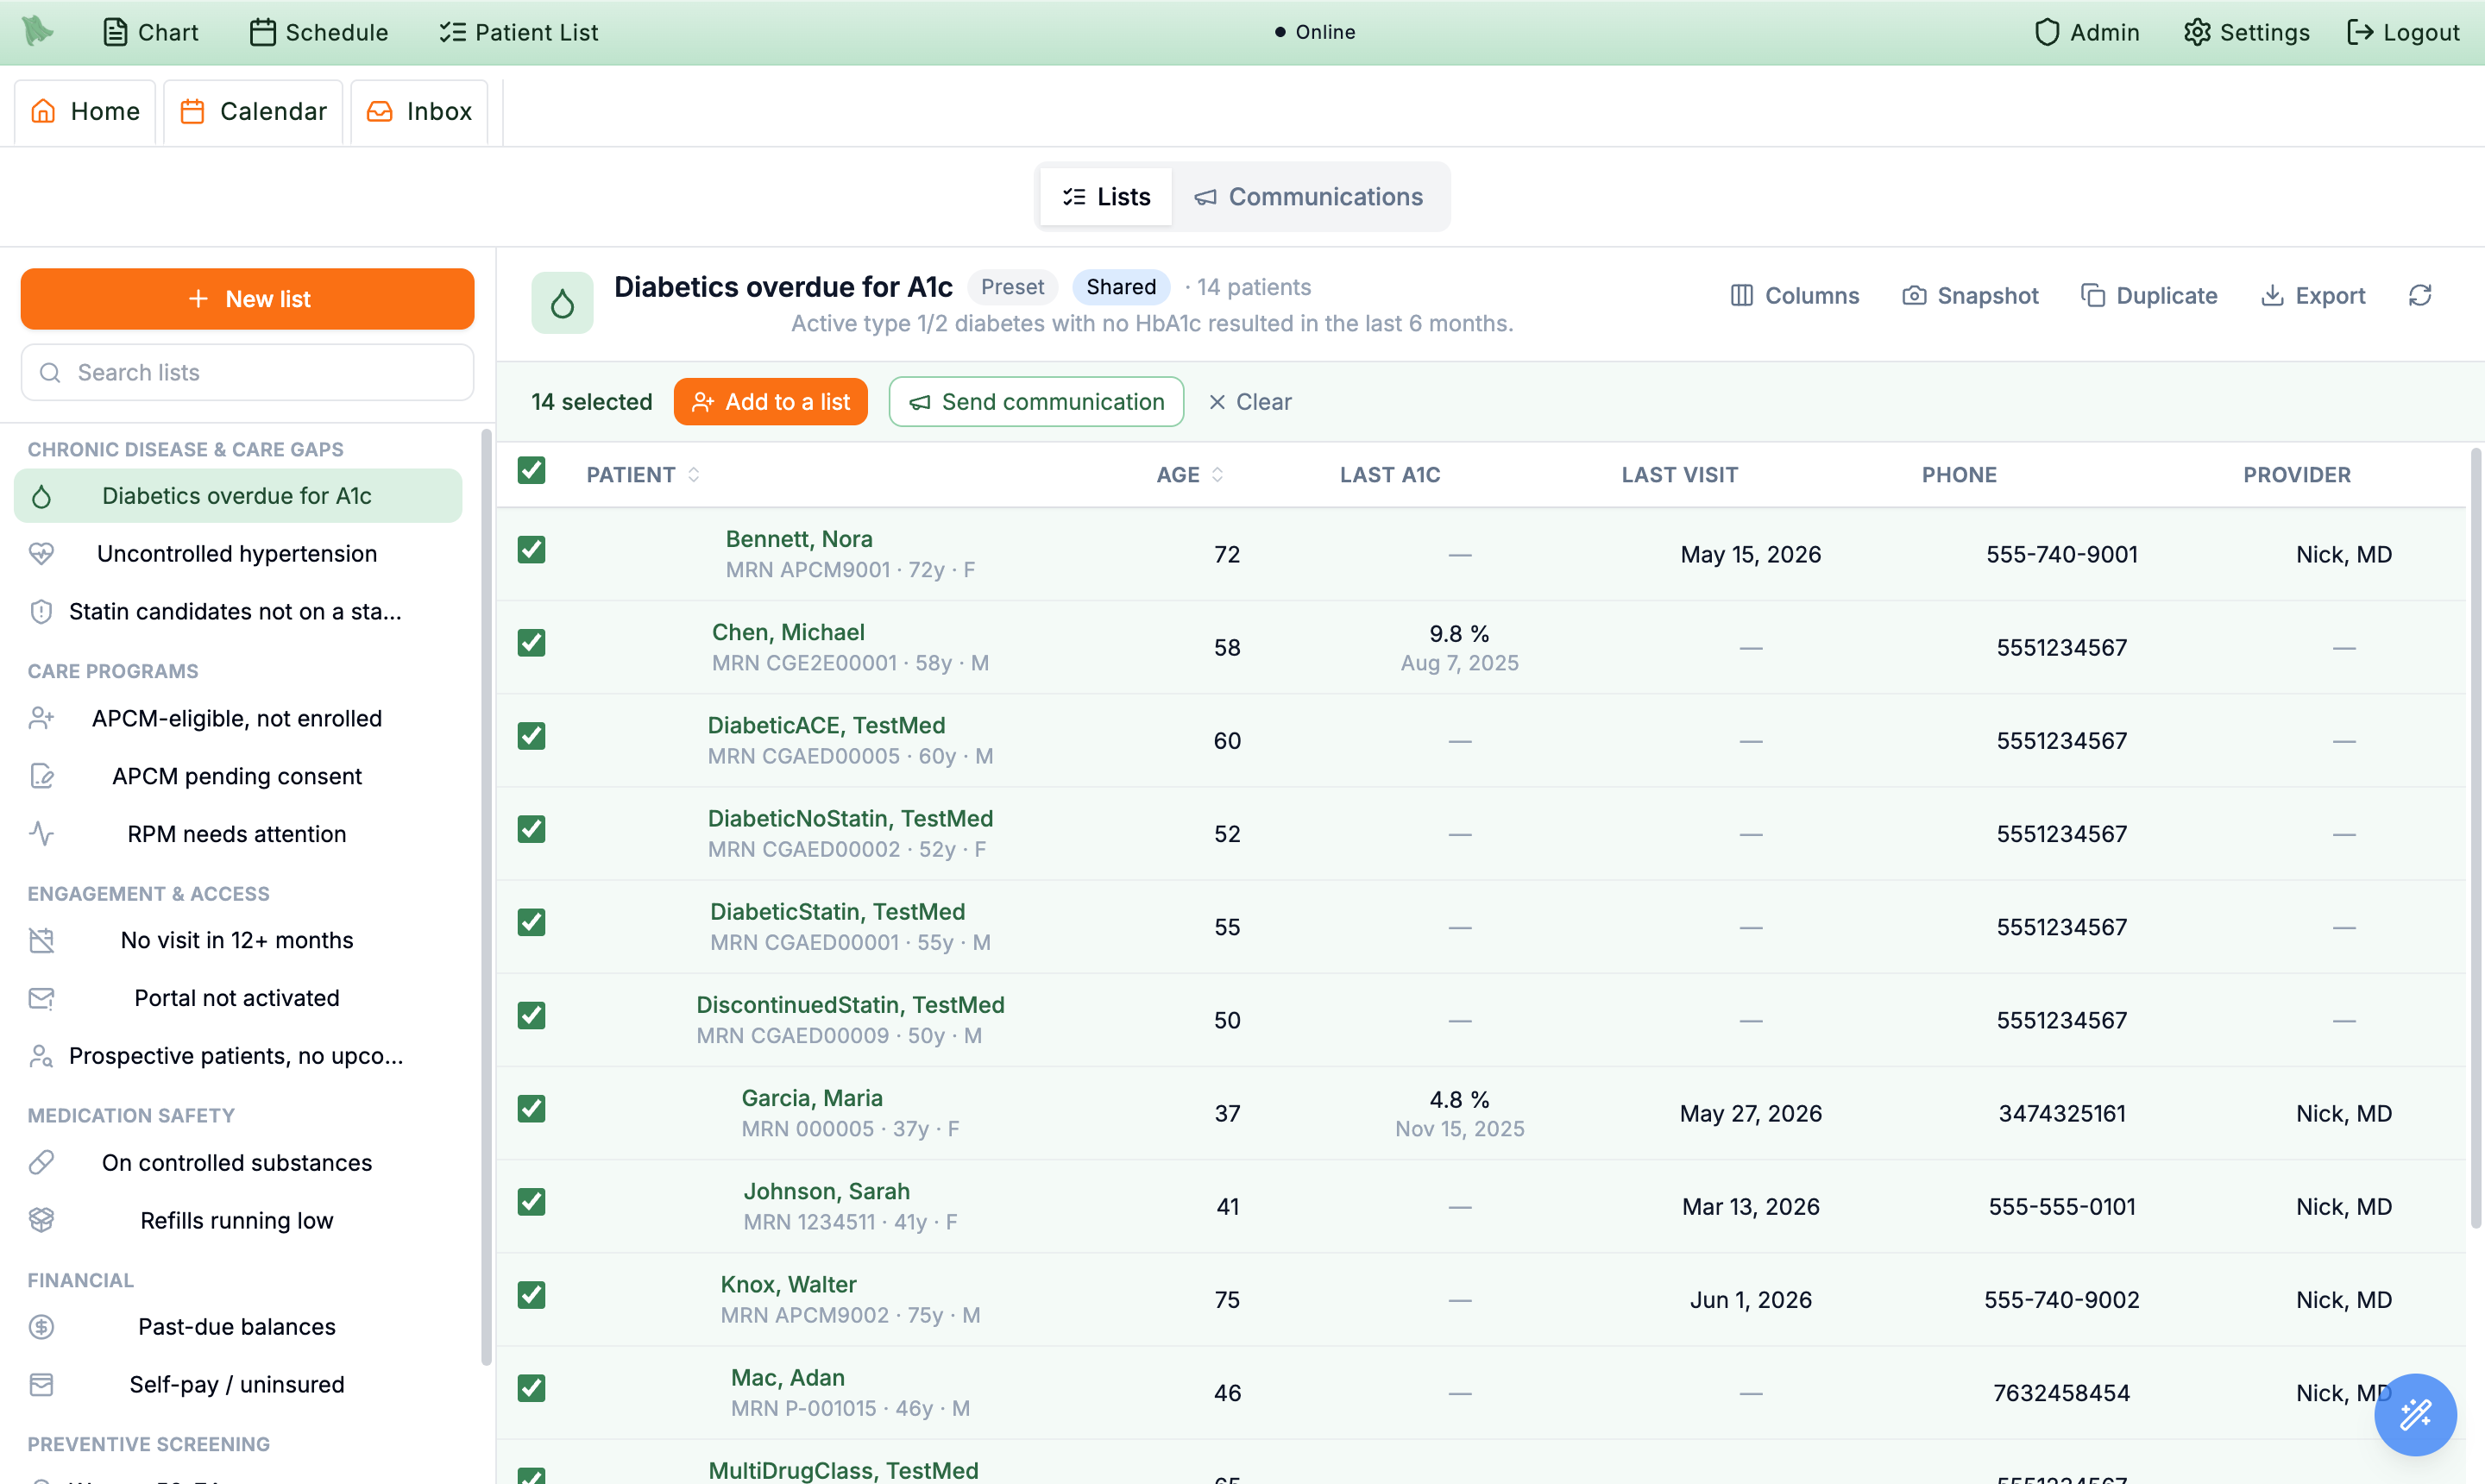
Add to a list, Send communication (campaigns), or Clear.Shape the table columns & export
The patient table is yours to shape. The Columns manager lets each list show exactly the data points that matter for that cohort — contact details for a recall list, last-lab values for a chronic-disease list — plus custom worklist columns you fill in yourself, and Export turns the current view into a CSV for outside work.
-
Open the Columns manager.
Click
Columnsin the list header. The dialog shows your currently selected columns on top and an add-a-column catalog below, grouped into Demographics, Contact, Status, Insurance, Care team, Encounters, Problems, Medications, Labs, Programs, and Custom. Money columns such asAccount balanceappear only for staff with a billing permission — for everyone else the catalog omits them, and a saved list that sorts by one falls back to its default order. - Add, remove, and reorder. Add a column from the catalog, remove one you don’t need, and reorder with the up/down arrows — the table reflows immediately, and the layout is saved with the list.
-
Add a parameterized column.
Some columns take a parameter so they read a specific value — a
Last A1ccolumn, for example, is tied to the relevantLOINCcodes and shows each patient’s most recent result with the custom label you give it. The same pattern surfaces a specific lab, vital, or program metric as its own column. -
Add a custom worklist column.
The Custom group adds columns you fill in yourself rather than ones Hero computes:
- Checkbox — a tick-box column for working a list (e.g. “Called,” “Reviewed,” “Scheduled”). Give it a label,
Apply columns, and a checkbox appears on every row that you and your team click to mark patients done. Add several with different labels to track multiple steps. - My sticky note — a read-only column that surfaces your own private sticky note for each patient (the one from the chart), so you can scan your notes across the whole cohort.
- Checkbox — a tick-box column for working a list (e.g. “Called,” “Reviewed,” “Scheduled”). Give it a label,
-
Export to CSV.
Exportdownloads the current list — the rows you see, with the columns you’ve chosen (checkbox marks included) — as a CSV file for reporting, mail-merge, or registry work.
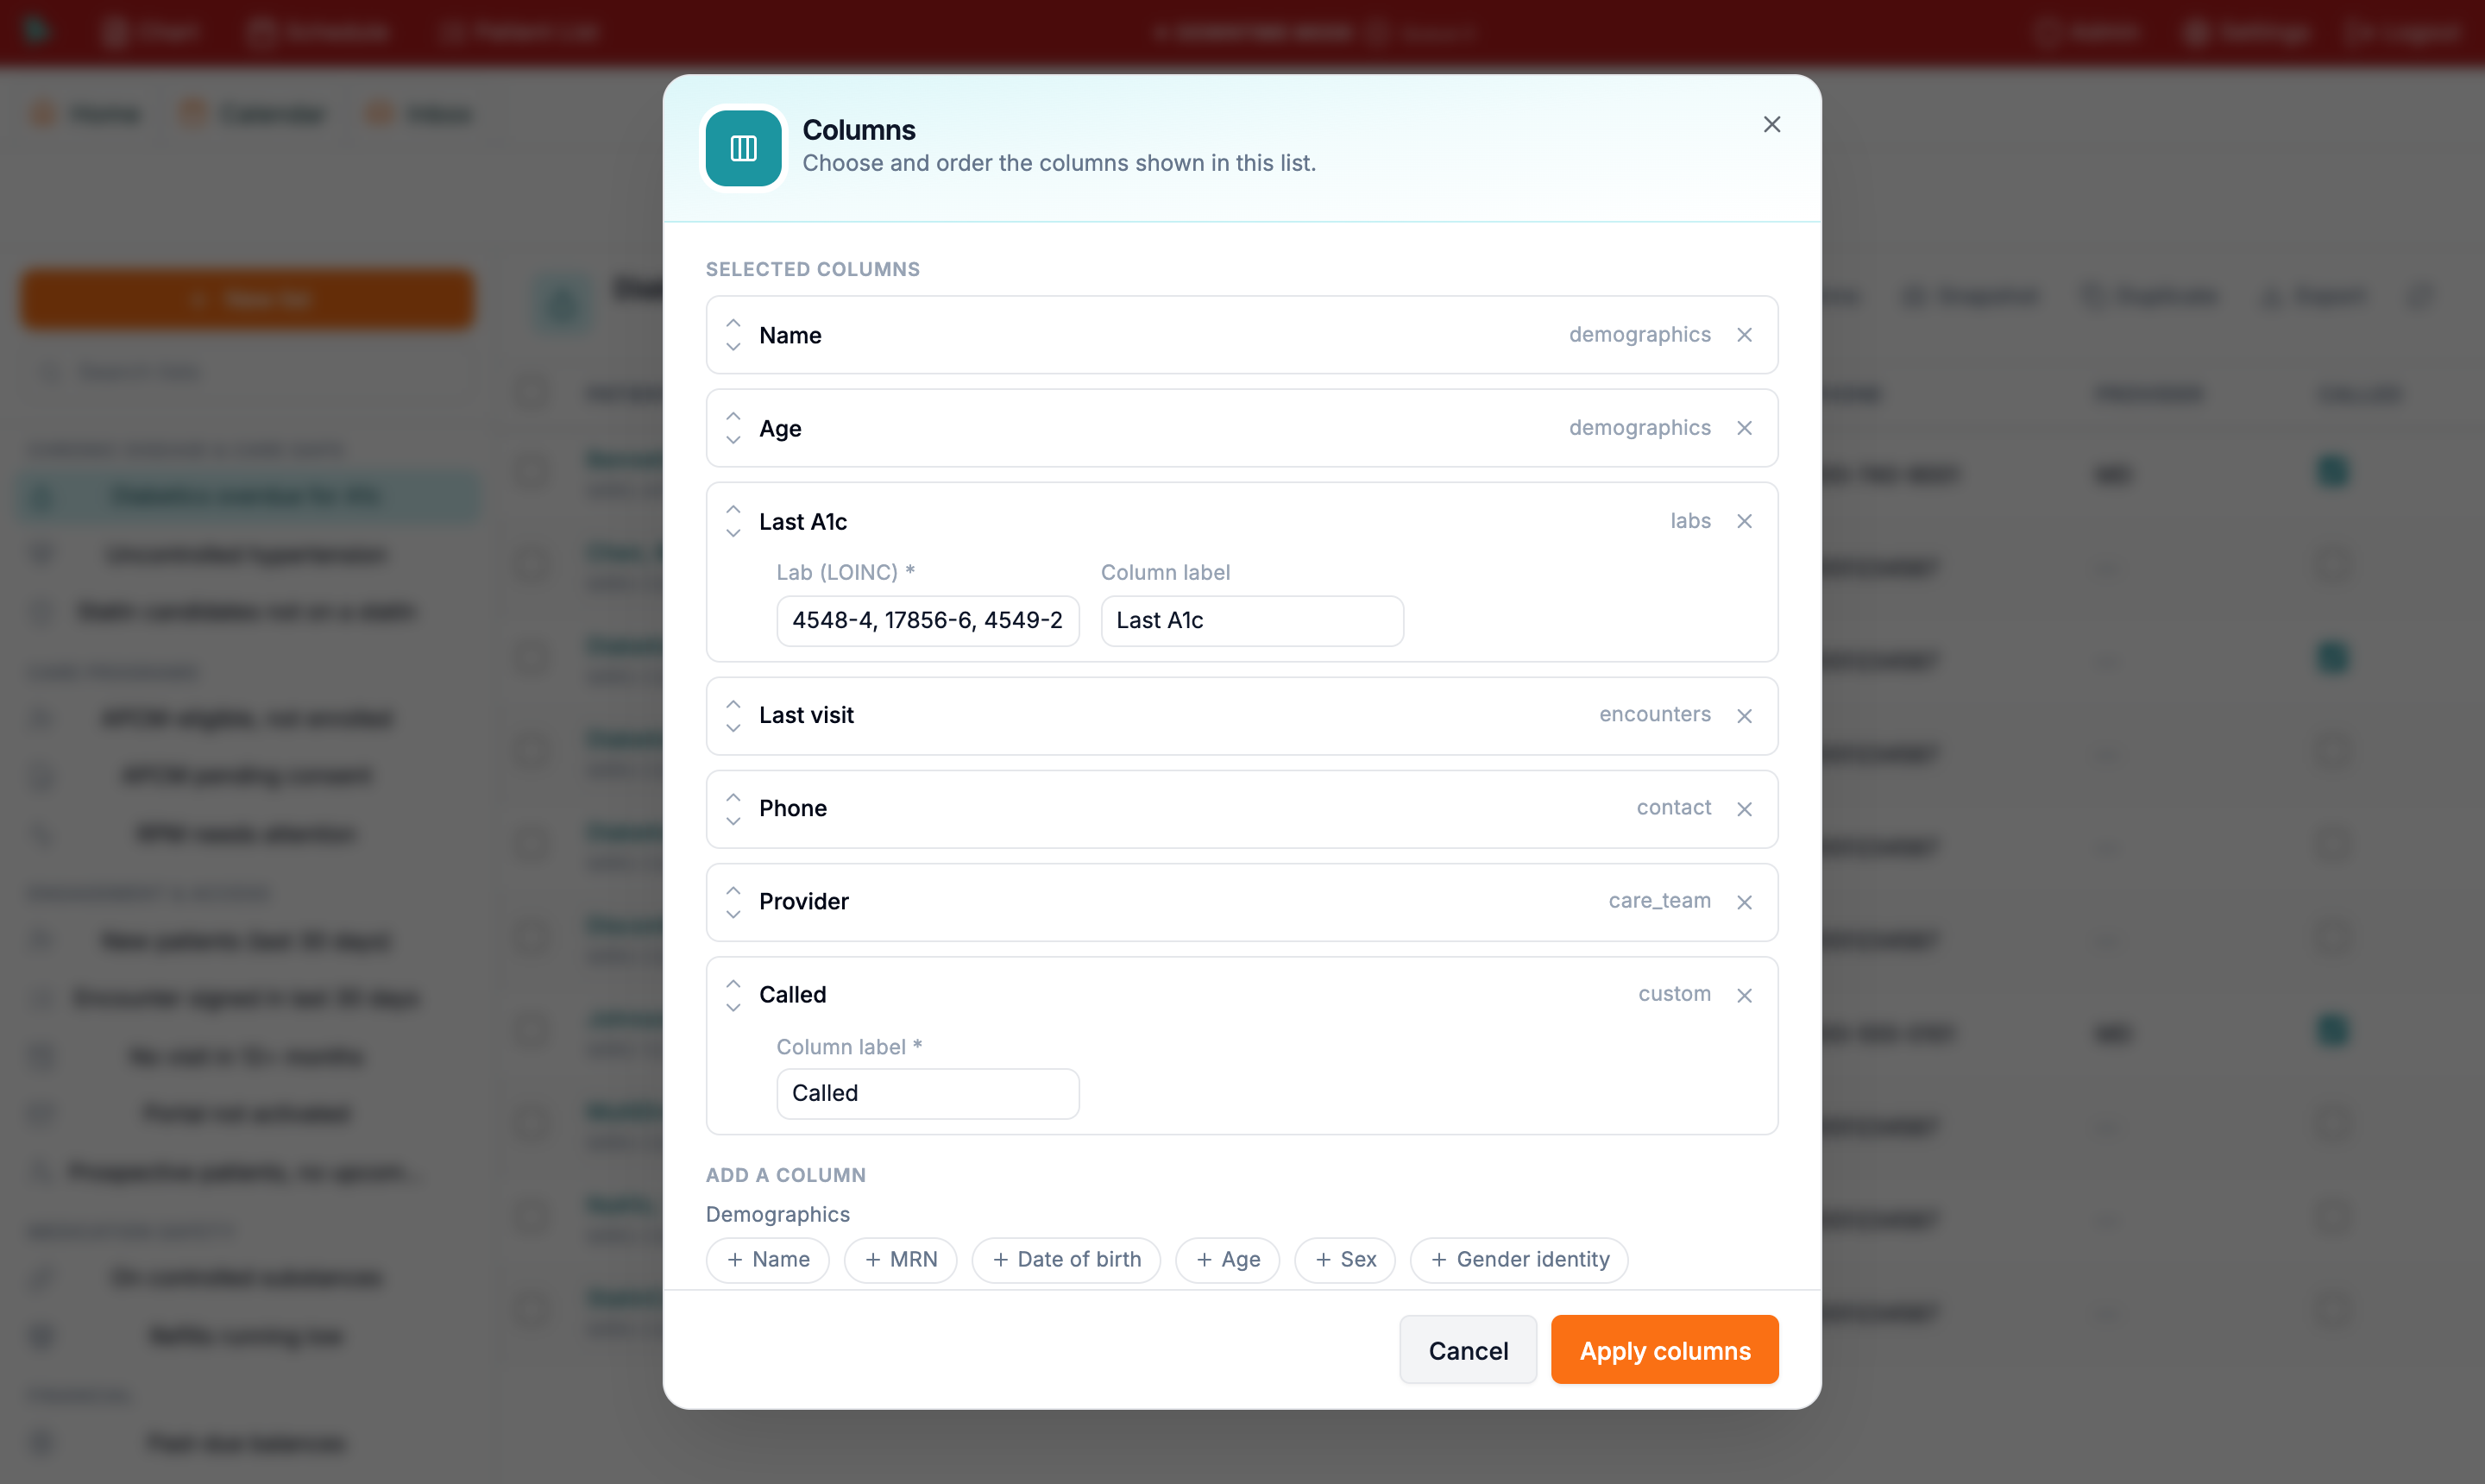
Columns dialog — a parameterized Last A1c and a custom Called checkbox column (category custom), above the add-a-column catalog.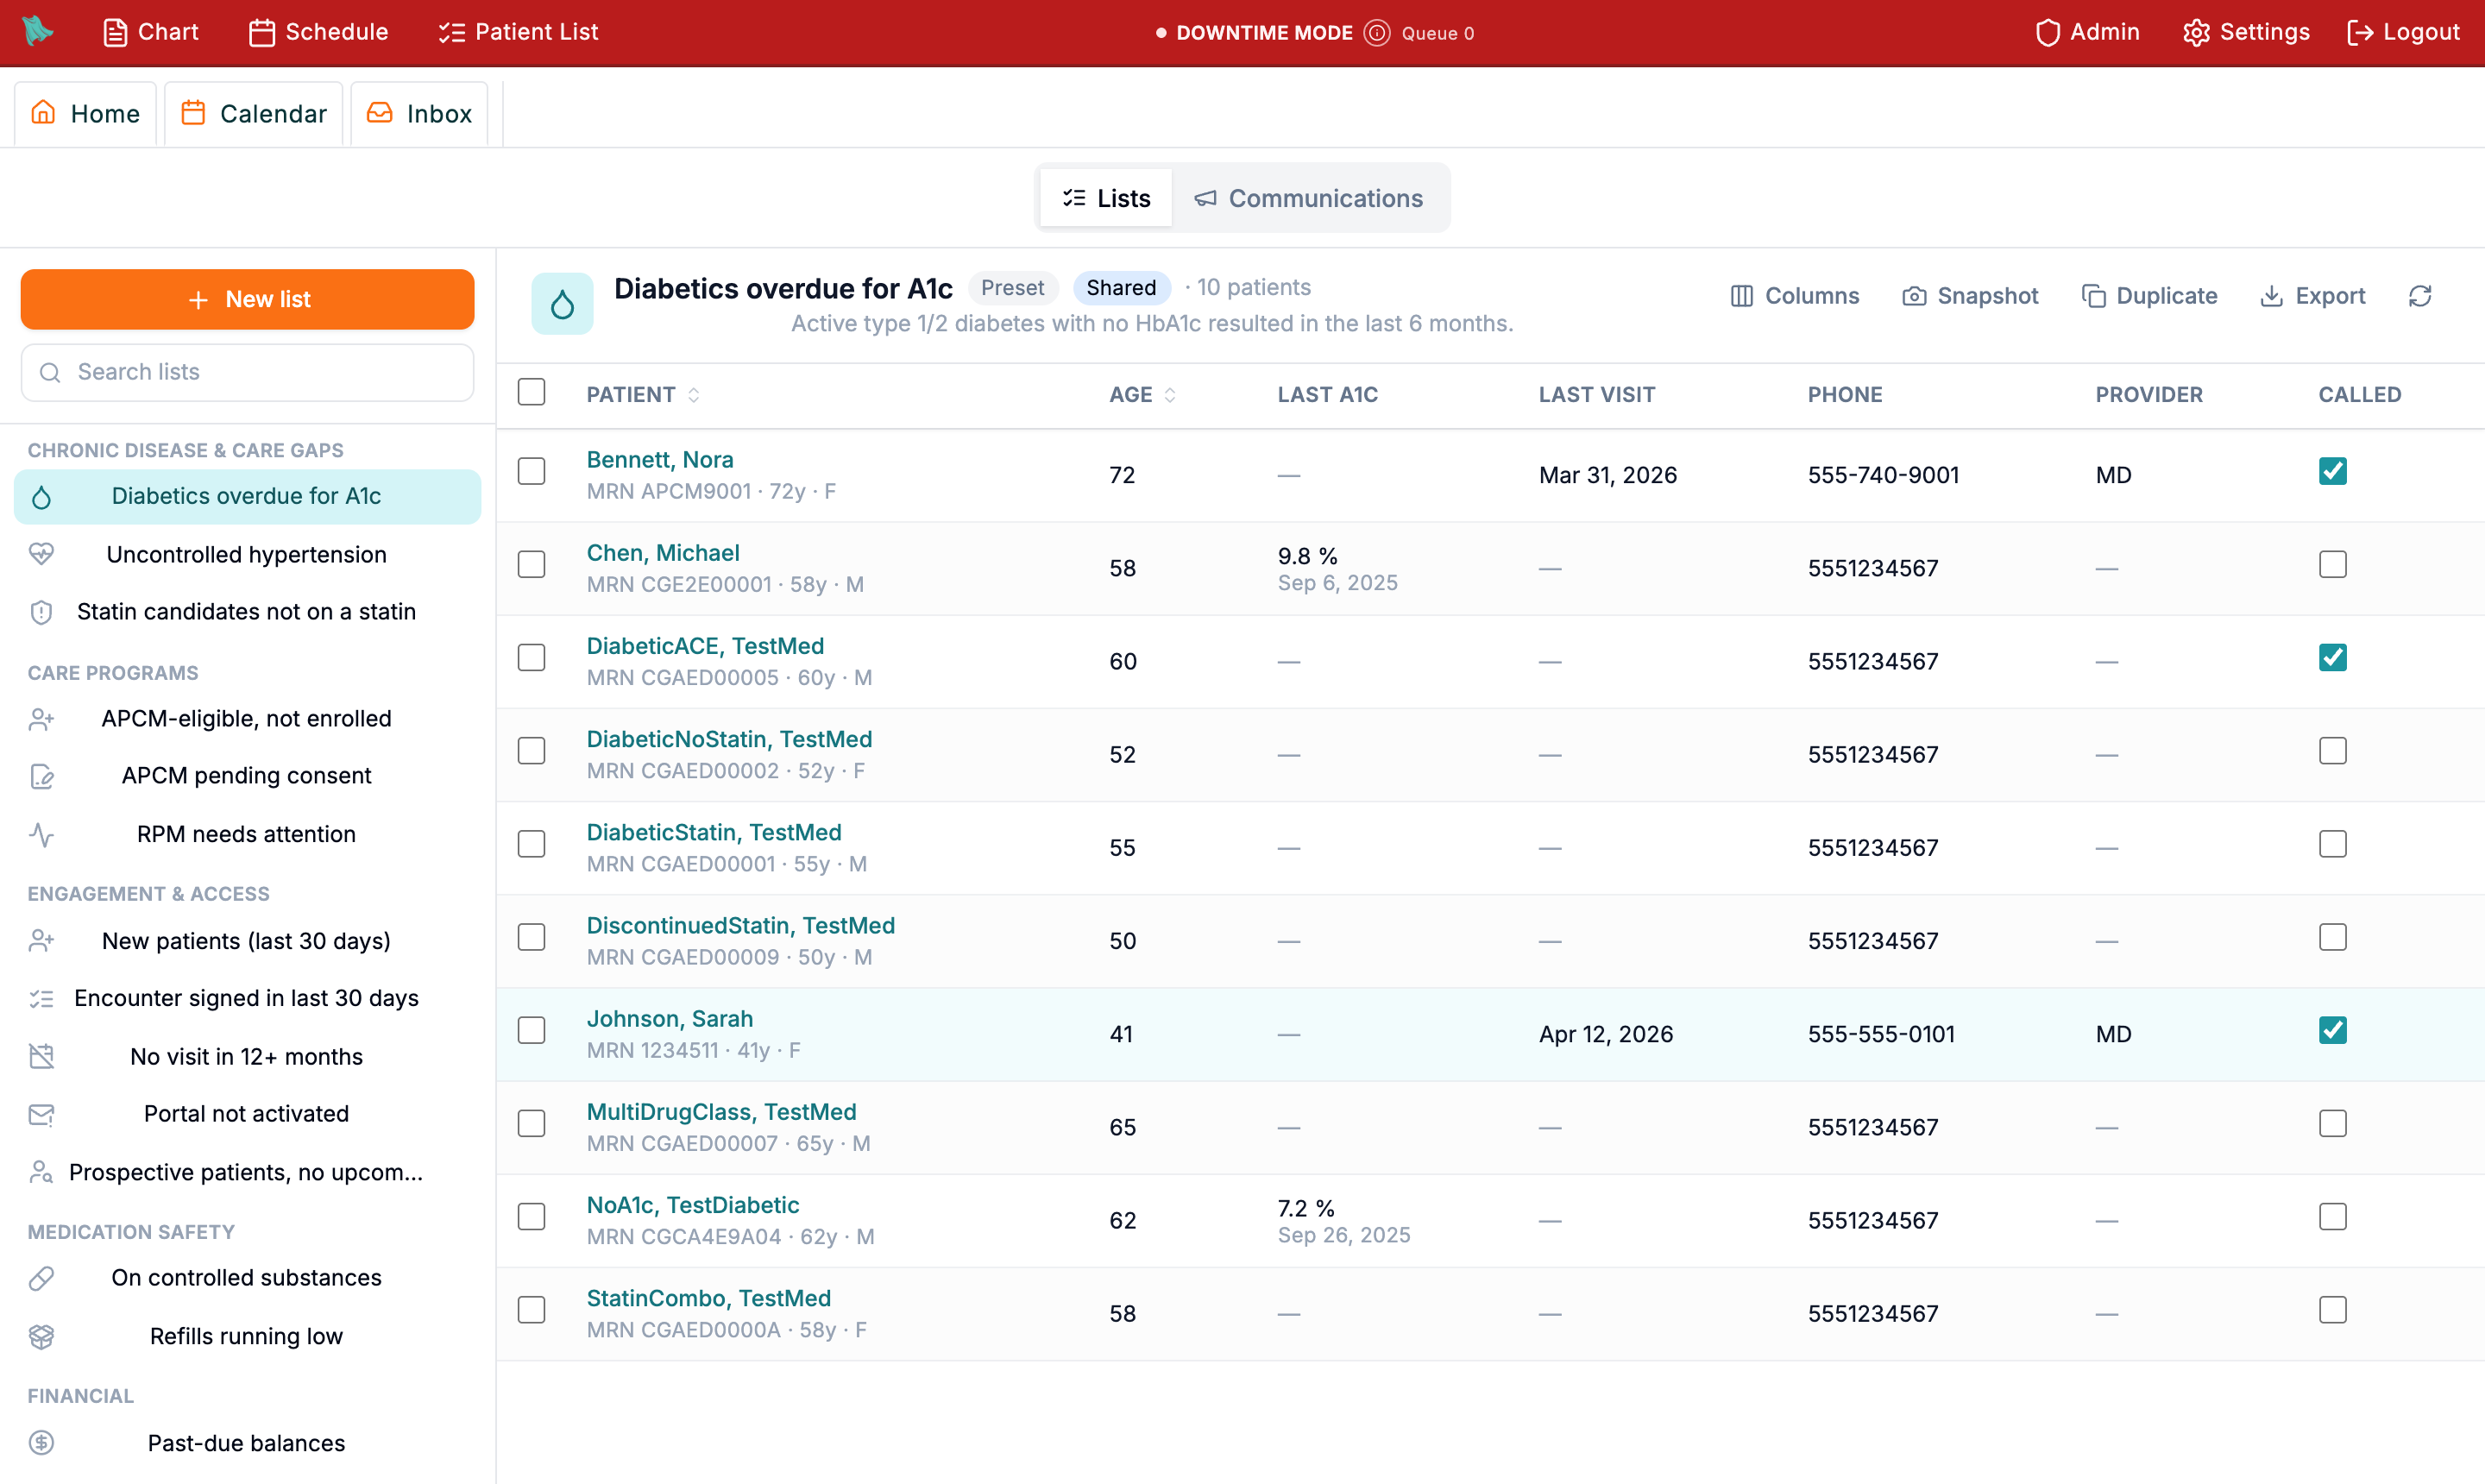
Called checkbox column on the table — tick a patient to mark them worked. On a shared or system list, everyone on the team sees the same ticks.Shared with org, the ticks are shared — the whole team works one set of marks together (great for dividing up a recall list). On a private list, the column and its ticks stay yours alone. Adding or relabeling a checkbox column on a system list changes it for the whole organization, so it needs Patient Lists manage permission (physicians always have it); anyone with access can tick the boxes.
Sharing a list (see Manual & shared lists) exposes the whole cohort — and its worklist ticks — to everyone in your organization who has Patient Lists access.
Reach a whole cohort with a campaign
Communications turns a patient list into outreach: one message sent to an entire cohort at once — a recall reminder, a flu-shot push, a balance notice — with delivery and engagement tracked per patient. It lives as a tab inside the Patient List workspace, so the cohort you just built is one click from a campaign.
-
Find the Communications tab.
Inside the Patient List workspace, switch to the
Communicationstab next toLists. You can also launch a campaign from a cohort directly — select patients in any list and clickSend communicationin the bulk selection bar, which opens the composer pre-loaded with that audience. -
Choose how the message goes out.
A campaign sends on one of three channels:
- Portal message — a secure portal message, with an email fallback for patients who don’t have a portal account.
- Email only — a plain email to the address on file.
- SMS text — a text message, capped at 160 characters and 25 recipients per campaign.
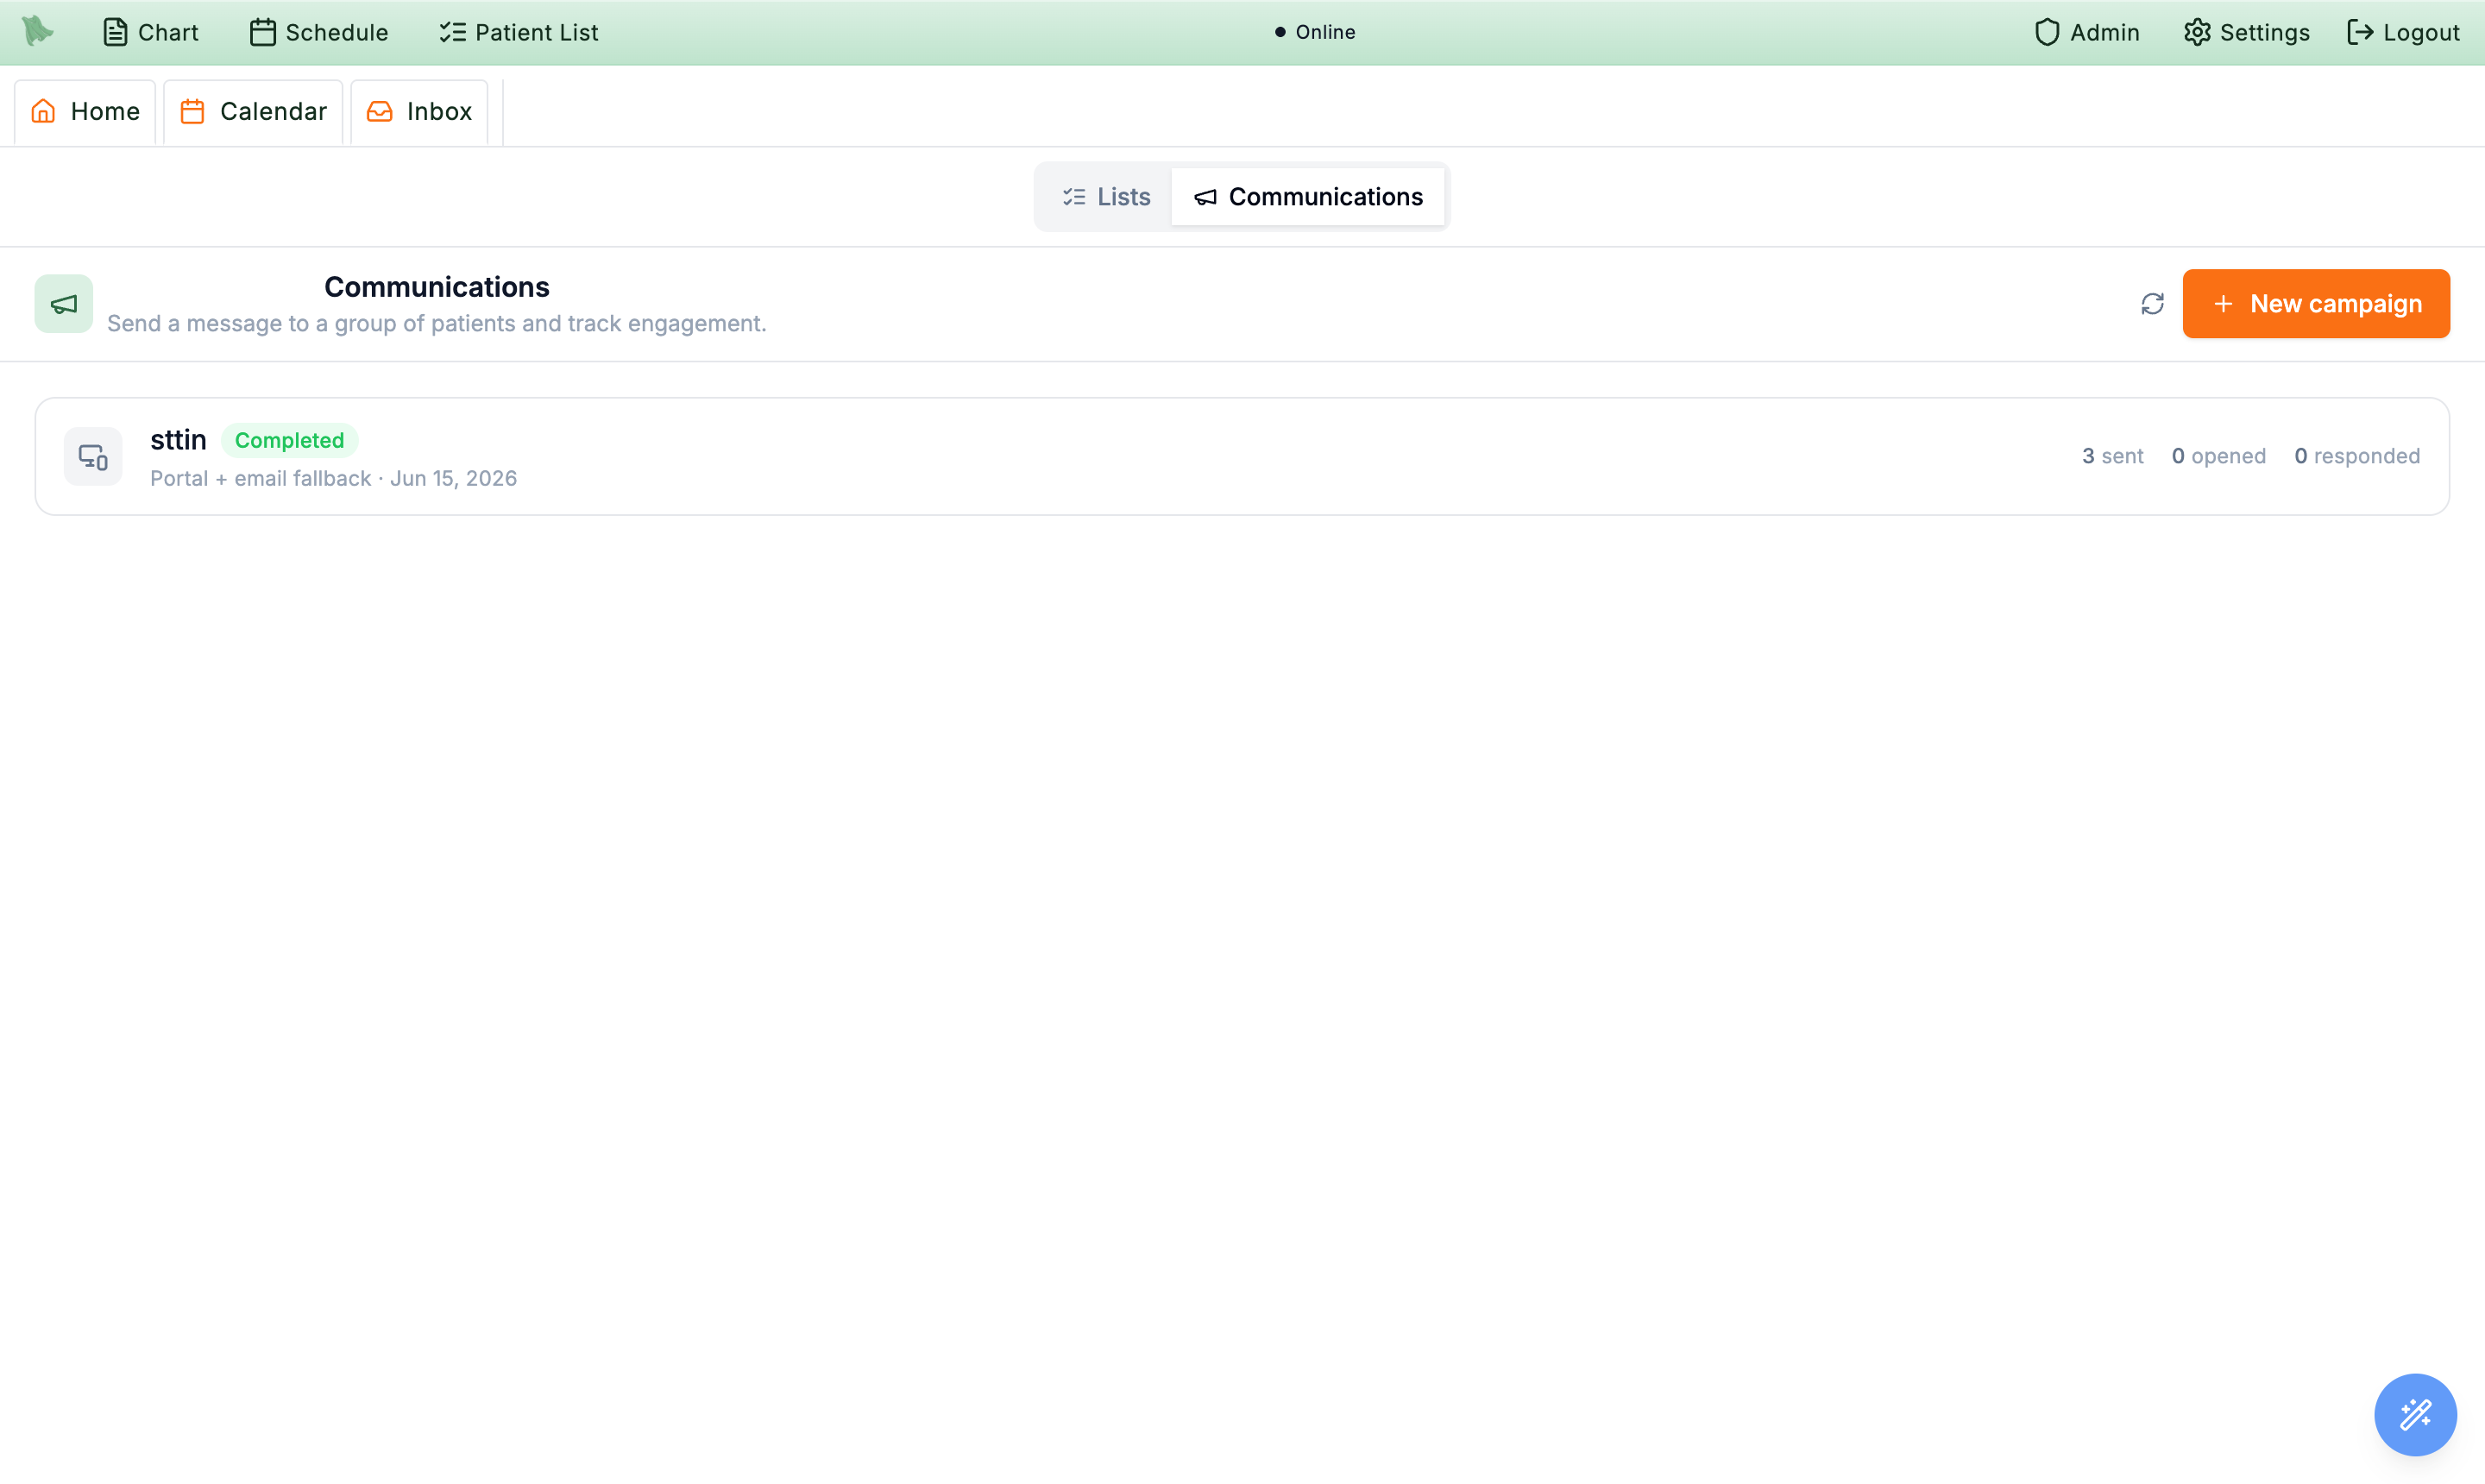
Communications tab — Send a message to a group of patients and track engagement, with a New campaign button.Email sending panel reading Finish email setup before sending, lists what is blocking it and the exact DNS records to add, and offers a Re-check button once your domain host has added them; both Send now and Send test stay disabled meanwhile. When it passes, the panel instead names the address you are sending from. SMS is unaffected. This is the email equivalent of the Stripe setup prerequisite for portal payments — get it done before you plan your first outreach.
Communications tab appears only for organization admins and users granted the communications permission. If you don’t see it, you can still build and share lists — ask an admin to run the outreach, or to grant the permission (see Staff accounts & permissions).
Compose, preview, and send a campaign
Click New campaign to open the composer. It walks you from naming the campaign through choosing a channel, writing the message, picking the audience, and reviewing exactly who will receive it before anything goes out.
-
Name it and pick a channel.
Give the campaign a
Campaign name(for your tracking, not shown to patients), then choose theChannel— portal message with email fallback, email only, or SMS text. -
Set the message type.
Message typeis required, and today there is only one choice:Treatment / care— “care, scheduling, results — transactional patient communication.” TheMarketingcard next to it is visible but greyed out (“Not yet available — requires unsubscribe & consent setup”), so promotional outreach can’t be sent from the composer yet. Keep campaign content on the treatment side of that line. -
Write the message with placeholders.
Fill the
SubjectandBody. Personalization placeholders are filled in per patient at send time — type them literally:- {{first_name}}, {{last_name}}, and {{full_name}} — the patient’s name.
- {{org_name}} — your practice name.
- {{portal_url}} — a link to the patient portal.
-
Pick the audience and review the preview.
Choose a
Patient listas the audience, then read the recipient preview — it resolves the channel for each patient (for example a portal recipient with no account shown as email), and marks each oneDeliverableYes or No with the reason (such as No phone number on file). Patients who have opted out of SMS are excluded automatically. - Mind the SMS limits. On the SMS channel a live 160-character counter tracks the body, and the 25-recipient cap auto-trims a larger audience — an amber alert tells you when the list has been limited so you can split a big cohort across runs.
-
Add reminders to re-ping non-responders (optional).
Remindersautomatically follows up patients who haven’t responded — set the cadence (days between attempts),Max attempts, and theReminder channel. -
Schedule for later (optional).
Schedulesets aSend atdate and time, interpreted in your clinic’s timezone, so a campaign can go out at a sensible hour instead of immediately. -
Send yourself a test first.
Send testdelivers the message you have composed — subject, body, and all — to your own email address, confirming with Test … sent to …. It is the safest dry run before anything reaches patients, and the quickest way to see how the personalization placeholders and your practice’s formatting actually land. It is offered on the portal and email channels only; there is no SMS test, because the composer never collects a phone number to send one to. -
Save or send.
Finish with
Save draftto come back later, orSend now— orScheduleif you set a send time — to launch it.
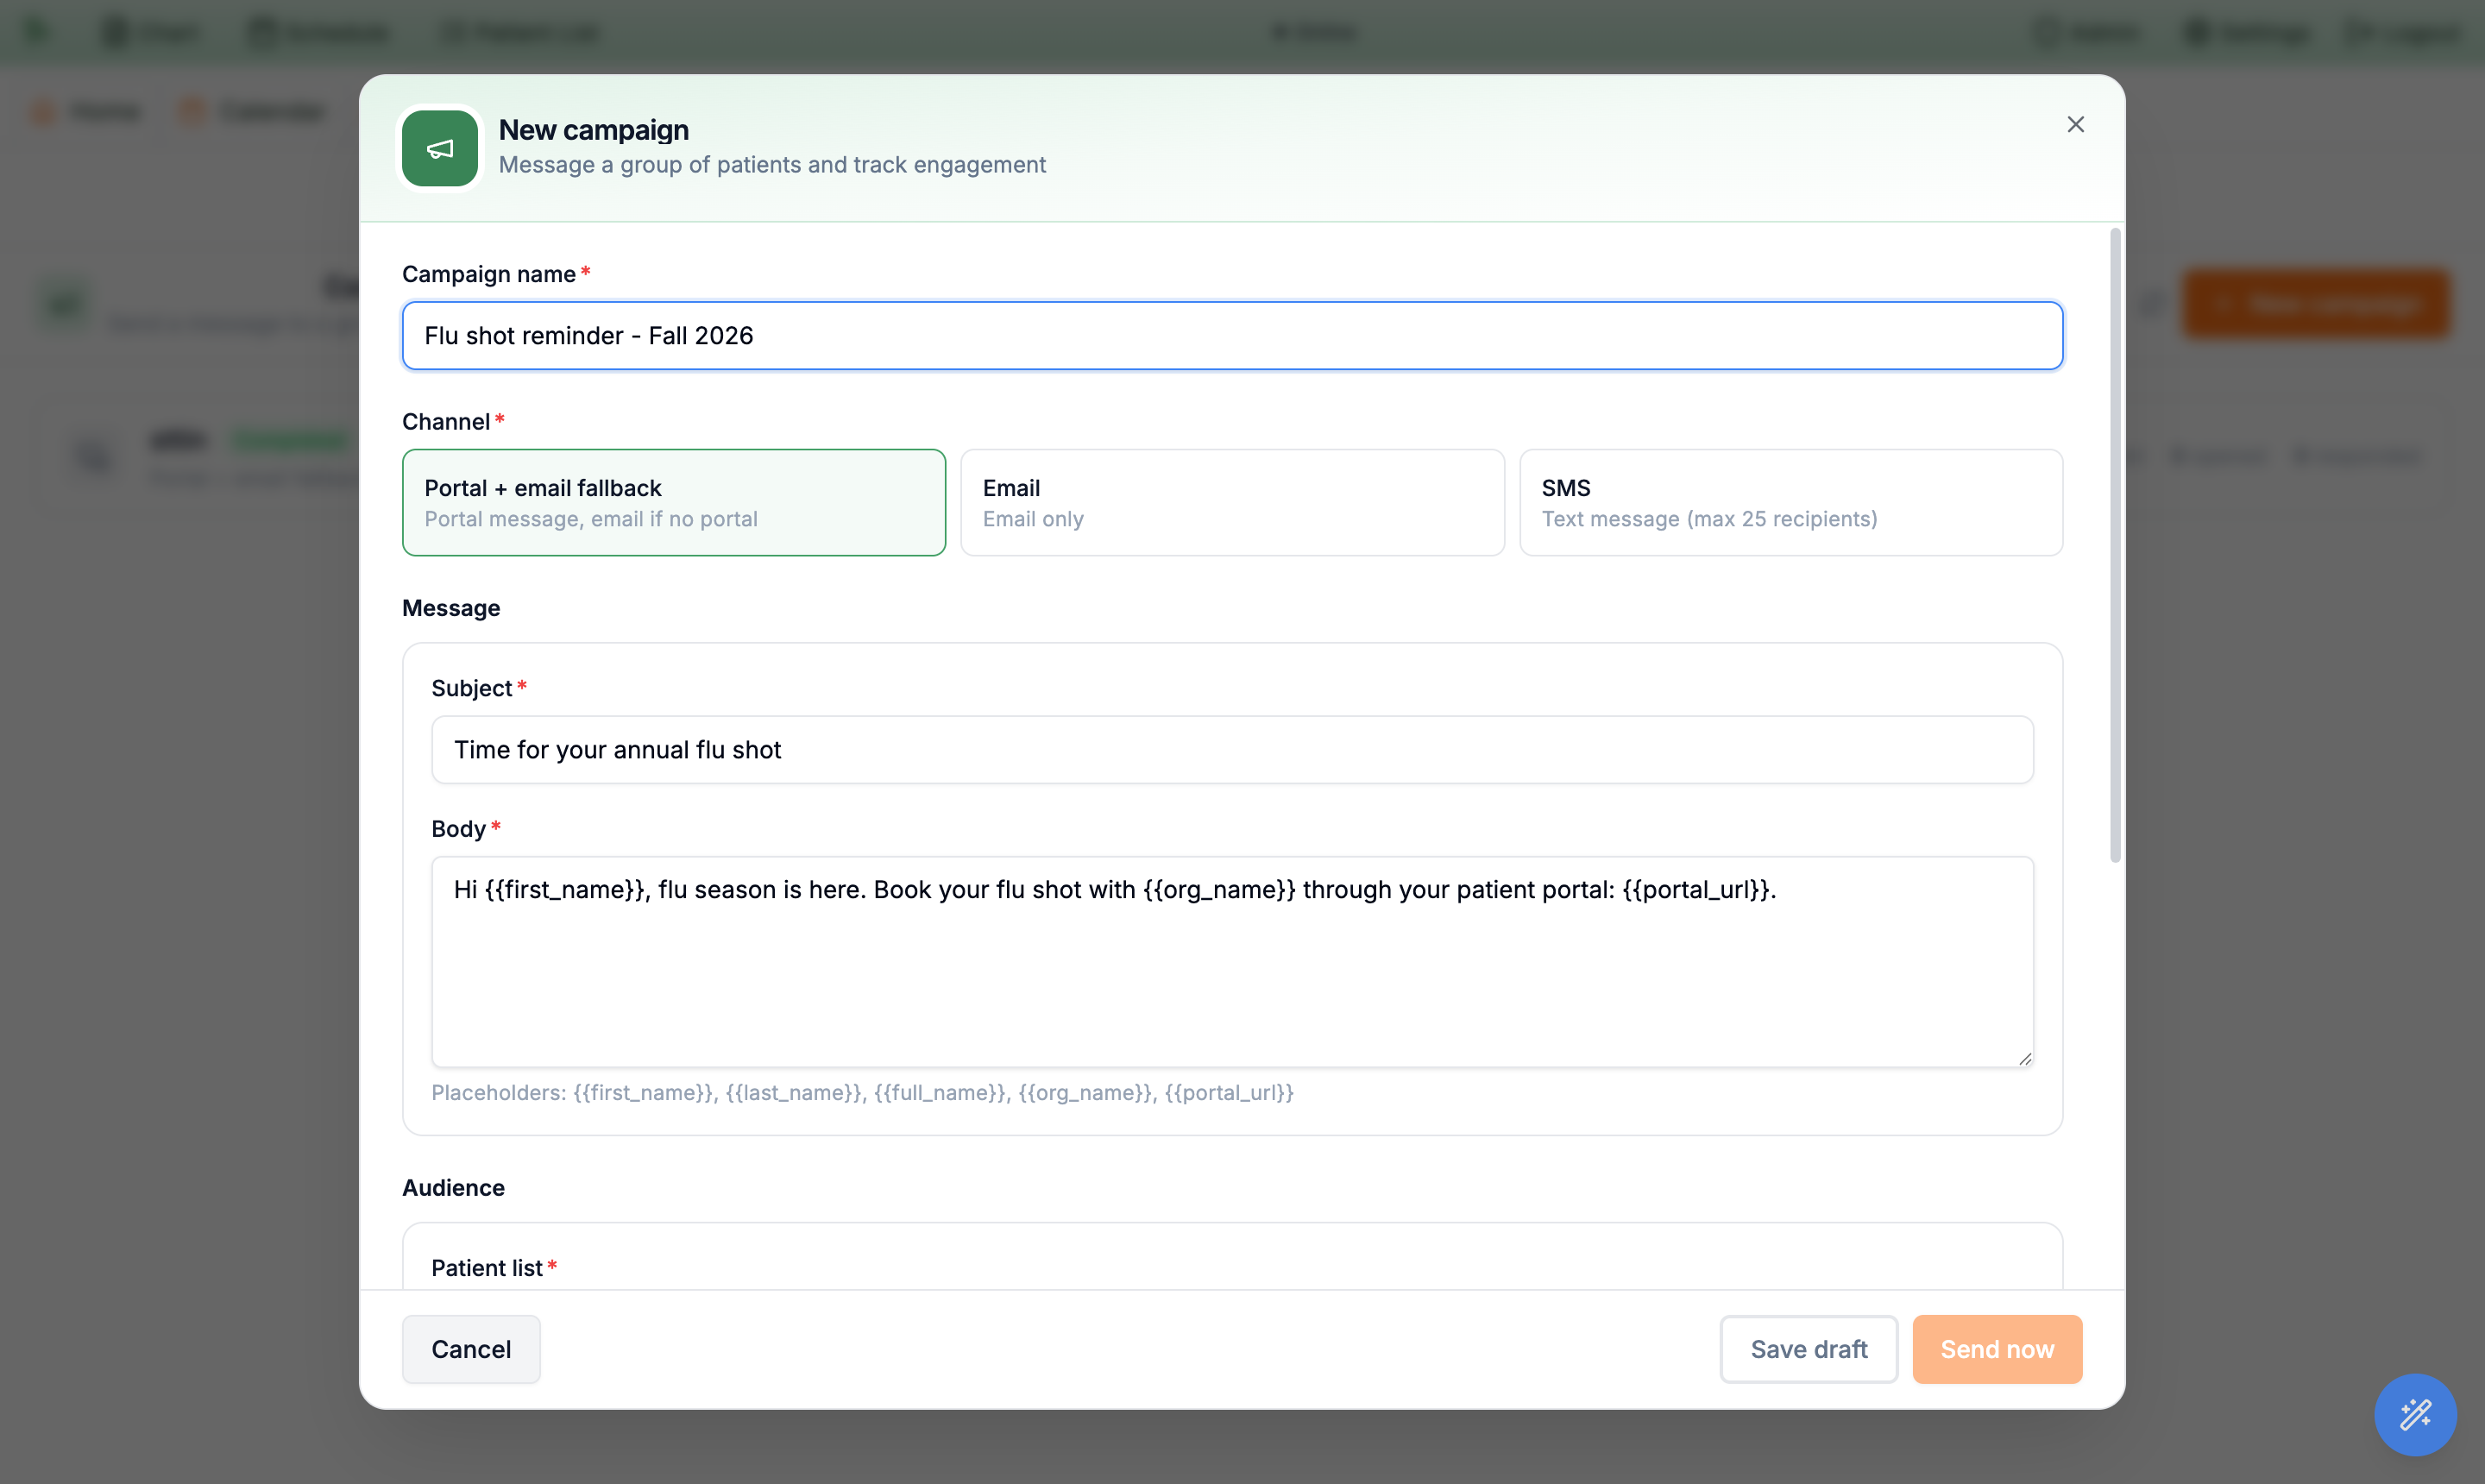
Subject and Body, and use the personalization placeholders.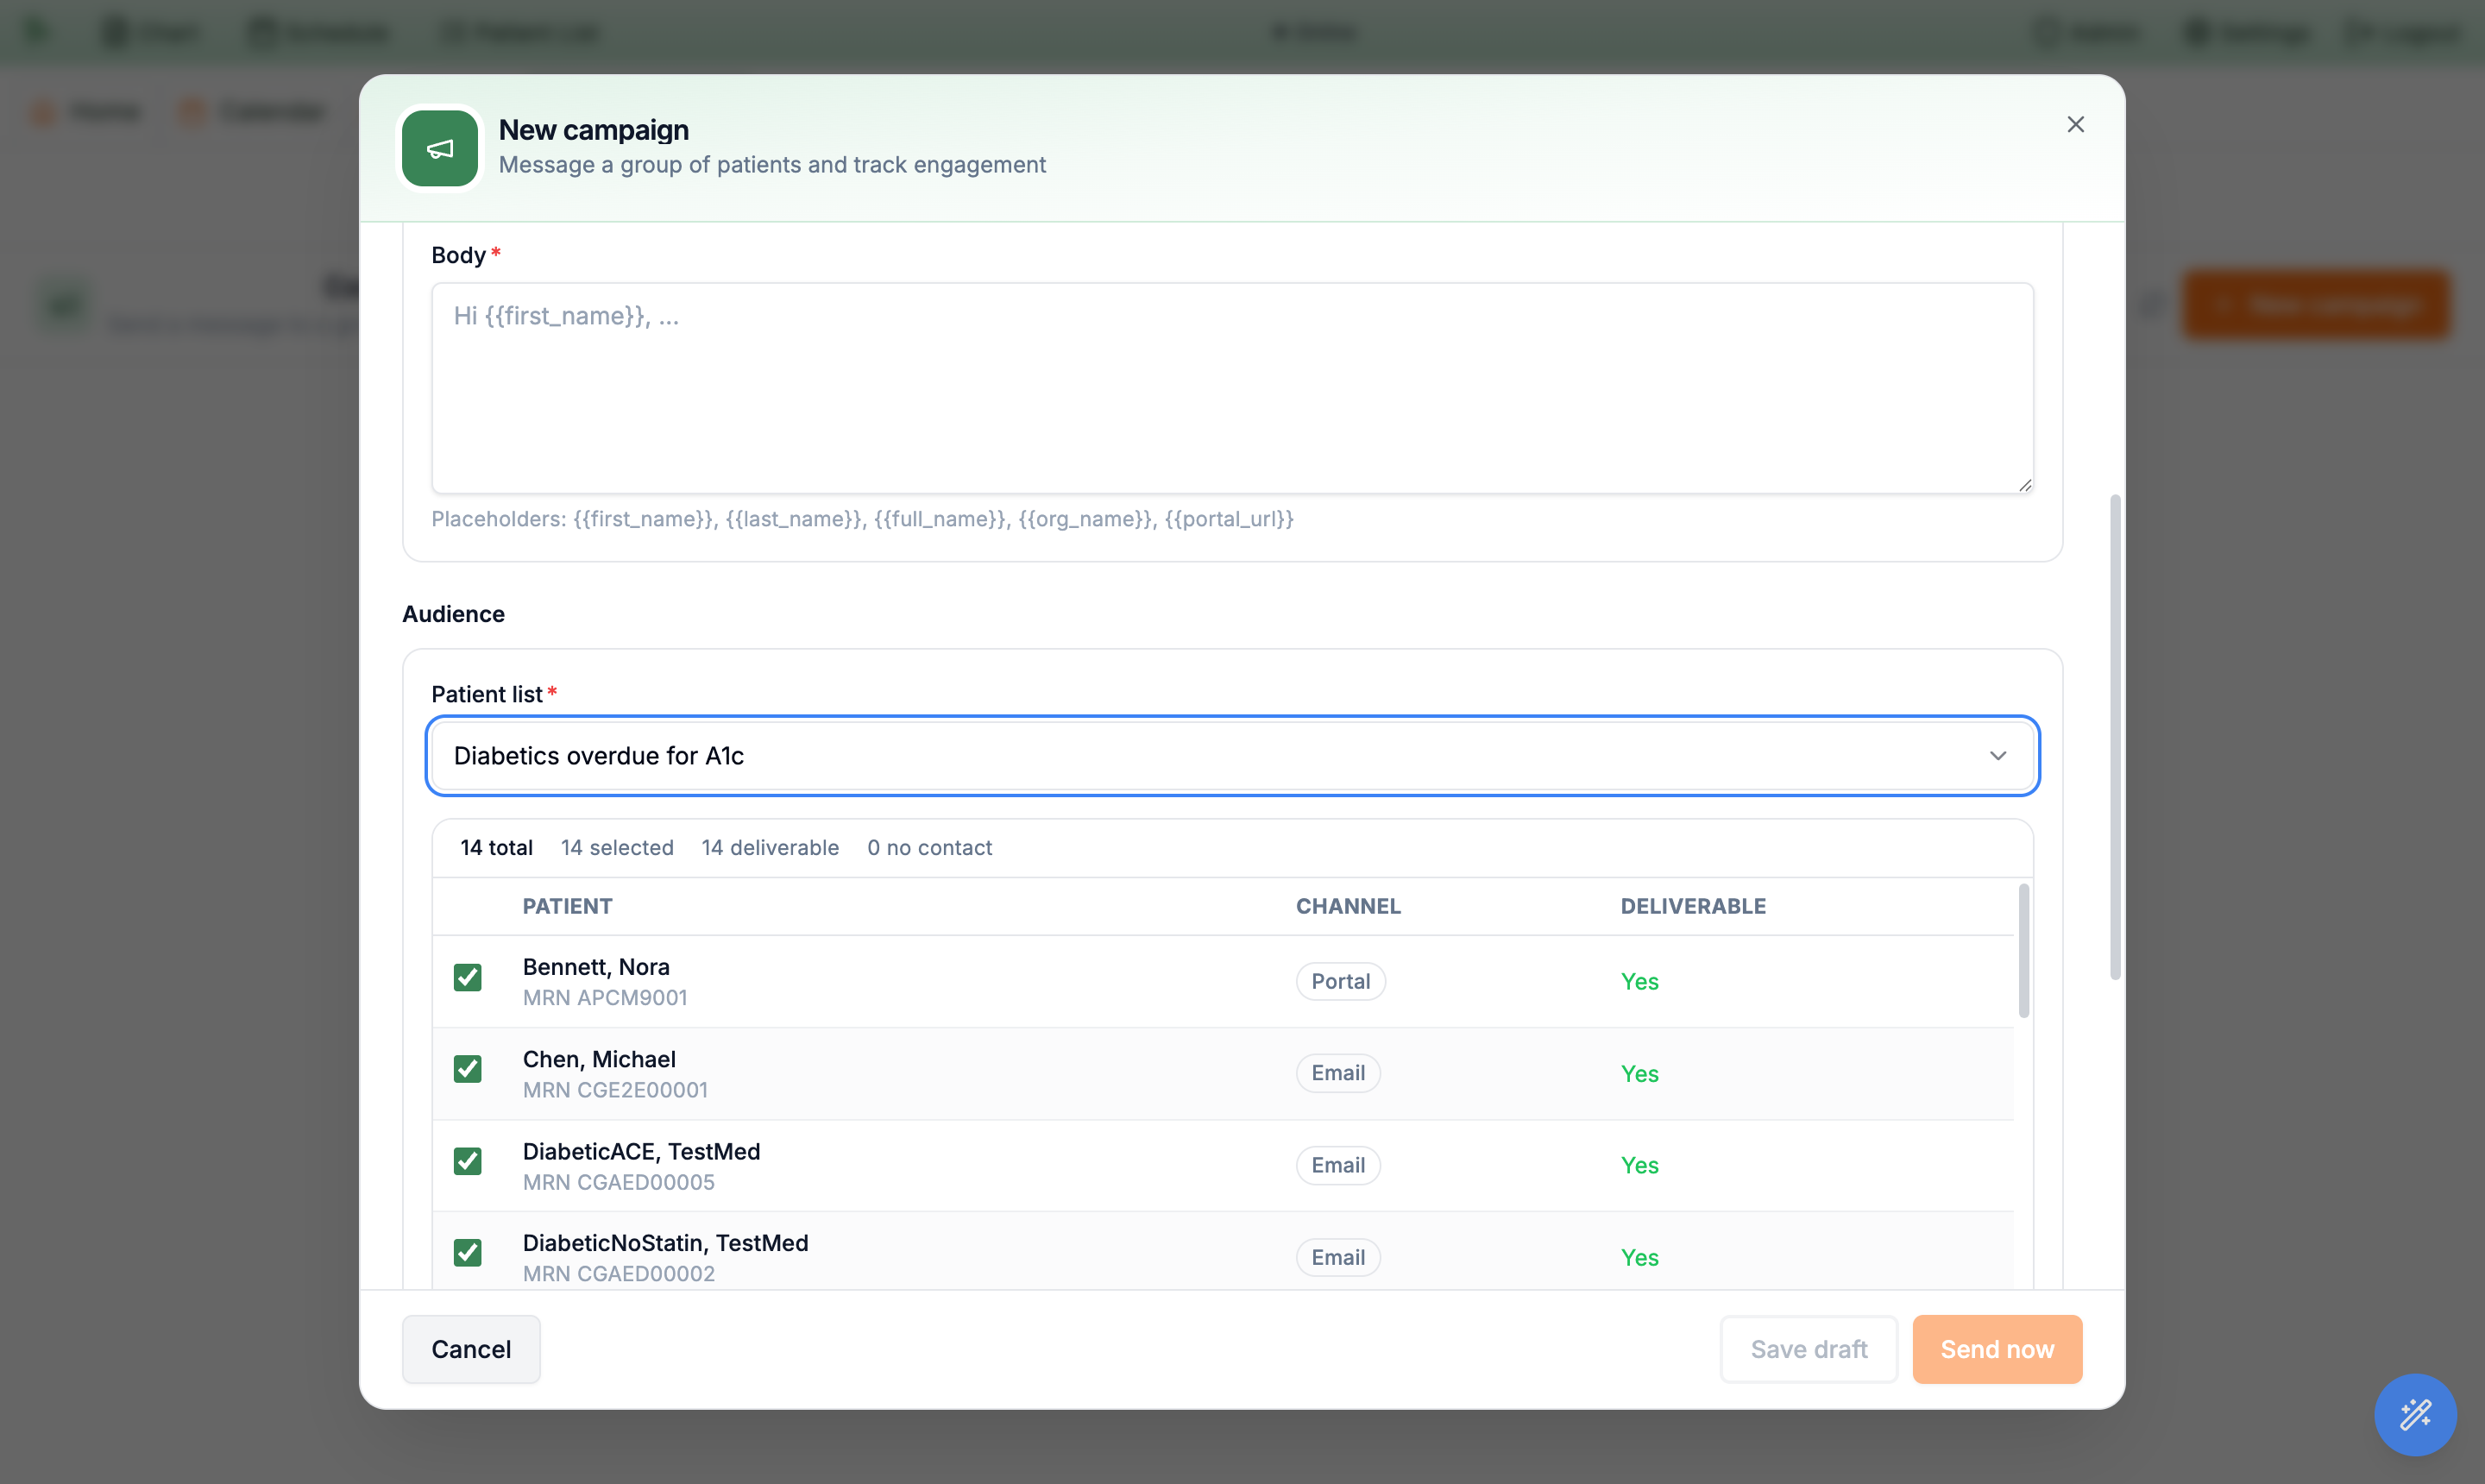
Deliverable Yes/No with reasons, here 14 of 14 deliverable.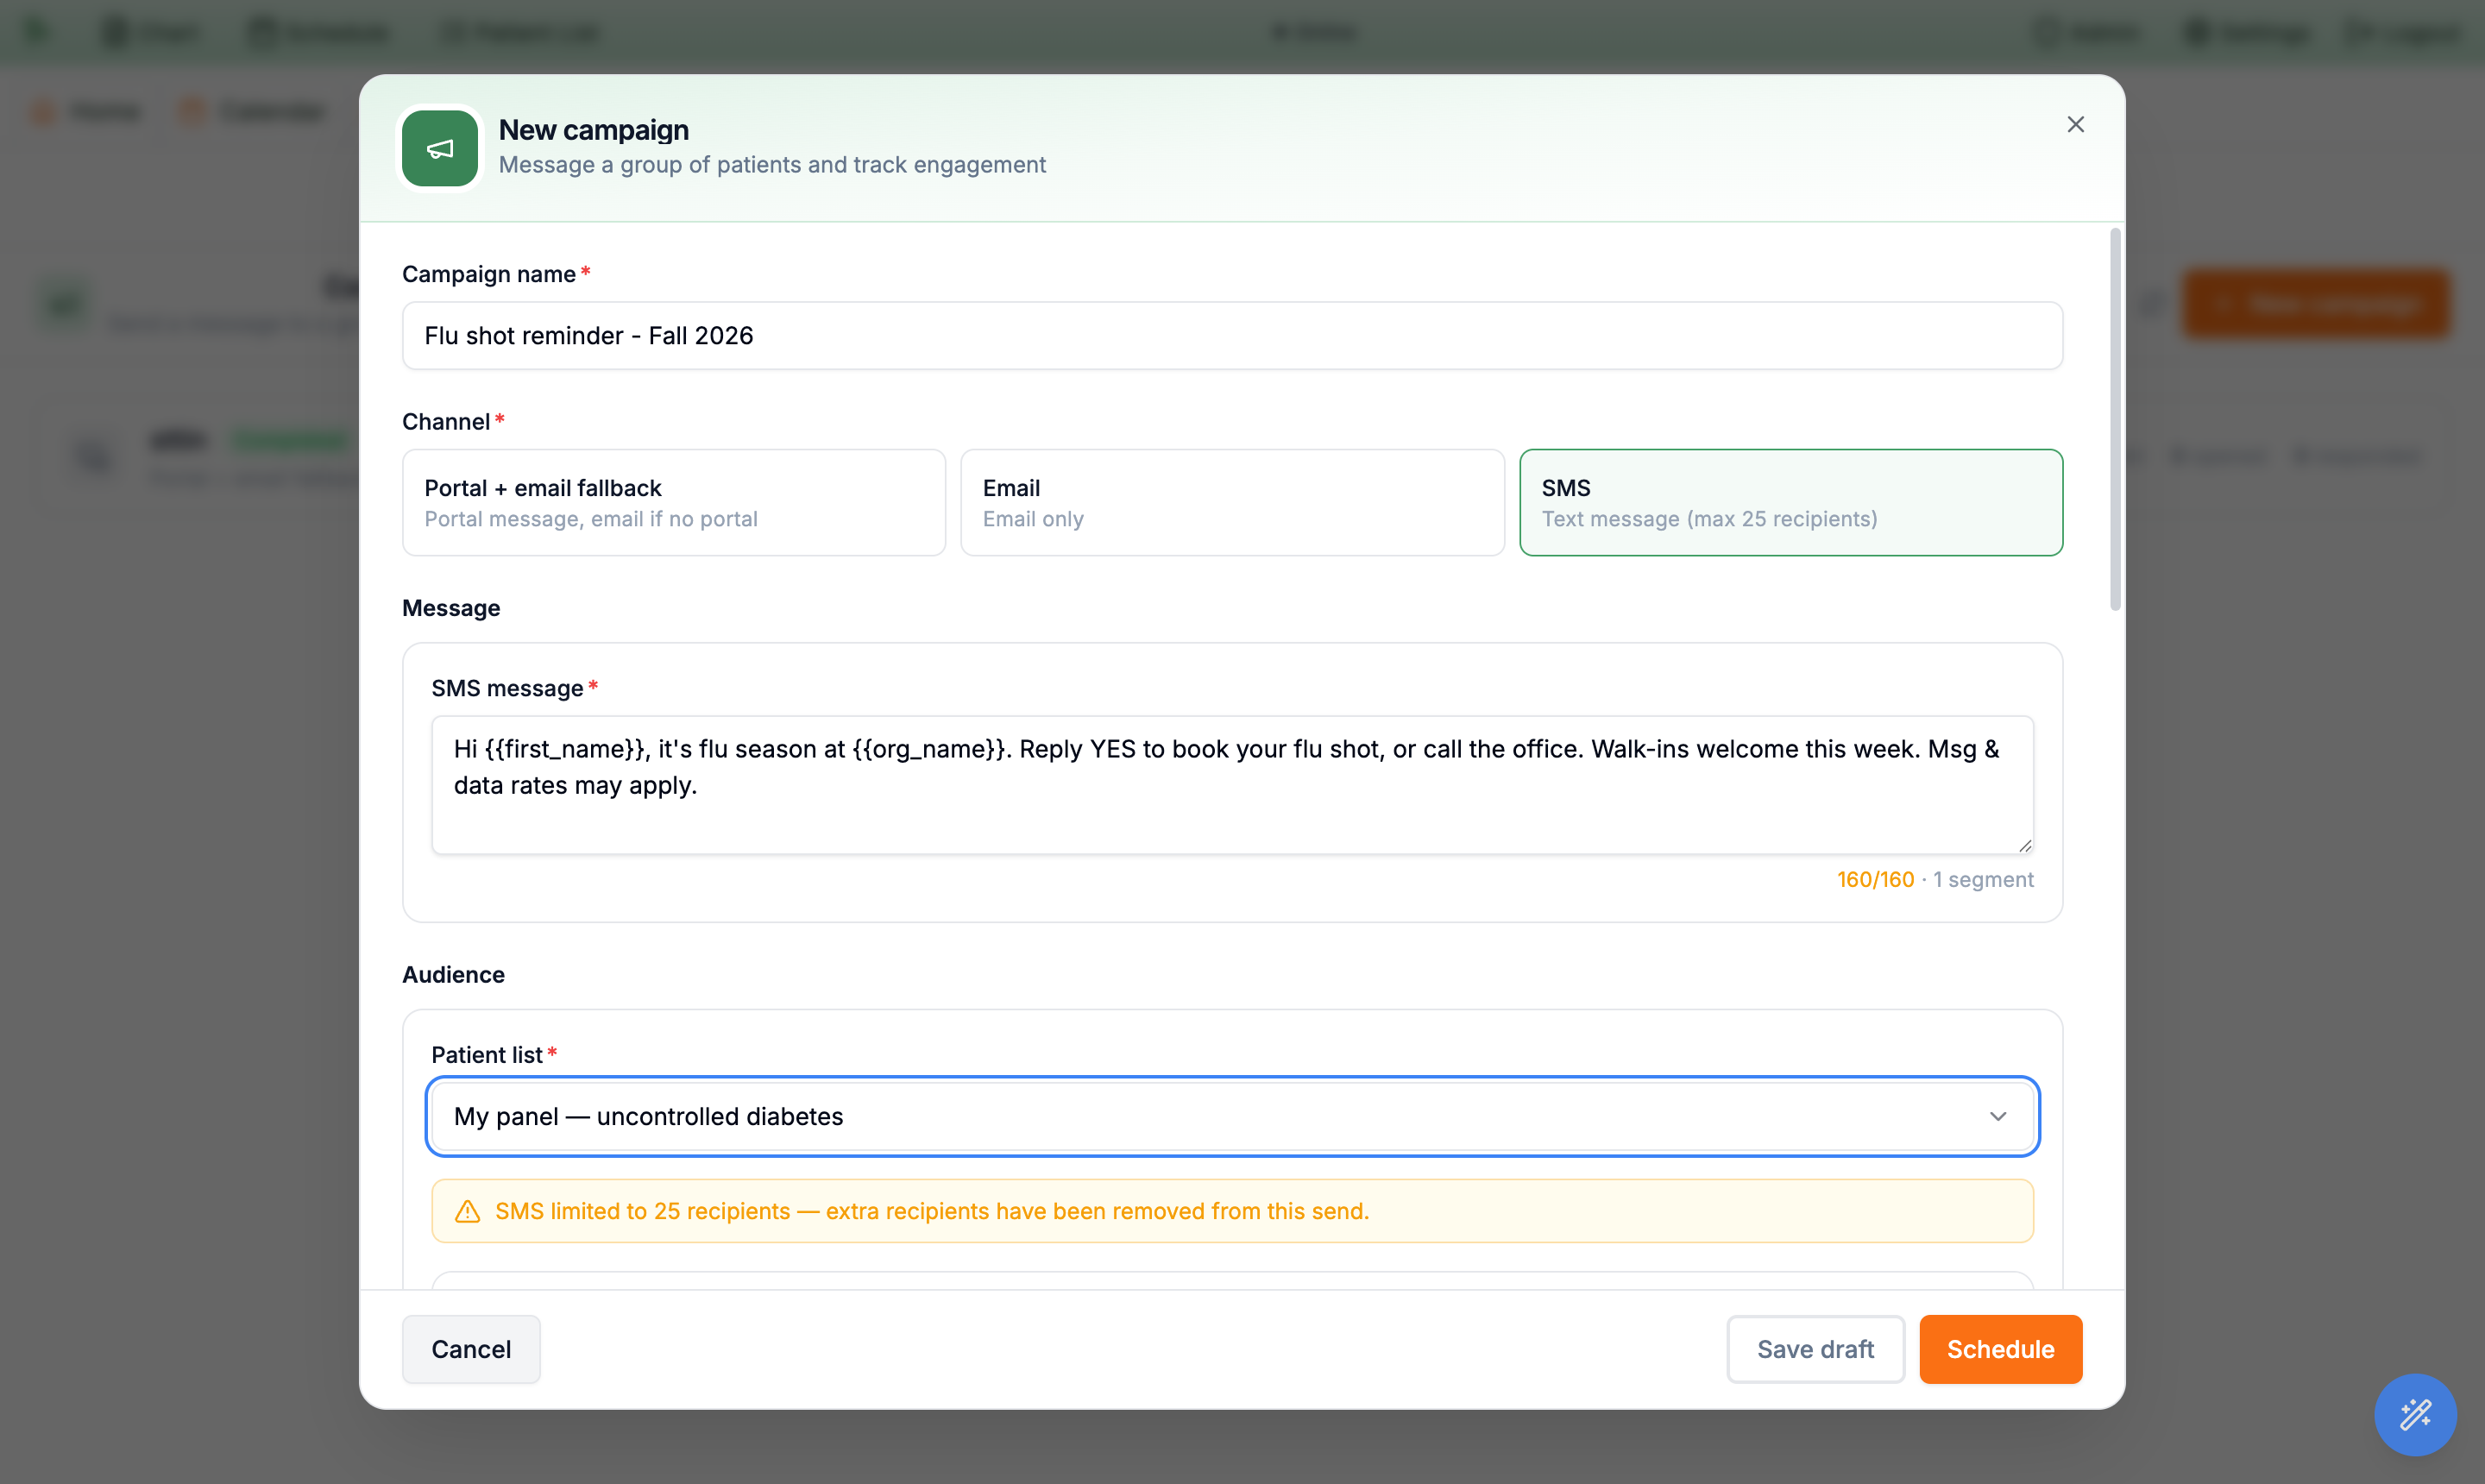
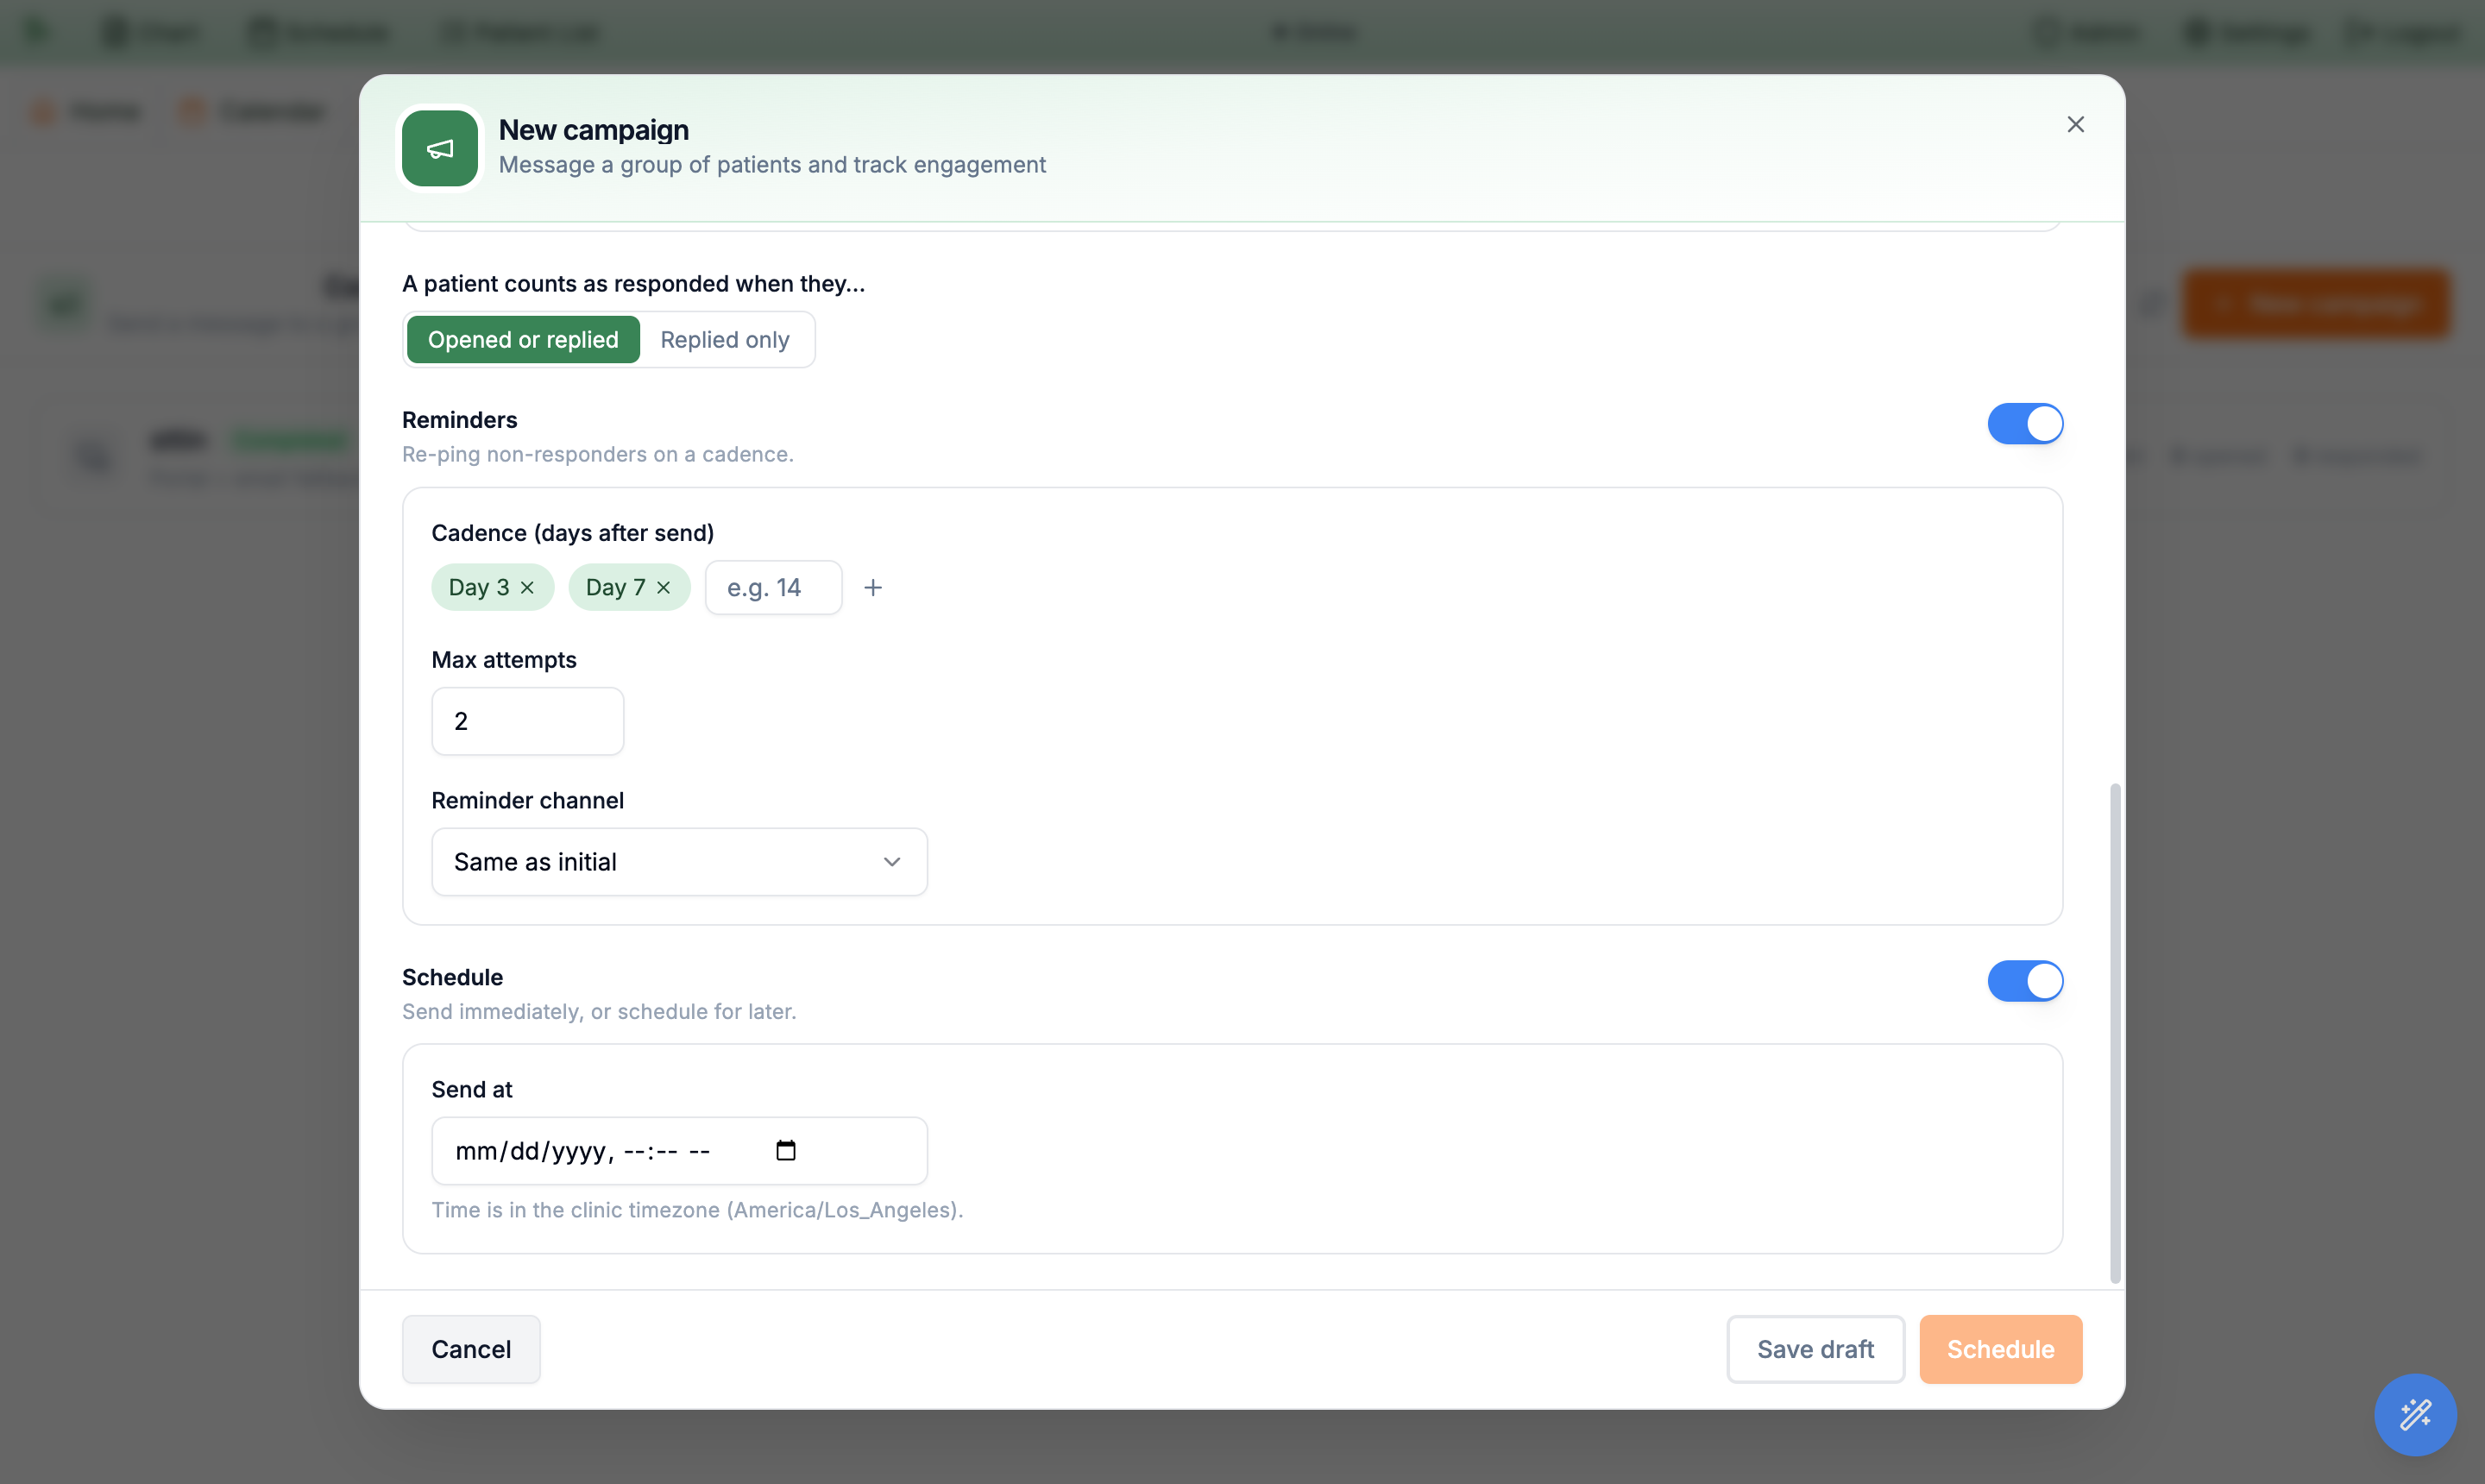
Reminders (cadence, Max attempts, Reminder channel) re-ping non-responders, and Schedule sets a Send at time in the clinic timezone.Send now delivers real messages to live patients. Check the recipient preview first — confirm the channel resolution, the deliverable count, and the placeholder text in your Body — and use Send test to read the message in your own inbox before you launch it to the cohort. SMS opt-outs are re-checked at send time, so a patient who unsubscribes after you composed the campaign is still dropped before delivery.
Track delivery and engagement
Once a campaign launches, its detail page becomes a live dashboard — you watch the rollups climb as messages send, open, and get answered, and you can drill into any single patient to see what happened on their channel.
-
Read the stat cards.
Six cards summarize the campaign at a glance:
Total(recipients),Sent,Opened,Responded,Reminders sent, andFailed. -
Drill into the recipient table.
Below the cards, one row per patient lists
Patient,Channel,Status,Sent,Opened,Responded,Reminders, andError— so a failed delivery shows both the patient and the reason it didn’t land. - Know what counts as a response. What “responded” means depends on the campaign’s definition — either Opened or replied (any engagement counts) or Replied only (an actual answer is required). Email opens are detected by a tracking pixel; SMS and portal replies register as they arrive.
-
Stop future reminders.
Cancel campaignhalts any scheduled reminders that haven’t fired yet. It does not unsend messages already delivered — once a message has gone out, it’s with the patient.
Opened as a floor, not an exact count, and lean on Responded for true engagement.
Need help? Email support@heroemr.com.