Encounter completion — the note & diagnoses
Document the visit and let Hero EMR turn it into a guided completion checklist: the note writer, auto-completion on save, and diagnoses.
Encounter completion — the note & diagnoses
Document the visit and let Hero EMR turn it into a guided completion checklist: the note writer, auto-completion on save, and diagnoses.
Open the encounter and meet the note writer
Every visit is documented in the note writer — a two-pane workspace. The left pane is the patient’s chart; the right pane is the note. You write the note on the right, and when you save, the left pane turns into a guided Encounter Completion checklist that walks you through diagnoses, orders, charges, follow-up, and medications before you sign.
-
Start the encounter.
On the dashboard agenda, hover the patient’s appointment row and click the small ▶ play button that appears on the right (its tooltip reads Begin encounter) — the same button sits on the calendar’s appointment list. Double-clicking the appointment row does the same thing. From the chart, open the
Encounterstab, single-click a row in theUpcoming visitspanel and useBegin encounterin the preview’s action strip. The note opens on a tab labelled Note: <patient>.- Once a visit is signed or complete the ▶ button stops appearing on hover — that is deliberate, not a fault. Double-click the row to open a signed visit and add an addendum.
-
Know the two panes.
- Left — Chart Review. Tabs for
Encounters,Notes,Labs,Imaging,Medications,Immunizations,Medications given,Prenatal,Brain Health,Procedures,Media, andLetters, plus the patient header strip (vitals, allergies, problems, pharmacies).Immunizations,Medications given,Prenatal, andBrain Healthonly appear when the matching organization feature is switched on under Admin → Additional Features — andPrenataladditionally needs an existing pregnancy episode on file for this patient. - Right — the note editor. A rich-text editor. Its toolbar runs bold/italic/underline, a
Formatdropdown holding headings, lists, alignment, and the note’s display style, then the note-type pill (for exampleProgress Note),+ New note, aVisibleorHiddencontrol for patient-portal visibility, dictation (microphone), and save. The visibility label follows the selected note, including an automatically hidden psychotherapy note; its tooltip readsManage hidden notewhen restricted.
- Left — Chart Review. Tabs for
- Switch panes whenever you need to. The small ⇆ icon button inside the note’s own tab in the tab strip flips the left pane between chart and completion — hover it and the tooltip reads Switch to Encounter Completion or Switch to Chart Review depending on where you are. It shows only on the active note tab, so you can flip back to the chart mid-visit without losing the completion you’ve started. Staff users don’t get the toggle, because they don’t complete encounters.
-
Go back to the visit’s prep with
Pre-visit. When the visit was booked on the calendar, aPre-visitbutton sits at the top right of the patient header, just left of the view switcher (Chart Review / Encounter Completion). In the vertical layout, with patient info on the left, it heads the middle column instead. It opens this visit’s Prep tab, the same tabPrep visit…opens from the calendar, so you can finish a review or reconciliation you skipped.- On a draft note, an amber number on the button shows how much is still to review there: Prep sections not checked off for this visit and, if your practice uses intake review, intake items waiting for review and provider flags to acknowledge. Hover the button for the list, for example Not checked off: Medications, Allergies. A green check means everything there is reviewed.
- The number appears only once Prep has been used on this patient’s chart, and counts only what you are allowed to check off. On a signed note the button is just a link.
- Staff see it when they can open the Prep tab (patient and schedule access).
***) and Shift+F2 goes back, and F8 opens the Note Writer guide. These are the defaults — remap any of them under Keyboard Shortcuts in Settings.
Retry. Only that panel reloads; you stay signed in and on the same screen. If it keeps coming back, reload the browser tab and tell Hero support what you were doing when it appeared.
Co-edit a note with another clinician
Collaborative editing lets two or more clinicians work on the same saved encounter note and Encounter Completion screen at once, the way several people edit one shared document. Changes merge live over a websocket, so a supervising physician and a resident — or a scribe and a clinician — can build the note together without overwriting each other. Unless an admin has chosen one mode for the whole practice (see step 1), it is off by default and is a per-clinician setting: the clinician who owns the encounter must have it enabled for a shared session to be allowed.
-
Turn it on (encounter owner).
Open the top-toolbar
Settingsgear and chooseSOAP Notes, which opens as its ownSOAP Notestab. ChooseSettingsin its left rail and turn onCollaborative editingunder Collaboration. It saves immediately. The same page also holds yourNote writing engine,Note display style, andChart Context— see Note templates.- If the switch is locked and reads Managed by your administrator (Admin → Documentation), your practice uses one mode for everyone — collaborative notes or single-editor notes — and only an admin can change it, under
Admin→Documentation. - Co-editing only works on a saved encounter. A brand-new, unsaved standalone note can’t be co-edited yet — press
Save Notefirst (see Auto-completion).
- If the switch is locked and reads Managed by your administrator (Admin → Documentation), your practice uses one mode for everyone — collaborative notes or single-editor notes — and only an admin can change it, under
-
Edit together.
When a second clinician opens the same encounter, they briefly see “Connecting… Waiting for collaboration sync”, then a presence bar appears across the top of the note: a green
Connecteddot, an “N people editing” count, and a colored avatar with each editor’s initials (hover an avatar for the full name and Active now).- Sections that someone is editing highlight with a colored border and lock to whoever is in them, so two people don’t type over the same paragraph. You can unlock a colleague’s section if you need to take it over.
- Toasts announce when someone joins, leaves, or starts signing.
- Finalize without collisions. When one clinician begins signing/finalizing the visit, everyone else sees a signing-in-progress lock so two people can’t sign at once. If a signing lock is held too long it can be force-unlocked, then the visit closes through the usual Sign & close step.
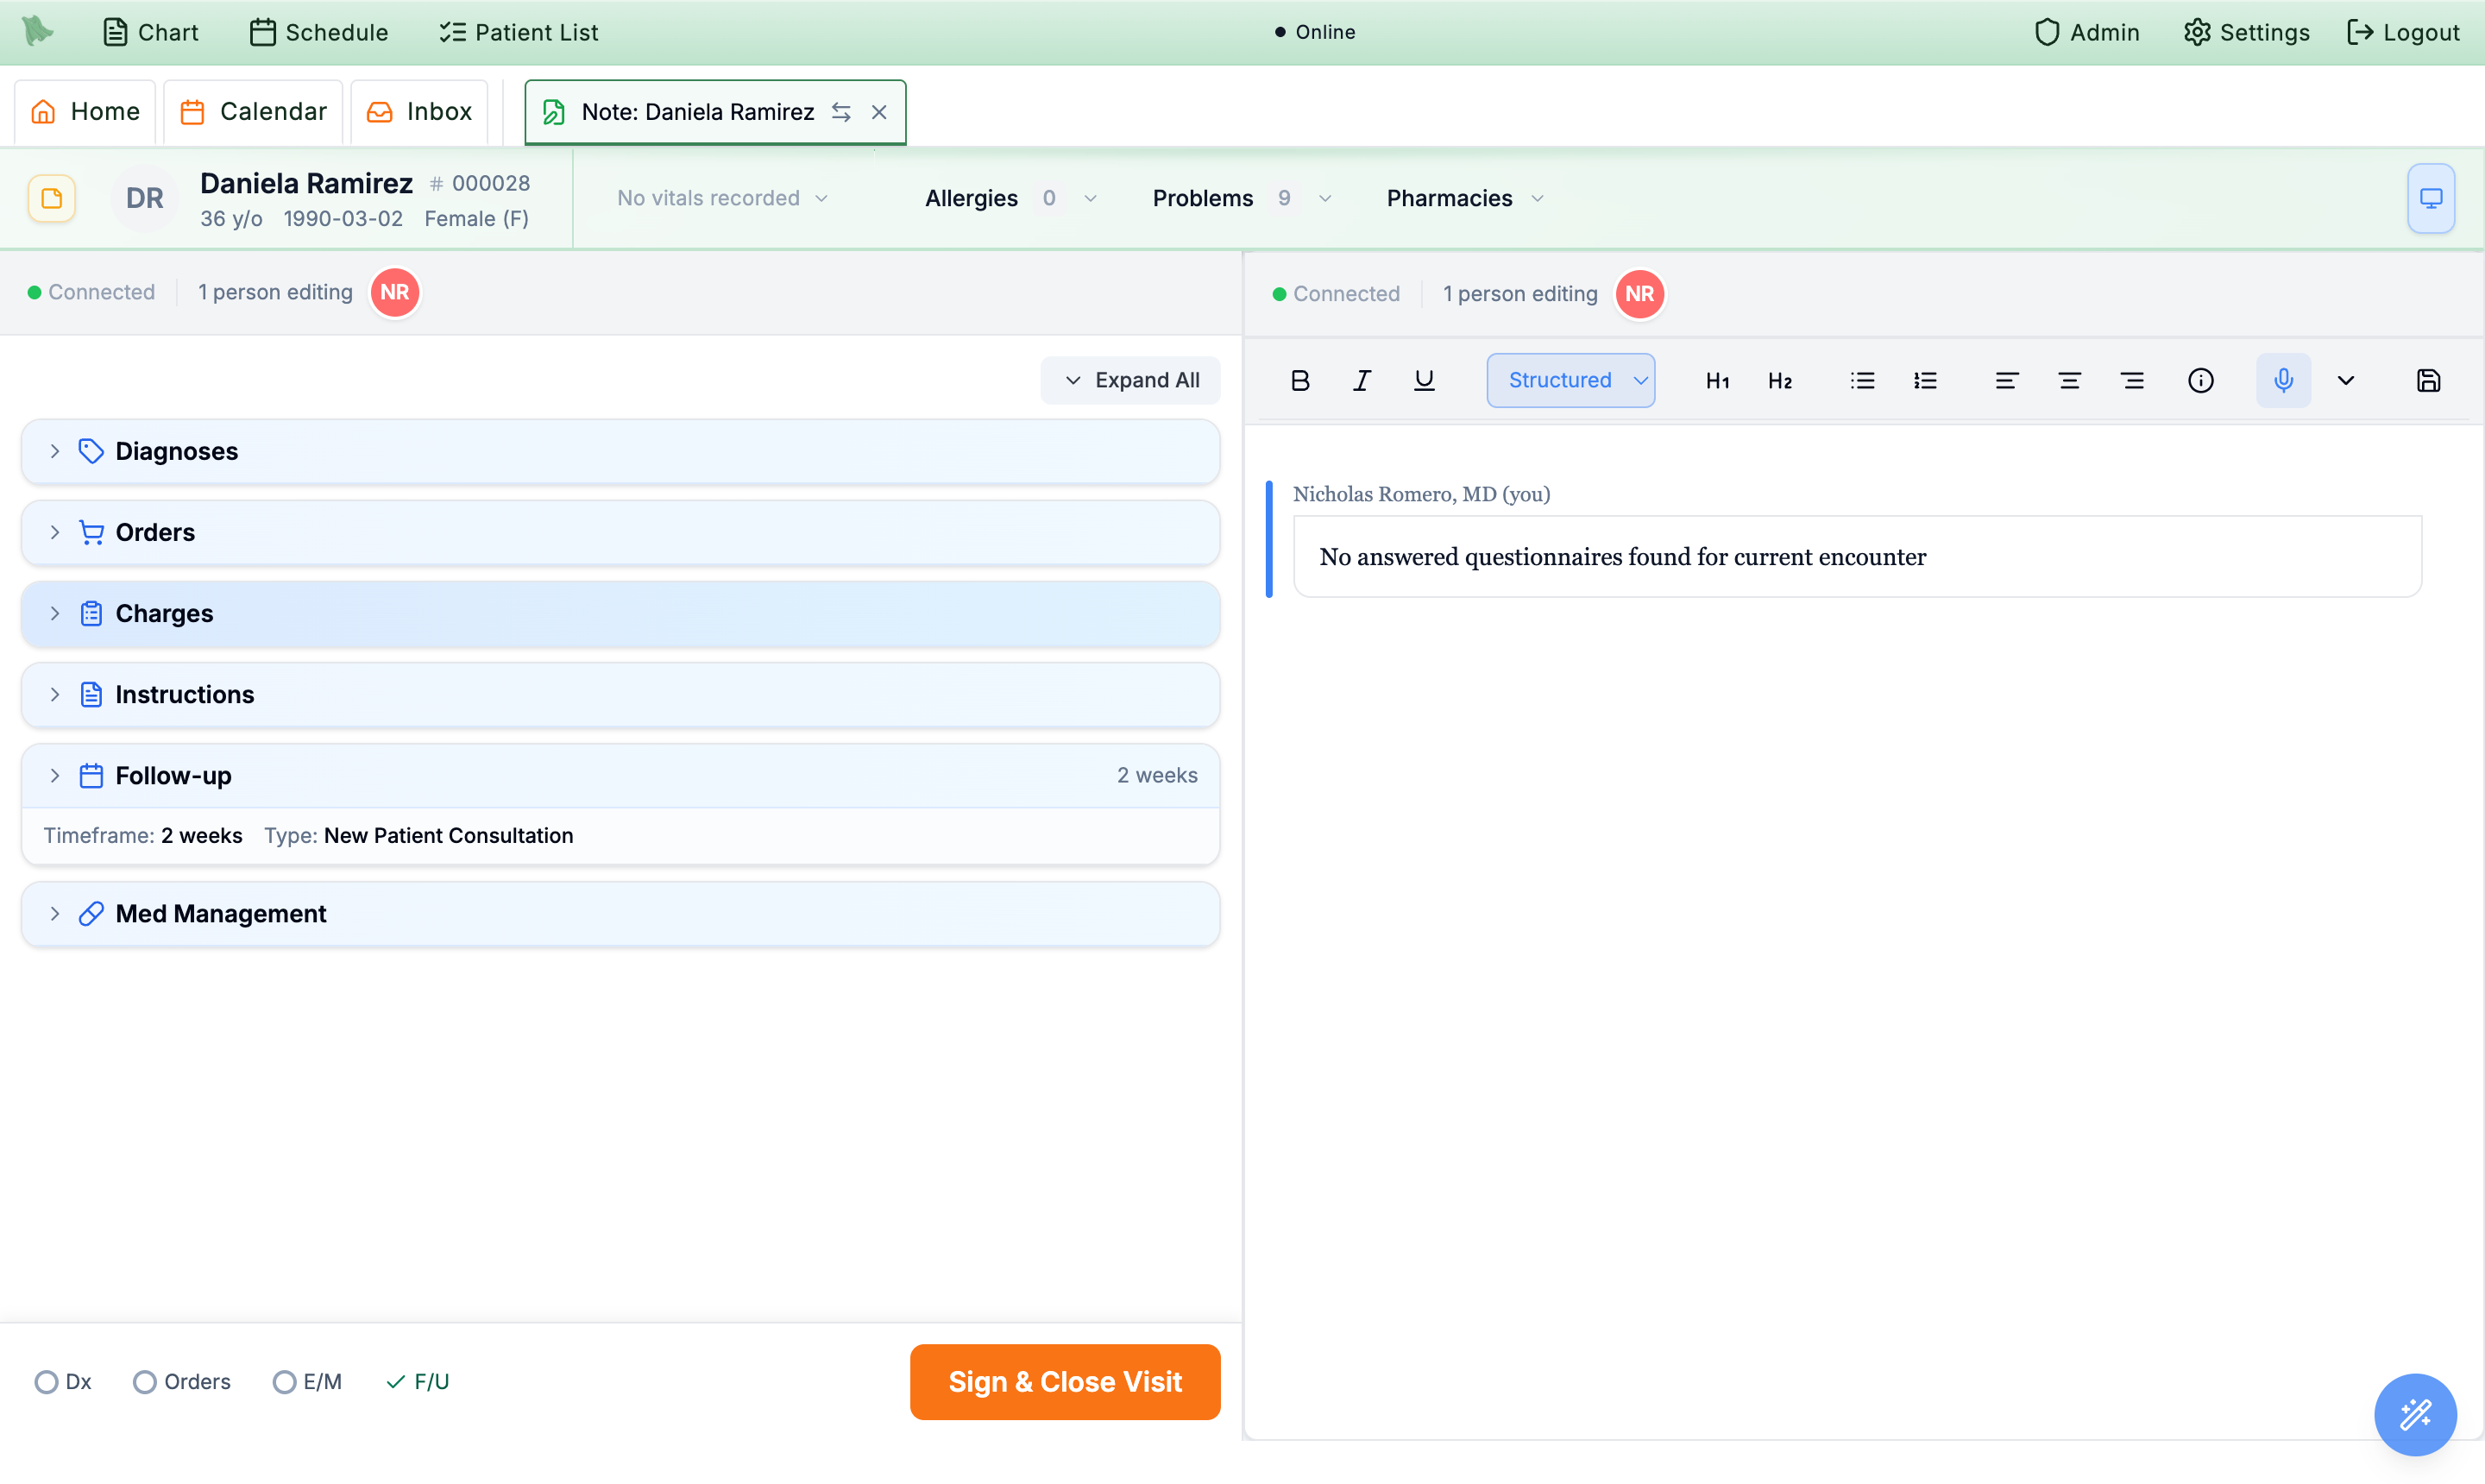
Connected dot, the editor count, and an initial-avatar. As more clinicians join, additional avatars appear and the count rises to “2 people editing,” and so on.With a second clinician in the note the presence bar shows two avatars and any section they’re working in carries their color — their cursor and edits stream in live as the two of you write, and either of you can hand a locked section back and forth.
Collaborative editing (and no practice-wide mode is set), a shared session won’t start even if everyone else has it on.
Copy forward: start a draft from an earlier signed note
Copy forward copies the text of an earlier signed note for the same patient into the draft you are writing, so you can update last visit’s history, assessment and plan instead of retyping them. Copy forward is off by default.
An administrator, or staff with documentation-policy management access, enables it under Admin → Documentation → Copy forward using the Copy forward checkbox. This workflow is available in the desktop note editor.
- Open an editable draft and choose
Copy forward. Select an earlier signed note for the same patient. The picker shows its type, author, date, and an AI summary or text preview. A note that cannot be copied explains why. - Press
Copy forward. If the current draft already contains writing,Copy into this noteasks whether toAdd beloworReplace current content. Read the choice before replacing work. - Review the copied text for this visit. Update the history, findings, assessment, and plan, then save the draft normally. Copying does not sign it or carry out its old orders.
Treatment Smart Blocks start the new visit empty where the old visit’s values would mislead. In .ketinfusion and .ketim, every time, the vitals, weight, dose, treatment number, IV access and injection site, the staff, today’s scales and scores, the drug screen, PDMP and pregnancy test results, and the codes are left out. In .spravato (and a practice’s own copy of it), the times and minutes, the vitals, today’s scales and scores, the screening results, the treatment number, the lot and the staff are left out; the dose and the codes carry. The program, HPI, exam, premeds, plan, frequency and baselines carry in all three. Fields that fill from the chart (weight, today’s PHQ-9, baseline vitals) fill again from the new visit. The note you copied from does not change.
Every copied Smart Block takes the block’s current version, the one its shortcut inserts today: fields your practice added since the earlier note appear with their starting values, and renamed fields and new choices show. The earlier visit’s values carry into every field the block still has. A field the block no longer has, or a choice it no longer offers, is left out. A block that was deleted or turned off is copied as it was.
Write a note with no appointment: New visit note and Quick note
To write a note when nothing was booked — a walk-in, a telephone call that needs documenting, an unscheduled or non-visit encounter, or documentation after the fact — start an unscheduled visit from the chart with New visit note. It creates the encounter without an appointment and opens its note in the note writer, the same note you get from a scheduled visit.
-
Have the button turned on (administrator, once).
New visit noteis off by default. An administrator turns it on underAdmin → Documentation(it is also listed inAdmin → Additional Features). It then shows to providers, and to staff who have permission to edit draft notes. -
Open the patient’s chart and click
New visit note. It sits on the chart’s tab bar next toNew orders(its tooltip reads Start an unscheduled visit for this patient and open its note). It is not offered from the chart pane inside an open note. -
Fill in the
New visit notedialog.Visit type— the office visit (or a follow-up) is preselected. Choose carefully: “Choose it now: the note writer can’t change it later.” The visit type also decides which note template dictation starts with. Orders-only visit types, and types your practice turned off or hid, are not offered (see Visit types).Provider— you, by default. “The visit is billed under this provider.” Staff choose the provider.Department— asked only when your practice uses departments and Hero can’t tell which one the visit belongs to.Date— always today. To document a visit from an earlier day, start it here and then change its date with the date-of-service chip in the note toolbar.
-
Click
Start note. The new visit appears on the chart’sEncounterstab and its note opens. Write, save, and sign it exactly like any other visit (Auto-completion, Sign & close).
Quick note (or press Ctrl+N). Sign & file to chart signs it and files it under a new notes-only encounter in one step — there is no Encounter Completion, diagnoses or charges.
Change the visit date (date of service) from the note
The date chip in the note toolbar is the visit’s date of service — the date billed for the visit. Use it to backdate a note to the day the patient was actually seen, for example a hospital encounter or a call documented the next morning. Hover it and the tooltip reads Date of service: <date>. Click to change it.
-
Click the date chip while the note is a draft.
A small
Date of servicecalendar opens: “This is the date billed for the visit. Pick a day to change it.” On a signed visit, start an addendum first; the visit’s clinician or a practice administrator can change a signed visit’s date that way. - Pick the day. It saves at once — there is no reason to type and no extra dialog — and the chip briefly reads Saved. The appointment, the recorded check-in and start times, and any claim not yet sent move to the new day. Coding, charges, diagnoses and the note text don’t change. Every change is recorded in the visit’s history.
When the date can’t change, the calendar says why instead of offering days:
| Message | What to do |
|---|---|
| The date of service can’t be in the future. | Pick today or an earlier day. |
| This visit’s appointment hasn’t happened yet. To change its date, reschedule the appointment. | Move the appointment on the calendar. |
| This visit’s claim has already been sent to <payer>. To change its date, use Correct & Refile in Billing. | Your billing team corrects the claim. |
| This visit’s claim is on hold for review in Billing. | Resolve the hold in Billing, then change the date. |
| To change a signed visit’s date, start an addendum first. | Create an addendum, then use the chip. |
| Hospital visits are dated by their admission. Move the rounding day instead. | Change the rounding day on the hospital stay. |
| Someone else has this visit open. | Ask them to close it, then try again. |
| Imported records keep the date they were imported with. | Imported visits can’t be redated. |
Delete a note or encounter opened by mistake
If you opened a new note you didn’t need, started an extra progress note, or began an encounter for the wrong patient, you can delete it while it is still an unsigned draft. What you can remove depends on how far it got: an unsigned draft note can be deleted by its author, an empty encounter can be deleted from the chart, and a signed note or visit is never deleted — it is amended or marked entered in error.
Delete an unsigned draft note
-
Open the note and click the × on it.
When the visit has one note, the × sits on the note-type chip in the note toolbar (for example
Progress Note); when the visit shows a tab strip with several notes, it sits on the selected note’s tab. Its tooltip reads Delete this note, or explains why the note can’t be deleted. -
Confirm with
Delete note. A completely blank note is deleted straight away. A note with any writing in it first asksDelete this note?: “This removes the note from the visit and the chart. As with all medical records, a copy is kept in the audit history.”Keep notebacks out. If a colleague is in the note at that moment, the dialog names them. - Check what happened to the visit. If the dialog also said “The empty visit will be removed too.”, the note was the visit’s only note and nothing else was on it, so the encounter leaves the chart as well. A visit that still holds anything else — orders, charges, vitals, diagnoses — stays on the chart.
The × is unavailable, with the reason in its tooltip, when:
- you are not the note’s author (Only the note’s author can delete it.) — ask the author;
- the note is signed (A signed note is changed with an amendment.) or in review — see Addenda;
- the visit is already closed, or the note is open on another device (open it on this one);
- it is an addendum’s draft — use
Discard empty addenduminstead; - it is the psychiatry half of a psychiatry and psychotherapy note pair (“This note is half of a psychiatry and therapy note pair, so it can’t be deleted on its own. If no psychotherapy was provided, remove the psychotherapy note from its tab.”; to drop the psychotherapy half, use
Remove psychotherapy noteon its tab, below), or an outside note (outside notes are removed by unfiling their document).
Remove the psychotherapy note from a pair
A split note template writes a psychiatry note and a psychotherapy note for the same visit (Psychotherapy add-on). If it wrote a psychotherapy note for a visit with no psychotherapy, for example a diagnostic screening, remove that half while both notes are unsigned drafts:
- Click the × on the psychotherapy note’s tab. Its tooltip reads Remove psychotherapy note.
-
Confirm with
Remove note. The dialog always asks first: Remove this psychotherapy note? “Use this when no psychotherapy was provided.” and “The psychiatry note stays; delete any Psychotherapy Add-On section from it. As with all medical records, a copy is kept in the audit history.”Keep notebacks out. Hero confirms Psychotherapy note removed and opens the psychiatry note. -
Tidy the psychiatry note.
Delete any
Psychotherapy Add-Onsection from it, and checkChargeshas no 90833, 90836 or 90838 before you sign. Once the psychotherapy note is removed, Hero no longer suggests those codes for the visit.
Anyone who can edit both notes can do this, not only the author. It is refused, with the reason in the tooltip, when the psychiatry note is signed (“The psychiatry note of this pair is signed, so this psychotherapy note can’t be removed. A signed note is changed with an amendment.”), when you can’t edit the psychiatry note right now, or when the pair revises a signed pair. Signed notes are changed with an amendment.
Delete an empty encounter from the chart
-
Right-click the draft visit on the chart’s
Encounterstab and chooseDelete empty draft. On a Mac, Control-click or click with two fingers on the trackpad to right-click. The item appears only for a past or current draft that has nothing in it; staff need permission to edit draft encounters. -
Confirm with
Delete draft. The dialog explains: “Nothing was written in this encounter — no note text, orders, charges, vitals, or attachments. Deleting it removes it from the chart.”Keepbacks out.
“This encounter can’t be deleted because…”
Hero only deletes an encounter when nothing would be lost. The message lists what is on it, for example it has documentation in progress, it has a note with content, it has diagnoses, it has charges, it has prescriptions, it has vitals or it has questionnaire answers. Documentation in progress means the visit’s Encounter Completion worksheet already holds something — usually because the note was saved and Hero filled in diagnoses, orders, charges or follow-up from it. Such an unsigned visit can’t be deleted. Delete your draft note (above) so nothing unsigned of yours remains on it, and leave the visit unsigned; nothing is billed or sent until someone signs it.
A signed visit was a mistake: entered in error
A signed visit is never deleted. Physicians and administrators can right-click it on the Encounters tab and choose Mark as entered in error… (see Encounters). The visit leaves the encounter list; its notes are not deleted — they stay readable under the chart’s Notes tab with Status: Void. Diagnoses and medication changes from that visit stay on the chart, so correct them separately if they were wrong.
Change the provider on an encounter
Hero has no control that switches an existing encounter from one provider to another. The provider is set when the visit starts — from the appointment’s provider, or the Provider you pick in New visit note — and the visit is billed under that provider. Use one of these routes instead:
- An upcoming appointment is booked with the wrong provider: reschedule it onto the right provider’s calendar (see Change an appointment’s provider or visit type). An encounter nobody has started moves with it; once its note is started or a claim exists, the move is refused, so cancel and rebook instead.
- The encounter was started under the wrong provider and nothing was written: delete it with
Delete empty draftor by deleting its blank note (Delete a note or encounter), then start the visit under the right provider withNew visit note. - You saw the patient and a colleague’s visit is already open: add your own note to that visit with
+ New notein the note toolbar (its tooltip reads Add another note to this encounter). Each note keeps its own author; the visit’s provider does not change. - The visit is signed: if it was documented under the wrong provider, a physician or administrator marks it
Mark as entered in error…and the correct provider documents a new visit.
Change the note type or the note template of a note you haven’t signed
Two different things are called a note’s “type”: the note type label (for example Progress Note), and the note template the AI writes into when you dictate. Both can change until the note is signed.
-
Change the note type label.
Click the note-type pill in the note toolbar (labelled
Note type) and pick another. The list is your practice’s note types, which an administrator manages underAdmin → Documentation → Note types. You can’t relabel a note you can only read. -
Rewrite a dictated note with another template.
If the note was written from a recording, click the history icon next to the microphone (
Retranscribe or view transcript) and chooseRetranscribe. TheRetranscribe from saved recording?dialog has aNote Templatepicker: choose the template you want and pressRetranscribe. ChooseReplace this text(the old text is kept in Version History) orKeep this text and add the new note after it. This works only on the computer where you recorded, for up to 10 days (see Recordings). -
Pick the template before you record next time.
The
Note Templatepicker in the recording overlay sets the template for that recording. To change which template a visit type always starts with, set itsNote templateunderSettings → SOAP Notes → Visit types(see Note templates). The visit type itself can’t be changed from the note.
A typed note has no template to swap: insert another starting point with a dot phrase such as .soap (see Note modules), or copy forward an earlier note.
Add your own visit types, including ones you don’t bill, and hide the ones you don’t use
The Visit type list in New visit note is your practice’s visit types. An administrator, or staff with documentation-policy management access, manages it under Admin → Documentation → Visit types, next to Note types: “The types clinicians choose from when they start a new visit note. Add your own, or hide built-in types your practice doesn’t use. Notes already written keep their type.” Each change saves on its own; there is no Save button.
- Add a type. Type its name in
Add a visit type, e.g. Non-billable Admin Note. Below it,Billablestarts ticked: “Signing a note of this type bills the visit as usual. Uncheck it for admin notes and other notes you never bill: they create no charge or claim. You can’t change this after the type is added.” Then clickAdd(or press Enter). A type you don’t bill showsNot billedin the list. - Rename, turn off or delete your own types. The pencil renames a type.
Turn offstops offering it; you can turn it back on any time. The trash can deletes it after “Delete …? Clinicians can’t choose it anymore. Notes already written keep it.” A type that one of your scheduling visit types still uses can’t be turned off or deleted: “Visit types in scheduling still use this type. Change or remove them first.” - Hide built-in types you don’t use. Built-in types are marked
Built-in. Every practice shares them, so you can’t rename or delete them.Hidetakes one off your practice’s lists only. - Bring a type back. Open
Hidden or turned offbelow the list and clickShowon a built-in type orTurn onon one of yours. You can delete your own types from there too.
Hidden and turned-off types leave New visit note, the Encounter Type choice when you set up a scheduling visit type, and the injection visit type choices. Visits and notes that already have the type keep it and still show it.
Notes of a visit type you don’t bill
A note of one of your own types with Billable unticked is signed with No charge: no charge and no claim, and the chart and Billing Monitor show No charge. The note writer hides Charges, says “This visit type isn’t billed, so no charge or claim will be made.”, and needs no diagnosis to sign.
- First signature only. A visit that was already signed keeps the billing it was signed with, even when it is reopened, re-signed or addended.
- Built-in types bill as usual. Only the types your practice added follow the
Billablebox.
Enter vitals without leaving the note
Type this visit’s vitals right in the note. They are saved to the chart for this visit, and a vitals card is added where your cursor was.
- Type
.addvitalsand press Enter. Or click the pulse button in the note toolbar (Enter this visit’s vitals and add them to the note)..vitalsentryand.quickvitalsdo the same. A small panel opens where you typed. - Type the blood pressure, then press Tab. Tab moves through diastolic, heart rate, respiratory rate, temperature, SpO2, weight and height. BMI fills in from weight and height.
- Press Enter to save. Or click
Save to note; Esc cancels. Vitals saved confirms it, and theVitals this visitcard appears in the note.
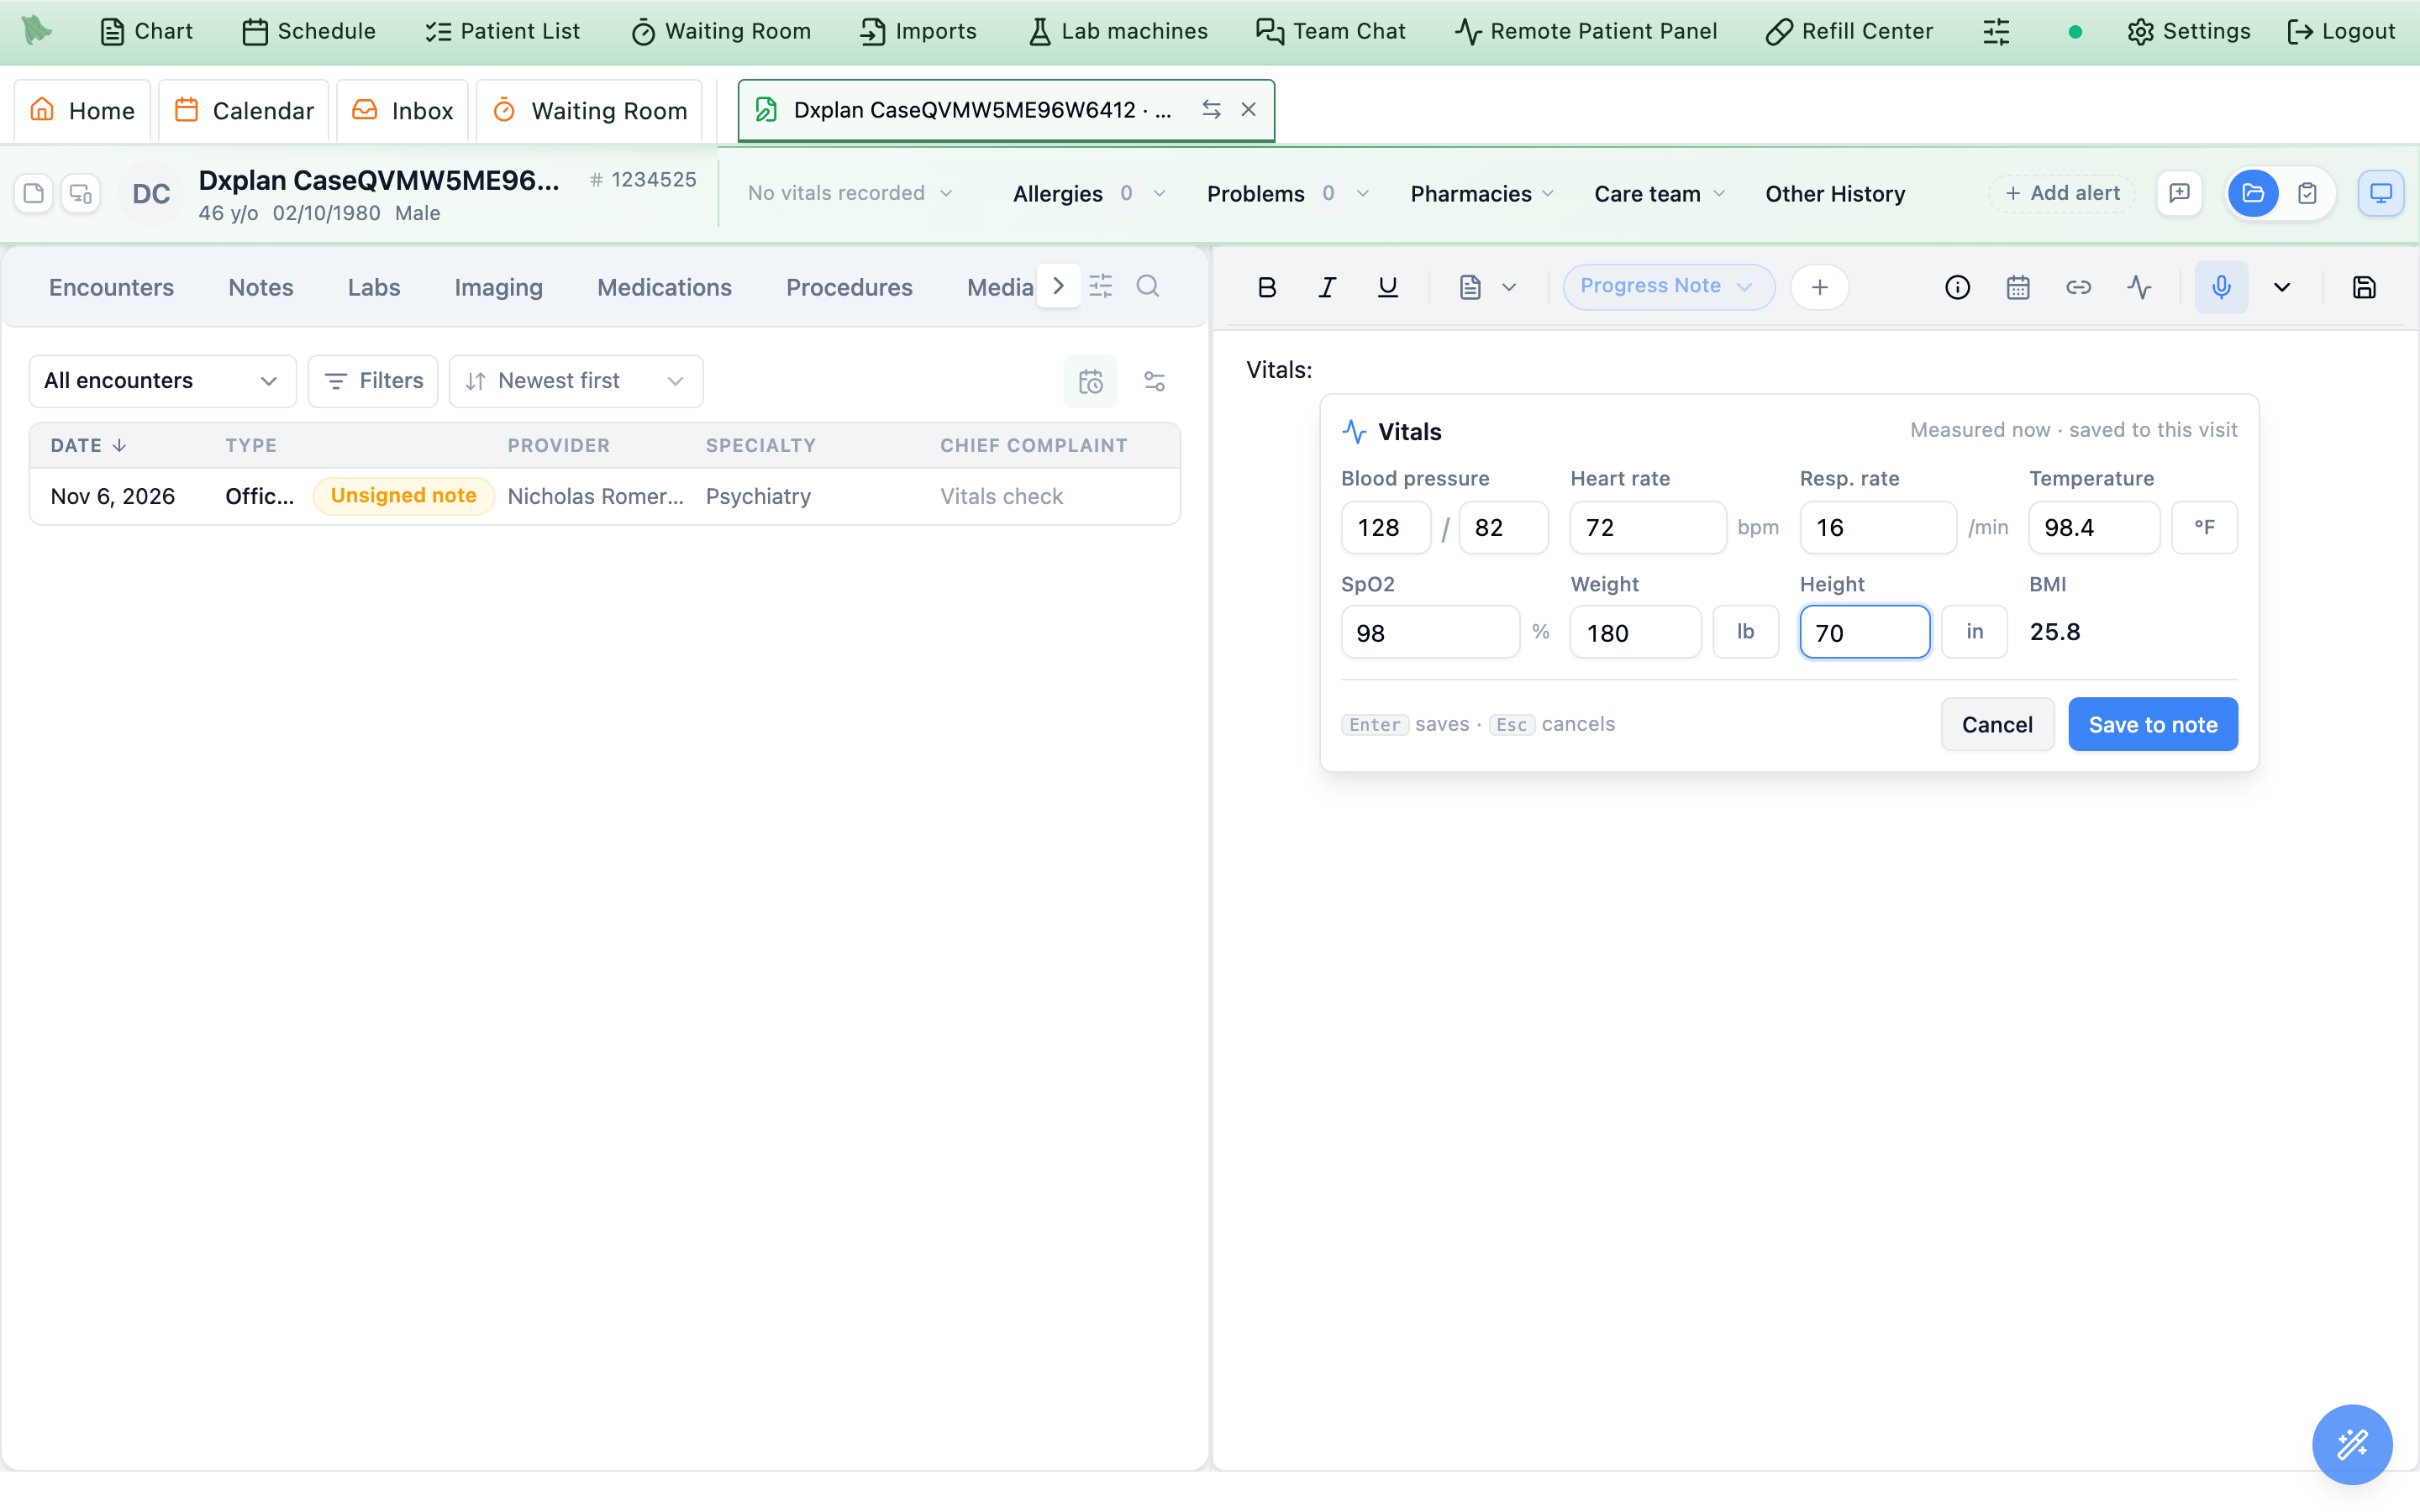
.addvitals. Tab moves from field to field; BMI fills itself in.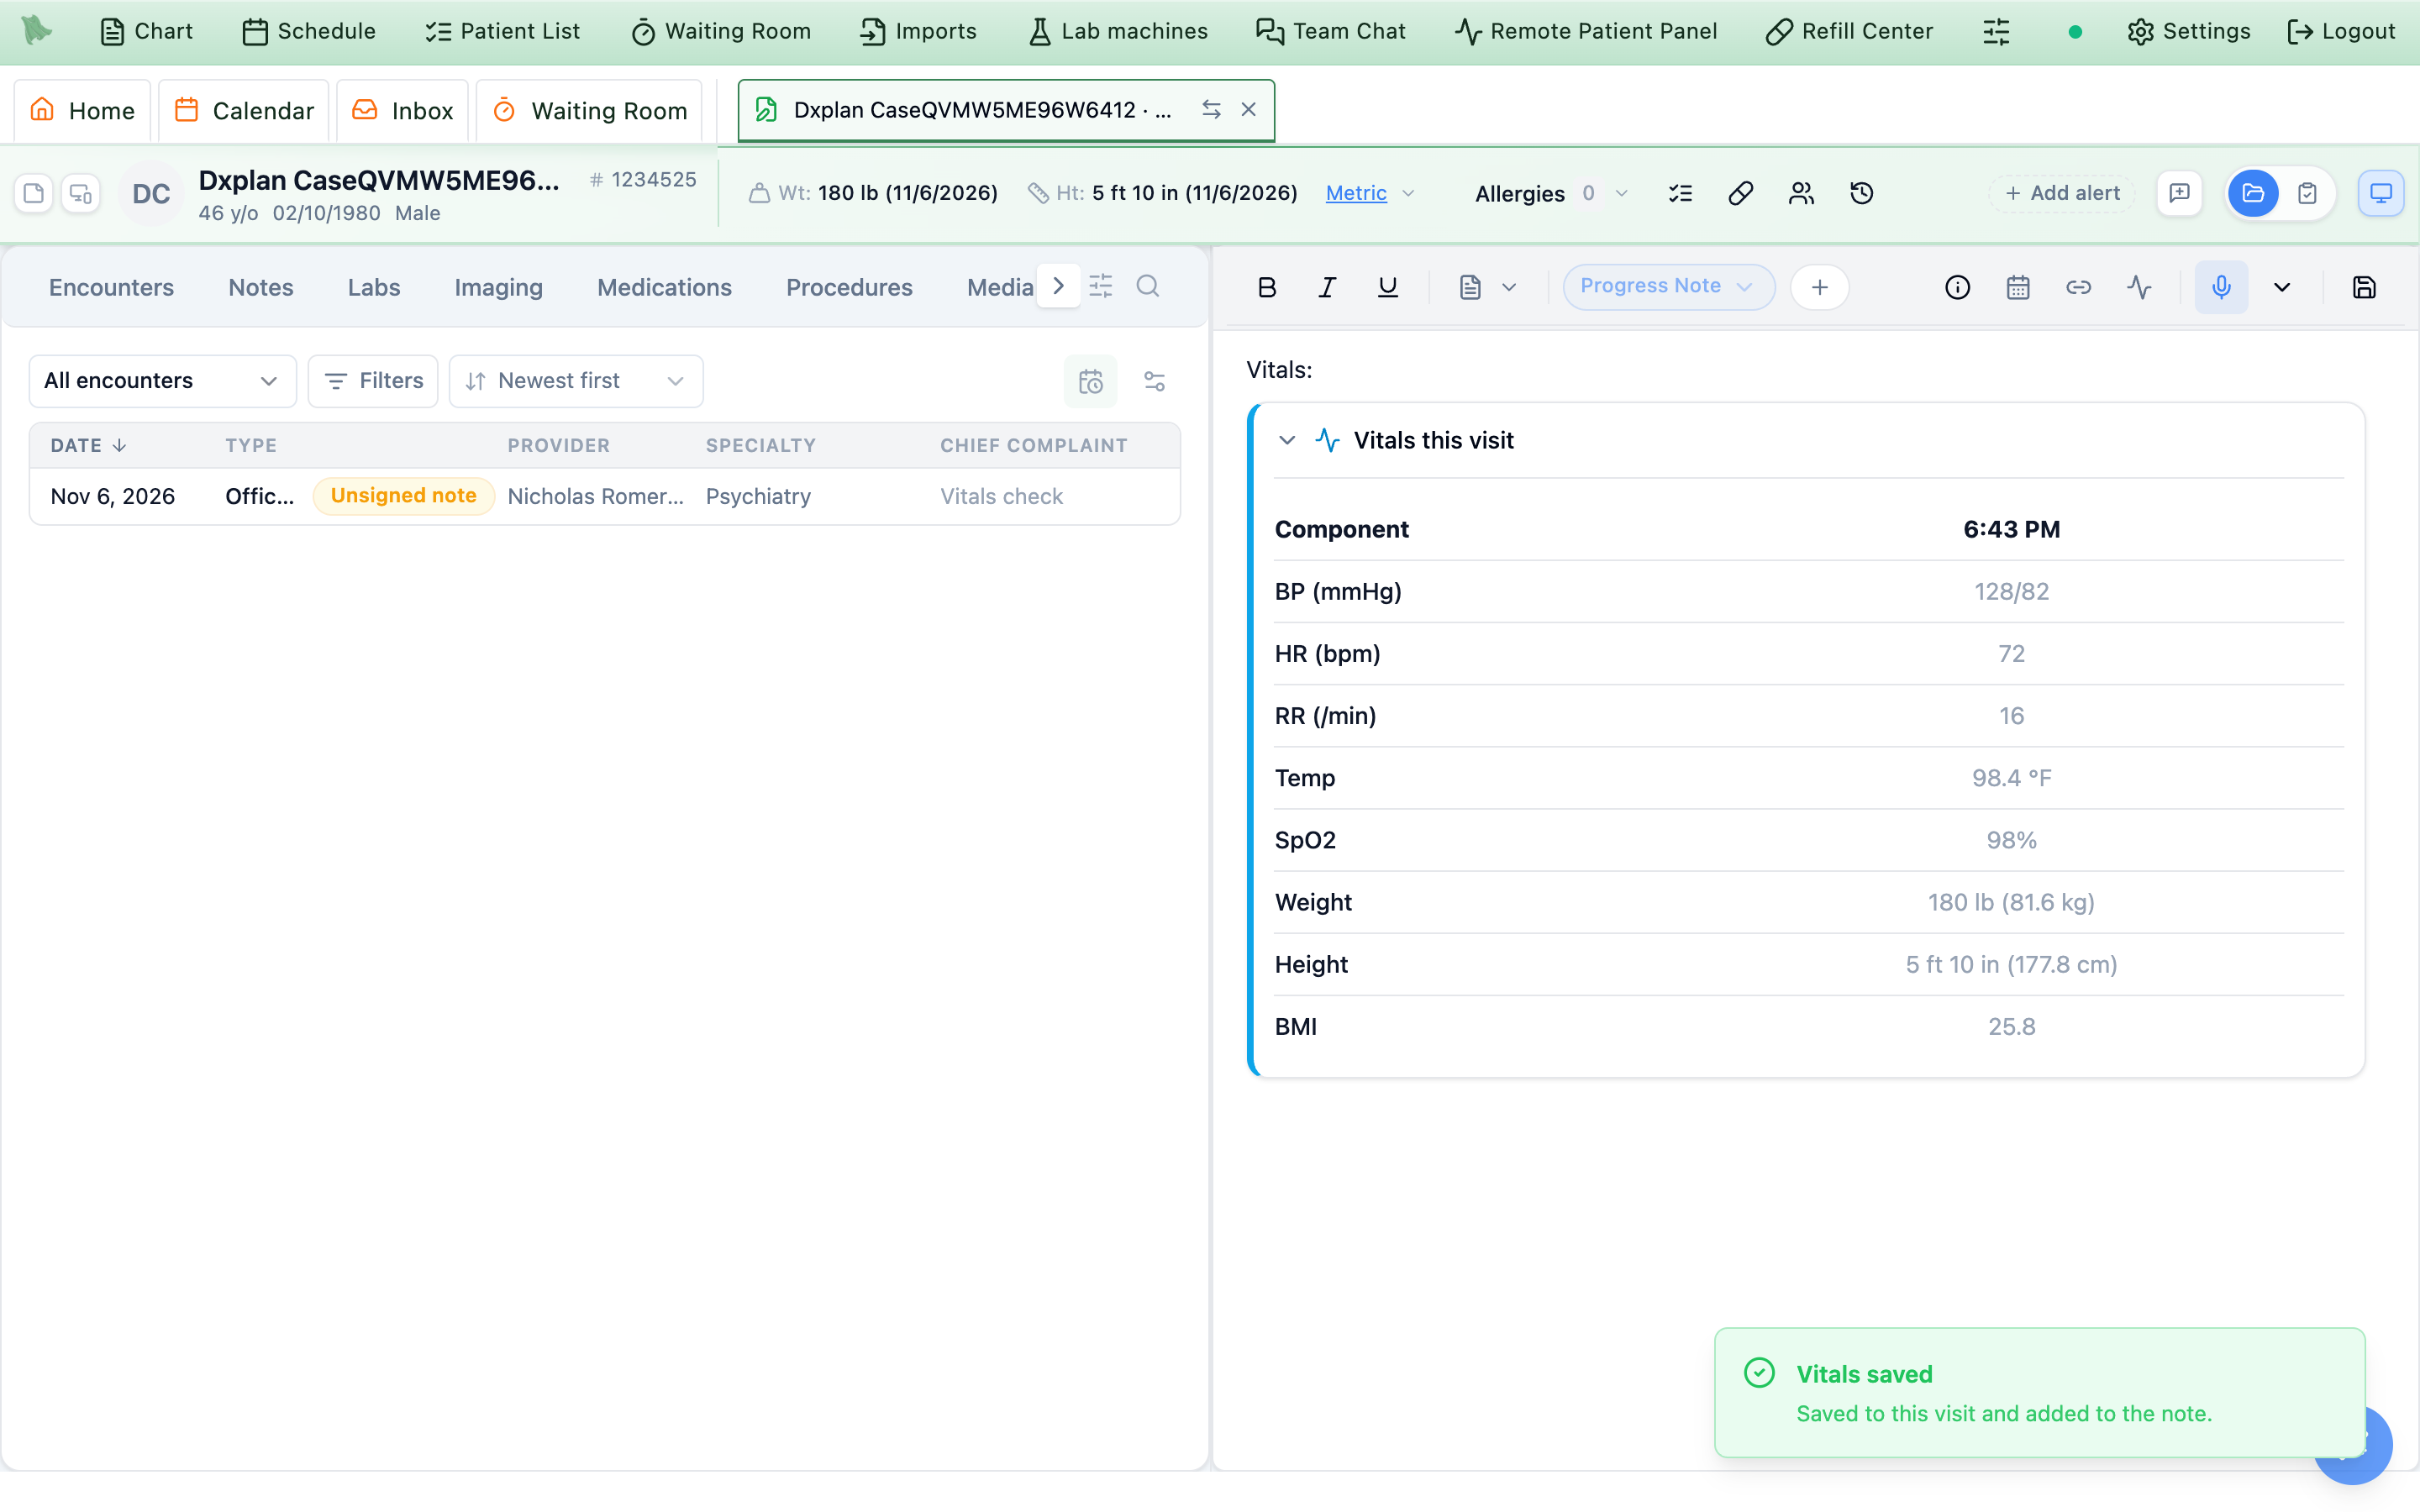
- Units. Click
°F,lborinto switch to °C, kg or cm. The panel starts in the units you use on the vitals bar. - Measured now. Vitals entered here are recorded at the current time. To record another time, or more vital signs such as pain or head circumference, use
Add encounter vitalsfrom the vitals bar. - Same checks. The panel checks values the same way the vitals bar does, for example that both blood pressure numbers are there.
- Who can. Staff need the
Record and edit vitalspermission.
Add, rename or retire your practice’s note types
The note types clinicians pick from the note-type pill, for example New Patient H&P, Procedure Note or Telephone Note, are your practice’s own list. Every practice starts with one built-in type, Progress Note, which new notes start on. An administrator, or staff with documentation-policy management access, manages the list under Admin → Documentation → Note types: “Labels clinicians pick from when writing a note. New notes start on the default; clinicians can change it per note.” Each change saves on its own; there is no Save button.
-
Add a note type.
Type its name in
Add a note type, e.g. Psychotherapy Noteand clickAdd(or press Enter), or click one of theSuggestionsbelow the box. Names must be different from the ones already on the list. A new type goes to the bottom of the list. -
Choose the default.
The type new notes start on is marked
Default. ClickMake defaulton another type to make it the default instead; there is only ever one. - Rename or reorder. The pencil renames a type. The up and down arrows move it; the note-type pill lists your types in this order.
-
Remove a type you don’t use.
The trash can removes a type no note uses yet. A type that notes already use is retired instead, and those notes keep it (the tooltip reads “Retires this label; notes already using it keep it”). Retired types are listed under
Retired, whereRestorebrings one back. The built-in type can’t be removed, only renamed. -
Use it on a note.
In the note writer, click the note-type pill (labelled
Note type) and pick the type. The pill opens once the note has been saved, so type a word or start dictating first; until then it shows the default. You can change the type until the note is signed (see Note type & template), and the chart’sNotestab can filter by it (Note types).
Settings → SOAP Notes → Visit types; see Note templates). Visit types, which decide the template and whether a visit is billed, are a separate list (see Visit types).
Write the note, hit Save, and the encounter completes itself
As soon as there is text in the note and you press Save Note, Hero EMR reads what you wrote and automatically switches the left pane into Encounter Completion, pre-filling each section from the note. A plan that says “follow up in three months” sets the follow-up; an assessment of “generalized anxiety disorder” is ready to drop in as a diagnosis. You review and adjust rather than start from a blank form.
-
Type your note and click
Save Note. Any free text or dictated/structured content counts. Saving is what triggers completion, and the note needs at least 25 characters of text: an empty or very short note still saves, but produces no diagnoses, orders, charges, follow-up, or instructions. -
Save again and Hero adds, never replaces.
The first save fills the sections straight away. Diagnoses and orders you entered by hand while talking to the patient stay exactly as you left them: the save reads the note and adds only what isn't there yet (a diagnosis, lab or imaging study it doesn't already have, or a charge line for a code the visit has no line for). It fills the visit level only when none is chosen, the follow-up timing unless you confirmed or booked one (a visit type you picked stays), and patient instructions only when they are empty. Suggested prescriptions are refreshed from the note, and a prescription you ordered or approved is never suggested again. A medicine the plan says to continue (“Continue sertraline 50 mg daily”) is suggested as a refill at its current strength, directions and supply; delete the suggestion when the patient doesn’t need one. A medicine another clinician prescribes (“continue lisinopril per PCP”), or one only listed in the medication history, is not suggested. Hero remembers what it has already put on the visit, so a diagnosis, lab, study or charge line you removed (or a study you changed, say to “with and without” contrast) is not put back on a later save, and a visit level you cleared stays cleared; only what is new in the note since then is added. It doesn't ask first. Once Hero has filled the visit from the note, a later save asks
Update from the note?— “Hero adds what the note has that isn't here yet. What you entered stays.” Press Enter or clickAdd from noteto add;Cancelskips the read.Start overasks once more, then “Replaces the unsent diagnoses, orders, charges, follow-up and instructions with what the note says.” Sent orders, a booked follow-up visit and in-office tests stay either way, and nothing changes if the read fails. If only the after-visit summary fails, your patient instructions and stop suggestions stay as they were and the finished message says “Patient instructions were not updated…”.Start overalso makes Hero forget what it put on the visit before. The finished message says what was added, for example “Added from the note: 2 diagnoses, 1 order. Your entries were kept.”, or “Nothing new in the note”. An addendum is different: the same dialog then reads “This addendum will be analyzed without clearing the encounter’s existing diagnoses, orders, charges, follow-up, or patient instructions” — it adds what it finds instead of replacing, leaves the visit’s charges and after-visit instructions alone, and never disturbs an order you already sent. See Change a visit after you’ve signed it. -
The completion checklist appears.
The left pane now shows collapsible sections:
Diagnoses,Orders,Charges,Instructions,Follow-up, andMedications. Suggested values (for example a 2-week follow-up) are already in place. A practice that uses In-office medications also getsMedications given in clinic, betweenOrdersandCharges. -
Work top to bottom, or jump around.
Use
Expand All/Collapse Allat the top to open every section at once. The footer chips —Dx,Orders,E/M,F/U, andMeds(plusLinkedonce you have both a diagnosis and an order) — are a live progress tracker: each turns green when that part is complete and doubles as a jump link. -
Finish with
Sign & Close Visit. The big button at the bottom finalizes the visit in one step. If something required is still missing, clicking it tells you what to fix instead of signing (see Sign & close the visit).
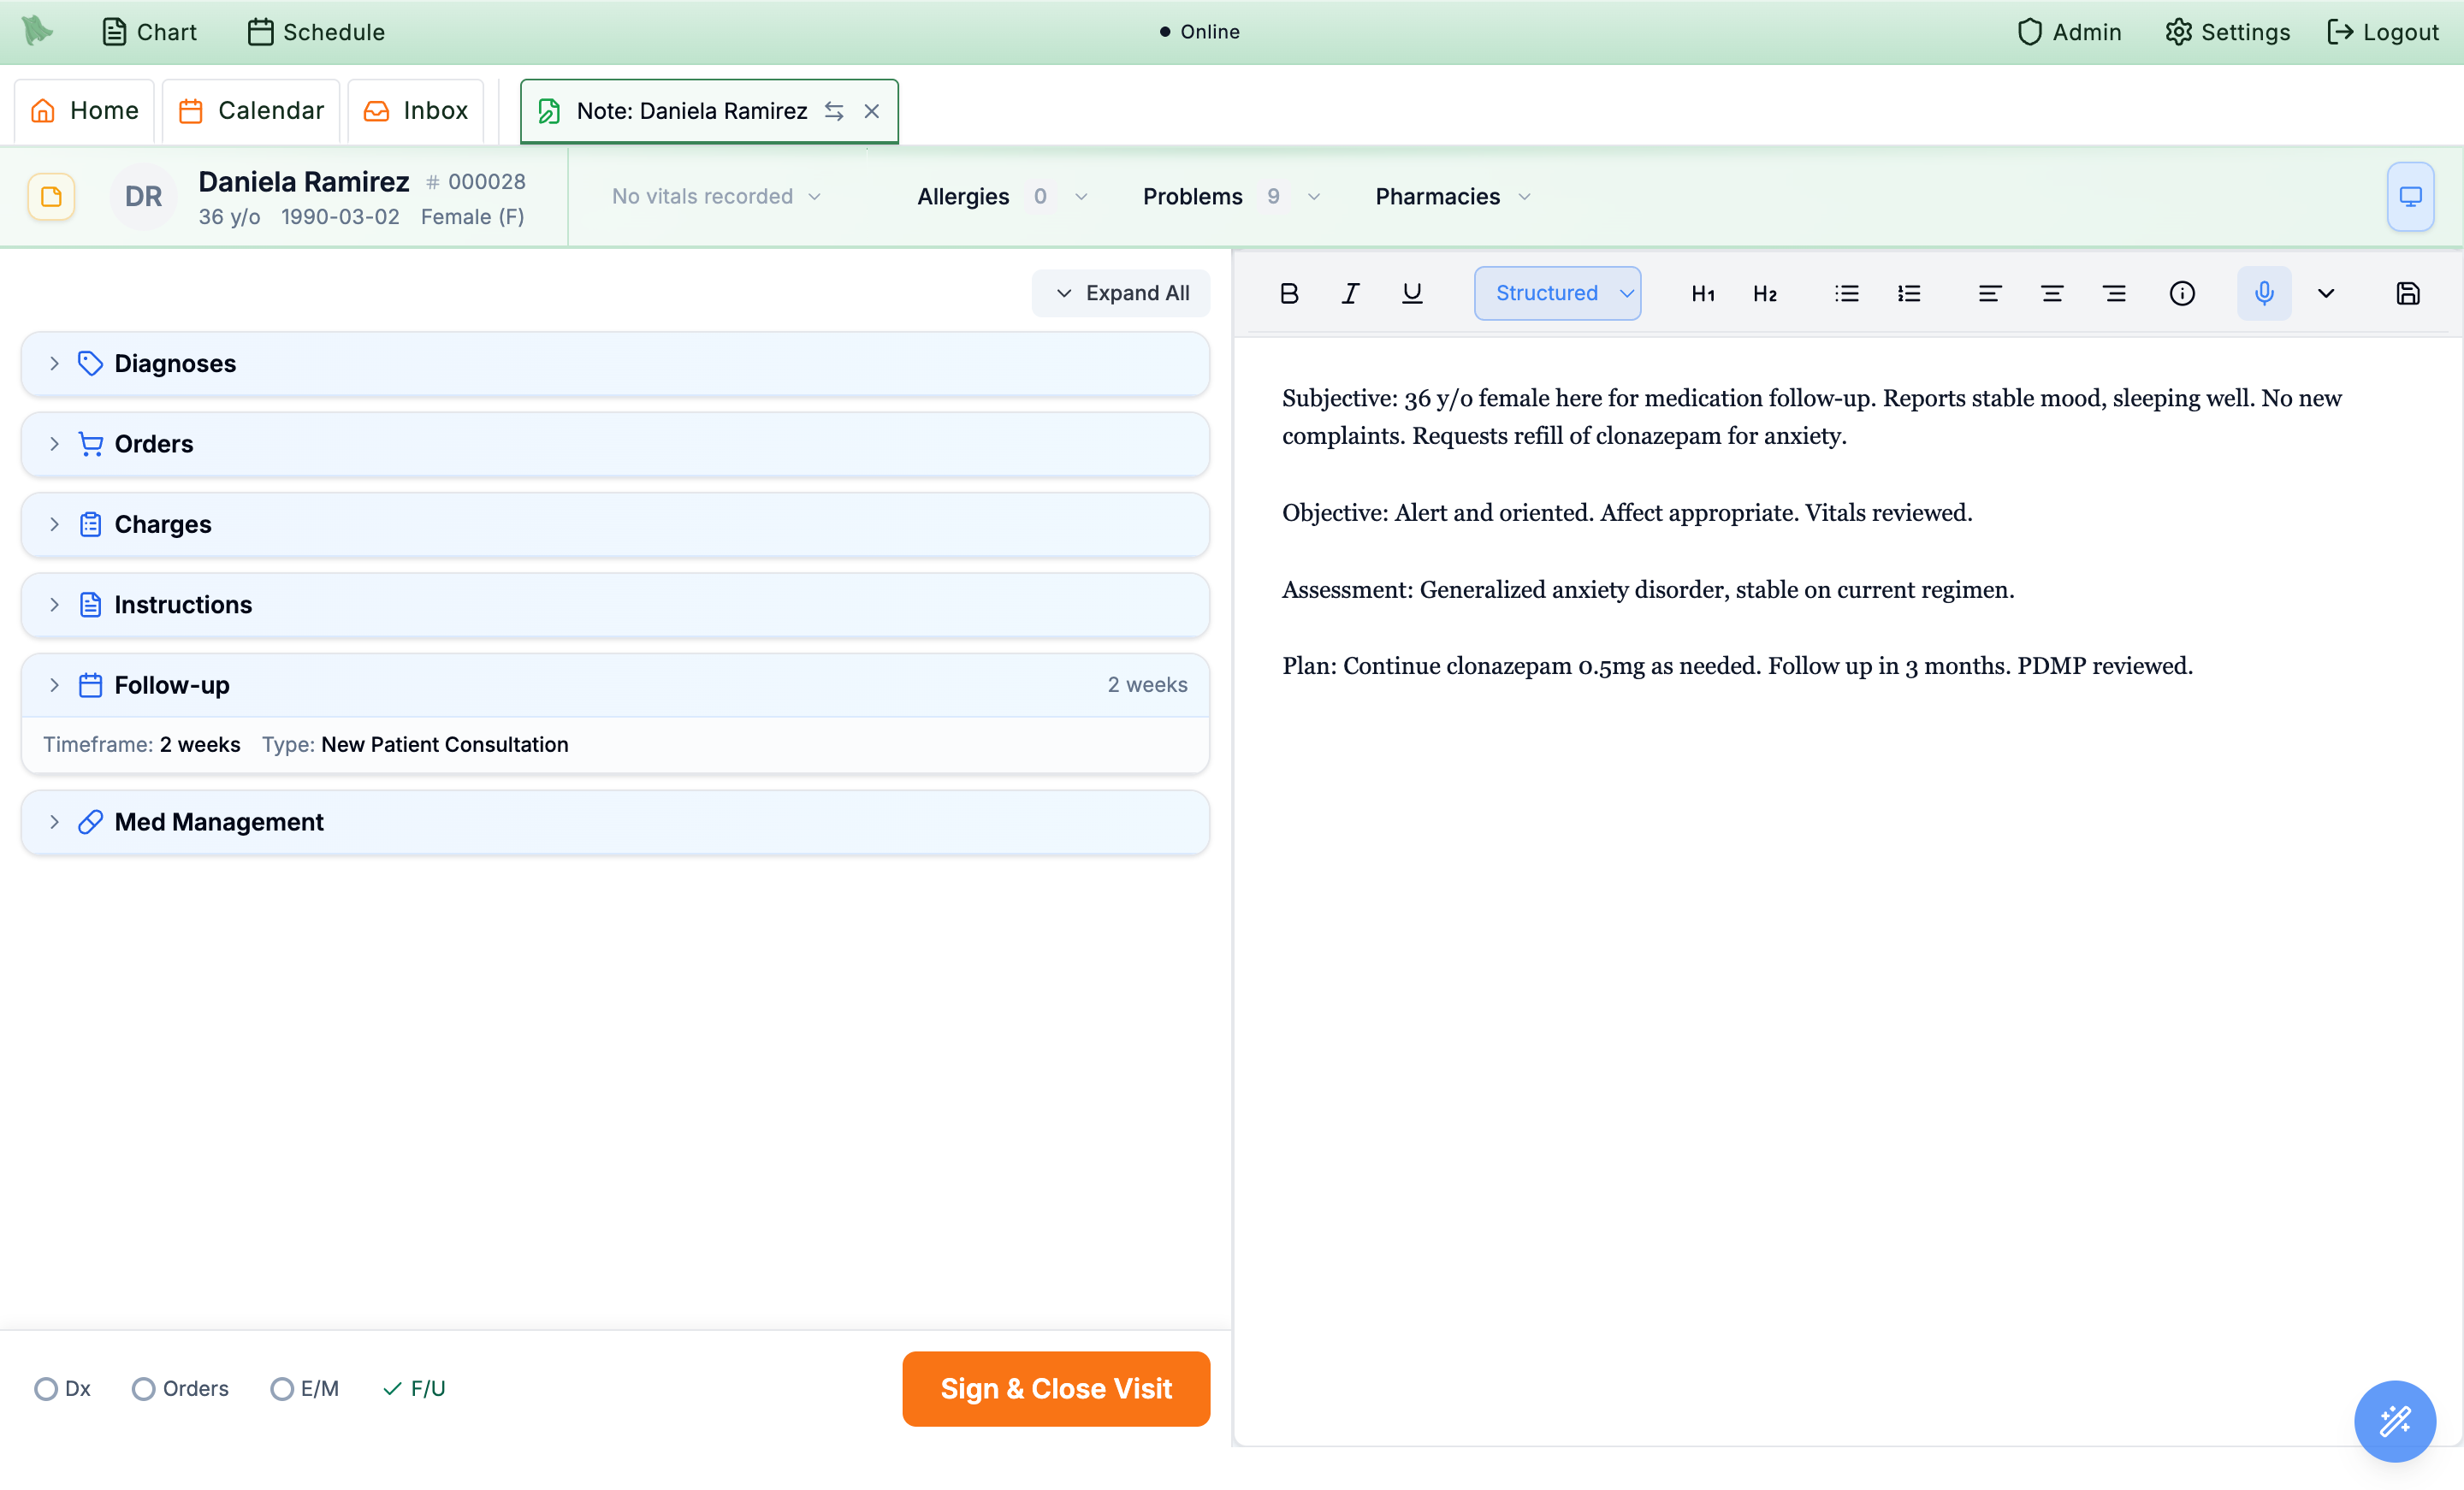
Sign & Close Visit. Individual orders are different: every prescription, lab, imaging, and referral row carries its own Sign & Send button, and pressing it transmits that order immediately — controlled prescriptions through the EPCS two-factor flow. Once an order shows as sent it has already left the EMR, whether or not the visit is signed.
Keyboard Shortcuts in Settings.
Add diagnoses (ICD-10)
The Diagnoses section captures the ICD-10 codes for the visit. You can search the full code set, click a frequently-used or favorite code, and reorder the list to set the primary diagnosis.
-
Search by code or description.
Type into
Search ICD-10 codes…(for example anxiety or F41.1) and press Enter, or click the + button in the box. Either opens the Search ICD-10 Codes window — the inline box itself doesn’t list results. Click a row there to add it to the visit.- In that window,
Billable codes onlyhides category headers that a payer would reject, and the specialty filter narrows the list to one specialty’s codes. - A green ⓘ next to a description marks an HCC relevant code.
- In that window,
-
Or use the quick lists.
- Frequently Used Diagnoses — one-click chips for the codes your practice uses most.
- My Favorite Diagnoses — your personal shortlist. Manage it with the gear or
Add favorites(see Favorites).
-
Set the primary and order.
Added codes appear under
Current Diagnoses. The first one is taggedPrimaryand every other row carries aSecondarybadge — click that badge to promote the row to primary. You can also drag the handle to reorder, star a row to favorite it, or click×to remove it. Adding the first diagnosis turns theDxtracker chip green.
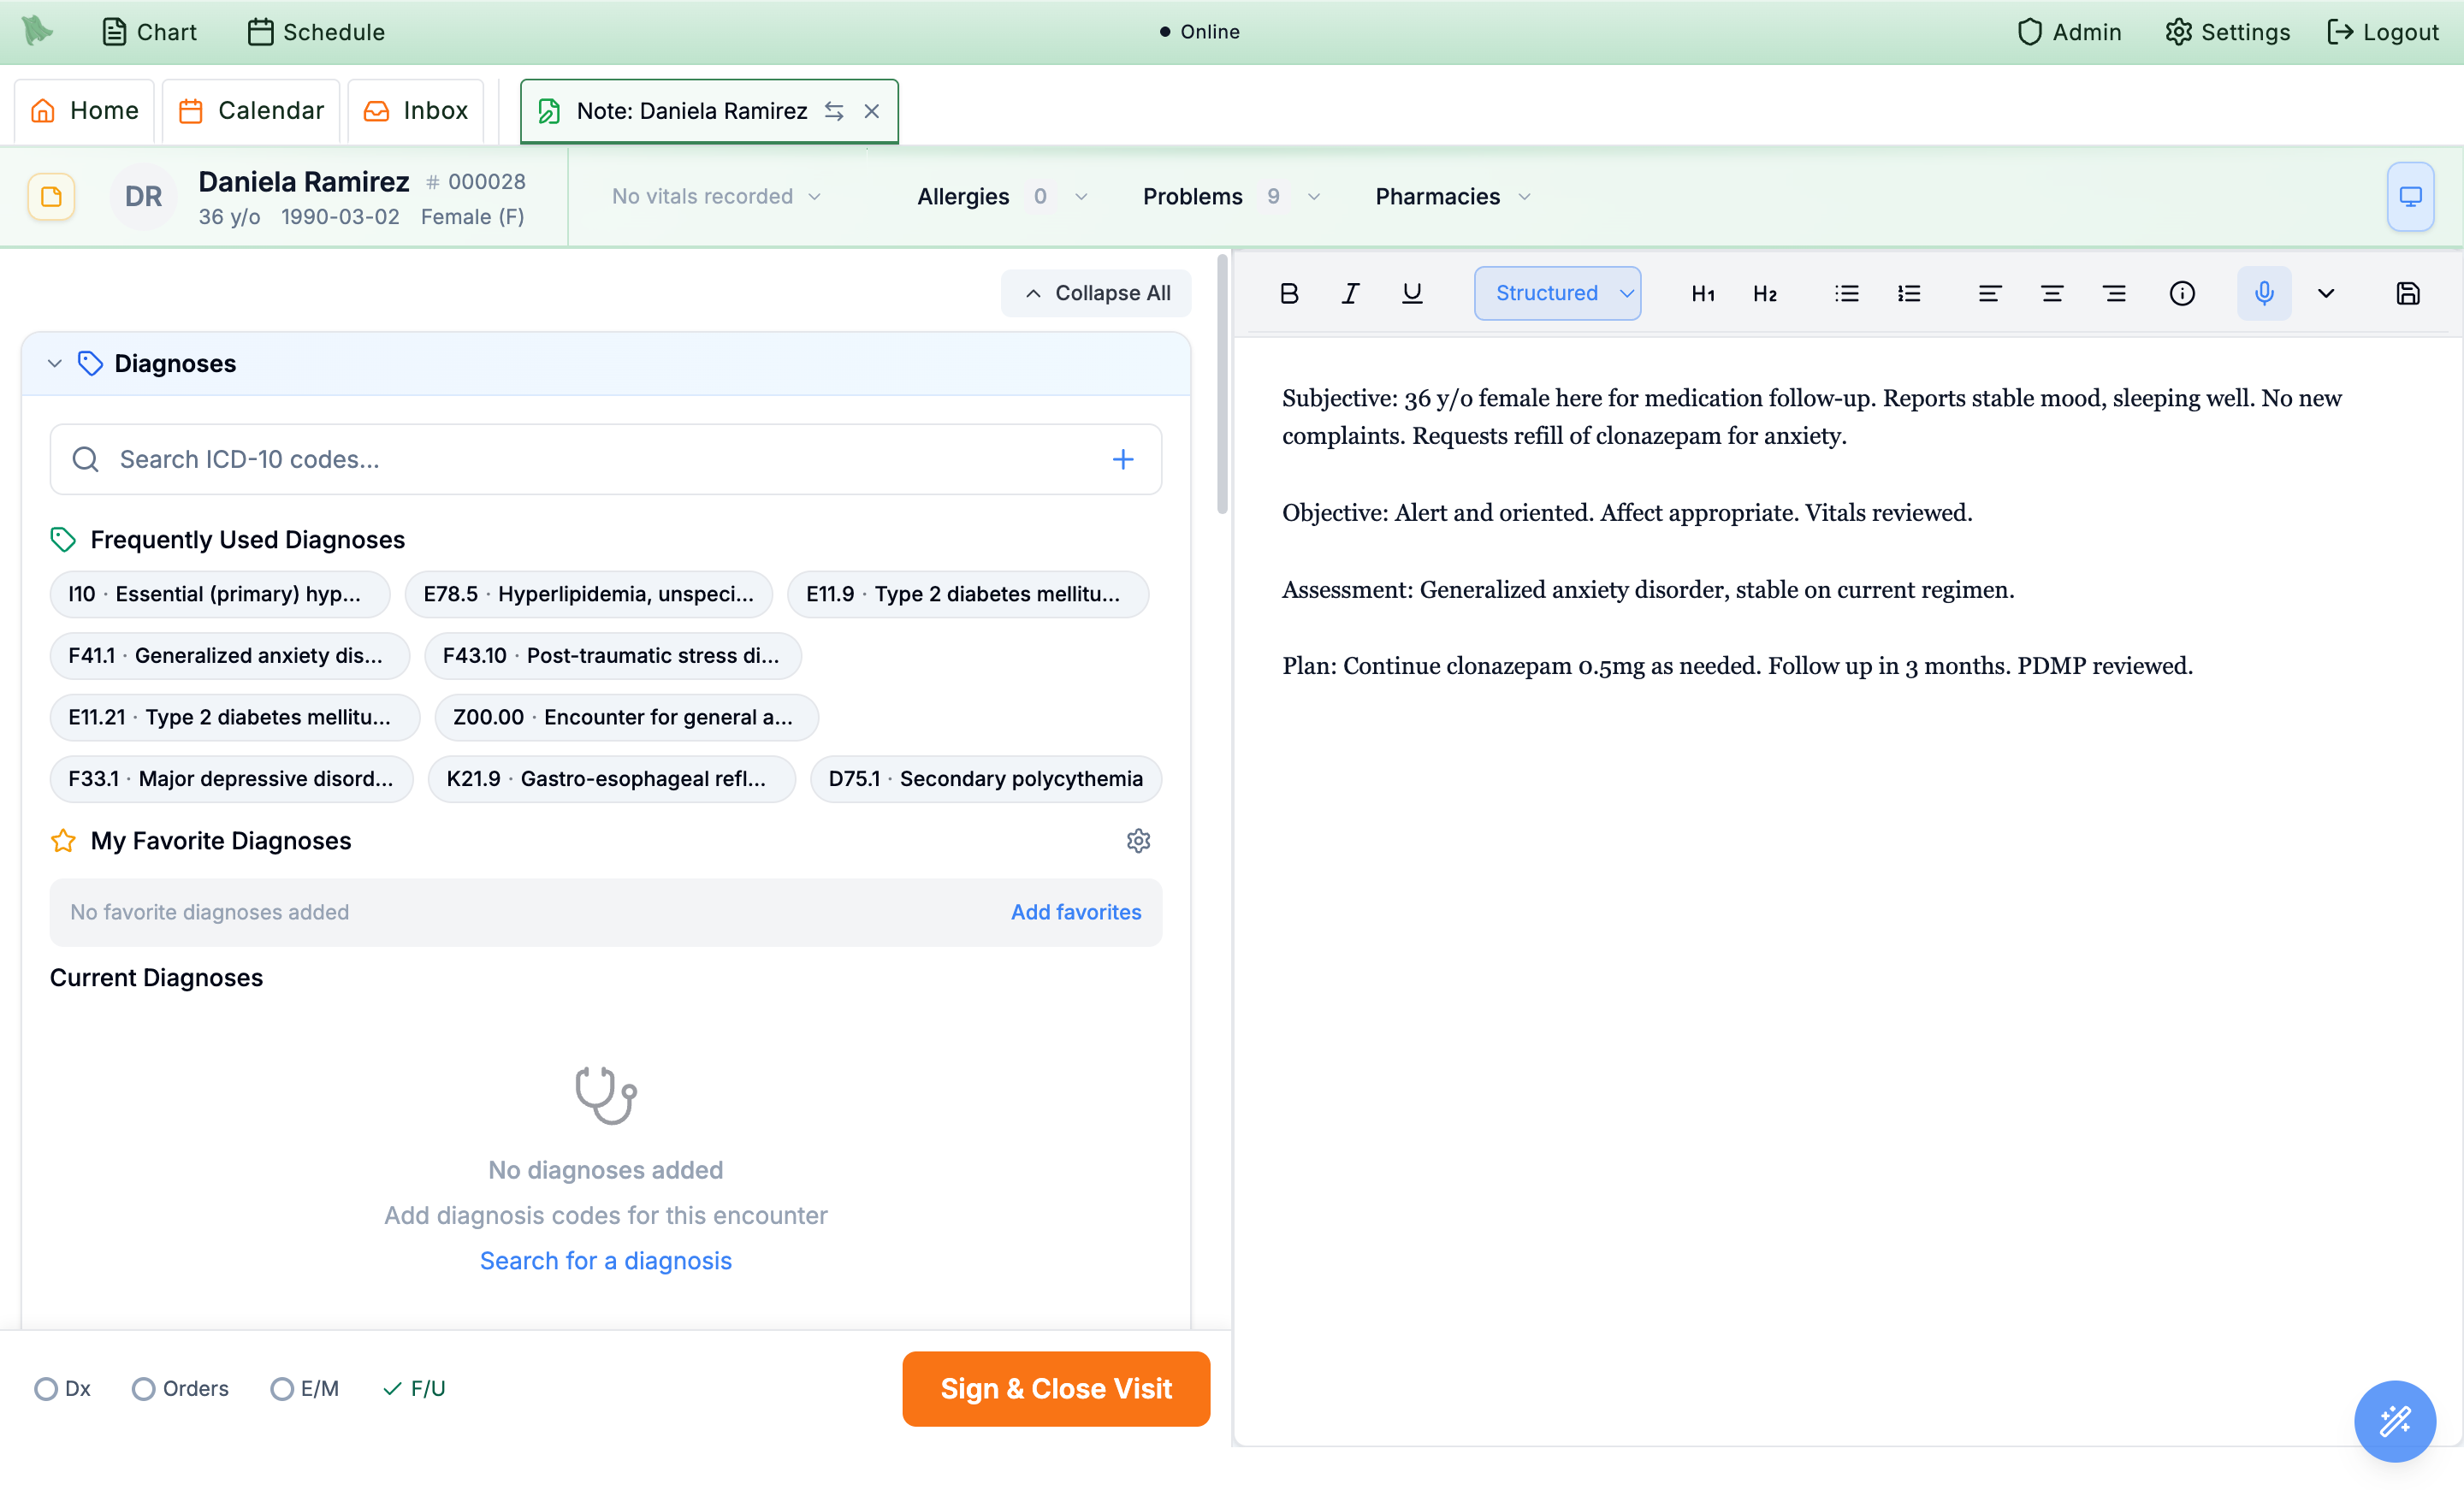
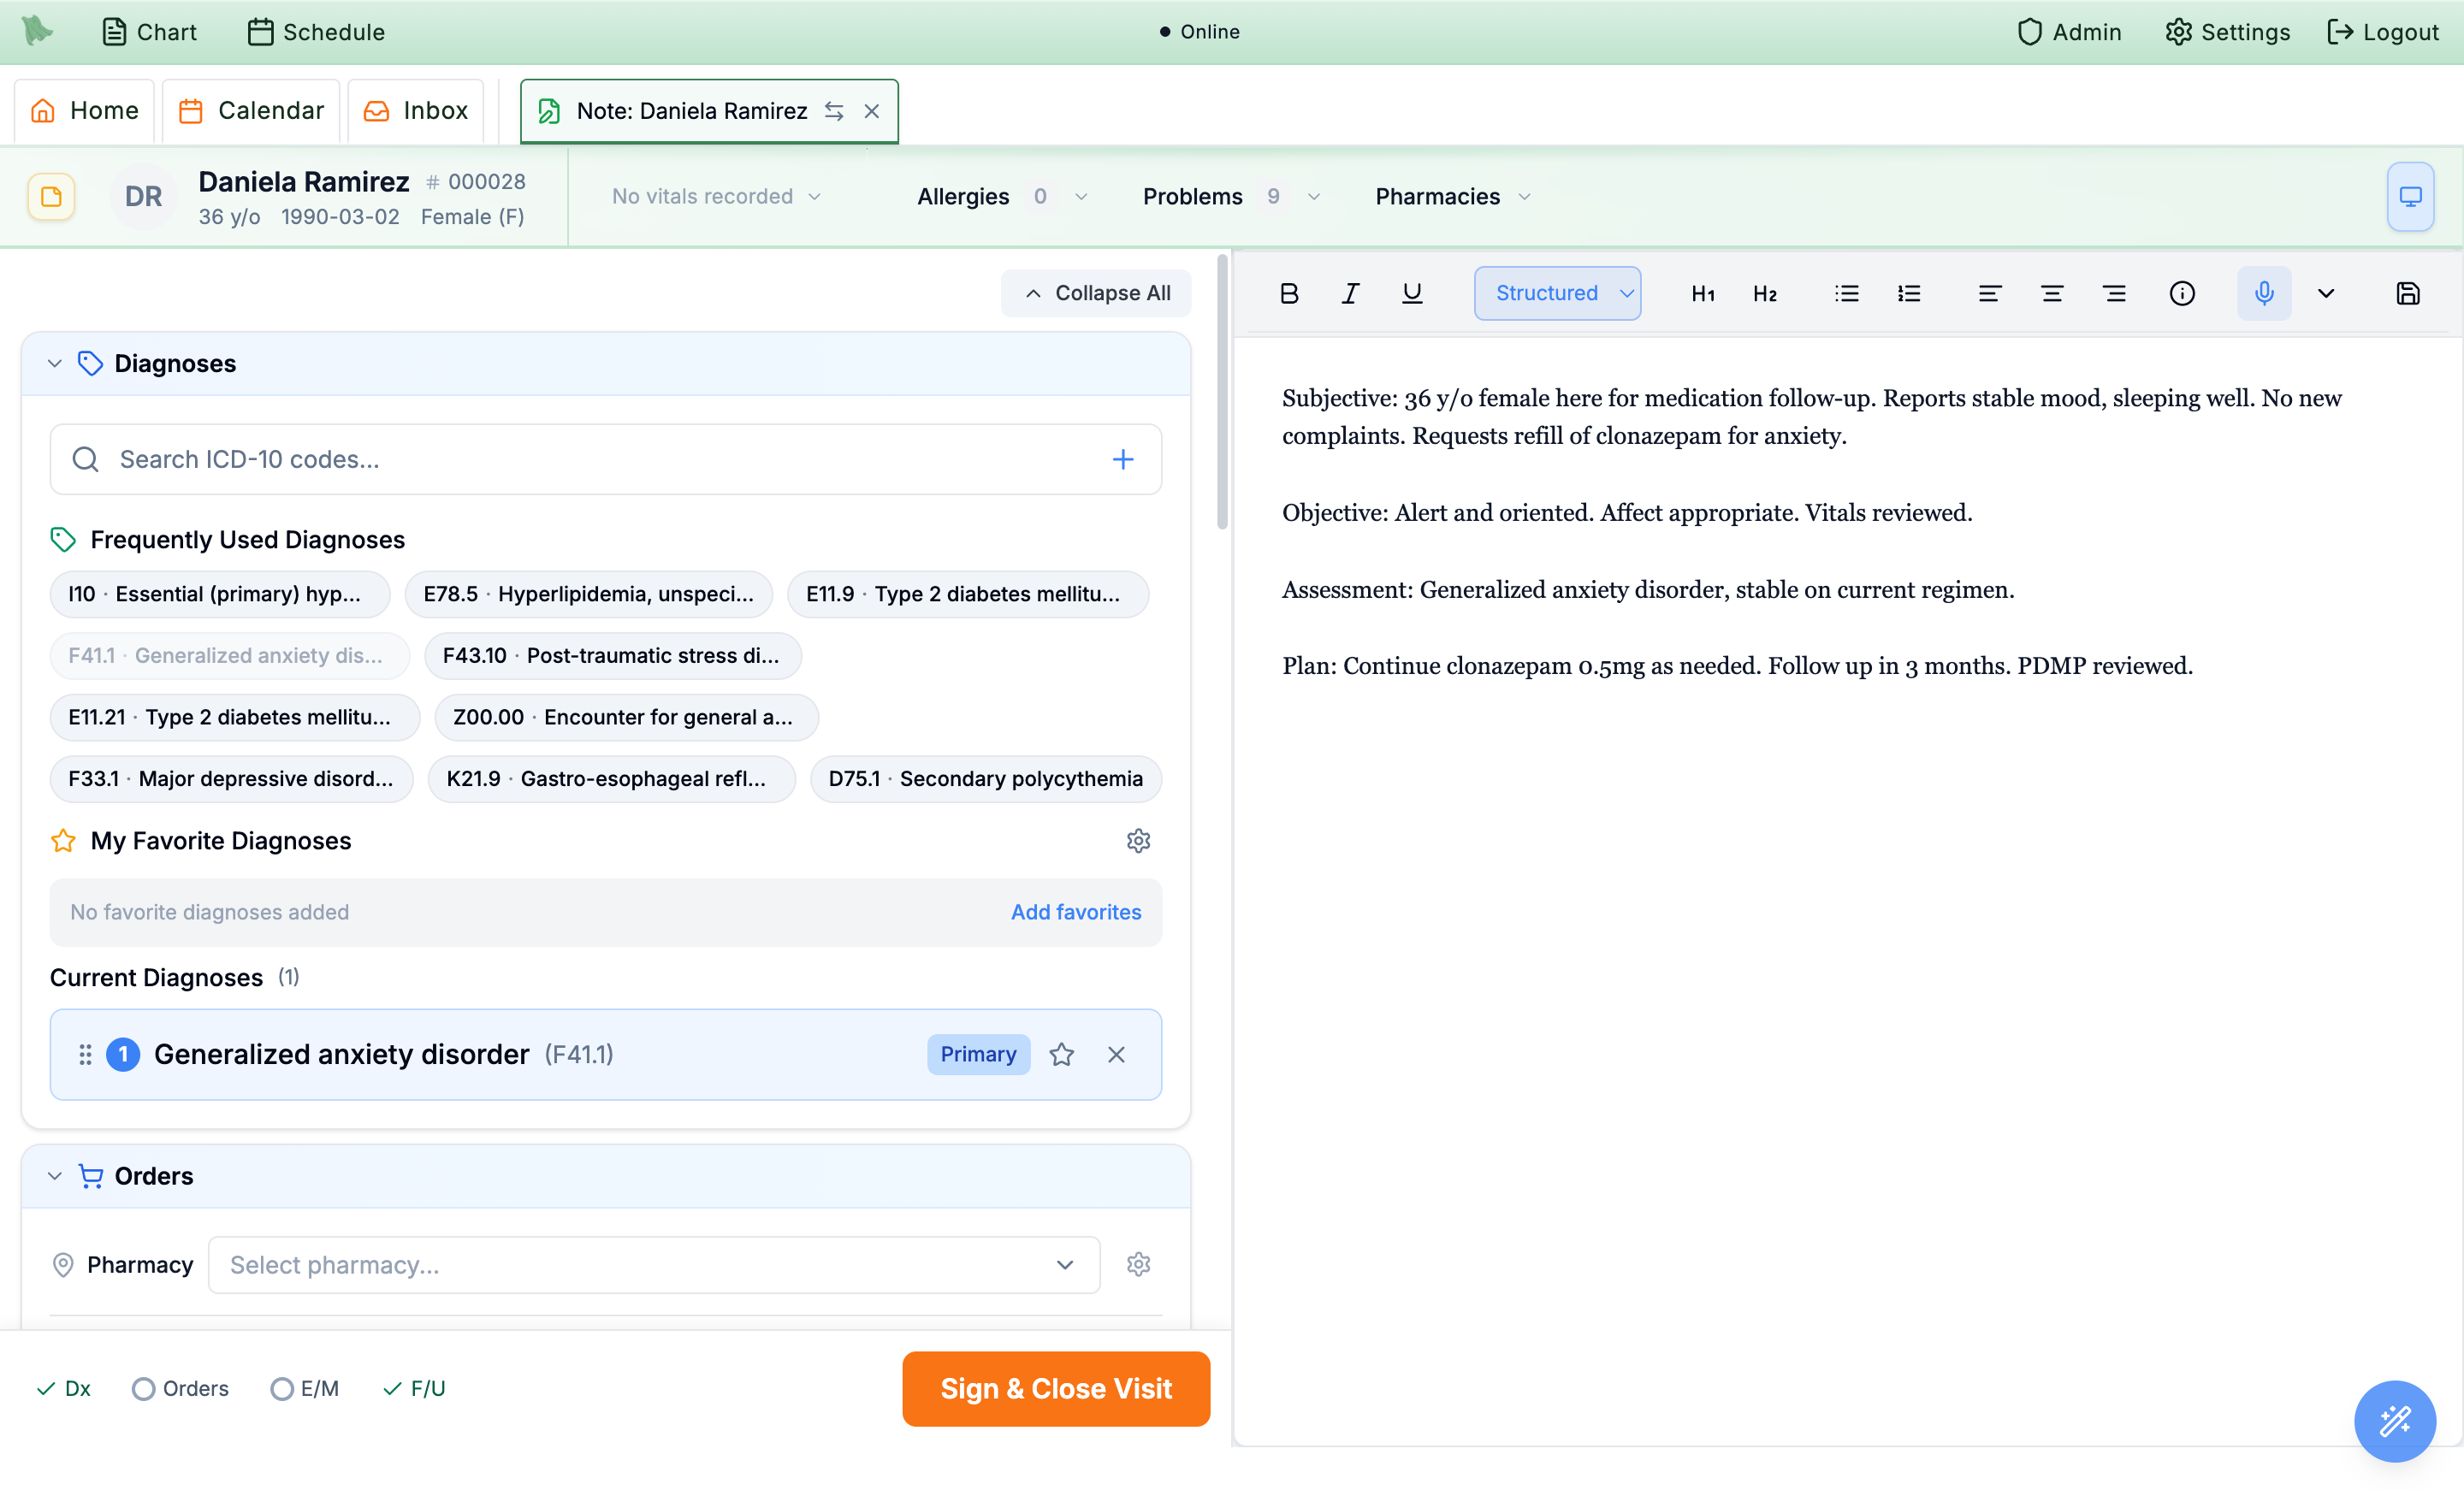
Primary; drag to reorder and the Dx chip turns green.The AI keeps your established diagnoses, and shows when it changes one
When Encounter Completion fills in the diagnoses, the AI starts from the patient’s established diagnoses: the codes on the last signed visit and the active problem list. It keeps your code exactly, with the same subtype, episode and severity, unless today’s note clearly documents a change. It never swaps a specific code for an “unspecified” one because the note is short.
- “ADHD, predominantly inattentive type (F90.0)” stays F90.0 when the note says “ADHD, continue Vyvanse”.
- “Major depressive disorder, recurrent, moderate (F33.1)” stays F33.1 when the note says “depression, stable on sertraline”.
- An AI-written note uses the same diagnosis names and codes in its Assessment and Plan.
When a code does change
If today’s note documents a change (“now meets criteria for combined presentation”, “worsened, now severe”, “now in partial remission”, or the new code written in the note itself), the new code is used and the diagnosis gets an amber Changed from … label.
- Save the note as usual. Encounter Completion opens with the diagnoses filled in.
- Look for an amber
Changed from …label. It sits next to a diagnosis inDiagnoses. - Click the label. It shows the code on file (from the last visit or the problem list), this visit’s code, and the reason, in the note’s own words.
- Keep it or put it back. If the change is right, do nothing. If not, click
Use …with the code on file. It replaces the new code in place, and its orders and charges move with it.
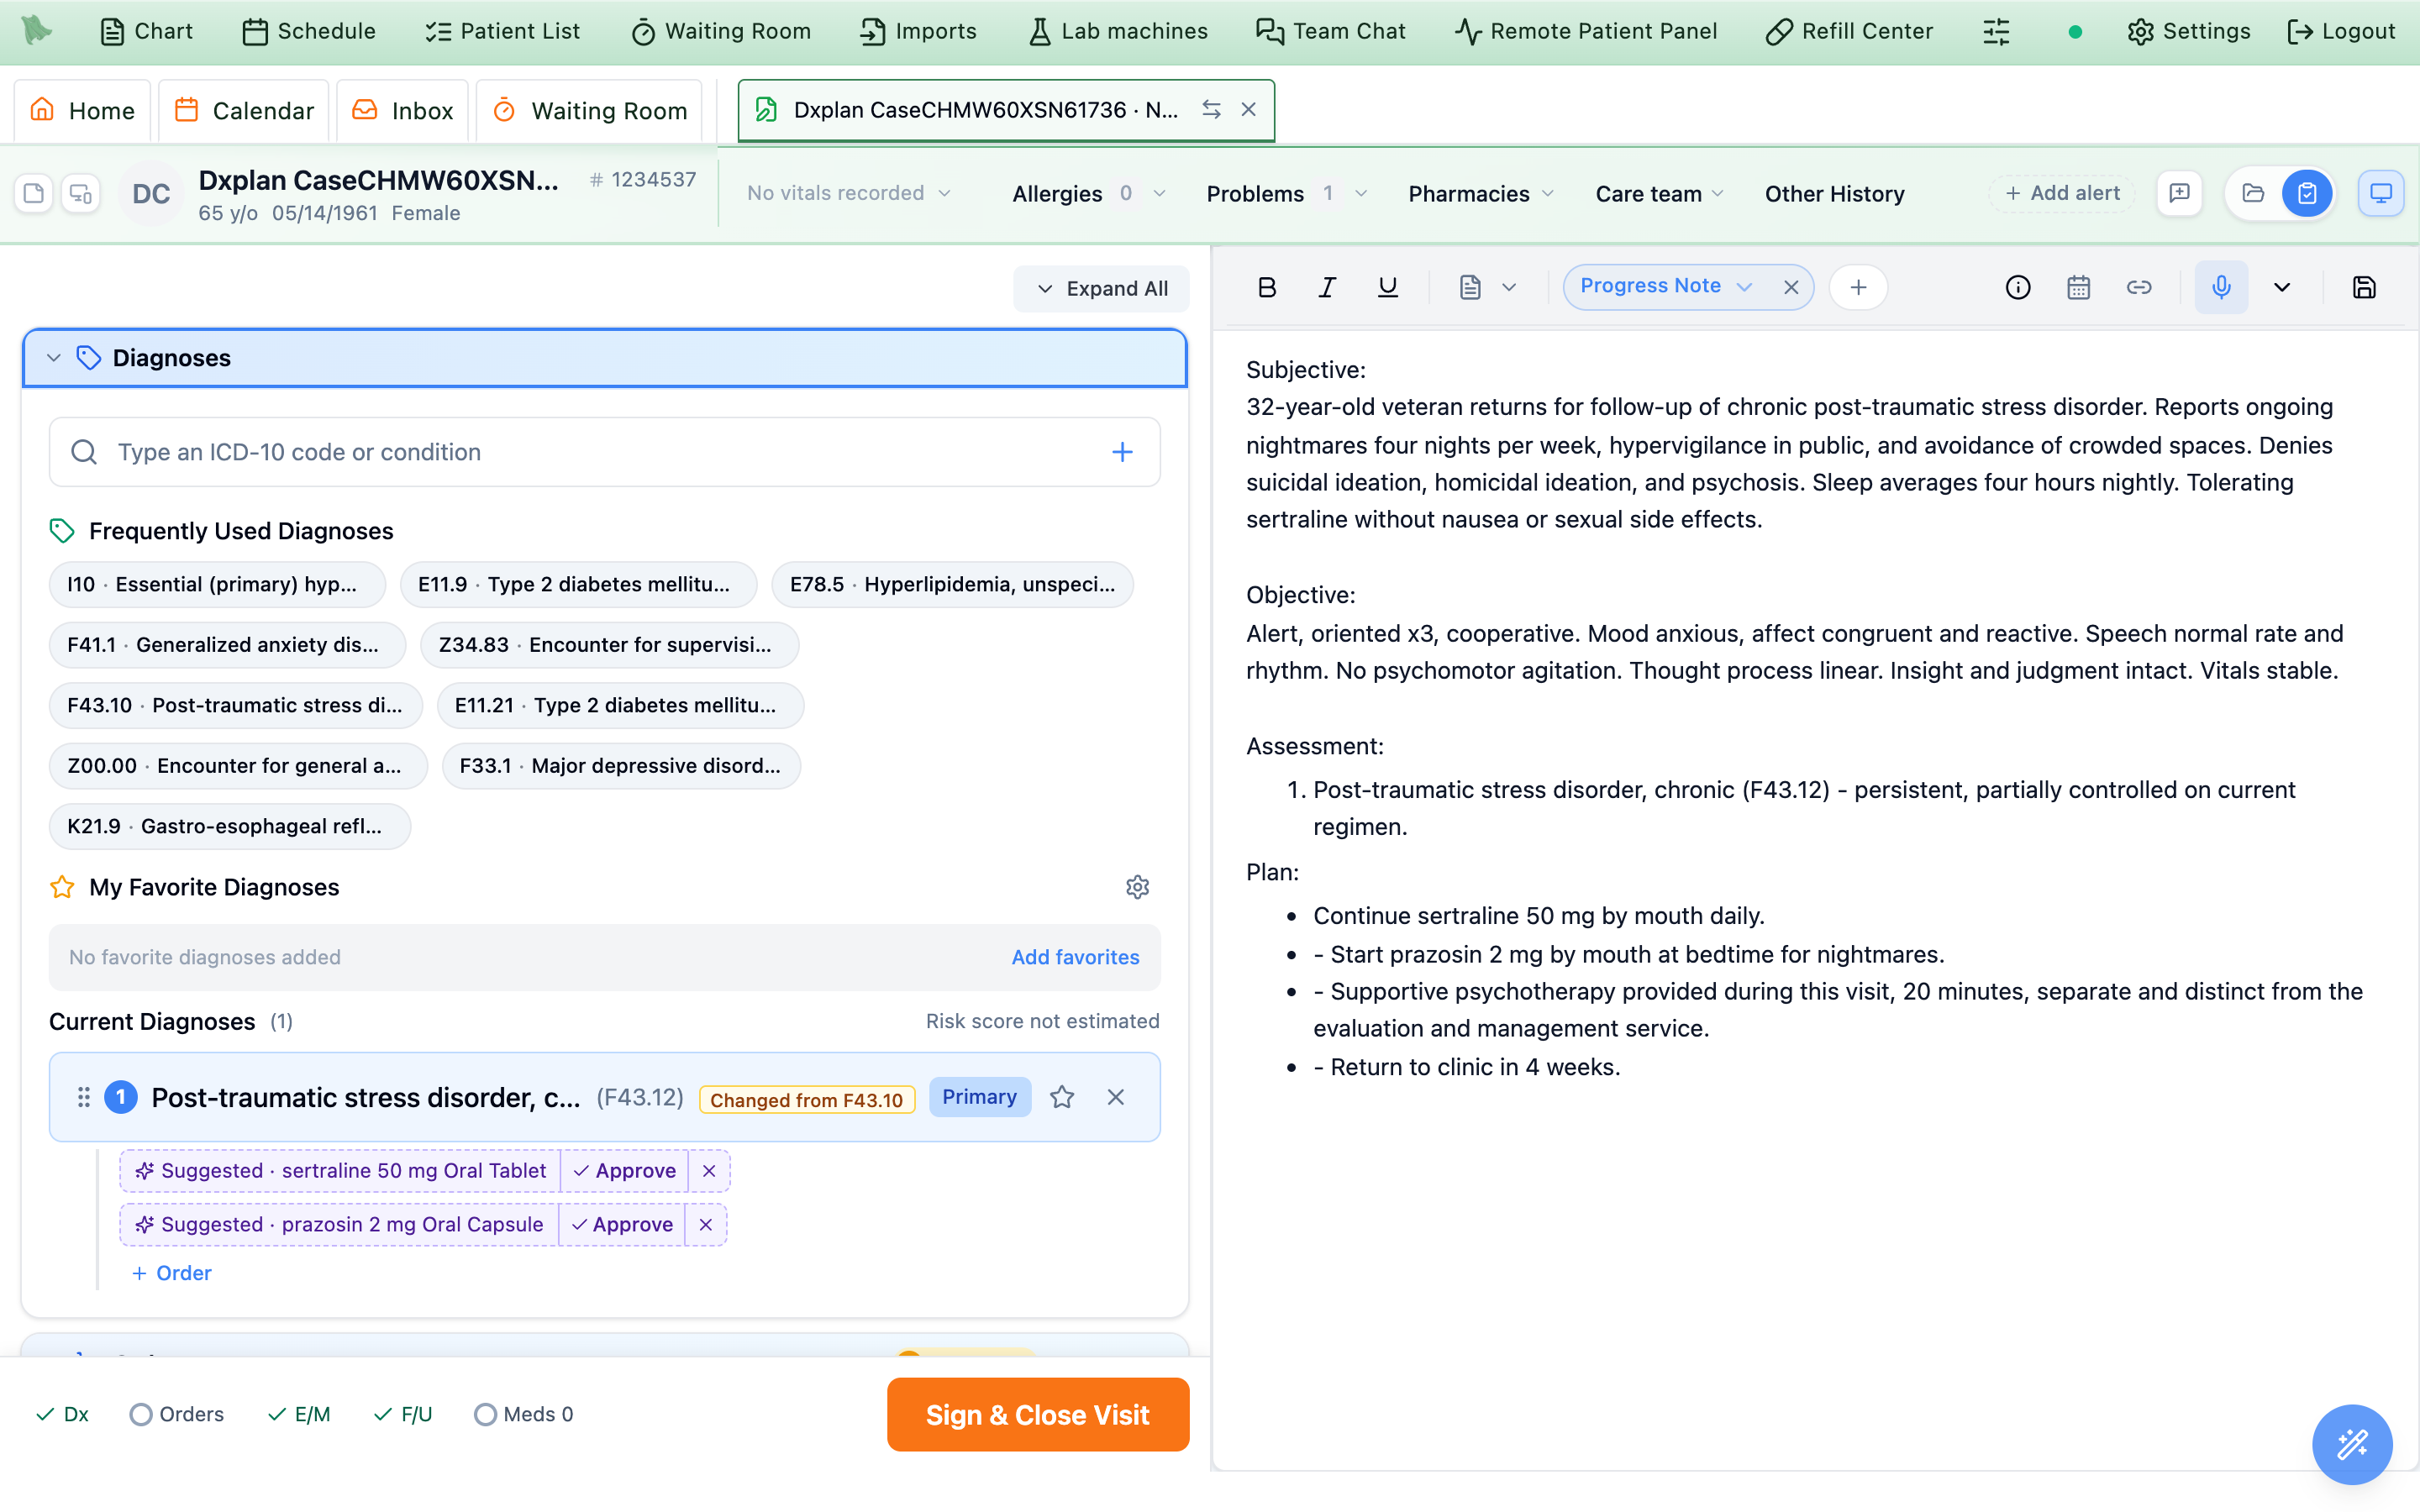
Changed from F43.10.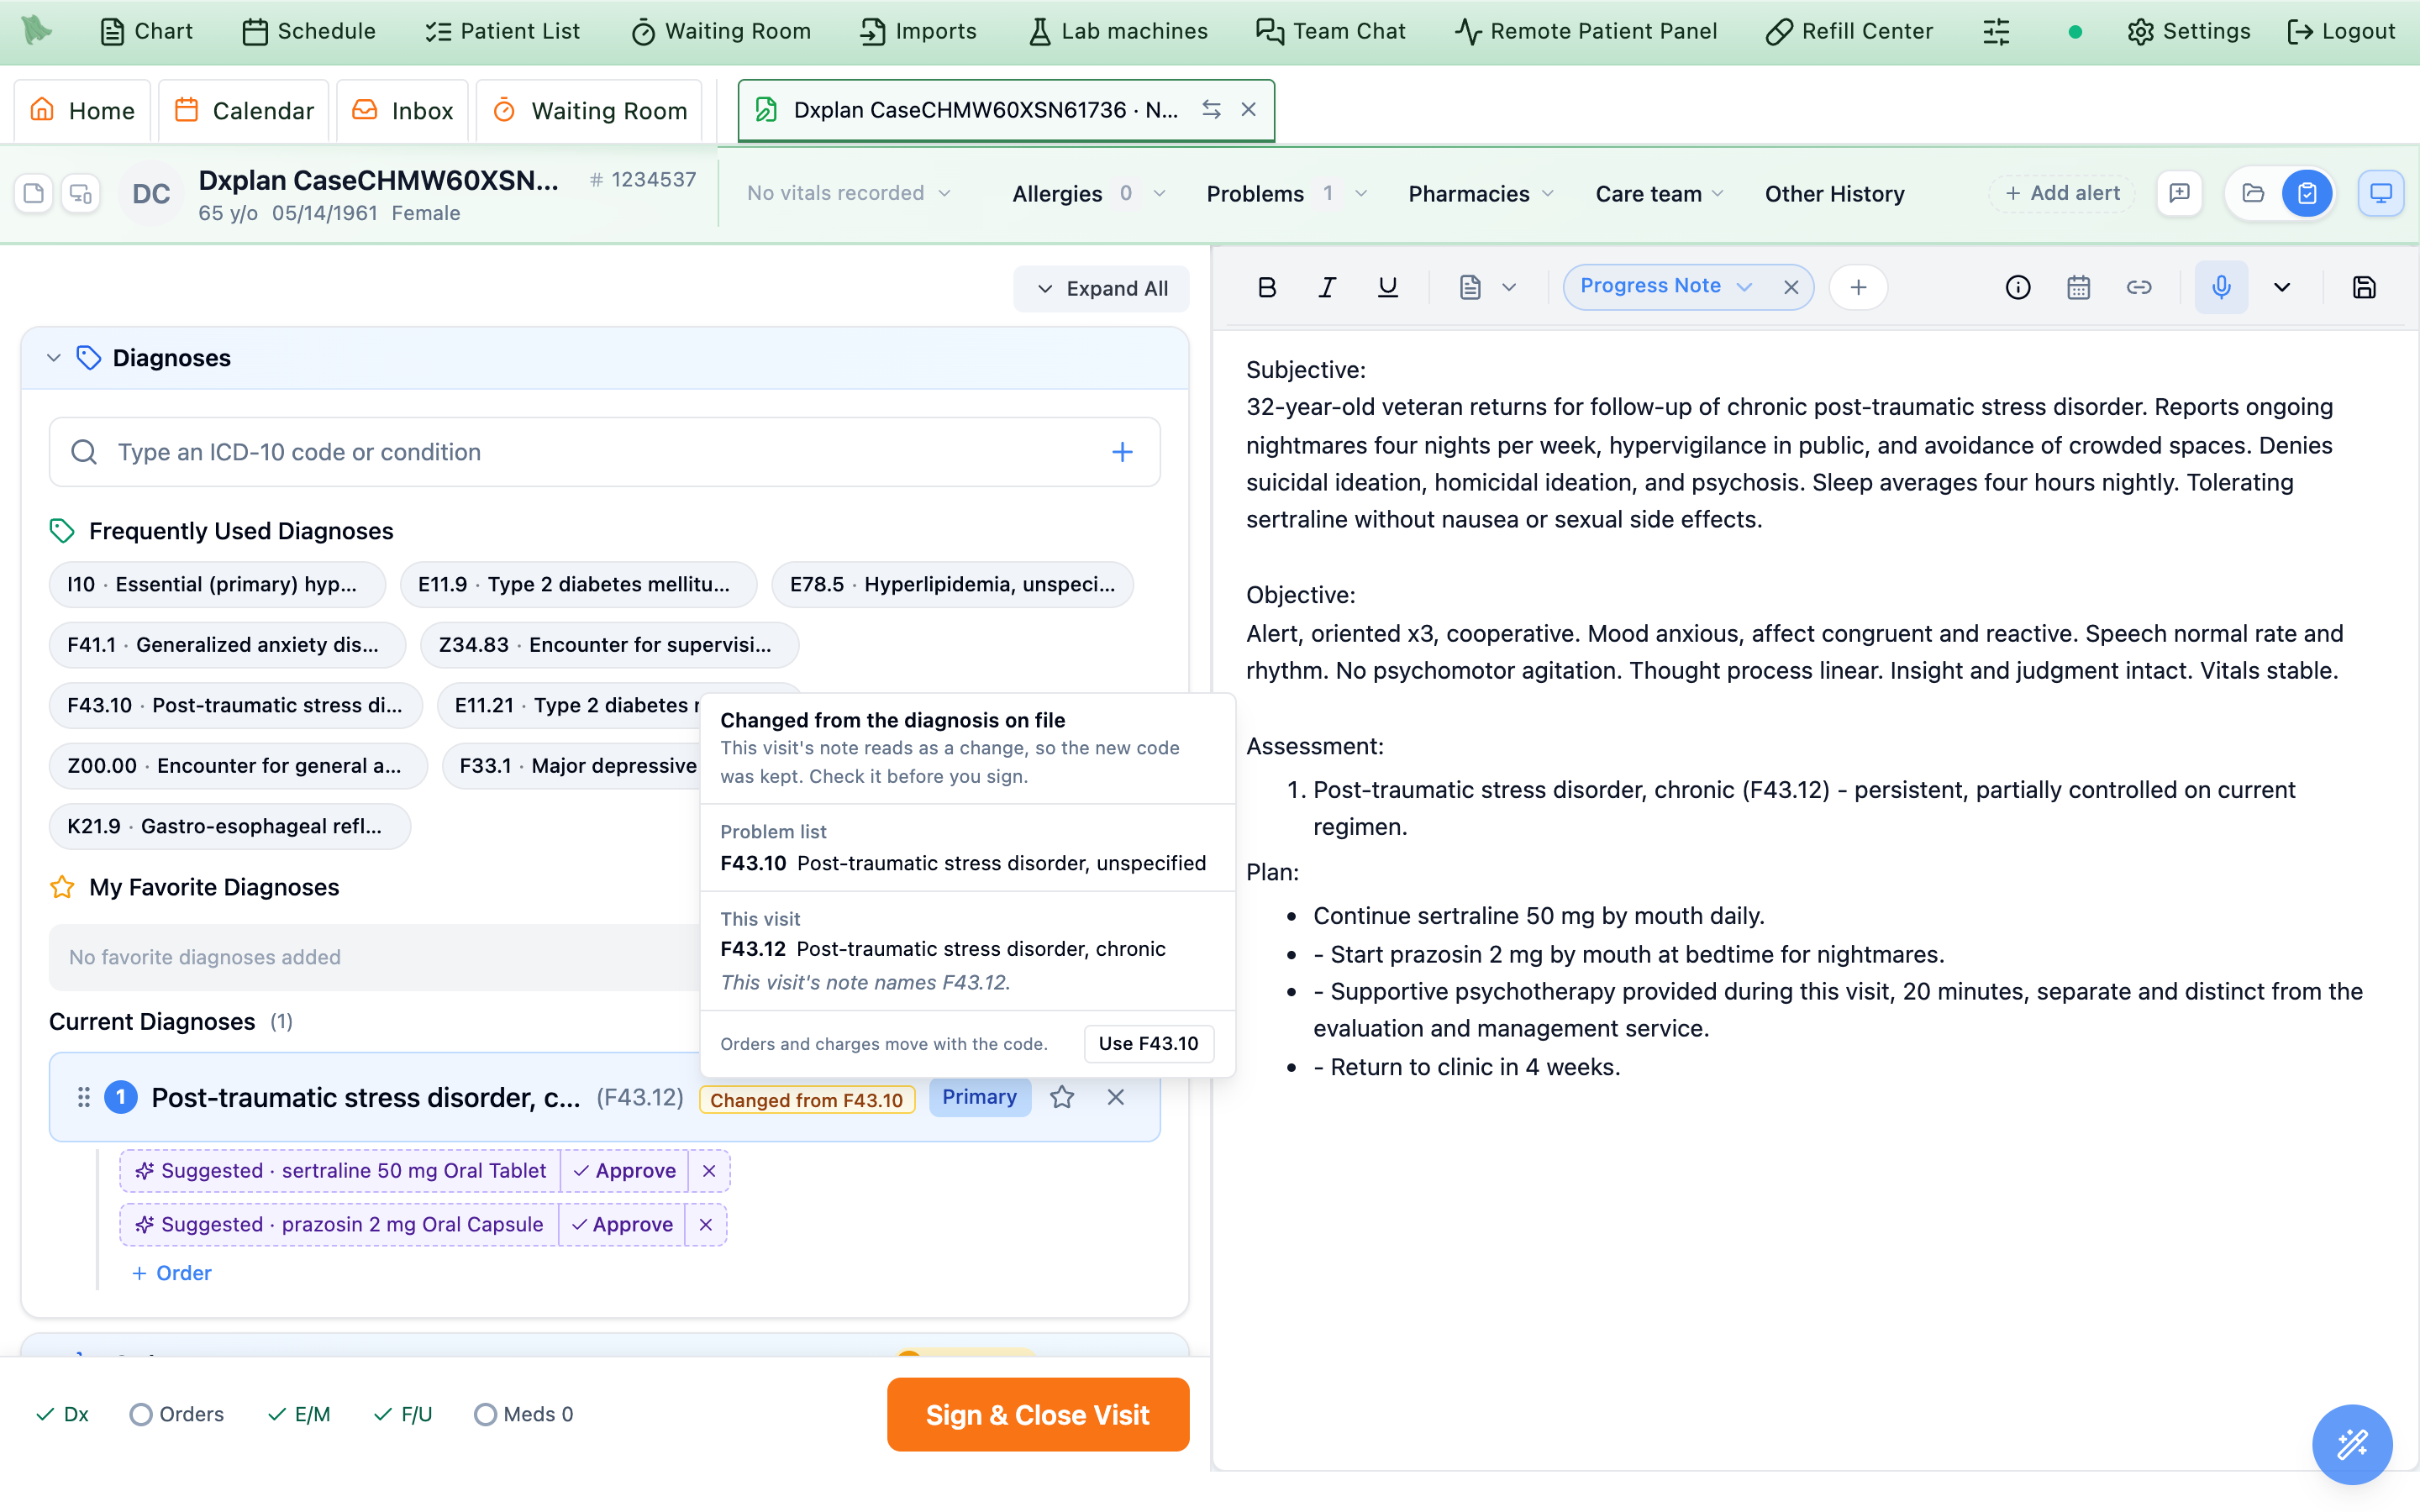
Use F43.10 puts the code on file back.- New problems are not changes. A diagnosis added for a new problem (for example panic disorder next to your generalized anxiety disorder) gets no label.
- Combined codes. When ICD-10 rules combine two conditions into one code (for example diabetes with kidney disease), the label says so.
- Advanced AI coding. It works the same with Advanced AI coding on or off.
Need help? Email support@heroemr.com.