Encounter completion — order sets
Turn the orders you place over and over into one-click bundles. Apply an order set from the encounter's order search, choose whether each item releases now, after a delay, or on a standing schedule, and manage the whole library from Settings.
Encounter completion — order sets
Turn the orders you place over and over into one-click bundles. Apply an order set from the encounter's order search, choose whether each item releases now, after a delay, or on a standing schedule, and manage the whole library from Settings.
Reusable order bundles
An order set is a saved bundle of everything you usually do for a type of visit — labs, imaging, referrals and medications, plus screeners, forms and consents, patient education, and outside lab and imaging orders (6.15a) — that you drop onto a patient in one step instead of searching for each item. A diabetes work-up, an annual wellness panel, a statin-monitoring recheck: build the bundle once, then apply it in seconds every visit. Each item in a set carries its own timing, so a single set can order some things now and schedule others for weeks or months out.
There are two places order sets live:
- In the visit — the
Order Setstab. Open Search Orders from the encounter and pick theOrder Setstab (the indigo layers icon) alongsideMedication,Lab,Imaging, and the rest. This is where you apply a set. - In Settings — the editor. The top-right
Settingsmenu →Order Setsopens the editor, where you create, edit, duplicate, and delete sets and seed the starter presets (see Build and manage sets).
A Scheduled orders panel in the encounter’s order entry area lists any upcoming (or failed) releases a set has queued, so future labs and imaging never fall off the radar (see the Scheduled orders panel).
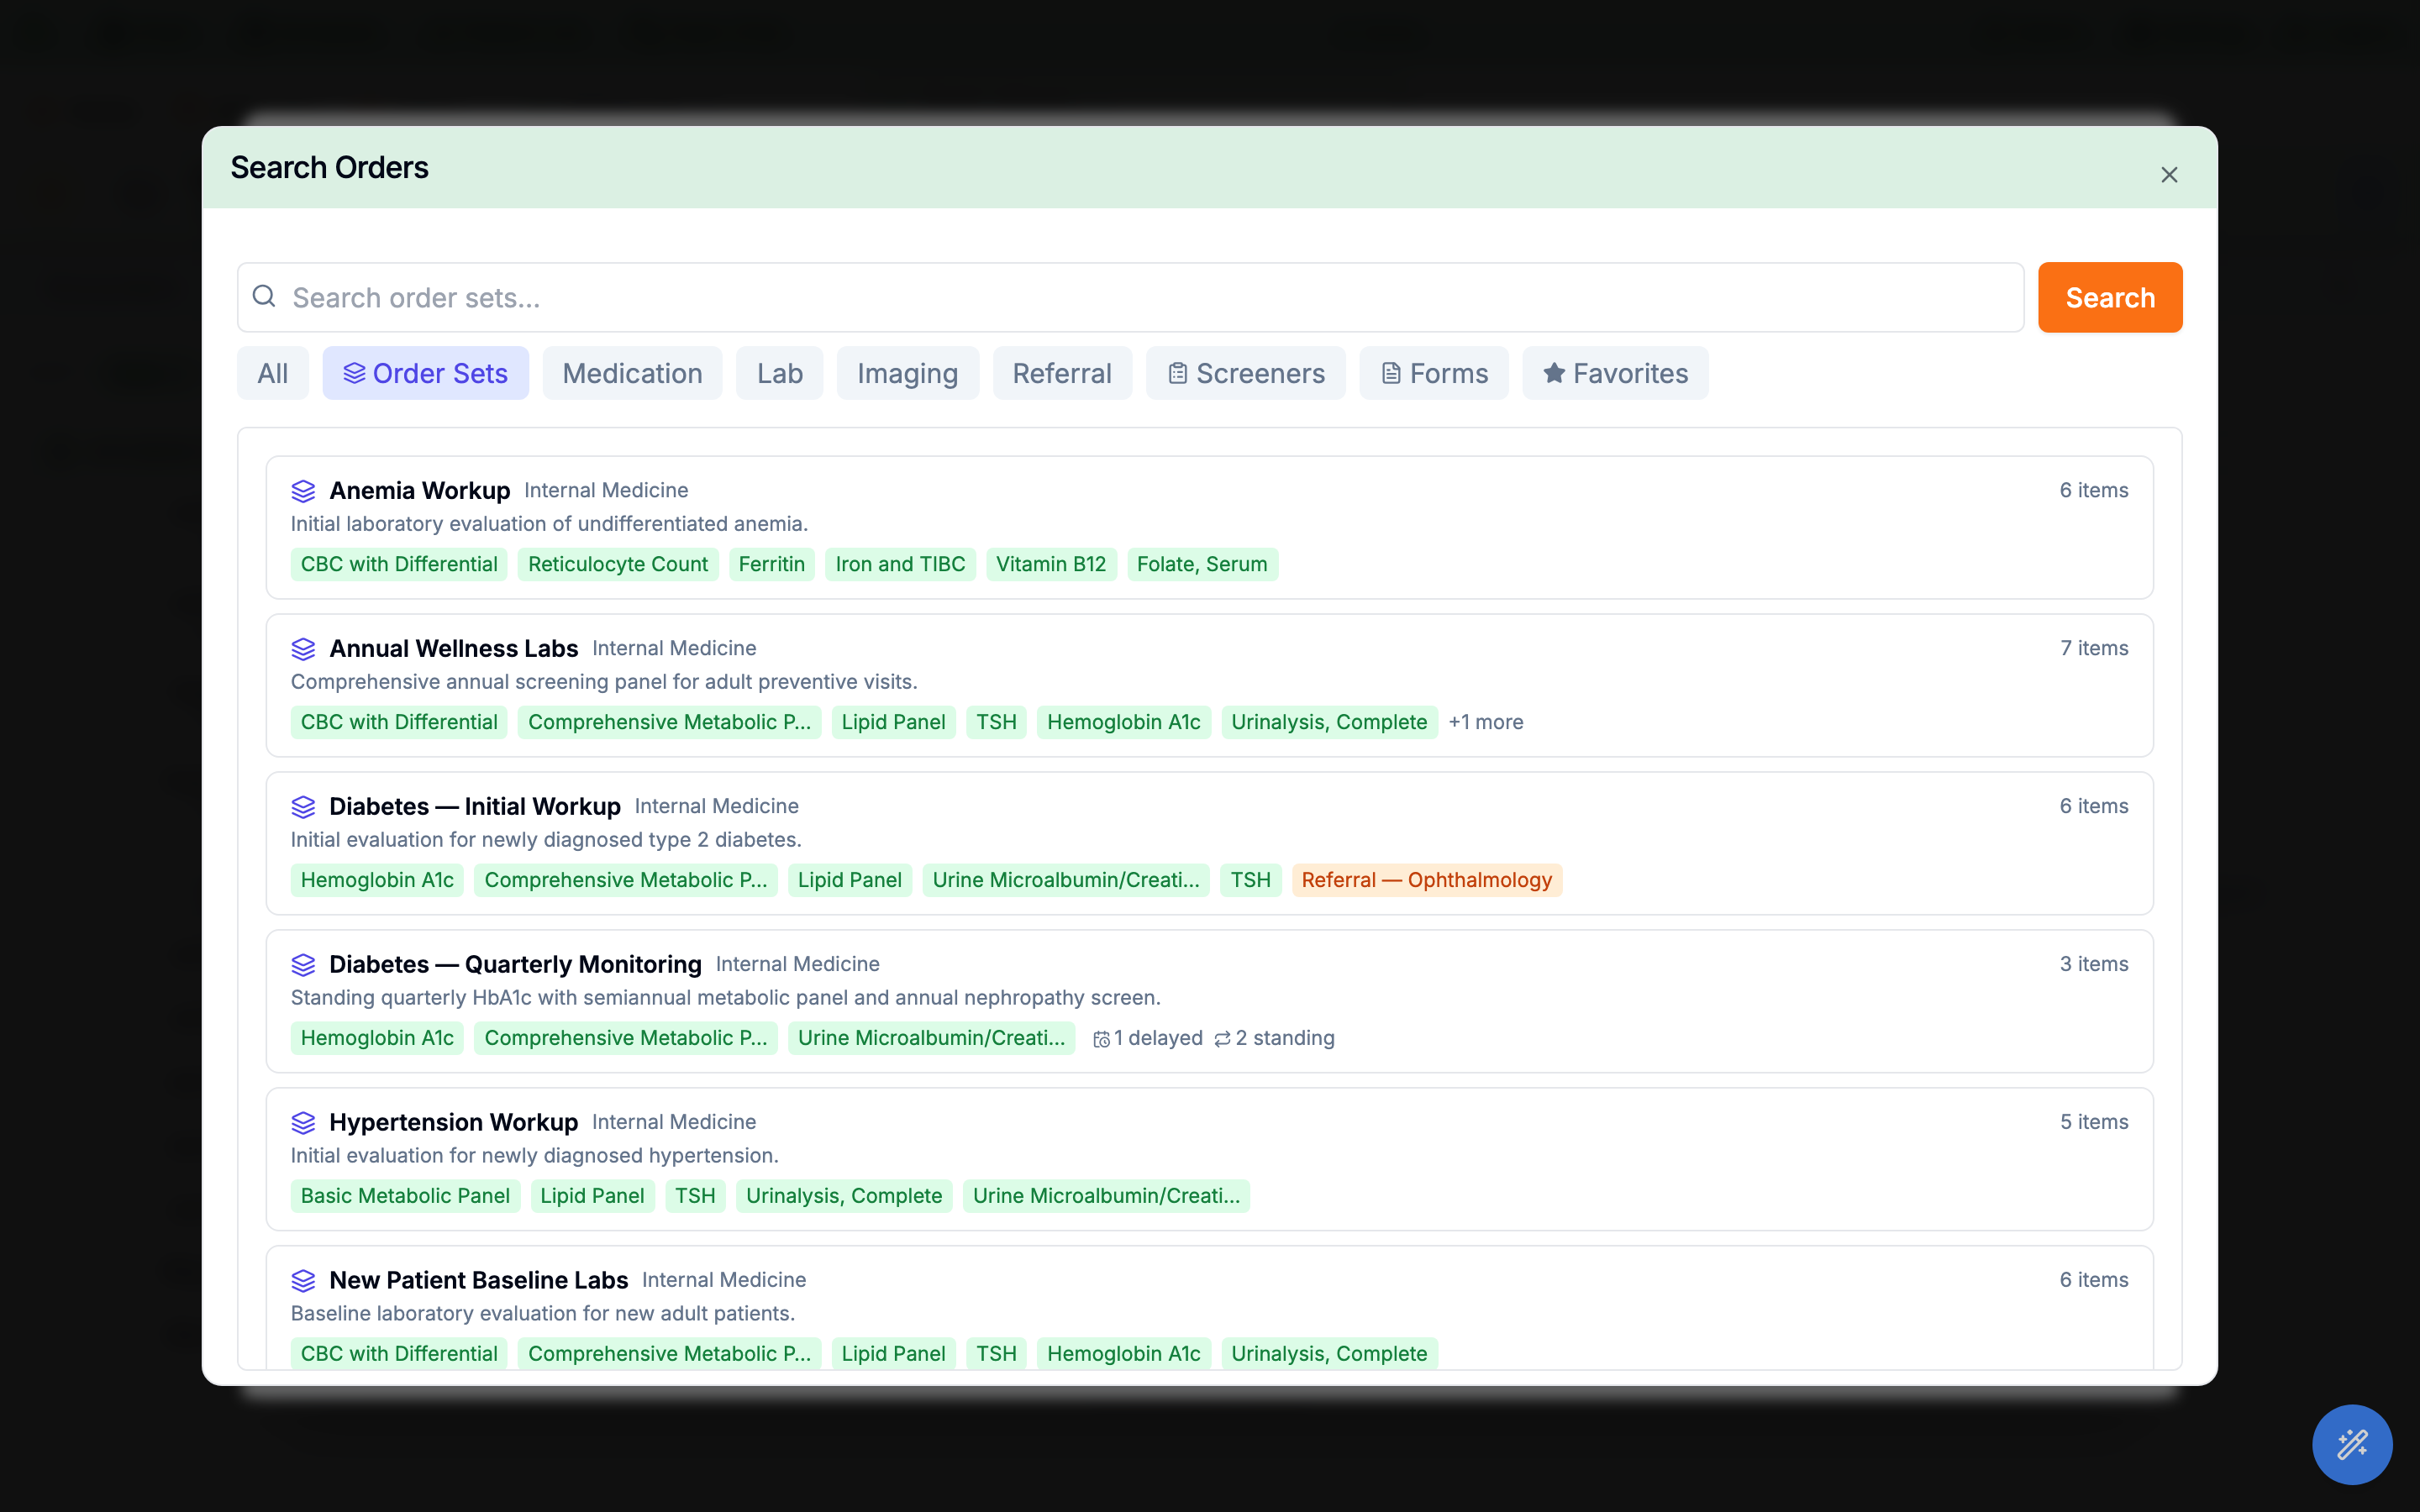
Search Orders. Each row shows the set’s specialty, description, item chips, and counts — including delayed and standing badges when a set schedules items for later.Put screeners, forms, education, outside orders and referrals in a set
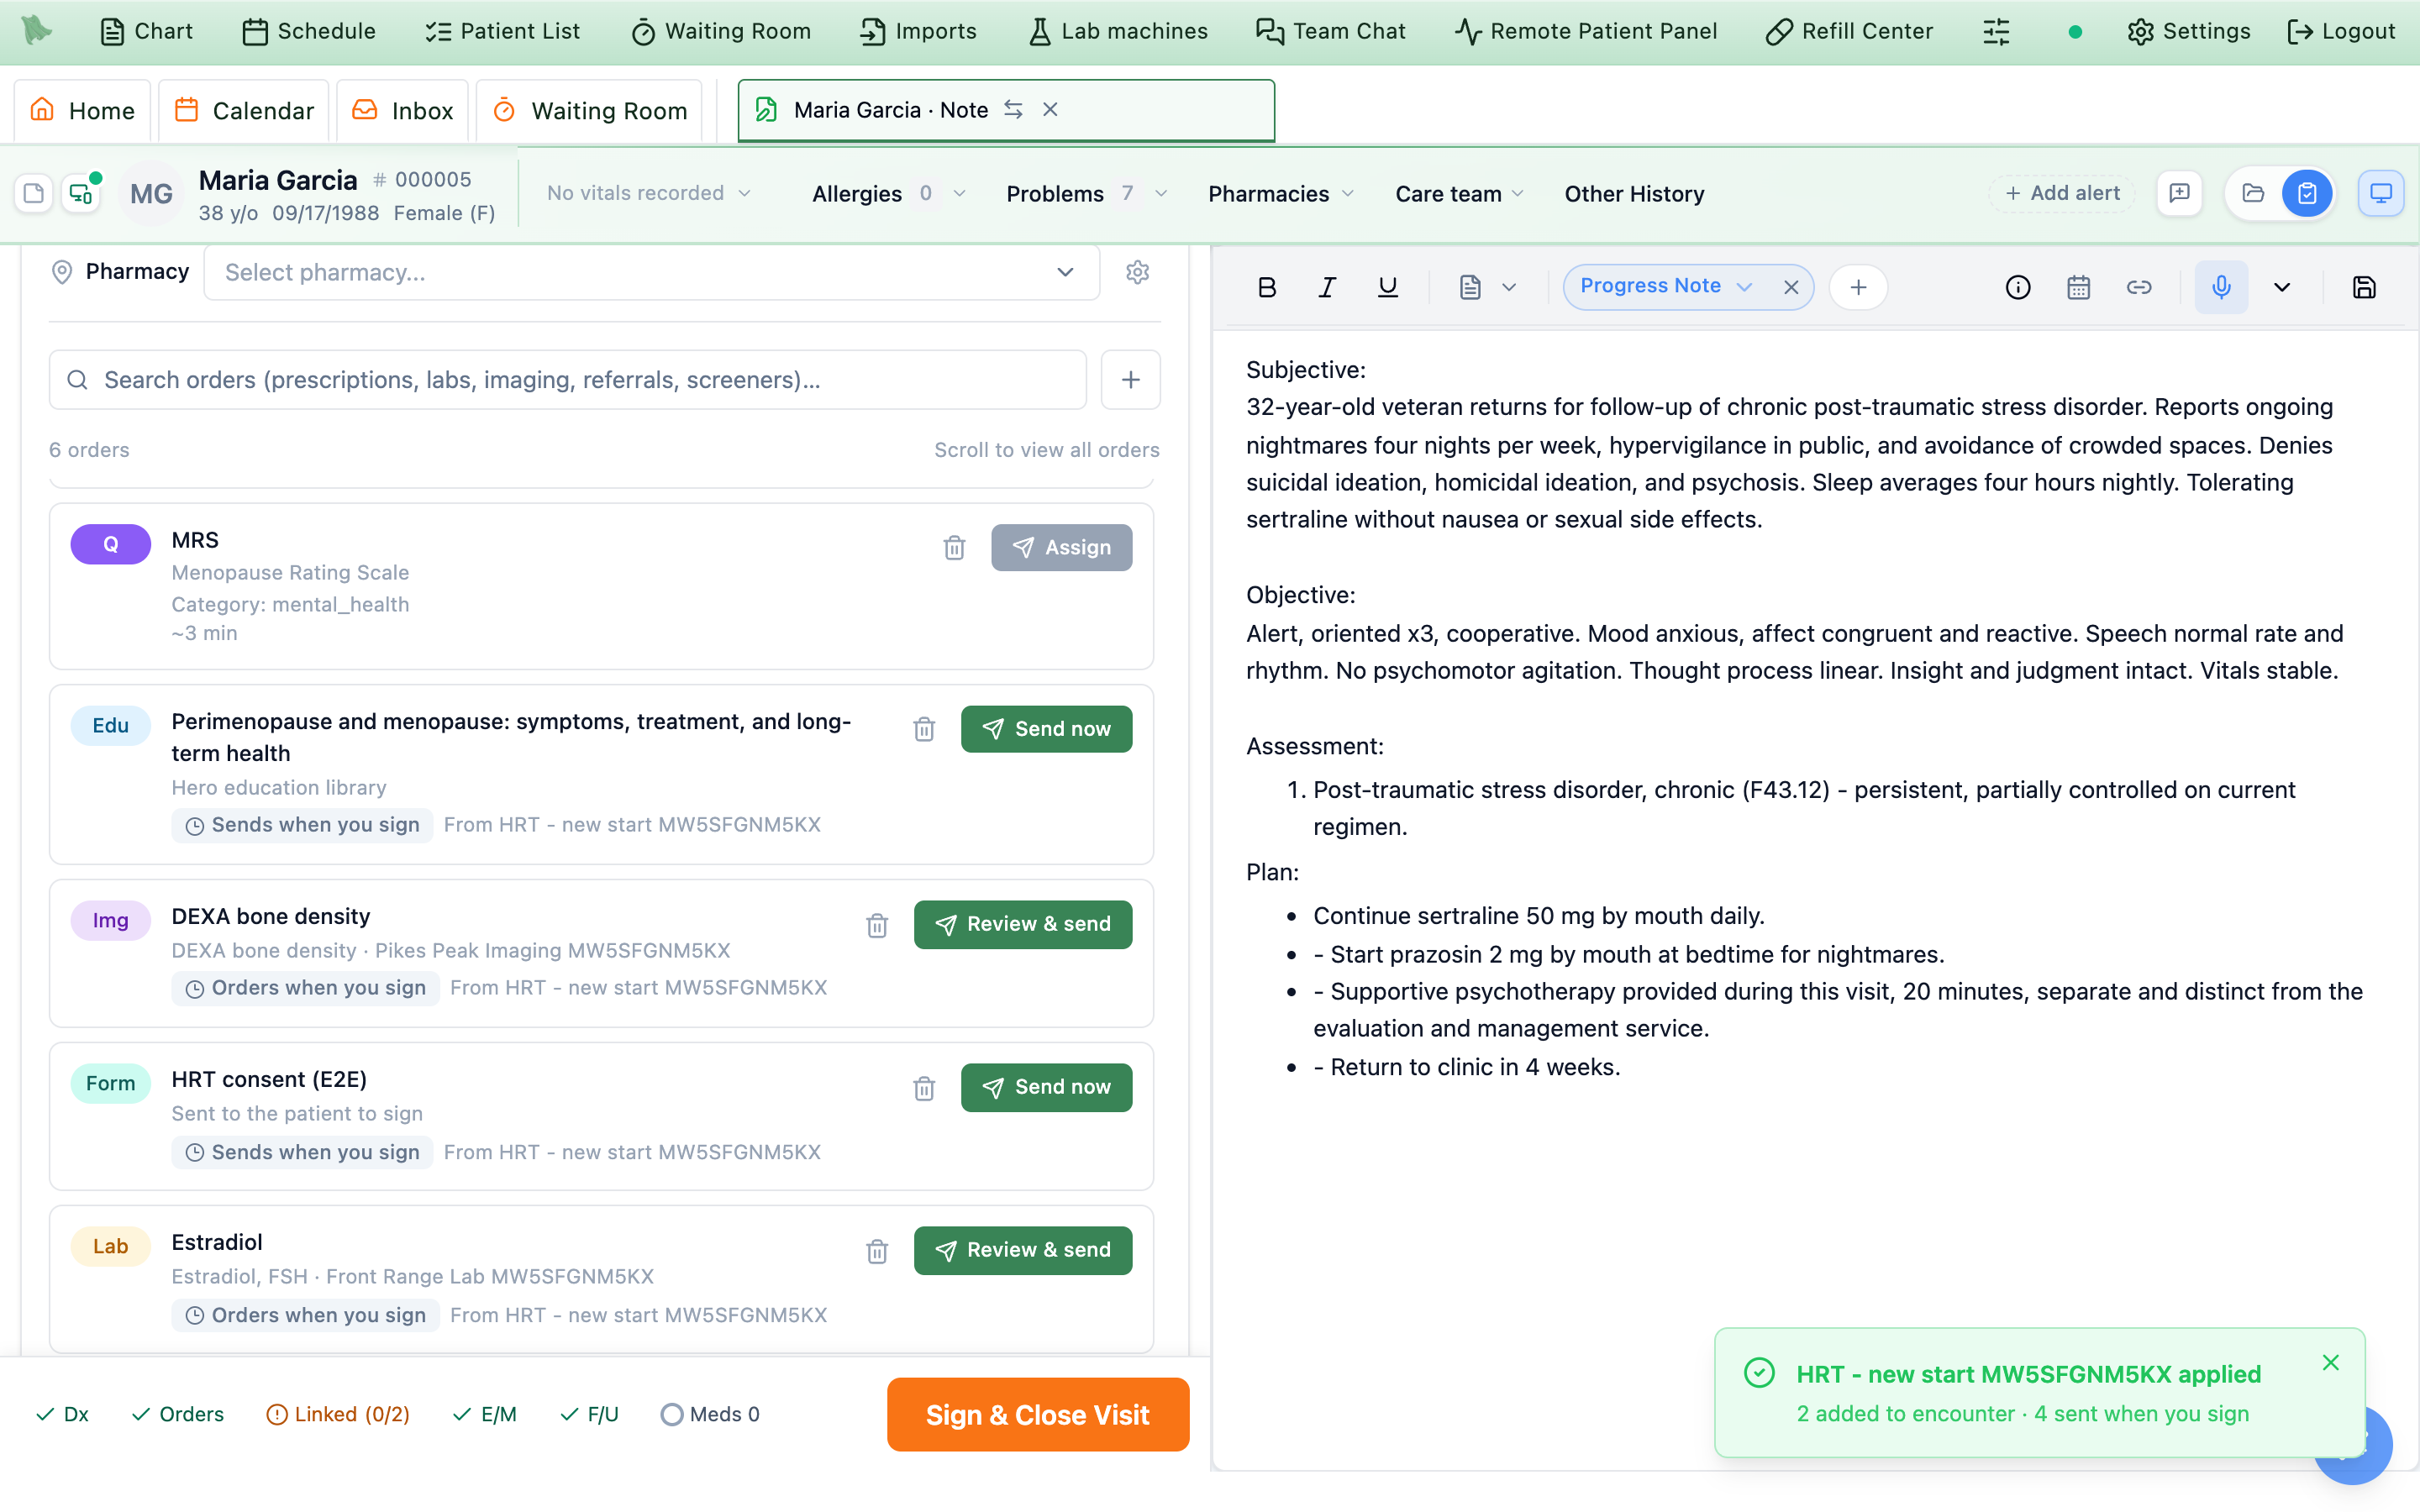
One set can hold everything you do for a type of visit, for example a new hormone therapy patient: an outside lab panel, a DEXA at your local imaging center, the Menopause Rating Scale, your consent form, your handout and a referral to a therapist. Applying the set puts each item where you already review that kind of order, and nothing reaches the patient or an outside facility until you sign the visit (or choose to send it sooner).
| Item | What it is | After you sign |
|---|---|---|
| Screener | A questionnaire from your practice’s library, such as the MRS or the ASRS. | Assigned to the patient with the visit’s questionnaires. |
| Form or consent | A form your patients sign in the portal, such as your HRT consent. | Sent to the patient’s portal to sign. |
| Patient education | A handout from Hero’s library or your own. | Shared to the patient’s portal and app. |
| Outside lab, outside imaging | An order form for a lab or imaging center outside Hero (a walk-in lab, a DEXA, a CAC score), with the facility, the tests or study, the clinical indication and your instructions filled in. | Signed and filed in the chart’s Labs or Imaging tab, ready to fax, print or share. |
| Referral | A referral to a real clinic or provider, chosen with the same Refer to search the visit uses. The NPI is optional, and a referral can also name only a specialty. | Sent like any referral from the visit. |
| Imaging | A catalog imaging order with your own clinical indication and instructions saved in the set (for example a pelvic ultrasound, “transvaginal and transabdominal”). | Sent like any imaging order. |
Add them to a set
- Open
Settings → Order Setsand clickNew set. Or open a set to change it. Give it a name such as HRT – new start. - Type what you want in
Add to this set. One search finds everything at once, grouped by kind.- Screener, form or handout. Click it. That’s all.
- Outside lab. Type the test (for example Estradiol) and choose the
Outside labrow. Pick the lab, add more tests withAdd a test, tickFastingif needed, and add instructions for the lab. - Outside imaging. Type the study (for example DEXA bone density) and choose the
Outside imagingrow. Hero guesses the modality and body part from the name; pick the imaging center and add the clinical indication and instructions. - Referral. Type the specialty or what it is for (for example Menopause therapy) and choose the
Referralrow. The referral window opens: search for the clinic or provider, or add it as a new one (NPI optional), then add the reason.
- Check the items. They are listed by kind. Click an item for its details. Prescriptions, labs, imaging and referrals have a pencil button that opens the same window the visit uses; imaging items also show
Clinical indicationandInstructionsright in the list. - Click
Create order set(orSave changes).
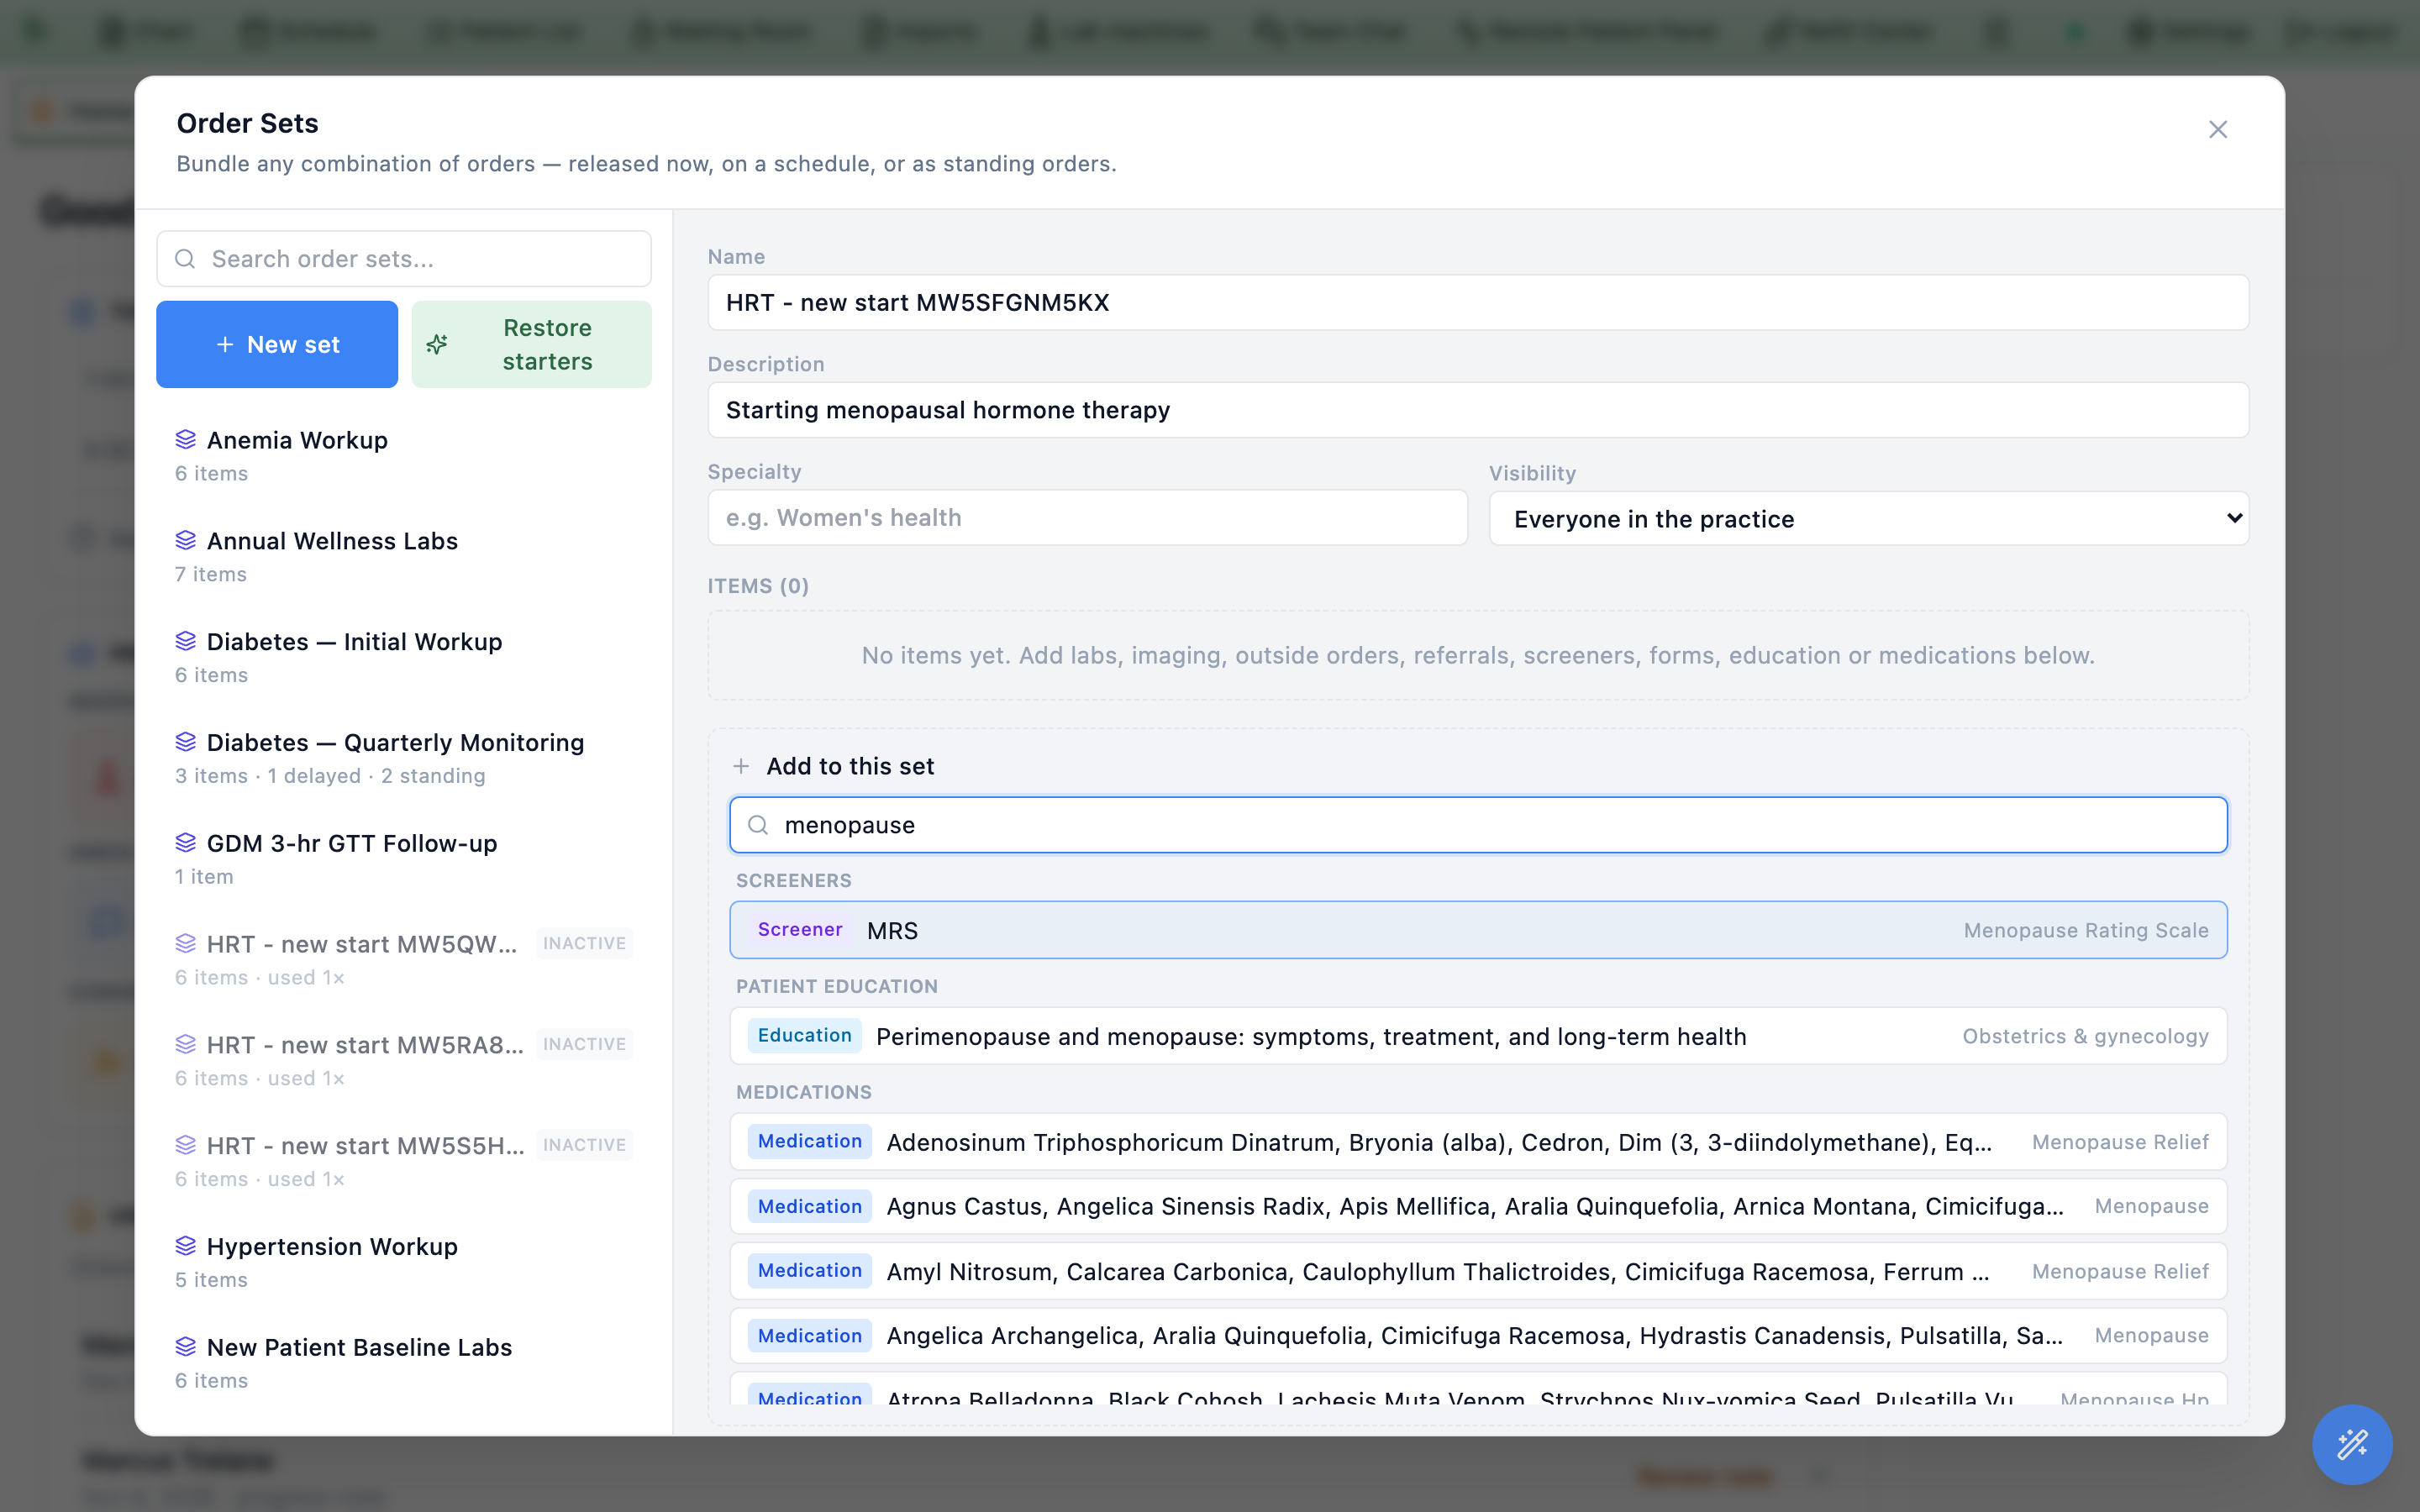
Add to this set finds screeners, handouts, medications and more, grouped by kind.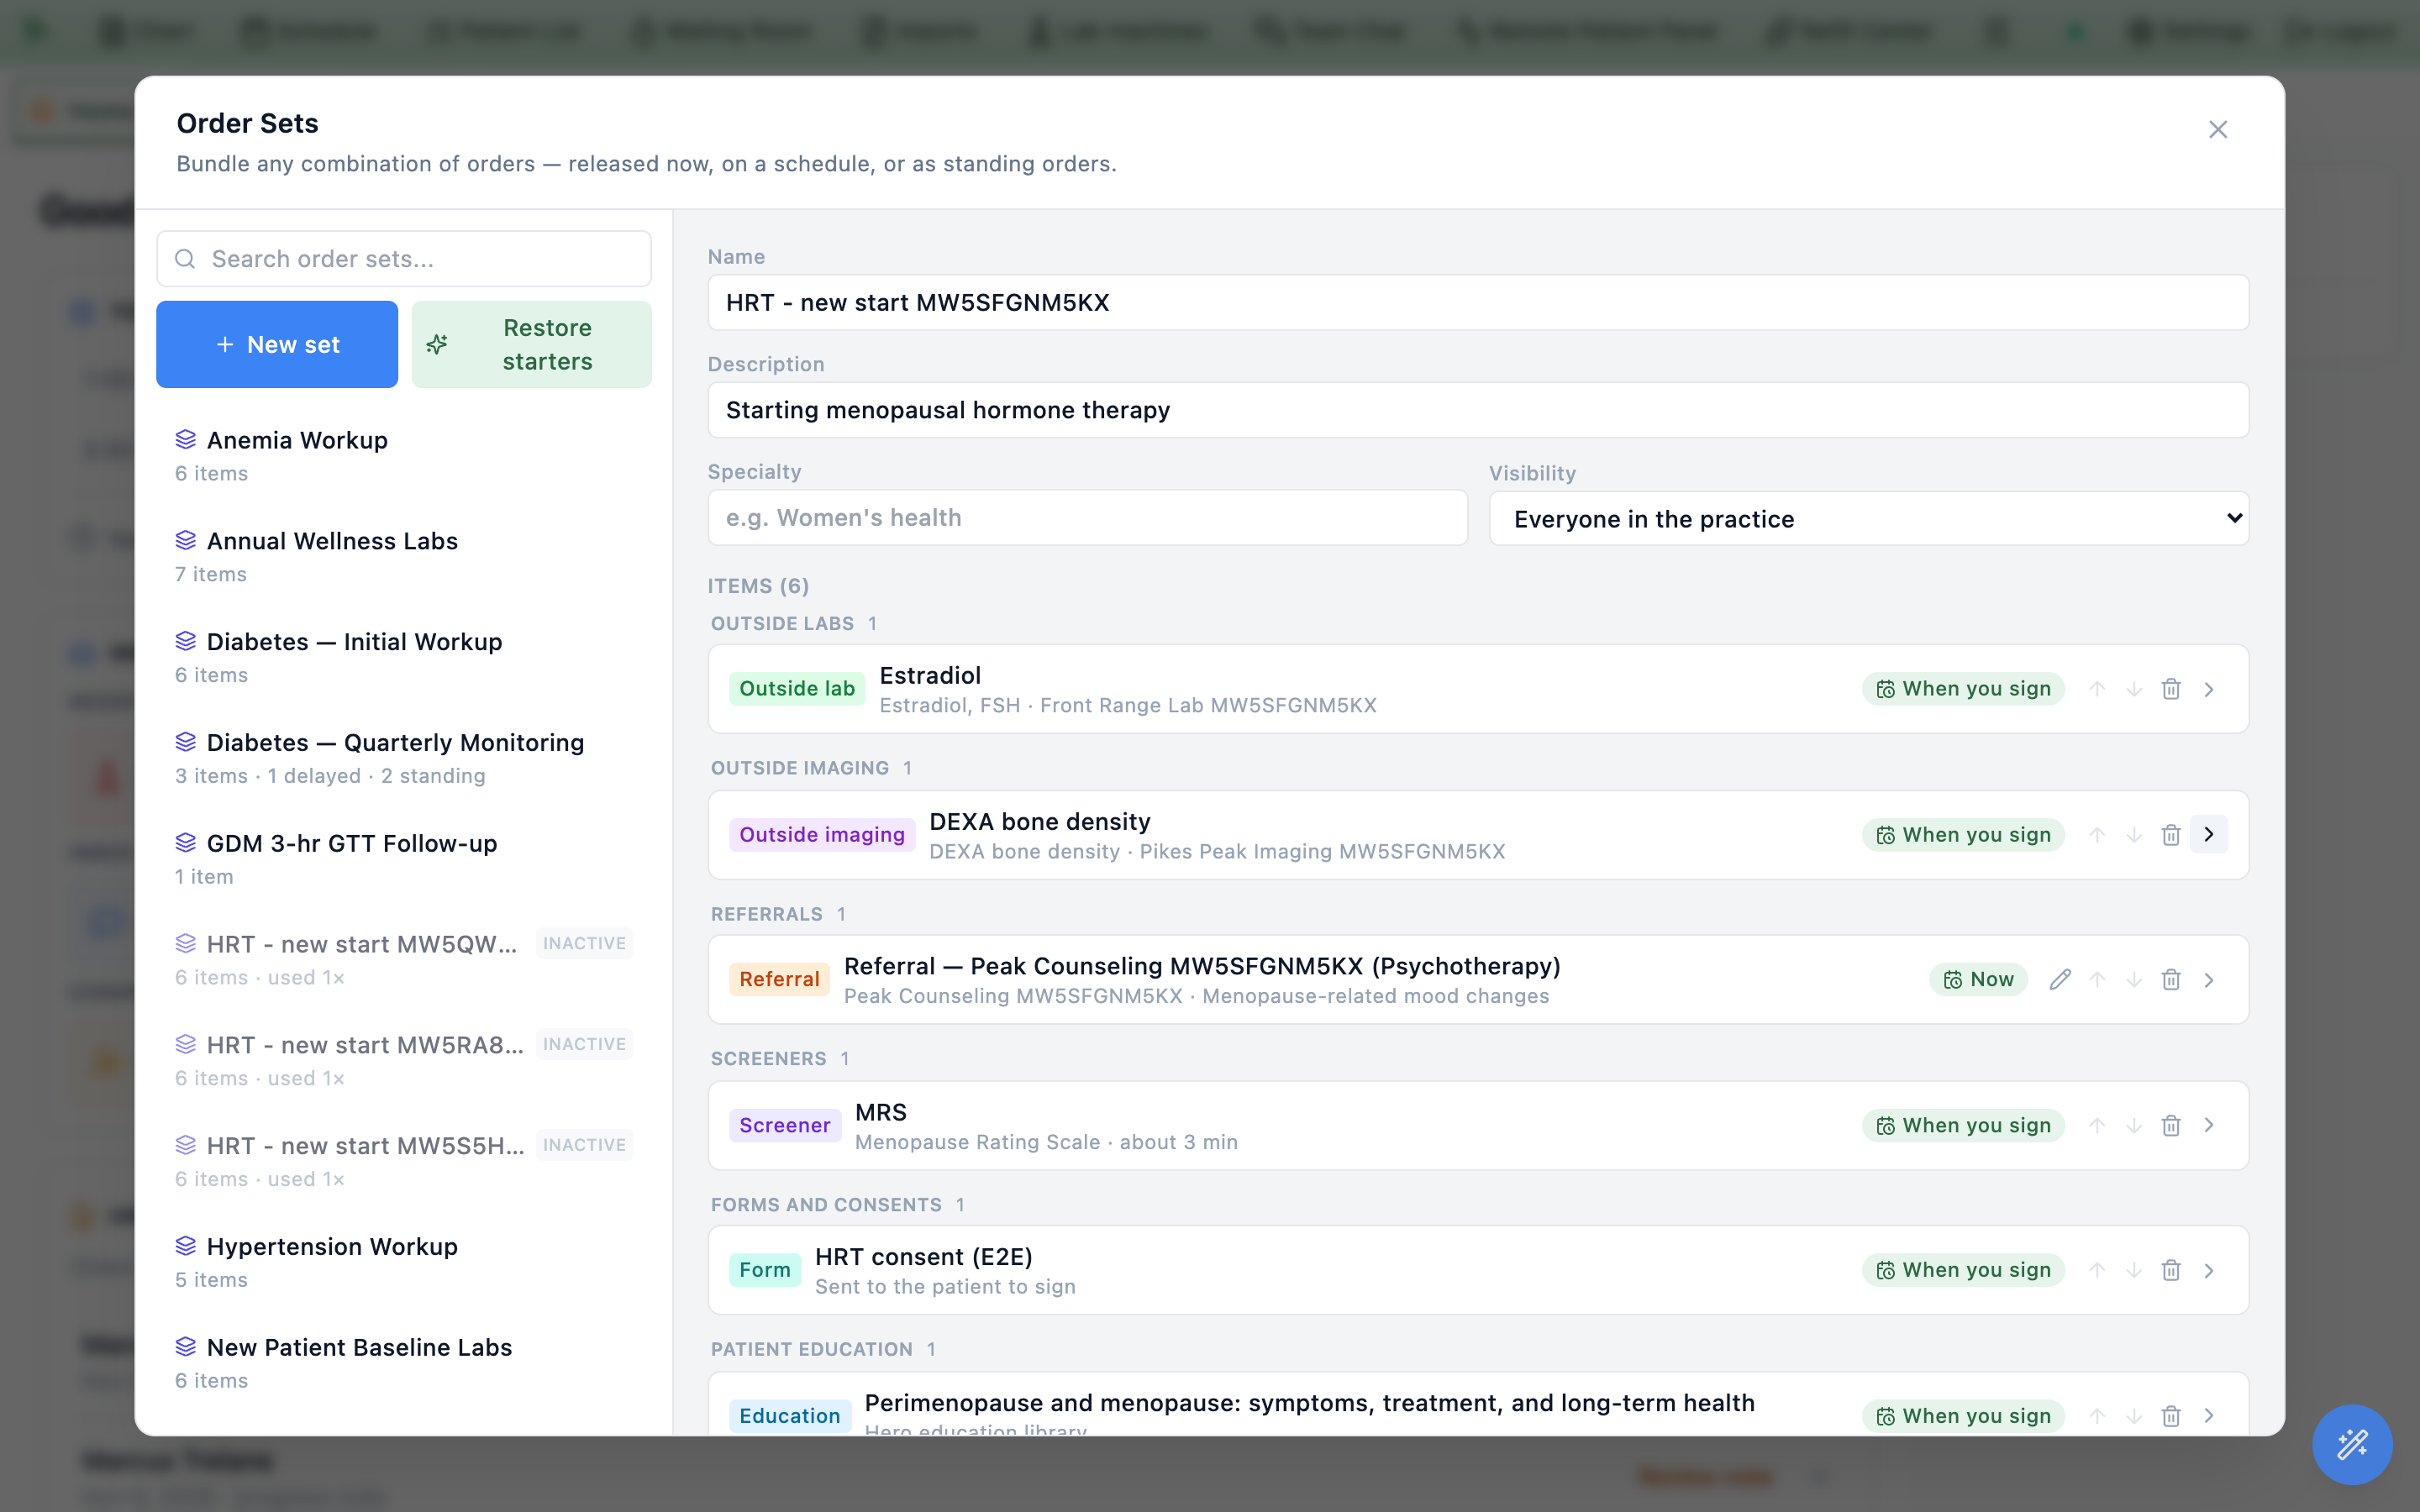
Apply it in a visit
- In the visit’s
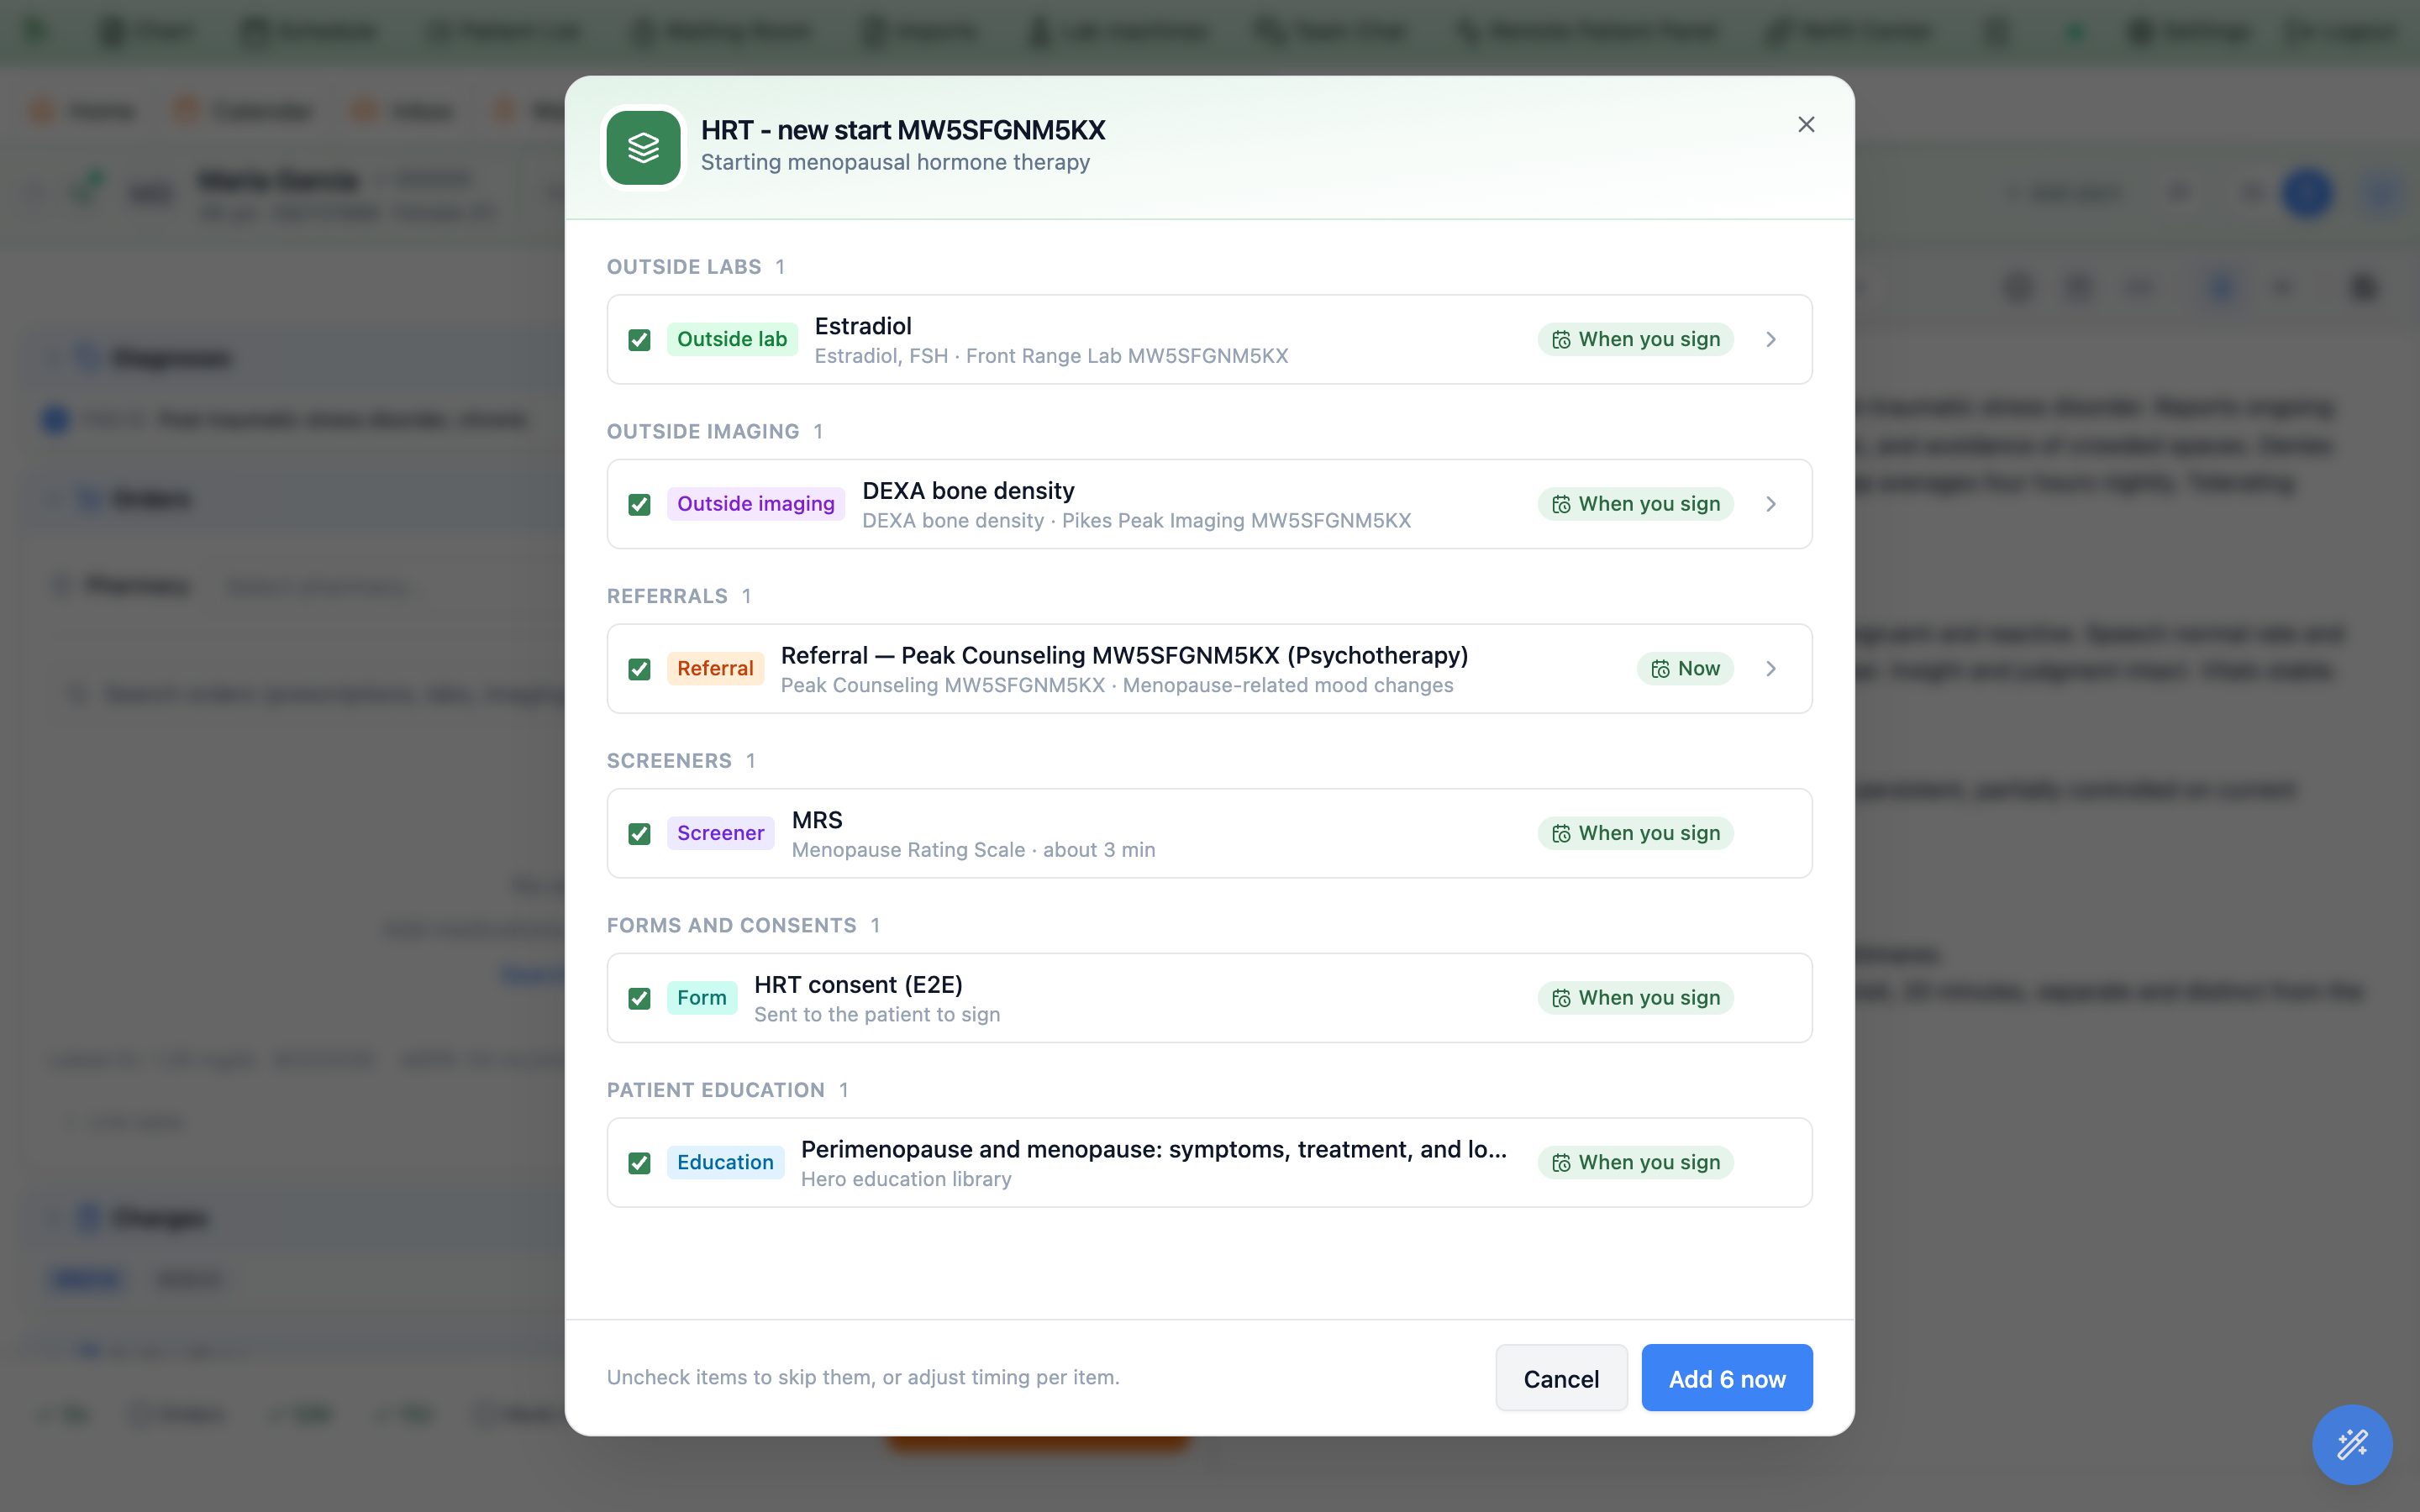
Orders, open the order search and chooseOrder sets. Click the+button next to the search box, choose theOrder setstab and click the set. This works the same in an Inbox conversation’s visit. - Uncheck anything you don’t want. The window shows the whole set grouped by kind, every item checked. The checkbox next to a group’s name unchecks the whole group. Click
Add N now. - Find each item where you’d expect it. The screener is with the visit’s questionnaires and is assigned when you sign; the referral is with the visit’s referrals, with the clinic and reason filled in; forms, handouts and outside orders are listed with the visit’s orders, marked
Sends when you signorOrders when you sign. - Send early if you need to.
Send nowsends a form or handout right away.Review & sendopens an outside order filled in from the set, so you can fax it, send it to the portal or print it now. The trash icon removes anything you don’t need. - Link the screener and the referral to a diagnosis, then sign. Click
Sign & Close Visitas usual. Each item goes out once, even if you sent it early or sign again later. The signed visit lists the outside tests and studies with its other orders.
Good to know
- Unavailable items. An item that can’t be used here shows unchecked with a short reason (for example Outside lab orders aren’t available here, or Open a visit to send this outside a visit). The rest of the set still applies.
- Diagnoses on outside orders. An outside order with no diagnoses of its own uses the visit’s diagnoses on the printed form; an outside imaging order with no clinical indication uses the diagnoses as the indication.
- Faxing is your choice. Signing files the outside order forms in the chart; fax them to the facility with
Review & sendbefore signing, or from the chart’sLabsandImagingtabs afterwards. - With the visit only. Screeners, forms, handouts and outside orders always go out with the visit; they can’t be scheduled for later or repeated. Labs, imaging and referrals still can (Timing).
- Cancelled appointment. A visit whose appointment was cancelled is documentation only: remove the waiting forms, handouts and outside orders before signing it, as with any other unsent order.
- Earlier visits don’t change. Editing a set never changes what an earlier visit already holds.
Apply an order set to the visit
Picking a set from the Order Sets tab opens the apply dialog. It lists every item in the set grouped by kind — for example Labs, Imaging, Outside labs, Outside imaging, Referrals, Screeners, Forms and consents, Patient education, Medications — each with a checkbox, its release timing, and an expander for the detail. The checkbox next to a group’s name unchecks (or checks) the whole group. You confirm what you want, then add it all at once.
- Review what’s selected. Each item’s checkbox is pre-set from the set’s defaults — core items come checked, optional ones (an add-on ultrasound, say) come unchecked. Uncheck anything you don’t want for this patient; it’s skipped without changing the saved set.
-
Open an item for the detail.
Click the chevron to expand a row. Labs show the
Clinical indication, aPriority(Routine,Urgent,STAT), and linkedDiagnoseschips; imaging shows the same fields but labels its selectUrgency(Routine,Urgent,Emergent); medications show the sig and dose; imaging that needs a side shows its laterality. You can adjust any of it here (see Timing). -
Add them.
The action button counts up what you’ll create — e.g.
Add 2 now · schedule 1means two orders staged on the encounter now and one queued for a future release. Immediate items land in the order list; scheduled items go to the Scheduled orders panel.
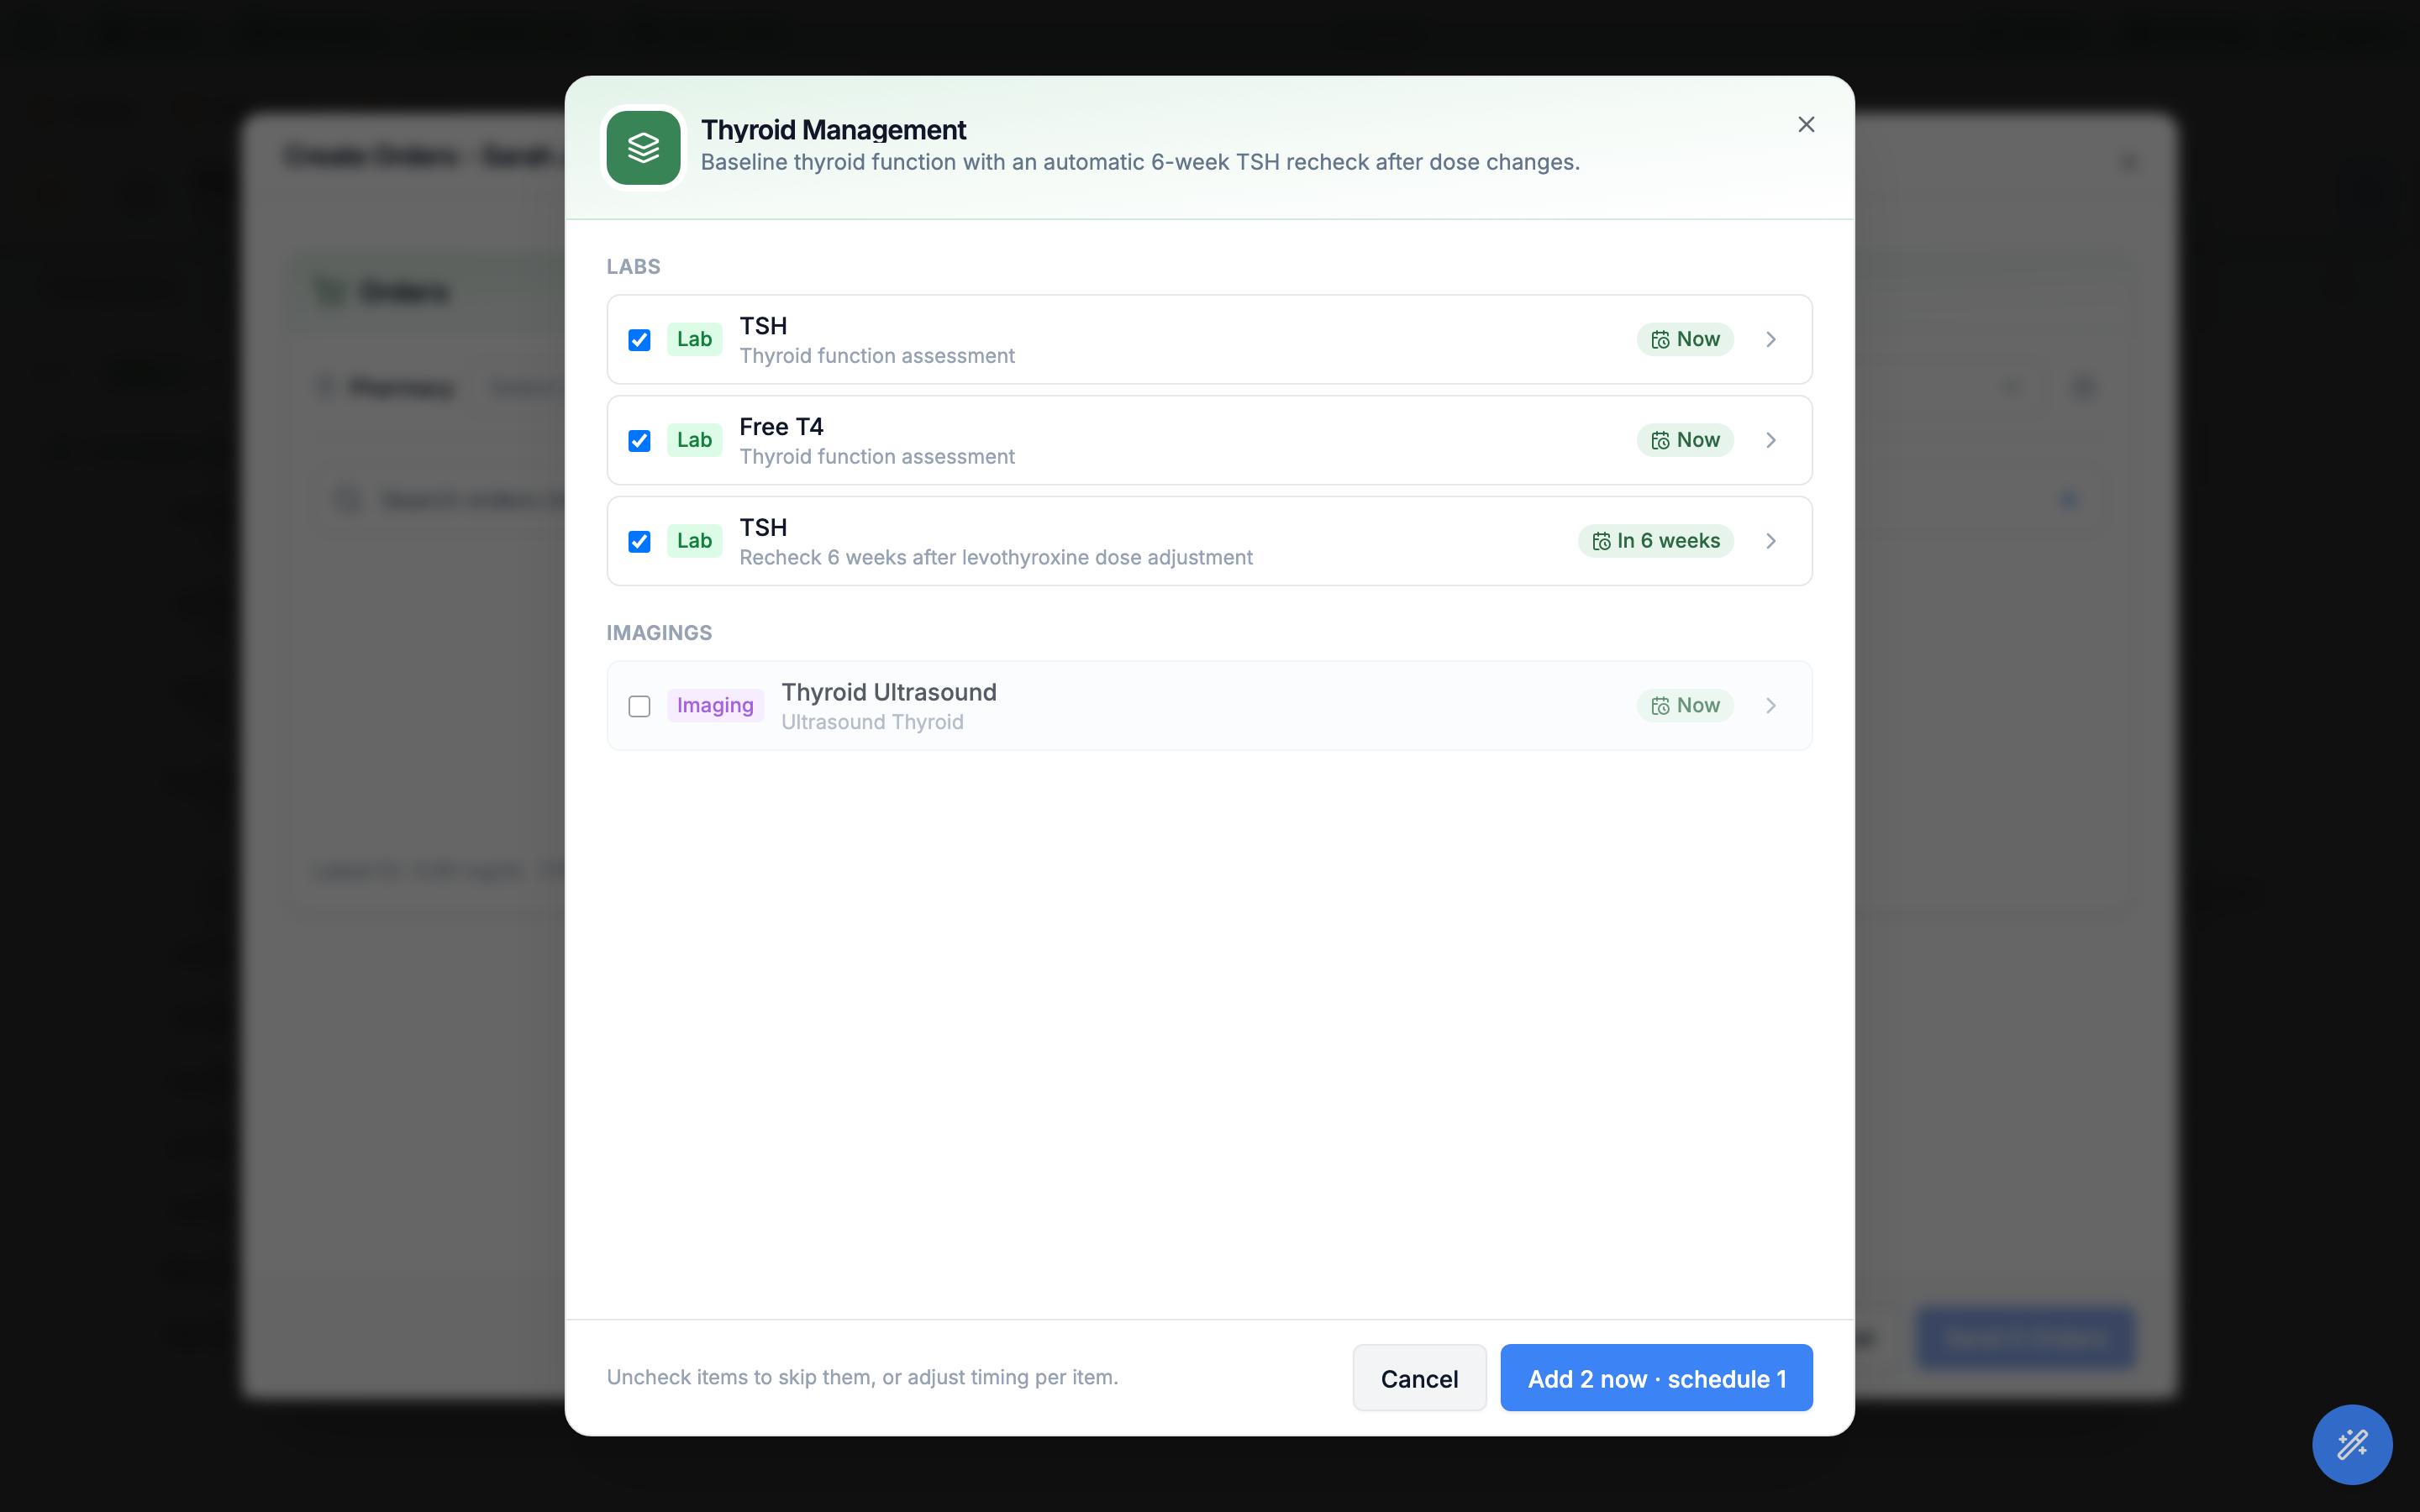
Thyroid Ultrasound is unchecked by default; the button summarizes the result — Add 2 now · schedule 1.Save changes to this set (update the set in place) or Save as new set (spin off a copy). A copy made from a personal set stays personal to you; org-wide sets stay shared. Skip both and your changes apply to just this visit.
Immediate, delayed, and standing
The heart of an order set is when each item releases. Every item carries one of three timings — four in obstetrics-enabled practices, which add gestational-age anchoring — set on the item and adjustable at apply time by expanding its row.
| Timing | Applies to | What happens |
|---|---|---|
Now (immediate) | Any order type | Staged as a draft order on the encounter and signed & transmitted with the note — nothing leaves Hero EMR until you Sign & Close the visit. |
After a delay (delayed) | Labs, imaging, referrals | Queued as a scheduled order that releases on a future organization-local date (for example In 12 weeks). Delayed medications use the prescription’s own do not fill until date instead — capped at 364 days. |
Standing order (recurring) | Labs, imaging, referrals only | Releases on a repeating interval — a count of days, weeks, or months × a number of occurrences (up to 24). Each release automatically spawns the next, e.g. Now, repeats every 3 months ×4. |
Pregnancy week (gestational age) | Labs, imaging, referrals — obstetrics practices only, never medications | Anchored to gestational age instead of a fixed date. You give a week window (from 24 to 28 weeks, or a start with the end left blank for an open-ended 10 weeks+) and a milestone key; the item schedules itself once for the patient’s current pregnancy, so it can’t also be a standing order. |
Expand any item in the apply dialog to see and change its Release (Now, After a delay with the interval and unit, or Pregnancy week where it’s offered), its Standing order repeat toggle, and its Clinical indication, Priority (Urgency on imaging), and Diagnoses. A short note under the controls spells out the schedule in plain language — “Releases automatically 6 weeks after ordering.”
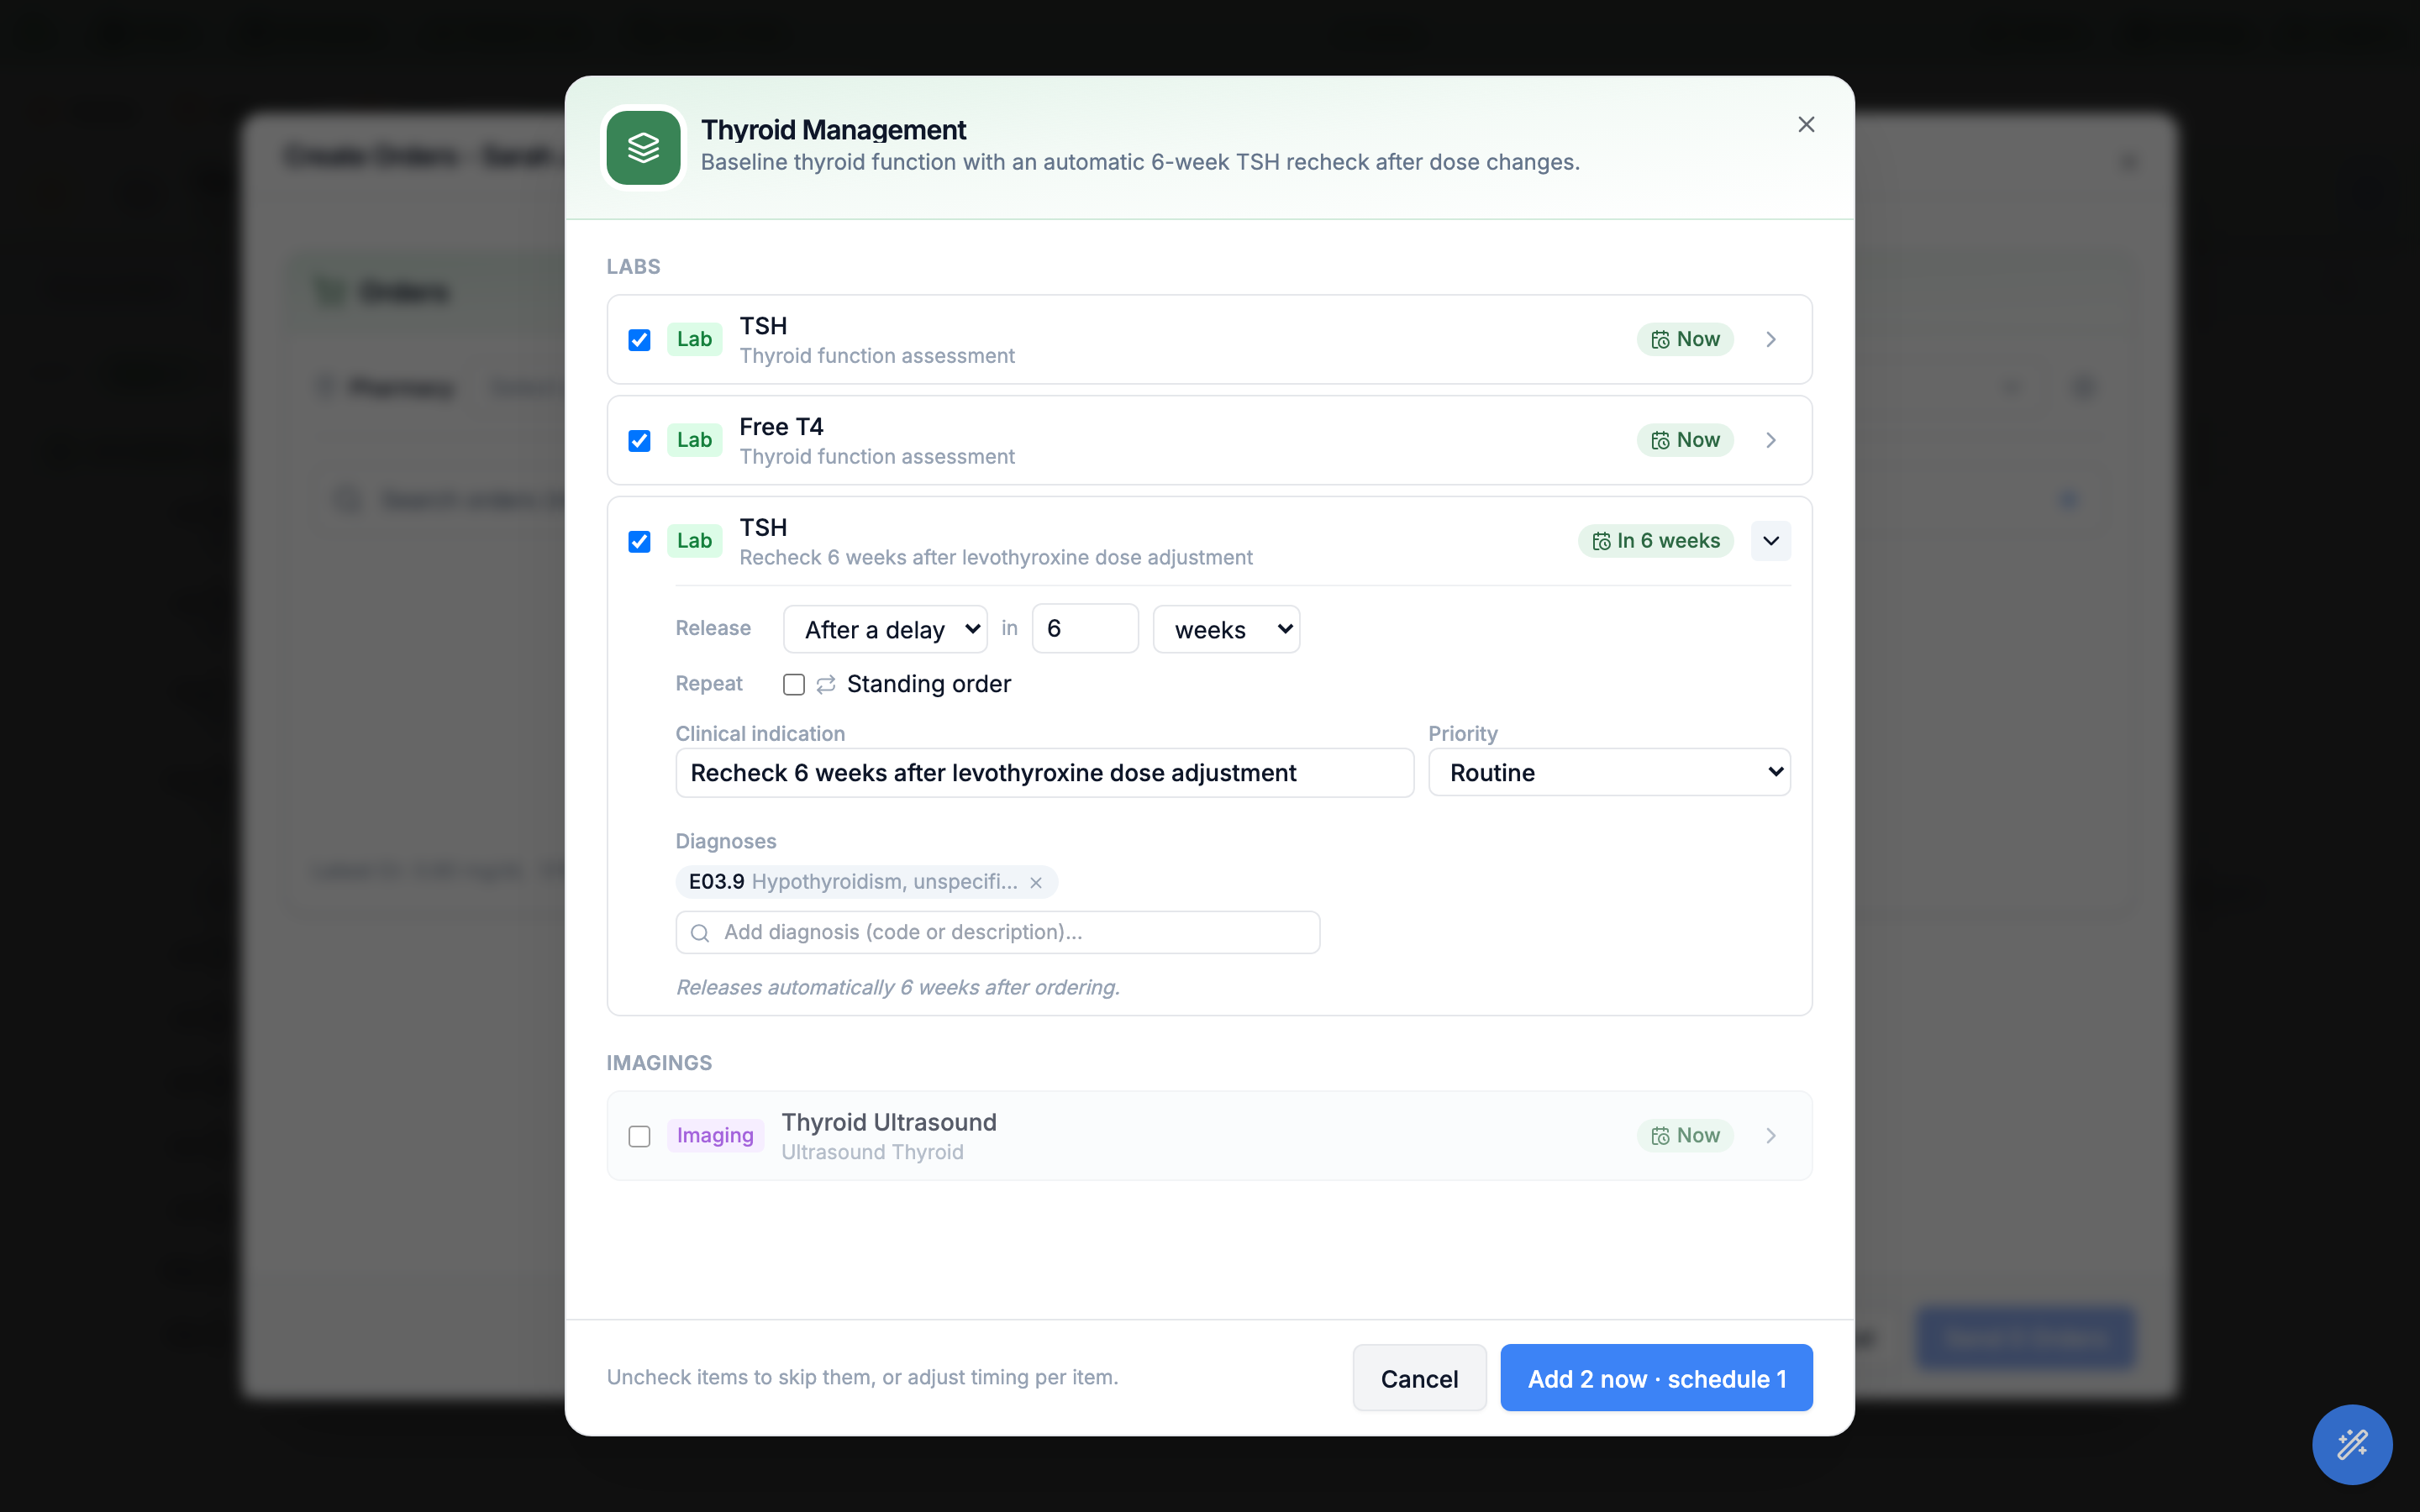
After a delay of 6 weeks, with its indication, priority, and diagnosis. The plain-language note confirms the schedule.do not fill until date.
Not scheduled column giving the reason for each skip — and where a milestone was already ordered this pregnancy, an Order again checkbox lets you deliberately repeat it.
Track releases in the Scheduled orders panel
Delayed and standing items don’t disappear until their date — they collect in the Scheduled orders panel inside the encounter’s Create Orders dialog. The panel header shows how many releases are pending and the next date (for example 1 upcoming · next Aug 25, 2026), and each row names the order, its release date, and the set it came from. A lab or imaging order that a signed visit gave a later date or a repeat (its When, see Order labs for a future date) is listed here too, as a Single order.
-
Read the queue.
Each scheduled row shows a type chip (
Lab,Imaging,Referral), the order name, the release date, andfrom <set name>(orSingle order) so you know its origin. A repeating order shows how often it repeats and how many are left, or until cancelled. Failed releases stay here too, flagged with the reason they didn’t fire. -
Release early or cancel.
Release nowfires a scheduled order immediately instead of waiting for its date.Canceldrops a single upcoming release; for a standing series,Cancel seriesstops all remaining occurrences at once. -
Let releases happen on their own.
On each item’s date Hero creates the order and sends it where signing the visit that day would have: a Quest test goes to Quest, a Labcorp test is sent to Labcorp for a Patient Service Center draw (or, at a practice that prints Labcorp requisitions, its requisition is prepared to print), and an imaging study booked with RadNet or RAYUS goes to the imaging center, usually within a minute. At a practice that draws Labcorp specimens in the office and orders electronically, a released Labcorp test waits in the chart’s
Labstab asDraw in officeinstead; tests released the same day for the same patient and clinician share one draw (see Record an in-office Labcorp draw). A released referral waits in the referral queue, and a test or study that isn’t matched to one of your lab’s or imaging center’s orders is created unsent, with a note, for staff to complete.
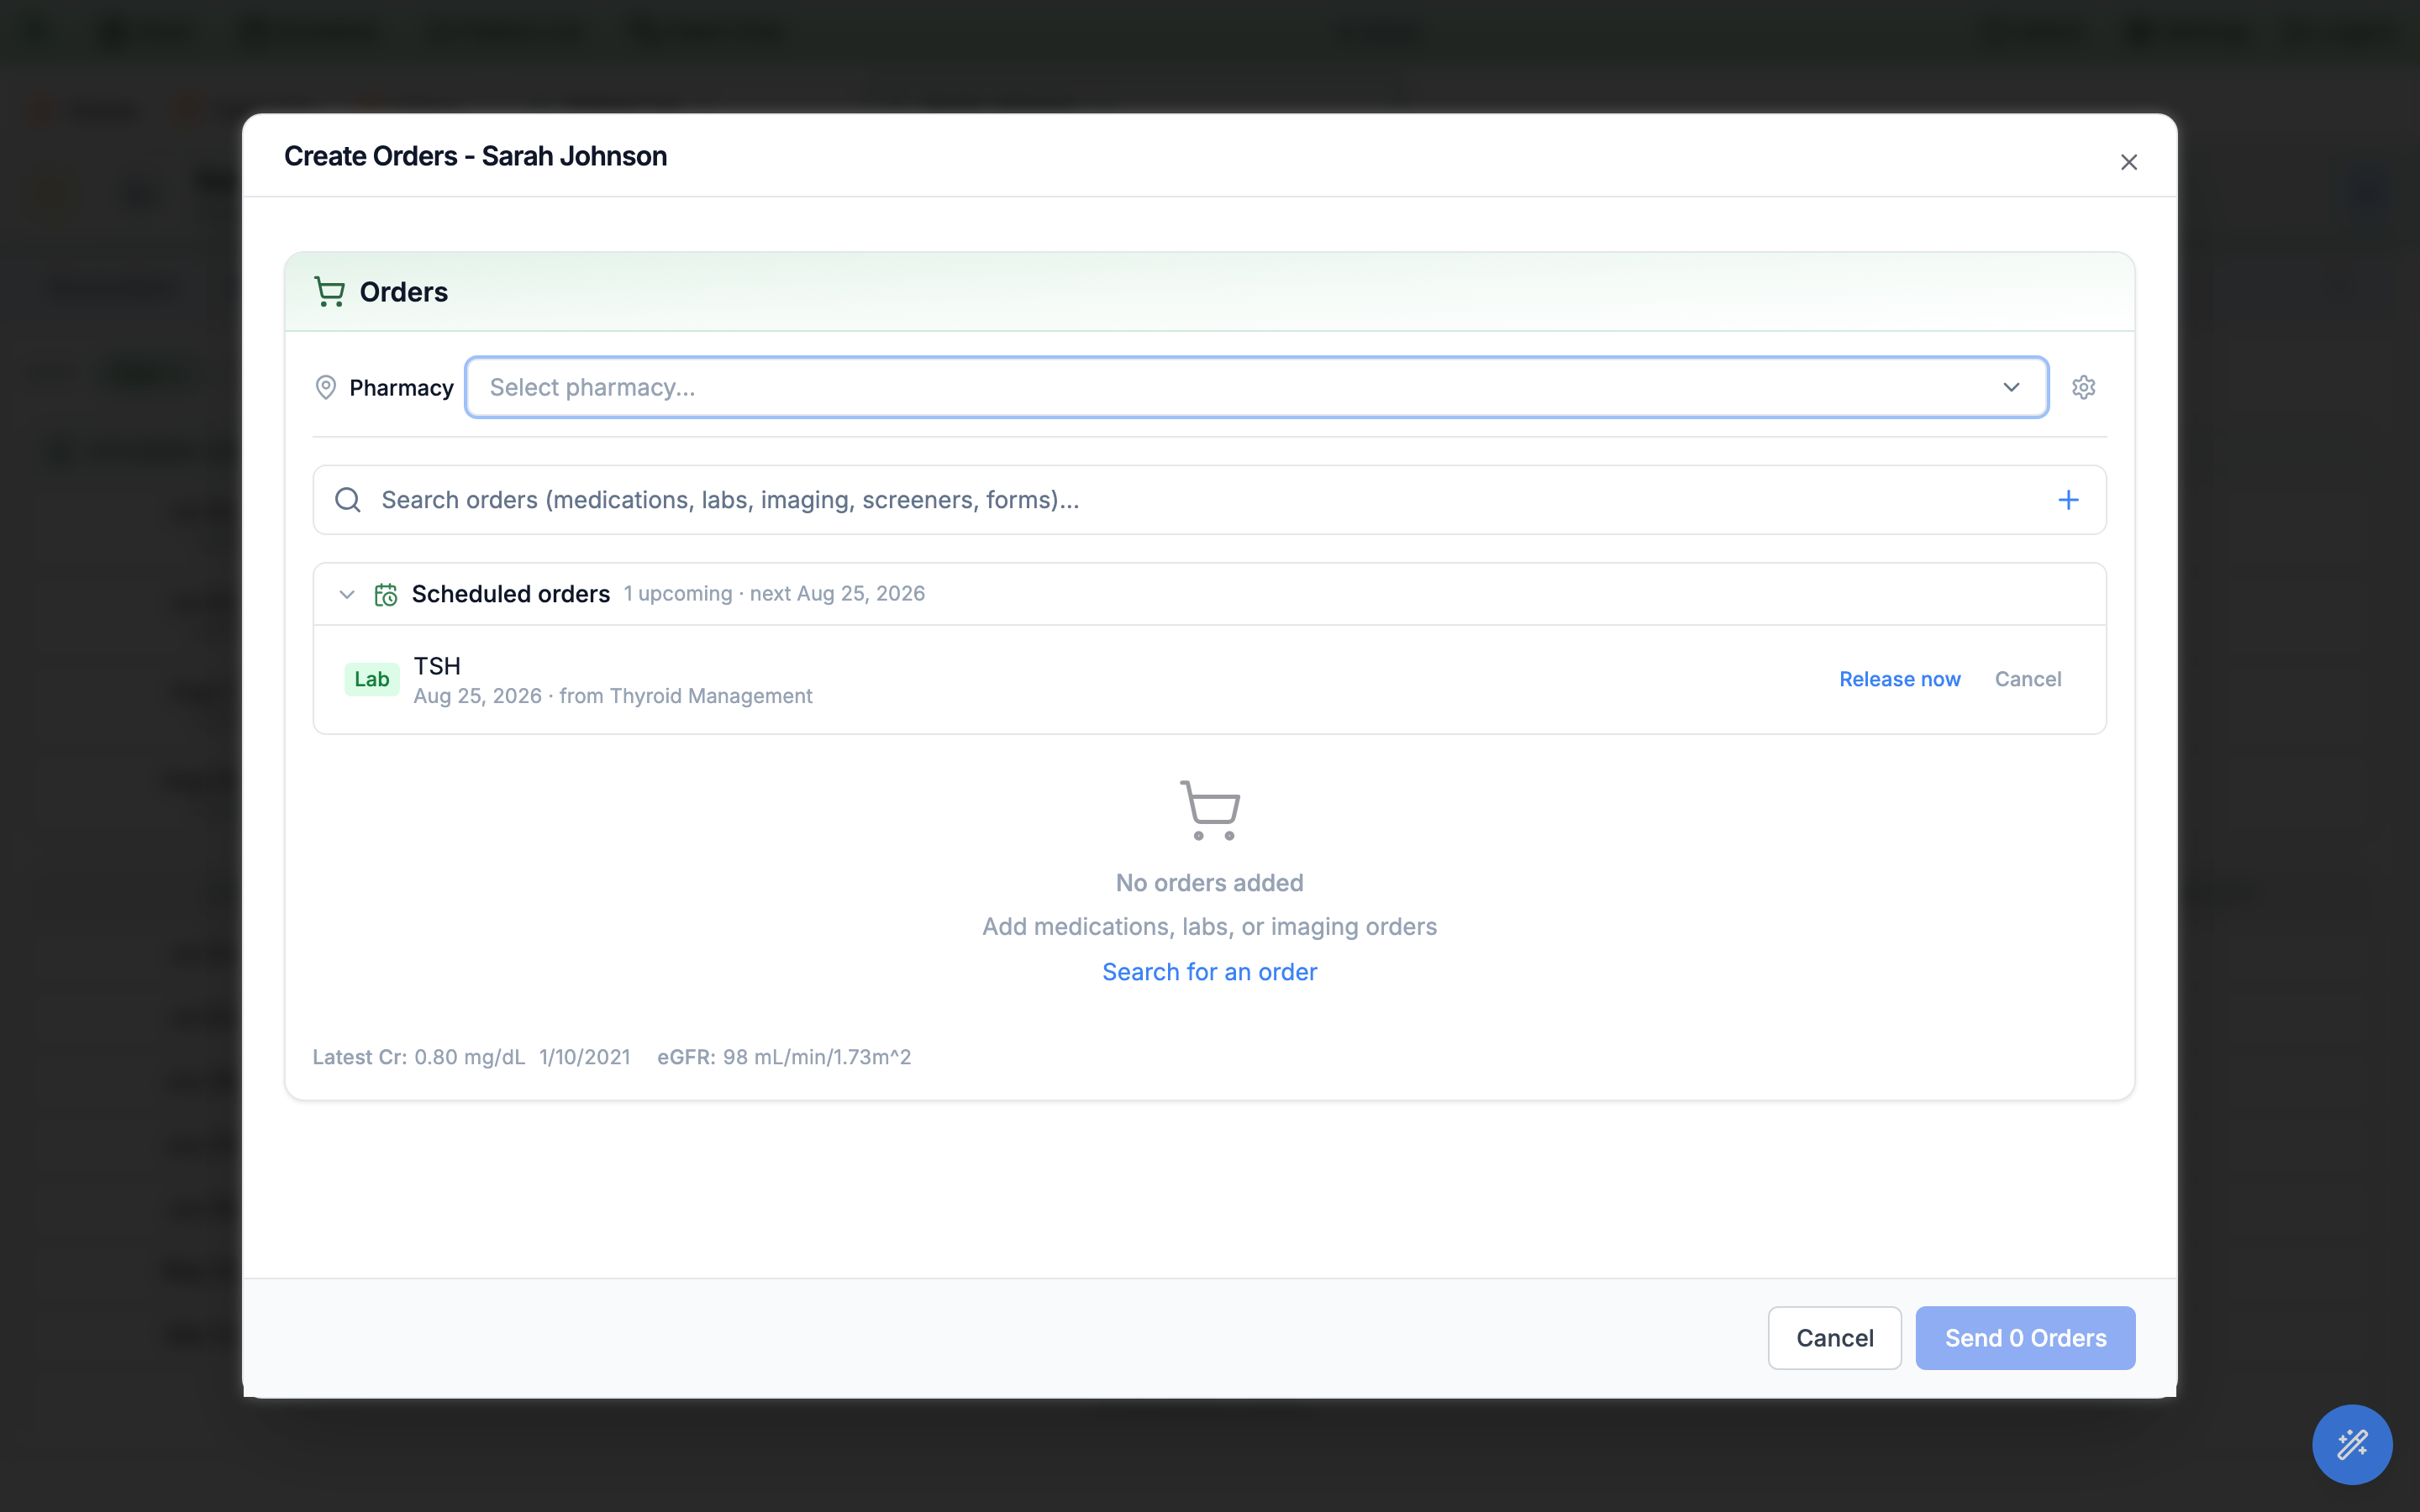
Scheduled orders panel in the encounter’s order entry: a TSH queued for a future date from Thyroid Management, with Release now and Cancel on the row.Cancel (or Cancel series) in the Scheduled orders panel.
Build and manage sets in Settings
Open the editor from the top-right Settings menu → Order Sets. The left column lists your sets with a search box, + New set, and a Starter sets button; the right pane edits whichever set you select. When you have none yet, the pane invites you to create one or add the starters.
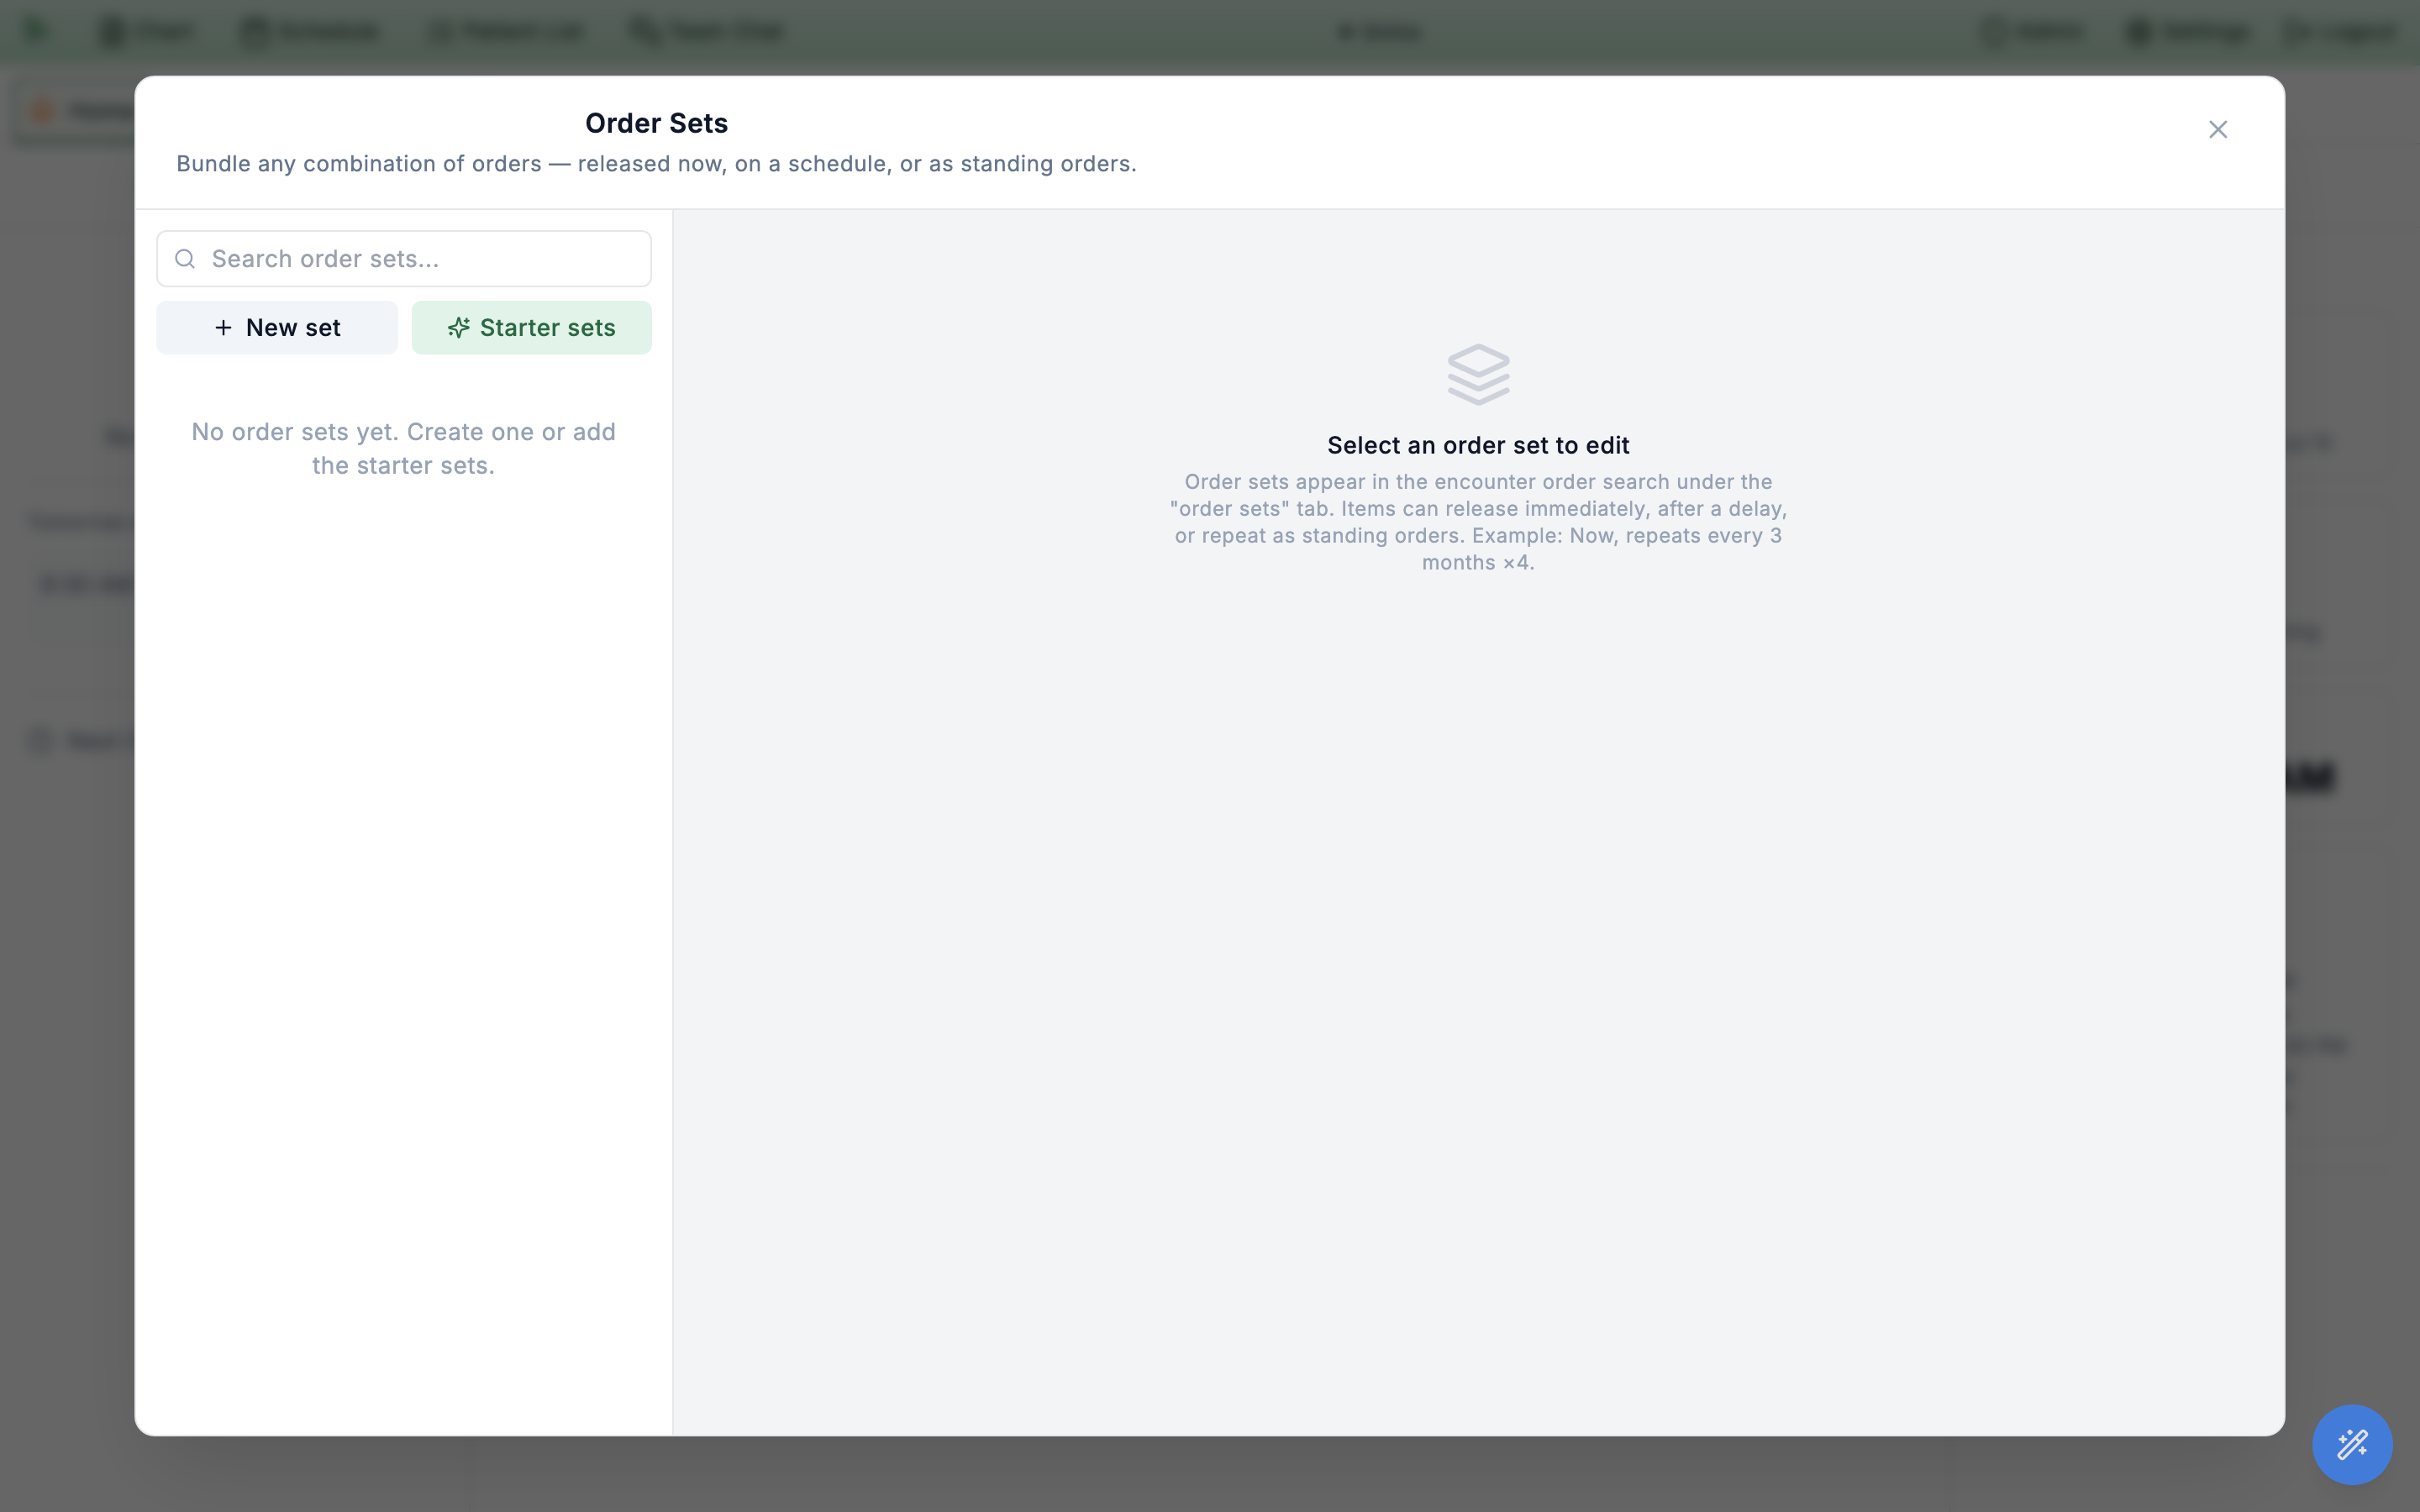
+ New set starts one from scratch; Starter sets seeds the ready-made presets (see Starter sets).-
Name and scope the set.
Give it a
Name, a shortDescription, and aSpecialty.Visibilitychooses who sees it —Everyone in the practice(org-wide) orOnly me(personal). The personal-only choice is gated to the set’s creator. LeaveActivechecked to make it available in the order search. -
Add items.
In
Add to this set, type what you want. One search finds every kind at once, grouped: labs and imaging from your catalogs, screeners, forms and consents, education handouts and medications, then the words you typed as anOutside lab, anOutside imagingstudy or aReferral. Use the arrow keys and Enter, or click. Items are listed by kind; reorder them with the up/down arrows or remove them with the trash icon (6.15a). -
Configure each item.
Expand an item to set its
Display name, whether it’sPre-checked when applying(the default-selected state), itsReleasetiming andStanding orderrepeat, itsDiagnoses, and aNotesline that shows when the set is applied. -
Save, duplicate, or delete.
Save changescommits your edits.Duplicateclones the set as a starting point for a variant;Deleteremoves it.
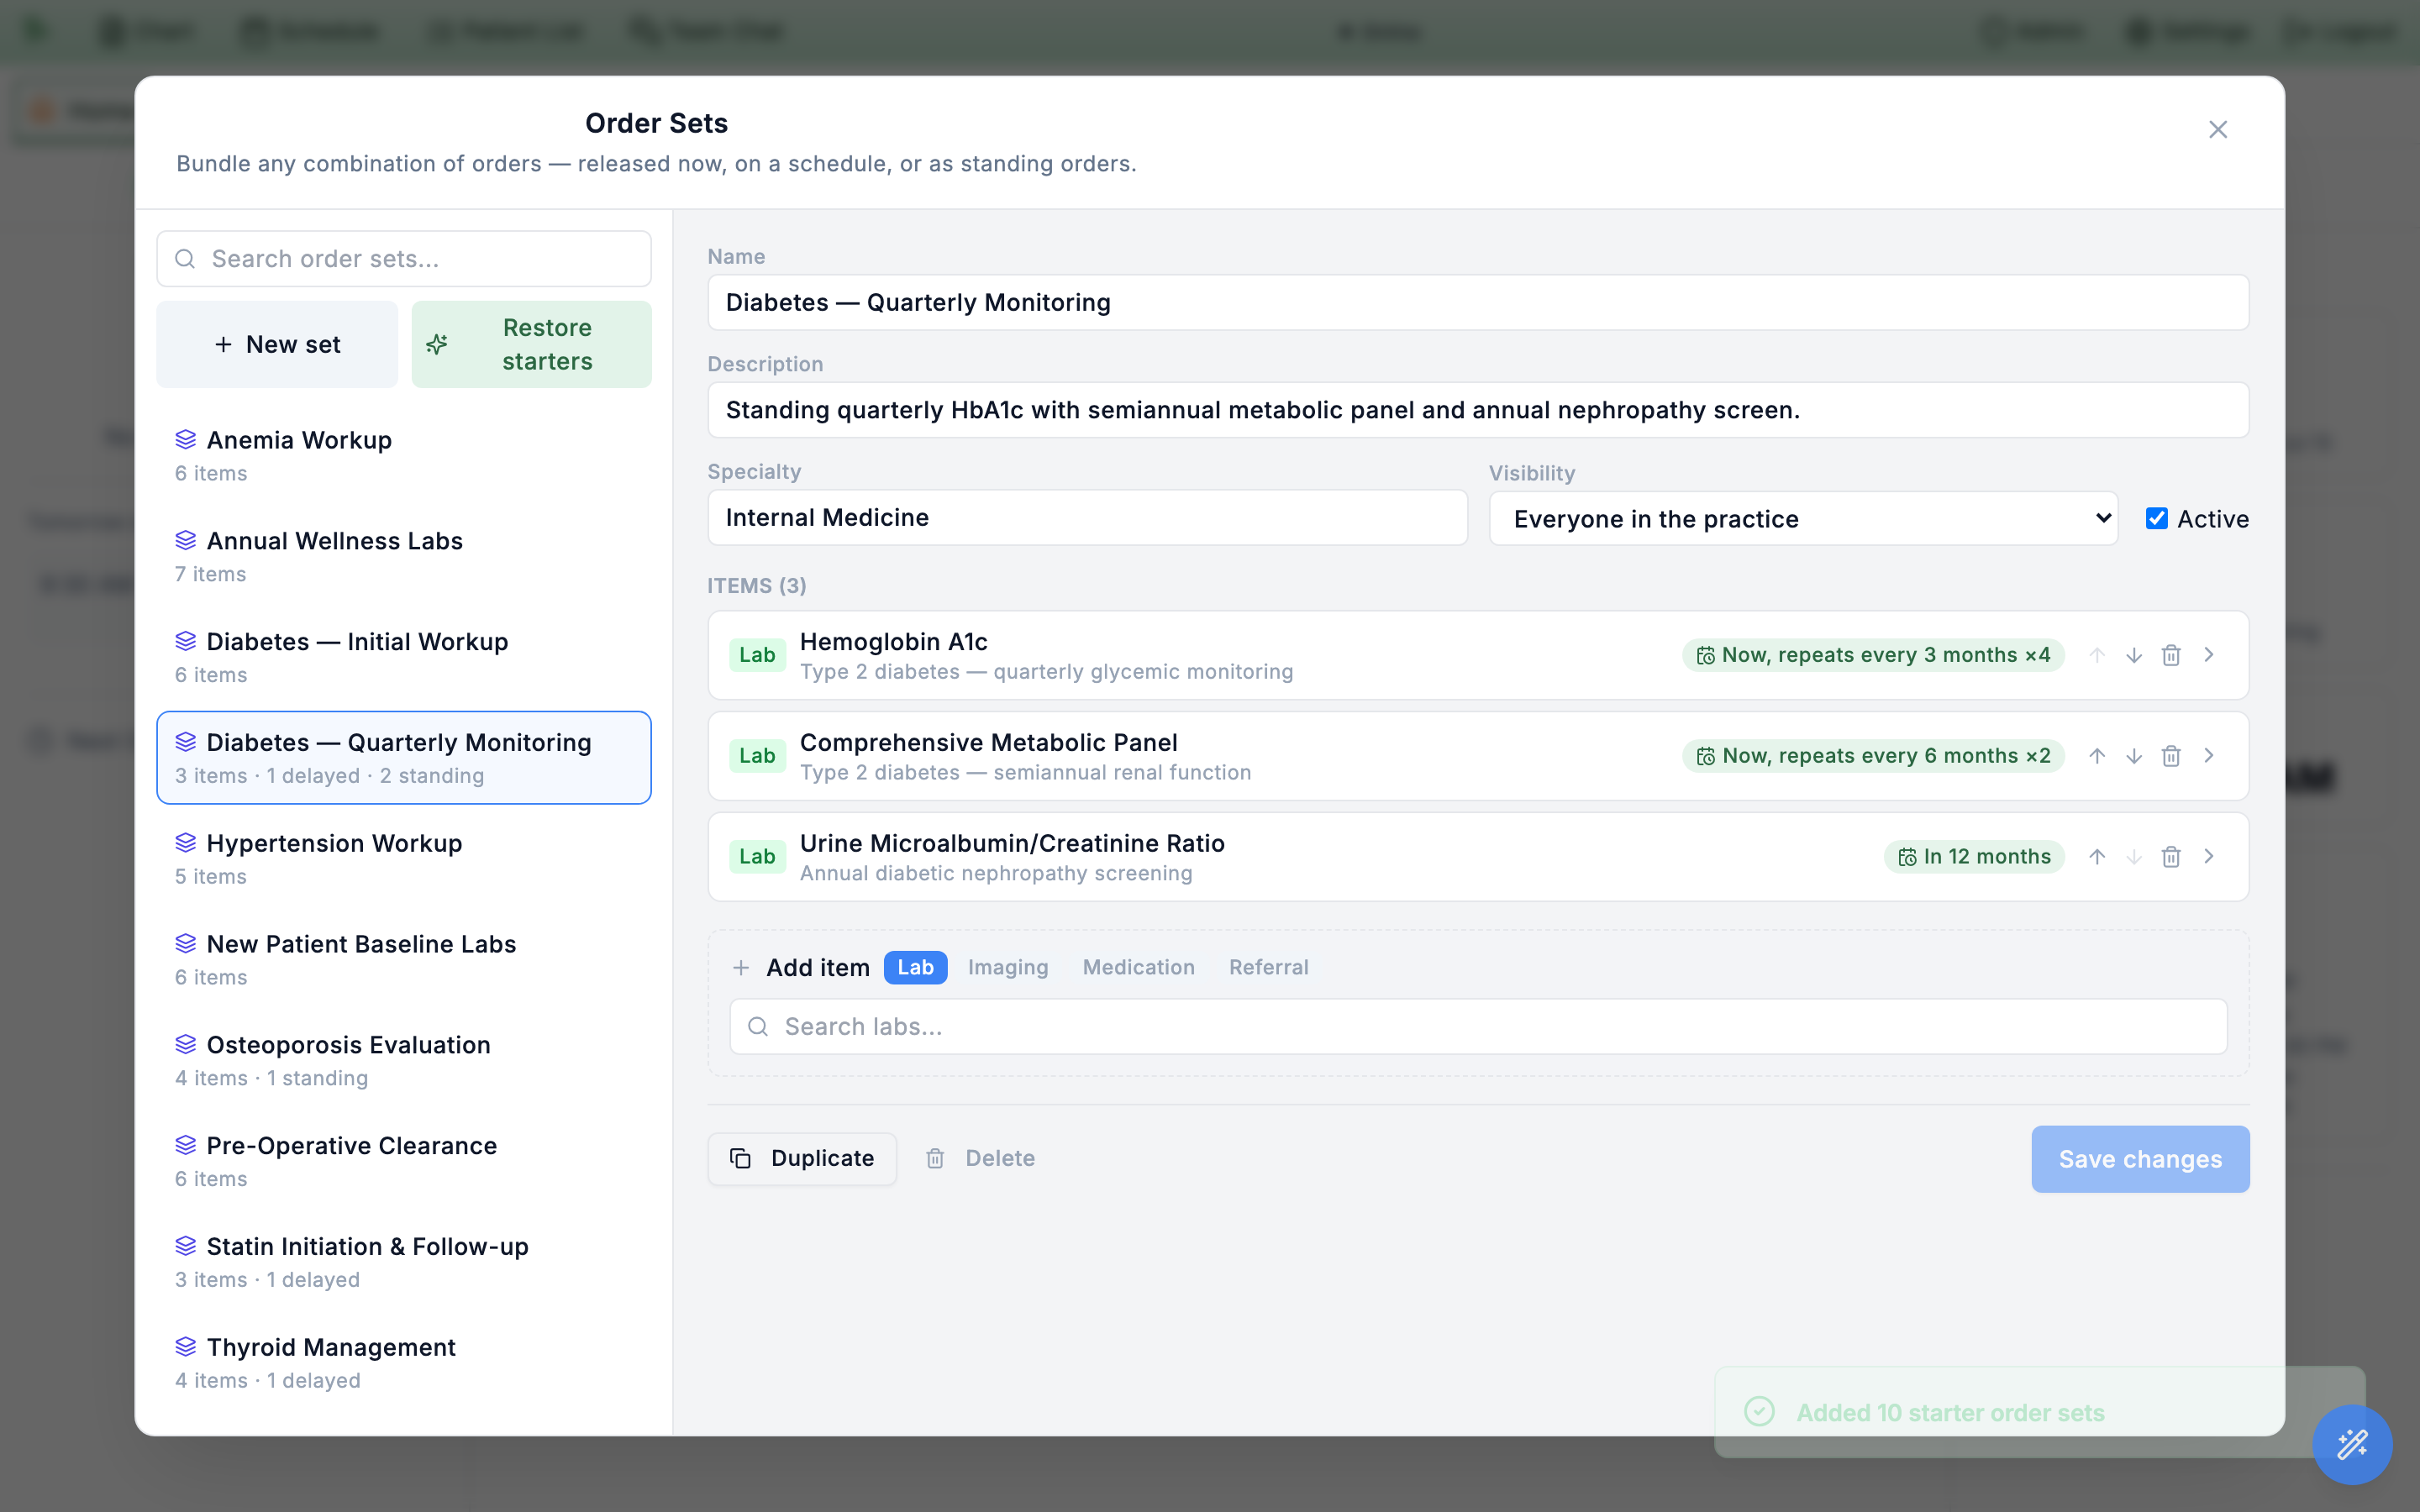
Visibility up top, then each item with its timing badge — standing (Now, repeats every 3 months ×4) and delayed (In 12 months).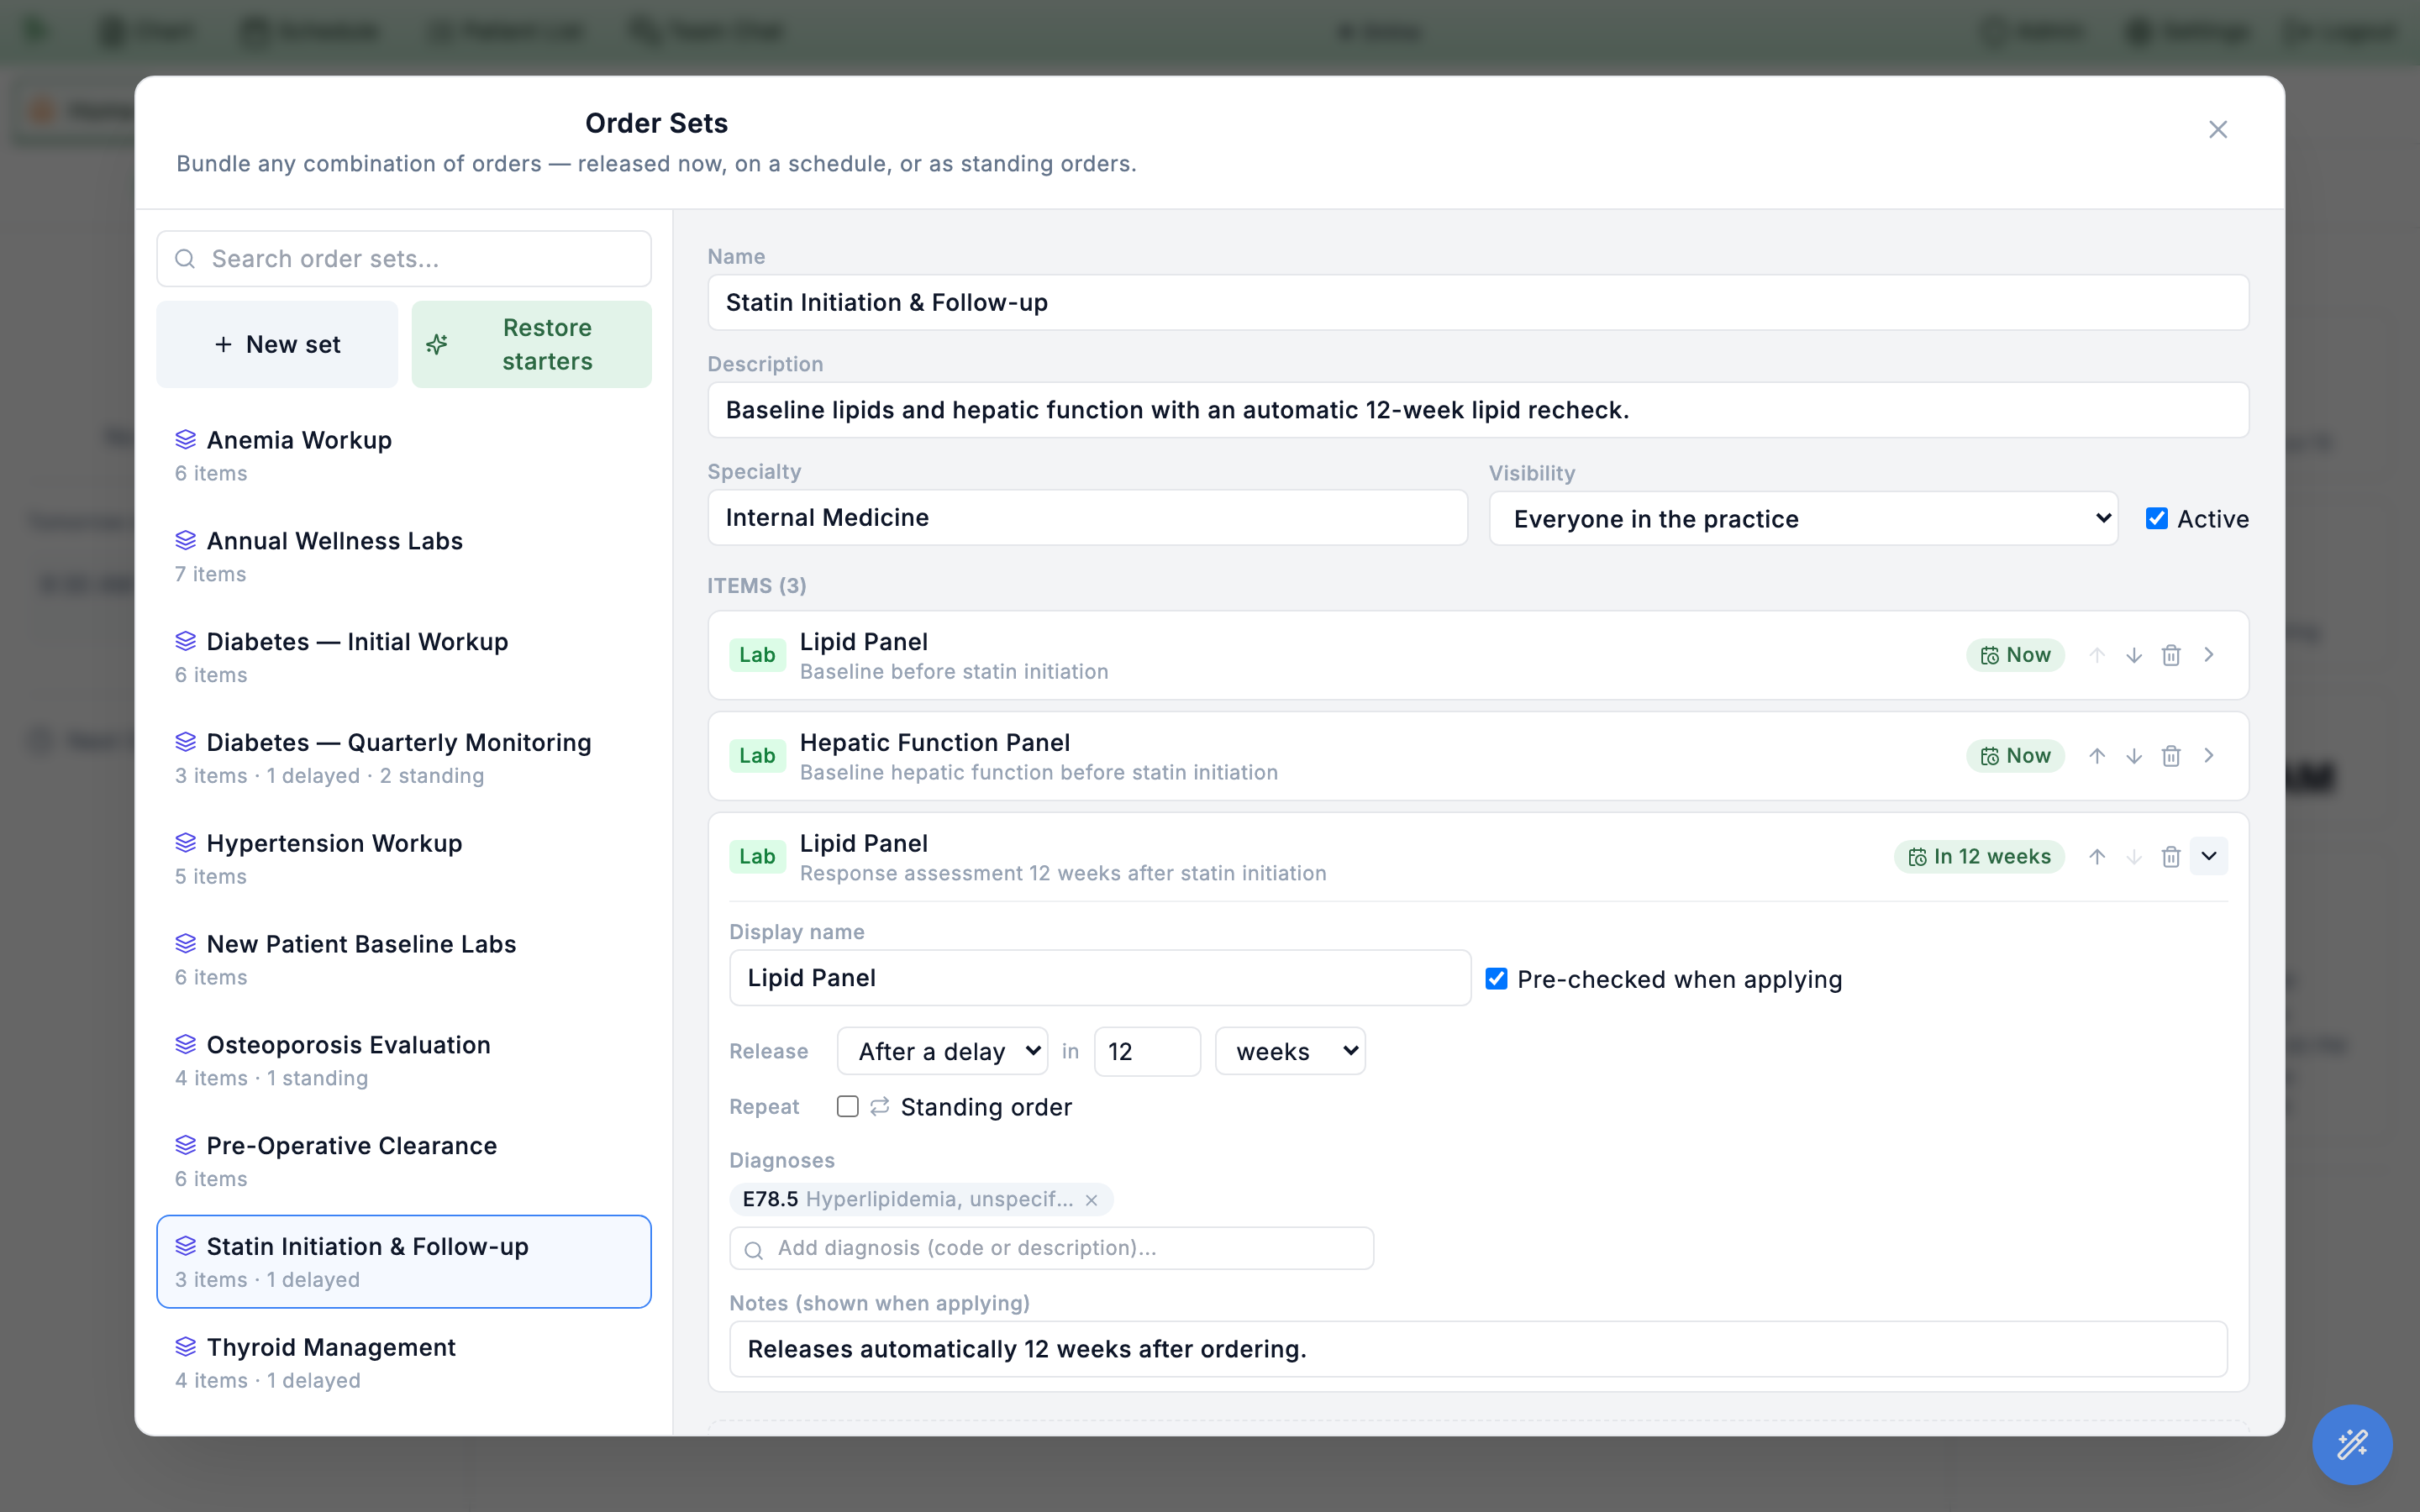
Pre-checked when applying, the Release timing (After a delay of 12 weeks here), the Standing order toggle, linked diagnoses, and an apply-time note.Seed the ten starter presets
You don’t have to build a library from scratch. The Starter sets button seeds ten built-in internal-medicine presets in one click. It’s idempotent — running it again only fills gaps rather than creating duplicates — and once sets exist the button reads Restore starters. A toast confirms how many were created — Added 10 starter order sets — or Starter sets already present when there was nothing to add.
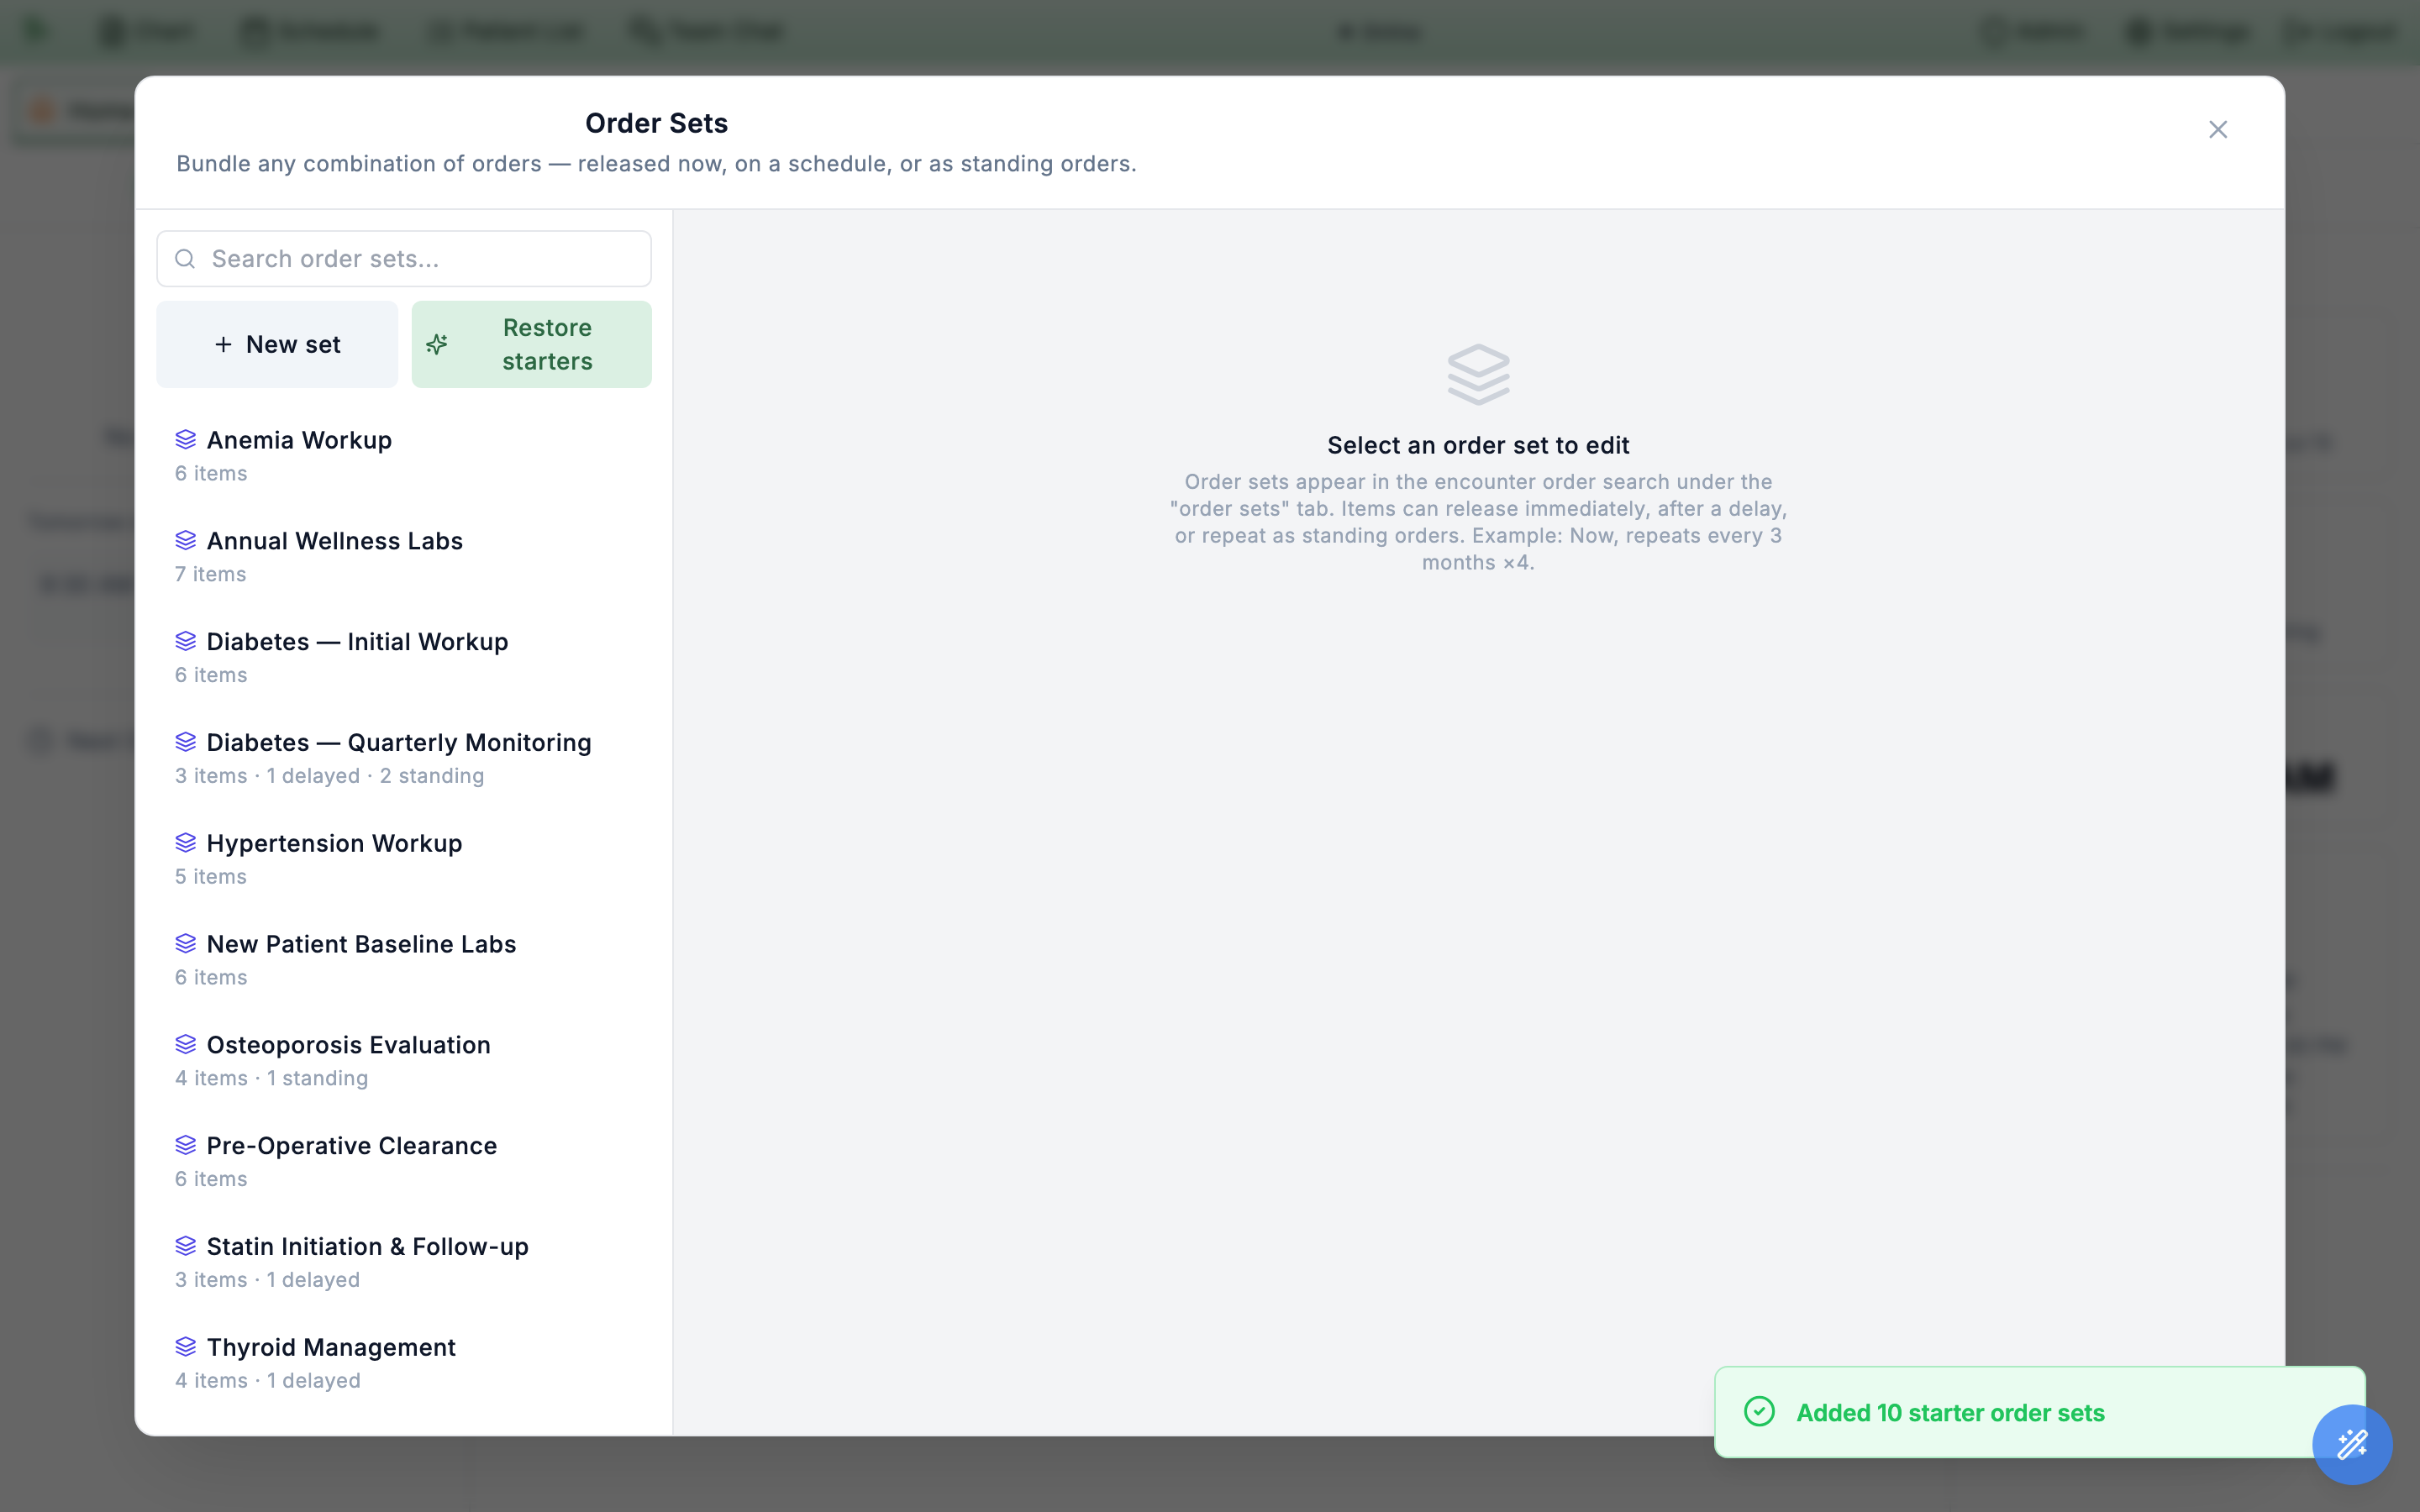
delayed / standing tallies show at a glance which sets schedule follow-up work.The ten presets are ready to apply as-is or to duplicate and tailor:
- Anemia Workup — initial laboratory evaluation of undifferentiated anemia (CBC, reticulocyte count, ferritin, iron/TIBC, B12, folate).
- Annual Wellness Labs — a comprehensive adult preventive-visit screening panel.
- Diabetes — Initial Workup — the newly-diagnosed type 2 evaluation, including an ophthalmology referral.
- Diabetes — Quarterly Monitoring — a standing quarterly HbA1c (repeats every 3 months ×4) with a semiannual metabolic panel and an annual nephropathy screen.
- Hypertension Workup — the initial evaluation for newly-diagnosed hypertension.
- New Patient Baseline Labs — baseline labs for new adult patients, including a urinalysis.
- Osteoporosis Evaluation — a work-up with a standing repeat DEXA.
- Pre-Operative Clearance — the pre-op panel, including a chest X-ray.
- Statin Initiation & Follow-up — baseline lipids and hepatic function with an automatic 12-week lipid recheck (delayed).
- Thyroid Management — baseline thyroid function with an automatic 6-week TSH recheck after a dose change, plus an optional thyroid ultrasound.
Obstetrics-enabled practices get more than ten. Alongside the internal-medicine presets, seeding also adds the gestational-age-anchored prenatal sets — Routine Prenatal — ACOG Schedule, Rh-Negative — Pre-RhIG Antibody Screen, and GDM 3-hr GTT Follow-up — so the count in the toast is higher there.
Restore starters anytime to bring back one you deleted.
Guardrails & troubleshooting
Order sets validate the same things a hand-entered order does, both when you apply a set and again when a scheduled item releases. A few guardrails are worth knowing in advance.
Genova labs can’t be in a set
Genova send-out labs need per-order AOE answers and billing details that only the lab editor collects, so they’re filtered out of the set editor’s lab search entirely. A Genova test that is already in a set blocks the apply even when its timing is Now (“Genova labs need the lab editor”) — uncheck it to continue, and order it from the encounter’s Search Orders dialog instead.
Imaging needs its side
Imaging that requires laterality must carry a side (left, right, or bilateral) before it can be added or released.
Scheduled referrals need a destination
A referral that releases later must have a recipient — both a destination name and a 10-digit NPI. Until it does, the editor disables the delayed timing with the hint Add a receiving provider (name + NPI) to schedule this referral.
Delayed meds cap at 364 days
A future-dated medication uses its do not fill until date, which can’t exceed 364 days out.
Duplicates are skipped
If an item in the set is already on the encounter, it’s skipped with a notice rather than added twice.
Labcorp’s questions are asked on the day
An order set saves no answers to Labcorp’s required clinical questions, so a scheduled Labcorp test asks them when it comes due. At an in-office draw, Record collection lists them under the test (Labcorp’s questions for this test) and records the draw with the answers. Otherwise the test waits in Labs as Answer clinical questions; Complete clinical questions on the chip saves the answers and sends the order (or prints the requisition). A scheduled Labcorp test still needs a diagnosis: without one its release fails with the reason (“Associate a diagnosis with Labcorp test …”) and the rest of its series stops.
Releases revalidate
Each scheduled release rechecks the patient, provider, and order bindings before it fires, so stale or broken items surface instead of releasing silently.
A scheduled order didn’t release
Failed releases don’t vanish — they stay in the Scheduled orders panel with the reason they didn’t fire (a provider who was deactivated, a binding that was removed, a validation that no longer passes). Resolve the underlying issue, then Release now to fire it manually, or Cancel the release if it’s no longer needed.
Order Sets tab or a set you expected? The tab only lists Active sets, and a personal (Only me) set is visible only to its creator — check the set’s Visibility and Active flag in the editor. If the library is empty, seed the starter sets.
Need help? Email support@heroemr.com.