Scheduling setup
Configure a physician's calendar foundations: where they work, when, what they offer, and recurring patterns. Everything here is scoped to one physician — pick the right physician first.
Scheduling setup
Configure a physician's calendar foundations: where they work, when, what they offer, and recurring patterns. Everything here is scoped to one physician — pick the right physician first.
Get to the Schedule Manager
Every scheduling setting lives in one place: the Schedule Manager. Open it from the top navigation and pick the physician you are configuring before changing anything — the availability tabs are scoped to that physician.
- Sign in as an admin or as the physician. Admins can configure any physician and see all eleven tabs. A physician opening their own scheduling settings sees only the five Schedule tabs — the organization-wide groups are admin-only.
-
Open
Admin > Scheduling. The Schedule Manager opens with the sidebar pinned toLocationsby default. -
Select the physician at the top of the panel.
Use the
Physician:picker to make sure you are editing the correct calendar.Locations,Weekly Schedule,Templates,Time Off, andVisit Configare per-physician. The picker disappears on the organization-wide tabs, because those settings are not tied to one calendar.
Add and associate practice locations
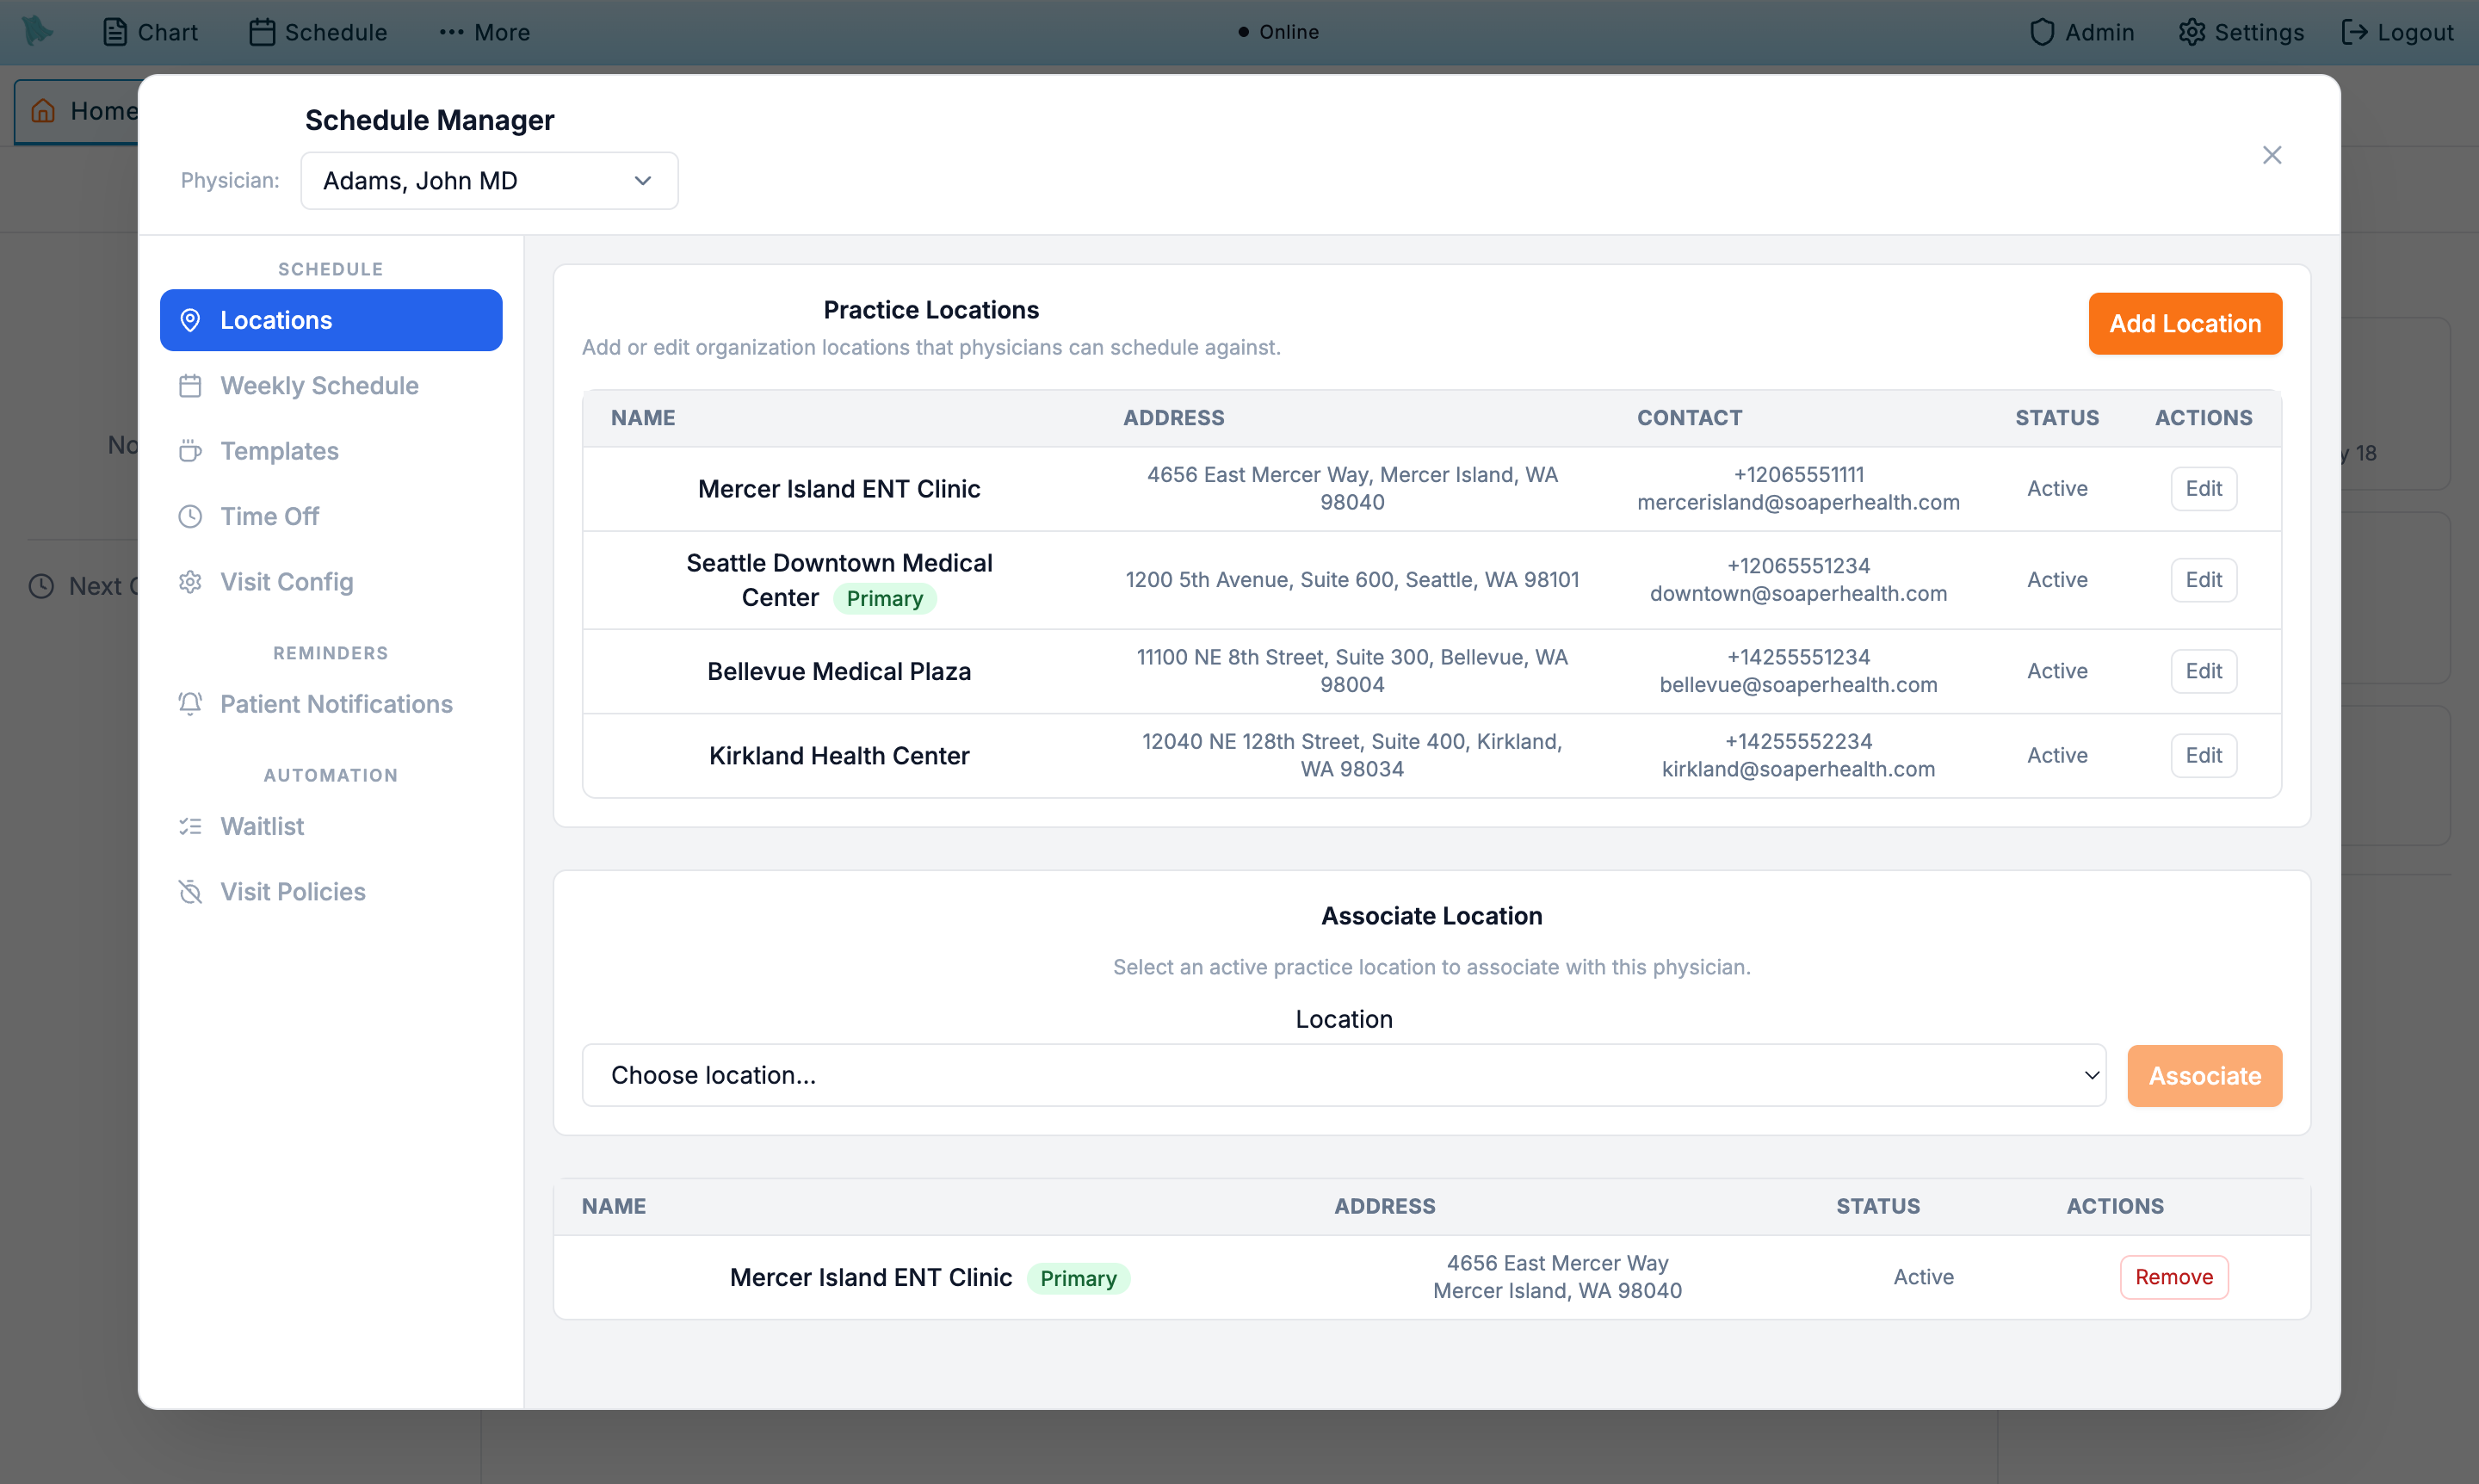
A physician can only be scheduled at locations that are part of the organization and explicitly associated with their calendar. The first physician on a new organization typically also creates the practice's primary location.
-
Open the
Locationstab. The top half shows the organization's practice locations; the bottom half shows the locations associated with the selected physician. -
Add organization locations (admins).
Click
Add Locationand fill the form.Location Name,Phone,Address Line 1,City,State, andZIP Codeare required;Address Line 2,Fax,Office Email,Facility NPI, andStatusare optional. Tick Set as primary practice location for the organization's main site, then clickAdd Practice Location. -
Associate a location with the physician.
In the Associate Location section, pick an active location from the dropdown and click
Associate. -
Set the physician's primary location.
On the physician's associated-locations table, click
Set Primaryon the row they normally work from. This is a separate setting from the organization's Set as primary practice location checkbox — that one marks the practice's main site, this one marks the default for this physician. -
Remove a location if it no longer applies.
Use
Removeon the associated locations table. Existing appointments are not deleted, but new appointments cannot be booked at that location.
Set the weekly schedule
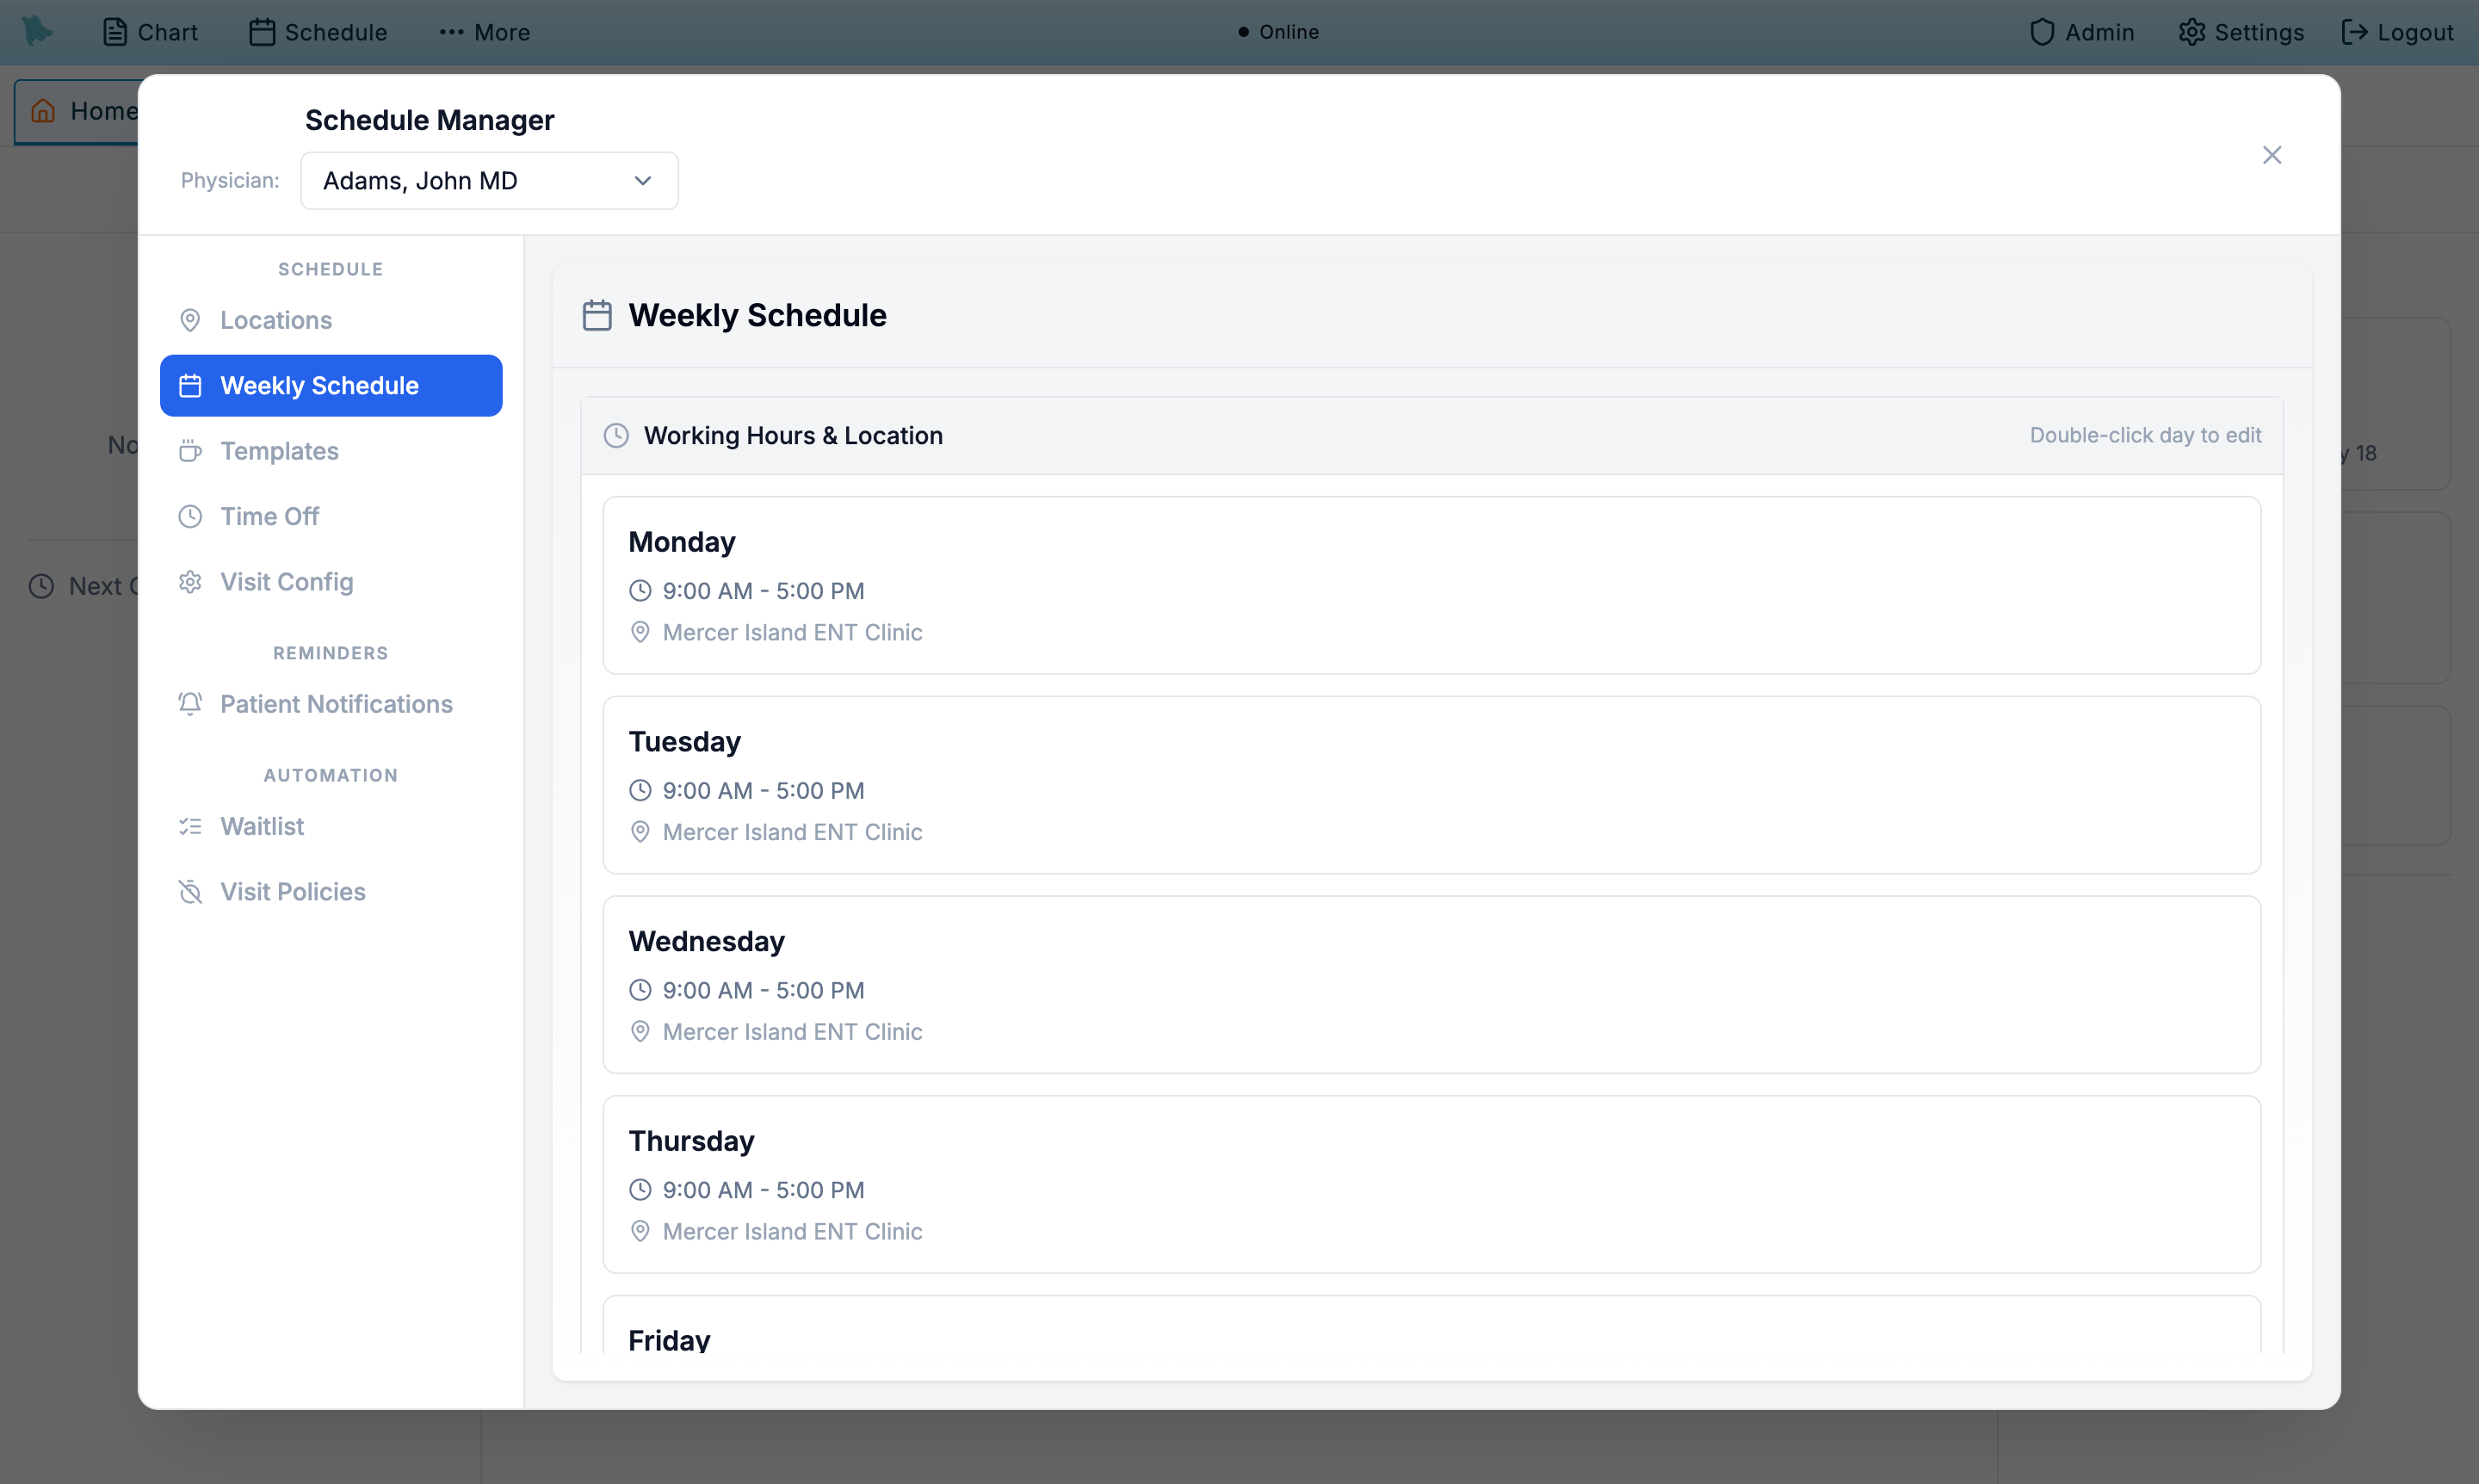
The weekly schedule defines, for each day, whether the physician is working, what hours they are available, and which location those hours are at. Patients can only book within these windows (minus any breaks or time off).
-
Open the
Weekly Scheduletab. You will see seven rows — one per day of the week — showing the current hours and location, or "Non-working day". -
Edit a day's hours.
Double-click the day row or use the
Edit schedulebutton. Set the start and end time, pick the location, and save. -
Mark non-working days.
Double-click the day row (or use the pencil) to put it in edit mode, then click
Non-workingnext toSave. The row then reads (Non-working day) and Not scheduled, and the day is removed from bookable availability. There is no way to save a day with empty hours —Savealways requires a valid time range and a location, soNon-workingis the only way to clear a day. - Repeat for every day the physician works. Different locations on different days are supported — for example, Mon/Wed/Fri at clinic A and Tue/Thu at clinic B.
Build the visit catalog
Visit types are the building blocks of the calendar. Each one defines how long an appointment lasts, what color it is, where it happens (your office, telehealth, the patient's home, or an outside facility such as a hospital or surgery center), whether it is bookable online, and which scheduling guardrails (notice, max-per-day, buffer) apply.
-
Open the
Visit Configtab. A new physician has no visit types — the tab shows No visit types configured. Create at least one active visit type before anything can be booked. Typical starters are an Annual Physical at 45 minutes, a Follow-up Visit at 25 minutes, and a Sick Visit at 20 minutes, but nothing is created for you. -
Click
Add Visit TypeorEdit visit typeon an existing card. The editor opens inline. -
Fill in the basics.
Give the visit a name and a duration in minutes (5–480). The description is optional but shown on the booking page. When you are creating a new visit type you must also pick an
Encounter Type *— the select is only rendered while adding, andSavestays disabled until you choose one. Editing an existing visit type never shows that select: the encounter type is fixed at creation, and the expanded card displays it read-only instead, as an Encounter Type block listing its code, name, and whether it is billable. Picking a telehealth-flavored encounter type (code TV, PC, or EV, or a name containing tele, virtual, phone, or e-visit) pre-selects Telehealth as the setting; picking the Surgery encounter type (code SURG) pre-selects Outside facility with a booking-time length. Available for Online Booking is pre-set from that encounter type's scheduling flag, and Requires Pre-visit Tasks and AI Pre-visit Chat are pre-checked. Change any of them before saving. - Decide whether the length is fixed or set at booking. Tick Set the length when booking for visits that differ case to case, such as surgeries. Staff then pick the length each time they book (quick picks from 30 minutes to 8 hours, or any number of minutes), and the duration on the visit type is only the starting value. Leave it unticked and every booking takes the visit type's duration.
- Say where the visit happens. Where does this visit happen? offers four settings: In office (one of your practice locations, during office hours), Telehealth (a virtual visit; when Zoom is connected a meeting is provisioned automatically), Home / travel (you go to the patient; adds route-based travel buffers), and Outside facility (a hospital, surgery center, hospital outpatient clinic, or nursing facility). Only one applies at a time.
-
For an outside facility, name the facility and the place of service.
Search Facility across your practice's facility list and the NPI registry, or enter one manually (name and street address; the NPI is recommended). The same list serves the rounding module, so a hospital entered once is available everywhere. Then choose Bills as (place of service):
22for a hospital outpatient clinic or campus,24for an ambulatory surgery center,21for an inpatient stay, or19,23,31,32,49,71for the other facility settings. Both are required;Createstays disabled until they are set. - Set the scheduling guardrails. Buffer time, max per day, minimum notice (in hours), and how far ahead patients can book (in days).
-
Choose when the visit type is offered online.
Online booking windows defaults to
All working hours. Switch toSpecific windowsto restrict this visit type to named day/time bands — up to 56 windows a week, each at least 5 minutes long. Windows are intersected with the day's working hours, so patients are only offered times inside both. The visit-type card then summarizes the setting as All working hours, N windows/week, or Staff Only. - Pick the options that apply. Requires Pre-visit Tasks (with the nested AI Pre-visit Chat), Available for Online Booking, Patients can self-schedule (patient portal), Default Visit Type, and Active. Online booking and portal self-scheduling are two independent switches; the card badge reads Public, Portal, Public + Portal, or Staff Only depending on which are on. An outside-facility visit type is always Staff Only: both patient switches are off and locked, because a patient can never book an operating-room block.
- Match the organization's follow-up visit type names. The office / virtual / phone follow-up mapping is an organization setting, not a per-physician one, and it matches by visit type name. The shipped names are Follow-up Visit, Telehealth Follow-up, and Phone Follow-up. Give the physician an active visit type matching the names your organization uses; if nothing matches, Hero EMR falls back to the physician's first active telehealth visit type for virtual and phone follow-ups and their first active in-person type otherwise.
- Choose a calendar color and save. The color shows on day, week, and month views so staff can spot visit categories at a glance. An outside-facility card shows its facility and place of service (for example Providence Saint John's Health Center · POS 22) in place of In-Person, and a booking-time length reads 240 min · set at booking.
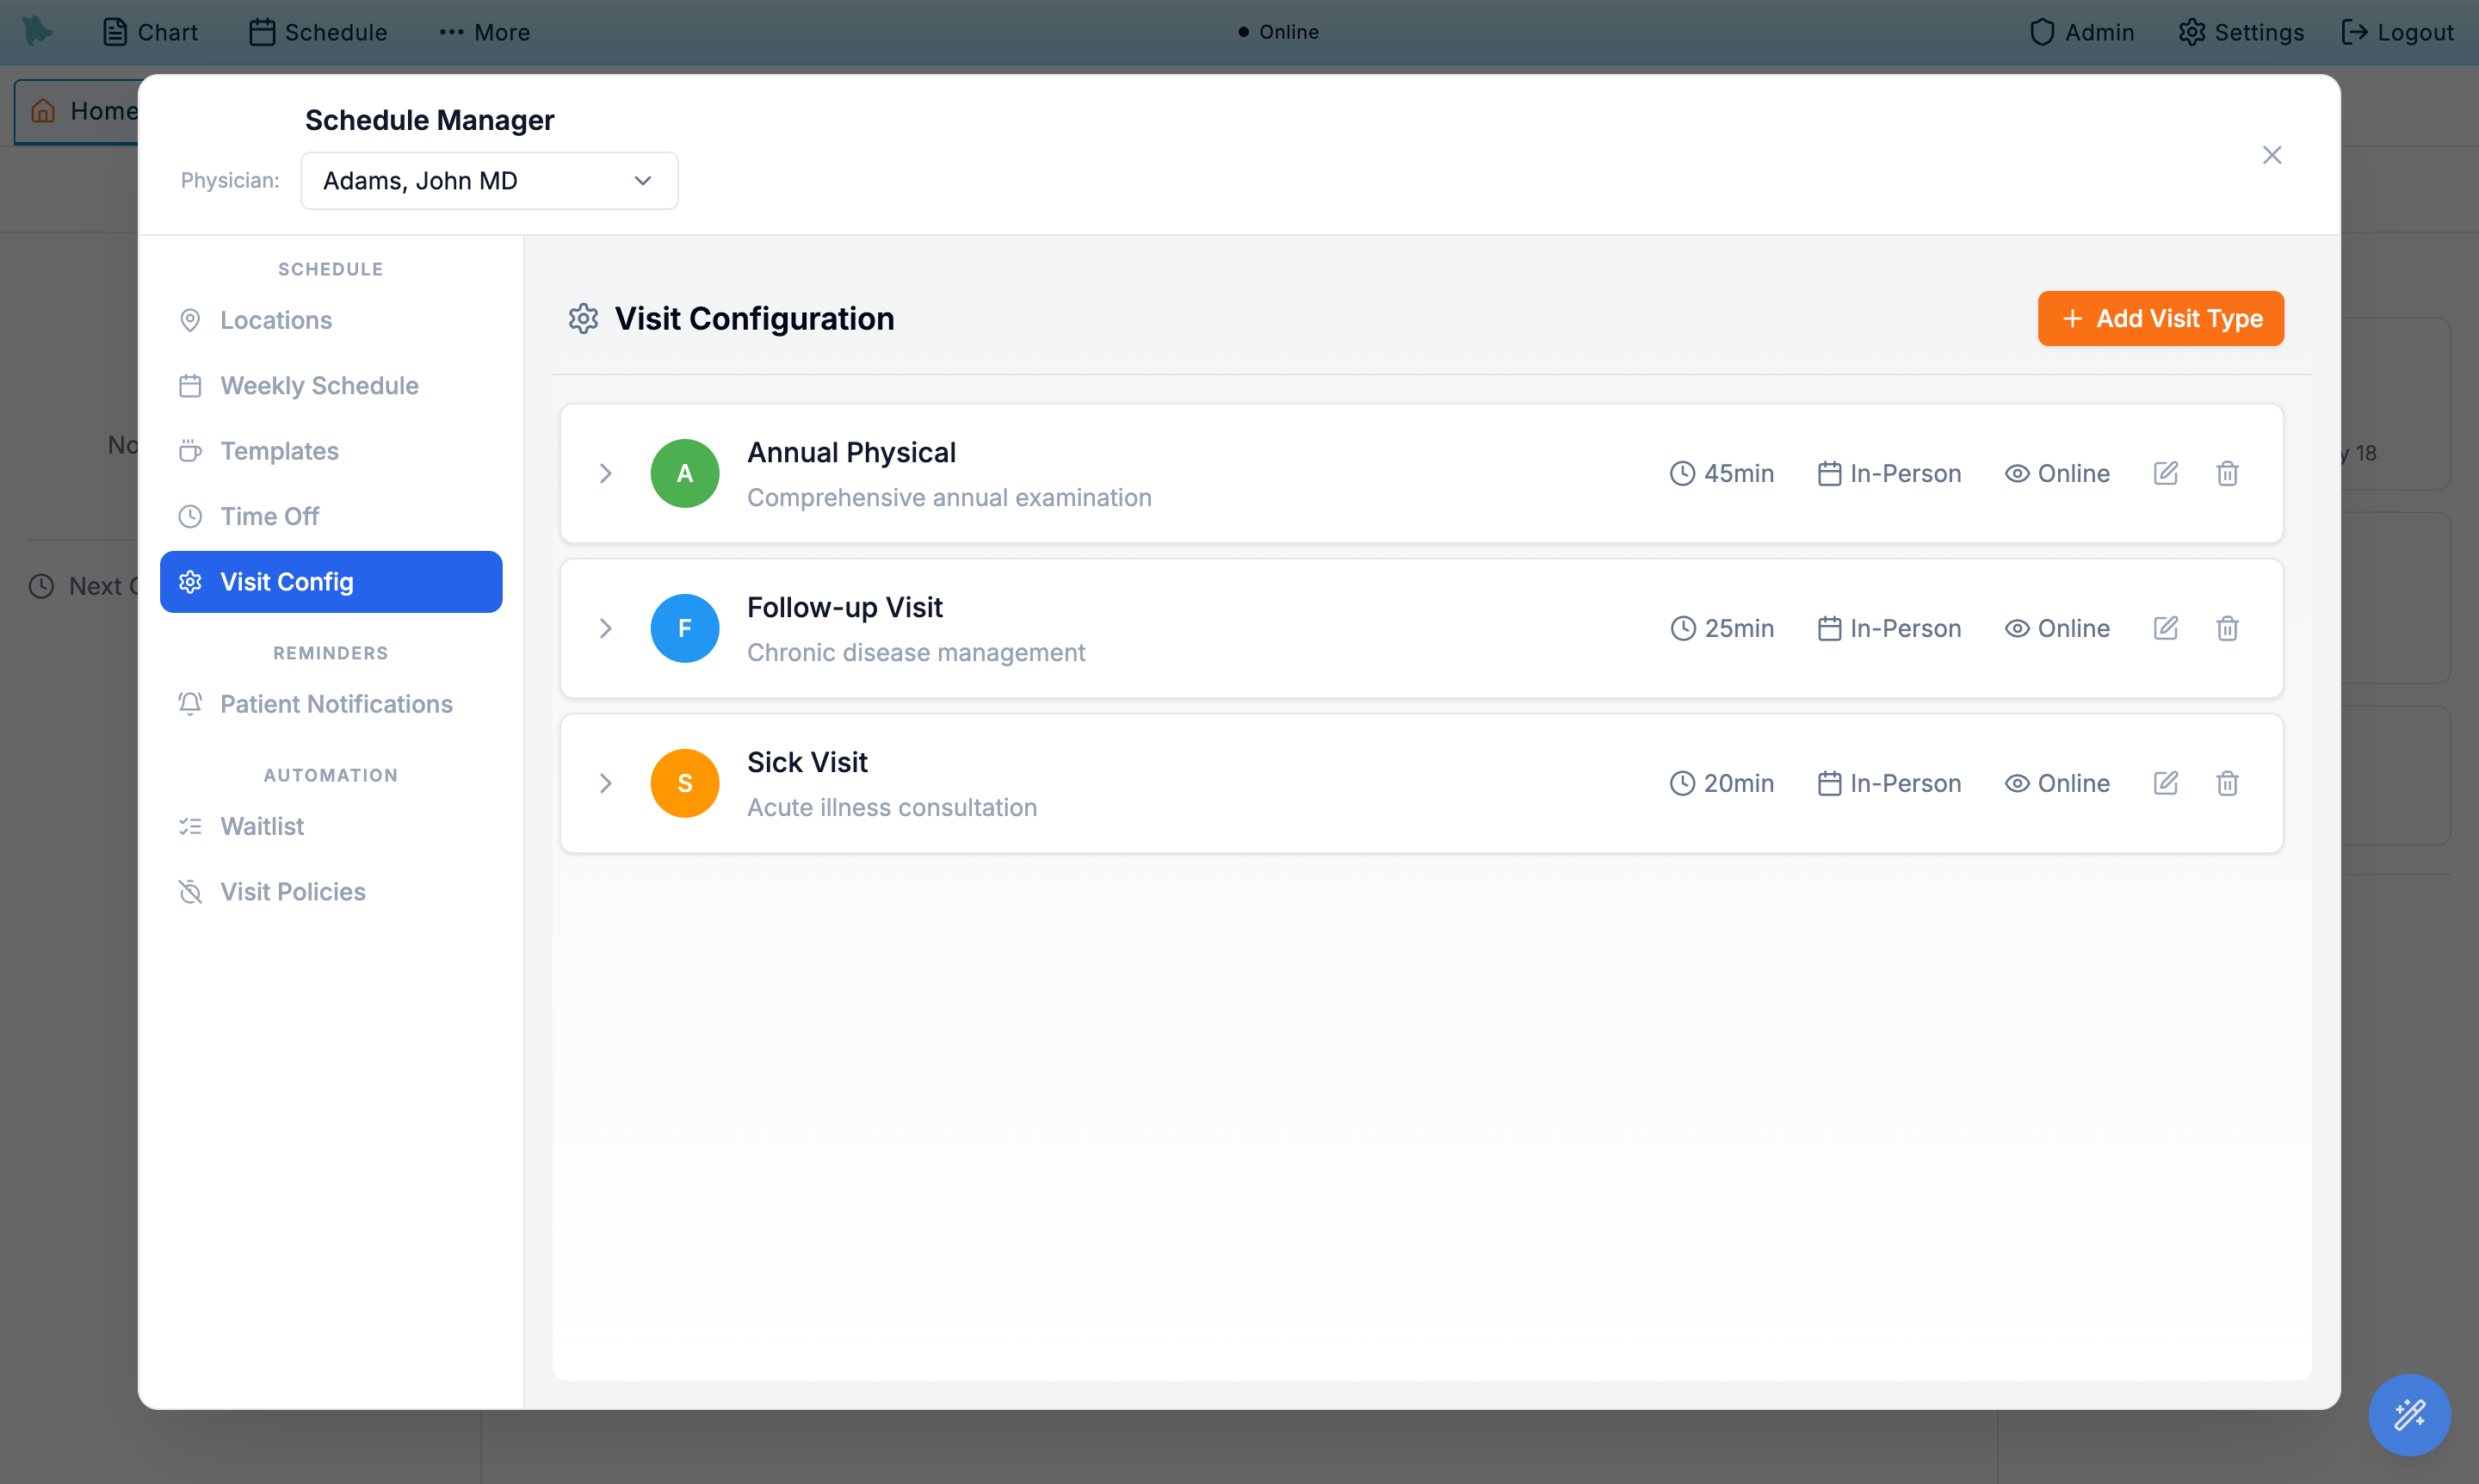
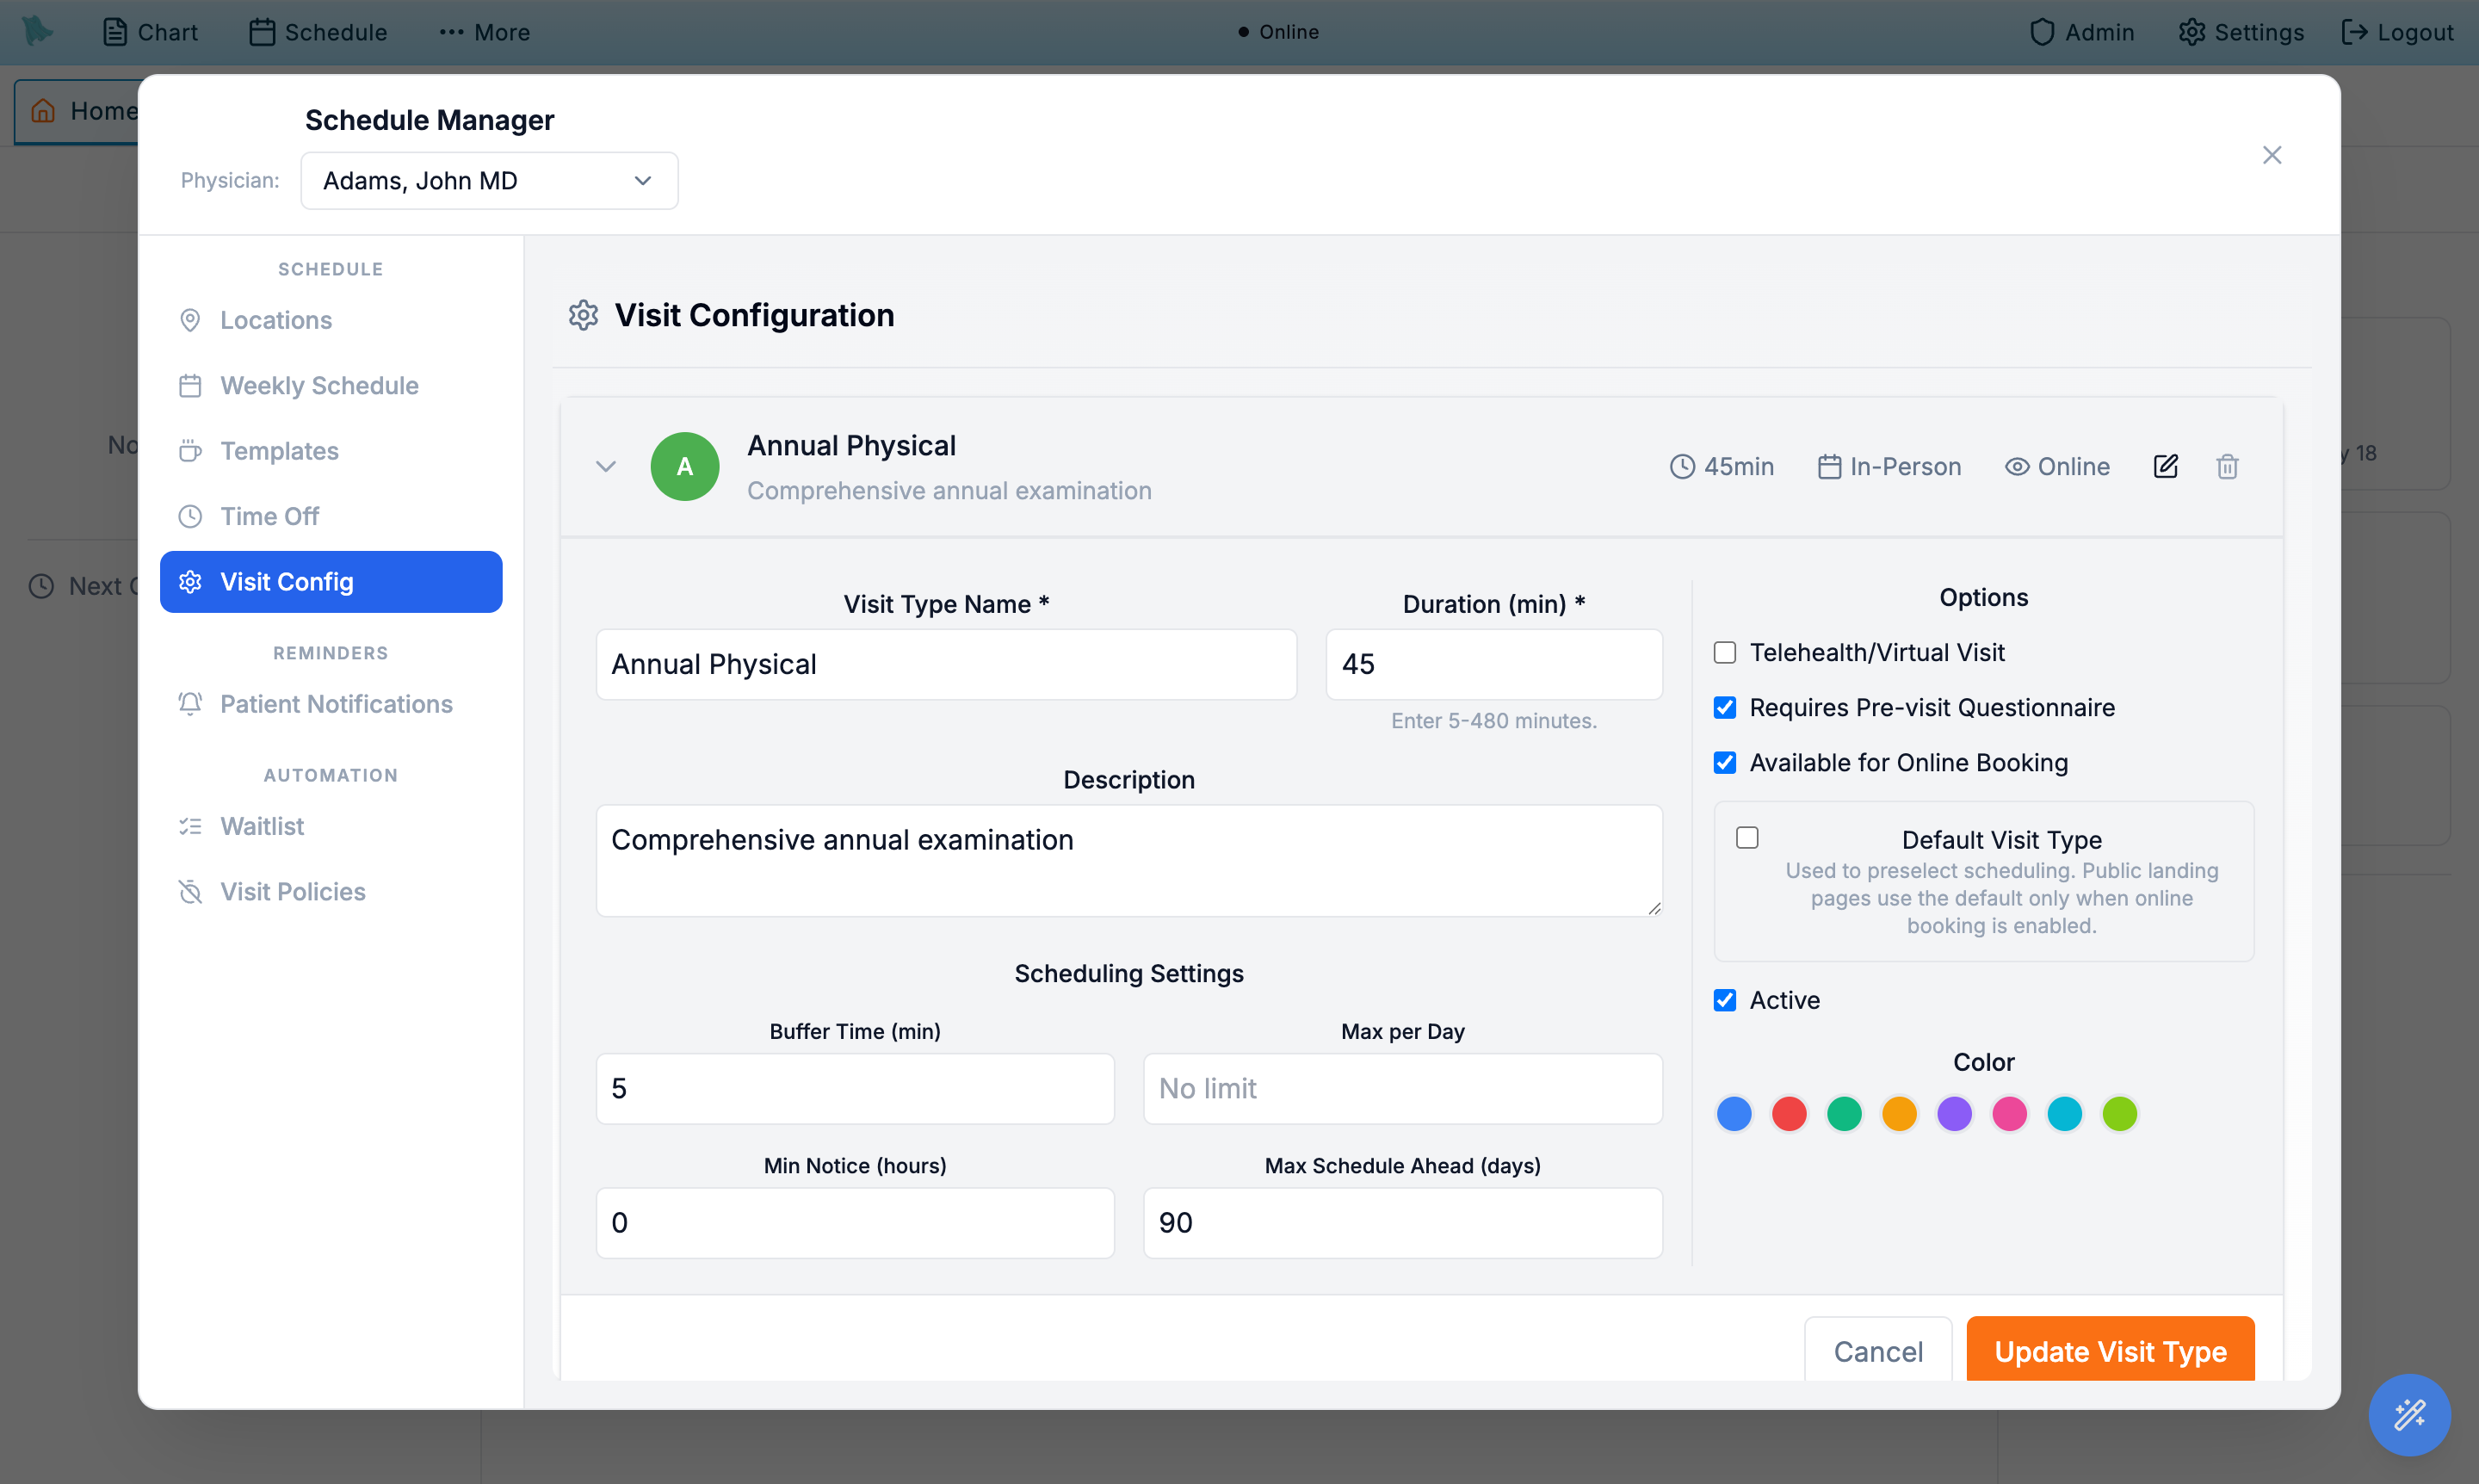
Encounter Type select is absent here — it only appears while adding a new visit type.What an outside-facility visit type does
Choosing Outside facility is what makes a surgery or a hospital-clinic session bill and schedule correctly with nothing extra to do per visit:
- Billing follows the visit type. Every encounter booked with it carries the visit type's place of service on the claim (CLM05-1 / CMS-1500 box 24B), and the facility's name, NPI, and street address go on the claim as the service facility (loop 2310C / box 32). The rate a service prices at follows the place of service, so a facility code prices at the facility rate automatically. The clinician can still change the place of service for one visit in Charge Capture, and that explicit choice always wins.
- Booking ignores office hours. An operating-room block at 06:30, or a hospital clinic on a day with no office session, books without a scheduling override. The office-hours, weekly-schedule, and break checks are skipped for this visit type; Hero EMR still warns when it overlaps another appointment or the physician's time off, because a physician cannot be in two places at once.
- The facility can change per booking. The booking dialog pre-selects the visit type's facility and lets staff switch to any other facility on the practice's list for that one case — a surgeon operating at two hospitals keeps one Surgery type. The facility name shows where the location normally appears on the calendar and in the appointment table.
- Patients never see it. Outside-facility visit types are staff-booked only; they are hidden from the website booking widget and the patient portal regardless of the online switches.
Create one outside-facility visit type per setting you work in — for example Surgery (POS 22 at the hospital, length set at booking), ASC Case (POS 24 at the surgery center), and Hospital Clinic (POS 22, 15 minutes) — and the right codes and facility follow every booking automatically.
Buffer time
Minutes of protected padding before and after the visit (0–60). Another appointment landing inside that window is blocked unless staff take the scheduling override. Useful for room turnover or charting.
Max per day
Hard cap on how many of this visit type can be booked in a single day. Leave blank for no limit.
Min notice
Smallest gap between booking time and visit start. Use it to prevent last-minute online bookings.
Max schedule ahead
How far in advance patients can book this visit type. Defaults to 90 days.
Where does this visit happen?
In office, Telehealth (when Zoom is connected, telehealth visits provision a meeting automatically), Home / travel (route-based travel buffers), or Outside facility (hospital, surgery center, clinic, nursing facility — carries the place of service and facility for the claim).
Set the length when booking
Lets staff pick the appointment length each time they book instead of using a fixed duration. The visit type's duration becomes the pre-filled value. Meant for surgeries and other visits that differ case to case.
Facility
Outside-facility types only. The hospital, surgery center, or clinic named on the claim (CMS-1500 box 32). Pick from your practice's list or the NPI registry, or enter it manually; the address is required for insurance claims, the NPI is recommended.
Bills as (place of service)
Outside-facility types only. The CMS place-of-service code every claim for this visit type is filed with: 22 hospital outpatient, 21 inpatient, 24 ambulatory surgery center, 19 off-campus outpatient, 23 emergency room, 31/32 nursing facility, 49 independent clinic, 71 public health clinic.
Requires Pre-visit Tasks
Assigns the patient's pre-visit work — questionnaires and forms — for this visit type, and drives the Previsit Status column and the pre-visit chips on the calendar. It does not block booking or confirmation.
Available for Online Booking
Shows the visit type to new patients on the public website booking widget. Turn off to keep it off the public site. Always off for an outside-facility visit type.
Patients can self-schedule (patient portal)
Lets existing patients pick this visit type when booking in the portal. If no visit types are marked self-schedulable, the portal falls back to organization default behavior. Always off for an outside-facility visit type.
Online booking windows
All working hours by default, or Specific windows to restrict online times to named day/time bands (up to 56 a week, 5 minutes minimum each).
Default visit type
Pre-selected in scheduling dialogs. Public landing pages use the default only when online booking is enabled; follow-up booking uses the organization's follow-up visit type names instead.
Add weekly templates for breaks and admin time
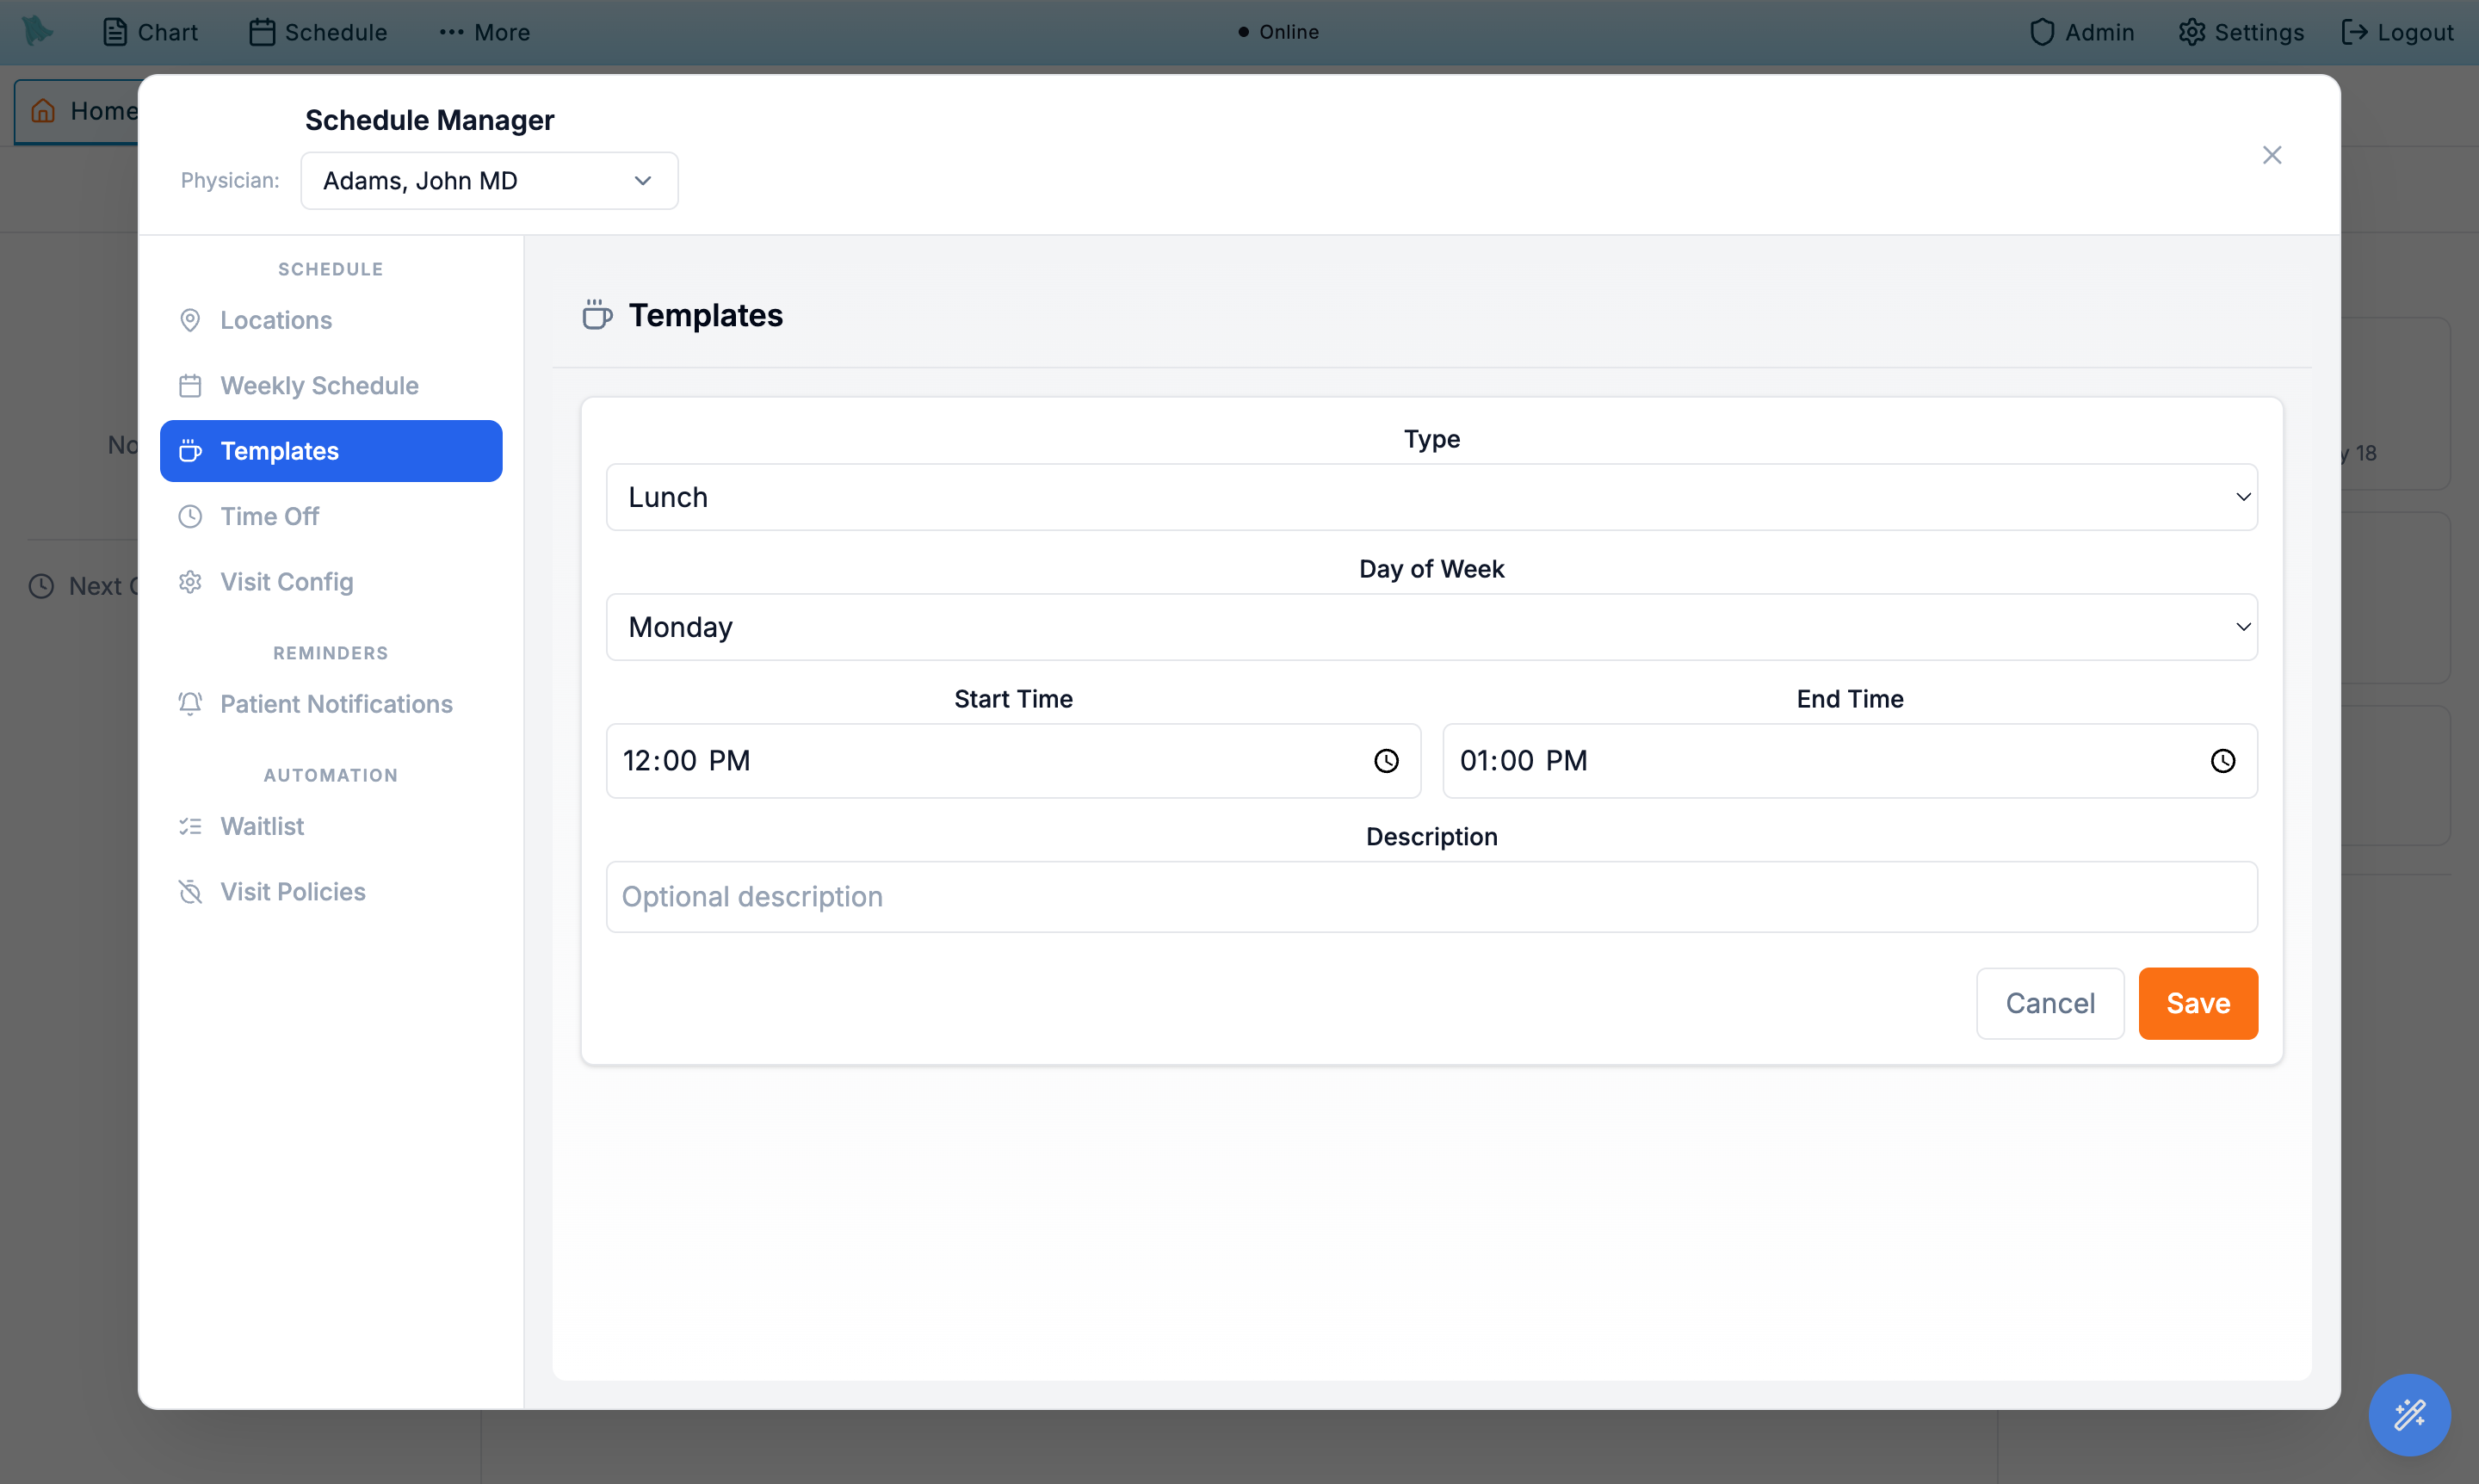
Templates are recurring blocks that repeat every week — lunch, recurring meetings, admin time, urgent slots, and same-day reserves. Once saved, they are removed from bookable availability and shown on the calendar with their own color.
- Open the
Templatestab and clickAdd Template. - Pick the template type. Lunch, Meeting, Administrative, Urgent, Same Day, or Other.
- Choose the day of the week and the start and end time. Add an optional description (it shows on the block).
- Save. The block appears every week on the calendar from now forward and is removed from bookable availability.
Open this slot to release that single occurrence without touching the weekly template. The same menu has Edit blocked time…, Unblock this time…, and Schedule over this time… (which books straight over the block behind the override confirmation). To add a one-off bookable window on a day that is otherwise off, right-click the day and use Open Schedule….
Block vacations, holidays, and one-off days
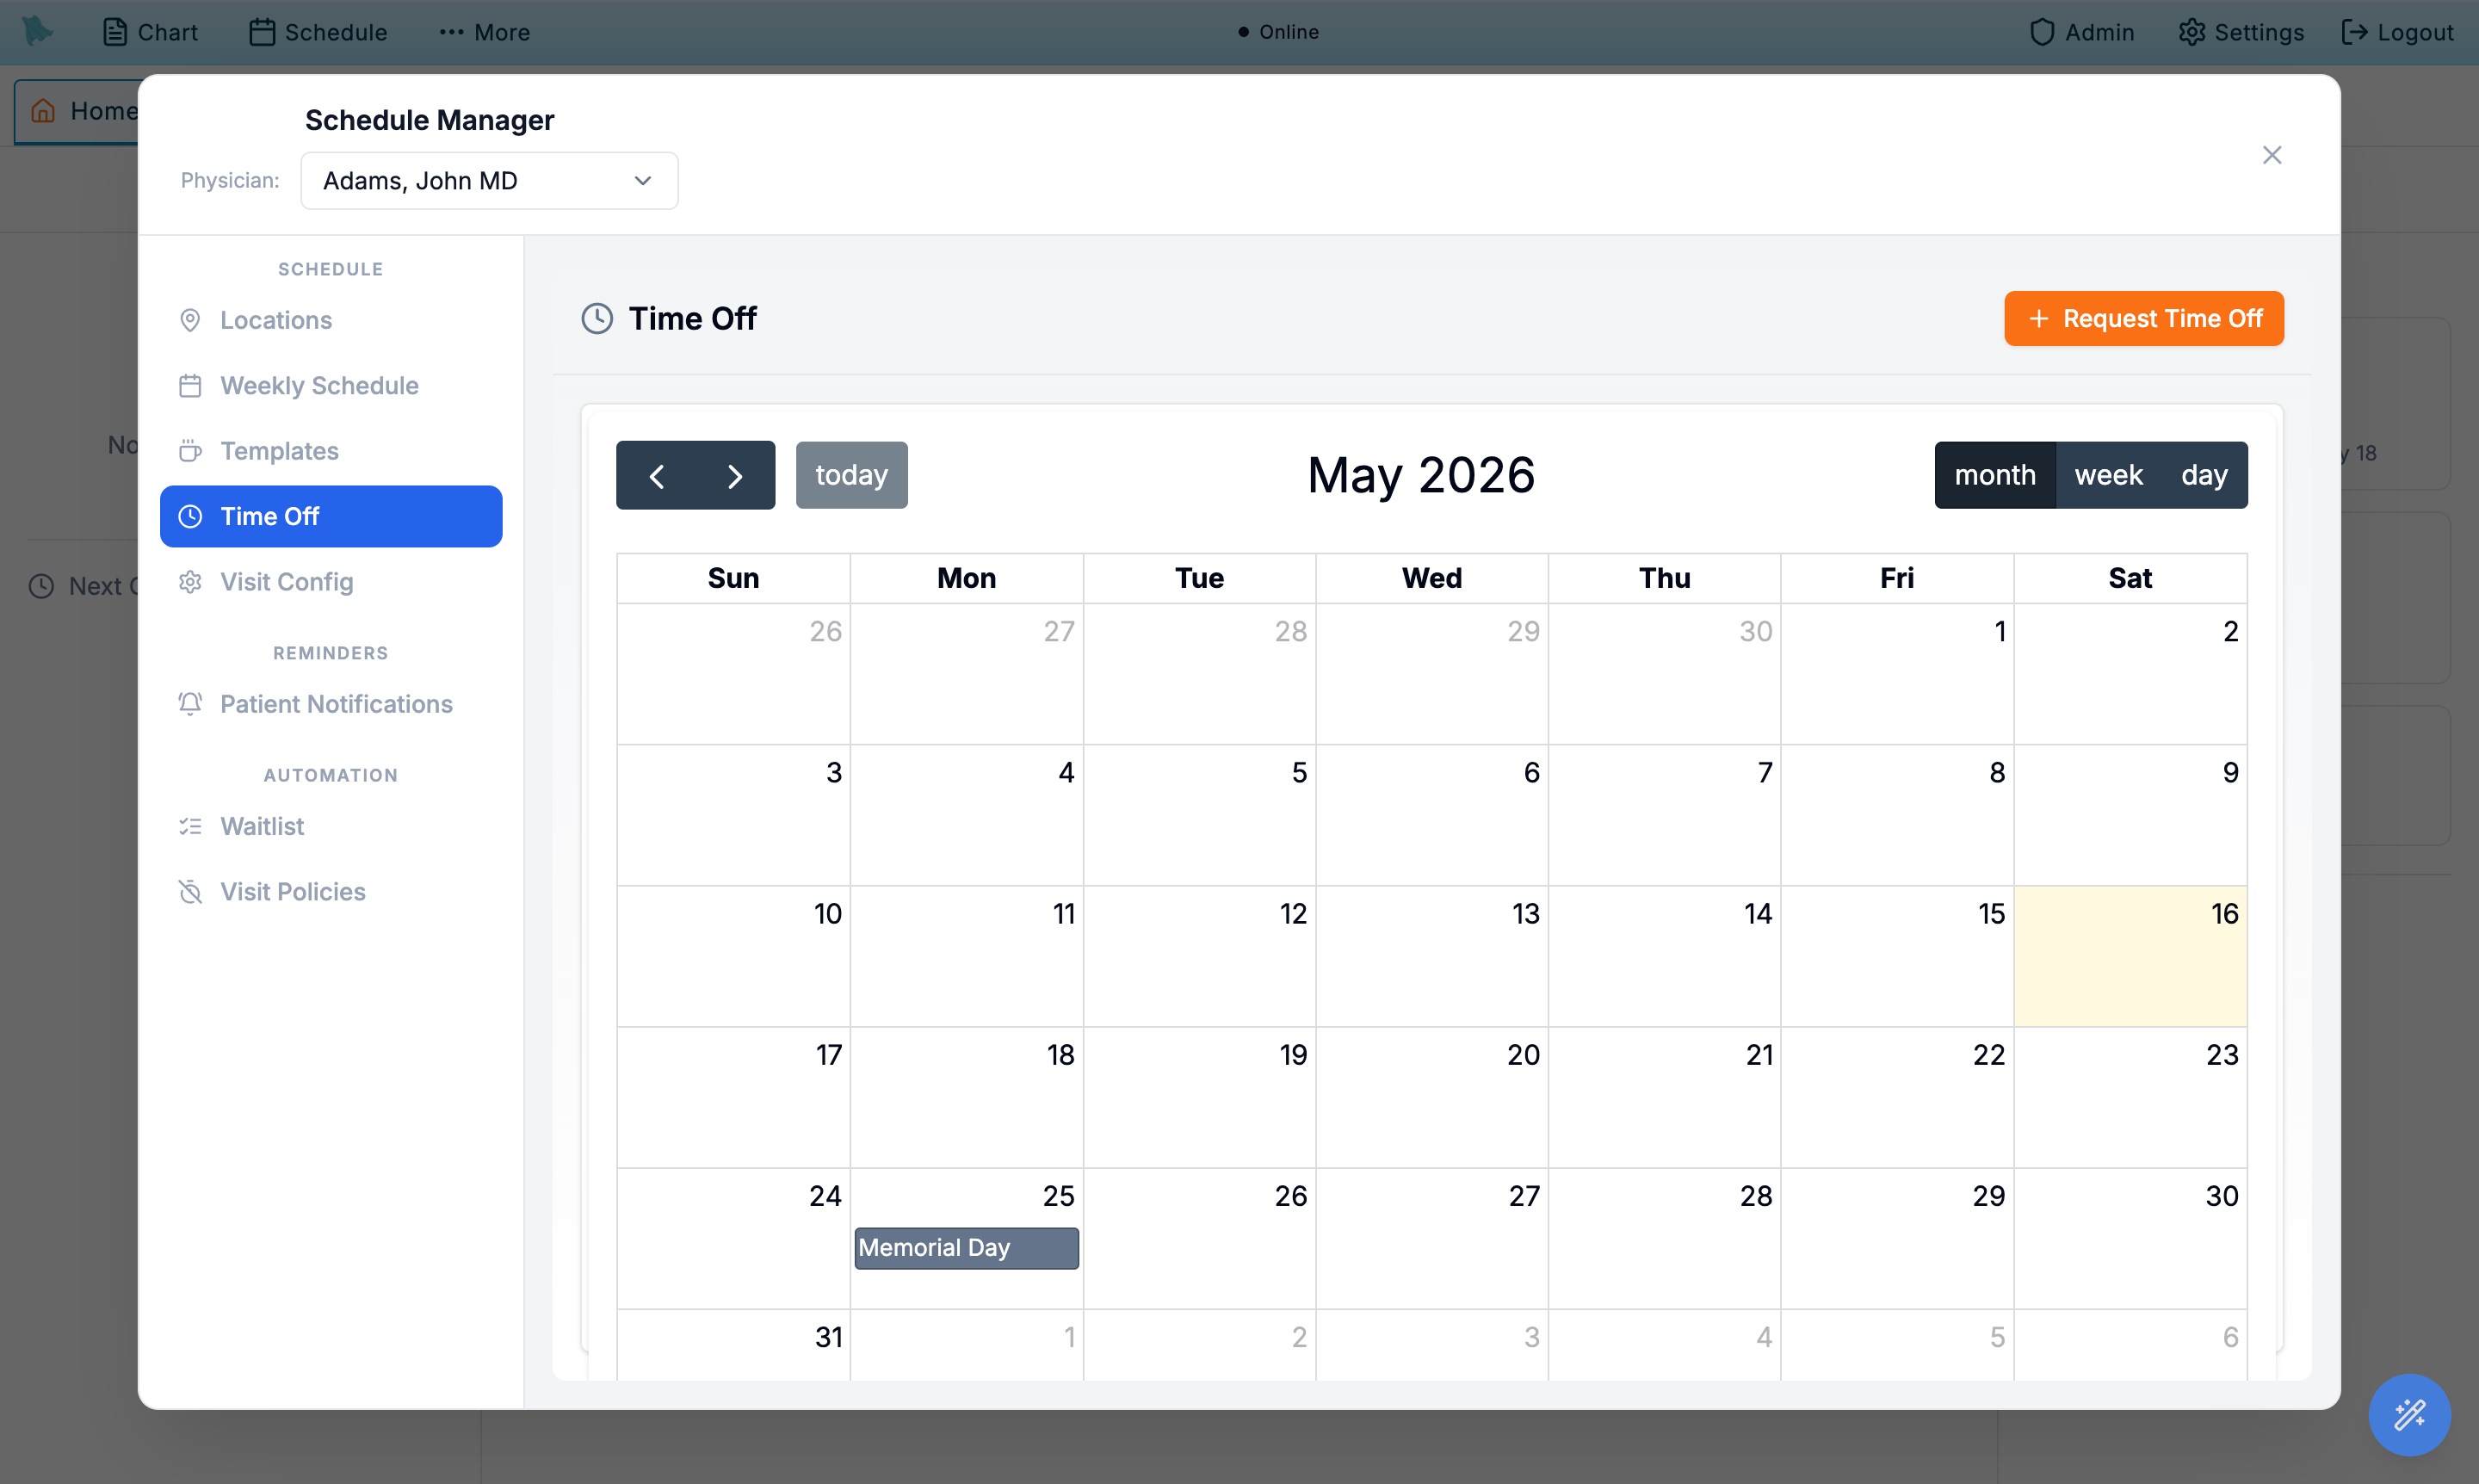
Time off blocks a physician's calendar for vacations, CME days, or a single morning out of office — one-off or repeating. Time off overrides working hours and templates for the dates it covers.
- Open the
Time Offtab. The calendar view shows the current month with existing time off and the organization's holidays marked. - Click
Request Time Off. Enter anEvent Name, pick theDate, then either tick All Day or set aStart TimeandEnd Time, and clickSave. - Block more than one day with
Repeat. The dialog holds a single date, so a week of vacation is entered asRepeat→Dailywith anEnd Date.Weekly,Monthly by date,Monthly by weekday, andYearlyare available too, for standing half-days and annual closures. - Handle holidays. Organization holidays appear on this calendar as all-day grey events and block the day automatically. Click one and confirm Work on this holiday? to give this physician a working override — the event turns green and reads (Working). Click it again and confirm Revert to day off for this holiday? to put the day back.
- Switch between month, week, and day views. Use the buttons in the toolbar to drill in on a specific date or browse upcoming entries in the panel below the calendar. Clicking a time-off event asks whether to delete it.
Request Time Off, but saving takes effect immediately — the block is live and stops bookings as soon as you click Save. Nothing is pending, and nobody has to approve it.
Need help? Email support@heroemr.com.