Practice setup — practice & people
Set up the organization and the people in it: practice info, physicians, staff and assistants, patient registration, patient-portal branding, and how everyone signs in and stays signed in.
Practice setup — practice & people
Set up the organization and the people in it: practice info, physicians, staff and assistants, patient registration, patient-portal branding, and how everyone signs in and stays signed in.
Set the practice record, locations, and accepted insurance
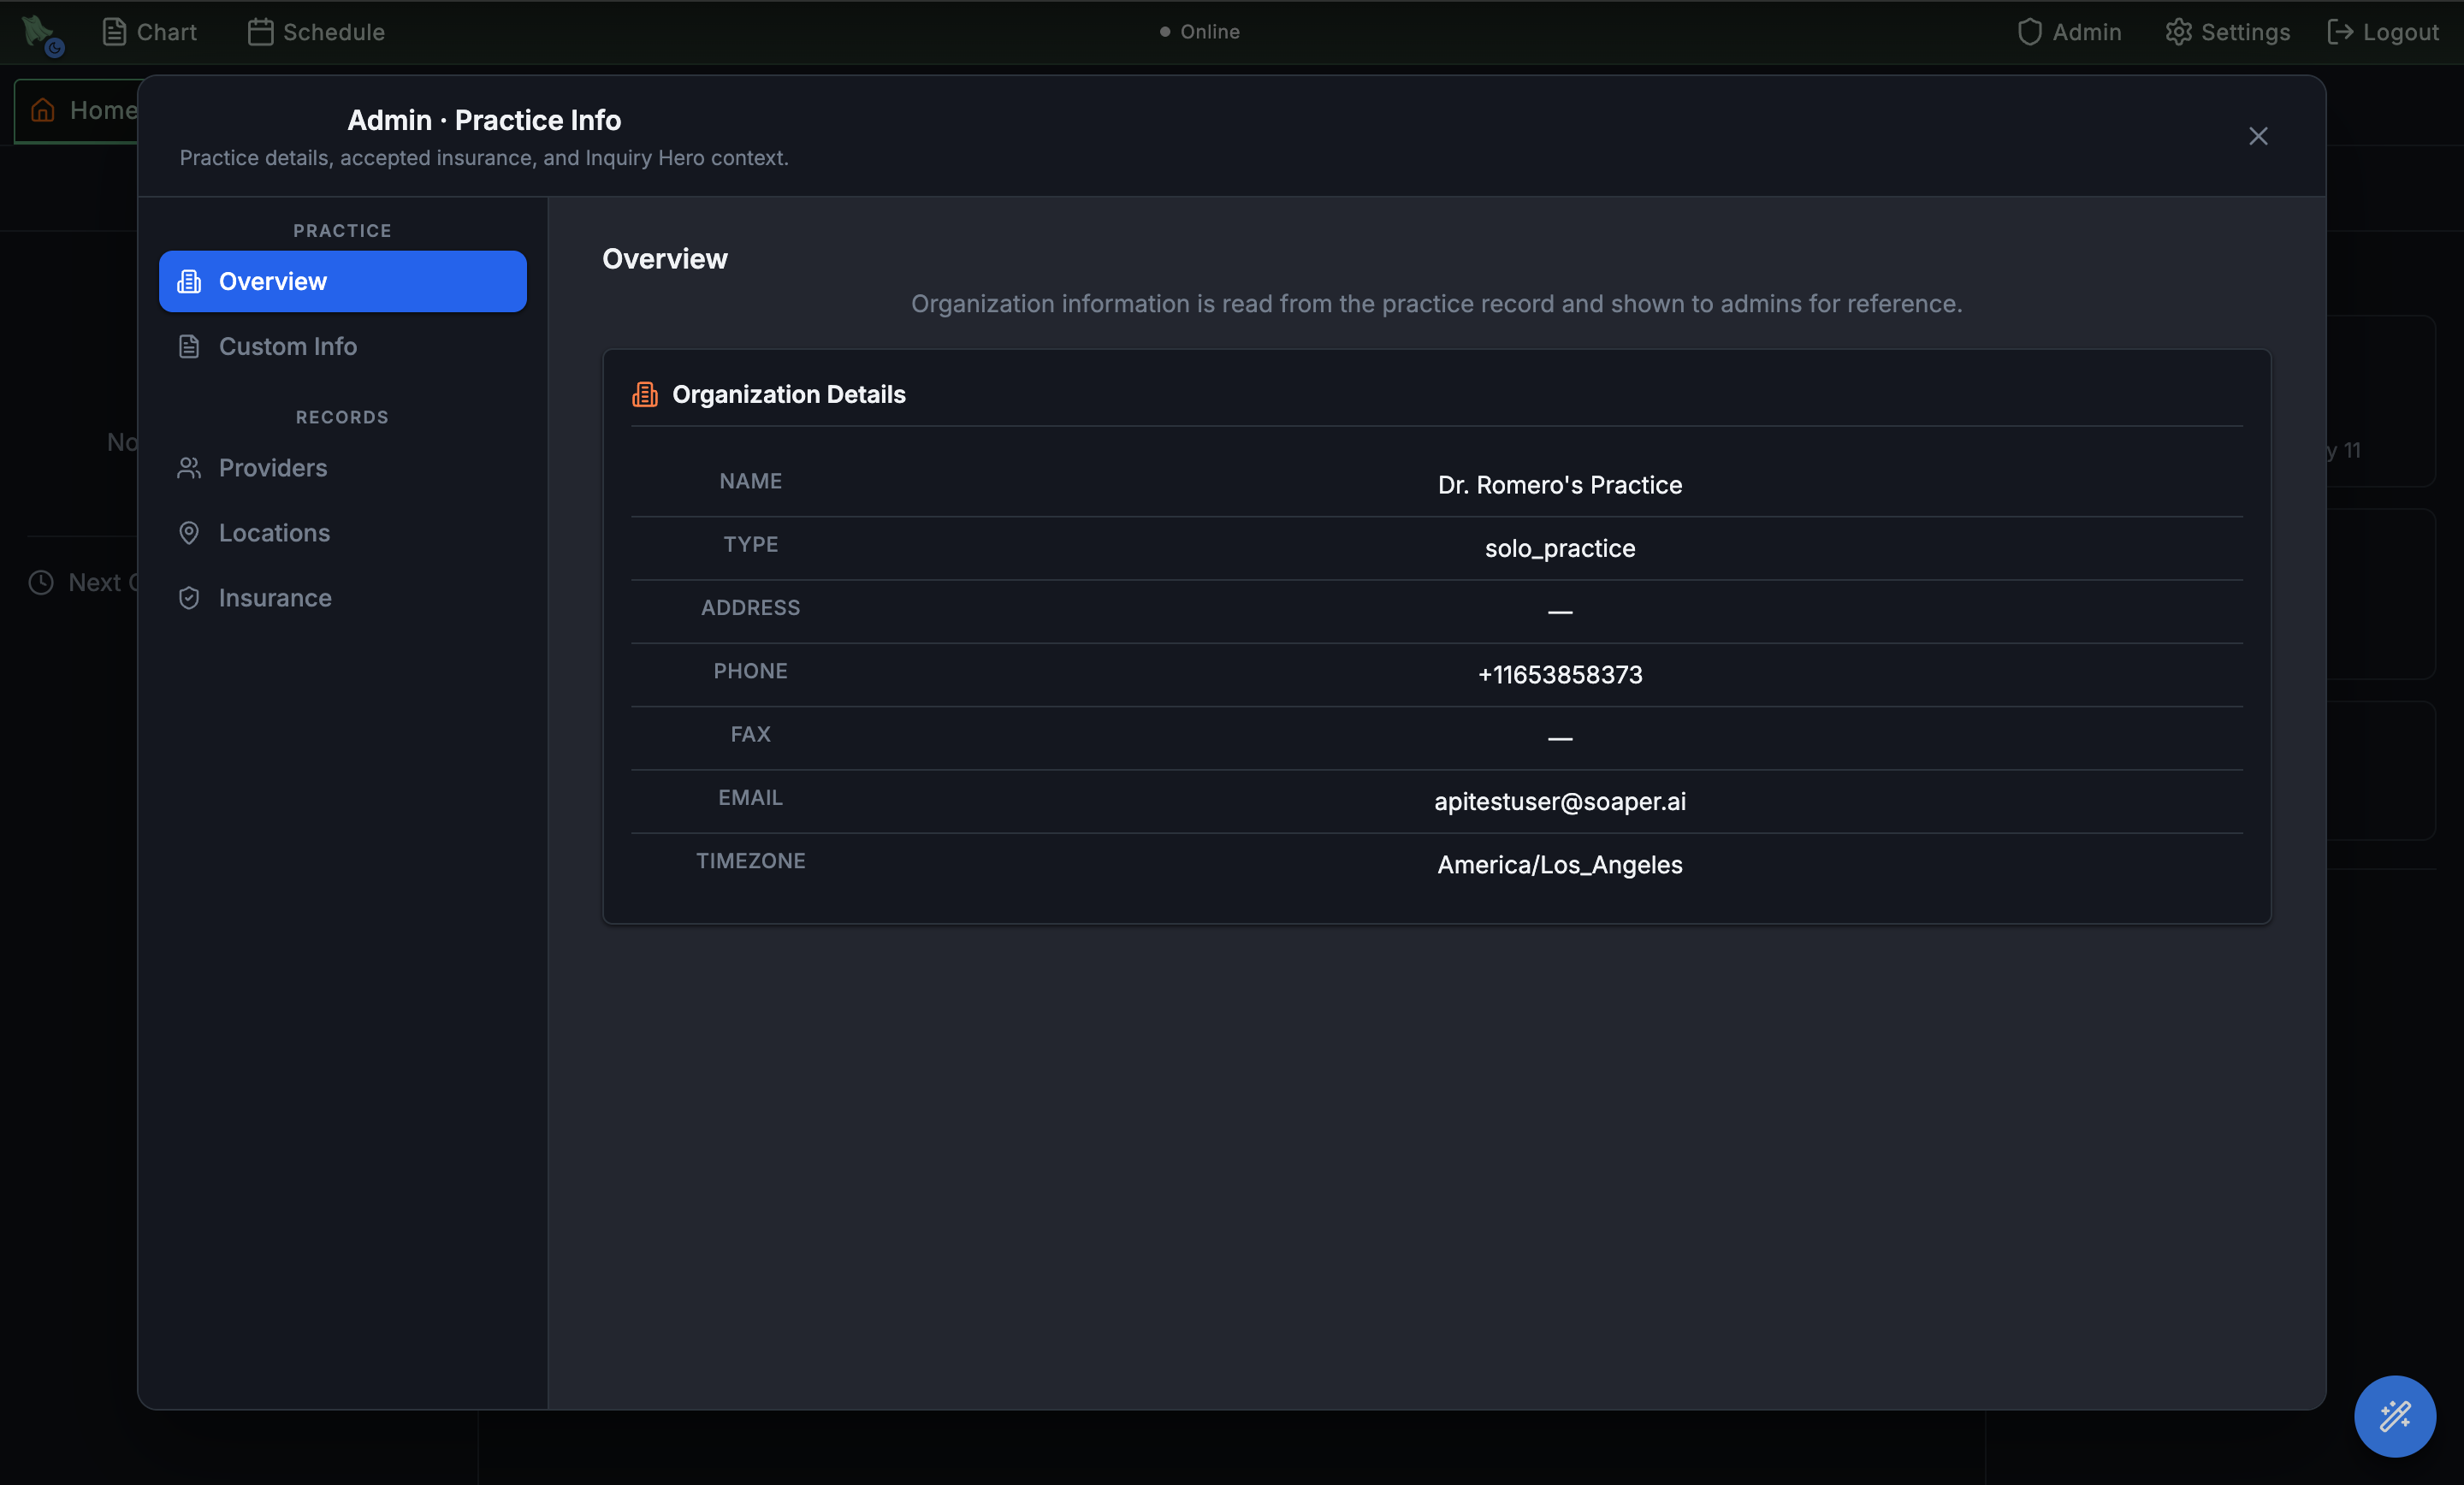
Practice Info is the organization's identity card. Org admins fill it in once; every downstream feature — claim submission, fax cover sheets, patient portal headers, online-booking landing pages — reads from this record. There is no per-physician override here; everything is at the organization level.
- Open
Admin > Practice Info. The modal opens to the Overview tab under the Practice section. - Check and correct the Organization Details. Click the pencil on the Organization Details card to edit the record in place: name, type (Hospital, Group practice, Solo practice, Clinic, Laboratory), street address, city, state, ZIP, phone, fax, and email. Click Save Organization when you're done, or Cancel to discard. These values flow into claims, fax cover sheets, and portal headers, so re-check them after a move or a rebrand. The organization timezone is shown on the same card but is deliberately not editable here — change it from Scheduling settings so appointment and reminder times are recalculated safely.
- Add Custom Info (optional). The Custom Info tab stores free-text fields shown to admins for reference — Inquiry Hero context, internal notes, third-party account numbers.
- Review Providers under the Records section. Lists every physician attached to the org. To add or edit them, use Physician Management — Practice Info is read-only here.
- Add practice Locations. Each physical address you see patients at. Locations also appear inside Scheduling > Locations when physicians assign themselves to a site.
- List Accepted Insurance. The plans your practice is in-network with. Used by online booking, intake, and the eligibility tools — patients see the list when picking a payer at booking.
Rename a diagnosis: show your practice’s own name for an ICD-10 code
Admin → Diagnosis names lets the practice show its own wording for an ICD-10-CM code (for example Gender dysphoria instead of the official title) in diagnosis pickers and the problem list. Claims keep the code, and staff can still see the official title.
- Open
Admin → Diagnosis names. Practice administrators, the owner and staff who manage templates can open it. - Under
Name a diagnosis, search ICD-10-CM by code or words, e.g. F64.0, and pick the code. Its official title shows asICD-10-CM: …. - Type your practice’s name and click
Save name. - Change or remove names under
Your practice’s names: the pencil edits a name (SaveorCancel); removing one brings back the official title.
In the diagnosis search and typeahead, a renamed diagnosis shows your name with the official title under it; tooltips on Current Diagnoses and diagnosis chips show the official title too. Until you add a name, every diagnosis shows its ICD-10-CM title.
List the insurance plans your practice doesn’t accept (out of network, not taking)
To mark a plan your practice doesn’t take, out of network or no longer accepted, add it to Insurance we don’t accept in Admin → Practice Info. Staff then see Not accepted on patients who have it, and patients who pick it online are told. It is off until you add a plan: with nothing listed, every plan works as before (“No plans listed. Every plan is treated as today.”).
- Open
Admin → Practice Infoand clickInsurance(under Records). Scroll pastAccepted InsurancetoInsurance we don’t accept. - Choose
When a patient has itfirst.Flag only: staff seeNot acceptedon the patient, calendar, check-in and booking screens, and patients who pick the plan online are told the practice doesn’t take it. Billing is unchanged.Treat as self-pay: flags it the same way, holds claims to the plan for review instead of sending them, and starts the visit as Cash pay at the visit’s self-pay price in charge capture (the clinician can change it). What billing does is in Plans you don’t accept.
- Search under
Search and add a plan(for example UnitedHealthcare Community Plan). Plans for your practice’s state are listed first; state plans are separate, so add each state’s plan you don’t take. Each result shows its payer ID and state. - Only some plans under that insurance? Fill in
Only some plans under this insurance(optional). Some plans you don’t take share an insurance with plans you do: TennCare (BlueCare) under BlueCross of Tennessee, a Dual Complete plan under UnitedHealthcare, TRICARE Prime under TRICARE East. Type a word from the plan name inPlan name has(for example PRIME, TENNCARE, DUAL COMPLETE), pick anInsurance type(for example Medicaid or QMB), or both. Hero reads the plan name and type from the patient’s latest eligibility check, matching whole words in any capitals, so the patient is flagged once their insurance has been checked, and again after every new check (a patient whose new check shows TRICARE Select is no longer flagged for a TRICARE Prime entry). Leave both empty to cover every plan under the insurance. You can list the same insurance more than once with different plans. - Optionally add
Notes(Why, or what staff should tell the patient…), then clickAddon the plan. A plan already listed (same insurance and same plans) showsOn the list. A message confirmsPlan added. - Add the same plan under its other payer IDs. Some insurers list a plan under more than one payer ID (for example UnitedHealthcare Community Plan Tennessee and the general UnitedHealthcare Community Plan, which some TennCare cards use). After you add a plan, Hero shows the others with the same name that work in your state, each with
Add this too(same action and plans). ClickDoneto close the list.
Change or remove a plan
Each listed plan shows which plans it covers (Every plan under this insurance, or for example Only plans with “PRIME” in the name), its payer ID, states and notes, with a menu to switch between Flag only and Treat as self-pay (Plan updated), a Which plans button to change the plan name or insurance type, and a Remove button (Plan removed). Removing a plan takes the flag off its patients. A Claims held tag marks a plan whose claims are being held. Treat as self-pay on only some plans of an insurance never holds claims, because plans you do accept share its payer ID: those visits still start as Cash pay.
Who can change the list
Practice administrators and staff who manage practice settings (Practice Info). Adding a Treat as self-pay plan, or changing or removing one, also needs permission to manage claims (billers, billing managers, office managers), because it places or lifts a claim hold.
What patients see
When a patient picks a listed plan in the portal (sign-up, adding insurance, or booking), they see Insurance not accepted with a message that your practice doesn’t accept the plan and either that visits will be billed as self-pay or that the office will contact them about payment before the visit. It never stops them signing up, saving the plan or booking. An entry for only some plans of an insurance isn’t shown when a patient picks the insurance (nothing yet says which plan they have); once their insurance has been checked, the booking screen tells them the practice doesn’t accept their plan.
For the staff chip on a patient’s policy, see Not accepted on a patient’s insurance. This list is separate from Accepted Insurance, which the AI phone agent reads (Insurance the AI mentions).
Contacts: every lab, imaging center and office in one place (address book)
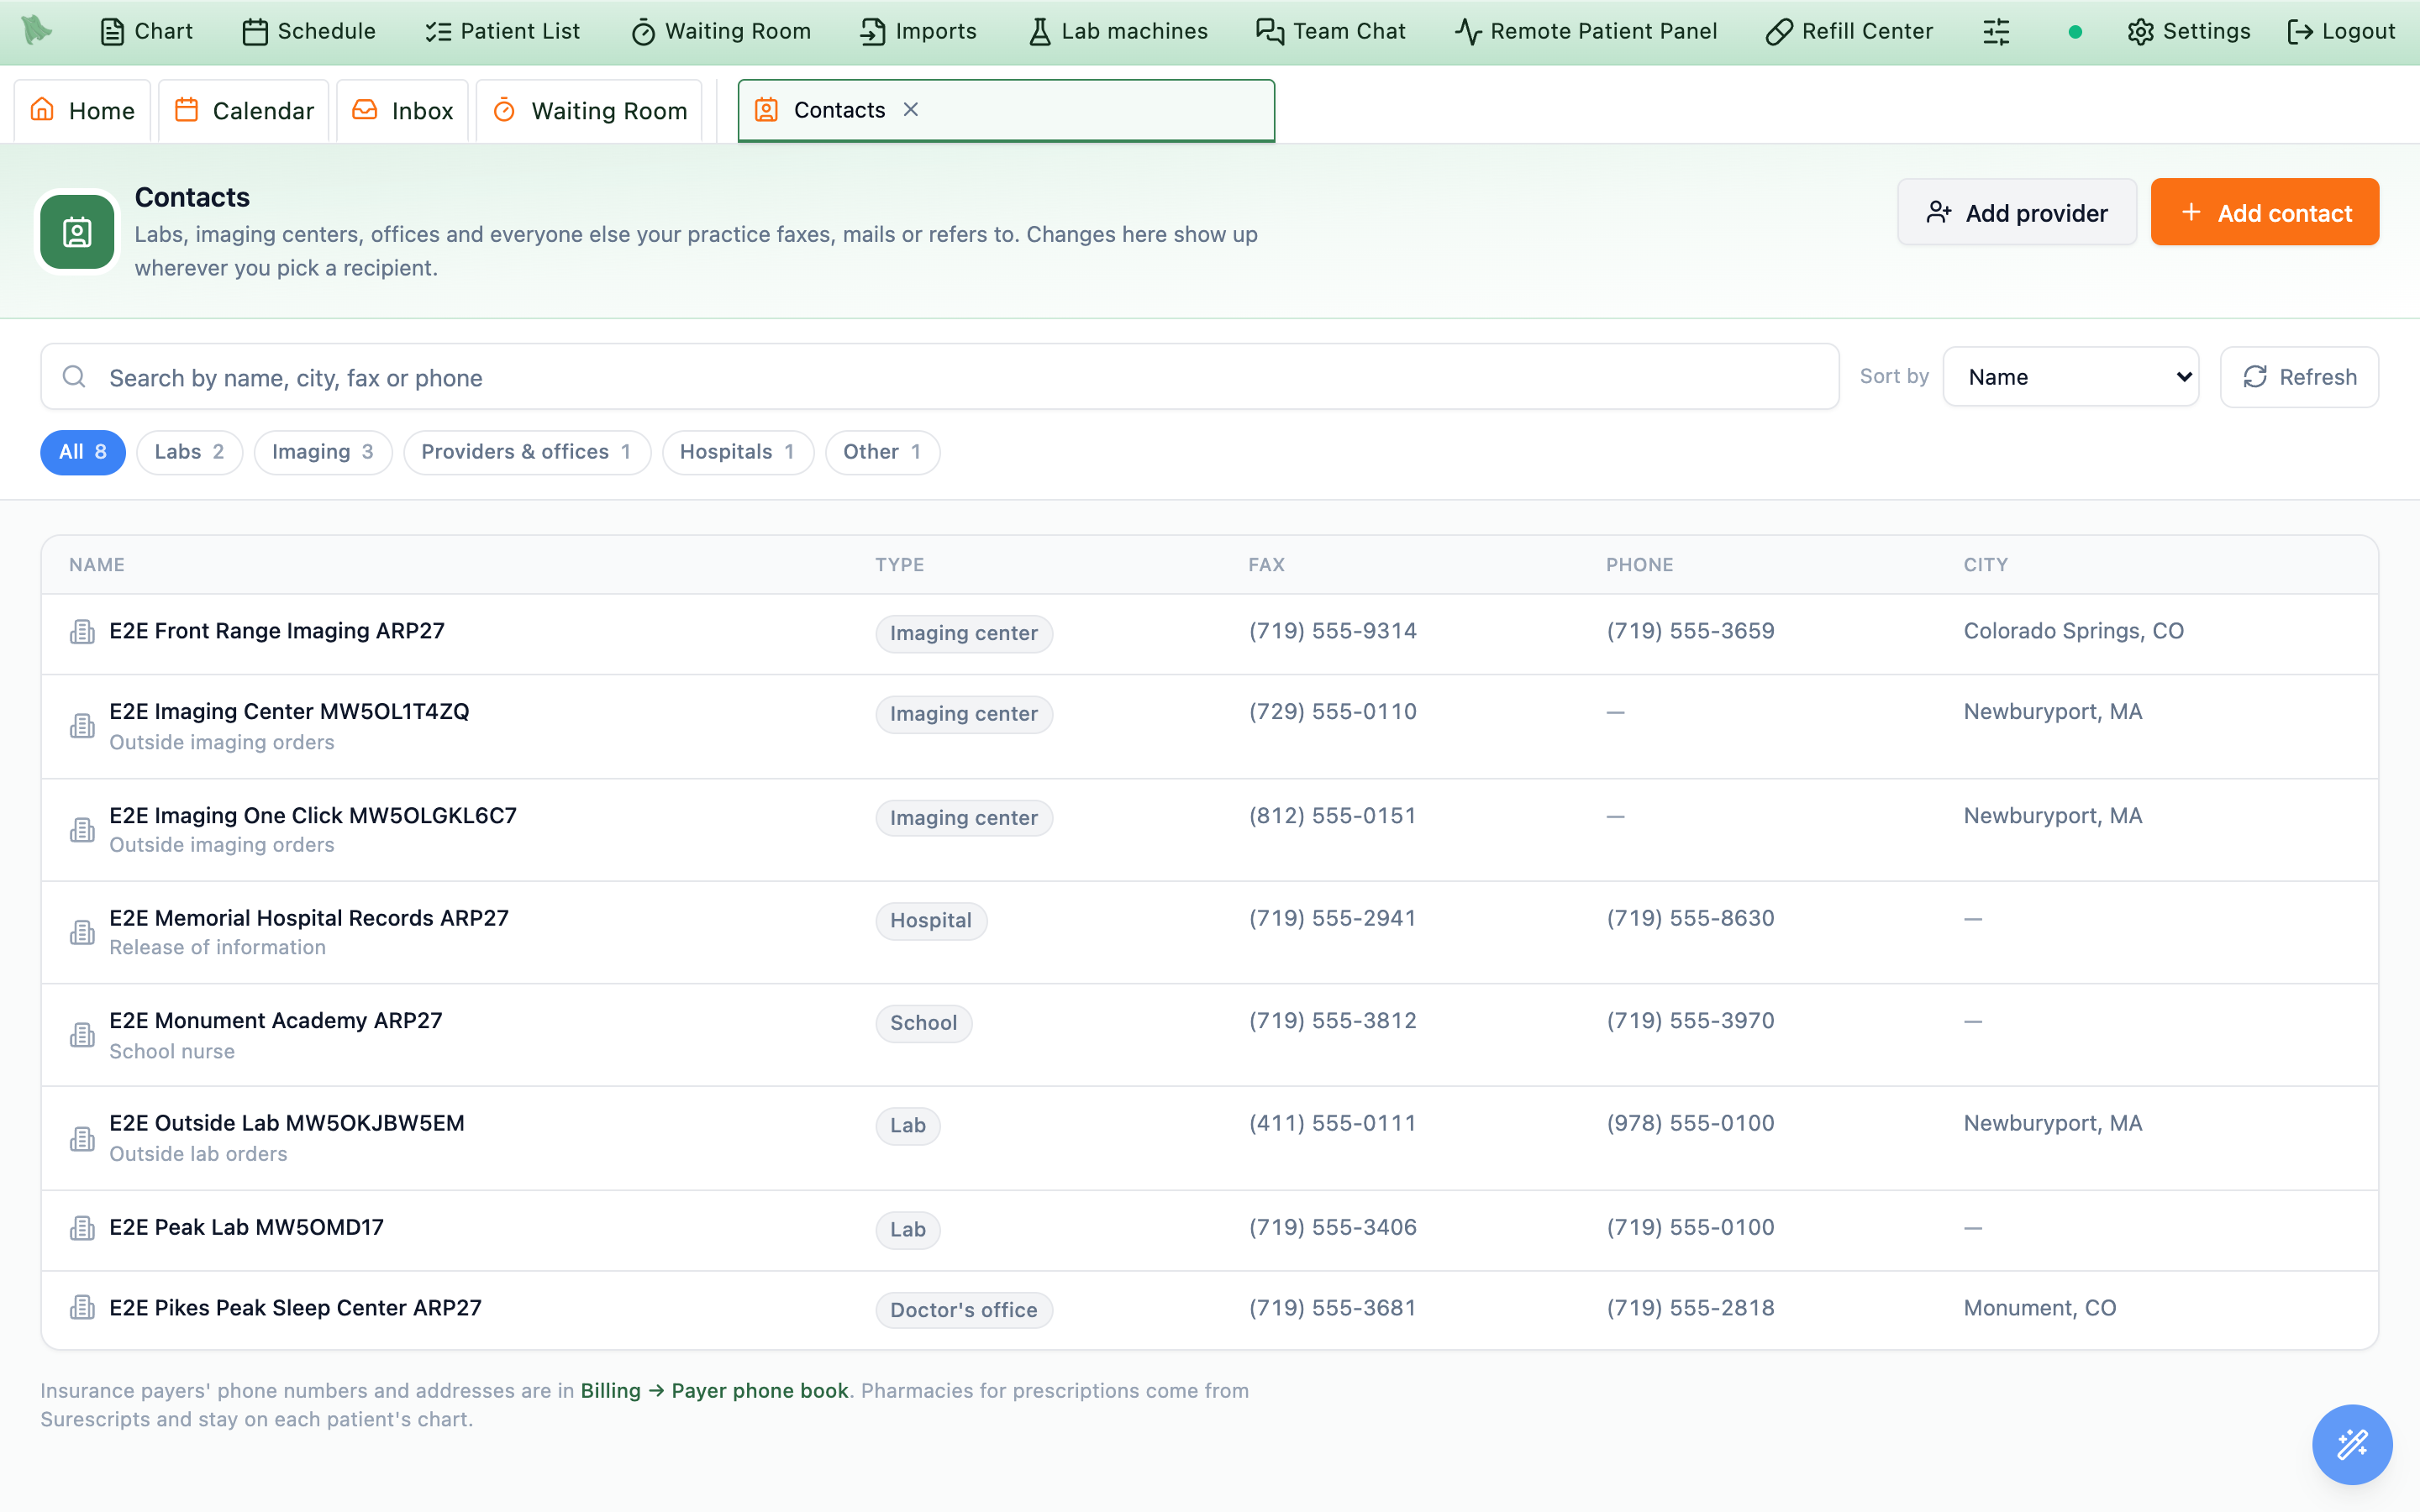
Admin → Contacts lists everyone your practice sends to: saved labs, imaging centers, doctors’ offices, hospitals, pharmacies, insurance companies, records offices, schools and others, plus your outside providers. Add, change or delete them in one place; the change shows up wherever you pick a recipient: Send fax, letters, Hero mail, and outside lab and imaging orders. Manage contacts in the address book search (letters, Hero mail) and in the Send fax window’s saved contacts opens the same page in a new browser tab, so what you are sending stays as it is.
Find a contact
- Chips (
Labs,Imaging,Providers & offices,Hospitals,Pharmacies,Insurance,Other) narrow the list. - Search by name, city, or any part of a fax or phone number.
Sort byname, type, or most recently changed.
Add a contact
- Click
Add contact. - Enter the name and choose its type. For example
Lab,Imaging centerorDoctor’s office. Then add a fax number or a full street address. Phone, email, an attention line and notes for your staff are optional. - Set up outside orders, if it takes them. For a lab or imaging center you send outside orders to, set
Takes outside orders(lab, imaging or both) and its NPI. - Click
Save contact.
Change or delete a contact
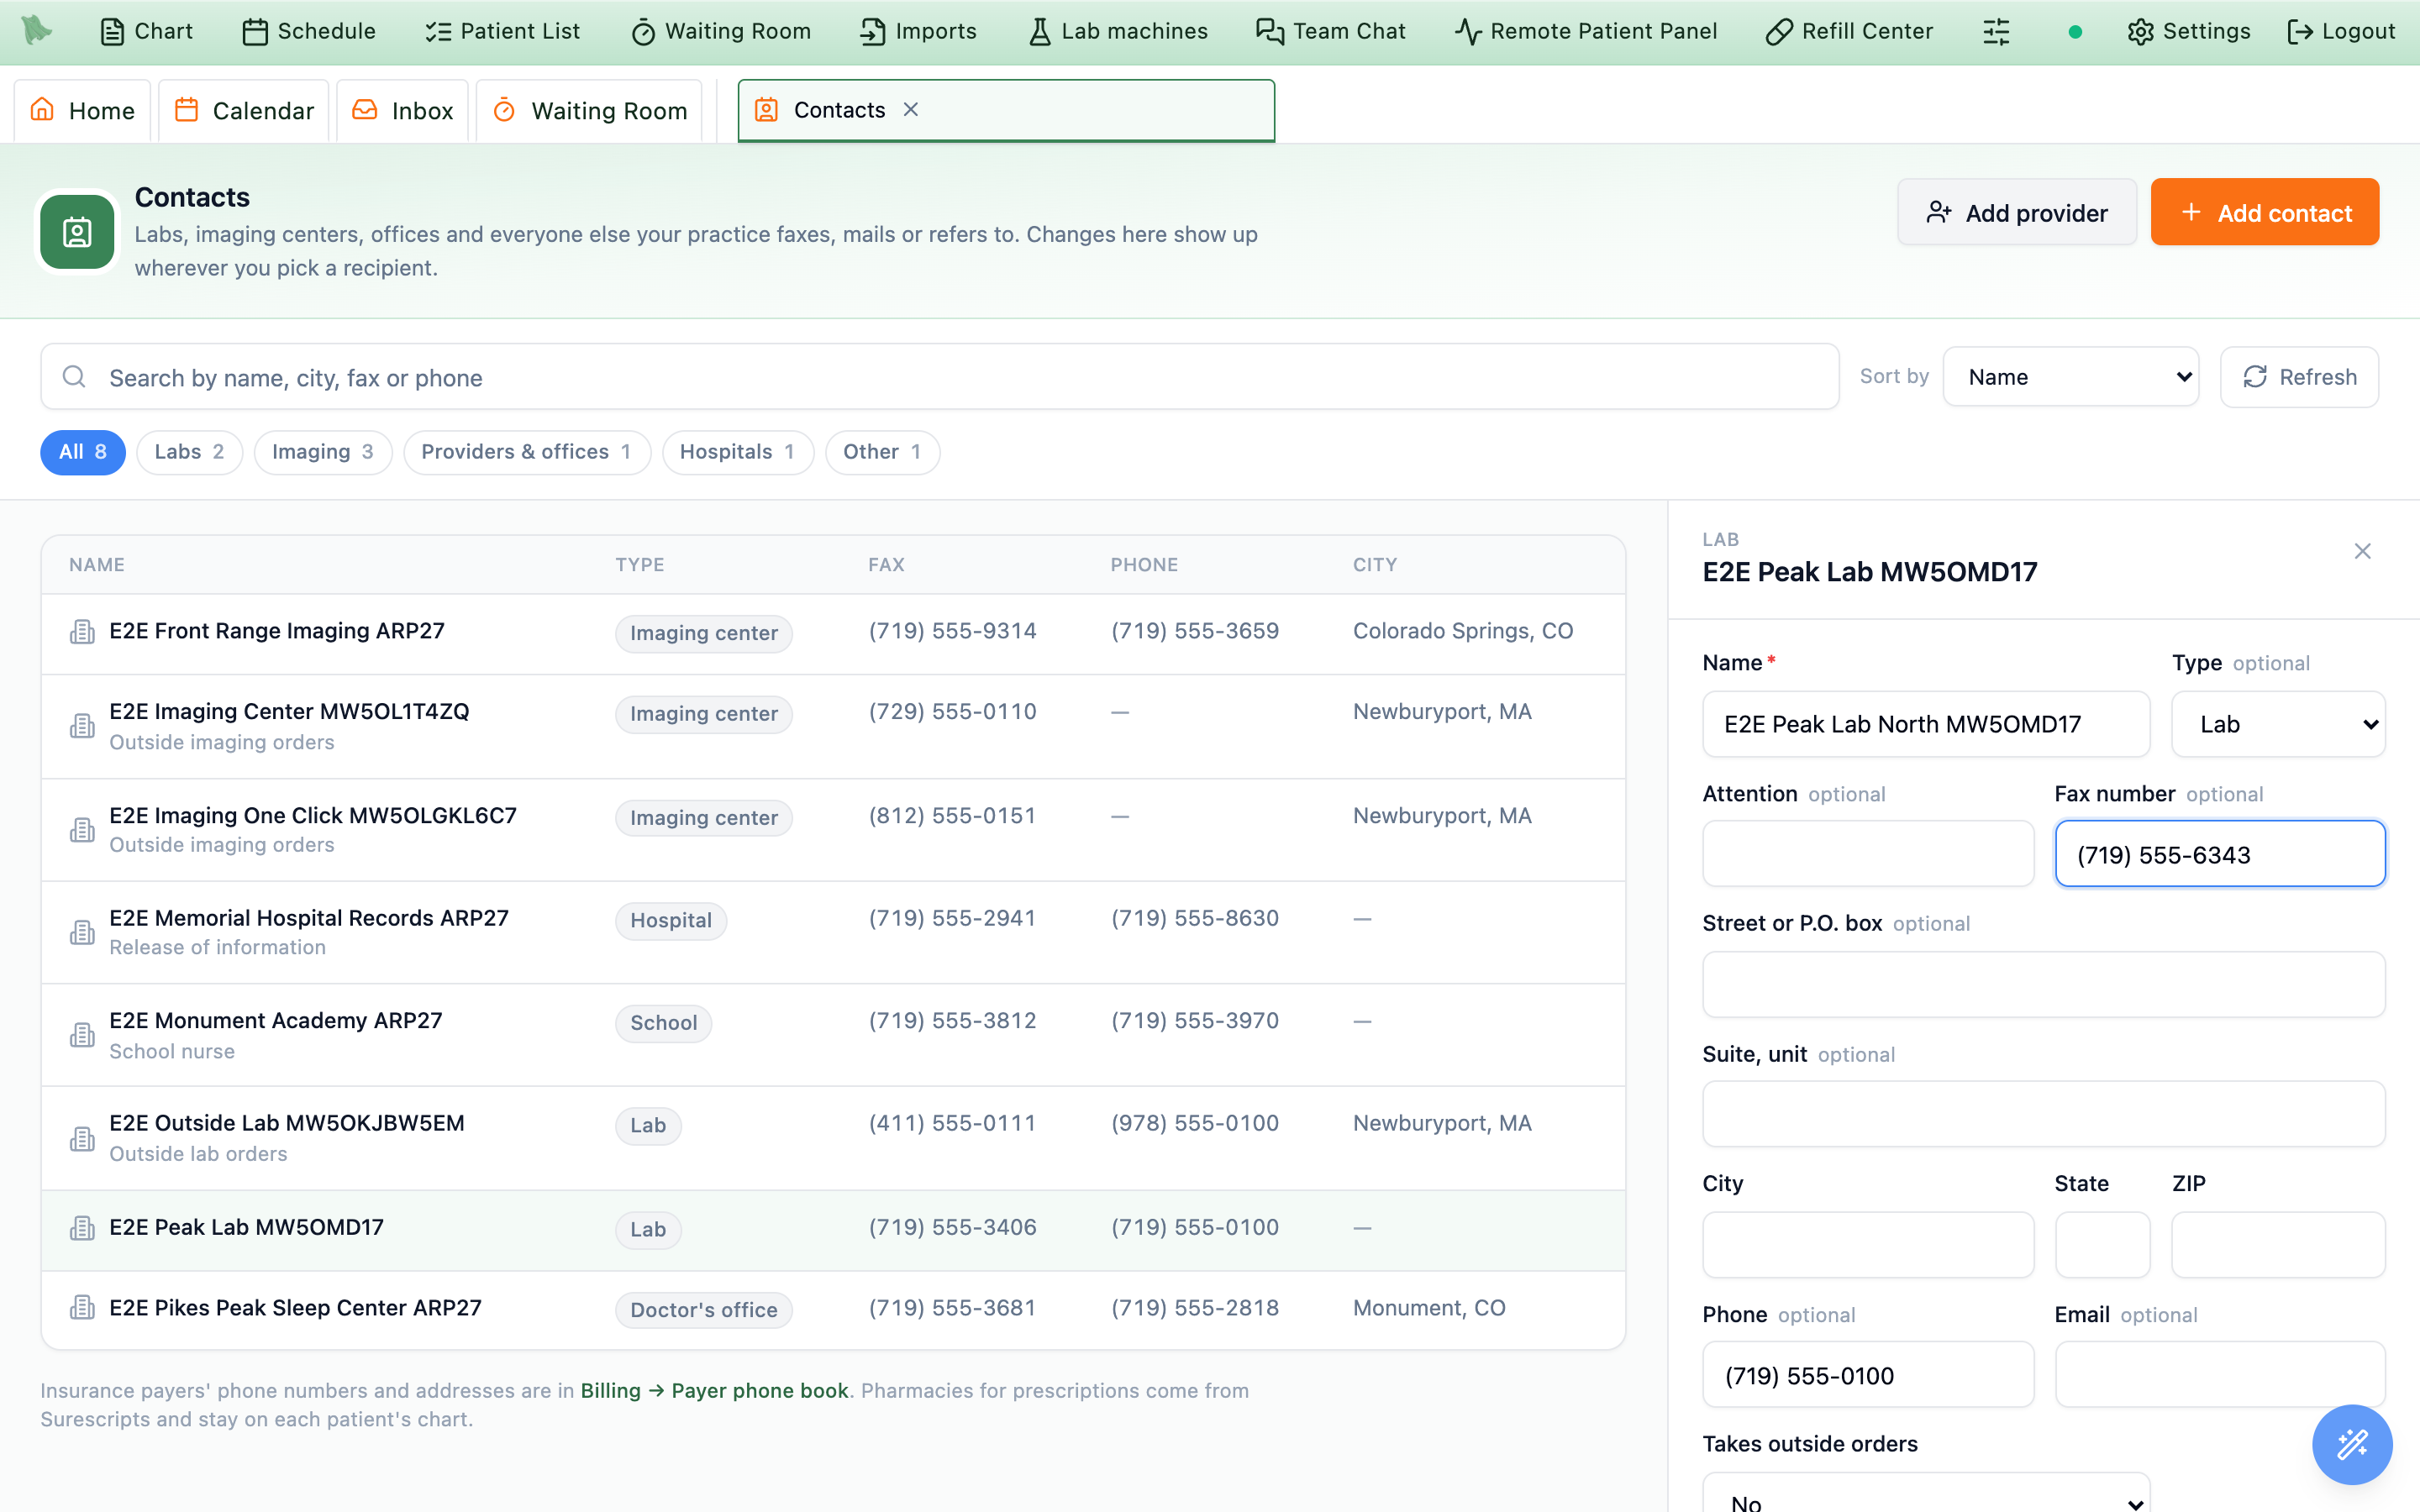
- Click the row. Its details open on the right.
- Change what you need and click
Save changes. Only what you changed is saved. - To delete, click
Deleteand confirm. A lab or imaging center that was used on outside orders says how many; those orders keep the details they printed.
- Fix it where you pick it. In the address book search, hover a saved contact and click
Edit. - Numbers saved from the Inbox. A texting or calling number saved with
Add to contactsinInbox → Inquiries(Inbox tour) is a phone-only contact, typed for exampleFamily or caregiverorVendorand listed underOther. Its name and note are what the Inbox shows on texts and phone messages from that number, so a change here shows there too. A number already on a saved contact can’t be added a second time from the Inbox. - Who can. Everyone who sends faxes or letters sees and adds contacts. Changing and deleting is for providers, administrators and staff who manage the practice’s fax contacts.
- Outside providers open in the same panel as Referring providers; add one with
Add provider. - Not here: insurance payers’ phone numbers are in
Billing → Payer phone book, and pharmacies for prescriptions come from Surescripts and stay on each patient’s chart.
Add physicians and keep their identifiers current
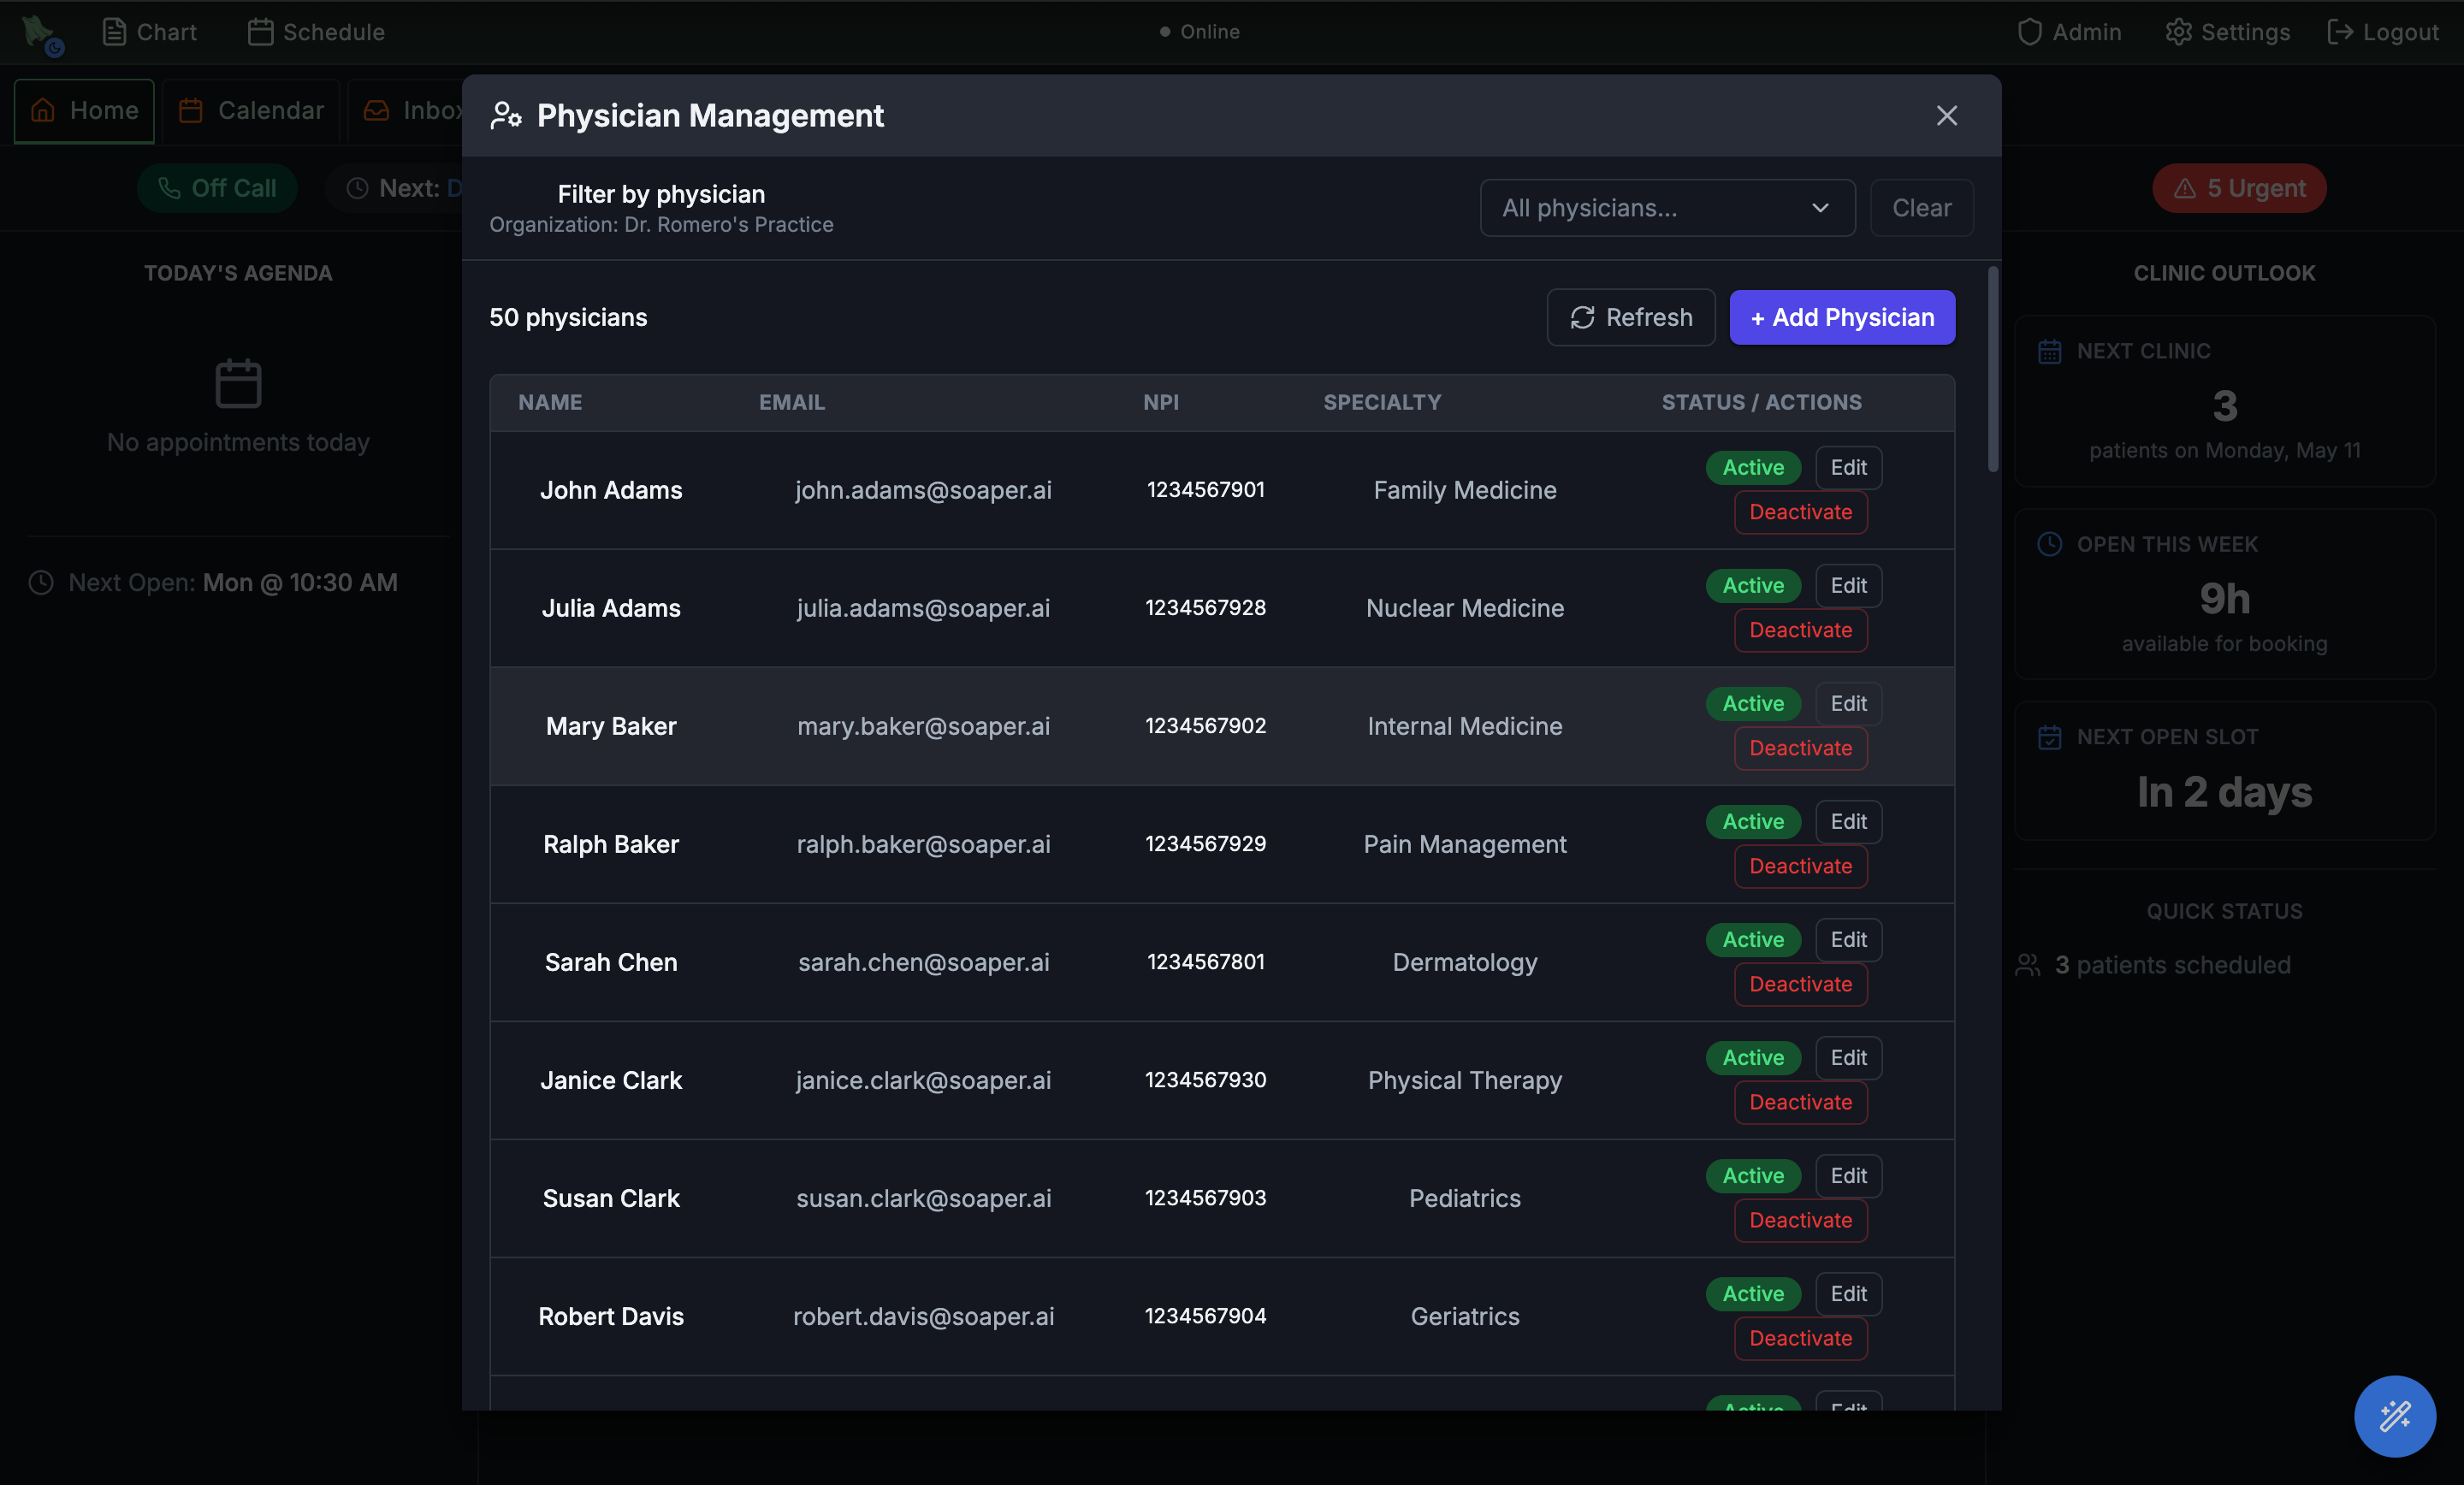
Physician Management is the source of truth for every clinician in the org. Each row carries the identifiers that downstream systems require: NPI for claims and SureScripts, specialty for online booking filters, and email for login. Each physician maintains their state-specific DEA registrations and prescribing addresses in Physician Settings. Deactivating a row hides the physician from scheduling and routing without deleting their history.
- Open
Admin > Physician Management. A table opens with every physician in the org. Search by name, email, NPI, or specialty, and narrow the list with the status pills — All, Active, Inactive, On leave — each of which carries a live count. - Use the Clinical visibility row for the second filter. Below the search bar, All / Visible / Hidden splits the roster by whether a physician is hidden from clinical contexts. Hidden rows also carry a Hidden badge.
- Click Add physician. Enter Name, Email (used for login), NPI, Specialty, and state-license information. The Email becomes their sign-in identifier, so use the address you want associated with their EMR account.
- Use Edit to update credentials. Keep NPI, licenses, specialty, and account details current here. Edits propagate to claim submission, SureScripts, EPCS, and chart signatures.
- Use Deactivate when a physician leaves. Deactivation removes them from booking, routing, and the Schedule Manager picker, but their signed notes, prescriptions, and claims remain in the chart for audit purposes.
Enter two or more DEA numbers (one per state) and their service addresses
A physician who prescribes in more than one state can save one DEA prescribing location for each state. The service or office address belongs to that DEA registration, while the physician's primary or mailing address remains separate.
- Open
Physician Settings > Addresses. Use the physician's own settings rather than the organization roster when adding prescribing locations. - Keep Primary / Mailing Address for general correspondence. This can be a home or mailing address and does not determine which address is sent with a controlled prescription.
- Under DEA prescribing locations, click Add DEA location. Enter a recognizable label such as Portland office, select the registered state, enter the DEA number, and complete that location's service address.
- Add every state where the physician prescribes. For example, save one Oregon registration with the Portland office and one Texas registration with the Austin office. Use mailing address can copy the mailing address as a starting point; edit the copied fields when the registered service location is different.
- Save settings. Hero validates duplicate states and DEA numbers and requires a complete service address for each registration. Each state takes one DEA number: a second registration for the same state is refused with “Only one DEA registration can be assigned to {state}.” A physician with two DEA numbers in two states adds one location for each.
Pick a physician’s specialty when it is not on the menu, and where malpractice details go
The Specialty field in Admin → Physician Management is a search box over the national list of provider specialties (provider taxonomy codes), not a short menu. If you can’t find your specialty, search for it in a different way; you cannot type a specialty of your own.
- Open
Admin → Physician Managementand clickEditon the physician (orAdd physician). - Click
Specialtyand type into Type to search specialties…. The search matches the specialty name, its broader group and its description. Try the broader group (for example Psychiatry & Neurology or Nurse Practitioner) and the narrower name (Child & Adolescent Psychiatry), or type the 10-character taxonomy code from the physician’s NPI record. Each result shows its code on the right. - Pick the result and save. When the old free-text specialty has no match yet, the form shows it under the field as
Current: …until you pick one. A second specialty goes inSecondary taxonomyunderPrescribing.
No specialties found for “…” means the words are not in the national list; use the code from the physician’s NPI registry entry instead.
Credentials, Specialty, the DEA number and Prescriber SPI, the Licensure section (license numbers and states), Tax & billing and contact details. Keep the malpractice certificate in your own credentialing files.Set up your signature: where it is in Settings
A physician’s signature is saved in their own Physician Settings, on the Signature tab, not in the Admin menu. Letters, faxed letters and forms that you sign use it.
- Click
Settingsin the top bar, thenProfile Settings. ThePhysician Settingsdialog opens. - Click
Signaturein the left column. It showsYour current signature:orNo signature has been saved. - Click
Create Signature(orEdit Signature). In theDigital Signature Editor, draw your signature with the mouse, trackpad or a finger;Clearstarts over. - Click
Save Signature.
Below the signature, Let my staff release forms and letters with my signature decides whether staff releases carry it; see Let staff use your signature. Each physician saves their own signature; an administrator cannot draw it for them. Staff accounts have no saved signature.
Invite medical assistants and front-desk staff
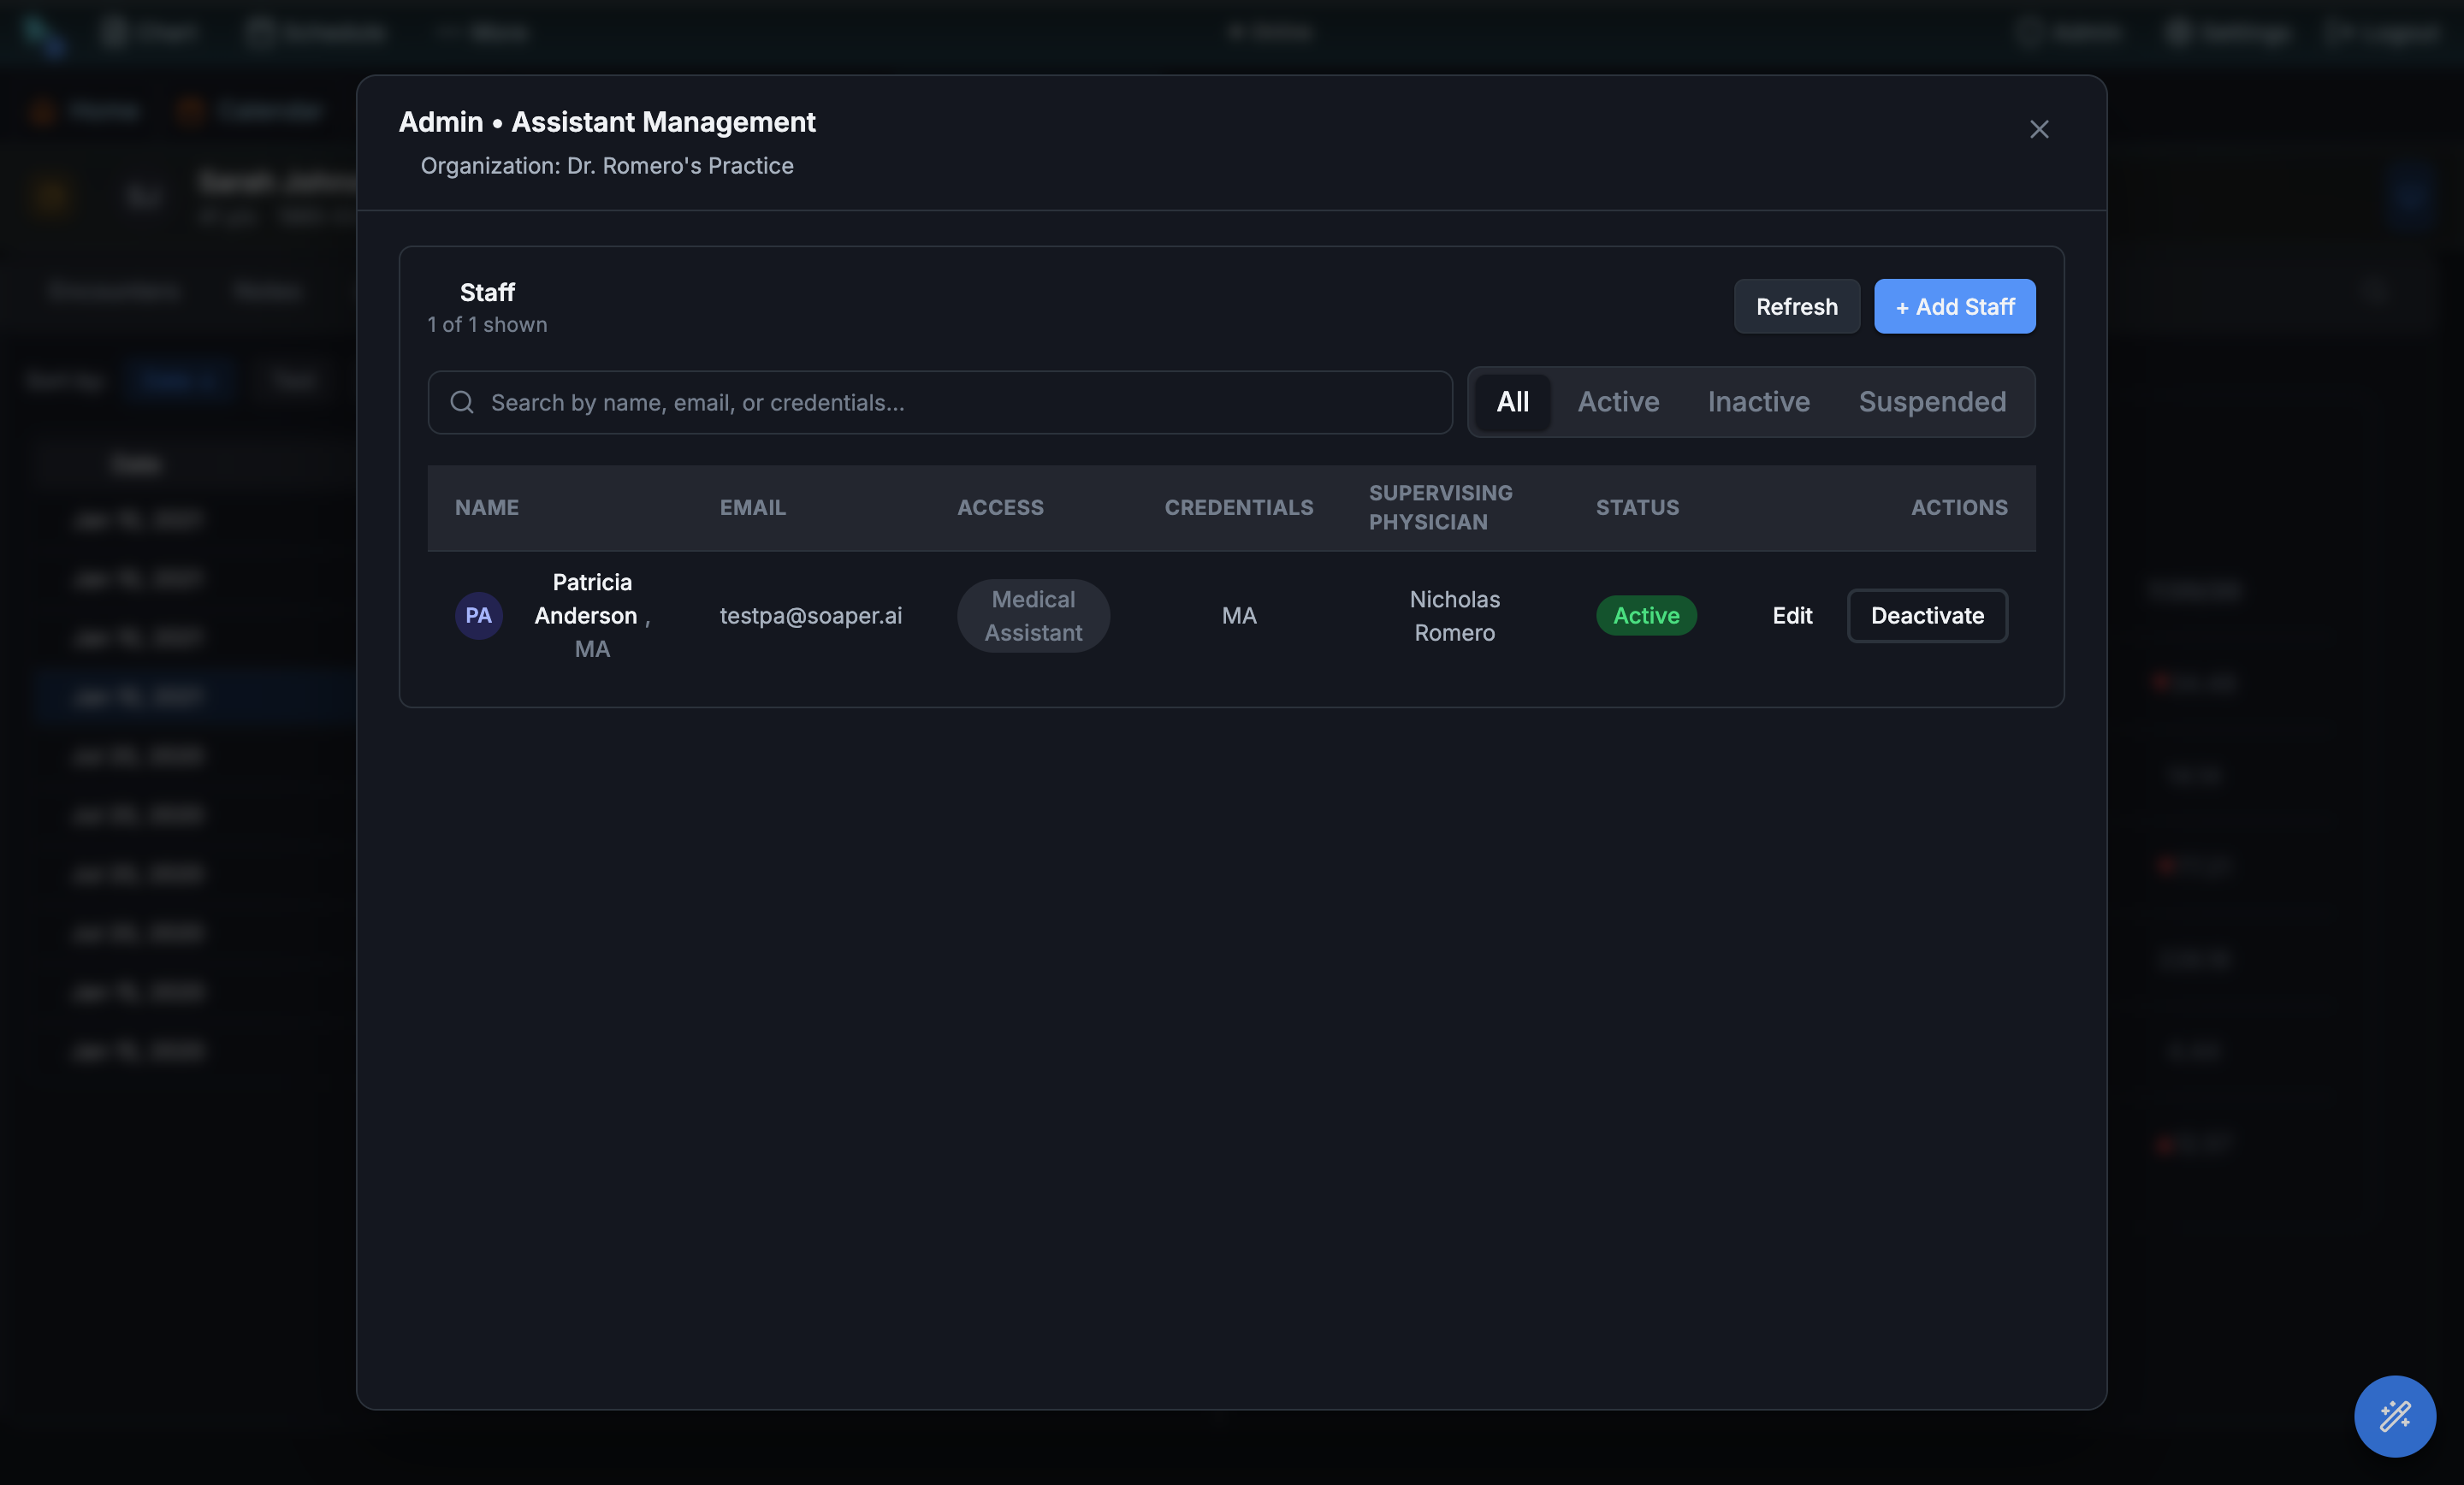
Staff & Assistants is the non-physician roster. Medical assistants, scribes, schedulers, front-desk users, and office managers live here. Office Manager is a staff role profile, not an administrator login; its delegated permissions determine which admin and billing tools it can use. Each row carries credentials (MA, RN, scribe, etc.), an email for login, and a supervising physician link — assistants act on behalf of their supervisor for orders, in-basket routing, and chart access.
- Open
Admin > Staff / Assistants. The Assistant Management modal opens with the full staff list. Toggle between All, Active, Inactive, and Suspended tabs to filter by status. - Click + Add Staff. Walk through the staff wizard: name, email, credentials (free text — MA, RN, LPN, Scribe), and the supervising physician they're paired with on the
Profilestep, then theAccessstep — “Pick one or more role profiles, then fine-tune individual permissions if needed.” Tick Role profiles such as Front Desk, Medical Assistant, Biller, or Billing Manager, and useCustomize granular permissionsfor anything extra. - Use Edit for ongoing changes. Re-link a supervisor when an MA changes pods, update credentials when they upgrade, change email if they migrate to a work address.
- Use Deactivate when a staff member leaves. They lose login access immediately; their prior in-basket actions and chart edits remain attributed to them.
| Workflow | Role profiles that include it |
|---|---|
| Open a patient’s billing without the clinical chart, and fix the address and insurance a claim needs (Patient billing) | Biller, Billing Manager, Office Manager |
| Book a visit, sign and send, or release a claim even though the insurance check failed, with a reason (Billing → Eligibility) | Front Desk, Biller, Billing Manager, Office Manager |
| Triage patient refill requests (Refills) | Medical Assistant, Nurse |
| Review pre-visit intake (Intake review) | Medical Assistant, Nurse, Intake Coordinator |
| Run the check-in kiosk (Kiosk) | Front Desk, Medical Assistant, Nurse, Intake Coordinator, Office Manager, Check-in Kiosk |
| Enroll and revoke walk-up tablets (Walk-up tablets) | Office Manager |
| Book and manage treatment series (Treatment series) | Front Desk, Medical Assistant, Nurse, Intake Coordinator, Office Manager |
| Start a patient’s work notes, school notes and forms, and approve, reject, edit, print, fax and email them, releasing them for a provider (Forms & Letters) | Front Desk, Medical Assistant, Nurse, Clinical Staff, Office Manager, Intake Coordinator, Referral Coordinator, Organization Owner — not Biller, Billing Manager or Back Office Biller |
Access step for staff who screen intake before visits; it carries no payment, billing, or chart-documentation rights. Practice owners can open Billing, including physician owners, when billing is enabled for the practice. Individual financial actions still have their own access checks.
Forms & Letters: releasing letters for a provider
The Forms & Letters group in Customize granular permissions holds one permission, Start forms and letters for a patient, and approve, reject, edit and send them. (forms_letters.manage). Under it the panel lists what it covers: starting a work note, school note or form for a patient (by phone, in person, fax or email); approving or rejecting forms and letters the patient asked for, releasing them for a provider; and editing, printing, faxing and securely emailing released forms and letters. Every role profile that works with patients at the desk or in the clinic includes it (table above); billers do not. Providers and practice administrators can do all of it without the permission.
- To take it away from one person, open
Admin > Staff / Assistants, Edit the staff member, go to theAccessstep and openCustomize granular permissions. - Untick the box under
Forms & Letters. It is marked−Removed(removed from the role profile) and the change applies only to this person. Save. - What they keep. With chart access (
patient.view) they still see the patient’s Forms & Letters list and can open, print, fax and download released documents. They can no longer start, release, reject, edit, withdraw or email them.
A staff release never signs as the provider: the document carries the provider’s saved signature only if that provider turned on Let my staff release forms and letters with my signature in their own settings, and otherwise the staff member’s name released on the provider’s behalf; see Review & release.
Front-desk refunds have a separate patient-payment refund permission. It allows refunds without granting write-offs, fee waivers, or credit adjustments. Waiving a patient’s no-show or late cancellation fee or removing an unpaid copay has its own permission (Waive a patient’s no-show or late cancellation fee or remove an unpaid copay), which no role profile includes: give it to one person and they can, with a reason, waive those fees and remove a copay nothing has been paid toward, even if their practice financials are hidden, but not change a copay’s amount. Taking payments also requires payment-collection permission and patient-invoice access. Dues refunds use the separate membership-refund permission. Review the staff member’s granular permissions for the intended workflow; see Payments & card readers.
Some permissions only the practice owner or an administrator can give, and no role profile includes them: changing the practice’s security settings (Security settings) and emergency chart access (Emergency chart access). An office manager can assign whole role profiles but not these. Staff add their own passkey or text-message number from the shield button Sign-in & security in the top bar (see Signing in & passkeys).
Reset an employee’s password, or resend their sign-in email
An administrator cannot see or type an employee’s password. To reset a staff member’s password, send them a new password setup email (or a one-time link) from Staff / Assistants; they then choose a new password themselves. Anyone can also reset their own password with Forgot password? on the sign-in screen.
- Open
Admin → Staff / Assistantsand find the person. Their status must beactive; a deactivated account needsActivatefirst. - Click
Resend setup emailand confirm “Send a password setup email to …?” The email carries a link that lets them set a new password. You can send it again after five minutes. - Email not arriving?
Setup statusshows whether a sign-in has been recorded and whether the email was accepted for delivery. For someone who has never signed in,Generate setup linkcreates aOne-time setup linkto hand them privately (“This link permits setting their password.”).
Physicians, and resetting your own password
- Forgot your password: on the sign-in screen click
Forgot password?, enter yourWork emailand clickEmail me a link. The link expires about an hour after it is sent; check your spam folder. - Know your password and want to change it: physicians open
Settings → Profile Settings → Password, enter the current password and a new one of at least 8 characters. - Physician Management has no reset button. A physician who is locked out uses
Forgot password?.
Make someone an administrator, or add a second admin
There is no switch in Hero to turn an existing user into a practice administrator. To give a staff member most of the admin tools, assign the Office Manager role profile (“Operational administration across staff, billing, scheduling, and portal settings.”). To add a second full practice administrator, contact Hero support.
- Open
Admin → Staff / Assistantsand clickEditon the person (or+ Add Stafffor someone new). - On the
Accessstep, tickOffice Manager. UseCustomize granular permissionsto add or remove single permissions for this person. - Save. They see the admin tools their permissions allow the next time the menu loads.
Search, add, and edit patients from the admin console
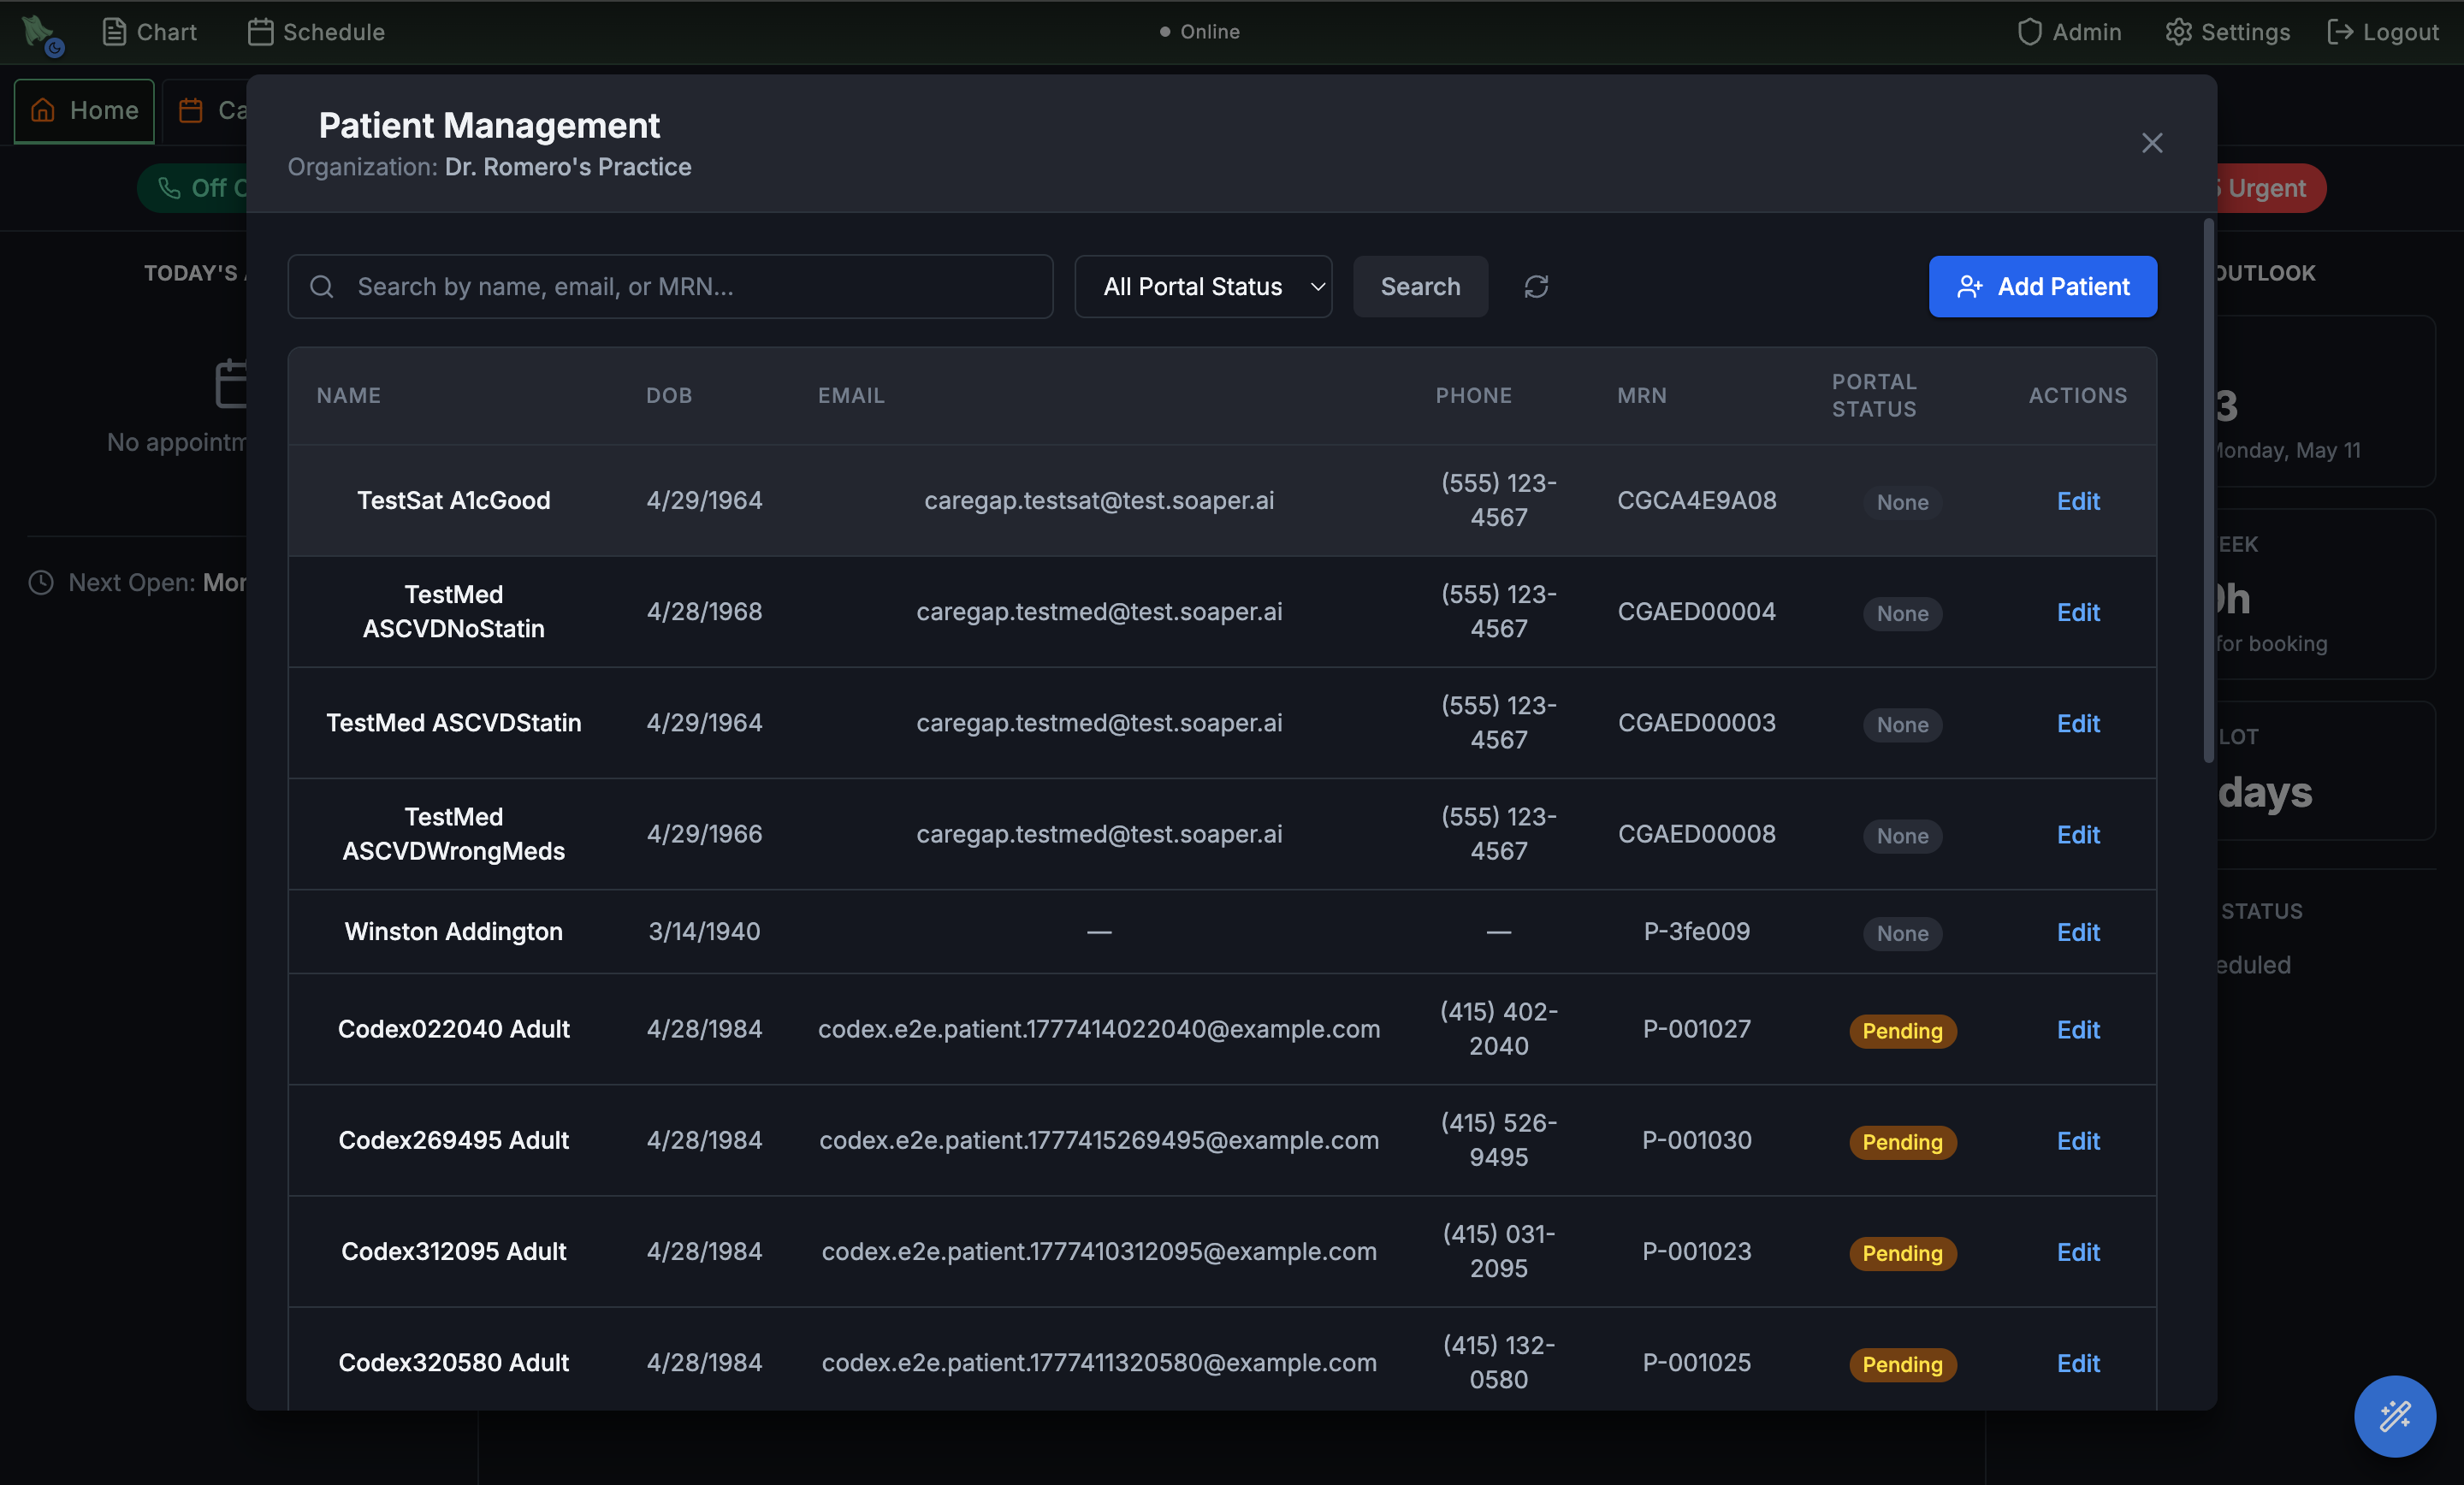
Patient Registration is the org-wide patient directory. Use it to add patients that bypass online booking (walk-ins, phone bookings, migrated charts) or to fix demographics that came in wrong from the portal. The list shows every patient in the org, regardless of which physician they see.
- Open
Admin > Patient Registration. This is not a modal — it opens as its own workspace tab titled Patient Registration (“Manage patient records and portal access”), with a searchable, paginated list of every patient. Search by name, email, or MRN. - Filter by portal status. The All Portal Status dropdown offers No Invitation, Pending (invited but not signed in), and Active. Row badges read No invite, Pending, or Active to match.
- Filter by patient status. A second dropdown, All Patient Status, filters on the clinical relationship instead: Active, Inactive, Prospective, Discharged, Transferred out, or Deceased. The two filters combine, which is how you find (say) active patients who never accepted a portal invite.
- Click Add Patient. The Register New Patient form opens. Enter First/Last name, DOB, sex, email, phone, and address. Unless your practice changes it, phone and (for adults) email are required, and so are a parent or guardian’s phone and email for a patient under 18; your practice chooses which fields are required, and can add an Insurance section, in Registration form settings. A patient registered without an email gets no portal invitation. The address ZIP accepts only a 5-digit ZIP or a 9-digit ZIP+4 (digit-only entries are reformatted, so
410561234saves as41056-1234); it may be left empty, but insurance claims will wait on a complete address. - Send or resend a portal invite from the row. The badge in the Portal column is a button while portal access is still No invite or Pending — hovering it swaps the label to Send invite or Resend invite. Once the patient's portal access is Active the badge is plain text. To manage access after that, click the key button on the row (
Portal access):Change email,Send sign-in link,Resend invite,Remove, andAdd parent or guardian. See Sign-in email & links. - Edit demographics. Click Edit on any row to fix name spelling, sex, contact info, or address.
Registration form: insurance and the fields your practice requires
Your practice decides what the front desk must fill in on Register New Patient, and can add an Insurance section to it. The settings apply to Register New Patient for everyone in the practice; patients who sign up online, imported charts and charts made from referrals or faxes are not affected, and neither are edits to existing patients.
Open the settings
Open Admin → Practice Info and choose Registration form, or click Form settings at the top of Admin → Patient Registration. Both show the same settings. Practice administrators, the practice owner, and staff allowed to manage practice information can change them. Nothing changes until you click Save.
Insurance on the registration form
Turn on Show insurance on the registration form (off by default) to add an Insurance section to Register New Patient:
- Choose
Has insuranceorSelf-pay / no insurance. Neither is chosen to start with. Self-pay adds no policy: “The patient is billed as self-pay until a policy is added.” - Click
Scan cardto read the insurance card. Upload photos or use this device’s camera (front, and back if you like), thenRead card; or, underTake the photos with a phone, show the QR code and take the photos with the patient’s phone. Check what the scan filled in: fields that were hard to read are listed after Double-check:. Pick the payer from the list. - Fill in the policy. Payer, member ID, group, coverage dates and the relationship to the patient. If someone else holds the policy, enter that person’s name, date of birth, sex and address. Click
Add secondary insuranceif the patient has a second policy. - Click
Create Patient. Hero saves the patient first, then the insurance, and checks eligibility the same way the Insurance tab does. The card photos are saved to the policy.
If the insurance can’t be saved, the patient is still created and nothing you entered is lost: “The patient was created, but the insurance wasn’t saved. Nothing you entered is lost.” Fix it and click Save insurance, or click Finish on the Insurance tab to finish it on the new chart. If the card was read but its photos couldn’t be kept, the form says so; scan again to keep them, or save without them.
Required fields
Under Required fields, switch Required on for each field the front desk must always fill in:
| Field | Notes |
|---|---|
Email | Patients 18 and over. Required unless you switch it off. |
Phone | Required unless you switch it off. |
Parent or guardian phone, Parent or guardian email | Patients under 18. Required unless you switch them off. |
Parent or guardian date of birth, Parent or guardian sex | Patients under 18. |
Mailing address | Street, city, state and ZIP. |
County, Race, Ethnicity, Mother's maiden name | |
Insurance or self-pay | Only while the Insurance section is shown. |
First name, last name, date of birth and sex are always required, and for patients under 18 the parent or guardian’s first and last name. Register New Patient lists what is still missing next to its save button, for example Still needed: Phone, Mailing address, and can’t be saved until it is filled in.
Patient Registration.
To fill in the form from the patient’s driver’s license or other photo ID, see Photo IDs and patient photos.
Make a patient inactive (archive a chart), or make an inactive chart active again
To archive a patient who no longer comes to the practice, change their Patient Status to Inactive (or Discharged, Transferred out or Deceased). To reactivate an inactive patient, set it back to Active. Nothing is deleted: the chart, notes, prescriptions and claims stay, and the patient still comes up in patient search.
- Open
Admin → Patient Registrationand search for the patient by name, email or MRN. To find patients who are already inactive, set theAll Patient Statusfilter toInactive. - Click the pencil on the patient’s row (its tooltip reads
Edit demographics). TheEdit Patientform opens. - Pick the new status in
Patient Status, underIdentity:Active,Inactive,Prospective,Discharged,Transferred outorDeceased. - Click
Save Changes. The new status shows on the chart’sDemographicscard asStatus.
| Status | What changes |
|---|---|
Inactive, Discharged, Transferred out | Automated messages stop: reminders, follow-ups, questionnaires, surveys, campaigns and balance reminders. Staff can still send a message by hand. An active membership ends at the end of the current billing period. |
Deceased | No communications at all, including messages staff send by hand. An active membership is cancelled straight away. |
Active | Automated messages start again for this patient. |
Patient Status is set here, not in the chart’s own Edit demographics form.Patient Status is not the same as a visit “on hold”. A website or AI phone booking that is waiting for the patient to finish online registration is a scheduling hold, handled from the schedule, not from the chart’s status.
Duplicate patient charts: merge them, or delete a registration made by mistake
Hero has no button to delete a patient or a patient registration, and staff cannot merge two charts themselves. Every chart is kept as part of the medical record. When the same person has two charts, ask Hero support to merge them; when a chart was made by mistake and has nothing in it, make it inactive.
- Check that it really is the same person. Compare name, date of birth, phone and email on both charts, and note both MRNs.
- Ask Hero support to merge the charts. Email support@heroemr.com or press F9 (
Report A Problem) with the two MRNs and which chart should be kept. Do not include other patient details. Support moves what was recorded on the duplicate onto the chart you keep; the duplicate stays behind as an inactive record so the audit trail is complete. - A chart made by mistake for nobody (a test patient, a typo that created a second patient): set its
Patient StatustoInactiveso no reminders go out; see Make a patient inactive.
How Hero tries to stop duplicates
- On
Register New Patient. If a chart in your practice has the same details, the form stops with “This may already be a patient” and lists the match (date of birth, phone ending, masked email and MRN). ClickOpen this chartif it is the same person. If it is someone else, the save button now readsCreate a new chart anyway. - Charts made by online registration, check-in and similar channels. When one may match an existing chart, the new chart gets a
Possible duplicate chartchart alert naming the other chart’s MRN and what matched, and a reviewer gets a to-do. If they are the same person, ask support to merge them as above; otherwise dismiss the alert (see Chart alerts).
Brand the patient portal without a code deploy
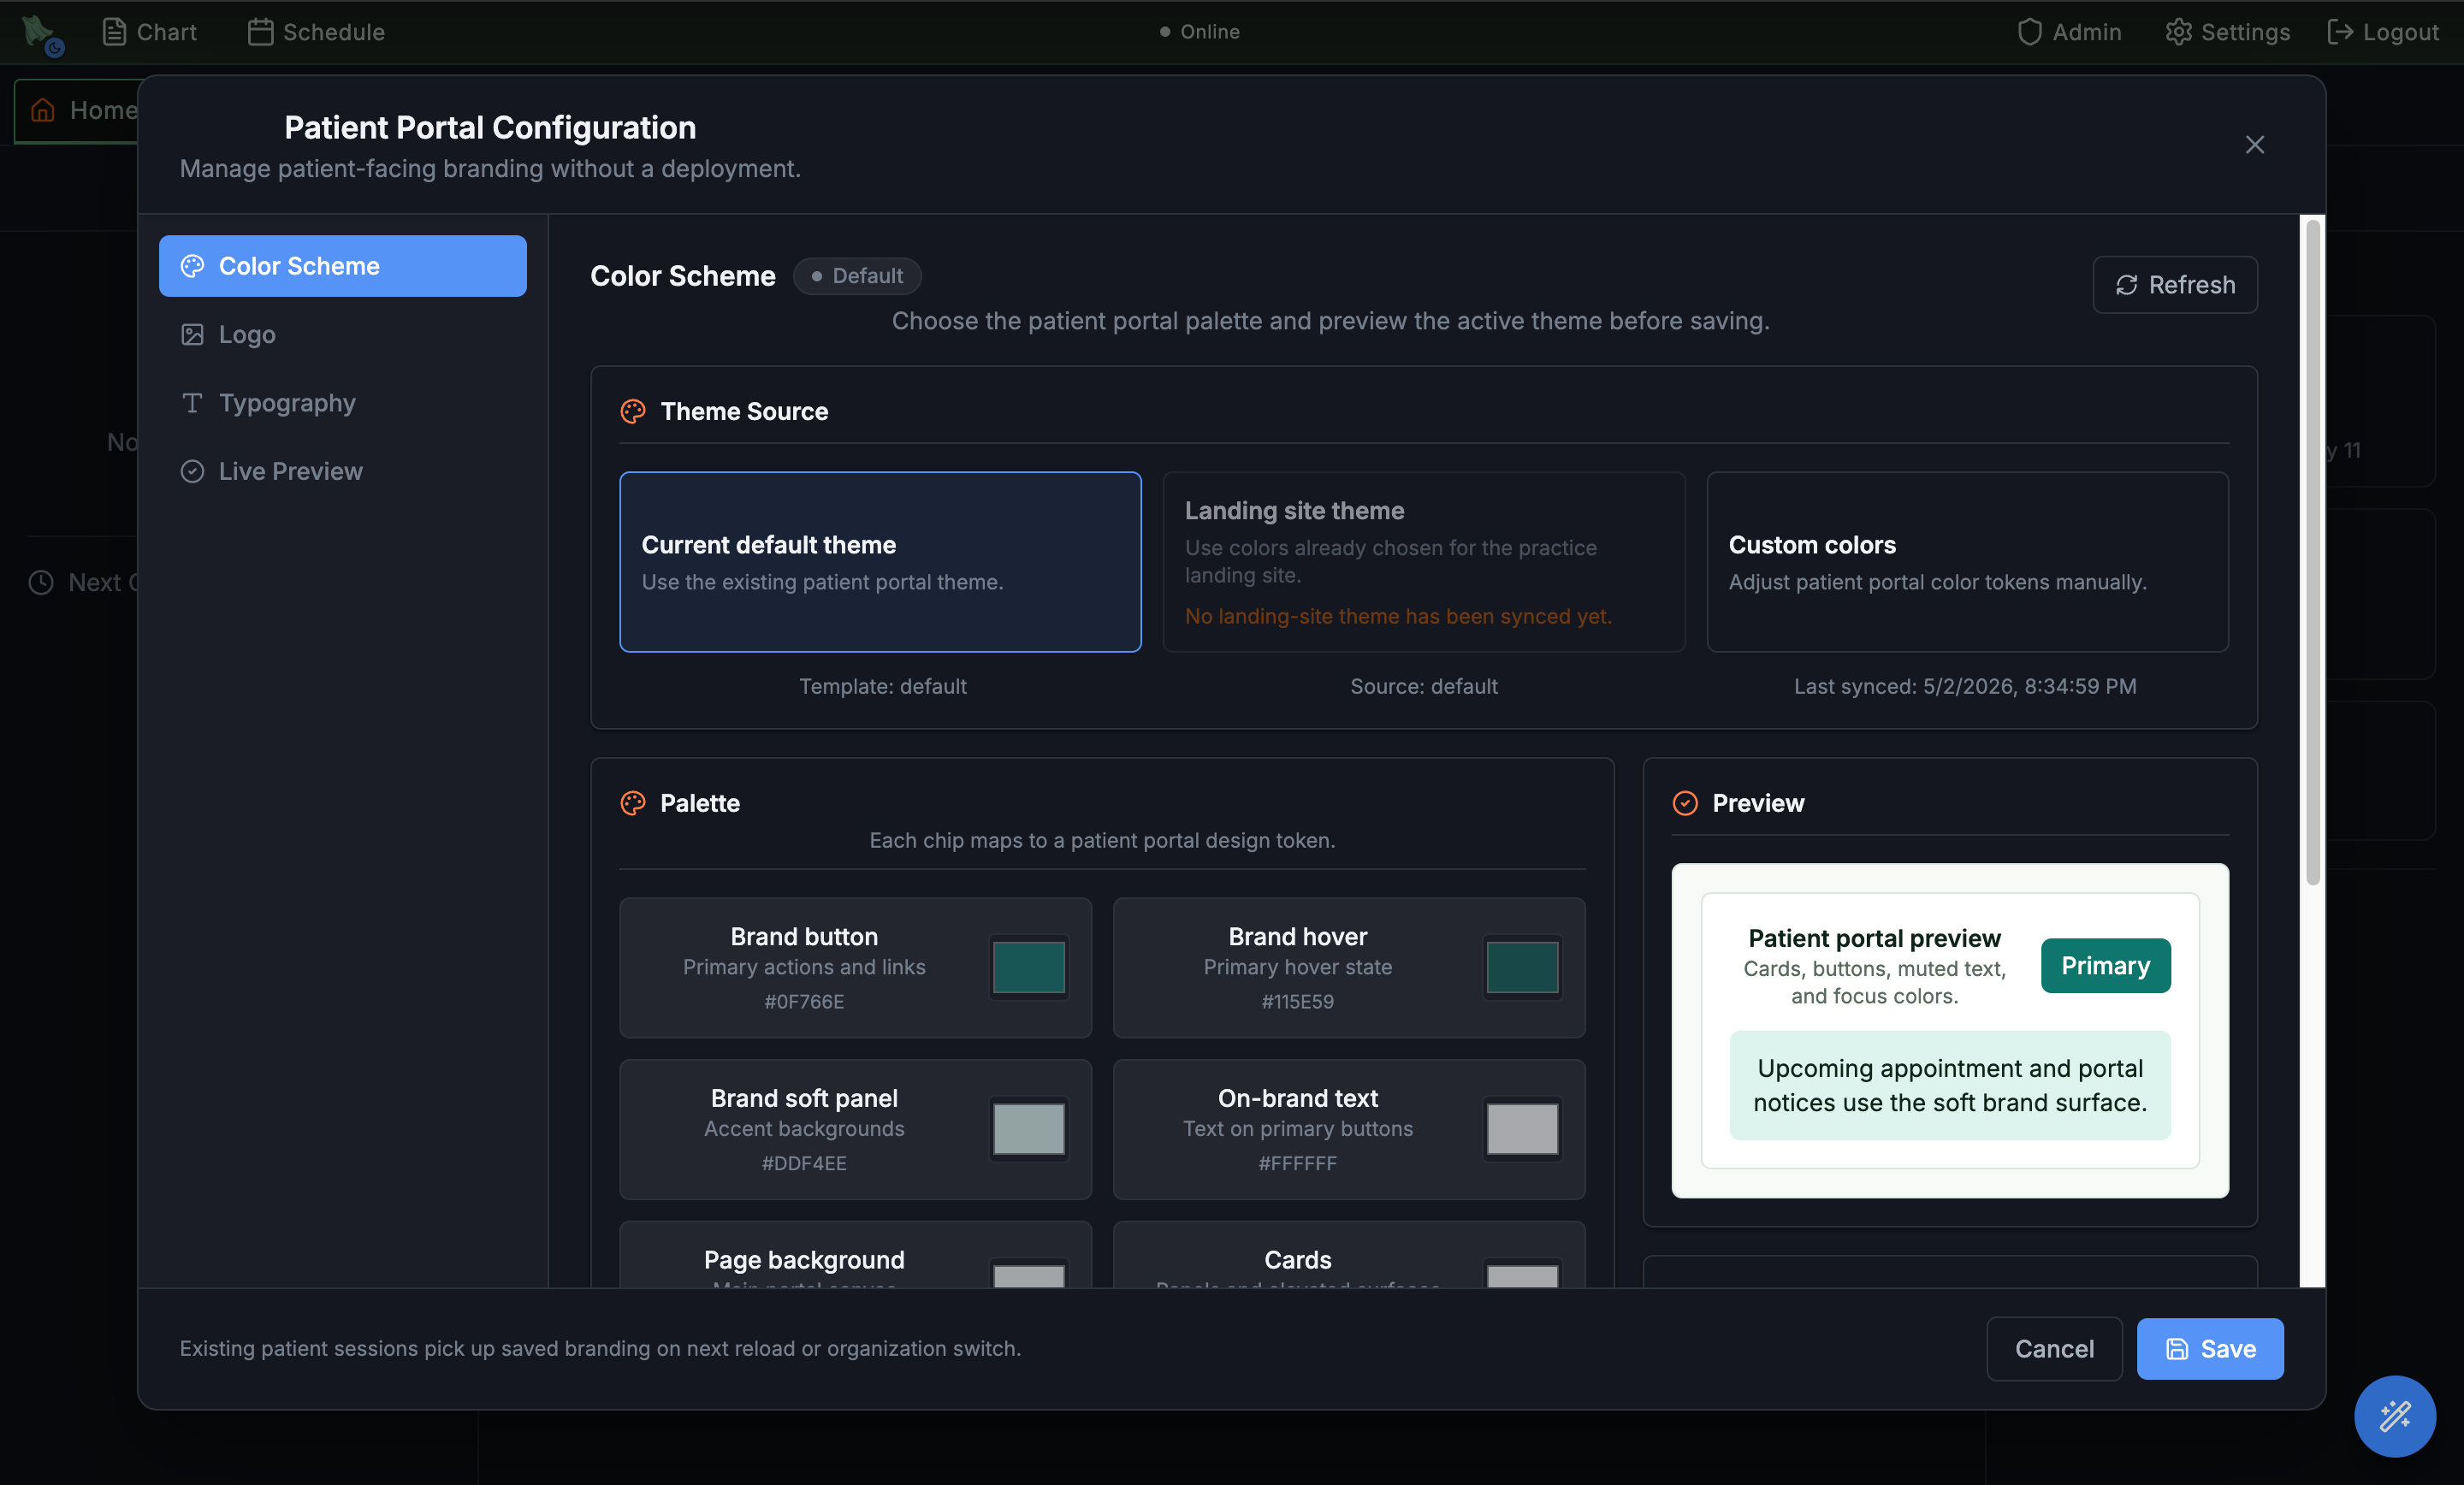
Patient Portal Configuration controls both what your patients can do in the portal and how it looks to them — feature toggles first, then color palette, logo, typography, and a live preview. The defaults work out of the box; customize when you want the portal to match your practice's identity or your landing site.
- Open
Admin > Patient Portal Configuration. The modal opens to the Features tab. The tabs run down a left rail: Features, Teens & guardians, Correction requests (only while Record correction requests is on in Additional Features), Color Scheme, Logo, Typography, and Live Preview. What parents and guardians of minors can see is set on Teens & guardians — see Teens & guardians. The deadlines for answering patients’ correction requests are set on Correction requests — see Record correction requests. - Decide what the portal offers. The Features tab carries twelve toggles, all on unless you turn them off (Online Bill Pay is listed only while billing is on): Secure Messaging (portal Messages tab and new-message alerts; staff replies over SMS or email keep working), Online Scheduling (book, reschedule, cancel, waitlist — viewing appointments, check-in, and telehealth join stay available), Online Bill Pay (balances, statements, saved cards, pay links; staff-collected payments are unaffected), Insurance Self-Service (patients adding their own cards; staff entry and the kiosk are unaffected), Health Records (labs, imaging, shared media, diagnoses, patient instructions), Visit Notes (signed visit notes and visit summaries; it sits under Health Records and only applies while that is on, so you can hide notes while keeping results visible), Letters & Forms (patient-initiated requests; questionnaires and required paperwork are unaffected), Refill Requests (the refill button, not the medication list), Document Uploads, Caregiver Sharing (adult patients inviting family or caregivers to help; turning it off stops new invitations only), Family Access Requests (a parent asking the practice to add another parent or guardian; turning it off stops new requests only), and Nutrition (food log, sharing and nutrition activities) (the food log and nutrition targets in the My Hero app; turning it off closes Nutrition in the app, keeps food logs, and the chart still shows anything already shared). Turning one off hides that surface from patients — it does not delete anything.
- Choose when patients see lab and imaging results. Still on Features, When patients see lab and imaging results is
Right awayunless you change it.After a clinician releases themholds each new result until a clinician releases it, or until Release automatically after (24, 48 or 72 hours) ends — see Releasing results after review. - Set the Orientation intake questions. Still on Features, the Orientation intake toggles control what new patients are asked during portal orientation. The history questions are Past Surgical History, Social History (not asked on proxy accounts), Family History, and GYN History (offered only to patients whose recorded sex is female or other, never on proxy accounts). Newly created organizations start with all four on. Family History is on for every practice unless you turn it off; for a practice set up before these settings existed, the other three start off until you turn them on, so confirm the setting before go-live rather than assuming it. When none is on, patients get no Health History step (Is health history part of intake?). The Social Security Number card in the same list is separate: it always starts off, even for a brand-new practice. Turn it on and patients are asked for their Social Security number while they set up their profile, and can skip it. Staff see only the last four digits, and every time someone views the full number it is logged (see The Social Security number row).
- Pick a Theme Source. On Color Scheme, three options: Current default theme (Hero defaults), Landing site theme (pulls colors already chosen for your physician landing site so portal and marketing match), or Custom colors (set each design token by hand).
- Tune the Palette. Each color chip maps to a specific portal design token: Brand button, Brand hover, Brand soft panel, On-brand text, Page background, Cards, etc. The right-hand Preview updates live.
- Watch the Accessibility card. Hero scores seven text/background pairs for WCAG contrast as you edit and prints each ratio — green when it passes, red when it doesn't. If any pair falls below AA you get “Some color pairs are below WCAG AA and cannot be saved” and the Save button stays greyed out until you fix it. A disabled Save almost always means a failing contrast pair, not a bug.
- Upload a Logo. Switch to the Logo tab, click Choose, and pick a PNG, WebP, or JPEG no larger than 2 MB — a transparent PNG or WebP looks best. SVG is not accepted and is rejected with “Unsupported logo type.” The logo appears in the portal header and on confirmation emails.
- Pick Typography. The Typography tab swaps the portal font family. Defaults match the EMR.
- Check the Live Preview. Renders an actual portal card with the active palette, so you can sanity-check the whole theme before committing.
- Click Save. Active patient sessions keep the old theme until they next reload; new sessions and emails pick up the change immediately.
Choose how long people stay signed in and how they sign in
Admin → Security holds the sign-in rules for everyone in your practice: how long someone can sit idle before Hero signs them out, how often they confirm it’s them again, whether a passkey can live on a phone or a security key, and, when your practice uses it, the terms of emergency chart access. The page reads: “These settings apply to everyone in your practice. Nothing changes until you save.”
-
Open
Admin → Security. In the Admin menu it sits underMoney and admin; you can also type “security” inFind an admin page. The practice owner and practice administrators always see it. Other staff see it only if an owner or administrator gave them the permission “Manage practice security settings: idle sign-out and how often two-step verification is repeated.” An office manager does not get it from the role alone. -
Pick a value for each setting you want to change.
A changed row is outlined and marked
Changes when you save. The bar at the bottom says what will change, for example “2 unsaved changes: Sign out after 30 minutes of inactivity, repeat two-step verification every 8 hours.” Your choices are kept if you switch to another Hero tab, and the browser asks before you close or reload the page. -
Click
Save Changes(orDiscardto start over). The bar confirms with “Saved. 1 setting updated.” Open Hero tabs pick up a new idle limit within a few minutes.
Sign-in sessions
| Setting | Choices (default) | What it does |
|---|---|---|
Sign out after inactivity | 5 minutes to 8 hours (1 hour) | Everyone is signed out of Hero after this much time with no activity. A one-minute warning comes first, and a recording or phone call in progress keeps the session open (see Staying signed in). |
Sign patients out of the portal after inactivity | 5 minutes to 3 hours (30 minutes) | Patients are signed out of the patient portal after this much idle time. They see a one-minute warning and can choose to stay signed in. Patients already signed in get the new time the next time they open the portal. |
Repeat two-step verification | 1 to 24 hours (12 hours) | People confirm it’s them with a text-message code or a passkey when they sign in, and again once this much time has passed. A shorter limit applies right away: anyone who verified longer ago than the new limit is asked again on their next action. A longer limit applies from each person’s next verification. |
Also end idle sessions on the server | Off (default) or On | Off keeps the usual behavior: the app signs idle people out on screen. On: Hero itself stops accepting a sign-in that has been idle longer than the limits above, even if the browser was closed or the computer went to sleep instead of signing out. The person signs in again. |
Passkeys and two-step verification
A passkey signs someone in with Touch ID, Windows Hello or their computer PIN, with no code to type. People without one confirm it’s them with a text-message code.
Passkeys on phones and security keys(Off (default)). On lets people keep their passkey on their phone (they scan a QR code to sign in) or on a USB security key. Turn it on when some computers have no Touch ID, Windows Hello or PIN. Passkeys already set up keep working either way, and the patient portal and the mobile apps are not affected.Your teamlists everyone on the clinical team with how they sign in. Three tiles count the peoplewith a passkey, usingtext-message codes only, andnot set up yet. Each person showsProvider,AdministratororStaff, their email, and one badge:Passkey,Passkey (phone or key),Text-message codesorNot set up(plusText codes toowhen they have both).- The list only reports. A passkey belongs to one person’s device, so each person adds their own (see Add a passkey).
Set up my passkeyopens your ownSign-in & securitywindow.
Emergency chart access
This group appears only after your practice turns on Emergency chart access in Admin → Additional Features (off by default). It sets the terms for staff who break the glass; who may use it is chosen in Staff permissions. The full workflow is in Emergency chart access.
| Setting | Choices (default) | What it does |
|---|---|---|
Access they get | Front desk, Medical assistant, Nurse, Referral coordinator | The staff access level used while emergency access lasts. Nurse access lets them read and update the chart; front desk access is mostly demographics and scheduling. |
How long it lasts | 15 minutes, 30 minutes, 1 hour, 2 hours, 4 hours | Access ends on its own after this time; the person can end it sooner. A new emergency needs a new reason. |
Who is told | Practice administrators, People who can view the Audit Log, Administrators and Audit Log viewers | These people get an urgent to-do, linked to the chart, each time someone uses emergency access. Give your privacy officer Audit Log access to include them. |
Practice Setup: Sign-in security
Admin → Practice Setup has a Sign-in security group with two steps; each opens this page.
Review sign-in security
Done once someone saves this page at least once. Until then it reads “Using Hero’s defaults: 60-minute idle sign-out, verify again every 12 hours.” Its details show the idle sign-out, how often people verify again, and whether passkeys may live on a phone or security key.
Passkeys for your team
Counts only, for example “3 of 5 have a passkey · 1 uses text-message codes · 1 has neither”. It shows as done when everyone has a passkey or text-message codes. The names are on this page’s Your team list, which needs the security-settings permission.
Try again. A save that fails says so in the bottom bar and keeps your choices. Until the page has been saved once, Hero uses the defaults shown above.Sign in, add a passkey, and stay signed in
Signing in
On Clinician Sign In, enter your email and password and click Sign in with password, or click Sign in with passkey. While Hero signs you in, the sign-in panel stays on screen and shows Signing you in with your email and each step as it finishes:
- Password:
Checking your password→Confirming your practice access→Opening your workspace. - Passkey:
Confirming your passkey→Confirming your practice access→Opening your workspace. - A two-step verification code:
Checking your code→Opening your workspace.
It usually takes a few seconds. After about eight seconds on one step the panel adds “Still working. A slow connection can take a little longer.” If the password is refused, you stay on the sign-in screen with your email still filled in.
Add a passkey
-
Open your own sign-in settings.
Providers and administrators:
Settings → Sign-in & Security(it opens your profile settings on theSecuritytab). Staff: the shield buttonSign-in & securityin the top bar. The staff window,Sign-in & security, holds your passkeys and your text-message number for two-step verification. -
Click
Add Passkey(Add Your First Passkeyif you have none). Hero may first ask you to confirm it’s you: “For security, confirm it’s you before adding a passkey.” After you confirm, setup continues on its own. -
Choose where the passkey lives (only when your practice allows phones and security keys).
Where should the passkey live?offersThis computer(Touch ID, Windows Hello or your computer PIN) orMy phone or a security key(scan a QR code with your phone, or plug in a USB security key; keep your phone nearby when you sign in). On a computer with no Touch ID, Windows Hello or PIN,My phone or a security keyis chosen for you. -
Name it and click
Create passkey.Device nameis required (for example My laptop or My phone). Then follow your computer’s or phone’s prompt.
If your practice keeps passkeys on the computer and this computer cannot make one, Hero says so: you can keep signing in with a text-message code, and your practice administrator can allow passkeys on phones and security keys in Admin → Security. A passkey on a phone or security key cannot be used for offline downtime sign-in on the computer.
| You see | What it means and what to do |
|---|---|
| “Passkeys can’t be created on this web address. Open your practice’s usual sign-in address and try again.” or “Passkeys can be added at …” | Passkeys belong to one web address. Open the address shown (your practice’s usual sign-in page) and add the passkey there. |
| “Setup was cancelled. Please try again.” | The device prompt was closed or timed out. Click Create passkey again. |
| “This device already has a passkey for your account.” | You already have one here; use it to sign in. |
| “Passkey not added. Confirm your identity to add a passkey.” | The confirmation step was cancelled. Start again and finish confirming it’s you. |
Passkeys Not Supported | This browser cannot make passkeys. Use a current Chrome, Safari or Firefox, or keep using text-message codes. |
To remove a passkey, click Delete on it and confirm with Delete passkey. The confirmation warns that removing it may disable offline downtime sign-in on that device.
Staying signed in
- The warning. One minute before the practice’s idle limit,
Still there?appears: “You have been inactive for about 60 minutes. To protect patient information you will be signed out in … seconds.” ClickStay signed in, orSign out now. Clicking elsewhere does not dismiss it. - Recordings. If a recording is not in a note yet, the warning adds that it will be deleted from this computer when you are signed out. A recording in progress keeps you signed in; a paused one does for up to an hour.
- Phone calls. A live or ringing phone call keeps you signed in, and so does a computer set up as a phone workstation.
- Several tabs. Activity in any Hero tab in the same browser counts for all of them.
- Signed out by the server. When
Also end idle sessions on the serveris on, reopening a browser that sat idle too long shows the sign-in page with, for example, “You were signed out after 60 minutes of inactivity. Please sign in again.”
Provider face time report: time with patients, billed codes and chart closing (practice owner)
The Provider face time report (“Time with patients, billed codes, chart closing”) lives in Practice Health under Reports (category Staff time). It shows, for each provider, how much time they spent with patients, what was billed, which visits fall short of the time their codes need, and how quickly charts were closed. Only the practice owner sees it until the owner shares it from the report’s Share button; Admin → Reports now opens it in Practice Health.
- Open
Practice Health → Reportsand pickProvider face time. - Choose the
Period:This week,Last 7 days,This month,Last month, or your ownFromandTodates (up to 92 days). Narrow to oneProvideror keepAll providers. - Read the practice tiles and the
Providerstable. Columns includeVisits,Face time,Video time together,Ambient minutes,Phone talk,Time flags,Open chartsandAvg time to close chart. Averages are per visit; click a column to sort. - Click a provider to see their visits, then filter with
All,Flagged onlyorOpen charts. Each visit row has the date, visit type,Setting, scheduled and check-in to check-out time,Billed codesand theTime check. - Click
Download CSVto save the visits as a spreadsheet file.
Face time is the longer of the video time with both of you on the call and the ambient recording time. Time flags compare that time with the minimum the billed codes require (psychotherapy 90832–90838, crisis 90839, prolonged 99417/G2212); prolonged codes count the whole day’s time, including charting, so a flag is worth a look rather than an error. E/M office visits (99202–99215) can be billed on medical decision making, so they are never flagged. Time to close chart runs from the end of the scheduled visit to when the note was signed.Need help? Email support@heroemr.com.